Showing 1841 items
matching john garden
-
 Ballarat Tramway Museum
Photograph - Digital image, W. J. Llewelyn, c1980
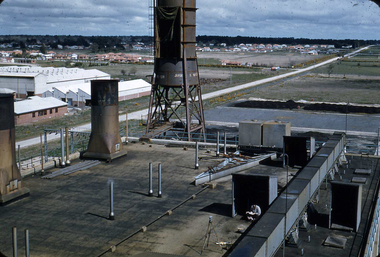
Yields information about the Ballarat Power Station B soon after construction and the precinct.Colour digital images taken by W. J. Llewelyn of Ballarat B Power Station, Norman St with a view showing some of the roof mounted equipment and looking towards the Wendouree suburb with Norman St in the view.. Could be early 1954, given the works at Johns Valves - Photo taken at the same time as btm6845i.. Note the surveyor and level in the middle bottom of the photograph.trams, tramways, ballarat b power station, secv, manufacturing, norman st -
 Ballarat Tramway Museum
Ephemera, John Dixon Products and Norm Hunt, "Drivers Rostered Times", May. 1970
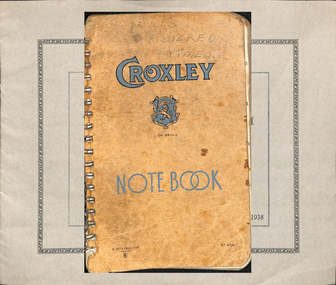
Has a strong association with tram crews and the rosters crew workings and Norm Hunt. Prepared by crews from sheets to enable them to know what service times to run, meal times, details of crew changes etc, based on their allocated shift or run from the roster.Notebook - 60 pages with brown card covers, wire spiral bound - Croxley or John Dixon Product with the Croxley symbol on the front cover and a list of their wire bound books on the rear. Each sheet faint ruled, both sides. Each sheet, the typewritten details of each SEC Ballarat run - giving sign on times, notes, timetables, which run taken or taken by, meal times, notes with regard to special instructions, finish times and total hours worked. Separated for Weekdays, Saturdays and Sundays. The May 1970 roster? On the last sheet has a heading "Owe Days", with names and number of days owed. See also Reg item 2298 and 4073 for other versions. trams, tramways, ballarat, rosters, employees, shifts, timetables -
 Ballarat Tramway Museum
Magazine, Association of Railway Enthusiasts (ARE), "Australian Railway Enthusiast - Vol 19, No. 3, September 1981", Sept. 1981
Copy of the Australian Railway Enthusiast - Vol 19, No. 3, September 1981 contains 6 photos under the titled "Ballarat - 10 years since closure". Also contains articles on Spain, the steam shunter at Junee known as Fanny, railways at Orange and Railways in the Blood by C. Henshaw. Photos by John Phillips, unless noted otherwise or Carolyn Dean or Mike Venn. 1 - No. 31, Victoria St bridge - see Reg item 405 or 2106 2 - No. 37 leaving Bridge St, entering Sturt St, front on shot 3 - No. 31, 12/9/1962 at Sturt and Lydiard St, photo by Mike Venn 4 - No. 14 and another single trucker in City Loop, see Reg Item 2016. 5 - Nos. 27 and 38 crossing at Wendouree Parade, May 1981 - see Reg Item 2787. 6 - No. 14, being driven by Tom Evans, opening the depot extensions, 19/9/1981 - Photo by Carolyn Deantrams, tramways, ballarat, closure, lydiard st, sturt st, victoria st, wendouree parade, btps, city loop, opening, bridge st -
 Ballarat Tramway Museum
Photograph - Digital image Set of 16, Floyd Bromley, BTM Tram Showcase day, 30/9/2018, 30/09/2018 12:00:00 AM
Set of 16 digital images of tram operations in Wendouree Parade during the BTM Tram Showcase day, 30/9/2018 (Oct. 2018 Fares Please!) by Floyd Bromley. .1 - No. 40 end on at St Aidans .2 - 40 and 28 ditto .3 - ditto .4 - No. 28 and crew - Peter Bruce, John Whiting and Liam Davies .5 - 26 and 27 arriving Gardens Loop .6 - 27 and 28 .7 - 28 and 40 at Carlton St .8 - 27 and 26 in Wendouree Parade .9 - 26 at Carlton St .10 - 27 descending into Depot Junction .11 - view out of 26's window .12 - 26 .13 - 26 and others at the loop, changed to Black and White .14 - 13 at St Aidans .15 - six cars at St Aidans .16 - Loop - 40, 26 and 27. Note: The white discs was a trial to indicate that a tram is following. This was an SEC practice in Bendigo. It was not subsequently adopted.trams, tramways, btm, depot, wendouree parade, carlton st, st aidans drive, gardens loop, events, tram 40, tram 28, tram 26, tram 27, tram 13 -
 Ballarat Tramway Museum
Photograph - Black & White Photograph/s, John Phillips, 26/01/1981 12:00:00 AM
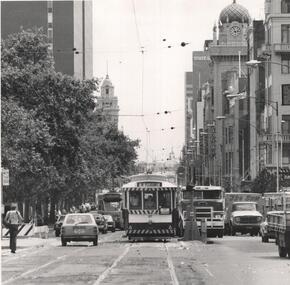
Yields information about one of the two visits to Melbourne for the Australia Day Parade of one of the Museum's trams.Black and White photograph of BTM No.27 operating in Flinders St. near intersection with Exhibition St. Melbourne during Australia Day 1981, 26/1/1981 - see March 1981 issue of Fares Please!. Carolyn Dean driver. Photo John Phillips. Tram has destination of "Mt Pleasant" and an auxiliary board "East Melbourne". In the background is the Gas and Fuel buildings and the Forum Theatre. See Reg Item 3085 for another photo of the tram in Flinders St. trams, tramways, btps, flinders st, australia day, tram 27 -
 Ballarat Tramway Museum
Photograph - Digital image Set of 28, Mal Rowe, 21/09/2019 12:00:00 AM
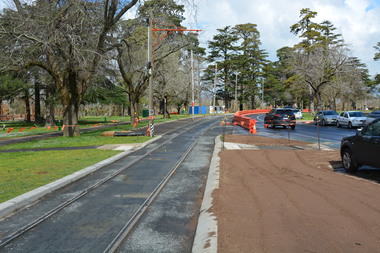
Set of 28 digital images of the 2019 Tramcar Showcase by Mal Rowe on 21/9/2019. .1 - View looking south from depot junction showing the track replacement pending the final asphalt layer. .2 - looking north towards depot junction .3 - 27 crossing Wendouree Parade .4 - 14 crossing with John Phillips ex MMTB Mk III Bus in the background. .5 - 13on the access track. .6 - 8 on the depot fan .7 - Cavalcade line up lead by 26 .8 - ditto .9 - group photo being arranged .10 - Cavalcade line up lead by 26 .11 - ditto .12 - 28 returning to the depot. .13 - ditto .14 - 27 returning to the depot on the access track. .15 - 18 ditto .16 - 18 ditto .17 - 13 ditto .18 - 13 ditto .19 - 18 ditto .20 - 40 running in with Mk III bus in the background .21 - 40 on the access track .22 - ditto .23 - 38 on the access track .24 - close up of the 22E truck .25 - depot fan in general. .26 - 14 on the access track .27 - 38 on the access track .28 - 38 dittotrams, tramways, btm, tramcar showcase, events, cavalcade, wendouree parade, trackwork, buses, 22e trucks, depot, tram 13, tram 38, tram 26, tram 14, tram 8, tram 27, tram 14, tram 28, tram 18, tram 27, tram 38, tram 40, tram 671 -
 Ballarat Tramway Museum
Newspaper, "Moves for Australasian tramway museum body", 28/04/1975 12:00:00 AM
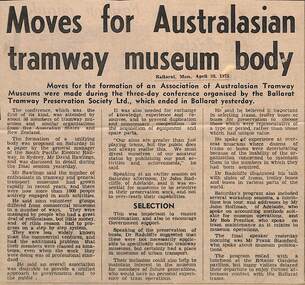
Newspaper cutting from a Melbourne paper, 28/4/1975, titled "Moves for Australasian tramway museum body", about the formation of an Australasian body, following the three day conference which ended the previous day. Quotes David Rawlings of SPER, Dr John Radcliffe, with speakers the previous day being John Hoffman, Bob Prentice and Frank Stamford. Has the newspaper date glued to the item.cotma, btps, conferences, sper -
 Ballarat Tramway Museum
Slide - 35mm slide/s, John Webster, 19/07/1959 12:00:00 AM
Kodachrome cardboard brown mount, colour slide of a Bender's Busways AEC Reliance? GMC 206 at a bus stop outside the Maples Store Geelong, 19-7-1959, with the destination North Shore. Photo by John Webster."19-7-58 - KFA 11 Buses Benders Busways Geelong"tramways, trams, buses, bus replacement, geelong -
 Ballarat Tramway Museum
Photograph - Digital image, John Ward, 19/08/1971 12:00:00 AM
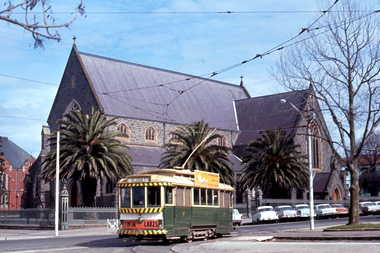
Yields information about the Dawson St crossover in Sturt St at the time of the tramway closure.Digital image of No. 17 using the Dawson St Cross over Sturt St, with St Patricks Cathedral in the background. Tram has destination of Victoria St with a Twin Lakes and SEC Roof advert. Photo by John Ward 19 August 1971. Slide title "01271 190871 SEC single truck tram 17 on crossover in Sturt St at Dawson St Ballarat Vic"trams, tramways, sturt st, dawson st, st patricks, tram 17 -
 Ballarat Tramway Museum
Photograph - Digital image, John Ward, 21/08/1971 12:00:00 AM
Yields information about the Victoria St appearance and a major hail storm in Sturt St at the time of the tramway closure.Digital image of No. 21, outbound in Victoria St to Victoria St. On either side of the road is the remains of a major hail storm that struck Ballarat the previous day. Tram has destination of Victoria St. Photo by John Ward 21 August 1971. Slide title "01311 210871 SEC single truck tram 21 on Victoria St line in suburban Ballarat Vic"trams, tramways, victoria st, tram 21 -
 Ballarat Tramway Museum
Photograph - Digital image, John Ward, 3/02/1971 12:00:00 AM
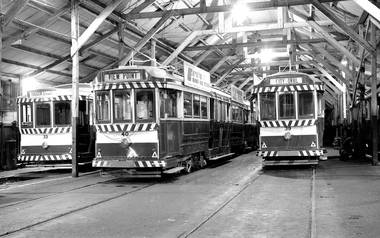
Yields information about the interior of the depot at night.Digital image of trams 33 (Haddon St), 40 (View Point) sand 39 (City Oval) in the depot at night. Photo by John Ward 3 Feb. 1971. Slide title "04615 030271 7118-D SECV single truck tram 33 bogie trams 40 & 39 in depot shed Wendouree Pde Ballarat Vic"trams, tramways, depot, tram 33, tram 40, tram 39 -
 Ballarat Tramway Museum
Photograph - Digital image, John Ward, 18/08/1971 12:00:00 AM
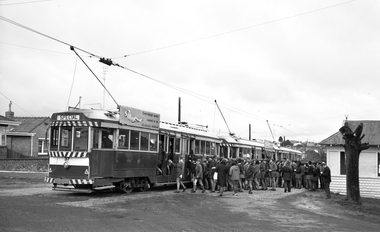
Yields information about the use of trams for school tours prior to closure of the Ballarat system.Digital image of trams 37, 41 and 40 loading school children at the Lydiard St North on a tour prior to the closure of the tramway. Photo by John Ward 18 August 1971. Slide title "04678 180871 7169-G SECV bogie trams 37, 41 & 40 with school children terminus Lydiard St North Ballarat Vic"trams, tramways, schools, tours, special trams, lydiard st north, tram 37, tram 41, tram 40 -
 Ballarat Tramway Museum
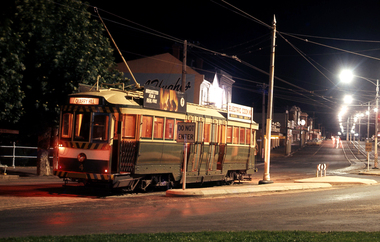
Photograph - Digital image, John Ward, 27/02/1971 12:00:00 AM
Yields information about the use of City Loop for storing trams at night.Digital image of trams 26 and 20 at night in the City Loop. Has the Big W store in the background. Photo by John Ward 27 Feb. 1971. Slide title "04410 270269 6926-D SECV Single truck trams 26 & 20 at night time on layover in Sturt St Ballarat Vic"trams, tramways, sturt st, city loop, night photo, tram 26, tram 20 -
 Ballarat Tramway Museum
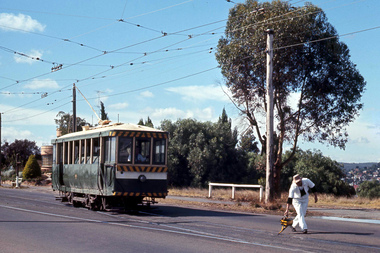
Photograph - Digital image, John Ward, 27/02/1971 12:00:00 AM
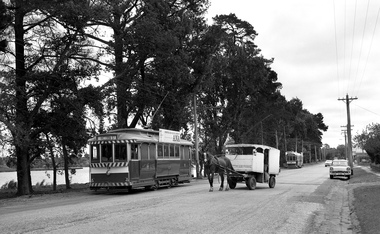
Yields information about the use of Wendouree Parade and the milk cart that use to run during the day at the time.Digital image of tram 13 in Wendouree Parade, with a horse drawn milk cart alongside. No. 39 is in the far distance. The tram has the destination of Victoria St and an ANA mutual benefit society roof advert. Photo by John Ward 27 Feb. 1971. Slide title "04410 270269 6926-D SECV Single truck trams 26 & 20 at night time on layover in Sturt St Ballarat Vic"trams, tramways, wendouree parade, horse drawn vehicle, milk cart, victoria st, tram 13, tram 39 -
 Ballarat Tramway Museum
Photograph - Digital image, John Ward, 28/08/1971 12:00:00 AM
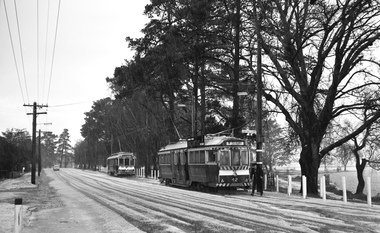
Yields information about the use of Wendouree Parade and big hail storm over Ballarat on the last full weekday of operations.Digital image of tram 42 at depot junction in Wendouree Parade, just after the heavy hailstorm of the 28 August 1971, on the last full weekday of running. The driver is changing the points. The tram has the destination of Mt Pleasant. In the background is tram 17. Photo by John Ward 20 August 1971. Slide title "04718 200871 7174-H SECV bogie tram 42 single truck tram 17 Wendouree Pde at Stafford Court Lake Wendouree Ballarat Vic"trams, tramways, wendouree parade, depot junction, closure, mt pleasant, tram 42, tram 17 -
 Ballarat Tramway Museum
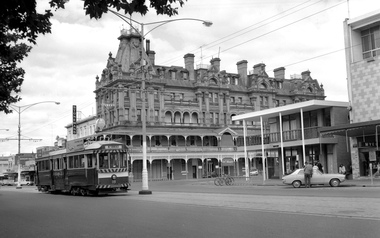
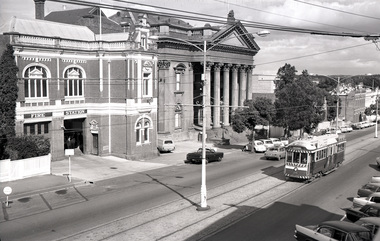
Photograph - Digital image, John Ward, 28/02/1969 12:00:00 AM
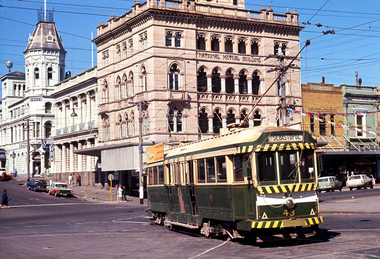
Yields information about the appearance of the intersection of Sturt and Lydiard St North during 1969.Digital image of tram 43 turning from Lydiard St North into Sturt St with the National Mutual Building and Craigs Hotel n the background. Tram has destination of Sebastopol. Photo by John Ward 28 Feb. 1969. Slide title "01114 280269 SEC bogie tram 43 Lydiard St North to Sturt St Ballarat Vic"trams, tramways, sturt st, lydiard st north, tram 43 -
 Ballarat Tramway Museum
Photograph - Digital image, John Ward, 22/03/1970 12:00:00 AM
Digital image of Bendigo tram 7 outward bound to Golden Square at corner of High and Laurel St Bendigo, with the United Kingdom Hotel in the background with a Carlton Draught sign. Photo by John Ward 22 March 1970. Slide title "00755 220370 SEC single truck tram 7 in High St at Robert St Golden Square Bendigo Vic"trams, tramways, bendigo, high st, golden square, tram 7 -
 Ballarat Tramway Museum
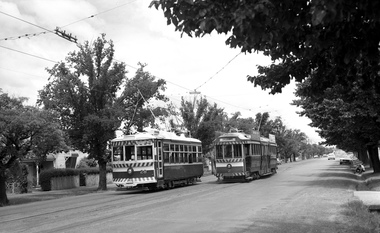
Photograph - Digital image, John Ward, 22/03/1970 12:00:00 AM
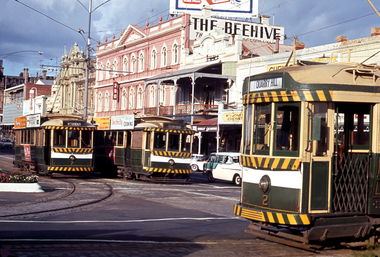
Digital image of three Bendigo trams at Charing Cross. Trams 7 (North Bendigo), 21 (Golden Square) and 2 (Quarry Hill). Has the Beehive building in the background, along with sings for 3BO, Myer, Amor gowns and Wm I Jones Chemist. The trams have some SEC Roof adverts. Photo by John Ward 22 March 1970. Slide title "00757 220370 SEC single truck trams 7 & 21 Pall Mall bogie tram 2 Mitchell St Charing Cross Bendigo Vic"trams, tramways, bendigo, charing cross, pall mall, mitchell st, tram 7, tram 21, tram 2 -
 Ballarat Tramway Museum
Photograph - Digital image, John Ward, 1/01/1972 12:00:00 AM
Digital image of Bendigo 28, with a Lake Weeroona destination, at the corner will Williamson St with the Shamrock Hotel in the background. Has signs for Carlton Draught beer. A Stonemasons signs is next door. Photo by John Ward 1 January 1972 Slide title "00890 010172 SEC Birney tram 28 Pall Mall at Williamson St outside Shamrock Hotel Bendigo Vic"trams, tramways, bendigo, pall mall, lake weeroona, tram 28 -
 Ballarat Tramway Museum
Photograph - Digital image, John Ward, 1/02/1971 12:00:00 AM
Digital image of Bendigo 4 at the Eaglehawk terminus at night. Tram has the destination of Quarry Hill and has two SEC roof adverts, including one for briquettes. Photo is looking along High St Eaglehawk. Photo by John Ward 1 February 1971 Slide title "00816 010271 SEC bogie tram 4 night time at terminus Eaglehawk Bendigo"trams, tramways, bendigo, eaglehawk, high st, night photo, tram 4 -
 Ballarat Tramway Museum
Photograph - Digital image, John Ward, 23/03/1970 12:00:00 AM
Digital image of the Bendigo scrubber, at the Garden Gully loop with a track worker pouring oil into the point blade. Note the water column in the background. Photo by John Ward 23 March 1970 Slide title "00770 230370 SEC Sprinkler maintenance tram ex 22 in Eaglehawk Rd suburban Bendigo Vic"trams, tramways, bendigo, scrubber tram, garden gully loop, tram scrubber -
 Ballarat Tramway Museum
Photograph - Digital image, John Ward, 1/01/1972 12:00:00 AM
Digital image of the Bendigo 18 to North Bendigo in Pall Mall at Williamson St with the Shamrock Hotel and the ANZ Bank in the background. Has signs for Stonemasons and Myers in the photo. Photo by John Ward 01-01-1972 Slide title "04759 010172 7208-H SECV bogie tram 18 Pall Mall at Williamson St Bendigo Vic"trams, tramways, bendigo, pall mall, north bendigo, tram 18 -
 Ballarat Tramway Museum
Photograph - Digital image, John Ward, 1/01/1972 12:00:00 AM
Digital image of the Bendigo 28 crossing No. 2 at Pinders Loop in Carpenter Loop on the Quarry Hill line. No. 28 has the destination of Quarry Hill, while No. 2 Eaglehawk. Photo by John Ward 01 - 01- 1972 Slide title "04751 010172 7207-H SECV Birney tram 28 passing bogie tram 2 in Carpenter St on Quarry Hill line Bendigo Vic"trams, tramways, bendigo, carpenter st, pinders loop, quarry hill, tram 28, tram 2 -
 Ballarat Tramway Museum
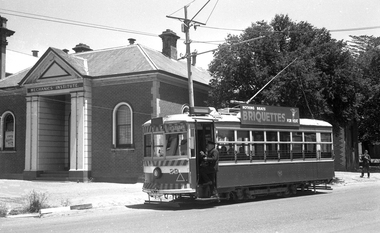
Photograph - Digital image, John Ward, 2/01/1972 12:00:00 AM
Digital image of the Bendigo 29 at the Eaglehawk terminus, with the Mechanics Institute building in the background. The tram has destination of Eaglehawk and a Briquettes roof advert. The driver is boarding the tram after turning the pole. Photo by John Ward 02 - 01- 1972 Slide title "04142 020172 7201-08 SECV Birney single truck tram 29 at terminus Sailors Gully Rd at High Eaglehawk Bendigo Vic"trams, tramways, bendigo, eaglehawk, tram 29 -
 Ballarat Tramway Museum
Photograph - Digital image, John Ward, 31/12/1971 12:00:00 AM
Digital image of the Bendigo 26 in Pall Mall passing the Bendigo Fire Station and the Court House. The tram has the destination of Eaglehawk. Photo by John Ward 31-12-1971 Slide title "004742 311271 71103-G SEC Vic Bogie tram 26 View St near Rowan St Bendigo Vic"trams, tramways, bendigo, pall mall, tram 26 -
 Ballarat Tramway Museum
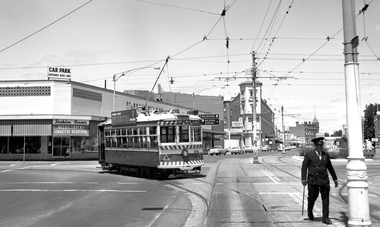
Photograph - Digital image, John Ward, 2/01/1972 12:00:00 AM
Digital image of the Bendigo tram 29 turning from Pall Mall into Mitchell St with the destination of Railway Station. In the background is the Fountain Plaza, advertising Melba Frocks and Gidgette Boutique, the City Family Hotel, Park Lane chicken shop. In the foreground is the Inspector returning the point bar to its holder on a pole. Photo by John Ward 2-1-1972. Slide title "04771 020172 7210-F SECV Birney tram 29 Pall Mall to Mitchell St at High St & View St Charing Cross Bendigo Vic"trams, tramways, bendigo, pall mall, mitchell st, charing cross, tram 29 -
 Ballarat Tramway Museum
Newspaper, The Courier Ballarat, "Trams out in force for special day", 28/09/1992 12:00:00 AM
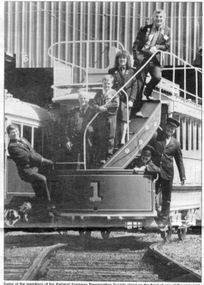
Newspaper cutting from The Courier, Ballarat, Monday Sept. 28, 1992, page 3 of the celebration of the Museum by operating trams along the shore of Lake Wendouree for almost 17 hours to mark the 21st anniversary of the closure of the Ballarat system. Includes a photo of a group of members sanding on the front of Horse Tram No. 1 - Len Millar, Frank Puls, David O' Neil, Alastair Reither, Colleen Low, John Phillips, Andrew Mitchell and Richard Gilbert. Includes comments by Richard Gilbert on the Museum, its Collection Policy and the winners of the colour competition including details of the prizes. Photo by Lachlan Bence and story by Kim Norbury. 2nd copy added 24/5/2006 Image of newspaper with text added 28/3/2011trams, tramways, 21st anniversary, horse tram no. 1, btm, celebrations -
 Ballarat Tramway Museum
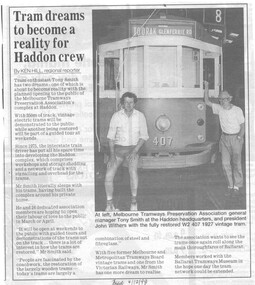
Newspaper, The Courier Ballarat, "Tram dreams to become a reality for Haddon crew", 4/12/1998 12:00:00 AM
Newspaper cutting from The Courier, Ballarat, Friday 4/12/1998, about the Melbourne Tramcar Preservation Association's complex at Haddon, describing the work done, Tony Smith's input and their work with the BTM. Has a photo of Tony Smith and John Withers by the front of W2 407. Article by Ken Hill, regional reporter.On bottom edge in ink "Friday 4/12/98"trams, tramways, mtpa, haddon, tony smith, john withers -
 Ballarat Tramway Museum
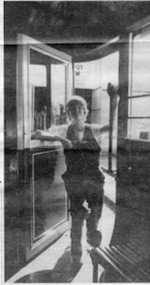
Newspaper, The Courier Ballarat, "Jacki on the track to full-time job", 30/03/1985 12:00:00 AM
Newspaper cutting from The Courier, Ballarat, Saturday March 30, 1985 about Jacki (Jacqui) Edwards working at the BTPS as part of the Commonwealth Employment Scheme. Details work being done by her, quotes Mr. John O'Loughlin CEP area project officer and the work being done by the scheme. Was on the front page of the paper. Includes two photographs in item. 2nd copy added 18/06/2006.trams, tramways, cep, jacki (jacqui) edwards, employment, btps -
 Ballarat Tramway Museum
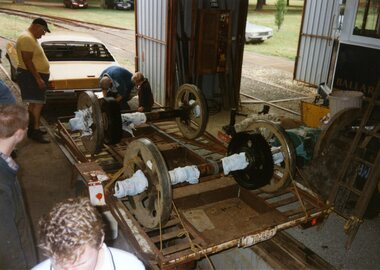
Photograph - Colour Photograph/s, Darren Hutchesson, 8/01/1999 12:00:00 AM
Colour photograph of BTM tram 28 wheels loaded onto a John Clowes supplied trailer for transport to AETM Adelaide on 8/1/1999 for reprofiling. In photo are John Clowes (standing by car), Stephen Butler, Simon Jenkins and Alastair Reither and two other people. Trailer positioned over pit in 5 road. Used in Feb. 1999 issue of Trolley Wire, page 41. Note spelling of John Clowes name in caption is "Clowes". Photo by Darren Hutchesson. Photo on AGFA Prestige paper.On rear of photo in blue ink "8/1/99 / Car 28, wheels/axles being loaded onto John Clowes' trailer for transport to out friends at AETM St Kilda - for reprofiling. / Photo: Darren Hutchesson"wheels, 28, aetm, btm, john clowes, tram 28