Showing 1023 items matching "bank of victoria"
-
 Lakes Entrance Historical Society
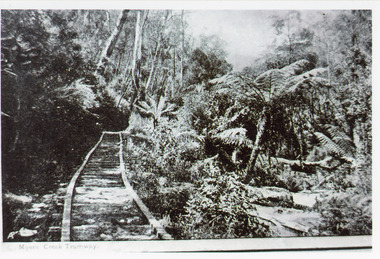
Photograph - Tramline, 1925
Rock obtained for works at the Entrance and around Gippsland Lakes.Black and white photograph of a tramway through bushland, steep bank above tramline, tree fern gully below. Tramway connected quarry to landing on Mississippi Creek, Colquhoun Forest north of Lakes Entrance. East Gippsland VictoriaMyer's Creek Tramwayvegetation, transport, room display -
 Lakes Entrance Historical Society
Photograph - Mississippi Creek Landing, 1950
From 1910c to 1940c stone was bought from quarry by tramline to the entrance and other sites around the lakes for stabilisation works.Black and white photograph of a derelict landing at Mississippi Creek, North Arm, showing remains of piles without decking on bank, unattached jetty in water. Creek surrounded by trees. East Gippsland Victoriatransport, waterways -
 Lakes Entrance Historical Society
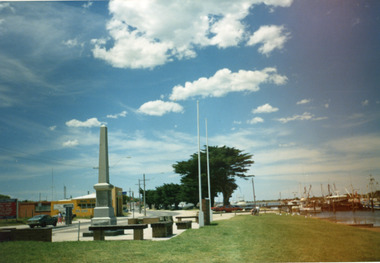
Photograph - Cenotaph, Bess Larkins, 1989
Also one other photograph, size 15 x 10, different perspective, with lake and sanddunes in background, donated by Vera BennettColour photograph of the Lakes Entrance War Memorial when situated on south side of Esplanade, west of Bank Jetty. Shows monument with inscriptions and tall four-sided pillar on concrete forecourt, two flagpoles and low seating. Lakes Entrance Victoriaworld war 1914-1918, memorials -
 Wodonga & District Historical Society Inc
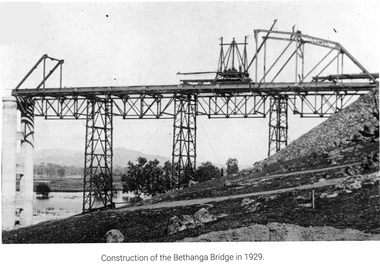
Photograph - Bethanga Bridge
The Bethanga Bridge was built between 1927 and 1930 as a joint venture between Victoria and New South Wales and was a key element of the River Murray Waters Agreement. It consists of nine spans of 82 metres long. Each span is supported between double reinforced concrete pylons and a riveted steel camel back Pratt truss. The overall span of the bridge is a length of 752 metres. It was completed in 1929 at a cost of £194,000. The road deck was initially constructed from timber but was replaced in 1961 with a concrete waffle slab deck 7.7metres wide. In 1961 the bridge deck and truss structure were raised 300 millimetres to allow for the enlargement of the lake. The bridge was designed in NSW by road engineer Percy Alan and the trusses were built by the Charles Ruwolt Pty. Ltd. Charles Ruwolt Pty. Ltd. was originally established by Charles Ruwolt as a foundry at Wangaratta in 1902 and transferred its operations to Richmond, Melbourne in 1914. By 1938 it had become one of the biggest engineering companies in Australia. After Charles Ruwolt’s death in 1946, Vickers Ltd. acquired the company and in 1948 the firm became known as Vickers Ruwolt Pty. Ltd. Because of the Bethanga Bridge’s unique location, over the waters of a dam with the border running down the centre of the body of water, the Bethanga Bridge is the only built structure shared by both Victoria and New South Wales. As the border of New South Wales aligns with the southern bank of the Murray River all of the other bridges along its length are deemed to be in New South Wales. The Bethanga Bridge is listed on both the New South Wales State Heritage Register and the Victorian Heritage Database. In 2015 the Bethanga Bridge was nominated for a heritage award by the Institution of Engineering Australia.These images are significant because they document the construction of a bridge which links Victoria and New South Wales and has been recognised for its historical, technical and engineering significance.A collection of photos documenting the construction of the Bethanga Bridge which links the States of Victoria and New South Wales as part of the construction of the Hume Dam .bethanga bridge, hume dam constuction, charles ruwolt, percy allan engineer -
 Buninyong Visitor Information Centre
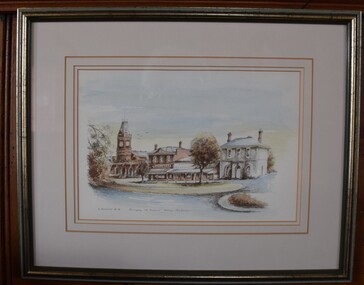
Painting - Water colour painting, R. Anderson, Township of Buninyong near Ballarat, Victoria, Australia, 1988
Painted in 1988 during the Bicentennial year. Artist: R. AndersonWater colour showing south side of Learmonth Street, Buninyong, including Town Hall, Whykes' Butchers, a shop and the National Bank building.R. Anderson, '88 Copyright.buninyong, shops, streetscapes, learmonth street -
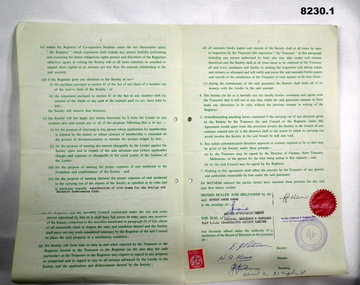 Bendigo Military Museum
Legal record - AGREEMENT AND GAURANTEE BDSC, 19.5.1978
This AGREEMENT and GAURANTEE signed on 19.5.1978 sets out the terms and conditions between "The Honorable Rupert James HAMER" being the Treasurer and "Bendigo, Eaglehawk and Kangaroo Flat Co - Operative Society limited" with registered Office at "Memorial Hall Pall Mall Bendigo" and the Australia and New Zealand Savings Bank Limited for an amount of $55,000.00 for the "Construction of Club Rooms for the "Bendigo and District Servicemen's Club". .1) Signed by Rupert James Hamer in the presence of (unclear) Registrar of Co - Operative Societies, the seal of the Bendigo, Eaglehawk and Kangaroo Flat Co - Operative Society and the Board of Directors "D. J. Paterson Director, W.A. Munro Director, J. K Barnes Secretary", witnessed by "H.J. Griffiths JP" .2) Signed by "R.J. Hamer Treasurer of Victoria, J.K. Barnes Secretary of the said Society". John Kerr Barnes OAM, refer Cat No 8040. Des Paterson, refer Cat No 8073P. W.A. Munro was William Alexander Munro WO.1 serving at Army Survey Regiment Bendigo. He served on the Committee of Bendigo RSL for the years 1974 - 78, Junior Vice President 1975, Senior Vice President 1976 - 77. Refer Cat No's 8073P and 8171..1) Legal document "Agreement" 4 pages, paper green colour, text in darker green with all added typing in black, hand written in blue pen, 3rd page has a red seal, purple circular stamp, red $5.00 stamp and six signatures. .2) Legal Document, "Guarantee" 4 pages green colour with text darker green, typed black additions added, two signatures in blue pen.brsl, smirsl, bdsc, 1978, legal -
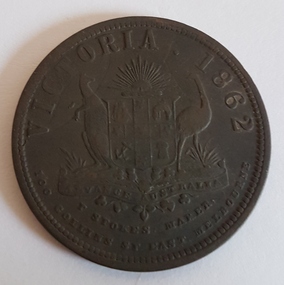 Linton and District Historical Society Inc
Token, Thomas Stokes, 100 Collins St. Melbourne, Victoria, 1862, 1862
Found buried at Dreamers Hill Road, by Geelong Bottle Club. Tokens used by business companies in place of cash during members' shortage of bank coins.Round metal token with the words "Victoria 1862" and coat of arms on face, and maker's name on reverse.Face: "Victoria 1862" around edge of token, "Advance Australia" beneath coat of arms. Reverse: "Thomas Stokes Maker 100 Collins Street East Melbourne".tokens, thomas stokes -
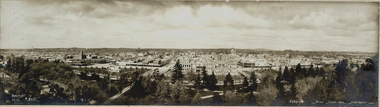 Bendigo Historical Society Inc.
Photograph - BENDIGO FROM CAMP HILL FIRE TOWER, c.1905
BHS CollectionBlack and white/sepia? Photograph mounted on green board. Narrow panoramic view of 'Bendigo from Camp Hill Fire Tower'. Rosalind Park in foreground., School of Mines, Town Hall, Bendigo Arcade, Banks, The Beehive, City Family Hotel, Law Courts and Post Office in foreground. Shamrock Hotel to left. Poppet legs of Royal Hustler's Mine Pall Mall. Inscriptions: 'Copyright Melb. P Scott', 'Bendigo from Camp Hill Fire Tower'. Royal Historical society of Victoria, Bendigo Branch, Circular blue stamp on back. 'MP270' TR corner. Portion of oval stamp on bottom right. Hand printed across bottom in ballpoint pen 'property of HJG Biggs, Town Hall Eaglehawk'. Portion of oval rubber stamp, purple, 'T. CA.., FOO.. Mark.. Be..' History: Previous Acc. No. MP 270.P Scottplace, landscape view, bendigo, bendigo, rosalind park, school of mines, bendigo town hall, camp hill, landscape, post office, bendigo post office, shamrock hotel, pall mall, fire tower -
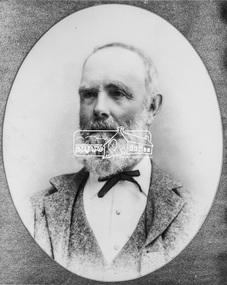 Eltham District Historical Society Inc
Photograph, C.S. Wingrove, Secretary, Eltham District Road Board 1858-1871; Shire Secretary, Shire of Eltham 1871-1904, 1858-1871
Charles Symons Wingrove, J.P. (1829-1905) arrived in Victorian in 1851. He had trained as an engineer, but tried his luck on the goldfields. In 1857 he was appointed as Secretary to the Eltham District Roads Board only one year after its foundation. He was to hold the position with the Board and later the Eltham Shire Council for total of 47 years. He also held the position of engineer for a large part of this period. During part of this time he was also secretary to the Heidelberg Shire Council. Over this period he was responsibly for an area stretching from Clifton Hill to Healesville, along the northern bank of the Yarra River. Other positions included Secretary to the Victorian Agricultural Society over along period.Wingrove was a main figure in the Municipal Association of Victoria. By the time he retired he was recognized as the “Grand Old Man” of Victorian local government. In 1858 Wingrove had a brick cottage built in Main Road near the State School and he lived here until his death. One room was uded as the Board and Council office. His descendants owned the house until 1974. It was later used as a psychiatric clinic. The park opposite the cottage has been named Wingrove Park in his honour. He is buried at St Helena with other members of his family. Age (Melbourne, Vic. : 1854 - 1954), Tuesday 18 July 1905, page 5 ABOUT PEOPLE. A conspicuous figure in northern municpal history, Mr. Charles Symons Wingrove, has passed away. He was for many years secretary and engineer for the shire of Eltham, and prior to the formation of the shire held the position under the old road board, his official connection with the district dating from beyond 1857. For about twelve years he also filled the position of shire engineer for Heidelberg council while retaining his other post, and the immense territory under his professional control, reaching from the boundary of Collingwood up to Healesville, was a matter of fatherly pride and interest to him. He arrived in Victoria in 1851, and was 76 years of age at his death. Mr. Wingrove retired from the position in the Eltham council only about a year ago. The interment will take place in St. Helena Cemetery, near Eltham township, today. Secretary, Eltham District Road Board 1858-1871 Secretary for the Shire of Eltham 1871-1904. Nearly 50 years service to the local community. For about twelve years he also filled the position of shire engineer for Heidelberg council. Reproduced Page 137 "Pioneers & Painters" This photo forms part of a collection of photographs gathered by the Shire of Eltham for their centenary project book,"Pioneers and Painters: 100 years of the Shire of Eltham" by Alan Marshall (1971). The collection of over 500 images is held in partnership between Eltham District Historical Society and Yarra Plenty Regional Library (Eltham Library) and is now formally known as the 'The Shire of Eltham Pioneers Photograph Collection.' It is significant in being the first community sourced collection representing the places and people of the Shire's first one hundred years.Digital image Print 25 x 20 cmc.s.wingrove, charles symons wingrove, eltham district road board, sepp, shire of eltham pioneers photograph collection, shire secretary, wingrove cottage, pioneers and painters, shire of eltham, councilor, municipal officer -
 Lakes Entrance Historical Society
Photograph - Flora Minter, Fish Marie, 2000 c
Colour photograph of copy of Flora Minters painting of the PS Murray in Cunninghame Arm, 1860s/1870s. Below Merrangbaur Hill near old natural entrance to the lakes. Tug boat beside it, and row boat with people. Cottage on bank far left. Photographed from a book. Lakes Entrance Victoriaships and shipping, waterways, vegetation, painting, artist -
 Bendigo Historical Society Inc.
Postcard - BLANCHE SLY POSTCARD COLLECTION, 1900 - 1920
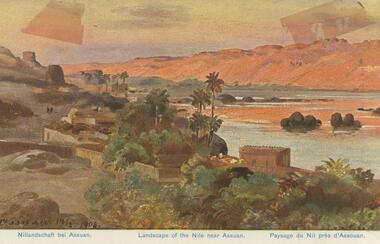
Postcard Album of Blanche Sly. Postcards stored in Folder 81 (49 postcards). 1403.1 - 1403.28 Grey linen look cover with picture of a small sailing boat pasted centre front pf cover. Partly torn sticker on lower LH corner. Blanche Victoria SLY Born: 11 Oct 1890, daughter of William and Hannah Sly Address: 1913; Loddon Vale Address: 1980; 100 Barnard Street Bendigo Died: Bendigo 12 June 1982, buried Bendigo G3 William Sly: Born: 1856 at Smythesdale, Victoria Married in Victoria in 1887; Hannah Theilman Died: Bendigo 1937, buried Bendigo G1 Hannah Sly Nee Theilman Born: 1866 Married in Victoria in 1887; William Sly Died: Bendigo 1948, buried Bendigo G3 See additional Research .Postcard Album of Blanche Sly containing 49 postcards. See 1403 Coloured painting of a landscape of the river Nile near Assuan. Egypt Small village with palm trees on near bank and desert dunes on far bank. . Addressee - Mrs. W Sly, Loddon Vale, via Pyramid, Victoria Sender - Pte S Olgaiti Not datedpostcard, collector, blanche sly -
 Lakes Entrance Historical Society
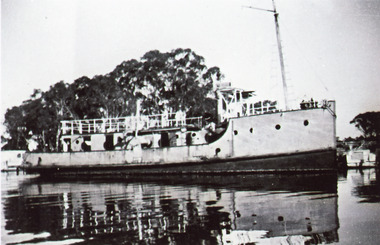
Photograph - W H Edgar, 1936
Suction dredge W H Edgar in process of dismantling 1936Black and white photograph showing PWD dredge W H Edgar moored at Paynesville Slipyard. Smaller boats moored at bank in background. Tall trees at back. Few people on board dredge. Paynesville Victoriaships and shipping, waterways, dredging -
 Bendigo Historical Society Inc.
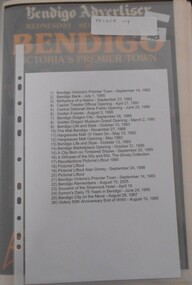
Newspaper - NEWSPAPER COLLECTION: BENDIGO ADVERTISER
Folder 114 1) Bendigo Victoria's Premier Town - September 14, 1983 2) Bendigo Bank - July 1, 1995 3) Birthplace of a Nation - September 23, 1992 4) Capital Theatre Official Opening - April 21, 1991 5) Central Deborah Mine Public Opening - June 20, 1986 6) Golden Futures - August 2, 1995 7) Bendigo Dragon City - September 28, 1988 8) Golden Dragon Museum Grand Opening - March 2, 1991 9) Bendigo Life and Style - October 13, 1993 10) The Mail Bendigo - November 27, 1968 11) Hargreaves Mall 10 Years On - May 13, 1992 12) Hargreaves Mall Opening - May 1982 13) Bendigo Life and Style - October 13, 1993 14) Bendigo Marketplace Opening - October 31, 1995 15) A City Born on Timbered Slopes - September 25, 1985 16) A Glimpse of the 50s and 60s, The Doney Collection 17) Recollections Pictorial Lift out 1990 18) Pictorial Lift out 19) Pictorial Lift out Alan Doney - September 24, 1986 20) Pictorial Lift out 21) Bendigo Victoria's Premier Town - September 14, 1983 22) Bendigo Remembers - August 15, 2005 23) Souvenir of the Shamrock Hotel - April 18 24) Symon's Dairy 75 Years in Bendigo - June 24, 1995 25) Bendigo City on the Move - August 26, 1987 26) Victory 50th Anniversary End of WWII - August 15, 1985newspaper, bendigo advertiser -
 Lakes Entrance Historical Society
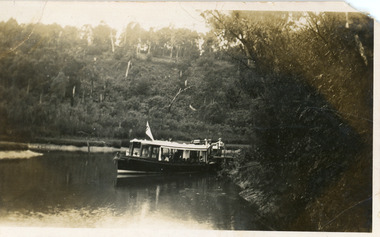
Postcard - MV Blackbird, Bulmers Studio, 1940
Four black and white small format postcards 6 x 8.5cm, slightly different view of the boat coming down the waterway.Black and white small format postcard showing Peels Tourist Ferry MV Blackbird leaving Comer's North Arm Jetty. Steep wooded banks, reeds along the shore. Lakes Entrance VictoriaNorth Arm Launch Trip, Lakes Entrance (on reverse)waterways, restaurant, boats and boating, tourism -
 Lakes Entrance Historical Society
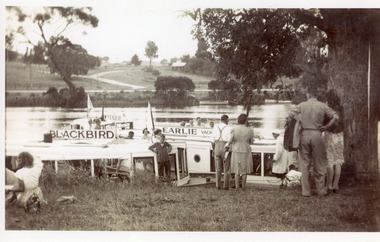
Photograph - MV Earlie, 1950 c
Also one black and white enlarged copy 13 x 21 cmBlack and white photograph showing tourist launch Blackbird and MV Earlie moored in Tambo River. Shows tourists about to board vessels. Two smaller boats tied to opposite bank, buildings above the road. Large old tree on right of people. Boat skipper in white coat and cap. Swan Reach Victoriawaterways, boats and boating, tourism -
 Lakes Entrance Historical Society
Postcard - MV Blackbird, Bulmers Studio, 1940
Black and white small format postcard showing Peels Tourist Ferry MV Blackbird leaving Comer's North Arm Jetty. Steep wooded banks, reeds along the shore. Lakes Entrance VictoriaNorth Arm Launch Trip, Lakes Entrance (on reverse)waterways, restaurant, boats and boating, tourism -
 Lakes Entrance Historical Society
Photograph - Loch Ard, Willis, Ron, 1951
Black and white photograph showing MV Lochard at jetty at top of North Arm. Well timbered bank opposite, lady on jetty. Lakes Entrance VictoriaBarbara Willis, 1951. Loch Ard trip to North Arm (on reverse)jetties, waterways, boats and boating, tourism, people -
 Lakes Entrance Historical Society
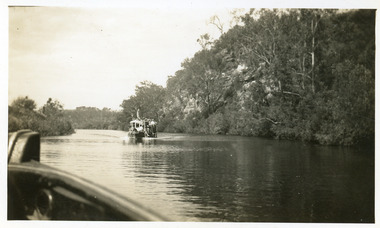
Photograph - Tambo River, 1950 c
Road between Swan Reach and Tambo Upper follows river bank opposite cliffsBlack and white photograph print showing tourist launch, possibly 'MV Blackbird' on Tambo River below the cliffs, taken from another boat. Tambo Upper Victoria waterways, boats and boating, tourism -
 Lakes Entrance Historical Society
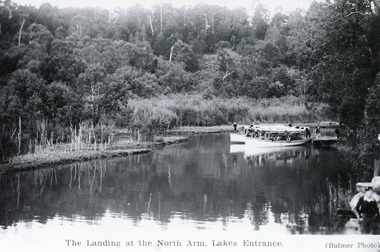
Postcard - Comer's Landing, 1945 c
Second copy existsBlack and white postcard showing two white tourist ferries, Peel's, at Comer's Jetty at top of North Arm. Several people on boats and on jetty. Boy on bank at bottom right hand corner of photo. High wooded banks, some dead vegetation on shoreline. Lakes Entrance VictoriaThe Landing at the North Arm Lakes Entrance (Bulmer photo)vegetation, waterways, boats and boating, tourism -
 Lakes Entrance Historical Society
Photograph - S.S. Tambo, 1885 c
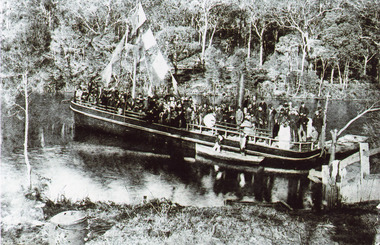
Black and white photograph showing S S Tambo, trail trip 1882 on Tambo River shows large crowd on boat, bunting flying from mast, two small row boats either side. Thick bush on far bank. Post and rail fence going into the water lower right hand corner. Camp oven or boiler and camp fire lower left hand corner. Tambo Upper Victoriaboats and boating, tourism, waterways -
 Lakes Entrance Historical Society
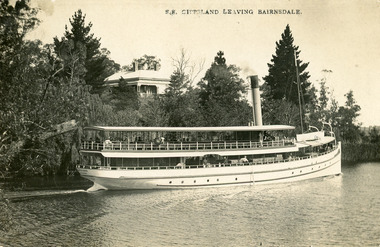
Postcard - S.S. Gippsland, Segerberg and Bulmer, 1909
S S Gippsland was launched at Paynesville 1908. Letter on back mentioning 'Our New Boat'Black and white postcard print showing S S Gippsland in Mitchell river at Bairnsdale, shows three pine trees, large house vegetation on eastern bank, ship leaving Bairnsdale newly painted. Lakes Entrance VictoriaS.S. Gippsland Leaving Bairnsdalevegetation, waterways, ships and shipping, houses -
 Lakes Entrance Historical Society
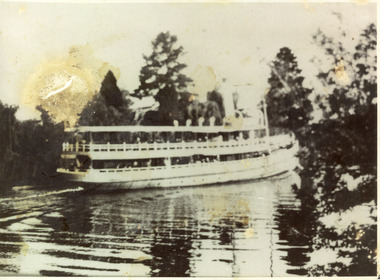
Photograph - S.S. Gippsland, 1910 c
Black and white photograph showing the S S Gippsland in Mitchell river, near Bairnsdale, shows three pine trees, other vegetation and a building on far bank, reflections in river,people on board, hull painted white, similar to a Bulmer postcard showing ship leaving Bairnsdale. Bairnsdale Victoria ships and shipping, waterways -
 Lakes Entrance Historical Society
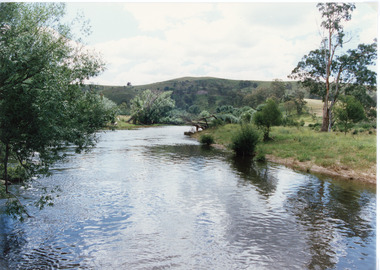
Photograph - Buchan River, Tambo Shire, 1994 c
Colour photograph of the Buchan river, showing stream flowing between low banks, hills rising in distance. Buchan Victoria topography, waterways -
 Lakes Entrance Historical Society
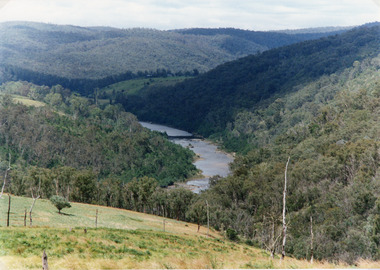
Photograph - Snowy River, Tambo Shire, 1994
Also second identical copyColour photograph of the Snowy River near The Basin, showing a river flowing between rocky banks, densely forested hills rising on both sides and into the far distance. Buchan Victoria topography, waterways -
 Eltham District Historical Society Inc
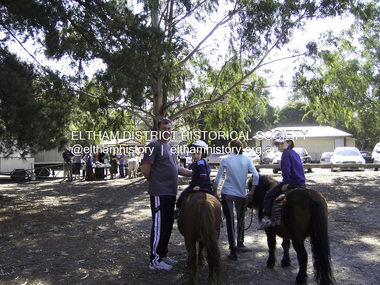
Photograph - Digital Photograph, Marguerite Marshall, Eltham Lower Park, 20 April 2008
Originally a race course, the park has brought the community together with a variety of activities. Published: Nillumbik Now and Then / Marguerite Marshall 2008; photographs Alan King with Marguerite Marshall.; p45 Once used for horse racing, which attracted visitors from Melbourne, the Eltham Lower Park has brought the community together with a wide range of activities. Horse riding is now enjoyed as a recreation in the park as are other sports. The park also includes the Diamond Valley Railway miniature trains and a sanctuary for the rare and vulnerable Eltham Copper Butterfly. Eltham Lower Park, with other parks, forms an almost continuous green band from Eltham’s centre, along the Diamond Creek to the Yarra River.1 Before European settlement the Wurundjeri people met on this land, particularly at the junction of the Diamond Creek with the Yarra River, which they called Birr-arung. This is commemorated by the sculpture, Not just a Pretty Place by Aleks Danko, winner of the 2000 Nillumbik Art in Public Places Award. The first European to settle here was probably Henry Foley, who in 1841 used it as part of his pastoral run. Foley sold his leasehold to Joseph Wilson in 1845, who soon after sold it to Frederick Falkiner. During the 1840s the future park was part of a government square mile (2.6 sqkm) reserve, north of the Yarra, within the Parish of Nillumbik, later named Eltham. Soon the land was used for horse racing after nearby residents cleared ten acres (4ha) in the early 1850s. A three-quarter of a mile (1.2km) race secured the winner the £10 Publican’s Prize. In response to popular demand, the newly formed Eltham District Road Board petitioned the Surveyor General of the Colony of Victoria, in 1856, for 36 acres (14.6ha) of crown land for a racecourse and recreation. By 1858 the Eltham races had become an institution. ‘Many skirmishes occurred and the way home was paved with temptation, with sly-grog for sale.3 In the early 1870s, two jockeys were sons of the police officer in charge of the Eltham Police Station, Miles S Lyons. Another ten acres (4ha) was added to the area in 1866 and 12 acres (4.8ha) – Hohnes Hill – in 1870. In 1866, two acres (0.8ha) on the creek banks became an animal pound with William Walsh the pound keeper in 1870, but this was later incorporated into the park. By 1877 the area was called a public park but horse racing and training continued into the 1920s. In the mid-1900s trotters were trained on a circuit road. In 1953 the Eltham Pony Club was established and used a cross-country course on Hohnes Hill. From the mid 1950s the club held the Eltham Easter Fair at the park, later to include a procession along Main Road from the town centre to the park. The park also attracted picnic parties and campers from the inner suburbs as did Wingrove Park, and businesses catering for visitors, sprang up on the opposite side of Main Road. Bus-loads of school children visited the park for Gould League bird days in the 1960s. In 1979 the Eltham Shire Council bought Lenister Farm, linking the park with the Yarra River. The Lenister Farm wetland includes a bird hide, viewing platform and interpretive signs.5 Pioneer Henry Stooke, later Road Board chairman, bought the 11 acres (4.5ha) - later to become Lenister Farm - from the Crown in 1862. Stooke never lived on this site and the two houses at Lenister Farm were built in the 20th century. Since its formation in 1871, the Council has controlled this crown land, which it named Eltham Park. But in the 1920s Eltham Council bought land near the town centre for a park, which it named Eltham Central Park. To avoid confusion the Council renamed Eltham Park, Eltham Lower Park. Since 2004 the Yarra footbridge has linked the park with the Yarra Valley Metropolitan Park and the Main Yarra Trail.This collection of almost 130 photos about places and people within the Shire of Nillumbik, an urban and rural municipality in Melbourne's north, contributes to an understanding of the history of the Shire. Published in 2008 immediately prior to the Black Saturday bushfires of February 7, 2009, it documents sites that were impacted, and in some cases destroyed by the fires. It includes photographs taken especially for the publication, creating a unique time capsule representing the Shire in the early 21st century. It remains the most recent comprehenesive publication devoted to the Shire's history connecting local residents to the past. nillumbik now and then (marshall-king) collection, eltham lower park, eltham park -
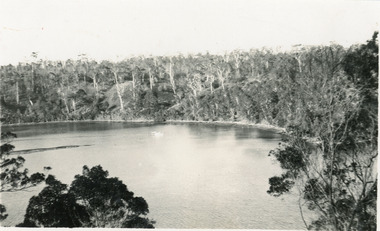
 Lakes Entrance Historical Society
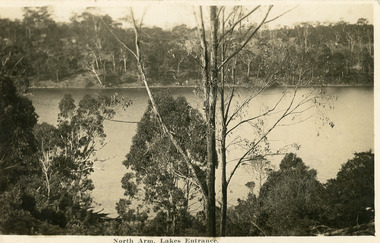
Postcard - North Arm, 1930c
Black and white postcard of a calm reach of the North Arm, showing the natural vegetation on the steep banks bordering the lake. Lakes Entrance VictoriaNorth Arm Lakes Entrance waterways, vegetation -
 Lakes Entrance Historical Society
Photograph - North Arm, 1950c
Black and white photograph of the narrow upper reaches of the North Arm. It shows four people and dog at two small boats on bank. Steep tree covered hillsides above sandy shoreline. Lakes Entrance Victoria vegetation, waterways, recreation -
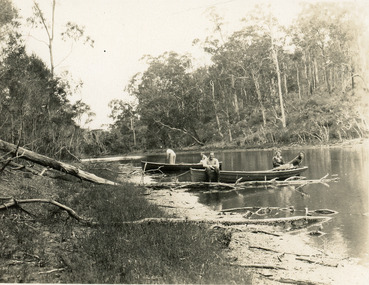
 Lakes Entrance Historical Society
Photograph - North Arm, 1924c
Black and white photograph of part of the North Arm. It shows the calm waters beneath steep heavily wooded banks. Some dead trees appear to have been ring barked. Lakes Entrance Victoriavegetation, waterways -
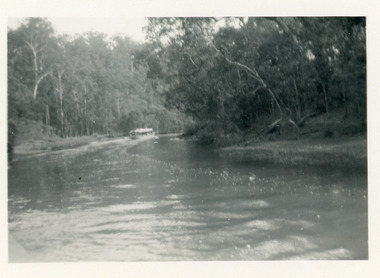 Lakes Entrance Historical Society
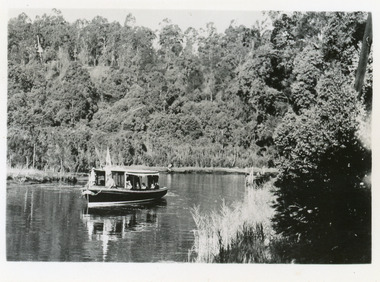
Photograph - North Arm, 1950c
Black and white photograph of a tourist launch travelling upstream between high tree covered banks on the North Arm, Lakes Entrance, Victoria. waterways, topography, tourism, boats and boating -
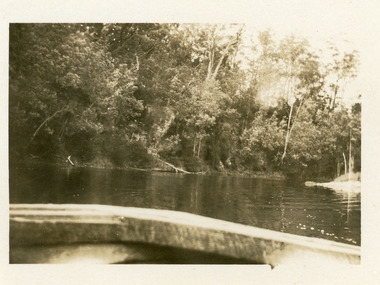 Lakes Entrance Historical Society
Photograph - Comer's Landing
Black and white photograph of the North Arm at Comer's Landing, North Arm, showing a tree covered steep bank opposite Mrs Comer's Tea Rooms, viewed over the back of a tourist launch. Lakes Entrance Victoriarestaurant, tourism, waterways