Showing 1005 items matching "ready"
-
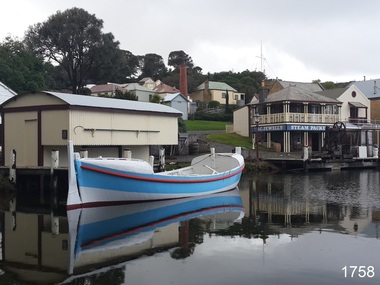
 Flagstaff Hill Maritime Museum and Village
Functional object - Lead Ingot, circa 1878
This lead ingot was donated to Flagstaff Hill Maritime Village in January 2015 by local residents who discovered the ingot in their garden after they purchased the property about 12 months ago The LOCH ARD cargo manifest lists “Pig lead 50 tons” comprising “944 pig and 37 rolls”. Subsequent classification has rendered this section of cargo as “Lead Ballast”. This could be true. The international price per ton of lead ore plunged from a high point of £17 in 1853 to a low of £8 in 1882. The cheaper price of lead at the time of the vessel’s loading in early 1878 may have meant it was considered as an alternative to other ballast material (traditionally stone) for the journey to Melbourne. Loch Line ships generally returned to Britain laden with Australian wool. Even though wool bales were “screwed in” to the hold to less than half their “pressed weight”, they still made an awkwardly light cargo for the passage around the Horn. The concentrated weight of lead pigs along the keel line would help steady and centre the ship, and perhaps the artefacts in this case were to be retained for this purpose, rather than being sold on to the ready colonial market. However this is conjecture. Demand for building materials in the gold and wool rich Colony of Victoria was high in the 1870s, and much of the LOCH ARD cargo was intended for the Melbourne International Exhibition in 1880, which was another example of buoyant economic conditions. In the nineteenth century lead was valued for its density (high ratio of weight to volume), flexibility (relative softness for working into shape), and durability (corrosion resistant and waterproofing properties). It was used for pipes and water tanks, roof flashing and guttering, window sealing and internal plumbing. Many large private residences and new public buildings were at planning or construction stage in the colony during this period. The LOCH ARD lead ingots could equally have been destined for this ready market. HISTORY OF THE LOCH ARD The LOCH ARD belonged to the famous Loch Line which sailed many ships from England to Australia. Built in Glasgow by Barclay, Curdle and Co. in 1873, the LOCH ARD was a three-masted square rigged iron sailing ship. The ship measured 262ft 7" (79.87m) in length, 38ft (11.58m) in width, 23ft (7m) in depth and had a gross tonnage of 1693 tons. The LOCH ARD's main mast measured a massive 150ft (45.7m) in height. LOCH ARD made three trips to Australia and one trip to Calcutta before its final voyage. LOCH ARD left England on March 2, 1878, under the command of Captain Gibbs, a newly married, 29 year old. She was bound for Melbourne with a crew of 37, plus 17 passengers and a load of cargo. The general cargo reflected the affluence of Melbourne at the time. On board were straw hats, umbrella, perfumes, clay pipes, pianos, clocks, confectionary, linen and candles, as well as a heavier load of railway irons, cement, lead and copper. There were items included that intended for display in the Melbourne International Exhibition in 1880. The voyage to Port Phillip was long but uneventful. At 3am on June 1, 1878, Captain Gibbs was expecting to see land and the passengers were becoming excited as they prepared to view their new homeland in the early morning. But LOCH ARD was running into a fog which greatly reduced visibility. Captain Gibbs was becoming anxious as there was no sign of land or the Cape Otway lighthouse. At 4am the fog lifted. A man aloft announced that he could see breakers. The sheer cliffs of Victoria's west coast came into view, and Captain Gibbs realised that the ship was much closer to them than expected. He ordered as much sail to be set as time would permit and then attempted to steer the vessel out to sea. On coming head on into the wind, the ship lost momentum, the sails fell limp and LOCH ARD's bow swung back. Gibbs then ordered the anchors to be released in an attempt to hold its position. The anchors sank some 50 fathoms - but did not hold. By this time LOCH ARD was among the breakers and the tall cliffs of Mutton Bird Island rose behind the ship. Just half a mile from the coast, the ship's bow was suddenly pulled around by the anchor. The captain tried to tack out to sea, but the ship struck a reef at the base of Mutton Bird Island, near Port Campbell. Waves broke over the ship and the top deck was loosened from the hull. The masts and rigging came crashing down knocking passengers and crew overboard. When a lifeboat was finally launched, it crashed into the side of LOCH ARD and capsized. Tom Pearce, who had launched the boat, managed to cling to its overturned hull and shelter beneath it. He drifted out to sea and then on the flood tide came into what is now known as LOCH ARD Gorge. He swam to shore, bruised and dazed, and found a cave in which to shelter. Some of the crew stayed below deck to shelter from the falling rigging but drowned when the ship slipped off the reef into deeper water. Eva Carmichael had raced onto deck to find out what was happening only to be confronted by towering cliffs looming above the stricken ship. In all the chaos, Captain Gibbs grabbed Eva and said, "If you are saved Eva, let my dear wife know that I died like a sailor". That was the last Eva Carmichael saw of the captain. She was swept off the ship by a huge wave. Eva saw Tom Pearce on a small rocky beach and yelled to attract his attention. He dived in and swam to the exhausted woman and dragged her to shore. He took her to the cave and broke open case of brandy which had washed up on the beach. He opened a bottle to revive the unconscious woman. A few hours later Tom scaled a cliff in search of help. He followed hoof prints and came by chance upon two men from nearby Glenample Station three and a half miles away. In a state of exhaustion, he told the men of the tragedy. Tom returned to the gorge while the two men rode back to the station to get help. By the time they reached LOCH ARD Gorge, it was cold and dark. The two shipwreck survivors were taken to Glenample Station to recover. Eva stayed at the station for six weeks before returning to Ireland, this time by steamship. In Melbourne, Tom Pearce received a hero's welcome. He was presented with the first gold medal of the Royal Humane Society of Victoria and a £1000 cheque from the Victorian Government. Concerts were performed to honour the young man's bravery and to raise money for those who lost family in the LOCH ARD disaster. Of the 54 crew members and passengers on board, only two survived: the apprentice, Tom Pearce and the young woman passenger, Eva Carmichael, who lost all of her family in the tragedy. Ten days after the LOCH ARD tragedy, salvage rights to the wreck were sold at auction for £2,120. Cargo valued at £3,000 was salvaged and placed on the beach, but most washed back into the sea when another storm developed. The wreck of LOCH ARD still lies at the base of Mutton Bird Island. Much of the cargo has now been salvaged and some was washed up into what is now known as LOCH ARD Gorge. Cargo and artefacts have also been illegally salvaged over many years before protective legislation was introduced. One of the most unlikely pieces of cargo to have survived the shipwreck was a Minton porcelain peacock - one of only nine in the world. The peacock was destined for the Melbourne International Exhibition in 1880. It had been well packed, which gave it adequate protection during the violent storm. Today, the Minton peacock can be seen at the Flagstaff Hill Maritime Museum in Warrnambool. From Australia's most dramatic shipwreck it has now become Australia's most valuable shipwreck artefact and is one of very few 'objects' on the Victorian State Heritage Register. The shipwreck of the LOCH ARD is of State significance ― Victorian Heritage Register S417 Flagstaff Hill’s collection of artefacts from LOCH ARD is significant for being one of the largest collections of artefacts from this shipwreck in Victoria. It is significant for its association with the shipwreck, which is on the Victorian Heritage Register (VHR S417). The collection is significant because of the relationship between the objects, as together they have a high potential to interpret the story of the LOCH ARD. The LOCH ARD collection is archaeologically significant as the remains of a large international passenger and cargo ship. The LOCH ARD collection is historically significant for representing aspects of Victoria’s shipping history and its potential to interpret sub-theme 1.5 of Victoria’s Framework of Historical Themes (living with natural processes). The collection is also historically significant for its association with the LOCH ARD, which was one of the worst and best known shipwrecks in Victoria’s history. Lead ingots (sometimes referred to as ‘lead ballast’ or ‘lead pigs), salvaged from the wreck of the LOCH ARD. Grey metal bars with flat base, rising in a curved moulded shape to form a smooth rounded upper face. The imprint of the maker runs along the upper surface in clearly legible capital lettering (height 3cm). Durable and heavy, with some marine staining, but in good condition. Stamped along curved surface, within oval border, "PONTIFEX & WOOD LONDON."flagstaff hill, warrnambool, shipwrecked coast, flagstaff hill maritime museum, maritime museum, shipwreck coast, flagstaff hill maritime village, great ocean road, loch line, loch ard, captain gibbs, eva carmichael, tom pearce, glenample station, mutton bird island, loch ard gorge, lead pigs, lead ingots, lead ballast, pontifex and wood, london, lead smelters -
 Eltham District Historical Society Inc
Document - Folder, Aerospace Industry, 1958-1961
honeywell, scout rocket, echo satellite, mercury rocket, centaur rocket, advent rocket, mariner satellite, dyna soar, x-15, midas rocket, tiros satellite, discoverer rocket, vanguard satellite, aerospace industry, alan gardiner collection, space industry -
 Federation University Historical Collection
Photograph - Colour photograph, Davey Paxman Experimental Steam Engine in the Mount Helen Workshop, c1994
The Davey Paxman Experimental Steam Engine was purchased by the Ballarat School of Mines as the result of a bequest from Thomas Bath.The Davey Paxman Experimental Steam Engine was purchased as the result of a bequest from Thomas Bath. The 'substantial sum' was used to build an Engineering Laboratory. The Ballarat School of Mines Council minutes of 08 November 1901 record: - Plans for [the] proposed building were submitted ... and ... it was resolved that a temporary building for an Engineering Laboratory be put up.' This laboratory, as an existing building, is first mentioned in the Ballarat School of Mines President's Annual Report of 1901, presented on 28 February 1902, reporting 'the erection of a building 67ft long by 33 ft wide' This report also lists all the equipment that would be accommodated in the Engineering Laboratory, including the experimental steam engine and boiler. The experimental Davey-Paxman steam engine arrived in Ballarat towards the end of 1902. The Engineering Laboratory was opened on 14 August 1903 by His Excellency Sir Sydenham Clarke. This engineering laboratory remained in use till about 1945. By 1944 preparations were under way at the Ballarat School of Mines to expand existing facilities, to be ready for the influx of returned soldiers. A new Heat Engines laboratory was built, this time of brick construction, replacing the previous corrugated-iron shed. In the early stages the steam engine was used to drive an overhead transmission shaft for machinery in the adjacent workshop. Later the steam engine was moved to a space that became the Heat Thermodynamics Laboratory. At the end of 1969 the engine was relocated to the Thermodynamics Laboratory at the then Ballarat Institute of Advanced Education (BIAE) Mt Helen Campus. It was donated to Sovereign Hill in 2006. According to the research of Rohan Lamb in 2001 around five experimental steam engines were made by Davey Paxman, and three of these had similar configuration to the Ballarat School of Mines Steam Engine, however, each of these was also unique with different valve arrangements. The list, which was on a scrap of paper in a folio held in the Essex Archives, confirmed that one was sent to India. The Ballarat steam engine can be dated to late 1901 to early 1902. Zig Plavina was responsible for moving the steam engine to Mount Helen, and worked on it as a technician for many years. He observed the following: * The condenser is driven by the low pressure engine. * The following arrangements are possible: i) the high pressure engine alone, exhausting to atmosphere. Condenser not used, crankshaft flanges not coupled. ii) crankshafts coupled, mains pressure (120 psi) steam supplied to high pressure engine, partially expanded steam delivered to low pressure engine (Tandem operation). Choice available re exhaust steam: either to the condenser or to atmosphere. iii) crankshafts not coupled, reduced pressure steam supplied to low pressure engine. Exhaust steam - either to the condenser or to atmosphere. * Valve arrangement - a choice of Pickering cut-off or throttle governor. On low pressure engine - throttle governor only.davey paxman experimental steam engine, model steam engine, steam, thermodynamics laboratory, thomas bath, bequest -
 Melbourne Tram Museum
Document - Personal Papers, Melbourne Tramways Trust (MTT), "Notice Papers for 'The Melbourne Tramways Trust' meetings", 1885 - 1886
Set of 16 Notice Papers or Meeting Agendas - sent to Trust Members and others for The Melbourne Tramways Trust for period April 1886 to November 1890 as listed below. Printed by Ferguson and Moore or Edgerton and Moore for the Trust. Signed by the Secretary. Covers construction arrangements, appointments, financial, loans, debentures, legislation, arrangements with the Melbourne Tramway and Omnibus Company and other organisations including banks. Notes are the principal items shown in the Orders of the Day. Printed by Fergusson and Moore or Edgerton and Moore - different name on the 17/1/1890 meeting. 1886 – 1887 – Thomas O’Grady and T. Hamilton remain as Chairman and Secretary respectively. Meeting No. Date Notes 5 16/4/1886 Wages, supplier payments, accept tenders for mechanical stokers, construction of Carlton line, notice to construct a siding in Wellington Parade and purchase of land for the Brunswick Engine house. 1888 – 1890 – Cr. C.H Jennings Chairman, T. Hamilton Secretary Meeting No. Date Notes 3 17/1/1890 Wages, supplier payments, accept tenders for crossings, railway crossings, cement and that the Hawthorn House is completed and ready for traffic. 4 24/1/1890 Special meeting to consider communication from MTCo re opening of the Hawthorn horse tramway. 5 14/2/1890 Wages, supplier payments. 6 14/3/1890 Wages, supplier payments, dispute with David Munro over fine for the Hawthorn bridge and Collingwood council seeking to widen approach to Victoria St bridge. 7 18/4/1890 Wages, supplier payments, wood blocking of Hawthorn and Victoria bridge lines. 8 16/5/1890 Wages, supplier payments, proceed with Victoria Bridge approaches. 9 13/6/1890 Wages, supplier payments, reappointment of C. W. Ellis as auditor, protect Trust interest in reference to the Hoddle St tramway bill. 10 11/7/1890 Wages, supplier payments including hire of horses for threading of cable. 11 8/8/1890 Wages, supplier payments, call tenders etc for St Kilda Esplanade line. 12 5/9/1890 Wages, supplier payments 13 3/10/1890 Wages, supplier payments, letting of tenders for track materials, 2nd crossover for cars in Spencer St. 14 31/10/1890 Wages, supplier payments, acceptance of tenders for Esplanade line. 1890 – 1891 – Cr. C.H Jennings Chairman, T. Hamilton Secretary Meeting No. Date Notes 1 19/12/1890 Wages, supplier payments, accept of tenders for Esplanade including engines. 15 3/11/1890 Special meeting to consider letter from St Kilda council re widening of the Esplanade. 16 28/11/1890 Wages, supplier payments, accept of tenders for Esplanade including engine house and cable. For a word version - see: \dbtext\hawthtramcoll\images\htd2003doc.doctrams, tramways, mtt, cable trams, melbourne tramways trust, construction, finances, mto co -
 Eltham District Historical Society Inc
Photograph - Digital Photograph, Marguerite Marshall, Avenue of Honour, Main Road, Eltham, 20 April 2008
The suggestion of an Avenue of Honour may have been originally put forward by Lady Irvine who was a member of the Welcome Home Committee. The Avenue of Honour was established to memorialise all those from Eltham who enlisted (some of whom were still fighting overseas at the time), similarly as the Shire of Eltham (Soldiers) Memorial Park was in tribute to all from the Shire who enlisted. The twenty-seven names of those killed from Eltham were engraved on the Eltham War Memorial Obelisk unveiled in 1919 at the corner of Main Road and Bridge Street. From an article in the Heidelberg News and Greensborough, Eltham and Diamond Creek Chronicle, September 22, 1917, p. 2, it was reported: Some few weeks ago a public meeting was held in the Eltham Rechabite Hall for the purpose of forming a committee to make necessary arrangements for the return of our brave lads from the front, with the result that the following officers were elected, viz., Sir William Irvine. president; Cr. R. D. Taylor, vice-president; Rev. T. W. Sapsford, secretary; Mr R. E. Gilsenan, treasurer; with a very strong committee of local residents. Lady Irvine then suggested that it would be nice to plant an Avenue of Honor, which was carried out in a very cheerful and spirited manner on Saturday afternoon. Cr Taylor and Mr R. E. Gilsenan occupied themselves during the fore-forenoon in getting the lining-out and other preliminaries ready, but shortly after one o'clock the willing workers could be seen wending their way towards the township, with picks, shovels. &c., on their shoulders, and in a very short time the gang at work was in appearance a very lively and pretty sight, the only thing that was missing was the camera, to have had a few snapshots taken. A little after 3 o'clock Sir William and Lady Irvine, and Mr W. Gray and family, arrived by motor. Cr Taylor then explained that their object in gathering together so hurriedly to plant the avenue was on account of the lateness of the season, and being offered 100 trees, free of charge, by Cr. Wm. G. Gray; of Allwood Nursery, Hurst's Bridge (for which the committee are deeply grateful to him and the public highly appreciate his generous offer). Sir Wm. Irvine then spoke at some length on the ravages of this cruel war, and the good that must result therefrom in bringing all closer together; he also referred to our brave lads who were fighting for us, and thought it was for those at home to show their appreciation by planting the Avenue of Honor. Lady Irvine thou proceeded to plant the first tree, which was an English oak: Sir William following by planting a Spanish chestnut; and Mrs W. G. Gray a sycamore. After that the gathering refired to the entrance of Mr R. E. Gilsenan's green paddock to partake of refreshments, which the ladies had kindly provided for the willing band of workers. Work was again taken to in earnest, and the planting finished, all being satisfied that they had done good work. At the Eltham Shire Council’s monthly meeting held May 6, 1918, Cr. Gray promised to give Council £20 to £25 worth of trees if the Council would plant and guard them. His desire was that a tree be planted in the name of every soldier lad who has gone to the front. Each tree was later adorned with a brass plaque with the name of a soldier and a wooden tree guard placed around them. Over the years many trees died, and following roadworks were replanted on a new alignment. Nillumbik Shire Council is continuing this process of replanting trees in a new alignment to move them away from overhead power lines and to clear the VicRoads reserve. Covered under Heritage Overlay, Nillumbik Planning Scheme. Published: Nillumbik Now and Then / Marguerite Marshall 2008; photographs Alan King with Marguerite Marshall.; p119This collection of almost 130 photos about places and people within the Shire of Nillumbik, an urban and rural municipality in Melbourne's north, contributes to an understanding of the history of the Shire. Published in 2008 immediately prior to the Black Saturday bushfires of February 7, 2009, it documents sites that were impacted, and in some cases destroyed by the fires. It includes photographs taken especially for the publication, creating a unique time capsule representing the Shire in the early 21st century. It remains the most recent comprehenesive publication devoted to the Shire's history connecting local residents to the past. nillumbik now and then (marshall-king) collection, avenue of honour, main road, eltham -
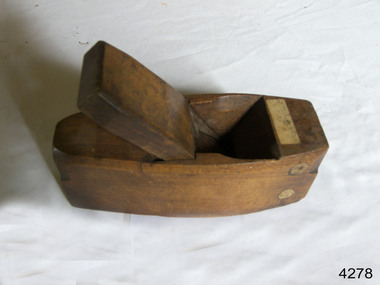 Flagstaff Hill Maritime Museum and Village
Tool - Smoothing Plane, Mid to Late 19th Century
A smoothing plane is typically used after the work piece has been flattened and trued by the other bench planes, such as the jack, fore, and joiner planes. Smoothing planes can also be used to remove marks left by woodworking machinery. When used effectively alongside other bench planes, the smoothing plane should only need a handful of passes removing shavings as fine as 0.002 inches (0.051 mm) or less. The work piece is then ready to be finished, or can be further refined with a card scraper or sandpaper. The smoothing plane is usually held with both hands, and used in a similar manner to the other bench planes. Though designed for smoothing, a smoothing plane can be used as an 'all-round' bench tool and for rougher work depending on how it is set up. Being smaller than other bench planes, the smoothing plane is better able to work on smaller work pieces and around obstructions. Since the 1700s wooden smoothing planes have predominantly been 'coffin shaped' wider in the middle and slightly rounded making them more maneuverable. It has also been claimed that the coffin design exposes more end grain, enabling the plane to better adjust to changes in humidity. John Moseley & Son: Records indicate that before 1834, the firm is listed at number 16 New Street, London and according to an 1862 advertisement the shop had been established in New Street since 1730, The Sun insurance records from the time show that John Moseley was the possessor of a horse mill in the yard of his premises, which means that some kind of manufacturing was taking place, as the mill would have provided power to run a saw or perhaps a grinding wheel so the probability is that he did not just sell tools, he made them as well. John Moseley died in 1828 and his will he names his four sons: John, Thomas, William and Richard. To complicate matters he also had brothers with the same first names; brothers Richard (of Piccadilly) and William (of Peckham Rye) are named as two of the executors. Brother Thomas is not mentioned in this will, but became a minister and was one of the executors of brother Richard’s estate when he died in 1856. From John’s will, we also learn that, although the shop was in New Street, he resided in Lympstone, Devon. The family must have had a house in that county for quite some time as both sons Richard and William are baptised in Devon, although John and Thomas were baptised in London. In the 1841 and 1851 census records, we just find William in New Street, but in 1861 both William and Richard are listed there as toolmakers. That Richard was staying overnight at New Street was probably just accidental as in 1851 and 1871, we find him with his wife Jane and children in Clapham and Lambeth respectively. In 1851 Richard is listed as “assistant clerk cutlery warehouse” and in 1871 as “retired plane maker and cutler”. Although the actual place of work is not stated, one may assume he worked in the family business. 1862 is a year full of changes for the firm. In that year, William had a new property built at 27 Bedford Street. In the catalogue for the 1862 International Exhibition, 54 Broad Street (later 54-55 Broad Street) is listed for the first time, which may very well coincide with the split of the business into a retail and a wholesale branch. Around the same time, they must have moved from New Street to 17 & 18 King Street because their manufacturing premises had been pulled down to form the New Street from Cranbourne Street to King Street. In January 1865, William died and Richard continued the business. In 1867, the partnership he had with his son Walker and Thomas Elis Hooker, is dissolved. Richard continued tool making at King Street and Bedford Street. Richard retired somewhere between 1867 and 1871, but the business continued. The business is taken over by W M Marples & Sons and tools continued to be made in London until 1904 when manufacturing relocated to Sheffield. A vintage tool made by a well documented company, this item was made commercially for firms and individuals that worked in wood and needed a tool that could produce a smooth finish to timber. The tool was used when timber items needed to have a smooth finish these types of planes were used in conjunction with profiled planes that provided a decorative finish. A significant tool from the mid to late 19th century that today is quite rare and sought after by collectors. It gives us a snapshot of how furniture and other decorative finishes were created on timber by the use of hand tools. Tools that were themselves hand made shows the craftsmanship used during this time not only to make a tool such as the subject item but also the craftsmanship needed to produce a decorative finish that was needed to be made for any timber item. Smoothing Plane coffin design Maker J Moseley & Son London & 2 1/4"flagstaff hill, warrnambool, shipwrecked-coast, flagstaff-hill, flagstaff-hill-maritime-museum, maritime-museum, shipwreck-coast, flagstaff-hill-maritime-village, plane moulding, moulding plane, plane, j heath, moseley -
 Flagstaff Hill Maritime Museum and Village
Oar, early 20th century
This oar is from the Lifeboat Warrnambool, which is on sit at Flagstaff Hill Maritime Village. The construction of the lifeboat ‘Warrnambool’ began 15th September 1909 and was completed almost 12 months later, 1st September 1910. It was built at the Government Dockyard in Williamstown, Victoria, along the lines designed by the Great Britain’s Royal Lifeboat Institution, and included whaleback decks fore and aft, mast and centreboard, and rudder and tiller hung from the sternpost. It could be propelled by both sail and oar. At that time Captain Ferguson was Chief Harbour Master and Mr Beagley was foreman boat builder. Mr Beagley built the lifeboat with his fellow workmen. The boat was described as “… a fine piece of workmanship and does credit to her builders and designers…” It had all the latest improvements in shape, disposition of weight and watertight compartments, and it had space for a large number of people in addition to the crew. It appears that 'H Meiers' whose signature was on the plaque that was found concealed in the hull, was involved with the building of the lifeboat. His signature and the dates of the start and finish of the boat’s construction are pencilled on the raw timber 'plaque' found in the hull in the early 1990’s when the lifeboat was being restored. It is interesting that the ‘Melbourne Directory’ of 1911, published by Sands and MacDougal, lists McAuley and Meiers, boat builders, Nelson Place foreshore, between Pasco and Parker Streets, Williamstown, (Victorian Heritage Database, ‘Contextual History, Maritime Facilities’), It is quite possibly the business of the person whose name is inscribed on the lifeboat plaque. Flagstaff Hill’s documentation also mentions that the keel was laid at ‘Harry Myers, boat builders, Williamstown, Melbourne’ – the name ‘Myers’ can also be spelled ‘Meiers’, which could be the same person as the Meiers in “McAuley and Meiers” (as mentioned in genealogy lines of Myers). The new lifeboat, to be named ‘Warrnambool’ was brought to town by train and launched at the breakwater on 1st March 1911 using the Titan crane (the old lifeboat built in 1858, was then returned to Melbourne in 1911). This new lifeboat was stationed at Warrnambool in a shed located at the base of the Breakwater, adjacent to the slipway. A winch was used to bring it in and out of the water. The lifeboat ‘Warrnambool’ was similar in size to the old lifeboat but far superior in design, build and sea-going qualities such as greater manoeuvrability. The ‘self-righting, self-draining’ design was “practically non-capsizeable” and even if the boat overturned it would right itself to an even keel and the water would drain away. The hull was built of New Zealand Kauri, using double diagonal planking, laid in two layers at right angles, with a layer of canvas and red lead paint between the timbers to help seal the planking. It has “… plenty of freeboard, high watertight spaces between the deck and bottom… through which pipes lead…” The backbone timbers were made of Jarrah. The lifeboat Warrnambool was one of several rescue boats used at Port Fairy and Warrnambool in early 1900's. In late 1914 the Warrnambool lifeboat and crew were used to help find what was left of the tragic wreckage of the Antares, and were able to discover the body of one of the crewmen, which they brought back to Warrnambool. Between 1951 and 1954 the lifeboat was manned under the guidance of Captain Carrington. He held lifeboat practice each month on a Sunday morning, to comply with the Ports and Harbour’s request that lifeboats be manned by a strong and competent crew, ready for action in case of emergency. In the early 1960’s it ended its service as a lifeboat and was used in Port Fairy as a barge to help dredge the Moyne River, bolted to the Port Fairy lifeboat. Flagstaff Hill obtained the Warrnambool in 1975. In 1984 it was on display at Flagstaff Hill Maritime Village, Warrnambool. On 23rd May 1990 she was lifted from the water and placed in a cradle for restoration. The name ‘WARRNAMBOOL could be seen faintly on the lifeboat before it was restored. It was during the restoration that Flagstaff Hill's boat builder discovered the 'plaque' inside the hull. A copy of the blueprint plans has the name “V.E.E. Gotch” printed on it. His advertisement in Footscray’s ‘Independent’ newspaper of Saturday 11th May 1901 states he is “Principal and Skilled member (Naval Architect) to the Court of Marine Inquiry of Victoria and holds classes for naval architectural drawing and arithmetic.” The oar is significant for its association with the lifeboat WARRNAMBOOL, which is significant for its half century service to the local community as a lifesaving vessel. She was also used to help retrieve the body of a shipwrecked crew member of the ANTARES. Large wooden oar, shaped two handgrip with tapering shaft to large flattened blade, (2) copper reinforcing strips on blade. Sweep oar is from the Lifeboat Warrnambool. flagstaff hill, warrnambool, shipwrecked-coast, flagstaff-hill, flagstaff-hill-maritime-museum, maritime-museum, shipwreck-coast, flagstaff-hill-maritime-village, oar, lifeboat warrnambool, sweep oar -
 Flagstaff Hill Maritime Museum and Village
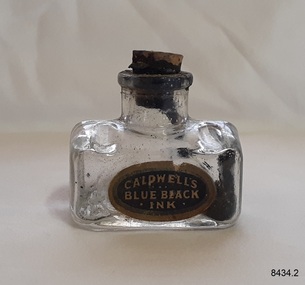
Container - Ink Bottle, Caldwell’s Ink Factory, Late 19th to early 20th centuries
This design of the bottle is sometimes called a ‘cottage’ or ‘boat’ shape. The Caldwell’s handmade glass ink bottle was mouth-blown into a three-piece mould, a method often used in the late 19th and early 20th centuries, with the maker's name engraved into the mould section for the base. The glass blower would cut the bottle off the end of his blowpipe with a tool and join a mouth onto the top, rolling the lip. The bottle was then filled with ink and sealed with a cork. This method of manufacture was more time-consuming and costly to produce than those made in a simple two-piece mould and 'cracked' off the blowpipe. The capacity for a bottle such as this was about 3 ½ oz (ounces) equal to about 100 ml. This particular bottle is unusual as it has four sloping indents at the corners of the shoulder, most likely for resting a pen with its nib upwards and the handle resting on a flat surface. Most of the bottles made during this era had horizontal pen rests that were indented into both of the long sides of the shoulder. Pen and ink have been in use for handwriting since about the seventh century. A quill pen made from a bird’s feather was used up until around the mid-19th century. In the 1850s a steel point nib for the dip pen was invented and could be manufactured on machines in large quantities. This only held a small amount of ink so users had to frequently dip the nib into an ink well for more ink. Handwriting left wet ink on the paper, so the blotting paper was carefully used to absorb the excess ink and prevent smudging. Ink could be purchased as a ready-to-use liquid or in powdered form, which needed to be mixed with water. In the 1880s a successful, portable fountain pen gave smooth-flowing ink and was easy to use. In the mid-20th century, the modern ballpoint pen was readily available and inexpensive, so the fountain pen lost its popularity. However, artisans continue to use nib pens to create beautiful calligraphy. Caldwell’s Ink Co. – F.R. Caldwell established Caldwell’s Ink Company in Australia around 1902. In Victoria, he operated from a factory at Victoria Avenue, Albert Park, until about 1911, then from Yarra Bank Road in South Melbourne. Newspaper offices were appointed as agencies to sell his inks, for example, in 1904 the New Zealand Evening Star sold Caldwell’s Flo-Eesi blue black ink in various bottle sizes, and Murchison Advocate (Victoria) stocked Caldwell’s ink in crimson, green, blue black, violet, and blue. Caldwell’s ink was stated to be “non-corrosive and unaffected by steel pens”. A motto used in advertising in 1904-1908 reads ‘Makes Writing a Pleasure’. Stationers stocked Caldwell’s products and hawkers sold Caldwell’s ink stands from door to door in Sydney in the 1910s and 1920s. In 1911 Caldwell promised cash for returned ink bottles and warned of prosecution for anyone found refilling his bottles. Caldwell’s Ink Stands were given as gifts. The company encouraged all forms of writing with their Australian-made Flo-Eesi writing inks and bottles at their impressive booth in the ‘All Australian Exhibition’ in 1913. It advertised its other products, which included Caldwell’s Gum, Caldwell’s Stencil Ink (copy ink) and Caldwell’s Quicksticker as well as Caldwell’s ‘Zac’ Cough Mixture. Caldwell stated in a 1920 article that his inks were made from a formula that was over a century old, and were scientifically tested and quality controlled. The formula included gallic and tannic acids and high-quality dyes to ensure that they did not fade. They were “free from all injurious chemicals”. The permanent quality of the ink was important for legal reasons, particularly to banks, accountants, commerce, municipal councils and lawyers. The Caldwell’s Ink Company also exported crates of its ink bottles and ink stands overseas. Newspaper advertisements can be found for Caldwell’s Ink Company up until 1934 when the company said they were the Best in the business for 40 years.This hand-blown bottle is significant for being the only bottle in our collection with the unusual sloping pen rests on its shoulder. It is also significant for being made in a less common three-piece mould. The method of manufacture is representative of a 19th-century handcraft industry that is now been largely replaced by mass production. The bottle is of state significance for being produced by an early Melbourne industry and exported overseas. This ink bottle is historically significant as it represents methods of handwritten communication that were still common up until the mid-20th century when fountain pens and modern ballpoint pens became popular and convenient and typewriters were becoming part of standard office equipment.Ink bottle; rectangular base, hand-blown clear glass bottle with its own cork. The bottle has side seams from the base to the mouth, an indented base and an applied lip. The corners of the shoulder sides have unusual diagonal grooves that slope down and outwards that may have been used as pen rests. Inside the bottle are remnants of dried blue-black ink. The glass has imperfections and some ripples on the surface. The bottle has an attached oval black label label with gold-brown printed text and border. The base has an embossed inscription. The bottles once contained Caldwell’s blend of blue black ink.Printed on label; “CALDWELL's BLUE BLACK INK” Embossed on the base "CALDWELLS"flagstaff hill, warrnambool, maritime village, maritime museum, shipwreck coast, great ocean road, ink, nib pen, writing ink, writing, copying, banks, lawyers, commerce, student, permanent ink, blue black ink, stationery, record keeping, handwriting, writing equipment, writing accessory, office supply, cottage bottle, boat bottle, mouth-blown bottle, cork seal, f r caldwell, caldwell’s ink company, albert park, south melbourne, inkstands, stencil ink, copy ink, quicksticker, zac cough mixture, three part mould, cauldwells, cauldwell's -
 Flagstaff Hill Maritime Museum and Village
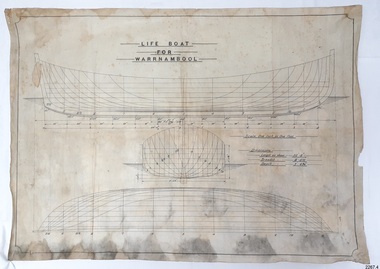
Plan - Vessel Line Drawing, Life Boat for Warrnambool, ca. 1900-1909
The plans were used for the construction of the lifeboat ‘Warrnambool’, which began 15th September 1909 and was completed almost 12 months later 1st September 1910. It was built at the Government Dockyard in Williamstown, Victoria, along the lines designed by Great Britain’s Royal Lifeboat Institution, and included whaleback decks fore and aft, mast and centreboard, and rudder and tiller hung from the sternpost. It could be propelled by both sail and oar. At that time Captain Ferguson was Chief Harbour Master and Mr Beagley was the foreman boat builder. Mr Beagley built the lifeboat with his fellow workmen. The boat was described as “… a fine piece of workmanship and does credit to her builders and designers…” It had all the latest improvements in shape, disposition of weight and watertight compartments, and it had space for a large number of people in addition to the crew. It appears that 'H Meiers' whose signature was on the plaque that was found concealed in the hull, was involved with the building of the lifeboat. His signature and the dates of the start and finish of the boat’s construction are pencilled on the raw timber 'plaque' found in the hull in the early 1990s when the lifeboat was being restored. It is interesting that the ‘Melbourne Directory’ of 1911, published by Sands and MacDougal, lists McAuley and Meiers, boat builders, Nelson Place foreshore, between Pasco and Parker Streets, Williamstown, (Victorian Heritage Database, ‘Contextual History, Maritime Facilities’), It is quite possibly the business of the person whose name is inscribed on the lifeboat plaque. Flagstaff Hill’s documentation also mentions that the keel was laid at ‘Harry Myers, boat builders, Williamstown, Melbourne’ – the name ‘Myers’ can also be spelled ‘Meiers’, which could be the same person as the Meiers in “McAuley and Meiers” (as mentioned in genealogy lines of Myers). The new lifeboat, to be named ‘Warrnambool’ was brought to town by train and launched at the breakwater on 1st March 1911 using the Titan crane (the old lifeboat built in 1858, was then returned to Melbourne in 1911). This new lifeboat was stationed at Warrnambool in a shed located at the base of the Breakwater, adjacent to the slipway. A winch was used to bring it in and out of the water. The lifeboat ‘Warrnambool’ was similar in size to the old lifeboat but far superior in design, build and sea-going qualities such as greater manoeuvrability. The ‘self-righting, self-draining design was “practically non-capsizeable” and even if the boat overturned it would right itself to an even keel and the water would drain away. The hull was built of New Zealand Kauri, using double diagonal planking, laid in two layers at right angles, with a layer of canvas and red lead paint between the timbers to help seal the planking. It has “… plenty of freeboard area, high watertight spaces between the deck and bottom… through which pipes lead…” The backbone timbers were made of Jarrah. The lifeboat Warrnambool was one of several rescue boats used at Port Fairy and Warrnambool in the early 1900s. In late 1914 the Warrnambool lifeboat and crew were used to help find what was left of the tragic wreckage of the Antares and were able to discover the body of one of the crewmen, which they brought back to Warrnambool. Between 1951 and 1954 the lifeboat was manned under the guidance of Captain Carrington. He held lifeboat practice each month on a Sunday morning, to comply with the Ports and Harbour’s request that lifeboats be manned by a strong and competent crew, ready for action in case of emergency. In the early 1960’s it ended its service as a lifeboat and was used in Port Fairy as a barge to help dredge the Moyne River, bolted to the Port Fairy lifeboat. Flagstaff Hill obtained the Warrnambool in 1975. In 1984 it was on display at Flagstaff Hill Maritime Village, Warrnambool. On 23rd May 1990, she was lifted from the water and placed in a cradle for restoration. The name ‘WARRNAMBOOL could be seen faintly on the lifeboat before it was restored. It was during the restoration that Flagstaff Hill's boat builder discovered the 'plaque' inside the hull. A copy of the blueprint plans has the name “V.E.E. Gotch” printed on it. His advertisement in Footscray’s ‘Independent’ newspaper of Saturday 11th May 1901 states he is “Principal and Skilled member (Naval Architect) to the Court of Marine Inquiry of Victoria and holds classes for naval architectural drawing and arithmetic.” The line drawing is significant for its connection with the lifeboat WARRNAMBOOL. The lifeboat is very significant to local and state history for its use in the lifesaving rescues of seafarers, particularly in Lady Bay. It was part of the local rescue equipment. It gave a half-century of service to the local community as a lifesaving vessel, including its involvement in retrieving the body of a shipwrecked crew member of the ANTARES. Line drawing in black ink and pencil on rectangular parchment or waxed linen. Drawing has diagrams of three profiles of a vessel, with measurements and connecting pencil lines on the left quarter. The plan is for the lifeboat named “Warrnambool”, which was built in Melbourne and completed in 1910. Old blue copies of the Lifeboat plan are archived also.“LIFE BOAT / FOR / WARRNAMBOOL” “Scale, One Inch to One Foot” “ “Length as shown 30’ – 8” “ “Breadth “ “ 8’ – 6 ½ “ “ “Depth “ “ 3’ – 4 ¾” “flagstaff hill, warrnambool, shipwrecked-coast, flagstaff-hill, flagstaff-hill-maritime-museum, maritime-museum, shipwreck-coast, flagstaff-hill-maritime-village, lifeboat, warrnambool lifeboat, boat plans, lifeboat plans, boat construction, boat building, line drawing, plan for lifeboat, life boat, life boat 'warrnambool', clinker design, 1910 lifeboat, life saving equipment, shipbuilding -
 Flagstaff Hill Maritime Museum and Village
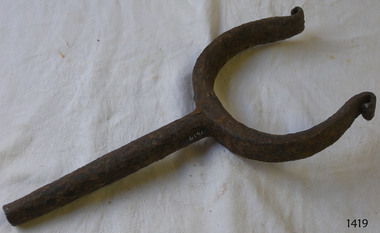
Rowlock, early 20th century
Rowlock from the Lifeboat Warrnambool, which is on site at Flagstaff Hill Maritime Village. The construction of the lifeboat ‘Warrnambool’ began 15th September 1909 and was completed almost 12 months later, 1st September 1910. It was built at the Government Dockyard in Williamstown, Victoria, along the lines designed by the Great Britain’s Royal Lifeboat Institution, and included whaleback decks fore and aft, mast and centreboard, and rudder and tiller hung from the sternpost. It could be propelled by both sail and oar. At that time Captain Ferguson was Chief Harbour Master and Mr Beagley was foreman boat builder. Mr Beagley built the lifeboat with his fellow workmen. The boat was described as “… a fine piece of workmanship and does credit to her builders and designers…” It had all the latest improvements in shape, disposition of weight and watertight compartments, and it had space for a large number of people in addition to the crew. It appears that 'H Meiers' whose signature was on the plaque that was found concealed in the hull, was involved with the building of the lifeboat. His signature and the dates of the start and finish of the boat’s construction are pencilled on the raw timber 'plaque' found in the hull in the early 1990’s when the lifeboat was being restored. It is interesting that the ‘Melbourne Directory’ of 1911, published by Sands and MacDougal, lists McAuley and Meiers, boat builders, Nelson Place foreshore, between Pasco and Parker Streets, Williamstown, (Victorian Heritage Database, ‘Contextual History, Maritime Facilities’), It is quite possibly the business of the person whose name is inscribed on the lifeboat plaque. Flagstaff Hill’s documentation also mentions that the keel was laid at ‘Harry Myers, boat builders, Williamstown, Melbourne’ – the name ‘Myers’ can also be spelled ‘Meiers’, which could be the same person as the Meiers in “McAuley and Meiers” (as mentioned in genealogy lines of Myers). The new lifeboat, to be named ‘Warrnambool’ was brought to town by train and launched at the breakwater on 1st March 1911 using the Titan crane (the old lifeboat built in 1858, was then returned to Melbourne in 1911). This new lifeboat was stationed at Warrnambool in a shed located at the base of the Breakwater, adjacent to the slipway. A winch was used to bring it in and out of the water. The lifeboat ‘Warrnambool’ was similar in size to the old lifeboat but far superior in design, build and sea-going qualities such as greater manoeuvrability. The ‘self-righting, self-draining’ design was “practically non-capsizeable” and even if the boat overturned it would right itself to an even keel and the water would drain away. The hull was built of New Zealand Kauri, using double diagonal planking, laid in two layers at right angles, with a layer of canvas and red lead paint between the timbers to help seal the planking. It has “… plenty of freeboard, high watertight spaces between the deck and bottom… through which pipes lead…” The backbone timbers were made of Jarrah. The lifeboat Warrnambool was one of several rescue boats used at Port Fairy and Warrnambool in early 1900's. In late 1914 the Warrnambool lifeboat and crew were used to help find what was left of the tragic wreckage of the Antares, and were able to discover the body of one of the crewmen, which they brought back to Warrnambool. Between 1951 and 1954 the lifeboat was manned under the guidance of Captain Carrington. He held lifeboat practice each month on a Sunday morning, to comply with the Ports and Harbour’s request that lifeboats be manned by a strong and competent crew, ready for action in case of emergency. In the early 1960’s it ended its service as a lifeboat and was used in Port Fairy as a barge to help dredge the Moyne River, bolted to the Port Fairy lifeboat. Flagstaff Hill obtained the Warrnambool in 1975. In 1984 it was on display at Flagstaff Hill Maritime Village, Warrnambool. On 23rd May 1990 she was lifted from the water and placed in a cradle for restoration. The name ‘WARRNAMBOOL could be seen faintly on the lifeboat before it was restored. It was during the restoration that Flagstaff Hill's boat builder discovered the 'plaque' inside the hull. A copy of the blueprint plans has the name “V.E.E. Gotch” printed on it. His advertisement in Footscray’s ‘Independent’ newspaper of Saturday 11th May 1901 states he is “Principal and Skilled member (Naval Architect) to the Court of Marine Inquiry of Victoria and holds classes for naval architectural drawing and arithmetic.” The rowlock is significant for its association with the lifeboat WARRNAMBOOL, which is significant for its half century service to the local community as a lifesaving vessel. She was also used to help retrieve the body of a shipwrecked crew member of the ANTARES. Rowlock, iron, upper ends scroll over, from the Lifeboat Warrnambool.flagstaff hill, warrnambool, shipwrecked-coast, flagstaff-hill, flagstaff-hill-maritime-museum, maritime-museum, shipwreck-coast, flagstaff-hill-maritime-village, life boat, life saving vessel, 1910 vessel, port fairy, boat builder plaque, rescue boat, beagley, government dockyard, williamstown, v.e.e. gotch, royal lifeboat institution, captain ferguson, non-capsizeable lifeboat, self-righting lifeboat, antares shipwreck, double diagonal planking, captain carrington, rowlock, lifeboat rowlock, lifeboat warrnambool -
 Flagstaff Hill Maritime Museum and Village
Vehicle - Vessel, Lifeboat Warrnambool, 01/09/1910
The construction of the lifeboat ‘Warrnambool’ began 15th September 1909 and was completed almost 12 months later, 1st September 1910. It was built at the Government Dockyard in Williamstown, Victoria, along the lines designed by the Great Britain’s Royal Lifeboat Institution, and included whaleback decks fore and aft, mast and centreboard, and rudder and tiller hung from the sternpost. It could be propelled by both sail and oar. At that time Captain Ferguson was Chief Harbour Master and Mr Beagley was foreman boat builder when he and his fellow workmen built the boat. The boat was described as “… a fine piece of workmanship and does credit to her builders and designers…” It had all the latest improvements in shape, disposition of weight and watertight compartments, and it had space for a large number of people in addition to the crew. It appears that 'H Meiers' whose signature, along with building dates, is pencilled on a concealed timber 'plaque' in the hull, was involved with the building of the lifeboat. It is interesting that the ‘Melbourne Directory’ of 1911, published by Sands and MacDougal, lists McAuley and Meiers, boat builders, Nelson Place foreshore, between Pasco and Parker Streets, Williamstown, (Victorian Heritage Database, ‘Contextual History, Maritime Facilities’), It is probably the company of the person whose name is inscribed on the lifeboat plaque. Flagstaff Hill’s documentation also mentions that the keel was laid at ‘Harry Myers, boat builders, Williamstown, Melbourne’ – the name ‘Myers’ can also be spelled ‘Meiers’, which could be the same person as the Meiers in “McAuley and Meiers” (as mentioned in genealogy lines of Myers). The new lifeboat, to be named ‘Warrnambool’ was brought to town by train and launched at the breakwater on 1st March 1911 using the Titan crane (the old lifeboat built in 1858, was then returned to Melbourne in 1911). This new lifeboat was stationed at Warrnambool in a shed located at the base of the Breakwater, adjacent to the slipway. A winch was used to bring it in and out of the water. The lifeboat ‘Warrnambool’ was similar in size to the old lifeboat but far superior in design, build and sea-going qualities such as greater manoeuvrability. The ‘self-righting, self-draining’ design was “practically non-capsizeable” and even if the boat overturned it would right itself to an even keel and the water would drain away. The hull was built of New Zealand Kauri, using double diagonal planking, laid in two layers at right angles, with a layer of canvas and red lead paint between the timbers to help seal the planking. It has “… plenty of freeboard, high watertight spaces between the deck and bottom… through which pipes lead…” The backbone timbers were made of Jarrah. The lifeboat Warrnambool was one of several rescue boats used at Port Fairy and Warrnambool in early 1900's. In late 1914 the Warrnambool lifeboat and crew were used to help find what was left of the tragic wreckage of the Antares, and were able to discover the body of one of the crewmen, which they brought back to Warrnambool. Between 1951 and 1954 the lifeboat was manned under the guidance of Captain Carrington. He held lifeboat practice each month on a Sunday morning, to comply with the Ports and Harbour’s request that lifeboats be manned by a strong and competent crew, ready for action in case of emergency. In the early 1960’s it ended its service as a lifeboat and was used in Port Fairy as a barge to help dredge the Moyne River, bolted to the Port Fairy lifeboat. Flagstaff Hill obtained the Warrnambool in 1975. In 1984 it was on display at Flagstaff Hill Maritime Village, Warrnambool. On 23rd May 1990 she was lifted from the water and placed in a cradle for restoration. The name ‘WARRNAMBOOL could be seen faintly on the lifeboat before it was restored. It was during the restoration that Flagstaff Hill's boat builder discovered the 'plaque' inside the hull. A copy of the blueprint plans has the name “V.E.E. Gotch” printed on it. His advertisement in Footscray’s ‘Independent’ newspaper of Saturday 11th May 1901 states he is “Principal and Skilled member (Naval Architect) to the Court of Marine Inquiry of Victoria and holds classes for naval architectural drawing and arithmetic.”The lifeboat WARRNAMBOOL is significant for its half century service to the local community as a lifesaving vessel. She was also used to help retrieve the body of a shipwrecked crew member of the ANTARES. Lifeboat "Warrnambool", a wooden, clinker hull, 'self-righting, self-draining design, single mast, pivoting centreboard. Complete with sail and yardarm. A 'plaque' was found inside the hull of the lifeboat, made of untreated wood, disc-shaped with one straight edge (Diam 15.5cm), inscribed by one of the boat builders in pencil script "Life Boat Start building / 15/9/09 - complete 1/9/10 / (signature looks like H Meiers) / Boat Builder)."'Plaque' inside body of boat is inscribed in pencil, script writing "Life Boat Start building / 15/9/09 - complete 1/9/10 / (signature looks like H Meiels) / Boat Builder)." flagstaff hill, warrnambool, shipwrecked-coast, flagstaff-hill, flagstaff-hill-maritime-museum, maritime-museum, shipwreck-coast, flagstaff-hill-maritime-village, lifeboat, life boat, vessel, life saving, 1910 vessel, port fairy, boat builder plaque, rescue boat, beagley, williamstown, government dockyard, v.e.e. gotch, royal lifeboat institution, captain ferguson, meiers, nelson place, non-capsizeable, self-righting, titan crane, double diagonal planking, captain carrington, barge, antares, self righting, crew of twelve, capacity of 30 survivors -
 Flagstaff Hill Maritime Museum and Village
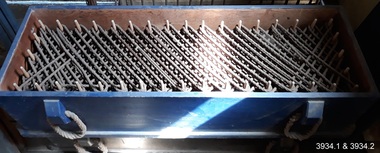
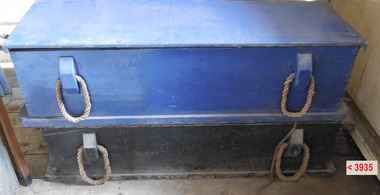
Equipment - Line faking box, Government of Victoria, 1860s
The rocket line faking box with lid has a frame inside with a specifically designed perimeter of faking pegs. The rocket shot line has been faked, or skilful wound, around these pegs to prevent it from tangling. The line is stored in the box, ready for attaching to the line throwing rocket. Some line faking boxes have a false base that is removed before firing the line-throwing pistol, leaving the line to feed out from the box when the rocket is fired. After the line is attached to the rocket the box tilted slightly and faced towards the wreck to allow it to be freely dispatched. The equipment often includes more that one faking box to make allowance for possible errors, broken lines or the need for a heavier line. Saving lives in Warrnambool – The coastline of South West Victoria is the site of over 600 shipwrecks and many lost lives; even in Warrnambool’s Lady Bay there were around 16 known shipwrecks between 1850 and 1905, with eight lives lost. In 1859 the first Government-built lifeboat arrived at Warrnambool Harbour and a shed was soon built to house it. In 1858 the provision of rocket and mortar apparatus was approved for lifeboat stations in Victoria, and in 1864 a rocket house was built to safely store the rocket rescue equipment. In 1878 the buildings were moved to the Breakwater area, and in 1910 the new Lifeboat Warrnambool arrived with its ‘self-righting’ design. For almost a hundred years the lifeboat and rocket crews, mostly local volunteers, trained regularly to maintain their rescue skills. They were summoned when needed by alarms, gunshots, ringing bells and foghorns. Some became local heroes but all served an important role. By the end of the 1950s the lifeboat and rescue equipment had become obsolete. Rocket Rescue Method - The Government of Victoria adopted lifesaving methods based on Her Majesty’s Coast Guard in Great Britain. It authorised the first line-throwing rescue system in 1858. Captain Manby’s mortar powered a projectile connected to rope, invented in 1808. The equipment was updated to John Dennett’s 8-foot shaft and rocket method that had a longer range of about 250 yards. From the 1860s the breeches buoy and traveller block rocket rescue apparatus was in use. It was suspended on a hawser line and manually pulled to and from the distressed vessel carrying passengers and items. In the early 1870s Colonel Boxer’s rocket rescue method became the standard in Victoria. His two-stage rockets, charged by a gunpowder composition, could fire the line up to 500-600 yards, although 1000 yards range was possible. Boxer’s rocket carried the light line, which was faked, or coiled, in a particular way between pegs in a faking box to prevent twists and tangles when fired. The angle of firing the rocket to the vessel in distress was measured by a quadrant-type instrument on the side of the rocket machine. Decades later, in about 1920, Schermuly invented the line-throwing pistol that used a small cartridge to fire the rocket. The British Board of Trade published instructions for both the beach rescue crew and ship’s crew. It involved setting up the rocket launcher on shore at a particular angle measured by the quadrant, inserting a rocket that had a light-weight line threaded through its shaft, and then firing it across the stranded vessel, the line issuing freely from the faking board. A tally board was then sent out to the ship with instructions in four languages. The ship’s crew would haul on the line to bring out the heavier, continuous whip line, then secure the attached whip block to the mast or other sturdy part the ship. The rescue crew on shore then hauled out a stronger hawser line, which the ship’s crew fixed above the whip block. The hawser was then tightened using the block on the shore end of the whip. The breeches buoy and endless whip are then attached to the traveller block on the hawser, allowing the shore crew to haul the breeches buoy to and from the vessel, rescuing the stranded crew one at a time. This rocket line faking box is significant for its connection with local history, maritime history and marine technology. Lifesaving has been an important part of the services performed from Warrnambool's very early days, supported by State and Local Government, and based on the methods and experience of Great Britain. Hundreds of shipwrecks along the coast are evidence of the rough weather and rugged coastline. Ordinary citizens, the Harbour employees, and the volunteer boat and rescue crew, saved lives in adverse circumstances. Some were recognised as heroes, others went unrecognised. In Lady Bay, Warrnambool, there were around 16 known shipwrecks between 1850 and 1905. Many lives were saved but tragically, eight lives were lost.Rocket line faking box with loose fitting lid, painted blue on the outside. Rectangular box has two rope handles within wooden rope holders fixed onto each long side and one at each end. The box has a hook and ring at the base each end for releasing the top from the inserted faking frame. The line faking frame is inside the box. It has seventeen wooden pegs along each long side of the frame and three pegs along each short side. A continuous length of rocket line has been faked around the pegs in a specific pattern.flagstaff hill maritime museum & village, flagstaff hill, maritime museum, maritime village, warrnambool, great ocean road, shipwreck, life-saving, lifesaving, rescue crew, rescue, rocket rescue, maritime accidents, rocket crew, beach rescue, line rescue, rescue equipment, rocket firing equipment, rocket rescue equipment, rocket apparatus, beach apparatus, petticoat breeches, breeches buoy, rocket house, rocket shed, lifeboat men, rocket equipment, rocket machine, rocket head, rocket launcher, rocket line, marine technology, line-firing pistol, line throwing gun, beach rescue set, traveller, hawser, faking, faking box, faked line, lady bay, warrnambool harbour, port of warrnambool, volunteer lifesavers, volunteer crew, breakwater, lifeboat warrnambool, rocket rescue method, rocket rescue apparatus, shore to ship, italian hemp, line-throwing pistol, line throwing cartridge, rocket apparatus rescue, stranded vessel, tally board, light line, whip line, endless whip, petticoat buoy, traveller chair, traveller block, her majesty’s coast guard, harbour board, line thrower, line throwing, beach cart, hand barrow, sand anchor, hawser cutter, life jacket, faking board, welsh hand barrow, rocket set, rocket line faking box, faking frame -
 Flagstaff Hill Maritime Museum and Village
Equipment - Line faking box, Government of Victoria, 1860s
The rocket line faking box has a frame inside with a specifically designed perimeter of faking pegs. The rocket shot line has been faked, or skilful wound, around these pegs to prevent it from tangling. The line is stored in the box, ready for attaching to the line throwing rocket. Some line faking boxes have a false base that is removed before firing the line-throwing pistol, leaving the line to feed out from the box when the rocket is fired. After the line is attached to the rocket the box tilted slightly and faced towards the wreck to allow it to be freely dispatched. The equipment often includes more that one faking box to make allowance for possible errors, broken lines or the need for a heavier line. Saving lives in Warrnambool – The coastline of South West Victoria is the site of over 600 shipwrecks and many lost lives; even in Warrnambool’s Lady Bay there were around 16 known shipwrecks between 1850 and 1905, with eight lives lost. In 1859 the first Government-built lifeboat arrived at Warrnambool Harbour and a shed was soon built to house it. In 1858 the provision of rocket and mortar apparatus was approved for lifeboat stations in Victoria, and in 1864 a rocket house was built to safely store the rocket rescue equipment. In 1878 the buildings were moved to the Breakwater area, and in 1910 the new Lifeboat Warrnambool arrived with its ‘self-righting’ design. For almost a hundred years the lifeboat and rocket crews, mostly local volunteers, trained regularly to maintain their rescue skills. They were summoned when needed by alarms, gunshots, ringing bells and foghorns. Some became local heroes but all served an important role. By the end of the 1950s the lifeboat and rescue equipment had become obsolete. Rocket Rescue Method - The Government of Victoria adopted lifesaving methods based on Her Majesty’s Coast Guard in Great Britain. It authorised the first line-throwing rescue system in 1858. Captain Manby’s mortar powered a projectile connected to rope, invented in 1808. The equipment was updated to John Dennett’s 8-foot shaft and rocket method that had a longer range of about 250 yards. From the 1860s the breeches buoy and traveller block rocket rescue apparatus was in use. It was suspended on a hawser line and manually pulled to and from the distressed vessel carrying passengers and items. In the early 1870s Colonel Boxer’s rocket rescue method became the standard in Victoria. His two-stage rockets, charged by a gunpowder composition, could fire the line up to 500-600 yards, although 1000 yards range was possible. Boxer’s rocket carried the light line, which was faked, or coiled, in a particular way between pegs in a faking box to prevent twists and tangles when fired. The angle of firing the rocket to the vessel in distress was measured by a quadrant-type instrument on the side of the rocket machine. Decades later, in about 1920, Schermuly invented the line-throwing pistol that used a small cartridge to fire the rocket. The British Board of Trade published instructions for both the beach rescue crew and ship’s crew. It involved setting up the rocket launcher on shore at a particular angle measured by the quadrant, inserting a rocket that had a light-weight line threaded through its shaft, and then firing it across the stranded vessel, the line issuing freely from the faking board. A tally board was then sent out to the ship with instructions in four languages. The ship’s crew would haul on the line to bring out the heavier, continuous whip line, then secure the attached whip block to the mast or other sturdy part the ship. The rescue crew on shore then hauled out a stronger hawser line, which the ship’s crew fixed above the whip block. The hawser was then tightened using the block on the shore end of the whip. The breeches buoy and endless whip are then attached to the traveller block on the hawser, allowing the shore crew to haul the breeches buoy to and from the vessel, rescuing the stranded crew one at a time. This rocket line faking box is significant for its connection with local history, maritime history and marine technology. Lifesaving has been an important part of the services performed from Warrnambool's very early days, supported by State and Local Government, and based on the methods and experience of Great Britain. Hundreds of shipwrecks along the coast are evidence of the rough weather and rugged coastline. Ordinary citizens, the Harbour employees, and the volunteer boat and rescue crew, saved lives in adverse circumstances. Some were recognised as heroes, others went unrecognised. In Lady Bay, Warrnambool, there were around 16 known shipwrecks between 1850 and 1905. Many lives were saved but tragically, eight lives were lost.Rocket line faking box with loose fitting lid, painted black on the outside. Rectangular box has two rope handles within wooden rope holders fixed onto each long side and one at each end. The box has a hook and ring at the base each end for releasing the top from the inserted faking frame. The line faking frame is inside the box. It has seventeen wooden pegs along each long side of the frame and three pegs along each short side. A continuous length of rocket line has been faked around the pegs in a specific pattern.flagstaff hill maritime museum & village, flagstaff hill, maritime museum, maritime village, warrnambool, great ocean road, shipwreck, life-saving, lifesaving, rescue crew, rescue, rocket rescue, maritime accidents, rocket crew, beach rescue, line rescue, rescue equipment, rocket firing equipment, rocket rescue equipment, rocket apparatus, beach apparatus, petticoat breeches, breeches buoy, rocket house, rocket shed, lifeboat men, rocket equipment, rocket machine, rocket head, rocket launcher, rocket line, marine technology, line-firing pistol, line throwing gun, beach rescue set, traveller, hawser, faking, faking box, faked line, lady bay, warrnambool harbour, port of warrnambool, volunteer lifesavers, volunteer crew, breakwater, lifeboat warrnambool, rocket rescue method, rocket rescue apparatus, shore to ship, italian hemp, line-throwing pistol, line throwing cartridge, rocket apparatus rescue, stranded vessel, tally board, light line, whip line, endless whip, petticoat buoy, traveller chair, traveller block, her majesty’s coast guard, harbour board, line thrower, line throwing, beach cart, hand barrow, sand anchor, hawser cutter, life jacket, faking board, welsh hand barrow, rocket set, rocket line faking box, faking frame -
 Melton City Libraries
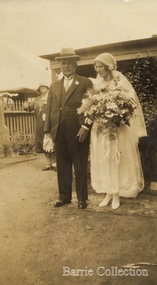
Photograph, Charles Ernest Barrie with daughter Mary Ena Barrie, 1930
Mary Ena married Keith John Robinson son of Isaac and Henrietta nee Raleigh of Creighton Melton. Mary and her father are photographed beside the Darlingsford house prior to her wedding in February 1930. Mary their first child was born in 1907. In circa 1980 she wrote about her parents and her early life. Page 1 of part of the original hand written script - Mother and father were married at the Methodist Church Melton by the Rev B E Williams on Aug 23rd 1906 and lived in the house beside the chaff mill for some years. [The family left Melton South in 1910. In 1911 they moved to the farm “Darlingsford” near the town of Melton home for their nine children born between 1907 - 1922 They had three daughters and six sons, the second boy died of diphtheria 1916 aged 5 years.] Page 2 Mary writes… Each winter Father would send a 20 ton truck to the Collingwood Central Methodist Mission to be distributed to the needy people in the area. Sr. Faith who was at the mission for many years became a very much loved friend of my parents and the family. I remember her as a prolific writer of childrens stories in the Methodist paper the “Spectator”. I still treasure a book sister Faith gave me for my birthday. Father and Mother gave the first donation of 10 pounds to open the fund to start “Yooralla” for crippled children all because a small boy asked for a bag of sweets for his brother who was crippled and not able to attend kindergarten. Sister Faith who was a small fragile woman with a tremendous spirit was a frequent visitor at our home where she loved the warmth, good food and the loving companionship of the family for many years. Later she ran the Chaucer Library in Collins just below Georges near the Athenaeum Theatre. Mother was an avid reader and many of the books she read came from this library. Page 4 – Mary writes….. Dad was always involved in district affairs ever ready to help someone in need, especially as a J. P. helping young people who may have been in trouble. He was always involved in the care of his [eight] brothers who were in need at times. He was an elder at the Scots Church Melton and Sunday School Superintendant when the Sunday School thrived. The anniversary became a special event with good singing supplemented by good music by Dad’s friends from Footscray saxophone and violin. The church would be packed both Sundays. The family home was open to all and sundry from the little Salvation Army lass from Bacchus Marsh driving a horse and jinker (without any experience) round the district. collecting, came looking for a bed for the night (and later crept into bed with me because she was terrified). The Methodist local preachers regularly spent several night and breakfast while visiting people in the Melton area. They were stationed at Bacchus Marsh and again drove a horse and jinker. One preacher I remember with gratitude was Mr Webster a retired school master and a fine man. Another was Pastor Tuttlebee again with no experience driving a horse and jinker. The first time he called Mother found him taking the winkers off the horse whilst it was still harnessed to the jinker. Another regular visitor was Mr Lister the federal member for Corio, he always stayed with us when he had meeting in this area. Another evening just as dusk another minister and his dear little wife were driving the horse and buggy to a new parish at Ballarat. They had asked at the Mac’s Hotel for accommodation, and their reply was we have no accommodation, go down to Mr and Mrs Barrie they will put you up for the night. They were most grateful to be taken in and cared for, somehow it seemed the most natural thing in the world that they would be welcome. A copy of Mary’s writing was given to her niece Wendy in 1990. Mary Ena Barrie's wedding daylocal identities -
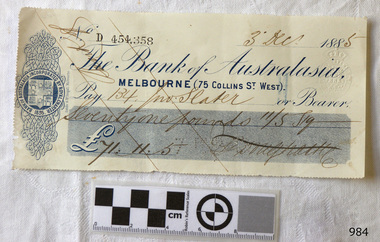 Flagstaff Hill Maritime Museum and Village
Currency - Bank cheque, Sands & McDougall Limited, 03-12-1885
This bank cheque originated from the Bank of Australasia, Melbourne branch. It was issued on 3rd December 1885 to a person surnamed Slater for £71.11.5 (seventy-one pounds, eleven shillings and five pence). The parallel lines are called Cheque Crossed and mean that only Slater and no one else could receive the payment and that it would have been paid into Slater's bank account, not exchanged for cash. The embossed dots signify that the cheque amount was also paid to be the bearer of the cheque. Slater would have visited the bank to deposit the money into his or her own account. The cheque was printed by Sands & McDougall, a long-standing Melbourne printing and stationery company. It was then Stamped at the bank with its own unique number before it was issued to the customer. From its previously perforated edges, it is presumed that the cheque was part of a page of cheques, likely to be contained within a book of similar cheques ready for use. The Bank of Australia was incorporated by Royal Charter of England in March 1834. It had its Australian beginnings on 14th December 1835, opening in Sydney. The Acting Superintendent of the bank at that time was David Charters McArthur. He was Superintendent from 1867-to 1876. The Melbourne branch opened on 28th August 1838 in a two-roomed brick cottage on the north side of Little Collins Street, where two huge mastiff dogs were used at night to guard the bank. The government also provided an armed military sentinel. Due to the bank's rapid growth, a new building for the Melbourne branch was opened in 1840 at 75 Collins Street West. By 1879 the bank had been upgraded to a magnificent two-storey building on the corners of Collins and Queens Streets, with the entry on Collins Street. In 1951 the Bank of Australasia amalgamated with the Union Bank to form the Australia and New Zealand Bank, now known as the ANZ. Then in 1970, the ANZ merged with both the ES&A and the London Bank of Australia to form the ANZ Banking Group Limited. The ANZ Banking Group Ltd kindly donated a variety of historic items from the Bank of Australasia. BANK of AUSTRALASIA, WARRNAMBOOL – In 1854 Warrnambool had two banks, the Union Bank and the Bank of Australasia. Later, completely different bank businesses opened; in 1867 the National Bank of Australasia, then in 1875 the Colonial Bank of Australasia. The original Warrnambool branch of the Bank of Australasia was established in July 1854, and operated from a leased cottage on Merri Street, close to Liebig Street. The bank next bought a stone building previously erected by drapers Cramond & Dickson on the corner of Timor and Gibson Streets. Samuel Hannaford was a teller and then Manager at the Warrnambool branch from 1855 to 1856 and the Warrnambool Council chose that bank for its dealings during 1856-57. In 1859 Roberts & Co. was awarded the contract to build the new Bank of Australasia branch for the sum of £3,000. The land was on a sand hill on the northeast corner of Timor and Kepler Streets and had been bought in 1855 from investor James Cust. The new building opened on May 21, 1860. The bank continued to operate there until 1951 when it merged with the Union Bank to form the ANZ Bank, which continued operating from its Liebig Street building. Warrnambool City Council purchased the former Bank of Australasia building in 1971 and renovated it, then on 3rd December 1973 it was officially opened as the Art Gallery by Cr. Harold Stephenson and Gallery Director John Welsh. The Gallery transferred to the purpose-built building in Liebig Street in 1986 and the old bank building is now the Gallery club. Staff at the Bank of Australasia in Warrnambool included the following men but others were also involved: Samuel Hannaford, Teller then Manager from 1855-1856; W H Palmer, Manager from January 1857 until November 1869 when the Teller Basil Spence was promoted to Manager; H B Chomley, Manager from April 1873 and still there in 1886; A Butt, Manager in 1895-1904; J R McCleary Accountant and Acting Manager for 12 months, until 1900; A Kirk, Manager 1904; J Moore, staff until his transfer to Bendigo in December 1908; J S Bath was Manager until 1915; C C Cox, Manager until April 1923; Richard C Stanley, Manager 1923 to April 1928. The bank cheque has significance through its association with the Bank of Australasia. The early Australian bank was established in 1834 by Royal Charter and opened in Sydney, Australia, in Sydney in 1835. The bank had many Australian offices in November 1877, particularly on the east and south coasts. Victoria had 45 percent of all Offices. The bank cheque is significant as an early example of financial management of money and money exchange or transfer.Bank cheque of the Bank of Australasia, Melbourne branch. The rectangular paper has three sides that have been perforated. It is printed in blue with bank's Insignia of a heraldic shield of sheep hung by their waists and ships in full sail. Embossed Stamp Duty mark. Embossed dots. Handwritten black ink details Dated 3rd Dec 1885. Printed in Melbourne by Sands & McDougall. Diagonal parallel lines are across the cheque. Printed: "Bank of Australasia, MELBOURNE (75 COLLINS ST. WEST)." "454,358" "Sands & McDougall, Melbourne" Embossed stamp: Symbol of Crown above double oval lines " - STAMP DUTY" "ONE PENNY" Embossed dots forming test "7 PAID T2" Handwritten: "3rd Dec. [188] 5" "134 - Slater" "Seventy one pounds 11/S 5p" "£71.11.5" Signature: (undecipherable) flagstaff hill, warrnambool, shipwrecked-coast, flagstaff-hill, flagstaff-hill-maritime-museum, maritime-museum, shipwreck-coast, flagstaff-hill-maritime-village, bank cheque, shipwrecked coast, flagstaff hill maritime museum, maritime museum, shipwreck coast, flagstaff hill maritime village, great ocean road, bank of australasia, boa, union bank, australia & new zealand bank, anz bank, bank note, melbourne, slater, sands & mcdougall, chrssed cheque, embossed dots, paid cheque -
 Bendigo Military Museum
Photograph - 4th Field Survey Squadron – Operation ARIGHT 93, Queensland, 1993
This is a set of 42 photographs taken during 4th Field Survey Squadron’s deployment on Operation ARIGHT 93 in North Queensland from the 30th of August to the 8th of October 1993. The Survey Field Completion area of operations was Weipa near the top end of the Cape York Peninsula. Survey parties conducted field checking of topographic maps covering Bamaga, Heathlands, Weipa, Lockhart River and Strathgordon in Perentie 110 Series Survey variant FFR Land Rovers. Hand-held Trimble and Magellan GPS receivers were used to assist with navigation and to position remote isolated features. Three Bell Kiowa LOH helicopters provided by 162 Recce Sqn supported field checking operations. Supplementary and Vital Asset Protection photography was taken by air camera operators in AAAvn Nomad aircraft from 173 Survl Sqn fitted with an RC10 aerial camera.This is a set of 42 photographs taken in 1993 durin8g 4th Field Survey Squadron’s deployment on Operation ARIGHT in North Queensland. The colour photographs are on 35mm negative film and are part of the Army Survey Regiment’s Collection. The photographs were scanned at 96 dpi. .1) - Photo, colour, 1993. Survey party in Perentie 110 Series Land Rover navigates through Cape York Peninsula sand hills. .2) - Photo, colour, 1993. Cape York Peninsula sand hills. .3) - Photo, colour, 1993. Cape York Peninsula Island. .4) - Photo, colour, 1993. Survey party in Perentie 110 Series Land Rover enters a Cape York Peninsula beach. .5) - Photo, colour, 1993. SPR Kim Baker takes a break on a Cape York Peninsula beach. .6) - Photo, colour, 1993. L to R: MAJ Andy Cordova (USA Exchange) from the Army Survey Regiment and unidentified civilians. .7) to .14) - Photo, colour, 1993. Cape York Peninsula topography. .15) - Photo, colour, 1993. Unidentified surveyor in Bell Kiowa LOH helicopter. .16) - Photo, colour, 1993. Bell Kiowa LOH helicopter circles base camp. .17) to .18) - Photo, colour, 1993. Cape York Peninsula topography. .19) - Photo, colour, 1993. Vehicle convoy taking a break. L to R: LT John Bath (Detachment OC), unidentified (x2), SPR Chris Pearse. .20) - Photo, colour, 1993. Vehicle convoy taking a break. .21) - Photo, colour, 1993. Vehicle convoy ready to go. SPR Chris Pearse. .22) - Photo, colour, 1993. Vehicle convoy on the move. .23) - Photo, colour, 1993. Cape York Peninsula topography. .24) - Photo, colour, 1993. Unidentified personnel. .25) - Photo, colour, 1993. SGT Neale ‘Tex’ Houston. .26) - Photo, colour, 1993. Ground below a Bell Kiowa LOH helicopter .27) - Photo, colour, 1993. L to R: SPR Mark Sinderberry and CPL Stuart Adrain in a Bell Kiowa LOH helicopter. .28) & .29) - Photo, colour, 1993. Ground below a Bell Kiowa LOH helicopter. .30) - Photo, colour, 1993. Base camp viewed from a Bell Kiowa LOH helicopter. .31) - Photo, colour, 1993. Cape York Peninsula topography in recovery after burn-off. .32) & .33) - Photo, colour, 1993. SPR Kim Baker contemplates crossing this bridge in his Land Rover. .34) - Photo, colour, 1993. SPR Kim Baker takes a break next to a billabong. .35) - Photo, colour, 1993. Survey party in Perentie 110 Series Land Rover crosses a creek. .36) - Photo, colour, 1993. Cape York Peninsula bush fire in distance. .37) - Photo, colour, 1993. Survey party in Perentie 110 Series Land Rover traverses a sand hill. .38) - Photo, colour, 1993. SPR Kim Baker. .39) - Photo, colour, 1993. Cape York Peninsula bush fire. .40) - Photo, colour, 1993. Cape York Peninsula topography. .41) & .42) - Photo, colour, 1993. Cape York Peninsula sand hills..1P to .42P – There are no personnel identified. ‘1993 OP ARIGHT’ annotated on negative sleeve.royal australian survey corps, rasvy, 4 fd svy sqn, op aright 93 -
 Uniting Church Archives - Synod of Victoria
Photograph, Before 1919
B. 1835 England, D. 1919 Christchurch NZ. Methodist minister. Chronicle 17 May 1919, p.43: Deep regret will be felt in South Aus-tralia at the passing away of the Rev. Samuel Knight, one of the best-known and most loved of the earlier ministers of the Wesleyan Methodist Church in Australia. The announcement of the death of Mr. Knight, who was in his 85th year, was received by cable on May 11 from Christ-church, New Zealand, where he had re-sided during the last few years with his only son, the Rev. Percy N. Knight, B.A. The veteran preacher spent over twenty years of his busy and useful life in this State. His last visit to Adelaide was in July, 1915, and it was through his agency and influence that £1,150 was raised for the reduction of the debt on the Archer-street Methodist Church. At that time, except for his head being crowned with snow-white hair, there was little in Mr. Knight's appearance to indicate his great age. He was obviously perfectly happy, and was still the tender shepherd who was so well beloved by his flock when he labored in South Australia. The older members of the Methodist Church remember well the splendid work he did more than half a century ago. He won similarly widespread respect in Vic-toria when he was transferred to the Con-ference there. He had charge of the prin-cipal circuits in both States, and he was equally successful as an eloquent preacher, a sympathetic and an assiduous pastor, and a wise and prudent administrator. His presence in the pulpit was always greeted by a large congregation, and the earnest-ness and spiritually of his discourses never failed to impress them. He was imbued with the true spirit of Methodism, and he had a firm and confident belief in the doctrines which he inculcated with such emotional fervor. Mr. Knight was a broad-minded, genial man with a keen sense of humor, and he shone on the platform. A true Christian, he was also a man of the world, and he could, when appealed to, give valuable counsel. He was a friend to be trusted, and he was ever ready to help those in need of his practical sympathy or his well-considered advice. He lived in an era of great Australian Methodists, and he was one of the greatest among them. Mr. Knight was an indefatigable worker, and under his control all the institutions of the circuits in which he worked nourished abundantly. He was a guide, philosopher, and friend to the younger ministers and exercised a great influence for good in Conference. Mr. Knight was born in Liverpool in 1834 and came to Australia in 1854. After spending several years in Victoria he arrived in Adelaide in 1867 to take charge of the Pirie-street Church. He received three ap-pointments as pastor at Pirie-street, two at Kent Town, and two at North Ade-laide (Archer-street), and he was also at Burra, Gawler, and Moonta. He was president of the Wesleyan Methodist Con-ference in 1877. In 1889 he returned to Victoria, and among the circuits of which he had charge at different times were Brunswick-st (Melbourne), St. Kilda, Ballarat, and Geelong. His activities by no means ceased after he went on the supernumerary list. For some years he was connected with Queen's College (Uni-versity of Melbourne), for which he col-lected a large sum for the liquidation of certain liabilities. The Samuel Knight scholarship was founded last year at Queen's College in his honor. Mr. Knight had taken up in recent years the work of establishing ministers in new circuits and of helping struggling churches. He undertook an energetic campaign of attack upon the debts on various churches that, recognising what his personality could do for them, had appealed to him for assistance, and achieved remarkable success in placing the finances on a sounder footing. A considerable portion of his own income in recent years was devoted to the assistance of young ministers, and to aug-menting the stipends that could be offered by newly established circuits in various parts of Victoria. Mr. Knight had been a widower for many years. His only daughter, Dr. Adela Knight, who appeared to have a brilliant career before her in medicine, died in Vienna about 25 years ago. The Rev. Samuel Knight was for many years a close personal friend of the late Sir Samuel Way, with whom he always stayed when visiting Adelaide. His death was a subject of reference at a number of Methodist churches in and around Ade-laide.B & W head & shoulders studio portrait of Rev. Samuel Knight, mounted on buff card.Rev. S. Knightknight, samuel, rev. -
 Melton City Libraries
Document, Darlingsford land title, 1863
Thomas Bell Darling purchased 176 acres from the Toolern Creek to Ferris Road. A house and bluestone barn/stables were built. The property was owned by Ralph Parkinson, followed by Richard Manning. SUMMARY – Darlingsford – Auction 1910 Darlingsford – Auction 1910 Melton Express October FRIDAY, October 28th At Three O’Clock At the RAGLAN HOTEL, MELTON SUBDIVISIONAL SALE of the DARLINGSFORD ESTATE, MELTON. Having a long frontage to the TOOLERN CREEK. In the Estate of the late RICHARD MANNING’ W. S. KEAST and L.A. FAIRBAIRN & CO., Auctioneers (in conjunction). Have received instructions from R.F. and J.L. Robertson, executors of Richard Manning deceased to offer by Public Auction, property almost adjoining Melton township, and having a frontage to the Toolern Creek, subdivided in to four lots as under:- Lot 1. – The homestead block containing 176 acres, being portion A, section 11, parish Kororoit together with the improvements, which consist of a 6-roomed stone house, milking shed, dairy, U.G. tank. Lot 2 – 177 acres 2 rood 23 perches, being Crown portion B of section 11 parish Kororoit. This block adjoins the homestead and is partly fenced. Lot 3 – 187 acres, Crown allotment C, section 11, parish Kororoit. adjoining the above lot. Lot 4 - 157 acres 1 rood 27 perches, being Crown allotment 9, section 12, parish of Kororoit. This block is only divided from the above lots by road, and adjoining Messrs. McVean and Gaitskill’s properties. This is one of the best known properties in the Melton district as a cultivation an grazing form, and its close proximity to the township makes it a very valuable, and portion of which could be cut into township blocks and should command a ready sale. For absolute sale. Terms- one fifth cash, one fifth in eight years, balance in 7 years with interest a the rate of 4 1/2 percent. Plan on application For further particulars apply W.S. KEAST, 610 Collins street, Melbourne; and L.A. FAIRBAIRN & Co., St James-buildings, Williams street, or at Bacchus Marsh; and as to the title, Dugdale and Creber, St. James-buildings, William Street Melbourne. Express November 5, 1910 On Friday last, Mr W.S. Keast and Messrs L.A. Fairbairn & Co., in conjunction, offered at the Raglan the Manning Estate known as Darlingsford, comprising of 700 acres, divided into four lots. Lot 4 was submitted first and passed in at L8 per acre. Lot 1 was then put up and went up to L13 per acre, at which it was also passed in. Lot 3 was next offered, and there being no bid was also passed in. Lot 2 was not offered. Express March 18, 1911 The Manning Estate of Darlingsford 600 acres was sold to Mr. Ernie for an undisclosed price. Note: Map KOROROIT COUNTY OF BOURKE Crown Grant Section 11 Portion A Thomas. B. Darling 176 . 0 . 0 acres on 29.3.1853 Lot 1 Portion B A. Russell 170 . 0 . 0 acres on 29.3.1853 Lot 2 Portion C Peter Inglis 176 . 0 . 0 acres on 29.3.1853 Lot 3 Section 12 Portion 3 P. Inglis 157 . 1 . 27 acres on 17.17.1863 Total 176 170 176 157. 1.27 679 . 1.27 acres November 5th 1910 On Friday night last Mr W S Keast and Messrs L A Fairbairn & Co, in conjunction offered at the Raglan Hotel the Manning Estate known as Darlingsford, comprising of 700 acres, divided into four Lots. Lot 4 was submitted first, and was passed in at L8.0.0. per acre. Lot 1 was then put up and went to L13.0.0. per acre at which it was passed in. Lot 3 was next offered, and then Lot 3 was next offered, and then being no bid was passed in. Lot 2 was not offered. October 22nd Notice of sale. 700 acres of splendid land close to the railway station. Divided onto 4 Lots 3 of which are maiden land and the whole of the acres is chocolate soil. No 1 Lot belonged to the late Mr Ralph Parkinson, and for years was liberally supplied with manure and crushed bones, and is capable of producing many crops.. The property being sold to wind up the Estate. Gisborne Gazette Friday December 17th 1911 Mr Sharp has sold his farm at the back of the township to Mr. E Barrie; price L15/10/ per acre. Agreement between Thomas Bell Darling and Ralph Parkinsonlocal identities -
 Melton City Libraries
Letter, Letter from Margaret B Gibson, 1928/2014
David McKenzie obituary, Romsey Examiner 1928 Another of Australia’s very old pioneers in the person of Mr McKenzie, passed away last weekend at his daughters residence At regent at the ripe old age of 92 years ( he would be 93 in November) Born at Berwick of Tweed Scotland, the late Mr McKenzie arrived in Australia with two of his uncles in 1855 by the ship “Red Jacket”. A stone- mason by trade he worked about Melbourne and at Geelong until attack by “gold fever” but met with no success at this venture so he returned to his trade, arriving at Melton about 1860. There he married and settles for about 20 years. In 1880 the Cherokee Heights with its subdivision was famous and Mr McKenzie moved there with his daughter. He continues in his trade, his work extending to Gisborne, Bacchus Marsh, Romsey, and Springfield and other places, where to this day, may be seen monuments of his skill and through tradesmanship as a mason. During his residence in the Mount, he took a keen interest in all the affairs of Kerrie and Cherokee, and he was a familiar figure at all the public gatherings at which he nearly always filled the position of Chairman, because of outstanding qualifications. He was a man of those sterling qualities possessed by those men who laid the foundation of this country so well and truly. Loyal, broad of vision, just in thought and deed, honourable to the extreme in all dealings, fearless in the cause of right, a lover of home and family, and ready to lend a hand to all progressive movements. To the memory of those grand men the youth of today should lift their hats in reverence. Mr McKenzie was a prolific reader of educational works, and the wonderful knowledge he retained upon a variety of subjects was a source joy to those who associated with him. His wife predeceased him by 43 years ago soon after arrival in Cherokee. A Pioneer of Melton There are probably some residents left at Melton and Bacchus Marsh who will remember the late Mr McKenzie, one of them has written as follows:- I knew the late Mr. McKenzie since I was a little boy – over 50 years ago- and no better man ever lived than he, he was a good man from every point of view. The late Mr McKenzie was born on the November 25th, 1835 at Montrose, Scotland. He came to Australia in 1853 and resided for a time with his uncle the late Mr. Gibson on the Kororoit Creek near Melton. A few years later he settled in Melton. In 1861 he was married to Miss Mary Buchanan, the eldest daughter of the late Mr. George Buchanan, one of the early settlers of Melton. Deceased resided on the main road to Bacchus Marsh one mile from Melton. He was a stone- mason by trade, and some fine buildings in Melton and surrounding districts to this day, stand to his credit. He built the Presbyterian Church Melton. The old school, the Shire Hall, many private dwellings and numerous bridges. He was highly respected, as he was well known for the good work he put into all he had to do with. He also took numerous contracts in the Melton Shire, and was also employed by the Shire as Clerk of Works. He was a most conscious man. In his day he took a prominent part in all public affairs, and was a leading spirit in the old school Board. He was one of the pioneers of the Melton Rechabite Tent. He was one of the earliest workers and supporters of the Melton Presbyterian Church, of which he was an elder, and for a great number of years, its Sunday School Superintendent and Teacher. He also lead the singing for many years before the days of the organ, as he had a splendid voice, and could sing his old Scotch songs and hymns up to within six months of his death. For the past five years he has resided with one of his daughters at north Preston, where he died. He had good health up to within six months of his death and could well remember all the early happenings at Melton and surrounding districts. There are five daughters and one living son:- Margaret Mrs. Walter Wyatt Twose of Burnley Elizabeth Mrs George Shebler of Brunswick Georgina Mrs Jack Sinclair Isabel Mrs H Knight of North Preston Jane Mrs William Gibson of Warragul John W. of Fremantle - Western Australia Letter from Margaret to the Melton Presbyterian Churchchurches, local architecture -
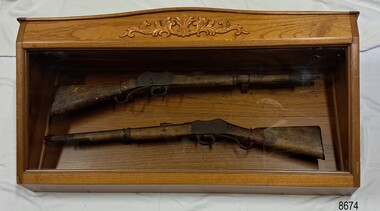 Flagstaff Hill Maritime Museum and Village
Weapon - Historic Rifles, Royal Small Arms Factory, 1877-1900
Martini-Henry Artillery Carbin rifles were made by the Royal Small Arms Factory at Enfield, Britain, from 1877 until 1900. Many were distributed to the British Colonies, including this pair, which was allocated to the Woodford Police, Victoria Police District of Warrnambool, Southwest Victoria. The Carbine model rifles were shorter than the standard rifles and more suited to mounted police and troopers. It is likely that in the early 20th century, Victoria Police replaced the two carbines with more modern firearms, and the outdated guns were stored in the stables. The rifles were left there and likely forgotten about due to changes in police staff. In 1915, police authorities announced that they would be replacing patrol horses with bicycles and would also close some smaller police stations. This affected Woodford Police Station, which closed in 1917. The forgotten firearms remained in the stables and were noticed by schoolboy Robert Jellie in 1940 and seen again in 1946. In 1995, the property was sold by the Education Department to a private owner. The Woodford Community donated the pair of Martini-Henry Carbines to the Victoria Police Museum in the late 1990s for mounting and display, which was funded by the Victoria Police Historical Society Inc. The decorative wood and glass display case and frame were designed to preserve the significant history of the guns. On November 1st 1999, the display was presented to Warrnambool Police and the local community due to the historical significance of the Woodford Police Station. In 2025, these items were formally deaccessioned by the Victoria Police Museum, and ownership was transferred to the Warrnambool Police Station. On March 10th, 2025, the display was transferred to Flagstaff Hill Maritime Museum and Village, where the historical story of the Martini-Henry Carbines could continue to be preserved and accessed by local families, the community, visitors to the area, and online visitors. WOODFORD POLICE: - The small settlement at Woodford was established in the 1840s around the Merri River where there was a ford across the water and a bridge from 1848 to 1851. The area was settled very early in Victoria’s history, and the river crossing provided travellers with access to the early route between Port Fairy (named Belfast at that time), Warrnambool and Melbourne. Occasionally, a Warrnambool police trooper would ride through Woodford and the district. In December 1854, Woodford Police barracks and stables were built on the hill by the Merri River on Bridge Road east, where Jubilee Park now stands. A local mounted trooper kept law and order in the area. In 1856, a lock-up was installed, and the first Woodford Police Station was in action in 1857. By 1871, the police station had been moved from the hill to land across the Merri River bridge, on the southern side of Bridge Road west, near Mill Street. In 1890, the police residence there was replaced by a stone Edwardian-style building with the stables and lock-up behind it and the old police station at the rear. The police continued to have a presence in Woodford until it was closed by the Police Commissioner in July 1917 for economic reasons. The residence was used for government housing until 1923, when it was taken over by the Education Department for the school teacher’s home. In 1995, it became privately owned. THE MARTINI-HENRY ARTILLERY CARBINE: - The Martini-Henry rifles were made in Britain from 1871 at the Royal Small Arms factory at Enfield and were stamped with the symbol of the Royal Cipher (Crown over VR) over ENFIELD to identify their origin. They were named after two of several people who helped design this method: Swiss Friederich von Martini and Scotsman Alexander Henry. The design was breech-loaded, and the inner barrel was rifled. A thumb rest was incorporated into the top right of the bullet receiver’s chamber. The small teardrop lever on the right side of the rifle showed whether the rifle was ready to be shot. In 1877, the shorter, lighter-weight Carbine version of the firearm was produced for mounted troops and artillery. Its official name was “Carbine, B.L., Rifled, Martini-Henry.” The bullets were slightly lighter in weight than those used for the longer rifle. The sight position was adjusted for the shorter gun, and wings were added to the sight on the tip, making it easier to slide the rifle back into a saddle bag. Some of the later Carbines also had leather sight covers screwed to the stock to prevent them from catching on the saddle bags. The Carbines had accessories available, such as barrel extensions with bayonets and swivels for adding slings. The Martini-Henry Carbine designs were later modified to fire the British .303 ammunition. Eventually, by 1900, the Martini-Henry Carbines were replaced by the Lee Enfield gun design. The pair of Martini-Henry Carbine firearms represents policing in the early pre-1900 days of colonial settlement; Woodford was one of the first townships settled in Victoria, and it had a police presence from 1854 until 1917. The rifles and display provide a historic connection between the location of Woodford and relatives and associates. The carbine rifles show a stage in the evolution of weapon design, adapted to suit mounted troops, and adding features to streamline use and storage. The ammunition was also improved during this progression. The carbines are important for their connection to policing law and order in a remote area. They are significant for their association with the township of Woodford, which was important to travel in the southwest Victoria district, providing access across a river for a road between Port Fairy and Melbourne, and later Warrnambool, and supplying food, goods and accommodation for the travellers. A pair of mounted rifles is mounted behind glass in a timer case, accompanied by a framed display of two photographs and an account of the rifles’ history. The case and display each have a horizontal board with a gently curved edge and carved decorations added. The identical firearms are British-made Martini Henry Carbine breach-loaded rifled guns, supplied by Britain to its Colonial troops from around 1877. The rifles are lever-action, single-shot .500 calibre weapons. They have a teardrop lever on their right side. They were used by Victoria Police mounted troops at the Woodford Police Station, Victoria. The black and white photographs were taken in 1946. The left photograph has a circled area; the right photograph is an enlarged view of the circled area, showing the Woodford Police Station in detail. The printed text is on textured paper with the Victoria Police watermark. It gives a summary of the rifle’s history. There is an inscription on the left photograph. Left photograph, handwritten in white pen: “WOODFORD” Document’s print: “During the late 1840s the small town of Woodford grew around the crossing of the Merri River on the Melbourne/Port Fairy Rad. Woodford was proclaimed a township in 1854 and a police quarters was established there in 1857. The police station remained until 1917 when it was closed and police service from then on was provided from Warrnambool. The building was then used as a school residence and is now privately owned. In !940 Robert JELLIE, then a schoolboy, observed two rifles mounted on the wall of the disused stable at the rear of the old police building. Following the devastating flood of 1946 (see photograph above) the rifles were again seen in the room next to the stable but were not seen again until the building was sold by the Education Department many years later. It was a recognition of the historical value of the rifles which led to their donation to the Warrnambool Police Complex. The rifles have been authenticated by the Victoria Police Armoury as being Victoria Police issue some time before 1900. The rifles are an identical pair of the famous British-made Martini Henry, a .500 inch calibre military weapon widely used by British Colonial troops. Victoria Police and the wider community of Warrnambool are indebted to the members of the Woodford community for their fine gesture in donating the rifles for mounting so that their historical importance can be preserved and they can be displayed for generations to come. This display was funded by the Victoria Police Historical Society Incorporated, and presented on the first day of November, 1999.”flagstaff hill maritime museum and village, great ocean road, shipwreck coast, martini henry, victoria police, woodford police station, rifle, carbine, display case, british, martini henry carbine, breech-loaded, rifled, colonial, single-shot, .500 calibre, weapon, gun, 1877, troops, mounted troops, merri river, victoria police woodford, victoria police warrnambool, victoria police melbourne, police quarters, robert jellie, school residence, stable, 1946 flood, victoria police armoury, identical pair, british colonial troops, victoria police historical society incorporated, woodford, bicycles, found by a schoolboy, edwardian-style building, victoria police museum, warrnambool police station -
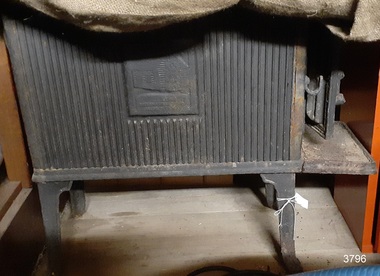 Flagstaff Hill Maritime Museum and Village
Domestic object - Wood Stove, circa 1880-1920
Stoves of this design are used for heating domestic places and were available in many designs and shapes. They commonly used wood as fuel and were not only used for heating but cooking as well. This stove was part of the original furnishings of the 1922 vessel 'Reginald M a South Australian costal trader it was made from material and fittings obtained from salvage yards. The vessel “Reginald M” was a two-masted coastal ketch, owned and built by Mr. Jack (John) Murch of Birkenhead, Port of Adelaide, South Australia. Its construction took approximately 6 months and it was launched at Largs Bay in 1922. Reginald M had a very shallow draft and a flat bottom that enabled it to come close to shore and to sit high and dry at low tide or to be beached on sand. The flat bottom was also to make the ship able to skim over reefs. Wagons could load and unload direct from her side. Her cargo included Guano, Barley, Wool, Horses, Cattle, Timber, Explosives, Potatoes, Shell Grit and Gypsum. On April 9th 1931Reginald M weathered a large storm in St Vincent Gulf, SA. The vessel suffered much damage; mast snapped and the crew labored for four hours to free her by chopping off the past and rigging. The crew patched her up and slowly returned to Port Adelaide with only a portion of the insured cargo being damaged. Her crew members at the time were owner Mr John H Murch of Wells Street Largs Bay, Skipper Mr R Murch John’s brother, Murray – son of Captain Murch and Seaman John Smith. Reg Webb purchased Carribie Station, at Marion in the Warooka District, south of Adelaide, in 1921. He cleared the land and farmed sheep and grain. In 1923 he shipped his own wool and grain from Marion Bay, having first carted 300 bags of the barley grain, 12 bags at a time, along the unmade track to the jetty. A photograph donated to Flagstaff Hill, dating about 1929 - 1942, shows two men on the Reginald M, holding between them their fishing catch of a large hammer shark. The photograph is stamped “GRENFELL STUDIO PORT LINCOLN PRINT” and titled “hammer shark caught on Reginald M”. The donor’s family lived on the Your Peninsular and dispatched their grain from a chute at Gleeson’s Landing to the awaiting transport vessel. Reg knew the Murch Brothers from Port Adelaide. The brothers had been using their ketch REGINALD M to ship Guano from the Islands, led by Captain Richard Murch. Reg approached them in 1934 about shipping grain from Marion Bay. The brothers visited the bay and thought it was an ideal place. They showed Reg where to stack his grain and they measured up the cliffs. When Reg was ready, they brought down and installed a ninety foot wooden chute. The bags of grain were then individually sent down the chute, landing in a waiting small boat then rowed to REGINALD M, 14 bags at a time. After 10 hours REGINALD M would be fully loaded with 1300 bags of grain and shipped to waiting ports. At one time a wild storm destroyed the chute but it was rebuilt and strengthened. REGINALD M was involved in shipping the grain from there until 1938. In 1940 Able Seaman Allan H Lucas served on Reginald M between September and December, being engaged and discharged from Port of Adelaide. His Certificate of Discharge was signed by ship’s Master W S Murch. It seems that at some stage Reginald M was used as a Customs vessel, as one photograph in Flagstaff Hill’s collection shows “H.M.C. No. 3, Pt Adelaide” on the bow. In 1969 the last freight left Marion Bay on the ketch REGINALD M carrying grain, wool and explosives. In late 1970 she was sold to the Mt. Lyell Mining and Railway Company and was used by them as a barge to carry explosives. In 1972 the Navy League of Strahan, Tasmania, purchased her for use by the Strahan Sea Cadet Unit to use at Macquarie Harbour and renamed her T.S. Macquarie. However this plan for use of Reginald M did not come to pass. In 1974 Mr. Andrew Rennie, of East Brighton, Melbourne, bought her for a similar purpose. , paying $5,000 and donating a ‘Cadet of the Year” trophy to the Sea Cadets. He sailed her from Strahan to Melbourne, planning to use her for pleasure sailing. In 1975 Reginald M was sold to Melbourne Ferry Company at auction. Later in 1975 the Reginald M was bought by Flagstaff Maritime Museum for $20,000 . She has been restored and is now one of the exhibits in the Village lagoon or lake. It was restored in 2006 using funds from a $4,000 government grant. Flagstaff Hill Maritime Village’s Collection holds several other artefacts associated with Reginald M. They include photographs of the Reginald M, including one photograph of her in Outer Harbour, S.A. dated 1947, with Skipper- R.F. Dale and Owner- John Murch. Another shows her docked at Port Adelaide, with the lettering H.M.C. No. 3 Pt ADEL (standing for His or Her Majesty’s Customs). The stove is significant as it represents the heating and cooking appliances used in late 19th and early 20th century, both on board vessels as well as for domestic purposes. The stove has additional significant for its association with the vessel "REGINALD M" a coastal trading ketch from South Australia built in 1922 at Largs Bay. It is one of very few sailing coastal trading vessels built in Australia with its flat bottom, single chine shape designed for navigating shallow water. See additional comments in the Production section this documents under Comments for further information regards the stove. Stove a cast-iron, rectangular, four-legged stove with a hinged front door. This stove was part of the original furnishings of the vessel 'Reginald M', built in Adelaide 1922. Image of a log cabin with an illegible inscription below it.flagstaff hil, warrnambool, flagstaff hill maritime museum, maritime museum, shipwreck coast, flagstaff hill maritime village, coastal trader, trading vessel, vessel reginald m, ketch, john murch ship builder, reg webb, carribie station, mt lyell copper company, queenstown navy league, andrew rennie, melbourne ferry company, r.f. dale, port adelaide vessel reginald m, macquarie training vessel, grenfell studio port lincoln, stove, domestic heating, domestic cooking, heater, cooking unit, wood fired stove, wood stove, wood-burning stove -
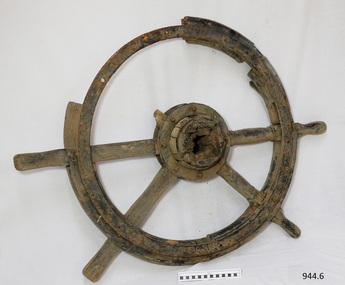 Flagstaff Hill Maritime Museum and Village
Equipment - Ship's Wheel, 1922
This ship's wheel was hand made from wood and metal using a recycled cart wheel. It originally belonged to the "Reginald M", a 2 masted, flat bottomed, coastal trading ketch with single chine. The REGINALD M The vessel “Reginald M” was a two-masted coastal ketch, owned and built by Mr. Jack (John) Murch of Birkenhead, Port of Adelaide, South Australia. Its construction took approximately 6 months and it was launched at Largs Bay in 1922. The Reginald M’s purpose was to serve the coastal trade of South Australia, to carry cargo cheaply and efficiently. It is believed that the keel was in fact hewn from two telegraph poles! Its builder frequented all the salvage yards for materials and fittings. Reginald M had a very shallow draft and a flat bottom that enabled it to come close to shore and to sit high and dry at low tide or to be beached on sand. The flat bottom was also to make the ship able to skim over reefs. Wagons could load and unload direct from her side. Her cargo included Guano, Barley, Wool, Horses, Cattle, Timber, Explosives, Potatoes, Shell Grit and Gypsum. On April 9th 1931Reginald M weathered a large storm in St Vincent Gulf, SA. The vessel suffered much damage; mast snapped and the crew laboured for four hours to free her by chopping off the past and rigging. The crew patched her up and slowly returned to Port Adelaide with only a portion of the insured cargo being damaged. Her crew members at the time were owner Mr John H Murch of Wells Street Largs Bay, Skipper Mr R Murch – John’s brother, Murray – son of Captain Murch and Seaman John Smith. Reg Webb purchased Carribie Station, at Marion in the Warooka District, south of Adelaide, in 1921. He cleared the land and farmed sheep and grain. In 1923 he shipped his own wool and grain from Marion Bay, having first carted 300 bags of the barley grain, 12 bags at a time, along the unmade track to the jetty. A photograph donated to Flagstaff Hill, dating about 1929 - 1942, shows two men on the Reginald M, holding between them their fishing catch of a large hammer shark. The photograph is stamped “GRENFELL STUDIO PORT LINCOLN PRINT” and titled “hammer shark caught on Reginald Emm”. The donor’s family lived on the Your Peninsular and despatched their grain from a chute at Gleeson’s Landing to the awaiting transport vessel. Reg knew the Murch Brothers from Port Adelaide. The brothers had been using their ketch REGINALD M to ship Guano from the Islands, led by Captain Richard Murch. Reg approached them in 1934 about shipping grain from Marion Bay. The brothers visited the bay and thought it was an ideal place. They showed Reg where to stack his grain and they measured up the cliffs. When Reg was ready, they brought down and installed a ninety foot wooden chute. The bags of grain were then individually sent down the chute, landing in a waiting small boat then rowed to REGINALD M, 14 bags at a time. After 10 hours REGINALD M would be fully loaded with 1300 bags of grain and shipped to waiting ports. At one time a wild storm destroyed the chute but it was rebuilt and strengthened. REGINALD M was involved in shipping the grain from there until 1938. In 1940 Able Seaman Allan H Lucas served on Reginald M between September and December, being engaged and discharged from Port of Adelaide. His Certificate of Discharge was signed by ship’s Master W S Murch. It seems that at some stage Reginald M was used as a Customs vessel, as one photograph in Flagstaff Hill’s collection shows “H.M.C. No. 3, Pt Adelaide” on the bow. In 1969 the last freight left Marion Bay on the ketch REGINALD M carrying grain, wool and explosives. In late 1970 she was sold to the Mt. Lyell Mining and Railway Company and was used by them as a barge to carry explosives. In 1972 the Navy League of Strahan, Tasmania, purchased her for use by the Strahan Sea Cadet Unit to use at Macquarie Harbour and renamed her T.S. Macquarie. However this plan for use of Reginald M did not come to pass. In 1974 Mr. Andrew Rennie, of East Brighton, Melbourne, bought her for a similar purpose. , paying $5,000 and donating a ‘Cadet of the Year” trophy to the Sea Cadets. He sailed her from Strahan to Melbourne, planning to use her for pleasure sailing. Also in 1975 Reginald M was sold to Melbourne Ferry Company at auction. Later in 1975 the Reginald M was bought by Flagstaff Maritime Museum for $20,000 . She has been restored and is now one of the exhibits in the Village lagoon or lake. It was restored in 2006 using funds from a $4,000 government grant. This ship's wheel is significant because of its association with the REGINALD M. REGNIALD M was a coastal trading ketch from South Australia built in 1922. It is one of very few sailing coastal trading vessels still extant, and its flat bottom, single chine shape illustrates a very simple but robust method of construction, compared to other round bilged examples of trading vessels. She is now listed on the Australian Register of Historic Vessels (ARHV Number: HV000562.)Ship’s wheel, also called a Helm, eight spoke design. Centre of wheel is handmade of wood and has iron rings around each side. The spokes are fitted into this wooden hub. The outer wheel has an iron ring on one side and sections of a wooden ring on the other. There are both original and modern bolt and screw fastenings. The wheel has remnants of black paint. This ship’s wheel was originally fitted to the ketch REGINALD M and removed during its restoration. flagstaff hill, warrnambool, shipwrecked-coast, flagstaff-hill, flagstaff-hill-maritime-museum, maritime-museum, shipwreck-coast, flagstaff-hill-maritime-village, ship's wheel, hand made ship's wheel, coastal trader, reginald m, ketch, john murch, ch murch, reg webb, carribie station, mt lyell copper company, queenstown navy league, andrew rennie, melbourne ferry company, r.f. dale -
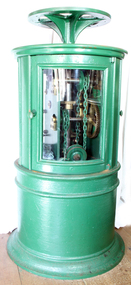 Flagstaff Hill Maritime Museum and Village
Machine - Dioptric Apparatus, mid 19th century
Before the introduction of electricity, lighthouses had a clockwork mechanism that caused the lens to rotate with a light source inside that was either powered by Kerosene or Colza oil. The mechanism consisted of a large weight attached by a cable through the centre of the lighthouse to the top where the cable wrapped around a barrel, drum or wheels that controlled the speed of the lights rotation by a clockwork mechanism. The keeper would crank the clockwork mechanism, which would lift the weight ready for the next cycle similar to an old grandfather clock mechanism. Once the weight lifted to its apex at the bottom of the first landing, the keeper would let it fall, which would pull on the cable, which would, in turn, operate a series of gears activating the rotation of the Fresnel optical lens, which would then rotate to create the lighthouse’s unique light speed of rotation characteristic. Creating a specific characteristic required a way to regulate the speed of the rotation, and was important as sailors could identify a particular light by its speed and time between flashes. The weight had to fall at a certain rate to create the proper rotation speed of the lens and a regulator within the mechanism accomplished this. History: From 1851, Chance Brothers became a major lighthouse engineering company, producing optical components, machinery, and other equipment for lighthouses around the world. James Timmins Chance pioneered placing lighthouse lamps inside a cage surrounded by Fresnel lenses to increase the available light output these cages, are known as optics and they revolutionised lighthouse design. Another important innovation from Chance Brothers was the introduction of rotating optics, allowing adjacent lighthouses to be distinguished from each other by the number of times per revolution the light flashes. The noted English physicist and engineer, John Hopkins invented this system while employed at Chance Brothers. Chance Brothers and Company was a glass works and originally based in Spon Lane, Smethwick, West Midlands England. The company became a leading glass manufacturer and a pioneer of British glass making technology. The Chance family originated in Bromsgrove as farmers and craftsmen before setting up a business in Smethwick near Birmingham in 1824. They took advantage of the skilled workers, canals and many other industrial advances taking place in the West Midlands at the time. Robert Lucas Chance (1782–1865), known as 'Lucas', bought the British Crown Glass Company's works in Spon Lane in 1824. The company specialised in making crown window glass, the company ran into difficulty and its survival was guaranteed in 1832 by investment from Chance's brother, William (1788 – 1856). William owned an iron factoring business in Great Charles Street, Birmingham. After a previous partnership that Lucas had dissolved in 1836, Lucas and William Chance became partners in the business which was renamed, Chance Brothers and Company. Chance Brothers invented many innovative processes and became known as the greatest glass manufacturer in Britain. In 1848 under the supervision of Georges Bontemps, a French glass maker from Choosy-le-Roi, a new plant was set up to manufacture crown and flint glass for lighthouse optics, telescopes and cameras. Bontemps agreed to share his processes that up to then had been secret with the Chance Brothers and stayed in England to collaborate with them for six years. In 1900 a baronetcy was created for James Timmins Chance (1814–1902), a grandson of William Chance, who had started the family business in 1771 with his brother Robert. Roberts grandson, James became head of Chance Brothers until his retirement in 1889 when the company became a public company and its name changed to Chance Brothers & Co. Ltd. Additional information: Lighthouses are equipped with unique light characteristic or flashing pattern that sailors can use to identify specific lighthouses during the night. Lighthouses can achieve distinctive light characteristics in a few different ways. A lighthouse can flash, which is when brief periods of light interrupt longer moments of darkness. The light can occult, which is when brief periods of darkness interrupt longer moments of light. The light can be fixed, which is when the light never goes dark. A lighthouse can use a combination of flashing, oscillating, or being fixed in a variety of combinations and intervals to create individual light characteristics. It is a common misconception that a lighthouse's light source changes the intensity to create a light characteristic. The light source remains constant and the rotating Fresnel lens creates the various changes in appearance. Some Fresnel lenses have "bulls-eye" panels create beams of light that, when rotated between the light and the observer, make the light appear to flash. Conversely, some lenses have metal panels that, when rotated between the light and the observer, make the light appear to go dark. This Dioptric clockwork apparatus used to turn a lighthouse optical lens is very significant as it is integral to a lighthouses operation, we can also look at the social aspect of lighthouses as being traditionally rich with symbolism and conceptual meanings. Lighthouses illustrate social concepts such as danger, risk, adversity, challenge and vigilance but they also offers guidance, salvation and safety. The glowing lamp reminds sailors that security and home are well within reach, they also symbolize the way forward and help in navigating our way through rough waters not just on the oceans of the world but in our personal lives be it financial, personal, business or spiritual in nature. Nothing else speaks of safety and security in the face of adversity and challenge quite the way a lighthouse does. Revolving dioptric clockwork apparatus used to turn a Fresnel optical lighthouse lens. A cylindrical cast metal pillar and cabinet painted green with 3 glass doors enclosing the top section. Inside the pillar/cabinet is a large clockwork mechanism used to turn and regulate a lighthouse light by means of weights and a chain attached to same. One door has the name "Adams Mare" in metallic dots similar to "Braille" to the inside edge of door frame.shipwrecked-coast, flagstaff-hill, flagstaff-hill-maritime-museum, flagstaff hill, maritime-museum, shipwreck-coast, warrnambool, flagstaff-hill-maritime-village, revolving dioptric mechanism, dioptric mechanism for lighthouse, lighthouse clockwork timing mechanism, acetylene lighthouse light mechanism, 19th century lighthouse mechanism, kerosene light, fresnel lenses, colza oil, chance brothers -
 Tarnagulla History Archive
Photograph - Photograph: Company's Dam and Flour Mill, Tarnagulla, c. 1880 - 1920
Williams Family Collection. On the 20th December 1873 it was reported in the Tarnagulla Courier that arrangements were being made for the erection of a steam flour mill at Tarnagulla. Mr Bristol had purchased the necessary plant which would be erected with as little delay as possible. The site chosen was the premises occupied previously by Mr John Pierce, grocer and wine and spirit merchant, at the corner of King and Commercial Road. These premises were incorporated in the mill building. Suitable buildings for receiving and storing grain and flour had been erected already. On 10th January, 1874 an advertisement in the Courier called for tenders from masons, bricklayers and carpenters for the erection of a flour mill at Tarnagulla for H. C. Bristol, Esq. with all enquiries to be made from G. Minto, Engineer. In December 1881 the proprietors made a request to the Tarnagulla Borough Council for permission to lay pipes to the Municipal Dam, which was generally known as the Company's Dam, and to obtain water from the dam for milling purposes. This was granted. Steam was got up for the first time on 30th of March, 1882. A large quantity of wheat was stored ready for milling. Just prior to 29th of April 1882 the boiler at the mill burst, as the result of which two men, J. H. Smith and W. Hargreaves died and H. Joyce Bousfield, senior and junior, were seriously injured. The mill commenced operations on 13th June, 1882 with Mr W Fitzgerald as manager. The price offered for wheat was thirty-seven pence per bushell. It operated with grinding stones until considerable renovations were done in the early part of 1899 when new rollers and more up to date equipment installed. The mill was then known as the Tarnagulla Flour Mill Co., with Thos. Comrie as proprietor, Mr Fitzgerald was still manager, and Mr T. Leonard was the traveller. Much new equipment was put in and each of the three floors had different processes. The rollers were on the ground floor, the purifiers and elevators reel were on the second floor, plus the clean wheat bin directly over the Ganz rollers. On the top floor was the chop reel, bran reel, inter-elevator reels, brush machine cyclone sack hoist, dirty wheat shaker, clean wheat bin, dust rooms and also double damping rooms. A plant was also erected for the making of an improved quality of wheaten meal, for which purpose special machinery was procured and a pair of stones was left for grinding the meal. A complete plant for the crushing of oats etc was also erected. The driving power of the mill was supplied by a new engine complete with 16 inch cylinder, manufactured and erected by Bousfield & Co. of Eaglehawk. It was fitted with Pickering governors, connected with the cylinder was a super heater. The boiler was tested and all connections etc. overhauled, with much of it being completely renewed. There was a complete network of belts, spouts, elevators etc. all over the building, all conveniently placed. The plans etc for the new plant were drawn up by Mr J. Kilborn, manager of the firm of Bodington & Co., engineers and millwrights of Carlton, which supplied the whole of the machinery, excepting the engine. The work of erection was carried out by Mr Kilborn and his assistants to the entire satisfaction of Mr Comrie, who had gone to considerable expense to bring the mill to a completely up-todate machine, fitted with all of the most modern appliances available. An advertisement on May 6th, 1899 read: "Tarnagulla Flour Mill Co., Patent Roller Flour. Also their Digestive Wheaten Meal specially prepared for Porridge or Bread." In January 1901, 6000 bags of wheat were received weekly at the mill and it was a common sight to see the streets lined with wagons. In May 1902 the mill was lighted by gas and in July 1906 an application was made to the Tarnagulla Borough Council for permission to lay a tram track from the mill to the Railways Station. Council was agreeable to this provided suitable plans were submitted. In 1913, 15,000 bags of wheat were bought at three shillings and four pence per bushell. In January 1914 the mill was renovated. At this time 1500 bags of wheat were coming in daily, with 20,000 bags in storage. On 15th December, 1917 the mill was advertised for sale, to be sold on Friday, 21st December,.1917, on behalf of the Estate of the Late Thomas Comrie, who had died on 4th August, 1910. The Courier at that time recorded him as being responsible for the building of the mill and with being the sole proprietor. The mill was closed, apparently, for a short period. The Courier reported on 13th of September, 1918 that the mill had been sold to Mr O. Albert of Talbot and that it would re-open. An advertisement read: ALBERT. O. & SON, MILLERS. During 1920 the mill was closed and pulled down. It was later re-erected at Mildura where it operated for many years. (by Donald Clark)Monochrome photograph depicting view of Company's Dam and the flour mill in Tarnagulla. Handwritten on reverse: 'J. Caldwell and photographer's stamp 'C. Bock Photo Tarnagulla'.tarnagulla -
Tarnagulla History Archive
Postcard - Photographic postcard: Company's Dam and Flour Mill, Tarnagulla, c. 1880 - 1920
Williams Family Collection. On the 20th December 1873 it was reported in the Tarnagulla Courier that arrangements were being made for the erection of a steam flour mill at Tarnagulla. Mr Bristol had purchased the necessary plant which would be erected with as little delay as possible. The site chosen was the premises occupied previously by Mr John Pierce, grocer and wine and spirit merchant, at the corner of King and Commercial Road. These premises were incorporated in the mill building. Suitable buildings for receiving and storing grain and flour had been erected already. On 10th January, 1874 an advertisement in the Courier called for tenders from masons, bricklayers and carpenters for the erection of a flour mill at Tarnagulla for H. C. Bristol, Esq. with all enquiries to be made from G. Minto, Engineer. In December 1881 the proprietors made a request to the Tarnagulla Borough Council for permission to lay pipes to the Municipal Dam, which was generally known as the Company's Dam, and to obtain water from the dam for milling purposes. This was granted. Steam was got up for the first time on 30th of March, 1882. A large quantity of wheat was stored ready for milling. Just prior to 29th of April 1882 the boiler at the mill burst, as the result of which two men, J. H. Smith and W. Hargreaves died and H. Joyce Bousfield, senior and junior, were seriously injured. The mill commenced operations on 13th June, 1882 with Mr W Fitzgerald as manager. The price offered for wheat was thirty-seven pence per bushell. It operated with grinding stones until considerable renovations were done in the early part of 1899 when new rollers and more up to date equipment installed. The mill was then known as the Tarnagulla Flour Mill Co., with Thos. Comrie as proprietor, Mr Fitzgerald was still manager, and Mr T. Leonard was the traveller. Much new equipment was put in and each of the three floors had different processes. The rollers were on the ground floor, the purifiers and elevators reel were on the second floor, plus the clean wheat bin directly over the Ganz rollers. On the top floor was the chop reel, bran reel, inter-elevator reels, brush machine cyclone sack hoist, dirty wheat shaker, clean wheat bin, dust rooms and also double damping rooms. A plant was also erected for the making of an improved quality of wheaten meal, for which purpose special machinery was procured and a pair of stones was left for grinding the meal. A complete plant for the crushing of oats etc was also erected. The driving power of the mill was supplied by a new engine complete with 16 inch cylinder, manufactured and erected by Bousfield & Co. of Eaglehawk. It was fitted with Pickering governors, connected with the cylinder was a super heater. The boiler was tested and all connections etc. overhauled, with much of it being completely renewed. There was a complete network of belts, spouts, elevators etc. all over the building, all conveniently placed. The plans etc for the new plant were drawn up by Mr J. Kilborn, manager of the firm of Bodington & Co., engineers and millwrights of Carlton, which supplied the whole of the machinery, excepting the engine. The work of erection was carried out by Mr Kilborn and his assistants to the entire satisfaction of Mr Comrie, who had gone to considerable expense to bring the mill to a completely up-todate machine, fitted with all of the most modern appliances available. An advertisement on May 6th, 1899 read: "Tarnagulla Flour Mill Co., Patent Roller Flour. Also their Digestive Wheaten Meal specially prepared for Porridge or Bread." In January 1901, 6000 bags of wheat were received weekly at the mill and it was a common sight to see the streets lined with wagons. In May 1902 the mill was lighted by gas and in July 1906 an application was made to the Tarnagulla Borough Council for permission to lay a tram track from the mill to the Railways Station. Council was agreeable to this provided suitable plans were submitted. In 1913, 15,000 bags of wheat were bought at three shillings and four pence per bushell. In January 1914 the mill was renovated. At this time 1500 bags of wheat were coming in daily, with 20,000 bags in storage. On 15th December, 1917 the mill was advertised for sale, to be sold on Friday, 21st December,.1917, on behalf of the Estate of the Late Thomas Comrie, who had died on 4th August, 1910. The Courier at that time recorded him as being responsible for the building of the mill and with being the sole proprietor. The mill was closed, apparently, for a short period. The Courier reported on 13th of September, 1918 that the mill had been sold to Mr O. Albert of Talbot and that it would re-open. An advertisement read: ALBERT. O. & SON, MILLERS. During 1920 the mill was closed and pulled down. It was later re-erected at Mildura where it operated for many years. (by Donald Clark)Photographic postcard, front image depicting view of Company's Dam and the flour mill in Tarnagulla. Handwritten on reverse: 'A Merry Christmas and a Happy New Year, E. Bool' and photographer's stamp 'C. Bock Photo Tarnagulla'.tarnagulla -
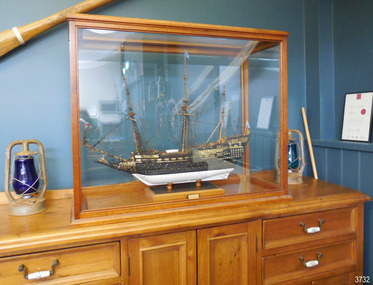 Flagstaff Hill Maritime Museum and Village
Craft - Ship Model, Sovereign of the Seas, Made between 1930-1955
This meticulously hand crafted ship model is one of the most intricate and challenging projects for a ship modeller to create. Jim Williams took up the challenge, choosing to make all of the components by hand, following a plan of the ship rather than purchasing a pre-made kit. He even made his own tools specifically for working with this model. The “Sovereign of the Seas” 1637-1697 - The magnificent ship “Sovereign of the Seas” was ordered by Charles I of England, who desired a giant Great Ship to be built. It was built by Peter Pett under the guidance of his father Phineas, the King's master shipwright, and launched with 102-guns at Woolwich Dockyard on 13th October 1637, as the Navy’s second three-decker first-rate ship. It was the most extravagantly decorated warship in the Royal Navy, bought with the help of a special 'Ship Money' tax imposed by the King. Soon afterwards the ship was remodelled and cut down to a safer and faster ship. Over the ship’s lifetime it was renamed “Commonwealth”, then in 1650 it became simply “Sovereign” then again after a rebuild in 1660 it was named “Royal Sovereign”. By 1642 the ship’s armament had been reduced to 90 guns. In 1651 Sovereign was made more manoeuvrable by reducing the upper works. It served throughout the wars of the Commonwealth and became the flagship of General Robert Blake. It was involved in all of the great English naval conflicts fought against the United Provinces and France and was referred to as 'The Golden Devil' by the Dutch. By 1660 the armament was changed attain to 100 guns. After the English Restoration, it was rebuilt as a first-rate ship of the line, with flatter gun decks and 100 guns, and most of the carvings were removed. During the First Anglo-Dutch War, in a secret session on 21 October 1652, the States-General of the Netherlands announced reward money for the crews of fire ships that succeeded in destroying enemy vessels; the Sovereign was singled out with an extra prize of 3000 guilders to sink or ruin it. Although repeatedly occupied by the Dutch, the Sovereign was retaken every time by the British and remained in service for nearly sixty years as the best ship in the English fleet. The Sovereign was in regular service during the three Anglo-Dutch Wars, surviving the Raid on the Medway in 1667. After a second rebuild in 1685 the Sovereign was relaunched as a first-rate ship of 100 guns, before taking part in the outset of the War of the Grand Alliance against Louis XIV of France, venturing into the Irish Sea, and later participating in the Battle of Beachy Head in 1690 and the Battle of La Hougue. At this time she was more than fifty years old. It was the first ship in history to fly ‘royals’ above the topgallant sails and a top gallant sail on the jigger-mast. The Sovereign eventually became leaky and defective with age and was laid up at Chatham when, on 27th January 1697, the famous ship caught fire, burning to the waterline. Jim Williams, the model’s maker - Jim (James Bernard) Williams was born in 1888 at The Forth in Scotland. He lived in Tasmania for some time and enlisted to fight in France in WW1. After the war he moved to Warrnambool, Victoria, where he worked at the Cramond & Dickson clothing store until the Great Depression in the 1930’s. He was later employed at Fletcher Jones Menswear, where he worked for 27 years until just before his death in 1959. Jim was a passionate ship model builder. He worked on his model ships between 1930 and 1955, including The Endeavour and The Sovereign of the Seas, which was one of the most intricate historic ship models to build. He had a table set up in a bay window and worked on them on and off using a jeweller's eye glass on the finer pieces. Jim’s long-time employer, Fletcher Jones, knew of Jim’s hobby and skill as a ship model builder and requested Jim to describe the model, Sovereign of the Seas, with the view of putting it on display. When the model was finished there was a full article and photo in The Standard newspaper. Jim described his work on the ship mode “Sovereign of the Seas” in correspondence to his then employer, Fletcher Jones. The document gives us an insight into his skill, patience, and regard for replicating the details of the original ship. Some of the details are: "In making the model the time taken to make certain items might be of interest. For instance "The Great Lantern" on the stern, four weeks, a similar time for the figurehead of St George & the Dragon. "The lower shrouds three to each side about six weeks & the rigging as whole several months. There are nearly 300 blocks and pulleys ranging from nearly 1 / 16 inch in diameter. Dead eyes were bored with 3 to 5 holes. To do this needles of different sizes, set in handles & ground to wedge ends were used. Glass cut and ground to shape were used windows. All gun-port covers (74) hinged. "All guns and anchors made of wood. Nothing for the model was purchased ready-made; everything hand made." Jim’s family donated the ship model along with many associated tools, accessories and papers. The model represents the Sovereign of the Seas. The Royal Navy ship of the line launched in 1637 has a significant British maritime heritage. These days the Sovereign of the Seas still remains one of the most intricate historic ship models to build, representing to the model enthusiast a true challenge to the art of model shipbuilding. The model of Sovereign of the Seas in Flagstaff Hill's collection is an exemplary example of a ship model built and hand crafted from a plan with the making of every item on the model, not a model kit with prefabricated parts. It was made by a local Warrnambool man Jim Williams as a leisure activity in the mid 20th century. The hobby and craft of ship model making has resulted in visual representations of the changes in maritime technology and advances in world-wide navigation. Ship model of HMS Sovereign of the Seas, a 17th century British warship. The handmade model is in wooden framed, airtight glass case. All components were hand crafted. Many of the tools used were made by the model maker, Jim Williams. An inscribed plaque is within the case. Inscribed on plaque "SOVEREIGN OF THE SEAS / 102 GUNS - 1634"flagstaff hill, warrnambool, shipwrecked coast, flagstaff hill maritime museum, maritime museum, shipwreck coast, flagstaff hill maritime village, great ocean road, model ship, vessel sovereign of the seas, jim williams, james bernard williams, the forth tasmania, freda williams, heather williams, phyllis bowditch, fletcher jones staff 1936, 17th century sailing ship, cramond and dickson, sovereign of the seas, royal sovereign, sovereign, charles 1, ship model -
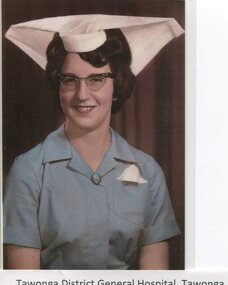 Kiewa Valley Historical Society
Photographs - Tawonga District General Hospital - Set of 21
In the early stages of the Kiewa Hydro-Electric Scheme the State Electricity Commission took over the financial and construction responsibility of the Tawonga District General Hospital building at a cost of 27,000 pounds. This included the removal and re-erection of the ex-military Bonegilla ward from Wodonga while in addition they carried out all the necessary building works that allowed the hospital to operate as a functional unit. The work was completed and handed over to the Hospital Committee of Management on September 1, 1949. Local residents raised 3,400 pounds through fund raising. The balance was met by the SEC and the Hospital and Charities Commission. The initial project was to provide for a basic temporary hospital which was later to include an Operating Theatre, Offices, Store, Mortuary and a Nurse’s Home, until the establishment of a permanent medical premises. Following the opening, 455 patients were admitted to the Tawonga District General Hospital and 254 operations were performed in the first year. The hospital relocated to Mount Beauty in the former SEC administration offices located in the town centre. Official opening of the 18 bed Tawonga District General Hospital on April 29 in 1961. Alpine Health CEO Mr Lyndon Seys oversaw the opening of the new Mount Beauty Hospital in November 2001 alongside Board of Management President Mr Andrew Randell, other board members and politicians. The Kiewa Hydro-Electric Scheme the State Electricity Commission played a pivotal part in the planning and initial funding of the Tawonga District General Hospital, with a view to providing medical support for its many workers on the Hydro scheme. Later, spouse and family members of workers were also able to access medical assistance The hospital was originally located in Tawonga away from the majority of the patients as the Hospital and Charities Board was not prepared to have it within the SEC controlled area. It was not until the gate at Tawonga South was taken down that the hospital was moved to the main centre of population at Mount Beauty. 1. Early nurses uniform; 2. Hospital Opening Ceremony; 3-7. Nursing Staff; 8. Delivery Room; 9. Mens Ward; 10.Enclosed Veranda; 11. Main Ward; 12-13. Kitchen; 14. Opening Ceremony 1949; 15.Original Hospital at Tawonga; 16-18. Relocated Hospital at Mt Beauty; 19. Rear of hospital and Matron’s quarters; 20. Hospital and Kiewa Valley House; 21. Renovated Hospital in 20001.Tawonga District General Hospital Tawonga; 2. Kiewa construction engineer Mr HHC Williams speaking at the opening of the hospital. Health Minister the Hon CP Gartside performed the official opening. L to R: TH Mitchell MLA; Manager of the hospital Mr RH Kronberg (obscured) Hon CP Gartside; CL McVilley; LT Knevitt; Matron AI Tarnish & W Sealey: 4. Dedicated Nursing Staff; 5. Nurse Campbell (nee Reid); 6. Sister Seager 1955 (nee Janice Burnett. First District Nurse; 7. L to R: Sister F Rosengrove; Sister J Griffiths; Matron AI Tarnish; Nurse D Satori; Nurse D Tregonning; Sister E Hill & Sister S O’Shannessy; 8. In the early years Tawonga District General Hospital had the second highest birth rate in Australia; 9. The men’s ward catered for men only in the early years of the hospitals operation; 10. The enclosed verandah at the original Tawonga District General Hospital allowed for an additional 10 beds; 11. Tawonga District General Hospital, Tawonga Main Ward. Ward ready and waiting for patients at Tawonga Hospital. Complete with lovely vases of flowers for every bed. Nice touch by the nurses; 12. Kitchen of Tawonga District General Hospital, Mt Beauty. The hospital kitchen provided meals for patients and a 3 course dinner for Meals on Wheels. In 1977, 11,795 meals were produced at an average cost of $2.60 per meal; 13. Tawonga District General Hospital, Tawonga. Kitchen. Kitchen staff employed in the old Tawonga District General Hospital 1949-1961; 14. The official opening ceremony of the Tawonga District General Hospital, 1949. The official ceremony was attended by a large number of residents and Tawonga District General Hospital was open for public inspection; 15. Original Tawonga District General Hospital transported form Bonegilla began operations in 1949; 16. In 1961, the Tawonga District General Hospital relocated to take a central position in the town of Mt Beauty in the former SEC Administration building; 19. The rear of the Tawonga District General Hospital and Matron’s house seen from Holland St, Mt Beauty during a snow storm in the mid 1960’s; 21. Tawonga District General Hospital & Kiewa Valley House, 2000. tawonga district hospital, mt beauty hospital, medical, health care, s.e.c. -
 Melbourne Tram Museum
Magazine, Yarra Trams, "Tramlines", 2004 - 2009
Set of 15 issues of Yarra Trams Magazine "Tramlines" All folded A3 unless noted otherwise. 1 - Issue 1 - August 2004 - staff event, message from CEO Hubert Guyot, new control centre, route 96, Olympic torch relay, tram 431, new livery, meet Johnpaul tram attendant. .1A - Issue 2 - December 2004 - customer satisfaction, tram attendants, remembrance day, CEO message, new routes, Camberwell depot, staff profile and tramways band. .2 - issue 3 - May 2005 - Fleet operations control centre opens, (photo), Balaclava Junction upgrade, grand union, Melbourne Uni superstop, fund raising. .3 - issue 4 - August 2005 - Congratulations to Lenny Bates 50, departure of Hubert, route 75 extended to Vermont South, fare evasion, trackwork and Superstops in Flinders St and Bourke St, East Preston Depot and think tram project. .4 - Issue 5 - December 2005 - folded A3 sheet, plain paper, colour photos - with articles on congestion, advertising campaign success re fare evaders, new platform stops in Flinders St, Network improvements and getting ready for the 2006 Commonwealth games featuring a cartoon poster of a tram in a race (see Reg item 1235 for the actual poster). Has a message from Dennis Cliche - new CEO. .5 - Issue 6 - May 2006 - folded A2 sheet, gloss paper, items re Commonwealth games, Karachi W-11 tram, Remembrance day, network improvements, Grand Prix, good Friday appeal, and the forthcoming centenary celebrations. Centre page spread has a large number of photos of staff during the Commonwealth Games. .6 - Issue 7 - October 2006 - folded A2 sheet, gloss paper, colour photos of the Centenary Art Tram (5006), Myki, network improvements, memories of 1906, Luna Party Tram (1011) with centre page spread of a photo of 5006 outside Luna Park, and the various tram images featured on the tramcar. See also Reg Item 864 for details of the making of the art work. .7 - Issue 8 - December 2006 - folded A3 sheet, gloss paper, colour photos of the "Tram It 2006" event, light rail, TramTracker being launched, Essendon, Centenary celebrations and "for the love of trams". .8 - Issue 9 - May 2007 - six pages - traffic condition, green depots, Joyce Barry, plaque at Brunswick Depot, fund raising, platform stops, trackwork, TramTracker, Police tram. .9 - Issue 10 - September 2007 - MSO tram, students travels, Transport Challenge 2007, website, TramTracker by SMS. .10 - Issue 11 - Melbourne trams a heritage icon, fund raising, TramTracker, cable tram tracks in Abbotsford St, route 86 to the Waterfront City Docklands, hailing trams. 11 - Issue 12 - Mulhouse tram, Bumblebee, on the docks, fundraising, St Kilda Road upgrades, TramTracker. .12 - Issue 13 - Bumblebee C2 class trams, traffic congestion, wind power tram, Flinders St trackwork. .13 - Issue 14 - Silver Paralympians on tram, green wind powered trams. .14 - Issue 15 - TramTracker Jake, film festival, Public Transport Ombudsman - Simon Cohen, Operations Centre, .15 - Issue 16 - 6 pages - tram performance, TramTracker at tram stops and iPhones, Mike Talks, Myki. All have the Yarra Trams logo on the front cover.trams, tramways, yarra trams, tickets, commonwealth games, flinders st, grand prix, karachi w-11 tram, construction, luna park, essendon depot, centenary, tramtracker, olympic games, control centre, balaclava junction, trackwork, grand union, melbourne university, superstops, vermont south, route 75, flinders st, bourke st, brunswick depot, cable trams, docklands, mulhouse, c2 class, flinders st, environment, ombudsman, myki, tramways band -
 Flagstaff Hill Maritime Museum and Village
Domestic object - Bowl, Late 19th or early 20th Century
The Process of Making Pottery Decorating, Firing, Glazing, Making, Technical There is a rhythm and flow to clay. It can’t be done all at once! Even the making process! It can take weeks to get everything done, especially if you can only work on your pottery once a week! Even though we have three hour classes, it’s often just not enough time! Here is an overview of some of the processes so you have a bit more grasp on some of the technical stuff! Step One – Design There are SO many ideas out there for making stuff in clay! From delicate porcelain jewellery, through to heavy sculptural work and everything in between. Deciding your direction is sometimes not that easy – when you first start, try everything, you will naturally gravitate to the style that you enjoy! The options and variations are endless and can get a wee bit overwhelming too! Check in with me before you start to ensure your ideas will work, what order you might do things, how you could achieve the look you are seeking and any other technical data required! Step Two – Making Clay is thixotropic. This means that as you work with it, the clay first gets sloppier and wetter, before is begins to dry in the atmosphere. For most things, you simply can’t do all parts of the project at once. An example of work order might look like: Get last weeks work out from the shelves Prepare clay for today’s work – roll your clay, prepare balls for throwing, make the first stage of a pinch pot) Clean up last week’s work and put it on the shelf for bisque firing Check that you have any glazing to do – and do enough of it that you will have time to finish your main project Do the next step of your next project – there might be a further step that can’t be complete immediately, in that case, wrap your work well and put onto the shelves. Letting your work rest for a while can really help keep your work clean and professional looking. Many things require bagging under plastic to keep it ready for work the next week – put your name on the outside of the bag so you can find your work easily. We have stickers and markers. Consider how you want to decorate your work – coloured slip can be applied at a fairly wet stage (remembering that it will make your work even wetter!). Trying to apply slip to dry clay won’t work! If you want to do sgraffito – you will need to keep the work leather hard (a state of dryness where you can still work the clay with a little effort and a little water and care). Step Three – Drying Most of the time your work can go into the rack uncovered to let it dry out for the following week. If you want to continue forming or shaping you will need to double bag your work – put your work on a suitable sized bat and put the bat in a bag so the base of the bag is under the bat, then put another bag over the top of the work and tuck the top of the bag under the bat. If you want to trim (or turn) your thrown work the following week, it should also be double bagged. If your work is large, delicate, or of uneven thicknesses, you should lightly cover your work for drying. When considering the drying process, bare in mind the weather, humidity and wind! The hotter and dryer, the faster things dry and work can dry unevenly in the shelves – this can lead to cracking – another time to lightly cover your work for drying. Step Four – Trimming and Cleaning Up Your work is dry! It is called greenware now and it is at it’s most fragile! Handle everything with two hands. I often refer to soft hands – keep everything gentle and with your fingers spread as much as possible. Try to not pick up things like plates too much, and always with both hands! Before your work can be bisque fired it should be “cleaned up”. You work won’t go into the kiln if it has sharp edges – when glazed, sharp edges turn into razor blades! Use a piece of fly wire to rub the work all over – this will scratch a little so be light handed. Use a knife or metal kidney to scrape any areas that require a bit more dynamic treatment than the fly wire offers! Finally, a very light wipe over with a slightly damp sponge can help soften and soothe all of your edges and dags! Trimming thrown work: If you are planning to trim (or turn) your thrown work (and you should be), make sure you bag it well – your work should be leather hard to almost dry for easiest trimming. Use this step to finish the work completely – use a metal kidney to polish the surface, or a slightly damp sponge to give a freshly thrown look. Wipe the sponge around the rim after trimming, and check the inside of the pot for dags! Trimming slip cast work: Usually I will trim the rims of your work on the wheel the following day to make that stage easier, however you will still need to check your work for lumps and bumps. Last but not least – check that your name is still clearly on the bottom of your work. Step Five – Bisque Firing When the work is completely dry it can go into the bisque kiln. The bisque kiln is fired to 1000°C. This process burns off the water in the clay as well as some of the chemically bound water. The structure of the clay is not altered that much at this temperature. Inside the bisque kiln, the work is stacked a little, small bowl inside a larger bowl and onto a heavy plate. Smaller items like decorations or drink coasters might get stacked several high. Consideration is paid to the weight of the stack and shape of the work. A bisque kiln can fire about one and a half times the amount of work that the glaze kiln can fire. The firing takes about 10 hours to complete the cycle and about two days to cool down. Once it has been emptied the work is placed in the glaze room ready for you to decorate! Step Six – Glazing Decorating your work with colour can be a lot of fun – and time consuming! There are three main options for surface treatment at this stage: Oxide Washes Underglazes Glazes Washes and underglazes do not “glaze” the work – It will still need a layer of glaze to fully seal the clay (washes don’t need glaze on surfaces not designed for food or liquid as they can gloss up a little on their own). Underglazes are stable colourants that turn out pretty much how they look in the jar. They can be mixed with each other to form other colours and can be used like water colours to paint onto your work. Mostly they should have a clear glaze on top to seal them. Oxides are a different species – the pink oxide (cobalt) wash turns out bright blue for instance. They don’t always need a glaze on top, and some glazes can change the colour of the wash! The glazes need no other “glaze” on top! Be careful of unknown glaze interactions – you can put any combination of glaze in a bowl or on a plate, but only a single glaze on the outside of any vertical surface! Glazes are a chemical reaction under heat. We don’t know the exact chemicals in the Mayco glazes we use. I can guess by the way they interact with each other, however, on the whole, you need to test every idea you have, and not run the test on a vertical surface! Simply put, glaze is a layer of glass like substance that bonds with the clay underneath. Clay is made of silica, alumina and water. Glaze is made of mostly silica. Silica has a melting point of 1700°C and we fire to 1240°C. The silica requires a “flux” to help it melt at the lower temperature. Fluxes can be all sorts of chemicals – a common one is calcium – calcium has a melting point of 2500°C, however, together they both melt at a much lower temperature! Colourants are metal oxides like cobalt (blue), chrome (green through black), copper (green, blue, even red!), manganese (black, purple and pink) iron (red brown), etc. Different chemicals in the glaze can have dramatic effects. for example, barium carbonate (which we don’t use) turns manganese bright pink! Other elements can turn manganese dioxide brown, blue, purple and reddish brown. Manganese dioxide is a flux in and of itself as well. So, glazes that get their black and purple colours, often interact with other glazes and RUN! Our mirror black is a good example – it mixes really well with many glazes because it fluxes them – causes them to melt faster. It will also bring out many beautiful colours in the glazes because it’s black colouring most definitely comes from manganese dioxide! Glaze chemistry is a whole subject on it’s own! We use commercial Mayco glazes on purpose – for their huge range of colour possibilities, stability, cool interactions, artistic freedom with the ability to easily brush the glazes on and ease of use. We currently have almost 50 glazes on hand! A major project is to test the interactions of all glazes with each other. That is 2,500 test tiles!!!! I’m going to make the wall behind the wheels the feature wall of pretty colours! Step Seven – Glaze (Gloss or sometimes called “Glost”) Firing Most of the time this is the final stage of making your creation (but not always!) The glaze kiln goes to 1240°C. This is called cone 6, or midrange. It is the low end of stoneware temperatures. Stoneware clays and glazes are typically fired at cone 8 – 10, that is 1260 – 1290°C. The energy requirement to go from 1240°C to 1280°C is almost a 30% more! Our clay is formulated to vitrify (mature, turn “glass-like”) at 1240°, as are our glazes. A glaze kiln take around 12 hours to reach temperature and two to three days to cool down. Sometimes a third firing process is required – this is for decoration that is added to work after the glaze firing. For example – adding precious metals and lustres. this firing temperature is usually around 600 – 800°C depending upon the techniques being used. There are many students interested in gold and silver trims – we will be doing this third type of firing soon! After firing your work will be in the student finished work shelves. Remember to pay for it before you head out the door! There is a small extra charge for using porcelain clay (it’s more than twice the price of regular clay), and for any third firing process! Once your work has been fired it can not turn back into clay for millennia – so don’t fire it if you don’t like it! Put it in the bucket for recycling. https://firebirdstudios.com.au/the-process-of-making-pottery/ The bowl is an example of kitchenware used in the 19th century and still in use today.Bowl white ceramic. Crack on side. Badly stained.Backstamp very faint and unable to be read.flagstaff hill, warrnambool, shipwrecked-coast, flagstaff-hill, flagstaff-hill-maritime-museum, maritime-museum, shipwreck-coast, flagstaff-hill-maritime-village, mixing bowl, food preparation, kitchen equipment, ceramic -
 Flagstaff Hill Maritime Museum and Village
Domestic object - Bowl
The Process of Making Pottery Decorating, Firing, Glazing, Making, Technical There is a rhythm and flow to clay. It can’t be done all at once! Even the making process! It can take weeks to get everything done, especially if you can only work on your pottery once a week! Even though we have three hour classes, it’s often just not enough time! Here is an overview of some of the processes so you have a bit more grasp on some of the technical stuff! Step One – Design There are SO many ideas out there for making stuff in clay! From delicate porcelain jewellery, through to heavy sculptural work and everything in between. Deciding your direction is sometimes not that easy – when you first start, try everything, you will naturally gravitate to the style that you enjoy! The options and variations are endless and can get a wee bit overwhelming too! Check in with me before you start to ensure your ideas will work, what order you might do things, how you could achieve the look you are seeking and any other technical data required! Step Two – Making Clay is thixotropic. This means that as you work with it, the clay first gets sloppier and wetter, before is begins to dry in the atmosphere. For most things, you simply can’t do all parts of the project at once. An example of work order might look like: Get last weeks work out from the shelves Prepare clay for today’s work – roll your clay, prepare balls for throwing, make the first stage of a pinch pot) Clean up last week’s work and put it on the shelf for bisque firing Check that you have any glazing to do – and do enough of it that you will have time to finish your main project Do the next step of your next project – there might be a further step that can’t be complete immediately, in that case, wrap your work well and put onto the shelves. Letting your work rest for a while can really help keep your work clean and professional looking. Many things require bagging under plastic to keep it ready for work the next week – put your name on the outside of the bag so you can find your work easily. We have stickers and markers. Consider how you want to decorate your work – coloured slip can be applied at a fairly wet stage (remembering that it will make your work even wetter!). Trying to apply slip to dry clay won’t work! If you want to do sgraffito – you will need to keep the work leather hard (a state of dryness where you can still work the clay with a little effort and a little water and care). Step Three – Drying Most of the time your work can go into the rack uncovered to let it dry out for the following week. If you want to continue forming or shaping you will need to double bag your work – put your work on a suitable sized bat and put the bat in a bag so the base of the bag is under the bat, then put another bag over the top of the work and tuck the top of the bag under the bat. If you want to trim (or turn) your thrown work the following week, it should also be double bagged. If your work is large, delicate, or of uneven thicknesses, you should lightly cover your work for drying. When considering the drying process, bare in mind the weather, humidity and wind! The hotter and dryer, the faster things dry and work can dry unevenly in the shelves – this can lead to cracking – another time to lightly cover your work for drying. Step Four – Trimming and Cleaning Up Your work is dry! It is called greenware now and it is at it’s most fragile! Handle everything with two hands. I often refer to soft hands – keep everything gentle and with your fingers spread as much as possible. Try to not pick up things like plates too much, and always with both hands! Before your work can be bisque fired it should be “cleaned up”. You work won’t go into the kiln if it has sharp edges – when glazed, sharp edges turn into razor blades! Use a piece of fly wire to rub the work all over – this will scratch a little so be light handed. Use a knife or metal kidney to scrape any areas that require a bit more dynamic treatment than the fly wire offers! Finally, a very light wipe over with a slightly damp sponge can help soften and soothe all of your edges and dags! Trimming thrown work: If you are planning to trim (or turn) your thrown work (and you should be), make sure you bag it well – your work should be leather hard to almost dry for easiest trimming. Use this step to finish the work completely – use a metal kidney to polish the surface, or a slightly damp sponge to give a freshly thrown look. Wipe the sponge around the rim after trimming, and check the inside of the pot for dags! Trimming slip cast work: Usually I will trim the rims of your work on the wheel the following day to make that stage easier, however you will still need to check your work for lumps and bumps. Last but not least – check that your name is still clearly on the bottom of your work. Step Five – Bisque Firing When the work is completely dry it can go into the bisque kiln. The bisque kiln is fired to 1000°C. This process burns off the water in the clay as well as some of the chemically bound water. The structure of the clay is not altered that much at this temperature. Inside the bisque kiln, the work is stacked a little, small bowl inside a larger bowl and onto a heavy plate. Smaller items like decorations or drink coasters might get stacked several high. Consideration is paid to the weight of the stack and shape of the work. A bisque kiln can fire about one and a half times the amount of work that the glaze kiln can fire. The firing takes about 10 hours to complete the cycle and about two days to cool down. Once it has been emptied the work is placed in the glaze room ready for you to decorate! Step Six – Glazing Decorating your work with colour can be a lot of fun – and time consuming! There are three main options for surface treatment at this stage: Oxide Washes Underglazes Glazes Washes and underglazes do not “glaze” the work – It will still need a layer of glaze to fully seal the clay (washes don’t need glaze on surfaces not designed for food or liquid as they can gloss up a little on their own). Underglazes are stable colourants that turn out pretty much how they look in the jar. They can be mixed with each other to form other colours and can be used like water colours to paint onto your work. Mostly they should have a clear glaze on top to seal them. Oxides are a different species – the pink oxide (cobalt) wash turns out bright blue for instance. They don’t always need a glaze on top, and some glazes can change the colour of the wash! The glazes need no other “glaze” on top! Be careful of unknown glaze interactions – you can put any combination of glaze in a bowl or on a plate, but only a single glaze on the outside of any vertical surface! Glazes are a chemical reaction under heat. We don’t know the exact chemicals in the Mayco glazes we use. I can guess by the way they interact with each other, however, on the whole, you need to test every idea you have, and not run the test on a vertical surface! Simply put, glaze is a layer of glass like substance that bonds with the clay underneath. Clay is made of silica, alumina and water. Glaze is made of mostly silica. Silica has a melting point of 1700°C and we fire to 1240°C. The silica requires a “flux” to help it melt at the lower temperature. Fluxes can be all sorts of chemicals – a common one is calcium – calcium has a melting point of 2500°C, however, together they both melt at a much lower temperature! Colourants are metal oxides like cobalt (blue), chrome (green through black), copper (green, blue, even red!), manganese (black, purple and pink) iron (red brown), etc. Different chemicals in the glaze can have dramatic effects. for example, barium carbonate (which we don’t use) turns manganese bright pink! Other elements can turn manganese dioxide brown, blue, purple and reddish brown. Manganese dioxide is a flux in and of itself as well. So, glazes that get their black and purple colours, often interact with other glazes and RUN! Our mirror black is a good example – it mixes really well with many glazes because it fluxes them – causes them to melt faster. It will also bring out many beautiful colours in the glazes because it’s black colouring most definitely comes from manganese dioxide! Glaze chemistry is a whole subject on it’s own! We use commercial Mayco glazes on purpose – for their huge range of colour possibilities, stability, cool interactions, artistic freedom with the ability to easily brush the glazes on and ease of use. We currently have almost 50 glazes on hand! A major project is to test the interactions of all glazes with each other. That is 2,500 test tiles!!!! I’m going to make the wall behind the wheels the feature wall of pretty colours! Step Seven – Glaze (Gloss or sometimes called “Glost”) Firing Most of the time this is the final stage of making your creation (but not always!) The glaze kiln goes to 1240°C. This is called cone 6, or midrange. It is the low end of stoneware temperatures. Stoneware clays and glazes are typically fired at cone 8 – 10, that is 1260 – 1290°C. The energy requirement to go from 1240°C to 1280°C is almost a 30% more! Our clay is formulated to vitrify (mature, turn “glass-like”) at 1240°, as are our glazes. A glaze kiln take around 12 hours to reach temperature and two to three days to cool down. Sometimes a third firing process is required – this is for decoration that is added to work after the glaze firing. For example – adding precious metals and lustres. this firing temperature is usually around 600 – 800°C depending upon the techniques being used. There are many students interested in gold and silver trims – we will be doing this third type of firing soon! After firing your work will be in the student finished work shelves. Remember to pay for it before you head out the door! There is a small extra charge for using porcelain clay (it’s more than twice the price of regular clay), and for any third firing process! Once your work has been fired it can not turn back into clay for millennia – so don’t fire it if you don’t like it! Put it in the bucket for recycling. https://firebirdstudios.com.au/the-process-of-making-pottery/ This bowl is an example of kitchenware used in the 19th century and still in use today.Bowl white ceramic plain that has two sets of edging around lip. Inside bowl has plaster designed to look like cooking mixture.flagstaff hill, warrnambool, shipwrecked-coast, flagstaff-hill, flagstaff-hill-maritime-museum, maritime-museum, shipwreck-coast, flagstaff-hill-maritime-village, kitchen equipment, ceramic