Showing 3173 items
matching destinations
-
 Ballarat Tramway Museum
Photograph - Ballast Motor - Hawthorn Depot, Ray Pearson, 1930's
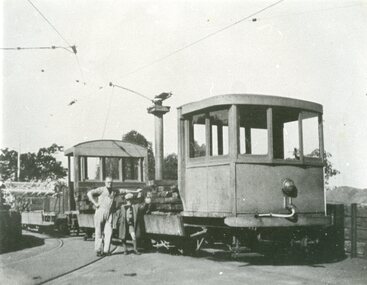
Black and white photograph of MMTB Ballast Motor No. 11 and trailer at Hawthorn Depot in the 1930's. The tram is loaded with sleepers. Photograph and details of the tramcar are given on pages 70 and 72 of Destination City, 4th Edition. Photograph from Ray Pearson Collection.Yields information about the the MMTB Ballast Motor and the sidings at Hawthorn Depot.Black and white photograph with notes on rear.On rear of both photographs "11 and Ballast Trailer, Hawthorn 1930's" and "B.T.P.S. Sales" in top and bottom left hand corners respectively in red ink.trams, tramways, melbourne, mmtb, hawthorn, ballast motor, work trams, tram 11 -
 Ballarat Tramway Museum
Photograph - Geelong 8 at East, Ken Winney, May 1947
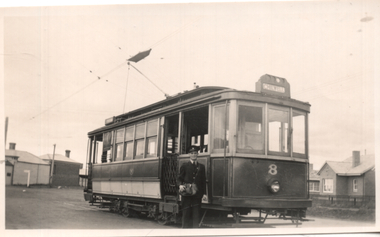
The photo shows Geelong No 8 at the East terminus with the conductor standing alongside. The tram has the destination of Chilwell. Note the large steel pan alongside the trolley pole to assist crews in locating the trolley pole on the overhead at night. Dated May 1947 on the rear.Yields information about the Geelong East terminus and tram 8.Black and white photograph with typed details on rear.Typed on rear SEC system Geelong, car no. 8 at "East". Ken Magor stamp and "K Winney" tramways, trams, geelong, tram 8, east -
 Melbourne Tram Museum
Negative - Copy - W5 808 The Esplanade St Kilda, Ray Pearson
Copy negative of a photograph of W5 808 in The Esplanade St Kilda near the corner with Fitzroy St. The tram entered service on 23/12/1937. The tram appears in a very new condition. The tram has the destination of Moreland. Photo considered to be post WW2Yields information about W5 808 soon after construction.Copy negative of a black and white photographtramcars, tramways, tram 808, st kilda, the esplanade, w5 class, moreland -
 Melbourne Tram Museum
Sign - Auxiliary Destination Board - Black Rock - Beaumaris, Victorian Railways (VR)
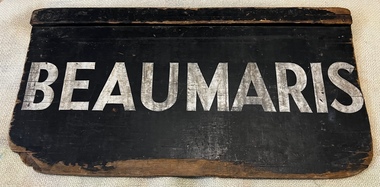
Used as a destination or auxiliary board on Sandringham trams and buses that operated from the Sandringham railway station tram/bus depot. Tram and bus services were operated by the Victorian Railways. Has been lettered on one side for Black Rock and the other Beaumaris.Demonstrates destination signs used by the Victorian Railways on their Sandringham services.Sign - plywood - 3 ply with a rebated timber section at the top of the sign, painted black with white letters. Two copies held.sandringham, vr trams, vr buses, signs, buses -
 Melbourne Tram Museum
Photograph - X2 676 Leeds St Footscray, Jim Seletto, c1960
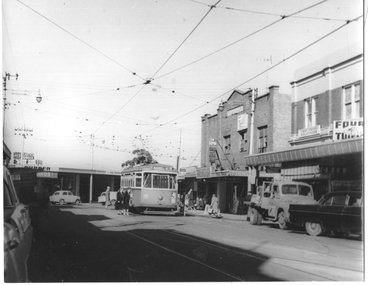
The photograph shows X2 class tram No. 676 with the destination of Russell St in Leeds St Footscray. Has the station buildings in the background as well as signs for Four & Twenty Pies, Ace Plastic & Rubber and a shore repair shop Photo by Jim Seletto c1960.Yields information about MMTB X2 676 and the Footscray Station terminus.Black and white photograph, with photographer's notes on the rear."Footscray Station, JSE6" and Jim Seletto stamp.trams, leeds st, footscray, x2 class, tram 676 -
 Melbourne Tram Museum
Photograph - Ballast Motor - Hawthorn Depot, Ray Pearson, 1930s
Black and white photograph of MMTB Ballast Motor No. 11 and trailer at Hawthorn Depot in the 1930's. The tram is loaded with sleepers. Photograph and details of the tramcar are given on pages 70 and 72 of Destination City, 4th Edition. Photograph from Ray Pearson Collection.Yields information about the the MMTB Ballast Motor and the sidings at Hawthorn Depot.Black and white photograph, with source notes on the rear.In ink "Perway siding Hawthorn" - Duplicate Ray Pearsontrams, mmtb, hawthorn depot, ballast motor, work trams, tram 11 -
 Melbourne Tram Museum
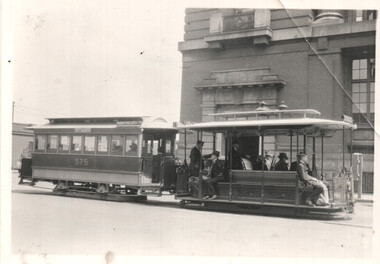
Photograph - Cable Tram 575 Bourke St at Spencer St, L A Clark, Dec. 1937
Photograph shows a cable tram set, trailer 575, at the Bourke St terminus Dec 1937 with the Mail Exchange building in the background. The conductor is selling a passenger on the grip car a ticket while the Gripman sits waiting for time. The tram has the destination of Northcote.Yields information about the Bourke St terminus in Dec. 1937Black and white photograph with notes on the rear.On rear in pencil "Bourke St Melbourne Dec. 1937", with stamp of L A Clark, and photo Number 642 written in. Has the number "54" in pencil in top right-hand corner. tramways, cable trams, bourke st, tram 575, conductor, gripmen -
 Melbourne Tram Museum
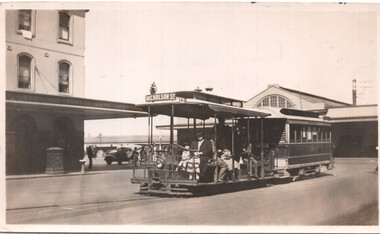
Photograph - Cable Tram 384 Bourke St at Spencer St, Ken Matthews, Oct. 1940
Photograph shows a cable tram set, trailer 384, at the Bourke St terminus Oct. 1940 with passengers on the Grip car. In the background is the Spencer St station buildings and Carlyon's hotel. The tram has the destination of Nicholson St and shows run number 12.Yields information about the Bourke St terminus in Oct. 1940Black and white photograph with notes on the rear.On rear in pencil "Melbourne cable trams, Oct 1940" and Ken Magor stamp, N Boxall stamp with number 56-26AA, and a note Per Ken Matthews. Has the number "11" in pencil in top right-hand corner. tramways, cable trams, bourke st, tram 384 -
 Melbourne Tram Museum
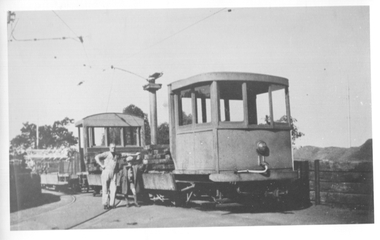
Negative - Cable tram at Port Melbourne, Wal Larsen, 6/3/1937
Photo of a cable tram set at the Port Melbourne terminus, with the grip man and conductor on the grip car. Trailer 449. In the background is Station Pier and shipping. The grip car has the destination of Collins St on the front and "Connects with Collins St electric cars" on the side. Yields information about the Port Melbourne cable tram terminus March 1937, prior to its closure soon after.Negative of a cable grip car at the Port Melbourne terminus. - Black and white print also held.Written on rear of album print "Cable tram No. 449 at Port Melbourne terminus" Written on the back of the second copy is "Graham St Port Melbourne on last day of advertised running although they went on for another week. No. 449, 6 March 1937. photo Wal Larsen." In ink "PSM 3" and in pencil in top right hand corner "176"trams, tramways, cable trams, port melbourne, station pier, tram 449 -
 Melbourne Tram Museum
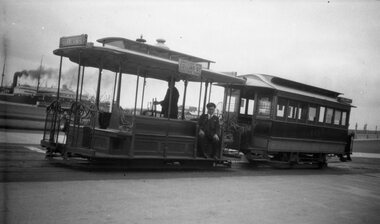
Photograph - Queens Parade Clifton Hill - cable tram set, Frank Shennen, c1940
Photograph shows car 586 in Queens Parade, Clifton Hill with the rail line and over bridge in the background. The grip mechanism has been lifted. The tram has the destination of Spencer St. Same handwriting as that of Frank Shennen though it may not be his photograph. Yields information about Clifton Hill cable tram depot and tram 586.Black and white photograph with notes on the rear.On rear in pencil "Car 586, possibly at Clifton Hill." Has the number "179" in pencil in top right-hand corner.tramways, cable trams, clifton hill, tram 586, clifton hill depot -
 Melbourne Tram Museum
Souvenir - Fridge Magnet, Toplite, "G' Day Australia", c2010
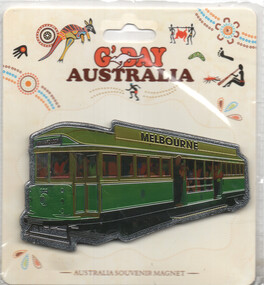
Fridge magnet featuring a Melbourne W2 class tram, 258, with the destination of Wynyard Loop (Auckland). This tram ran in Auckland in this configuration. Was tram 421 in Melbourne - see reference. Has an semi-open drop centre and a roof sign "Melbourne". Made by Toplite.Demonstrates a Souvenir featuring a Melbourne W class tram.Plastic printed colour fridge magnet mounted onto a card within its plastic envelope for sale.trams, tramways, melbourne, w2 class, fridge magnet, auckland -
 Ballarat Tramway Museum
Negative - Set of 5, Campbell Duncan, Carey Grammar school visit to Ballarat, 13/09/1969 12:00:00 AM
Yields information about the visit of the Carey Grammar school visit to Ballarat and the Eureka siding in 1969.Set of five negatives of the Carey Railway Club visit to Ballarat on Saturday 13/9/1969. .1 - 34 with the destination of Mt Pleasant at Carlton St loop, though running a Special .2 - 17 and 34 with another single trucker at Gardens Loop - 17 has a Twin Lakes sign and destination of Gardens via Sturt St West. 34 showing Special. .3 - side on view of 34 at Carlton St Loop - with a SEC electric cooking roof advert. .4 - DERM entering the Eureka Siding. .5 - DERM leaving the Eureka Siding, has the Millar Bros engineering works in the background.trams, tramways, tours, eureka, wendouree parade, carlton st loop, carlton st, railways, tram 34, tram 17 -
 Ballarat Tramway Museum
Photograph - Black & White Photograph/s - set of 4, Richard Gilbert, c August 1971
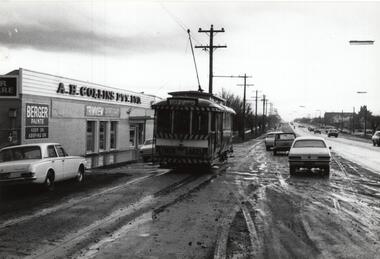
Yields information about the appearance of the Sebastopol line shortly before the closure of the first of the Ballarat tram lines. Series of 4 Black and white photographs of tram operations on the Sebastopol line, during August 1971. .1 - Tram 12, with the destination of Grey St and a twin lakes sign, pass the A H Collins hardware store, with adverts for Berger Paints and Trimview windows. shows the nature of Albert St after rain. .2 - Trams 27 (Sebastopol with a Twin Lakes sign) crossing 32 at the Grey St loop. .3 - Tram 12, showing Depot via Drummond North southbound in Albert St Sebastopol. .4 - Tram 26 at the Sebastopol terminus showing City Oval as its next destination. This may not be correct.trams, tramways, sebastopol, albert st, grey st, tram 12, tram 27, tram 26, tram 32 -
 Ballarat Tramway Museum
Postcard, Nu-color-vue or Nucolorvue Productions, Spring St Melbourne
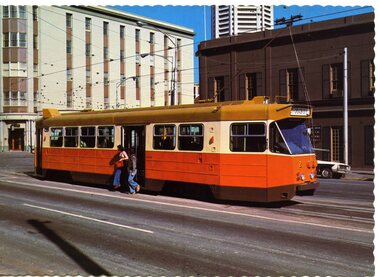
Colour postcard with serrated edges of MMTB Z class tram No. 2 in Spring St. Melbourne about to turn into Bourke St. Has two people stepping out of tram onto safety zone (no barriers). Tram has destination of "CITY - SPENCER ST." In background are the buildings of the Windsor Hotel, the Imperial Hotel and Nauru House. On rear of card is name of company "Nucolorvue" and caption "Melbourne Australia / Melbourne's new Z class tram Number 2.", card number NCV1419 in place for postage stamp, and copyright and symbols. See Destination City re introduction of Z class trams (1975)trams, tramways, spring st, melbourne, z class trams, tram 30, tram 25, tram 28, tram 5, tram 19 -
 Ballarat Tramway Museum
Photograph - Colour Photograph/s, 21/11/1962 12:00:00 AM
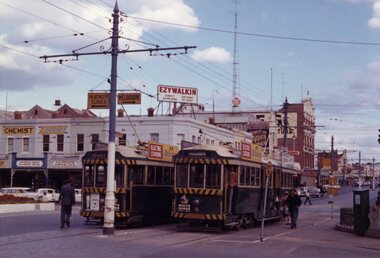
Colour print of Bendigo SECV Bendigo trams 2 and 4 at Charing Cross. On Kodacolor paper with a Kodak red ink stamp on rear. Trams have dash canopy lights, but no large white strip under the drivers windows. Photo dated 21.11.1962. Buildings on corner of Pall Mall and Mitchell St in background. Both trams fitted with roof ads and dash canopy ads - White Horse Whiskey. Shows "safety zone" arrangements. No. 2 has destination of "Quarry Hill" while 4 has destination of "Eaglehawk". Has a number of passengers boarding trams. Note "PYE" name on radio tower mast.On rear top left hand corner "2 and 4 / 21.11.62" in very wavy handwriting, typical of an aged person.charing cross, bendigo, mitchell st., safety zone, tram 2, tram 4 -
 Ballarat Tramway Museum
Photograph - Colour Photograph/s, Dave Macartney, 1963
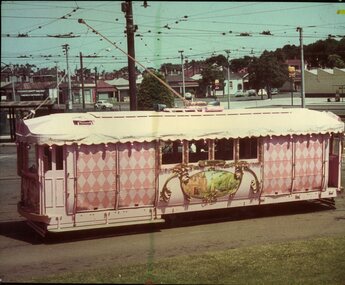
Colour print with black borders of MMTB Works car No. 16 (later 16W), decorated for Myers Emporium at South Melbourne Depot. Destination City, 4th Edition, page 100 gives dates of this car decorated for Myers as being 11/59 to 12/59 and 11/63 to 12/63. Photo taken of 1963 tram by Dave Macartney. Tram fitted with trolley pole skid, two speakers and has a Cinderella scene painted on the side of the tram. Buildings in Hanna Street (later Kingsway) visible, Golden Fleece Service station in background. See Destination City, 4th Edition, page 100decorated trams, myers, south melbourne, work trams, tram 16, tram 16w -
 Ballarat Tramway Museum
Photograph - Black & White Photograph/s
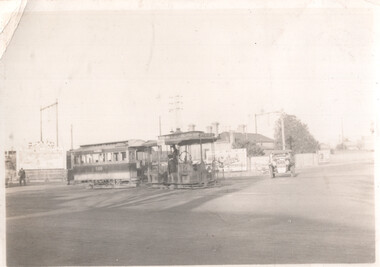
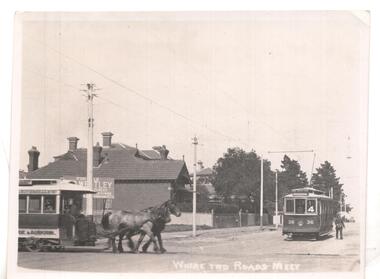
Black & white photo ex Postcard? titled 'Where two roads meet', showing a horse tram ( Hawthorn Bridge to Auburn Road (Riversdale Road) and Prahran and Malvern No. 36 on Glenferrie Road with Deepdene destination, at the intersection of Riversdale & Glenferrie Roads, Hawthorn. Corner block (SE) behind photo has a 'For Sale' sign on it, with houses in background. Now a block of shops. Tram No. 36 is an F class car, later renumbered - see p14 of Destination City, 4th edition. See also inscriptions. Questions: How horse tram number determined and date of photograph??`` Reimaged 17/7/2017 both front and back.'T101, No. 26 horse tram of Hawthorn Tramway Trust in Riversdale Road. No. 36 toastrack (enclosed cross seat) of the Prahran & Malvern Trams in Glenferrie Road, Hawthorn 1917. Horse trams ran from Auburn Road to Hawthorn Bridge and connected with the Richmond cable trams. W.Jack.'trams, tramways, pmtt, horse trams, riversdale road, glenferrie rd , tram f 36 -
 Melbourne Tram Museum
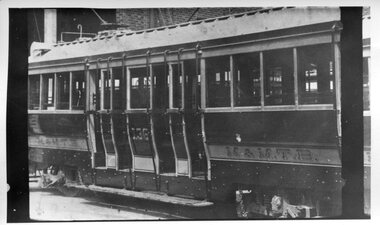
Photograph - Black and White Photos - MMTB P Class Tram 136 at Hawthorn, pre May 1925
Photo shows one of the Maximum Traction Bogies trams built for the Hawthorn Tramways Trust by Duncan and Fraser of Adelaide in 1917-1918. Photographed in the Hawthorn Depot some time before May 1925. This tram began its life as HTT No. 30. The body was sold in 1944. The full photo appears on page 17 of Tramway by the River.Yields information about early liveries of MMTB ex HTT bogie trams.Two photos of former HTT bogie tram No. 136 at Hawthorn Depot before May 1925. On rear of photo 1, it is noted that the paintwork was that before May 1925. Other notations (1) Long piece of barrier rail along drop centre (2) Monogram (HTT) on saloon doors (3) Triple railings over bulkhead windows (4) Cylindrical destination box (on rear). Notes on photo 2, (1) paintwork was that before May 1925 (2) Route No D (3) Monogram (HTT) on saloon door (4) Triple railings over bulkhead window (5) Old destination box (6) Iron gates.See notes above.tramways, trams, hawthorn depot, tram 136, mmtb, htt, p class, route d -
 Melbourne Tram Museum
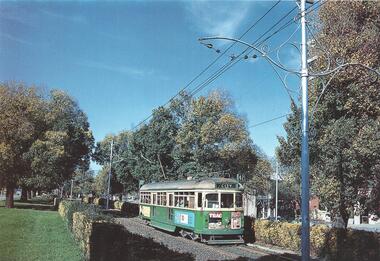
Postcard, Kew Depot Committee - AETA, "Seattle", 1991
Postcard - full colour, Divided back type of SW5 840 inbound in Victoria Parade May 1973 with the destination of City, Route 42. Note the hedges on either side of the tram reservation. Tram has front advertisements for TEAC sound equipment and Courage Draught. On the rear has a photo of a destination blind - showing Kew Depot with the words "75 years of Service" underneath, address and stamp blocks, PMTT logo with an A class tram in the centre. In the bottom left hand corner are the details of the photo, printer - Biscay Greetings and photographer - Ray Marsh and the number T102. 2nd copy added 15/9/2020.trams, tramways, postcards, kew depot, victoria parade, celebrations, pmtt, tram 840, sw5 class, mmtb -
 Flagstaff Hill Maritime Museum and Village
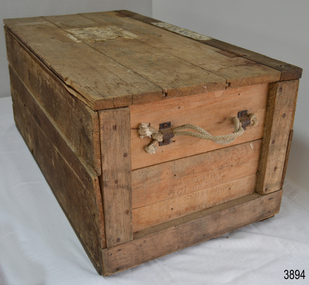
Container - Trunk, Doctor William Roy Angus M.B., B.S., Adel., 1923, F.R.C.S. Edin.,1928, c. late 1930's
This trunk was donated to Flagstaff Hill Maritime Village by the family of Doctor William Roy Angus, Surgeon and Oculist. It is part of the “W.R. Angus Collection” that includes historical medical equipment, surgical instruments and material once belonging to Dr Edward Ryan and Dr Thomas Francis Ryan, (both of Nhill, Victoria) as well as Dr Angus’ own belongings. The Collection’s history spans the medical practices of the two Doctors Ryan, from 1885-1926 plus that of Dr Angus, up until 1969. The trunk was used by Dr. Angus when he served as Surgeon Captain for the Australian Army during WW2. At that time his residence was in Warrnambool. His time of service was spent in Ballarat, Victoria, and in Bonegilla, N.S.W. The portion of the paper label on the trunk that ends in an 'a' is possible the end of the word 'Bonegilla', where his trunk could have been sent. ABOUT THE “W.R.ANGUS COLLECTION” Doctor William Roy Angus M.B., B.S., Adel., 1923, F.R.C.S. Edin.,1928 (also known as Dr Roy Angus) was born in Murrumbeena, Victoria in 1901 and lived until 1970. He qualified as a doctor in 1923 at University of Adelaide, was Resident Medical Officer at the Royal Adelaide Hospital in 1924 and for a period was house surgeon to Sir (then Mr.) Henry Simpson Newland. Dr Angus was briefly an Assistant to Dr Riddell of Kapunda, then commenced private practice at Curramulka, Yorke Peninsula, SA, where he was physician, surgeon and chemist. In 1926, he was appointed as new Medical Assistant to Dr Thomas Francis Ryan (T.F. Ryan, or Tom), in Nhill, Victoria, where his experiences included radiology and pharmacy. In 1927 he was Acting House Surgeon in Dr Tom Ryan’s absence. Dr Angus had become engaged to Gladys Forsyth and they decided he further his studies overseas in the UK in 1927. He studied at London University College Hospital and at Edinburgh Royal Infirmary and in 1928, was awarded FRCS (Fellow from the Royal College of Surgeons), Edinburgh. He worked his passage back to Australia as a Ship’s Surgeon on the on the Australian Commonwealth Line’s T.S.S. Largs Bay. Dr Angus married Gladys in 1929, in Ballarat. (They went on to have one son (Graham 1932, born in SA) and two daughters (Helen (died 12/07/1996) and Berenice (Berry), both born at Mira, Nhill ) Dr Angus was a ‘flying doctor’ for the A.I.M. (Australian Inland Ministry) Aerial Medical Service in 1928 . Its first station was in the remote town of Oodnadatta, where Dr Angus was stationed. He was locum tenens there on North-South Railway at 21 Mile Camp. He took up this ‘flying doctor’ position in response to a call from Dr John Flynn; the organisation was later known as the Flying Doctor Service, then the Royal Flying Doctor Service. A lot of his work during this time involved dental surgery also. Between 1928-1932 he was surgeon at the Curramulka Hospital, Yorke Peninsula, South Australia. In 1933 Dr Angus returned to Nhill and purchased a share of the Nelson Street practice and Mira hospital (a 2 bed ward at the Nelson Street Practice) from Dr Les Middleton one of the Middleton Brothers, the current owners of what previously once Dr Tom Ryan’s practice. Dr Tom and his brother had worked as surgeons included eye surgery. Dr Tom Ryan performed many of his operations in the Mira private hospital on his premises. He had been House Surgeon at the Nhill Hospital 1902-1926. Dr Tom Ryan had one of the only two pieces of radiology equipment in Victoria during his practicing years – The Royal Melbourne Hospital had the other one. Over the years Dr Tom Ryan had gradually set up what was effectively a training school for country general-practitioner-surgeons. Each patient was carefully examined, including using the X-ray machine, and any surgery was discussed and planned with Dr Ryan’s assistants several days in advance. Dr Angus gained experience in using the X-ray machine there during his time as assistant to Dr Ryan. When Dr Angus bought into the Nelson Street premises in Nhill he was also appointed as the Nhill Hospital’s Honorary House Surgeon 1933-1938. His practitioner’s plate from his Nhill surgery is now mounted on the doorway to the Port Medical Office at Flagstaff Hill Maritime Village, Warrnambool. When Dr Angus took up practice in the Dr Edward and Dr Tom Ryan’s old premises he obtained their extensive collection of historical medical equipment and materials spanning 1884-1926. A large part of this collection is now on display at the Port Medical Office at Flagstaff Hill Maritime Village in Warrnambool. In 1939 Dr Angus and his family moved to Warrnambool where he purchased “Birchwood,” the 1852 home and medical practice of Dr John Hunter Henderson, at 214 Koroit Street. (This property was sold in1965 to the State Government and is now the site of the Warrnambool Police Station. and an ALDI sore is on the land that was once their tennis court). The Angus family was able to afford gardeners, cooks and maids; their home was a popular place for visiting dignitaries to stay whilst visiting Warrnambool. Dr Angus had his own silk worm farm at home in a Mulberry tree. His young daughter used his centrifuge for spinning the silk. Dr Angus was appointed on a part-time basis as Port Medical Officer (Health Officer) in Warrnambool and held this position until the 1940’s when the government no longer required the service of a Port Medical Officer in Warrnambool; he was thus Warrnambool’s last serving Port Medical Officer. (Masters of immigrant ships arriving in port reported incidents of diseases, illness and death and the Port Medical Officer made a decision on whether the ship required Quarantine and for how long, in this way preventing contagious illness from spreading from new immigrants to the residents already in the colony.) Dr Angus was a member of the Australian Medical Association, for 35 years and surgeon at the Warrnambool Base Hospital 1939-1942, He served as a Surgeon Captain during WWII1942-45, in Ballarat, Victoria, and in Bonegilla, N.S.W., completing his service just before the end of the war due to suffering from a heart attack. During his convalescence he carved an intricate and ‘most artistic’ chess set from the material that dentures were made from. He then studied ophthalmology at the Royal Melbourne Eye and Ear Hospital and created cosmetically superior artificial eyes by pioneering using the intrascleral cartilage. Angus received accolades from the Ophthalmological Society of Australasia for this work. He returned to Warrnambool to commence practice as an ophthalmologist, pioneering in artificial eye improvements. He was Honorary Consultant Ophthalmologist to Warrnambool Base Hospital for 31 years. He made monthly visits to Portland as a visiting surgeon, to perform eye surgery. He represented the Victorian South-West subdivision of the Australian Medical Association as its secretary between 1949 and 1956 and as chairman from 1956 to 1958. In 1968 Dr Angus was elected member of Spain’s Barraquer Institute of Barcelona after his research work in Intrasclearal cartilage grafting, becoming one of the few Australian ophthalmologists to receive this honour, and in the following year presented his final paper on Living Intrasclearal Cartilage Implants at the Inaugural Meeting of the Australian College of Ophthalmologists in Melbourne In his personal life Dr Angus was a Presbyterian and treated Sunday as a Sabbath, a day of rest. He would visit 3 or 4 country patients on a Sunday, taking his children along ‘for the ride’ and to visit with him. Sunday evenings he would play the pianola and sing Scottish songs to his family. One of Dr Angus’ patients was Margaret MacKenzie, author of a book on local shipwrecks that she’d seen as an eye witness from the late 1880’s in Peterborough, Victoria. In the early 1950’s Dr Angus, painted a picture of a shipwreck for the cover jacket of Margaret’s book, Shipwrecks and More Shipwrecks. She was blind in later life and her daughter wrote the actual book for her. Dr Angus and his wife Gladys were very involved in Warrnambool’s society with a strong interest in civic affairs. He had an interest in people and the community They were both involved in the creation of Flagstaff Hill, including the layout of the gardens. After his death (28th March 1970) his family requested his practitioner’s plate, medical instruments and some personal belongings be displayed in the Port Medical Office surgery at Flagstaff Hill Maritime Village, and be called the “W. R. Angus Collection”. The W.R. Angus Collection is significant for still being located at the site it is connected with, Doctor Angus being the last Port Medical Officer in Warrnambool. The collection of medical instruments and other equipment is culturally significant, being an historical example of medicine from late 19th to mid-20th century. Dr Angus assisted Dr Tom Ryan, a pioneer in the use of X-rays and in ocular surgery. Trunk, handmade, from the W.R. Angus Collection. Wooden trunk, rope handles on ends, metal hinges, previously closed by nails. Trunk has labels with names and destinations. Stamped into wood on end is text from original timber. One paper label is peeling off.Metal label “Captain W. R. Angus” (black writing on white metal label). On lid in blue writing “Captain W.R. Angus”. Paper label “Captain W.R. Angus, 214 Koroit Street, Warrnambool, Victoria. V 141633 (looks like)”. Obscured label “ - - a Rail Station”.flagstaff hill, warrnambool, shipwrecked coast, flagstaff hill maritime museum, maritime museum, shipwreck coast, flagstaff hill maritime village, great ocean road, dr w r angus, t.s.s. largs bay, warrnambool base hospital, flying doctor, medical treatment, surgeon captain w.r. angus, ww2 service ballarat, ww2 service bonegilla, wooden trunk, military service, trunk for personal effects storage -
 Bendigo Historical Society Inc.
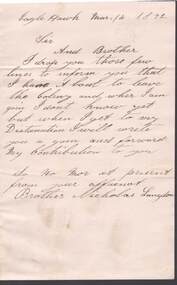
Document - ANCIENT ORDER OF FORESTERS NO. 3770 COLLECTION: CORRESPONDENCE
Letter written on white paper and dated Mar,/4. 1872. Letter from Nicholas Langdon mentioning that he was about to leave the Colony and doesn't know where he is going, but when he gets to his destination he will write again and forward his Contribution.societies, aof, correspondence, ancient order of foresters no. 3770 collection - correspondence, nicholas langdon -
 Ballarat Tramway Museum
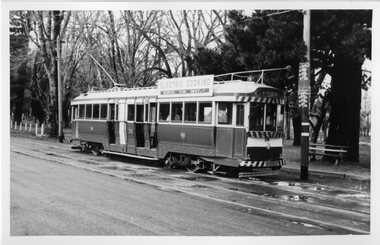
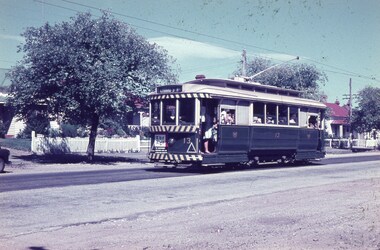
Photograph - Black & White Photograph/s, Len Millar, 1969
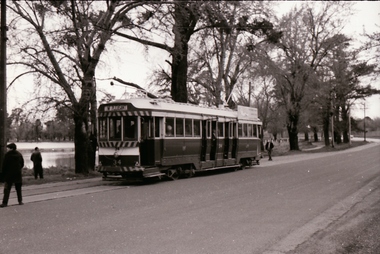
Yields information about the tram services in Ballarat in particular at the Gardens terminus.Black and white photograph on card paper of SEC tram 35 at the Gardens terminus in Wendouree Parade. The tram has the destination of Mt Pleasant and an Electric Cooking roof advertisement. The tram stop pole has the two timetable boards. Photo by Len Millar during 1969.Detailed notes on rear in ink and pencil by Len Millar and Keith Kings - see image i2.trams, tramways, gardens loop, wendouree parade, tram stops, tram 35 -
 Ballarat Tramway Museum
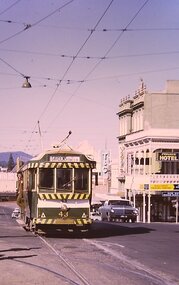
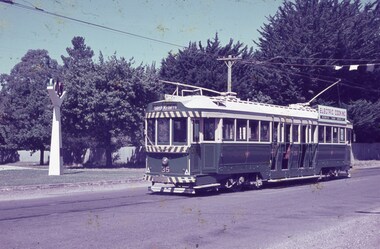
Photograph - Digital image, W. J. Llewelyn, 1/01/1970 12:00:00 AM
Yields information about the intersection of Sturt and Lydiard St.Digital images of tram 43 crossing Lydiard St in Sturt St, with destination of Gardens via Sturt St West. Has the T&G sign, Mechanics Institute and the Unicorn Hotel in the view. Photo by Chris Phillips. Image dated 1/1/1970 - to be confirmed. trams, tramways, sturt st, lydiard st, city, tram 43 -
 Ballarat Tramway Museum
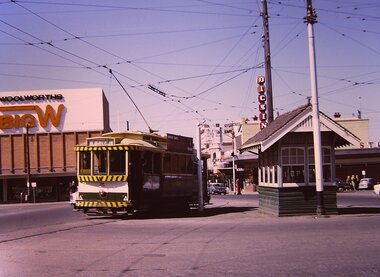
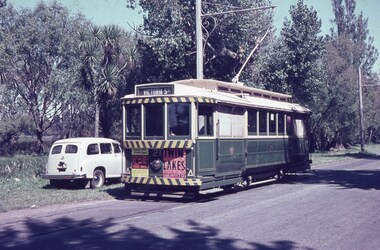
Photograph - Digital image, Chris Phillips, c1970
Yields information about the intersection of Sturt and Grenville St prior to closure of the SEC operated system.Digital image of No. 26 at the corner of Sturt and Grenville St. Tram about to cross Grenville St into Bridge St, has destination of Mt. Pleasant. In the background is the Woolworths Big W store and the Dickins Supermarket. Also in the view is a letter box and the tramway shelter. Photo c1970.trams, tramways, grenville st, sturt st, shelters, bridge st, tram 26 -
 Ballarat Tramway Museum
Slide - 35mm slide/s, Keith Caldwell, 8/03/1960 12:00:00 AM
Yields information about tram 31 and Gardens Loop.Agfa colour slide, white cardboard mount, photo by Keith Caldwell on 8/3/1960 of: Tram 31 running in Wendouree Parade on the south side of Gardens Loop. Tram has the destination of Gardens Sturt St West and has a Briquettes dash panel advertisement.Stamped on bottom of slide "8 Mar 60". tramways, trams, wendouree parade, lake wendouree, tram 11 -
 Ballarat Tramway Museum
Slide - 35mm slide/s, Keith Caldwell, 12/03/1962 12:00:00 AM
Yields information about the nature of Lydiard St North and the trams used.Agfa colour slide, white cardboard mount, photo by Keith Caldwell on 12/3/1962 of: Tram 13 northbound in Lydiard St North with lots of passengers and children. Tram has the destination of Lydiard St North and has an The Age advert on the front dash panel..In ink "Lydiard St Nth #13 12.3.62"tramways, trams, lydiard st north, tram 13 -
 Ballarat Tramway Museum
Slide - 35mm slide/s, Keith Caldwell, 16/03/1963 12:00:00 AM
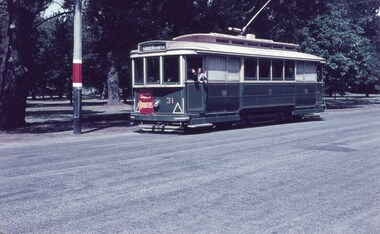
Yields information about tram 21 and Wendouree Parade and the nearby Lake Wendouree.Agfa colour slide, white cardboard mount, photo by Keith Caldwell on 16/3/1963 of: Tram 21 in Wendouree Parade, approaching St Aidans Drive. Tram has the destination of Mt Pleasant, a Dancing at Civic Hall and a Twin Lakes dash panel advert.In ink "16.3.63"tramways, trams, wendouree parade, st aidans drive, tram 21 -
 Ballarat Tramway Museum
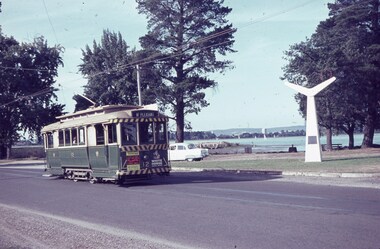
Slide - 35mm slide/s, Keith Caldwell, 1963
Yields information about tram 12 and Wendouree Parade, the Olympic Monument and the nearby Lake Wendouree.Agfa colour slide, white cardboard mount, photo by Keith Caldwell during 1963 of: Tram 12 in Wendouree Parade / Hamilton Ave after leaving the Carlton St Loop. Has the Olympic Monument in the background and Lake Wendouree. Tram has the destination of Mt Pleasant.In ink "1963"tramways, trams, wendouree parade, olympics, hamilton ave, tram 12 -
 Ballarat Tramway Museum
Slide - 35mm slide/s, Keith Caldwell, 1963
Yields information about tram 35 the Olympic Monument and Wendouree Parade.Agfa colour slides, white cardboard mount, photo by Keith Caldwell during 1963 of: Tram 35 in Wendouree Parade passing the Olympic Monument leaving Hamilton Ave. Tram has the destination of Gardens via Sturt St West and an SEC cooking roof advert.tramways, trams, wendouree parade, hamilton ave, olympics, tram 35 -
 Ballarat Tramway Museum
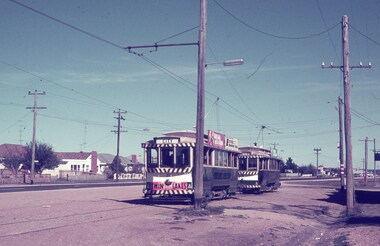
Slide - 35mm slide/s, Robert Thomson, 11/04/1971 12:00:00 AM
Yields information about Ballarat's trams at the Sebastopol terminus and the tram operations.Agfa blue/white mount, colour slide of trams 33 and 30 at the Sebastopol terminus. Tram 33 has roof adverts for Eureka Tiles and Bliss Bombs and a Twin Lakes sign on the front. Tram 33 has the destination of City, No. 30, Lydiard St North."11-4-71" in ink.tramways, trams, sebastopol, tram 33, tram 30