Showing 6737 items matching "negatives"
-
 Ballarat Tramway Museum
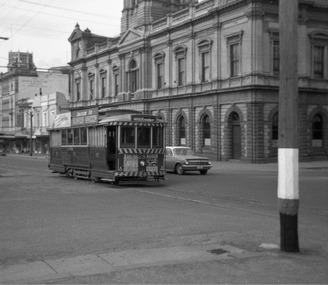
Photograph - Digital Image, Peter Knife, SEC 28 Westbound in Sturt St, 14/8/1965
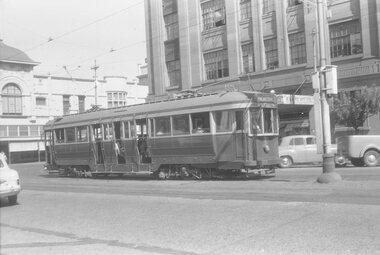
Digital image of SEC 28 Westbound in Sturt St at Armstrong St with the Ballarat Town Hall in the background. The tram has a Castrol oil and SEC cooking roof advert. On the front are a Twin Lakes and dancing at Civic Hall signs. Photo by Peter Knife 14 Aug 1965,Yields information about Ballarat's trams in August 1965.Digital image of a black and white negativetramways, tramcars, ballarat, sturt st, town hall, tram 28 -
 Ballarat Tramway Museum
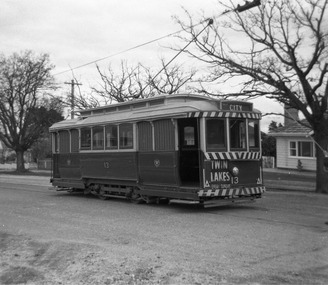
Photograph - Digital Image, Peter Knife, SEC 13 inbound in Lydiard St North, 14/8/1965
Digital image of SEC 13 inbound in Lydiard St North. The tram has the destination of City and a Twin Lakes advert on the rear dash panel. Photo by Peter Knife 14 Aug 1965,Yields information about Ballarat's trams in August 1965.Digital image of a black and white negativetramways, tramcars, ballarat, lydiard st north, tram 18 -
 Ballarat Tramway Museum
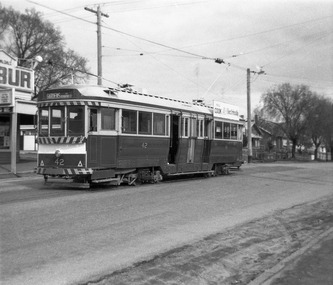
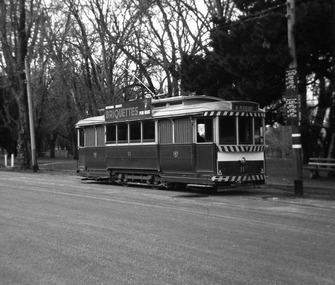
Photograph - Digital Image, Peter Knife, SEC 42 at the Mt Pleasant terminus, 14/8/1965
Digital image of SEC 42 at the Mt Pleasant terminus. The tram has the destination of Gardens via Drummond St Nth. In the background is the Milk bar/shop that was located at the terminus. Photo by Peter Knife 14 Aug 1965.Yields information about Ballarat's trams in August 1965.Digital image of a black and white negativetramways, tramcars, ballarat, mt pleasant, tram 42 -
 Ballarat Tramway Museum
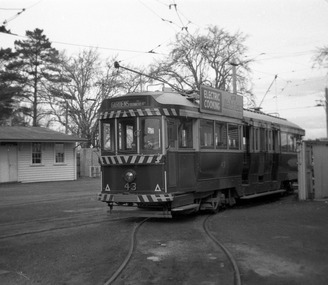
Photograph - Digital Image, Peter Knife, SEC 43 squeezing into Road 0 at Ballarat Depot, 14/8/1965
Digital image of SEC 43 squeezing or turning into Road 0 at Ballarat Depot. Tram has an electric cooking roof advert. Photo by Peter Knife 14 Aug 1965. This track "0 Road" was built to accommodate bogie cars in the mid-1950s, a set of very sharp reverse curves. Yields information about Ballarat's trams in August 1965.Digital image of a black and white negativetramways, tramcars, ballarat, tram 43, sec depot, 0 road -
 Ballarat Tramway Museum
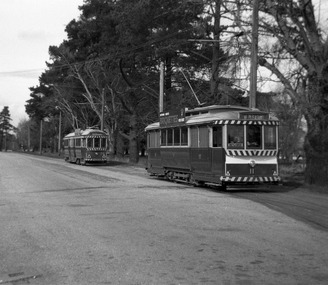
Photograph - Digital Image, Peter Knife, SEC 38 and 11 at Depot junction, 14/8/1965
Digital image of trams 11 and 38 at depot junction in Wendouree Parade. Tram's 38 passengers will transfer to No. 11 which continued to the run onto Mt Pleasant. No. 11 has a Briquettes roof advert. Photo by Peter Knife 14 Aug 1965. Yields information about Ballarat's trams in August 1965.Digital image of a black and white negativetramways, tramcars, ballarat, mt pleasant, tram 11, sec depot -
 Ballarat Tramway Museum
Photograph - Digital Image, Peter Knife, SEC 11 at Gardens bound for Mt Pleasant, 14/8/1965
Digital image of SEC 11 at Gardens Loop in Wendouree Parade bound for Mt Pleasant. Note the timetable boards on the pole alongside the tram. The tram has a SEC Briquette roof advert. Photo by Peter Knife 14 Aug 1965. Yields information about Ballarat's trams in August 1965.Digital image of a black and white negativetramways, tramcars, ballarat, tram 11, gardens loop, wendouree parade -
 Ballarat Tramway Museum
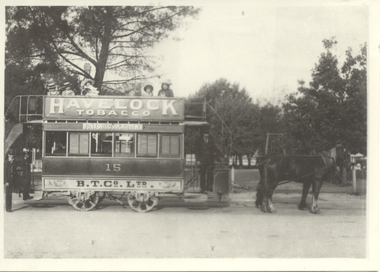
Photograph - Black & White Photograph/s and Copy Negative, Wal Jack, Horse Tram No. 15 Wendouree Parade, c1895
Black and White photograph of Horse Tram No. 15 Wendouree Parade. Driver and conductor standing at either end. Some well-dressed, passengers on the top deck. Gardens view in the background. Has Havelock Tobacco advert. on the side panel, along with lettering "B.T.Co. Ltd. " on the side of the tram. The driver is in a uniform. Wal Jack says on the rear of Reg Item btm804.3 taken in 1895 and on rear of 804.5 - at View Point.Yields information about the Ballarat's horse trams and the horses used.Black and white photograph and copy negative. 804.1 - Ray Pearson's captions included in the scanned images., 804.2 - In top right hand corner in pencil "Gold Museum 127.79" 804.4 - Has Wal Jacks notes on rear and image number T160.trams, tramways, horse trams, gardens, wendouree parade, ballarat, tram 15 -
 Bendigo Historical Society Inc.
Negative - PRISM MINING WHIP NEGATIVE FOR A. RICHARDSON, Unknown
PRISM MINING WHIP NEGATIVE FOR A. RICHARDSON.bendigo, mining, negative prism mining whip -
 Vision Australia
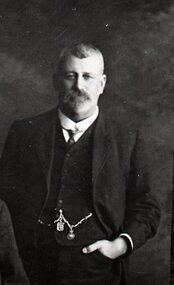
Photograph - Image, Portraits of men involved with Queensland Industrial Institute for the Blind
Four historical images of men important to the history of the Queensland Deaf, Dumb and Blind Institution or the subsequent organisations it became.4 rows of B/W negativesqueensland industrial institute for the blind, queensland blind, deaf and dumb institution -
 Vision Australia
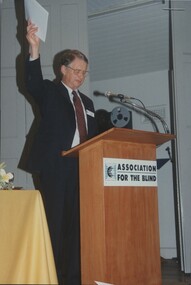
Photograph - Image, Robin Pleydell at AGM
Association for the Blind treasurer Mr Robin Pleydell at an Annual General MeetingCol. photographs and negatives of Robin Pleydellassociation for the blind, robin pleydell -
 Vision Australia
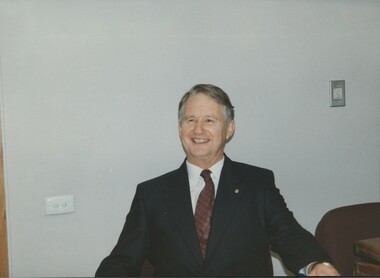
Photograph - Image, Robin Pleydell
Association for the Blind treasurer Robin Pleydell at KooyongCol. photograph and negative of Robin Pleydellassociation for the blind, robin pleydell -
 Vision Australia
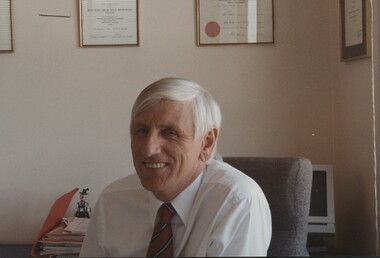
Photograph - Image, John Cook in his office
Portrait photographs of John Cook in his officeCol. photographs and negatives of John Cookassociation for the blind, john cook -
 Vision Australia
Negative - Image, Carols by Candlelight rehearsal night
Rehearsal night at Ormond Hall for the 1981 RVIB Carols by Candlelight performanceCol. negatives of Carols by Candlelight rehearsalcarols by candlelight, royal victorian institute for the blind -
 University of Melbourne, Burnley Campus Archives
Negative - Colour negatives, Trees
11 negatives of trees, not at Burnley. Not digitised.trees, plants, arboriculture -
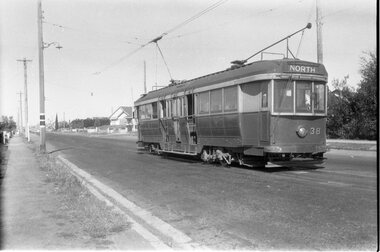 Ballarat Tramway Museum
Negative - Geelong Belmont terminus tram 38, Laurie Gallop, early 1956
Photo shows Geelong No. 38 at the Belmont terminus, High Street with the return destination of North. Note the compulsory tram stop on the left-hand pole. One of a set of photos was taken between 15/2/1956 and 3/3/1956 when services operated only between Belmont and North before the final closure of the Belmont route on 25/31956 and that bogie tram 31 is not shown on the board, having gone to Ballarat on 15/2/1956 - see item 5554. See item 8213 for an article on the Geelong system by Keith Kings. Yields information about the Belmont tram terminus prior to closure.Black and white Negative - 120 sizetram stops, tramways, high st, geelong, tram 38, belmont -
 Ballarat Tramway Museum
Negative - Geelong tram 36 Mercer St, Laurie Gallop, early 1956
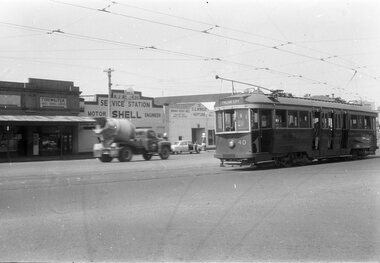
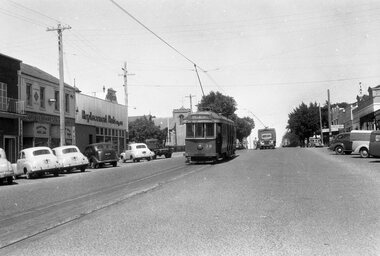
Photo shows Geelong tram 36 outbound to North in Mercer St at Ginn St. In the background is a shop selling Franklins Lemon Swish, a four & Twenty Pie shop, Toppa Ice cream, a Coca Cola truck, a Hotel advertising Richmond Lager, three parked buses and a shop advertising hot pies. On the pole is a tram stop with a metal "CARS STOP HERE" sign. On the left-hand side of the photograph a surveyor can be seen at work.Yields information about the Geelong operations toward the closure of the tram system.Black and white Negative - 120 sizetramways, geelong, mercer st, tram 36, tram stops -
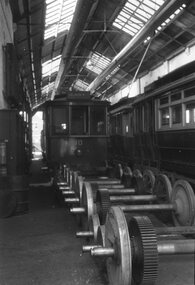 Ballarat Tramway Museum
Negative - Geelong depot tram 10 and wheels, Laurie Gallop, early 1956
Photo shows Geelong tram 10 in the depot showing a destination of East with 6 wheelsets in front of it and other tramcars alongside. Wheel flanges appear to be worn and may have been readied to go to Ballarat or Bendigo for further use after turning.Yields information about the Geelong operations toward the closure of the tram system.Black and white Negative - 120 sizetramways, geelong, depot, tram 10, wheels -
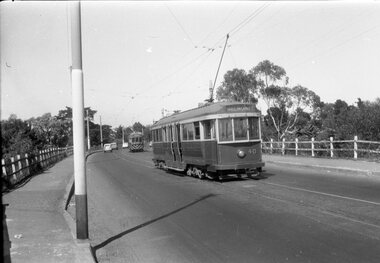 Ballarat Tramway Museum
Negative - Geelong trams 33 & 40 Barwon Bridge, Laurie Gallop, early 1956
Photo shows Geelong trams 33 & 40 in Moorabool St just south of the Barwon Bridge on the long crossing loop. Based on the running board at item 8267, most likely tram No. 33. One of a set of photos was taken between 15/2/1956 and 3/3/1956 when services operated only between Belmont and North before the final closure of the Belmont route on 25/31956 and that bogie tram 31 is not shown on the board, having gone to Ballarat on 15/2/1956 - see item 5554. See item 8213 for an article on the Geelong system by Keith Kings. Yields information about the Geelong operations toward the closure of the tram system.Black and white Negative - 120 sizetramways, geelong, moorabool st, tram 33, tram 40, barwon river -
 Ballarat Tramway Museum
Negative - Tram 40 - Moorabool & Malop Streets, Laurie Gallop, early 1956
Photo shows Geelong 40 on its way to North Geelong, turning from Moorabool St into Malop St. In the background are now the National Mutual and Market Square buildings. One of a set of photos was taken between 15/2/1956 and 3/3/1956 when services operated only between Belmont and North before the final closure of the Belmont route on 25/31956 and that bogie tram 31 is not shown on the board, having gone to Ballarat on 15/2/1956 - see item 5554. See item 8213 for an article on the Geelong system by Keith Kings. Yields information about the Geelong operations toward the closure of the tram system.Black and white Negative - 120 sizetramways, geelong, moorabool st, malop st, tram 40 -
 Ballarat Tramway Museum
Negative - Geelong scrubber at depot, Laurie Gallop, early 1956
The photo shows the Geelong scrubber on the front of No. 2 road with No. 16 behind and No. 19 alongside. One of a set of photos was taken between 15/2/1956 and 3/3/1956 when services operated only between Belmont and North before the final closure of the Belmont route on 25/31956 and that bogie tram 31 is not shown on the board, having gone to Ballarat on 15/2/1956 - see item 5554. See item 8213 for an article on the Geelong system by Keith Kings. Yields information about the Geelong operations toward the closure of the tram system and in particular the Geelong scrubber or track cleaning tram.Black and white Negative - 120 sizetramways, geelong, geelong depot, scrubber, geelong 16, geelong 19 -
 Ballarat Tramway Museum
Negative - Tram 40 at the North terminus, Laurie Gallop, early 1956
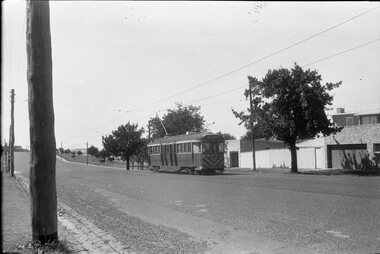
Photo shows Geelong tram 40 at the North Terminus, with the Pilkington glass factory behind. The tram has the destination of Belmont. One of a set of photos was taken between 15/2/1956 and 3/3/1956 when services operated only between Belmont and North before the final closure of the Belmont route on 25/31956 and that bogie tram 31 is not shown on the board, having gone to Ballarat on 15/2/1956 - see item 5554. See item 8213 for an article on the Geelong system by Keith Kings. Yields information about the Geelong operations toward the closure of the tram system and the North terminus.Black and white Negative - 120 sizetramways, geelong, geelong depot, tram 40, north -
 Ballarat Tramway Museum
Negative - Tram 33 Geelong depot, Laurie Gallop, early 1956
Photo shows Geelong 33 on No. 5 road at Geelong depot being driven out with the destination set to North. One of a set of photos was taken between 15/2/1956 and 3/3/1956 when services operated only between Belmont and North before the final closure of the Belmont route on 25/31956 and that bogie tram 31 is not shown on the board, having gone to Ballarat on 15/2/1956 - see item 5554. See item 8213 for an article on the Geelong system by Keith Kings. Yields information about the Geelong operations toward the closure of the tram system.Black and white Negative - 120 sizetramways, geelong, geelong depot, tram 33 -
 Ballarat Tramway Museum
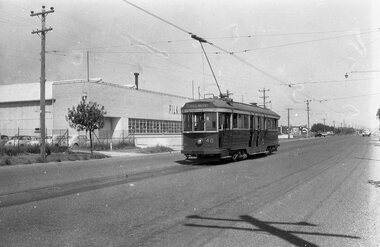
Negative - Tram 40 - Mercer St, city end, early 1956
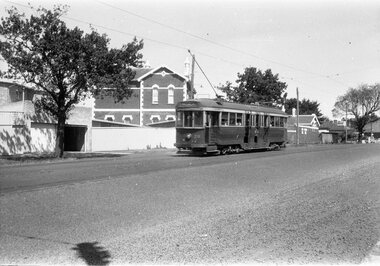
Photo shows Geelong tram 40 Mercer St, city end. The tram has the destination of North. In the background is a typewriter shop, R J Reynolds? Shell service station and S G Winkler Service station with a Neptune sign. The driver has his hand on the air brake and the controller with the front driver's window open. One of a set of photos was taken between 15/2/1956 and 3/3/1956 when services operated only between Belmont and North before the final closure of the Belmont route on 25/31956 and that bogie tram 31 is not shown on the board, having gone to Ballarat on 15/2/1956 - see item 5554. See item 8213 for an article on the Geelong system by Keith Kings. Yields information about the Geelong operations toward the closure of the tram system.Black and white Negative - 120 sizetramways, geelong, tram 40, north, mercer st -
 Ballarat Tramway Museum
Negative - Tram 38 Mercer Street, Laurie Gallop, early 1956
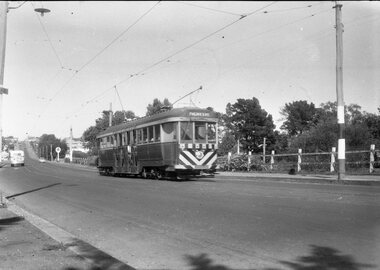
Photo shows Tram 38 Mercer Street, near The Esplanade with the destination of Belmont. One of a set of photos was taken between 15/2/1956 and 3/3/1956 when services operated only between Belmont and North before the final closure of the Belmont route on 25/31956 and that bogie tram 31 is not shown on the board, having gone to Ballarat on 15/2/1956 - see item 5554. See item 8213 for an article on the Geelong system by Keith Kings. Yields information about the Geelong operations toward the closure of the tram system.Black and white Negative - 120 sizetramways, geelong, tram 38, mercer st -
 Ballarat Tramway Museum
Negative - Moorabool St, looking south at the Kardinia Park loop, Laurie Gallop, early 1956
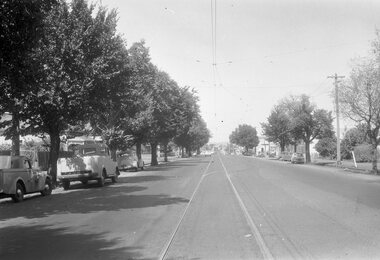
Photo shows Moorabool St, looking south at the Kardinia Park loop. One of a set of photos was taken between 15/2/1956 and 3/3/1956 when services operated only between Belmont and North before the final closure of the Belmont route on 25/31956 and that bogie tram 31 is not shown on the board, having gone to Ballarat on 15/2/1956 - see item 5554. See item 8213 for an article on the Geelong system by Keith Kings. Yields information about the Geelong tram system.Black and white Negative - 120 sizetramways, geelong, moorabool st, kardinia park loop -
 Ballarat Tramway Museum
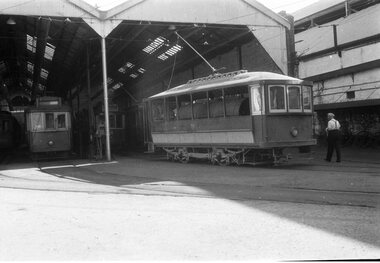
Negative - Tram 19 at Geelong Depot, Laurie Gallop, early 1956
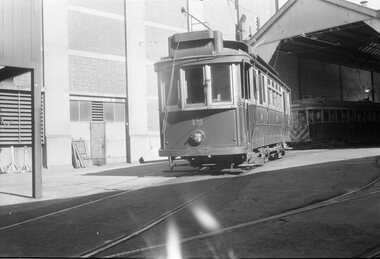
Photo shows Tram 19 at Geelong Depot One of a set of photos was taken between 15/2/1956 and 3/3/1956 when services operated only between Belmont and North before the final closure of the Belmont route on 25/31956 and that bogie tram 31 is not shown on the board, having gone to Ballarat on 15/2/1956 - see item 5554. See item 8213 for an article on the Geelong system by Keith Kings. Yields information about the Geelong operations toward the closure of the tram system.Black and white Negative - 120 sizetramways, geelong, geelong depot, tram 19 -
 Ballarat Tramway Museum
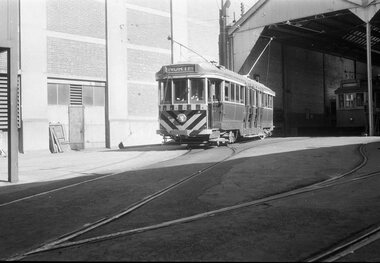
Negative - Geelong 38 and welding truck - Moorabool St, Laurie Gallop, early 1956
Photo shows Geelong 38 south bound to Belmont and welding truck - Moorabool St between Myers and McKillop Streets. The welding with the power supply from the overhead would most likely be repairing a broken joint. One of a set of photos was taken between 15/2/1956 and 3/3/1956 when services operated only between Belmont and North before the final closure of the Belmont route on 25/31956 and that bogie tram 31 is not shown on the board, having gone to Ballarat on 15/2/1956 - see item 5554. See item 8213 for an article on the Geelong system by Keith Kings. Yields information about the Geelong operations toward the closure of the tram system.Black and white Negative - 120 sizetramways, geelong, tram 38, moorabool st, welding truck, track repairs -
 Ballarat Tramway Museum
Negative - Tramcar allocation board - Geelong, Laurie Gallop, early 1956
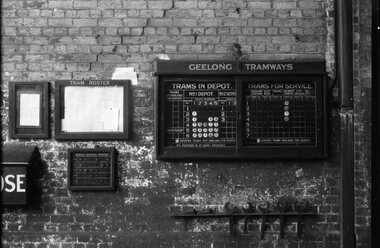
Photo shows the Tramcar allocation board - in the Geelong depot. Shows the four bogie cars in operation or available on the day the photograph was taken. Shows that some of the Meadowbank-built trams and bogie trams had already left the depot. One of a set of photos was taken between 15/2/1956 and 3/3/1956 when services operated only between Belmont and North before the final closure of the Belmont route on 25/31956 and that bogie tram 31 is not shown on the board, having gone to Ballarat on 15/2/1956 - see item 5554. See item 8213 for an article on the Geelong system by Keith Kings. Yields information about the Geelong depot allocation board that showed the location and use of the tramcars on the day.Black and white Negative - 120 sizetramways, geelong, depot, depot allocation, tramcar allocation -
 Ballarat Tramway Museum
Negative - Geelong tram inbound Mercer Street, Laurie Gallop, early 1956
Photo shows a Geelong tram inbound in Mercer Street, near The Esplanade. Tram has the destination of Belmont. Based on the running board at item 8267, most likely No. 33. One of a set of photos was taken between 15/2/1956 and 3/3/1956 when services operated only between Belmont and North before the final closure of the Belmont route on 25/31956 and that bogie tram 31 is not shown on the board, having gone to Ballarat on 15/2/1956 - see item 5554. See item 8213 for an article on the Geelong system by Keith Kings. Yields information about tramway operations prior to closure of the Geelong system.Black and white Negative - 120 sizetram stops, tramways, geelong, mercer st, tram 33 -
 Ballarat Tramway Museum
Negative - Geelong tram at Balliang St loop in Moorabool St, Laurie Gallop, early 1956
Photo shows a Geelong tram to North in Moorabool St at the Balliang St / Forser St loop in Moorabool St. In the background is a Caltex Service station and a bus. See also item 8299 for the trailing photograph.Yields information about the Geelong operations toward the closure of the tram system.Black and white Negative - 120 sizetramways, geelong, belmont, moorabool st, crossing loop