Showing 223 items matching " city family buildings"
-
 City of Ballarat Libraries
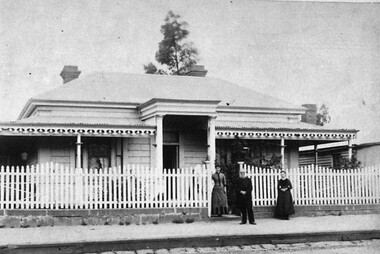
Photograph - Card Box Photographs, Ludbrook Family group photograph 1900
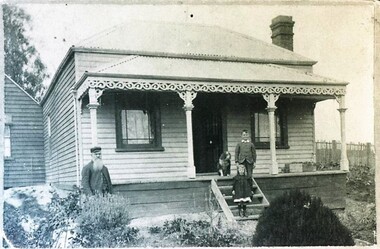
The photo was taken at the home of George Ludbrook in Chamberlain Street, which was built in 1866. It shows Mrs Henry Ludbrook & family.george ludbrook, henry ludbrook, chamberlain street, garden, building, people, private dwelling, ballarat, costume -
 City of Ballarat Libraries
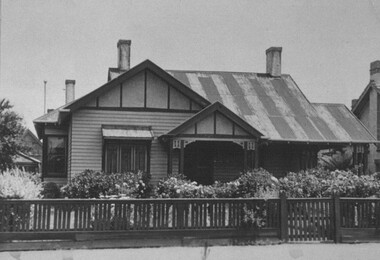
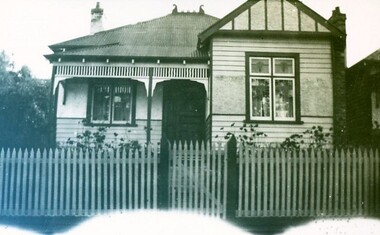
Photograph - Card Box Photographs, Residence of Frank Butler's family, Ballarat circa 1910
The house with the striped tin roof is 8 Errard Street South.errard street south, building, frank butlers, private dwelling, garden -
 City of Ballarat Libraries
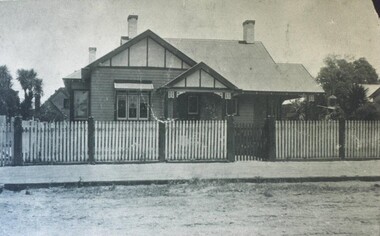
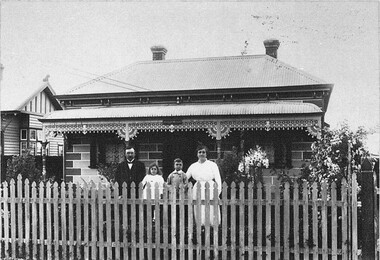
Photograph - Card Box Photographs, Residence of Frank Butler's family, Ballarat circa 1900
The house is now 9 Errard Street South.errard street south, building, garden, streetscape, private dwelling, frank butler -
 City of Ballarat Libraries
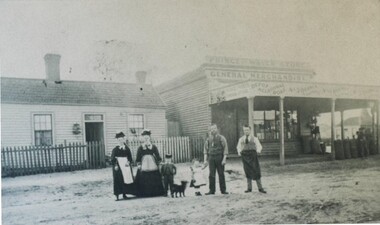
Photograph - Card Box Photographs, Prince of Wales Store, Ballarat circa 1880
The Prince of Wales Store was run by the Busfield Family who lived next door. The store could be found on, what was then known as, Melbourne Road.prince of wales store, busfield, melbourne road, old melbourne road, building, commerical, private dwelling -
 City of Ballarat Libraries
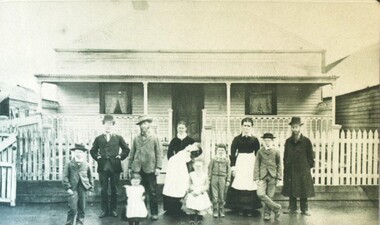
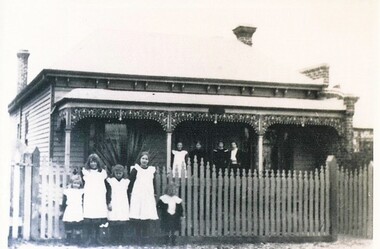
Photograph - Card Box Photographs, Busfield family in front of their cottage, Ballarat circa 1880
busfield, building, cottage, private dwelling, persons -
 City of Ballarat Libraries
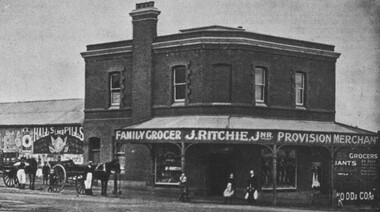
Photograph - Card Box Photographs, Advertisement for J. Ritchie Family Grocery Store. From the Ballarat Courier Supplement December 15th, 1909
The store was located on the corner of Grant and Bond Streets. j. ritchie family grocery store, grant street, bond street, building, commerical, advertising, vehicle, work -
 City of Ballarat Libraries
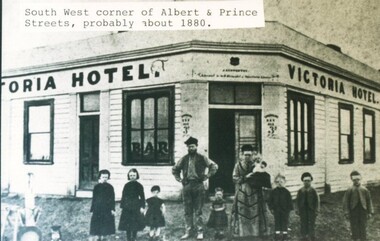
Photograph - Card Box Photographs, Victoria Hotel, Sebastopol 1880
It is presumed that the licencee, J. Kenworthy and his family are standing out the front.victoria hotel, building, hotel, persons, commerical, sebastopol, albert street -
 City of Ballarat Libraries
Photograph - Crick family residence, Ballarat circa 1935
The house was located at 18 Church Street.crick, building, house, persons, costume, private dwelling -
 City of Ballarat Libraries
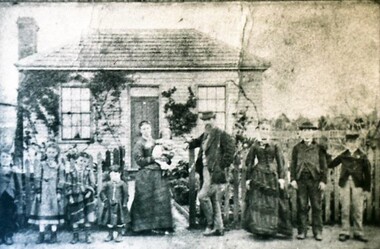
Photograph - Card Box Photographs, Thomas Carvosoe & family at their cottage, Ballarat circa 1876
The cottage was located at 712 Ripon Street South. thomas carvosoe, ripon street south, building, house, private dwelling, persons, costume -
 City of Ballarat Libraries
Photograph - Card Box Photographs, 'Hillview' Windermere. Home of the Harding family circa 1905
The Harding's lived at 'Hillview' from 1860-1940. The women pictured are Elizabeth & Helen Harding.hillview, elizabeth harding, helen harding, windermere, building, private dwelling, persons, garden -
 City of Ballarat Libraries
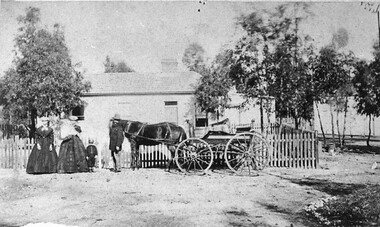
Photograph - Card Box Photographs, Site of St Martins in the Pine circa 1880
Pictured are the Fanning family who were toll-keepers. The property on Geelong Road is now St Martins in the Pines which was gifted to the Sisters of Mercy by Alice Fanning.st martins in the pines, alice fanning, sisters of mercy, building, vehicle, persons, private dwelling -
 City of Ballarat Libraries
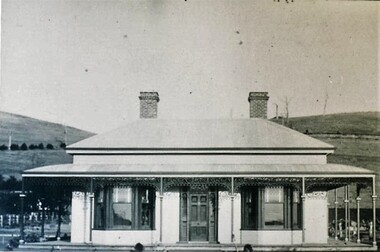
Photograph - Card Box Photographs, Residence of the Coghlan Family circa 1900
The house is located on Victoria Street. It is now incorporated into the Generalate of the Sisters of Mercy and the ballroom & some smaller rooms existcoghlan, sisters of mercy, victoria street, building, church -
 City of Ballarat Libraries
Photograph - Card Box Photographs, James Family Home, Ballarat circa 1890
The house was located in Bond Street.james family, bond street, building, house, private dwelling, persons, costume -
 City of Ballarat Libraries
Photograph - Card Box Photographs, A. Stevenson's Residence, Ballarat circa 1925
The house was located at 7 Eyre Street.stevenson family, eyre street, building, private dwelling -
 City of Ballarat Libraries
Photograph - Card Box Photographs, Residence of the Usebach family, Ballarat circa 1880
The house was located on the north side of Gregory Street and was named 'Hollywood'. Pictured are Mr & Mrs Gotlieb Usebach and their children Kath & William.gregory street, gotlieb usebach, building, house, private dwelling, persons, costume -
 City of Ballarat Libraries
Photograph - Card Box Photographs, Methodist Parsonage, Talbot circa 1880
Reverend W.S. North & family pictured.methodist parsonage, talbot, reverend w.s. north, building, persons, private dwelling -
 City of Ballarat Libraries
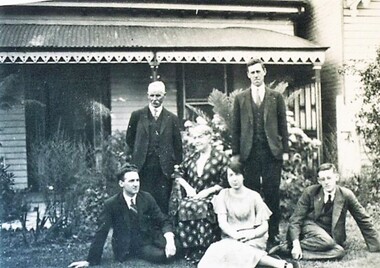
Photograph - Card Box Photographs, The Ludbrook Family circa 1918
The family are pictured at their home at 213 Victoria Street, Ballarat East.victoria street, charles ludbrook, building, private dwelling, persons -
 City of Ballarat Libraries
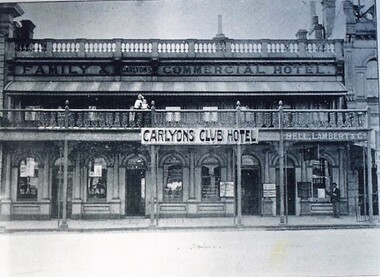
Postcard - Card Box Photographs, Carlyon's Club Hotel
Also known as Carlyon's Family & Commerical Hotel.carlyon's club hotel, building, hotel, commerical -
 City of Ballarat Libraries
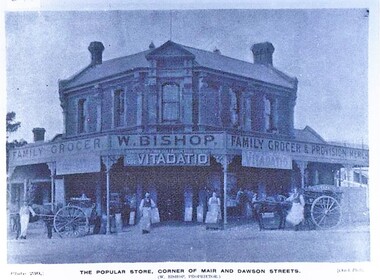
Photograph - Card Box Photographs, The Popular Store, Corner Mair and Dawson Streets
W. Bishop Proprietor. Family Grocer and Provision Merchant.w. bishop, mair street, dawson street, building, commerical, store, ballarat -
 City of Ballarat Libraries
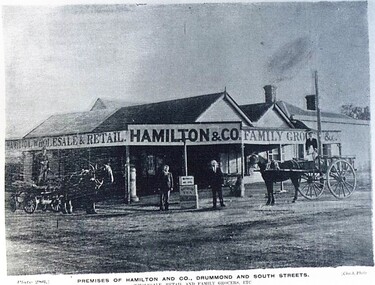
Postcard - Card Box Photographs, Premises of Hamilton and Co., Drummond and South Streets. Ballarat
Wholesale & Retail and Family Grocers. Plate 286 Chuck Photo Series.hamilton & co., drummond street, south street, building, commerical, shop, persons -
 City of Ballarat Libraries
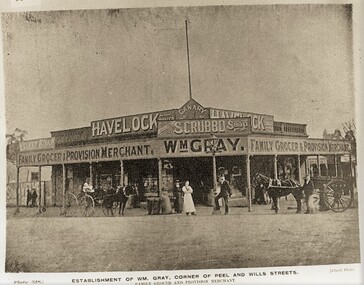
Postcard - Card Box Photographs, Establishment of WM Gray, Corner of Peel and Wills Street. Ballarat
Family Grocer and Provision Merchant. Scrubbo Soap. Plate 318 Chuck Photo Series.w.m. gray, peel street, wills street, building, shop, persons -
 Hume City Civic Collection
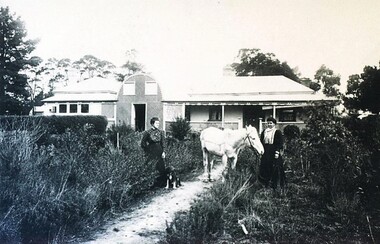
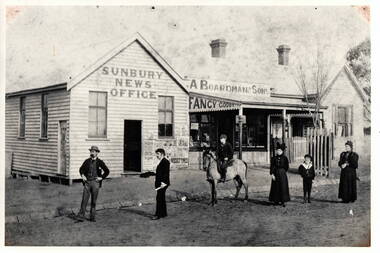
Photograph, Sunbury News Office
The Boardman family were local business people in Sunbury, who were storekeepers and also produced the local newspaper. Their original building was in Brook Street near the railway station but they later located their business further down in Brook Street on the corner of O'Shanassy Street. A black and white photograph with a cream border of a news office, store and cottage with a picket fence. The buildings are weatherboard with corrugated iron roofs.A young tree surrounded by a tree guard has been planted on the footpath between the cottage and shop.Two men and two ladies and a boy are standing in front of the buildings on the unmade road. A boy on horseback is alsoweith the group.j.a. boardman, sunbury news office, businesses., brook street -
 Hume City Civic Collection
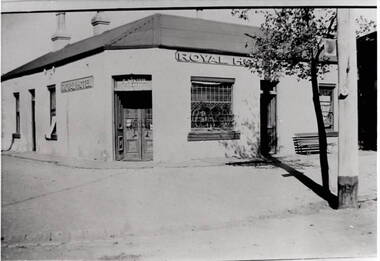
Photograph, Royal Hotel
This is an image of the original single storey Royal Hotel building which was on the corner of Brook and Evans Streets. In the 1930s the single storey structure was demolished after a fire and replaced with a double storey Art Deco red brick building, which still stands on the same site.At one stage there were four hotels in Evans Street between Station Street and Brook Street. At some stage the Millett family owned them. The Royal and the Olive Tree (formerly the Railway) hotels remain on their original site but not in their original appearance.A black and white photograph with a cream border of a single storey hotel building with a headlight window on the RHS of the corner entry doorway, which also has lead light windows. A young tree and power pole are seen on the RHS of the image. hotels, royal hotel, s.winter, t. millett -
 Ballarat Tramway Museum
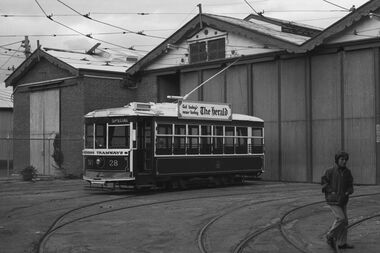
Negative, Bruce Herbert, "Bendigo and Ballarat Trams (AETA Convention) 30 Mar 1975", 30/03/1975 12:00:00 AM
Negative folder - made by ROW1 International of West Germany containing 40 No. 35 mm negatives of the AETA 1975 Convention visit to Ballarat and Bendigo on 30-3-1975. 17 photos of Ballarat and 23 of Bendigo. Bendigo photos: 1 - No. 28 at the depot 2 - ditto 3 - 24 and another bogie tram in side the depot 4 - No. 3? inside the depot 5 - 12, scrubber - 17 and two bogie trams 6 - scrubber and other bogie trams. 7 - general view with 24 and other bogie trams 8 - ditto 9 - Four trams at the Gold Mine, lead by 28. 10 - 19 at the Gold Mine 11 - single trucker with "tram tours" sign on the front 12 - 28 and two other cars at the Joss House, North Bendigo 13 - 19 and two other cars at the Joss House 14 - 30 at depot junction and loop 15 - 28 and 18 16 - 18 in the loop 17 - 28 and 18 McCrae St 18 - 28, 18 and 30 ditto 19 - 19 20 - No. 18 and 28 in Pall Mall with The Beehive in the background. Outside the building is an American Doughnut Kitchen van. The junction trackwork for the Eaglehawk lines remain in position. 21 - No. 30 northbound, with the City Family Hotel and other shops in the background. 22 - ditto and the cenotaph, 23 - B74 on a train at Spencer St. trams, tramways, btps, ballarat, aeta, bendigo, bendigo trust, depot, mccrae st, tram 28 tram 19 tram 30 tram 18 tram 24 tram 3 tram 12 tram 17 tram scrubber -
 Ballarat Tramway Museum
Slide - 27 mm sq slide/s - set of 4, Lilian Butler, Scenes of Sturt St, c1971
Yields information about tram operations in the city area of Ballarat.Set of 4 colour slides - Kodachrome white cardboard mounts - slide mounts dated August to September 1971. .1 - Photo of No. 37 at the intersection of Sturt and Lydiard Streets with the Town Hall in the background and the tramway shelter. Has detailed street signs - Government Tourist Bureau, Art Gallery and street name and a sign "Danger Cross Streets at Right Angles" .2 - No. 30 with the destination of City, westbound in Sturt St with the Town Hall, Fletcher Jones and Coles stores in the background. .3 - Nos. 30 and 21 parked in the City Loop. .4 - view of the south side of Sturt St just to west of Grenville St with the Family Footwear, Spot Cafe, Bill Valpied Fruit, Union Hotel and Thomas Jewellers buildings in the view. Photo from the collection of Lilian Butler. .2 and .3 have in pencil "Photo to America" written on them in pencil.ballarat, tramways, trams, sturt st, city loop, lydiard st north, city, signs, tram 30, tram 21 -
 Ballarat Tramway Museum
Slide - 35mm slide/s - set of 24, Noel Simons, 20/05/1971 12:00:00 AM
Set of 24 transparencies taken on 20/5/1971 on Kodak mounts. 1195.1 - Bendigo 19 arriving at Charing Cross en route to North Bendigo with Fountain Plaza and the City Family Hotel in the background. No. 19 has two roof ads for the SEC. -'Electricity better for cooking' and 'Everything's under control in my all electric kitchen' 1195.2 - as above, but standing at the Charing cross stop, with the Beehive Stores and other buildings along the east side of Pall Mall in the background. 1195.3 - No 21 ex Golden Square crossing View St. trackwork in front of No. 25 waiting to depart for Quarry Hill. No.21 has two roof ads (as for No.19 in 1195.1) and No.25 has one SEC roof ad and another. Ezywalkin sign in the background, and Fountain Plaza. 1195.4 - as for 1195.3, but after 21 has arrived and 25 left for Quarry Hill. Has Ezywalkin store and the Beehive store in the background. 1195.5 - No. 5 at the Eaglehawk terminus. Photo taken with a cannon in foreground looking along High St. Eaglehawk. Has shops on the west side of High St. in the background. 1195.6 - No. 5 at the Eaglehawk terminus, close up of the rear of the tram - note tow bar arrangement. Has destination of Quarry Hill. 1195.7-Nos.25 and 5 crossing at the Thorpe St. Loop, California Gully. No. 25 bound for Eaglehawk (has SEC Briquette and electric cooking roof ads) and 5 en route for Quarry Hill with a SEC and Cinzano roof ad. 1195.8 - as for 1195.7, but after trams have passed each other. Has Borough Auto Service building in the background. 1195.9 - No. 5 in Mt Korong Road, towards Bamard Street, photo taken after tram has passed photographer. 1195.10 - No. 30 at the Golden Square terminus with the Milk Bar on the right hand side of the photograph. 1195.11 - No. 30 inbound at Fire Station Loop, High St. Golden Square. Has old fire station in the background. Passengers are boarding the tramcar. 1195.12 - No. 30 in High St, bound for North Bendigo between Vine and Wattle Streets. 1195.13 - No. 5 bound for Eaglehawk waits at Iron Bark Gully Loop, at Hayes St. 1195.14 - No. 5 and No. 2 crossing at Iron Bark Gully Loop. 1195.15 - No. 5 bound for Eaglehawk leaving the Manchester Loop, Long gully. 1195.16 - No. 5 passing William Street, Long Gully en route to Eaglehawk. 1195.17 - No. 5 just before the California Gully Crossing Loop. 1195.18 - Nos. 5 and 26 crossing at California Gully crossing Loop. No. 5 heading to Eaglehawk, 26, Quarry Hill. 1195.19 - No. 5 in High St. Eaglehawk with Bob Moyle's Victoria Hotel and the TAB in the background. 1195.20 - No. 5 in High St. Eaglehawk approaching the terminus. Photo taken after the tram has passed the photographer. Has Foodland store and J. Best Fruit supply in the background, along with Eaglehawk Town Hall. 1195.21 - No. 5 at the Eaglehawk terminus, photo taken along seldom used track along High St. 1195.22 - as for 1195.22 - but at the very end of the track. 1195.23 - No. 5 en route for Quarry Hill climbs High St. Eaglehawk with the Victoria Hotel and Eaglehawk Town Hall in the background. 1195.24 - No. 5 and 25 crossing at Jobs Gully Loop. Note 25 has a black on white destination roll, while No. 5 has a white on black destination roll. Information written on in black ink and date stamped on purple ink. 1195.1 - "No. 19 arrives at Charing Cross Bendigo from Golden Square" 1195.2 - "No. 19 about to leave Charing Cross for North Bendigo" 1195.3 - "No. 25 awaiting departure for Quarry Hill, watches No. 21 arrive at Charring Cross from Golden Square" 1195.4 - "No. 21 on North Bendigo service and No. 25 on Quarry Hill run await departure at Charing Cross" 1195.5 - "No. 5 at Eaglehawk terminus" 1195.6 - "No. 5 at Eaglehawk terminus" 1195.7 - "Nos. 5 and 25 crossing at Thorpe St. Loop, California". 1195.8 - "Nos. 25 and 5 crossing Thorpe St. Loop, California Gully". 1195.9 - "No. 5 descending Mt Korong Rd. towards Bamard St." 1195.10 - "Birney car No. 30 at Golden Square terminus" 1195.11 - "Birney car No. 30 in High Street near Thistle Street (Fire Station Loop)" 1195.12 - "No. 30 in High St. between vine and Wattle Streets" 1195.13 - "No. 25 at Hayes Street Loop Iron Bark". 1195.14 - "Nos. 2 and 5 crossing at Hayes Street Loop Iron Bark" 1195.15 - "No. 5 at Manchester Loop opposite Havilah Road, Long Gully" 1195.16 - "No. 5 passing William Street, Long Gully". 1195.17 - "No. 5 at California Gully" 1195,18 - "Nos. 26 and 5 at Thorpe St. Loop, California Gully". 1195.19 - "No. 5 in High St. Eaglehawk". 1195.20 - "No. 5 approaching Eaglehawk terminus" 1195.21 - "No. 5 at Eaglehawk terminus" 1195.22 - "No. 5 at Eaglehawk terminus" 1195.23 - "No. 5 in High St. Eaglehawk" tramways, trams, bendigo, charing cross, eaglehawk, california gully, golden square, iron bark gully, jobs gully, tram 2, tram 5, tram 19, tram 21, tram 25, tram 26, tram 30 -
 Ballarat Tramway Museum
Slide - 35mm slide/s - set of 25, Noel Simons, 26/02/1972 12:00:00 AM
... and the City Family Hotel. 1204.20 - as for 1204.19, but with No. 7 en.... In the background is the Fountain Gate Plaza building and the City Family ...Set of 25 transparencies taken on 26/2/1972 on Kodak mounts. 1204.1 - Bendigo No. 5 - just arrived at Manchester Loop near Havilah Road, Long Gully. Photo taken after tram has passed photographer. 1204.2 - No. 26 in Backhaus St. Long Gully passing William St, en route to Quarry Hill. Photo taken after tram has passed photographer. 1204.3 - No. 5 climbing the High St. Hill Eaglehawk, heading for Quarry Hill with the buildings on the West side of High St. in the background, including the Eaglehawk Town Hall. 1204.4 - as for 1204.3, but tram close up. 1204.5 - as for 1204.3, but after tram has passed photographer. 1204.6 - No. 5 at intersection of Mt Korong Road Ironbark and Calder Highway, with the AMPOL service 'station in the background. Photo taken after tram has passed photographer. 1204.7 - No. 26 en route to Quarry Hill shortly after leaving Needle Loop, passing William St., Long Gully. 1204.8 - No. 5 at California Gully Loop, picking up a passenger, with the shops at Long Gully in the background. Photo taken after tram has passed photographer. 1204.9 - No. 5 in Long Gully, en route to Quarry Hill. Photo taken after tram has passed photographer. 1204.10 - No. 2 at Eaglehawk terminus with the Eaglehawk Town Hall and Post Office in the background. Tram has two SEC roof ads. 1204.11 - No. 2 at Eaglehawk terminus, close up. 1204.12 - as for 1204.11, but through the park gates. 1204.13 - as for 1204.11, but with tram stop shelters in the foreground and buildings on the West side of High St in the background. 1204.14 - No. 2 in Mt. Korong Rd, midway between California Gully Loop and Needle Loop. Photo taken after tram has passed photographer. 1204.15 - No. 5 in Long Gully, en route to Quarry Hill. 1204.16 - as for 1204.15, but with trams departed loop. Has an ESSO service station in the background. 1204.17 - No. 26 leaves Charing Cross up View St.. Photo taken after tram has passed photographer. Has Armstrong Tyre Service, Cohns Drinks ad on a building and the T&G building in the background. Also Firestone ads on the tyre service building. 1204.18 - No. 5 waits at Charing Cross with the Alexandra Fountain in the background. Tram has two SEC roof ads, 'Everything s fine in my all electric kitchen' and 'Electricity Best for Cooking'. Has RACV, Colonial Mutual Life buildings in the background and the planting areas around Charing Cross gardens in the foreground. 1204.19 - No. 21 en route to North Bendigo arrives at Charing Cross, with passengers waiting to board. No. 5 in the background. In the background is the Fountain Gate Plaza building and the City Family Hotel. 1204.20 - as for 1204.19, but with No. 7 en route to Golden Square. 1204.21 - as for 1204.19, but closer up. 1204.22 - as for 1204.18 1204.23 - No. 25 in Nolan St. near the crossing of Bendigo Creek, running a special tram tour. 1204.24 - No. 25 on a special charter, in Weeroona Ave. at Cnr of Caledonia St. passing the Gas works. 1204.25 - Nos. 25 (showing Golden Square), 7 and 26 at Charing Cross. Has fountain in the background.Information written on in blue ink and date stamped on purple ink. 1204.1 - "No. 5 at Manchester Loop, near Havilah Rd. Long Gully." 1204.2 - "No. 26 in Backhaus St. Long Gully passing William St." 1204.3 - "No. 5 in High St. Eaglehawk." 1204.4 - "No. 5 in High St. Eaglehawk." 1204.5 - "No. 5 in High St. Eaglehawk." 1204.6 - "No. 5 in Mt. Korong Rd., Ironbark, passing Calder Highway Junctn." 1204.7 - "No. 26 shortly after leaving Needle Loop, passing William St., Long Gully. No. 5 cresting hill in distance." 1204.8 - "No. 5 at California Gully Loop." 1204.9 - "No. 5 in Long Gully" 1204.10 - "No. 2 at Eaglehawk terminus." 1204.11 - "No. 2 at Eaglehawk terminus." 1204.12 - "No. 2 at Eaglehawk terminus." 1204.13 - "No. 2 at Eaglehawk terminus." 1204.14 - "No. 2 in Mt. Korong Rd, midway between California Gully Loop and Needle Loop. 1204.15 - "Nos. 2 and 26 crossing at Long Gully." 1204.16 - "No. 26 leaves Long Gully loop for Eaglehawk as No. 2 pulls out of the far end towards Bendigo" 1204.17 - "No. 26 beginning the climb up View St. from Charing Cross." 1204.18 - "No. 5 at Charing Cross." 1204.19 - "No 21 arrives at Charing Cross from Golden Square while No. 5 awaits departure time for Eaglehawk." 1204.20 - "Nos. 7, 21, and 2 (behind which is No. 5) at Charing Cross." 1204.21 - "Nos. 7, 21, and 2 at Charing Cross." 1204.22 - "No. 5 at Charing Cross." 1204.23 - "No. 25 in Nolan St. near Bendigo creek crossing" 1204.24 - "No. 25 in Weeroona Ave. at cnr of Caledonia St." 1204.25 - "Nos. 25, 7, 26 and 2 (behind 26) at Charing Cross."tramways, trams, bendigo, eaglehawk, long gully, california gully, charing cross, north bendigo, tram 2, tram 5, tram 7, tram 21, tram 25, tram 26 -
 Ballarat Tramway Museum
Slide - 35mm slide/s - set of 6, Noel Simons, 28 Feb. 1972
Set of 6 transparencies taken on 28/2/1972 on Kodak mounts. 1206.1 - Bendigo No. 5 at Hayes St. Loop, en route for Quarry Hill. 1206.2 - No. 5 at Garden Gully Loop, Mt. Korong road, Ironbark. en route to Quarry Hill. Note the water column in the background. 1206.3 - No. 5 in View St. Bendigo, with the Commodore Motel in the background. 1206.4 - No. 6 en route for Golden Square in Fire Station loop, with the fire station building in the background. Photo taken after tram has passed photographer. 1206.5 - No. 6 in High St., running through Golden Square Shopping Centre, en route for Golden Square. Photo taken after tram has passed photographer. 1206.6 - No. 6 arriving at Charing Cross, bound for North Bendigo, with the City Family Hotel, ANZ bank and the Cenotaph (war memorial) in the background.Information written on in blue ink and date stamped on purple ink. 1206.1 - "No. 5 at Hayes Loop, Ironbark." 1206.2 - "No. 5 at Garden Gully Loop, Mt. Korong road, Ironbark." 1206.3 - "No. 5 in View St. just after start of double track near Barnard St." 1206.4 - "No. 6 in High St. at Fire Station loop." 1206.5 - "No. 6 in High St. running through Golden Square shopping centre." 1206.6 - "No. 6 arriving at Charing Cross from Golden Square."tramways, trams, bendigo, hayes st. loop, garden gully loop, view st., golden square, charing cross, tram 5, tram 6 -
 Ballarat Tramway Museum
Slide - 35mm slide/s - set of 12, Noel Simons, 28 Feb. 1972
Set of 12 transparencies taken on 28/2/1972 on Kodak mounts. 1207.1 - Bendigo 26 and 2 at Charing Cross. 26 en route for Eaglehawk, 2 for Quarry Hill. Has the Colonial Mutual Life, Armstrong Tyre Service, and Australian Mutual Provident Society buildings and a Cohns Drinks ad. in the background. 1207.2 - as for 1207.1 but with Alexandra fountain in the foreground. 1207.3 - No. 2 in Mitchell St. heading for Quarry Hill. Photo taken after tram has passed photographer. Has buildings on either side of Mitchell St. in the background, including the Plaza Theatre. 1207.4 - No. 6 en route for Golden Square departing Charing Cross. Has the RACV and ANZ bank in the background. 1207.5 - No. 2 crossing Pall Mall to enter Charing Cross ex Quarry Hill, with the Fountain Plaza in the background. 1207.6 - No. 6 arriving Charing Cross ex Golden Square with No. 21 alongside. No. 21 has the SEC ad. 'Everything's fine in my all electric kitchen.' Has the City Family Hotel and the Fountain Plaza shopping centre in the background. 1207.7 - No. 5 at Charing Cross en route for Quarry Hill with No. 2 behind. No. 2 has two SEC roof ads, 'Everything s fine in my all electric kitchen' and 'Electricity best for cooking'. RACV building in the background. Tram crews are discussing the day in the front of the tram. 1207. 8 - No. 21 in High St. Bendigo with the Cathedral in the background. No. 21 has two SEC roof ads, 'Everything's fine in my all electric kitchen' and 'Electricity best for cooking'. 1207.9 - No. 6 in High St. Bendigo with the Cathedral in the background. 1207.10 - No. 6 in High St. Bendigo, just past Wattle St. Photo taken after the tram has passed the photographer from within the Highway Car Sales yard. 1207.11 - No. 26 bound for Eaglehawk at the end of the double track in View St., note signal contactors, tram stop and section signs mounted on pole. 1207.12 - No. 26 turning from View St. into Barnard St.Information written on in blue ink and date stamped on purple ink. 1207. 1- "Nos. 26 and 2 at Charing Cross." 1207.2 - "Nos. 26 and 2 at Charing Cross." 1207.3 - "No. 2 in Mitchell St. just after leaving Charing Cross." 1207.4 - "No.6 leaving Charing Cross for Golden Square." 1207.5 - "No. 2 arriving at Charing Cross from Quarry Hill." 1207.6 - "No. 21 waits at Charing Cross as No. 6 arrives from Golden Square." 1207.7 - "No 5 at Charing Cross with No. 2 lurking behind." 1207.8 - "No. 21 in High St. at cnr of Wattle St." 1207.9 - "No. 6 in High St. at cnr of Wattle St." 1207.10 - "No. 6 in High St. between Wattle and Vine Sts." 1207.11 - "No. 26 at end of double track in View St. near Barnard. St. 1207.12 - "No. 26 seen at dusk turning from View St. into Barnard St."tramways, trams, bendigo, charing cross, high st, view st., tram 2, tram 5, tram 6, tram 21, tram 26 -
 Ballarat Tramway Museum
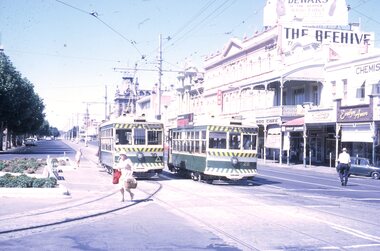
Slide - 35mm slide/s - set of 4, Peter Moses, Jan. 1969
Set of four colour slides taken at Charing Cross Bendigo, Jan. 1969. .1 - Trams 30 and 28 travelling to North Bendigo and Golden Square respectively. Has the Beehive building in the background, along with W.M.I. Jones Chemist, Evelyn Amor shop, Dewars Whiskey rooftop advertisement. 28 has a SEC Briquettes roof advertisement. .2 - As above but with the front or bogie tram in the photo. Also has A. G. Treloar Optician's shop. Kodak cardboard mount slide, taken by Peter Moses, Jan. 1969. .3 - Close up photo of Birney No. 30, with 28 in the background. .4 - No. 28 leaving for Golden Square with the Plaza building, the Cenotaph, and the City Family Hotel in the background. Kodak cardboard mount slide, taken by Peter Moses, Jan. 1969.On the rear of all the slides "P. Moses" in black ink .1 - "Bendigo Charing Cross" and in red ink "19" .2 - "Bendigo three trams / Charing Cross" and in red ink "21" .3 - "Bendigo" and in red ink "23" .4 - "Bendigo Charing Cross" and in red ink "14". tramways, trams, bendigo, tram 28, tram 30