Showing 318 items
matching garden st bridge
-
 Ballarat Tramway Museum
Slide - 35mm slide/s - set of 7, Noel Simons, 22/11/1962 12:00:00 AM
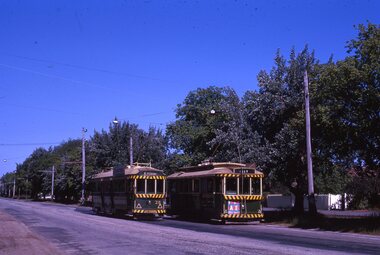
Set of 7 Kodachrome transparencies taken on 22/11/1962. 1161.1 - trams 38 and 20 in Sturt St. West at the Russell St. loop. No. 20 has possibly terminated and is showing "CITY" while 38 is showing "Mt Pleasant" Both trams fitted with dash canopy lighting, but no large white stripe. 20 has a Twin Lakes sign. 1161.2 - tram 33 just before Gardens Loop in Wendouree Parade, with destination of "Victoria St." Has a Twin Lakes sign. 1161.3 - tram 39 at corner of Lydiard St. North and Sturt St. with Post Office in background. 1161.4 - tram 40 turning from Sturt St into Lydiard St. North with Post Office in background and showing destination of Lydiard St. North. A blue Holden with red stripes for the Radio Cabs co. is in the foreground, along with pedestrians. 1161.5 - tram 41 in Sturt St. at the City terminus, showing destination of Mt Pleasant with Post Office and ANZ Bank buildings in background. Numerous people waiting on the seats at the tram stop. 1161.6 - tram 13 in Sturt St. near Doveton St. showing destination of Bell St. Many cars and pedestrians on the south side of Sturt St. Note the Austin motor car by the tram showing a stop signal. Tram 13 has a Twin Lakes sign. 1161.7 - trams 13, 26, and 39 in the City Loop near Bridge St. Has Morseheads and Grenville St. tram shelter in the background.1161.1 - "38 and 20 crossing in Sturt St. Ballarat near Russell Street" - in blue and black ink. The "Russell St" is a later addition, over white out. 1161.2 - "33 near Botanic Gardens terminus, Wendouree Parade, Ballarat" 1161.3 - "No. 39 in Lydiard St. Ballarat at Cnr. of Sturt St." 1161.4 - "No. 40 entering Lydiard St. from Sturt St. Ballarat" 1161.5 - "No. 41 in Sturt St. Ballarat at cnr of Lydiard St." 1161.6 - "No. 13 in Sturt St. Ballarat, at Cnr. of Doveton St." 1161.7 - "Nos. 13, 26, and 39 in Sturt St. Ballarat near Bridge St." All have date stamp of "22 Nov. 1962" in purple ink. All black ink unless otherwise noted.tramways, trams, ballarat, sturt st. west, wendouree parade, lydiard st., city loop, taxis, radio cabs, tram 13, tram 20, tram 26, tram 33, tram 38, tram 39, tram 40, tram 41 -
 Ballarat Tramway Museum
Slide - 35mm slide/s - set of 2, Noel Simons, 24/11/1962 12:00:00 AM
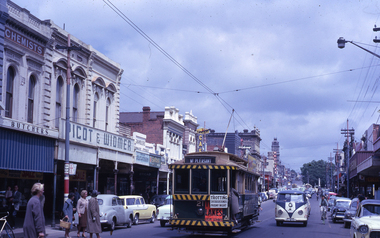
Set of 2 Kodachrome transparencies taken on 24/11/1962. 1163.1 - No. 21 in Bridge St., with destination of "Mt Pleasant" with a Twin Lakes advert and "Trotting Showgrounds Friday Night" auxiliary board on front dash panel. Also Picot & Widmer, chemists shop alongside tram. Tram at a stop with people boarding. 1163.2 - No. 13 and 30 crossing at the end of the double track in Sturt. St, at Grenville St. Both trams have Twin Lakes signs. Photo shows buildings either side of Sturt St.1163.1 - "No. 21 in Bridge St. Ballarat" 1163.2 - "No. 13 and 30 at foot of Sturt St. Ballarat" All have date stamp of "24 Nov. 1962" in purple ink. All black ink unless otherwise noted.tramways, trams, ballarat, bridge st, grenville st., sturt st., tram 13, tram 21, tram 30 -
 Ballarat Tramway Museum
Slide - 35mm slide/s - set of 13, Noel Simons, 28/04/1971 12:00:00 AM
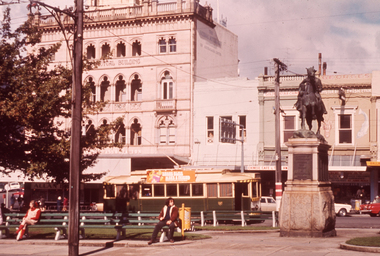
Set of 13 transparencies taken on 28/4/1971 on PAKON mounts. 1168.1 - No. 21 at City terminus - taken from North side of street. Has Boer War statue on right side and National Mutual building in the background. 1168.2 - No. 34 with destination "Sebastopol" in Sturt St., outside Town Hall, with National Mutual building in background. 1168.3 - No. 18 at corner of Sturt and Lydiard Sts with National Mutual building and Craigs Hotel in background. 1168.4 - 18 at intersection of Sturt and Dawson St. 1168.5 - No. 30 at intersection of Armstrong St and Sturt St. with Fletcher Jones building in background. 1168.6 - No. 14 at City Terminus, showing destination of "Victoria St." with Town Hall in the background. 1168.7 - No. 11 bound for Mt Pleasant, opposite Titanic Bandstand in Sturt St. Has a Twin Lakes advertisement on the front dash panel and an unknown roof advertisement. 1168.8 - No. 21 at bottom of Sturt St. approaching the Grenville St. junction, with Dickins Food Store and the Spot Cafe in the background. Tram has destination of "Victoria St". and a roof advertisement for a cigarette? company. 1168.9 - No. 26 and three other trams in City Loop, looking west along Sturt St., just after a heavy hail storm. 1168.10 - No. 21 at the intersection of Sturt St and Dawson St. with Golden City Hotel and the Ritzy Cafe in the background. Can see the Dawson St. crossover track, just after a heavy hail storm. 1168.11 - No. 21 and three other trams at City Loop looking east along the south side of Sturt St. See also image 1168i1a - cleaned up and edited by Peter Waugh April 2024 - used in the April 2024 issue of Fares Please. 1168.12 - No. 14 entering the South side of Sturt St. from Bridge St. with Dickins Store in the background and the Grenville St. shelter alongside the tram. 1168.13 - No. 37 at Sturt and Dawson St., eastbound, showing "Lydiard St. Nth" Has SEC roof advertisement on the side of the tram.1168.1 -"Sturt & Lydiard Sts" 1168.2 - "Town Hall" 1168.3 - "Sturt St & Dawson Sts" 1168.4 - "Sturt and Lydiard Sts" 1168.5 - "Sturt St." 1168.6 - "Sturt and Lydiard Sts" 1168.7 - "Sturt St." 1168.8 - "Bridge St." 1168.9 - "City Loop" 1168.10 -"Dawson & Sturt Sts." 1168.11 - "City Loop" 1168.12 - "Bridge St." All have date stamp of "28 Apr 1971" in purple ink on base. All blue ink unless otherwise noted.tramways, trams, town hall, sturt st., dawson st, armstrong st., grenville st, bridge st., titanic bandstand, tram 11, tram 14, tram 18, tram 21, tram 26, tram 30, tram 34, tram 37 -
 Ballarat Tramway Museum
Slide - 35mm slide/s - set of 9, Noel Simons, Sept. 1971
Set of 9 Kodak Ready-mount with slides made from the Association of Railway Enthusiast Provincial Tramways film strip. Reference Item 2560 details the ARE Film Strip, and provide references to other slides. See also Reg. item 1164. 1174.9 on plain white mount. 1174.1 - Tram 40 North bound for Lydiard St. North at the Railway Gates, with the gates closed. Tram carrying a heavy load of passengers. Railway station building and car park in background. Taken from the signal box. 1174.2 - Tram 12 bound for Gardens, photographed across the median strip plantation near Dawson St. Image i2a - adjusted 9/2021 to remove colour cast. 1174.3 - Tram 43 in bound along Wendouree Parade near Barrett Ave, passing a former tram stop and with "Warning Oncoming Trams" sign mounted on an adjacent pole. See also Reg. item 1172.1 for a photo taken in May 1971. This photo taken after the closure of the Victoria St. line, as the tram stop has been painted out. 1174.4 - Looking along the track to Sebastopol terminus on the west side of Albert St. - telephoto shot showing bogie tram in the far distance. Shows the nature of the track, poles, tram stop frequency and in the fare distance the terminus. Also show the trees that used to be along this section of the track. 1174.5 - No. 42 showing "Special" in Macarthur St. approaching Drummond St. north. Photo taken from under the verandah of a shop on the south side of the street that were many years later to become the Tramcar Restaurant. Note metal fence to cemetery. 1174.6 - Nos. 21 (Sebastopol) crossing 14 (Lydiard St. Nth) at the loop between Sayle and Grey St. Photo taken looking south. 1174.7 - No. 12 bound for Mt Pleasant, in Bridge St. about to stop at the junction for the two routes. Telephoto photo looking west along Bridge St. with many cars in the photo. Very few people on the street itself. 1174.8 - No. 30 and 17 at the City Terminus, on the north side of Sturt St. Taken from the Post Office corner with the Town Hall in the background. 1174.9 - No. 39 inbound along Sturt St. West. with many cars on the road. Bus stop on a pole on the other side of the road.1174.1 - "No. 40 on Lydiard St. North service waits at the level crossing at Ballarat Railway Station." 1174.2 - "No. 12 bound for 'Gardens' seen across the centre plantation in Sturt St." 1174.3 - "Barrett Ave." 1174.4 - "The Sebastopol route near the terminus" 1174.6 - "Nos. 21 and 14 crossing at Sayle St. Loop on Sebastopol route" 1174.7 - "No. 12 at Eastern end of Bridge St." 1174.8 - "Nos. 30 and 17 in Sturt St. at Cnr of Lydiard St." 1174.9 - "No. 39 City bound from 'Gardens" in Sturt St. West" All have date stamp of "Sep 1971" in black ink. Writing in blue ink.tramways, trams, lydiard st. nth, railway crossing, sturt st, wendouree parade, sebastopol, macarthur st., bridge st., sturt st. west, tram 12, tram 14, tram 17, tram 21, tram 30, tram 39, tram 40, tram 42, tram 43 -
 Ballarat Tramway Museum
Slide - 35mm slide/s, Noel Simons, 21/11/1962 12:00:00 AM
Set of 6 transparencies taken on 21/11/1962 on Kodak mounts. 1189.1 - Bendigo No.11 at Quarry Hill terminus. Photo taken looking in along the route. Tram has destination of North Bendigo. 1189.2 - No. 21 in Pall Mall bound for North Bendigo. Tram has roof ads for Mamouney's furniture and SEC. In the background are the National Bank building, Dad and Dave's Cafe and the Beehive Buildings and the London Pharmacy. 1189.3 - No. 2 in Mitchell St, just after crossing over railway bridge. Photo taken after tram has passed photographer. Has what appears to be an SEC road works crew in the background. Has destination of Quarry Hill. 1189.4 - No. 17 climbing Mitchell St. on the start of the single track section, just before crossing the railway bridge. Has destination of Quarry Hill and the large Maples building sign in the background. 1189.5 - as for 1189.4 but after tram has passed photographer. Has an Ilford film roof ad and an SEC roof ad. Railway bridge in the background. 1189.6 - No. 21 at Charing Cross with passengers boarding. Tram has destination of North Bendigo and roof ads for SEC 'Electric Cooking' and Sandhurst Milk. In background are the buildings on the south side of High St. Also has a SEC worker in white overalls sweeping the track.Information written on in black ink and date stamped on purple ink. 1189.1 - "Birney car No. 11 in High St. Bendigo at Golden Square terminus" 1189.2 - "No. 21 in Pall Mall Bendigo near Charing Cross" 1189.3 - "No. 2 in Mitchell St. Bendigo, just after crossing bridge over railway line (Quarry Hill route)" 1189.4 - "No. 17 in Mitchell St. Bendigo, climbing the hill the bridge over the railway line. (Quarry Hill route)" 1189.5 - "No. 17 in Mitchell St., Bendigo approaching bridge over Railway line (Quarry Hill route)" 1189.6 - "No. 21 at Charing Cross, Bendigo"tramways, trams, bendigo, golden square, pall mall, mitchell st., quarry hill, tram 2, tram 11, tram 17, tram 21 -
 Ballarat Tramway Museum
Slide - 35mm slide/s - set of 4, Noel Simons, Apr. 1967
Set of 2 slides made from the Association of Railway Enthusiast Provincial Tramways film strip, possibly during April 1967. 1192.1 and 1192.3 mounted in Kodak Ready Mounts. The others in plain white mounts. Slides dated Dec. 1968. 1192.1 - No. 21 out bound to Golden Square in High St., between Wattle and Vine Streets. Photo taken after tram has passed photographer. Has a sign for "Reid's Furnituorium" in the background. 1192.2 - Bendigo No. 28 dressed up as Myers Christmas tram, passing the Post Office and Courts in Pall Mall. 1192.3 - Bendigo No. 23 at Needle Loop en route to Eaglehawk. Tram has two SEC roof ads, one "Electric Cooking" and the other "Everything fine in my all electric kitchen". 1192.4 - Bendigo scrubber parked at the end of the main depot lead, alongside the depot office buildings.Details in blue ink, date hand stamped in purple ink. 1192.1 - "No. 21 heads along High St for Golden Square between Wattle and Vine Streets." 1192.2 - "Birney No. 28 in Christmas Garb, traverses Pall Mall en route to North Bendigo". 1192.3 - "No. 23 at Needle Loop on its run to Eaglehawk". 1192.4 - "Scrubber car at Bendigo Depot".tramways, trams, north bendigo, bendigo, bridge st loop, depot, tram 21, tram 23, tram 28, tram scrubber -
 Ballarat Tramway Museum
Slide - 35mm slide/s - set of 20, Noel Simons, 21/05/1971 12:00:00 AM
Set of 20 transparencies taken on 21/5/1971 on Kodak mounts. 1197.1 - Bendigo No. 5 en route to Eaglehawk at Creeth St Long Gully. Tram has a SEC roof ad and Cinzano roof ad. 1197.2 - No 5 approaching Needle Loop between Long Gully and California Gully. On left hand side is the City of Bendigo sign, indicating city boundary. 1197.3 - As for 1197.2 but actually entering loop. Photo taken after tram has passed photographer. 1197.4 - No. 26 bound for Eaglehawk descending the railway bridge near Eaglehawk, at Jobs Gully. 1197.5 - as for 1197.4, but after crossing bridge, now ascending a hill. Photo taken after tram has passed photographer. 1197.6 - No. 26 climbing High St. hill Eaglehawk, nearing end of Double track, bound for Quarry Hill. Shows centre of the road poles. 1197.7 - As for 1197.6, with tram entering single track section. Photo taken after tram has passed photographer. Has a BP service station in the background. 1197.8 - No. 26 (bound for Quarry Hill) crossing No. 17 (Eaglehawk) at Job's Gully Loop. 1197.9 - No. 17 climbing railway bridge at Job's Gully, en route to Eaglehawk. Photo taken after tram has passed photographer. 1197.10 - No.26 bound for Quarry Hill, leaving Long Gully Loop? Has the Creeth St. church in l197.l in the far background. Photo taken after tram has passed photographer. 1197.11 - Tramway Point work at the northern end of Long Gully Loop. 1197.12 - No. 17 en route for Quarry Hill turning into View St. from Bamard St. Tram has SEC roof ads "Everything fine in my all electric Kitchen' and 'Electric Cooking is Matchless'. 1197.13 - as for 1197.12, but tram has turned into View St and about to enter the double line track. Photo taken after tram has passed photographer. 1197.14 - No. 21 enters Nolan St after turning from MacRae St. en route to Bendigo. Note sign on its own post noting tram turns "Beware Tram Turns" and stop sign on adjacent pole "Trams stop on Request". No. 21 has two SEC roof ads. 1197.15 - No. 21 in Nolan St. after turning from Bridge St. (White Hills Road). Note signal light for Bridge St. loop on pole corner of street. Photo taken after tram has passed photographer. 1197.16 - No. 2 bound for Eaglehawk at unknown location. 1197.17 - Tram stop sign on a pole "CARS STOP BY REQUEST" 1197.18 - No. 5 in Carpenter St.? en route to Quarry Hill. 1197.19 - No. 28 has just arrive at Golden Square terminus, passengers are disembarking and the trolley pole is being turned. Golden Square Hotel in the background. 1197.20 - No. 28 at Golden Square terminus. Has a "Nothing beats Briquettes for hear roof ad. Information written on in black ink and date stamped on purple ink. 1197.1 - "No. 5 at Creeth St. Long Gully" 1197.2 - "No. 5 approaching Needle Loop between Long Gully and California Gully" 1197.3 - "No. 5 at Needle Loop between Long Gully and California Gully" 1197.4 - "No. 26 crossing railway bridge at Job's Gully near Eaglehawk" 1197.5 - "No. 26 just after crossing railway bridge at Job's Gully near Eaglehawk/ 1197.6 - "No. 26 in High St. Eaglehawk" 1197.7 - "No. 26 at end of double track in High St. Eaglehawk" 1197.8 - "Nos. 26 and 17 crossing at Job's Gully Loop" 1197.9 - "No. 17 crossing railway bridge at Job's Gully near Eaglehawk". 1197.10 - "No. 26 at Long Gully" 1197.11 - 'Northern end of points at Long Gully Loop". 1197.12 - "No. 17 turning into View St. from Bamard St. Bendigo". 1197.13 -'No. 17 at beginning of double track in View St. after leaving Bamard St. Bendigo. 1197.14 - "No. 21 enters Nolan St. from MacRae St. Bendigo." 1197.15 - "No. 21 in Nolan St. Bendigo just after leaving White Hills Road." 1197.16 - "No. 2" 1197.18 - "No. 5" 1197.19 - "Birney car No. 28 at Golden Square Terminus" 1197.20 "Birney car No. 28 at Golden Square Terminus" tramways, trams, bendigo, long gully, railway bridge, jobs gully, trackwork, nolan st, quarry hill, tram stops, golden square, tram 2, tram 5, tram 17, tram 21, tram 26, tram 28 -
 Ballarat Tramway Museum
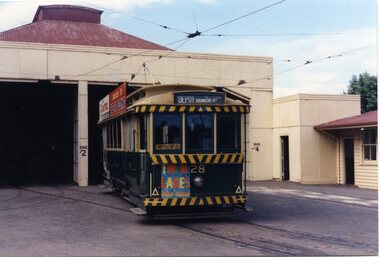
Slide - 35mm slide/s - set of 13, Noel Simons, 24/05/1971 12:00:00 AM
Set of 13 transparencies taken on 24/5/1971 on Kodak mounts. 1200.1 - No. 7 en route to Golden Square turning from Bridge St. into Nolan St. Photo taken after tram has passed photographer. Tram has a briquettes roof ad. 1200.2 - No. 21 in McCrae St. just before Nolan St. Photo taken after tram has passed photographer. 1200.3 - No. 7 in Nolan St at corner with McCrae St. Passenger boarding tram at a tram stop. 1200.4 - No 7 turning from Nolan into McCrae St. with Golden Fleece service station in background. 1200.5 - No. 7 in Thunder St en route to North Bendigo. Photo taken after tram has passed photographer. 1200.6 - No. 5 en route to Eaglehawk just after leaving Needle Loop between Long Gully and California Gully. 1200.7 - No. 5 at the start of the double track in High St. Eaglehawk. 1200.8 - No. 5 at Eaglehawk terminus showing "Depot" with Leo A Hughes Photographer advertisement on building in background. 1200.9 - No. 5 at Eaglehawk terminus. Has two SEC roof ads 'Everything's fine in my all electric kitchen' and 'Electricity best for cooking'. 1200.10 - No. 5 at Eaglehawk terminus, with canon, war memorial outside Town Hall and Leo A Hughes Photographer advertisement on building in background. 1200.11 - No. 5 in McCrae St. about to enter Arnold St. and depot. Tram showing depot, has driver changing points. 1200.12 - No. 5 in Arnold St. Photo taken looking up the centre of the access track - shows the overhead at depot junction. 1200.13 - Depot entrance with signage at depot entrance and depot building in background.Information written on in black ink and date stamped on purple ink. 1200.1 - "No. 7 entering Nolan St. from Bridge St." 1200.2 -"No. 21 in McRae St. about to turn into Nolan St." 1200.3 - "No. 7 in Nolan St. at corner of McRae St." 1200.4 - "No. 7 turning from Nolan St. into McRae St." 1200.5 - "No. 7 in Thunder St. just after turning from Caledonia St." 1200.6 - "No. 5 just after leaving Needle Loop between Long Gully and California Gully. 1200.7 - "No. 5 in High St. Eaglehawk at start of double track." 1200.8 - "No. 5 at Eaglehawk terminus" 1200.9 - "No. 5 at Eaglehawk terminus" 1200.10 - "No. 5 at Eaglehawk terminus."\ 1200.11 - "No. 5 in McCrae St. about to enter Arnold St." 1200.12 - "No. 5 in Arnold St." 1200.13 - "Entrance to Bendigo Tram Depot, No. 5 running into shed."tramways, trams, bendigo, mccrae st, north bendigo, california gully, eaglehawk, depot, tram 5, tram 7, tram 21 -
 Ballarat Tramway Museum
Slide - 35mm slide/s - set of 19, Noel Simons, 26/02/1972 12:00:00 AM
Set of 18 transparencies taken on 26/2/1972 on Kodak mounts. 1203.1 - Bendigo 5 at Eaglehawk terminus - with new traffic works. 1203.2 - No. 5 climbing the High St. hill Eaglehawk with the buildings on the east side in the photo. 1203.3 - No 2 descending the road over rail bridge at Job's Gully, heading for Quarry Hill. 1203.4 - as for 1202.3, but more side on. Tram has two SEC roof ads. 1203.5 - as for 1202.4 1203.6 - No. 26 entering Garden Gully Loop, Mt. Korong Road, Ironbark. Tram en route to Eaglehawk. Water column on right hand side of photograph. 1203.7 - No. 2 on the Eaglehawk route, Iron Bark area?, bound for Quarry Hill. 1203.8 - as for 1202.7, but photo taken after tram has past photographer. 1203.9 - No. 5 at Eaglehawk terminus, night photo. Tram has arrived at terminus, showing Quarry Hill, pole turned, but the tram lights have yet to be turned around. 1203.10 - as for 1202.9, but lights have been turned around. 1203.11 - No. 26 climbing the View St. Hill near the Commodore Hotel. Has Campbells Electrical Services building in the background. Photo taken after the tram has passed the photographer. 1203.12 - No. 7 end on photograph, at Golden Square, destination showing Golden Square - night photo. 1203.13 - number not used. 1203.14 - as for 1202.12, but partially side on, has a passenger looking out the tram. 1203.15 - as for 1202.12, but with hotel in the background. 1203.16 - No. 26 and 2 at Charing Cross, night photo. Tram 26 en route to Quarry Hill, 2 to Eaglehawk. 1203.17 - Interior photo of No. 26, at night. 1203.18 - No. 26 at the Quarry Hill terminus as night. 1203.19 - as for 1202.18, but central portion of the tramcar.Information written on in blue ink and date stamped on purple ink. 1203.1 - "No. 5 at Eaglehawk terminus" 1203.1 - "No. 5 in High St. Eaglehawk" 1203.3 - "No. 2" 1203.4 - "No. 2" 1203.5 - "No. 2" 1203.6 - "No. 26 at Garden Gully Loop Mt Korong Rd., Ironbark" 1203.7 - "No. 2" 1203.8 - "No. 2" 1203.9 - "No. 5 at Eaglehawk terminus" 1203.10 - "No. 5 at Eaglehawk terminus" 1203.11 - "No. 26 in View St. Near the Commodore Motel" 1203.12 - "No. 7 at Golden Square Terminus" 1203.14 - "No. 7 at Golden Square Terminus" 1203.15 - "No. 7 at Golden Square Terminus" 1203.16 - "Nos. 26 and 2 at Charing Cross" 1203.17 - "Interior of No. 26" 1203.18 - "No. 26 at the Quarry Hill terminus" 1203.19 - "No. 26 at the Quarry Hill terminus "tramways, trams, bendigo, eaglehawk, bridges, iron bark gully, night photo, quarry hill, golden square, tram 2, tram 5, tram 7, tram 26 -
 Ballarat Tramway Museum
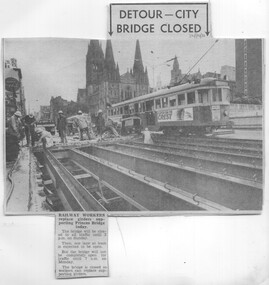
Newspaper, Herald & Weekly Times Ltd, "Detour - City Bridge Closed", 24/10/1970 12:00:00 AM
Newspaper Clipping from The Sun newspaper 24/10/1970 about the replacement of bridge girders in Swanston St. over the Railway lines with W2 381 in the background. Gives details of road closure. Good photo of the type of structure."24/10/70" in blue ink in top left hand corner.trams, tramways, swanston st., mmtb, bridges -
 Ballarat Tramway Museum
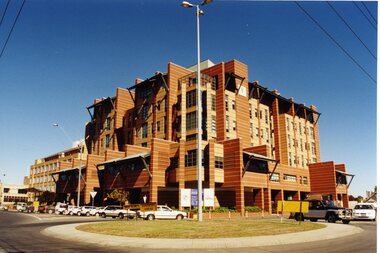
Photograph - Colour Photograph/s - set of 25, Austin Brehaut, 7/04/2000 12:00:00 AM
Yields information about various locations in Ballarat in March 2000 for comparison with previous photographs.Set of 25 colour photographs taken by Austin Brehaut on 7 April 2000 showing various locations that Ballarat trams once ran in, for use in a BTM presentation, named "Ballarat Past and Present" at the COTMA 2000 Ballarat Conference. All on Fujicolour Crystal Archive Paper. On rear in blue ink is the date, location and where relevant a reference number to photo locations that the author of the presentation had requested. Letter from Austin, filed with the worksheet for Reg. Item 1772. 1773.1 - Base Hospital, Cnr Drummond St. North and Mair St. .2 - Hospital Corner - Base Hospital Along Drummond St. North .3 - St John of God Hospital, cnr Mair and Drummond St. Nth. .4 - Hospital Corner, looking South East from Base Hospital .5 - Gardens at Loop (Wendouree Parade) .6 - Gardens Loop and Shelter .7 - Shelter at Gardens Loop .8 - Bridge Mall looking west .9 - Lower Victoria St. along Bridge St .10 - Railway crossing, Ballarat Station, with gates open .11 - Victoria St. hill facing west .12 - Railway crossing, Lydiard St. North .13 - Railway crossing, Ballarat Station, with gates closed .14 - Lydiard St. North terminus from cemetery .15 - Lydiard St. North at Macarthur St. .16 - Lydiard St. North at Sturt St facing South East - Post Office on left .17 - Looking north along Lydiard St at Sturt St .18 - Sturt and Lydiard Sts corner from Post Office .19 - Centre plantation Sturt St. looking east .20 - Sturt St. West near Ballarat and Clarendon College .21 - Sturt St. West facing west at Russell St. .22 - Victoria St. terminus .23 - Victoria St. terminus .24 - St Alipius Church, Victoria St. .25 - Junction of tramline and Phoenix foundry railway in Sturt St. at Armstrong St. (transferred from roadway) See Reg item 4645 and 4646 for the 2010 comparisons.See Aboveballarat, hospital corner, gardens loop, railway crossing, lydiard st. north, sturt st, phoenix foundry, armstrong st., victoria st., sturt st. west -
 Ballarat Tramway Museum
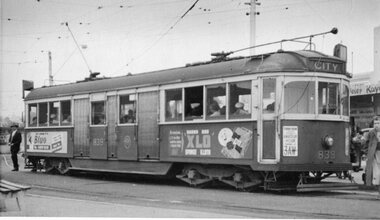
Photograph - Black & White Photograph/s, late 1950's or early 60's?
Black and white photograph, of MMTB W5 839 at the roundabout at corner of Mt Alexander Road and Fletcher St. Essendon, Essendon Station late 1950's or early 1960's. In the background is the railway bridge over Mt. Alexander Road. All blinds drawn. Tram showing destination "CITY". On the sides of the tram are advertisements for "Bluo" and "XLO Sponge cloth". On the front of the tram is an advertisement for radio station 3AW, Amateur Hour, Terry Dear. Photograph not well focused. trams, tramways, essendon, mmtb, mt alexander road, tram 839 -
 Ballarat Tramway Museum
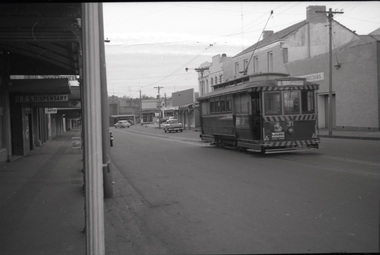
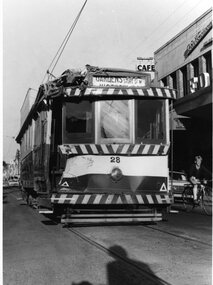
Photograph - B&W print of donated negative, Ron E. Fluck, 23/06/1962 12:00:00 AM
Black and white print of a donated negative. Print made 8/1998. Photo of SEC tram no. 31 in Main St, Ballarat East, with destination of "Gardens via Drummond St." Tram has been fitted with dash canopy lighting, but not the large white strip under the lighting. Has small triangles on the panels. Also has a small ad for White Horse whisky. Shows buildings on either side of Main St. and the Caltex service station in the background on Main Road and Bridge St. Photo taken 23-6-1962. Copy made Oct. 2001 for the "gold, Gold GOLD" temporary exhibition - colour laser print onto card, with Velcro dots on rear. Stored in box D1 (Display Box) 02/2003. High Res scan of negative added 17/1/2019.tramways, trams, main st, 31, ballarat, tram 31 -
 Ballarat Tramway Museum
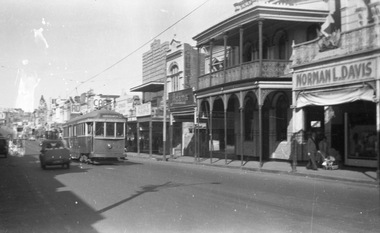
Photograph - B&W print of donated negative, Ron E. Fluck, 23/04/1950 12:00:00 AM
Black and white print of a donated negative. Print made 8/1998. Photo of SEC bogie tram No. 22 in Bridge St. Photo taken 23-4-1950. Destination of "Gardens via ???" in one line? Has Norman L.Davis building in foreground and buildings on either side of street. Negative has watermark on left hand side. High Res scan of copy negative added 17/1/2019tramways, trams, bridge st, 22, ballarat, tram 22 -
 Ballarat Tramway Museum
Photograph - B&W print of donated negative, Ron E. Fluck, 23/04/1950 12:00:00 AM
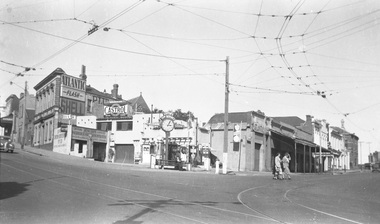
Black and white print of a donated negative. Print made 8/1998. Photo of the Lister's Junction Service Station, overhead and tram track at the intersection of Bridge St, Main St and Victoria St. (Stones Corner). Shows the style of overhead construction, signal contactors, the service station, its clock and associated advertising. Three ladies are crossing the road. Photo taken on 23.4.1950 at 3.05pm. Advertising on service station has Atlantic, Shell, and Castrol. Has multiple petrol dispensing bowsers. Clocks has directional arrows for Melbourne and Geelong. Tram tracks visible. Copy made Oct. 2001 for the "gold, Gold GOLD" temporary exhibition - colour laser print onto card, with Velcro dots on rear. Stored in box D1 (Display Box) 02/2003. high res scan of the negatives added 18/1/2019.tramways, trams, bridge st, stones corner, ballarat, main st -
 Ballarat Tramway Museum
Photograph - B&W print of donated negative, Ron E. Fluck, 13/08/1950 12:00:00 AM
Black and white print of a donated negative. Print made 8/1998. Photo of a street scene in Swanston St. Melbourne on the Princes bridge with St Paul's Cathedral in the background. Has two W2's in the photo, a number of motor cars, also the Princes Bridge Station building. Photo taken 13-8-1950. Image i1 high res scan of the negatives added 18/1/2019.tramways, trams, melbourne, swanston st., princes bridge -
 Ballarat Tramway Museum
Photograph - Black & White Photograph/s, 1930's
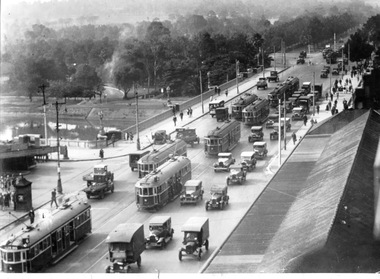
Black and white photo going to sepia toned, of about 11 W2's and many motor vehicles on Princes Bridge Melbourne, taken from the tower on Flinders Street station building, during the late 1930's. Many people on bridge, traffic jam of motor vehicles on the bridge itself. Note buildings at the Batman avenue terminus. Can see a tram trolley pole of a tram in Batman Avenue. No curve from Batman Ave. into Swanston St. At least two of the trams do not have route number boxes. There are a number of delivery vehicles in the photograph, but no horse drawn vehicles are to be seen.trams, tramways, melbourne, princes bridge, flinders st. station, batman ave., tram 321 -
 Ballarat Tramway Museum
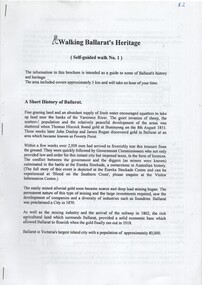
Ephemera - Tour Notes, Jennifer Barnes, 'Walking Ballarat's Heritage', Aug. 1998
18 page self-guided walk No. 1 of Ballarat with three staples along left hand edge. Page 1 incorporates a short history of Ballarat, followed by tour commencing at Ballarat Visitor Information Centre, 33 Sturt St., west to Lydiard St., south to former goal (jail) and return to Railway station. Returning to Sturt St. via Mair and Camp Streets finishing up in Bridge St. Mall. Interest: Page 3, under "2. Sturt St.", on paragraph on electric trams and second re 'Ballarat Vintage Tramway'. Mrs. Jennifer Barnes is the wife of City of Ballarat Councillor, Mr. John Barnes$2 (in blue biro top left hand corner page 1) - cost price of purchase from Ballarat Visitor Information Centre.local history, ballarat railway station, heritage buildings, tourism -
 Ballarat Tramway Museum
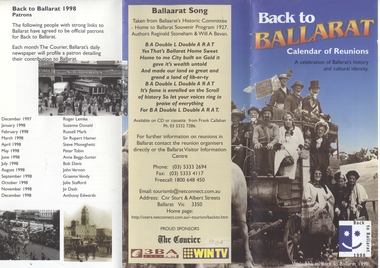
Pamphlet, Ballarat Visitor Information Centre, "Back to Ballarat: Calendar of Reunions - a celebration of Ballarat's History and Cultural Identity, mid 1997
Fold out pamphlet with 6 panel, printed in colour on gloss paper, containing calendar for reunions Dec. 1997 to Dec. 1998, details for reunions and special events. Included as a features and photographs of yesteryear. 1. Frontispiece - 'Linton Express' stage coach 2. Back panel, photo of tram in S.E.Dickins store and horse cab in front of Town Hall 3. Small photo of ESCo tram at Lydiard St. and Sturt St. Corner 4. ? - Picor and Widmer moving stock across Bridge St. blocking tram to Victoria St. ca 1960. One Panel is Ballaarat song - taken from Ballaarat's Historic Committee - home to Ballarat Souvenir Program 1927, authors Reginald Stoneham & Will A. Bevan. These words along with associated tune is often sung to this day at gatherings of locals etc. Sponsors of pamphlet were 3BA, WIN TV, and The Courier. List of patrons on one panel. Also contains a sheet of paper with updates as of 23/4/1998 of reunions. Second copy added 31/10/12 - and imaged. See Reg Item 5468 for a postcard.trams, tramways, ballarat song, reunions, ballarat trams -
 Ballarat Tramway Museum
Photograph - Colour Photograph/s, 23/11/1962 12:00:00 AM
Colour postcard size print of SEC Ballarat trams 13, 26 and bogie car in the City Loop. Photo dated 23.11.1962. Printed on AGFA paper. In background is Morseheads building and another single trucker heading onto Bridge St. Tram 13 has "Twin Lakes" sign in multiple colours on front panel, 26 has briquette ad and the bogie car has an SEC Ad as well. Bogie car has front or east trolley pole up, as if to run back to Bridge St. All trams fitted with dash canopy lighting, but not the large white strip on the front panel. Tram 13 has the destination of "CITY"On rear top left hand corner "23.11.62" in very wavy handwriting typical of an aged person.city loop, sturt st., ballarat, tram 13, tram 26 -
 Ballarat Tramway Museum
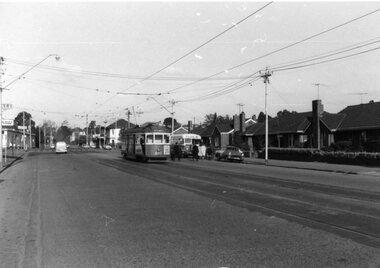
Photograph - Black & White Photograph/s, Dave Macartney, 23/12/1967 12:00:00 AM
Black and white photograph of SEC Tram 17 bound for the city turning from Barkly St. into Main St., on the Mt Pleasant route. Photo taken from the tower on the Ballarat Fire Station. Tram painted in the Bridge St. Traders Association Christmas Livery. Shows the view out to Mt Pleasant along Barkly St and the houses along this route. Photo by Dave Macartney - 23/12/1967. Photocopy made 4/1999 for display purposes.trams, tramways, mt pleasant, barkly st., main st, bridge st traders, tram 17 -
 Ballarat Tramway Museum
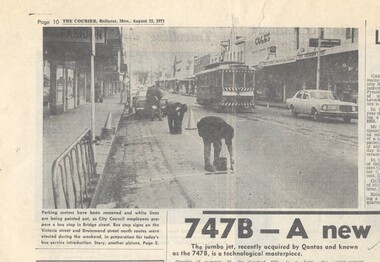
Newspaper, The Courier Ballarat, Installing bus stops in Bridge St, 23/08/1971 12:00:00 AM
Yields information about the closure of the SEC Ballarat system in particular the changes made to Bridge St.Newspaper clipping pasted onto a single sheet of paper with two Punch holes on the left hand side with one hole through the photograph within the cutting. Clipping from The Courier, Ballarat, Monday, 23/8/1971 (newspaper date, with page 10), with a photo and associated caption of Council employees painting out parking lines in Bridge St. in preparation for a bus stop. Has a single truck tram in the photo heading along Bridge St. for the city. Caption notes that the work was being done in preparation for the bus service introduction. Photograph taken either Saturday afternoon after shops closed or on Sunday as street has very few cars in it. See Reg item 3767 for print of photograph. 1069.2 - copy of cutting, image added 10/9/2013, from a donation by Dave Macartney.In red ink in upper central right hand corner, "21/8/71"trams, tramways, closure, bus changeover, bridge st, bus stops -
 Ballarat Tramway Museum
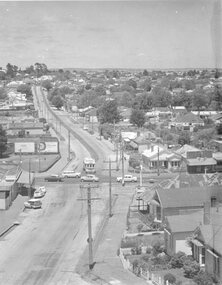
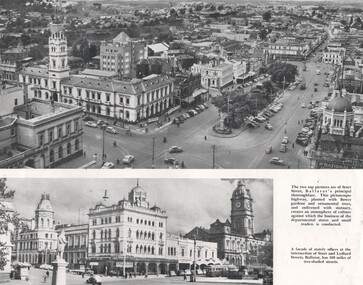
Photograph - Illustration/s, Ballarat Views, 1950's mid
Single sheet of printed paper, collected from a magazine (p59/60) with two black and white photos of Ballarat and one colour of Bendigo. Photo 1 - 260mm long x 122mm high, photo of north east Ballarat from Town Hall, looking out to Black Hill. Photo similar to Reg. No. 102, but buildings on corner of Grenville and Bridge St has a Plume sign instead of a Mobilgas Ad. This indicates early to mid 1950's. One tram in loop in one in Bridge St. Also has a "Neptune" sign in photograph. Photo 2 - 195mm long x 75mm high - from north east corner of Sturt and Lydiard Sts looking towards Town Hall and Craig's Hotel. Photo includes SEC bogie at tram stop and the front end of bus travelling east in Sturt St. Photo 3 - 230mm long x 156mm high - colour printed photo of Pall Mall, Bendigo from west side (by Post Office), looking towards the Shamrock Hotel. Photo includes signs for "COR Motor Spirit", "Tanox Paint" and the rear of a Bendigo to Huntly bus. See item Reg. No. 102trams, tramways, ballarat, bendigo, pall mall, oil companies -
 Ballarat Tramway Museum
Photograph - Black & White Photograph/s - set of 2, The Courier Ballarat, 6/04/1971 12:00:00 AM
Yields information about the incidents that can occur on a street tramway system - collisions resulting in derailments than can affect other people as well.Black and white photograph of damage after a collision to Ballarat tram No. 28 Ballarat Courier photo. Shows detail of the BTPS received the tram. Photo taken 6/4/1971, published 7/4/1971 of No. 28 driven through Bridge St after collision in Victoria St. See Reg Item 1063 for the newspaper cutting. Colour photocopy, laminated, of this photograph on display 4/2000 at 02-02-06. 672.1 - Collected by Alan Bradley from the Ballarat Courier early 1980's. See Excel file "Record of Ballarat Courier Photos SEC era" (Archive Documents) for source of details.672 - Ballarat Courier Photo stamptrams, tramways, ballarat, accidents, bridge st , tram 28 -
 Ballarat Tramway Museum
Photograph - Colour Photocopy/photocopies, John Phillips, 28/01/1980 12:00:00 AM
Yields information about the operation of a Ballarat (ex Melbourne) tram in Melbourne during an Australia Day celebrations by the BTPS and the city skyline at the time.Colour photograph of BTM Ballarat Tram No. 40 at the corner of Swanston St and Flinders St. Melbourne on 28 Jan. 1980. Tram fitted with Pioneer Settlement and Peters Ice Cream Roof Ads, showing Sebastopol destination. Taken during the Australia Day celebrations. Young & Jackson Hotel in the background with many advertisements. Photo taken from the Princes Bridge Station Plaza. Taken by John Phillips. Second copy added 9/11/2005 to display box D2. See also Reg Item 4131 and 4132 for other photos of the day - Wellington Parade. See 1979-1980 Annual Reportaustralia day, melbourne, btps, tram 40 -
 Ballarat Tramway Museum
Photograph - Black & White Photograph/s, mid to Late 1965
Set of seven Black and white photographs of the arrangements and work for the track reconstruction at the intersection of Hoddle St/Punt Rd and Bridge Road Richmond late 1965. On Kodak paper. 1420.1 - Bridge Road looking east at River St. crossover (Hawthorn bridge in distant background). Tram-bus connection at a weekend. Note driver's uniform. Conductor walking to bus with passengers. Conductors often worked through on the bus and next tram at this time to save crews. 1420.2 - Bridge Road at Punt Rd and Hoddle St. intersection looking north west. Reconstruction of curves. Would probably be a Sunday given that new rails are in situ. 1420.3 - Ditto - looking south east 1420.4 - looking south east 1420.5 - looking east - replacement bus service passing with old cable winding house in the background. Concrete being placed. 1420.6 - Wellington Parade at Simpson St. crossover looking east. Bus-tram connection. Bus 542 and tram 966 (Kew Depot) 1420.7 - ditto - bus 570 and tram 850 (Camberwell). See P.Winspur note - see data sheet for Reg. item 1418.trams, tramways, bridge road, tram - bus connections, trackwork, mmtb, tram 939, tram 966, tram 850 -
 Ballarat Tramway Museum
Photograph - Black & White Photograph/s, early Oct. 1965
Set of two Black and white photographs on Kodak paper of the track reconstruction in Hawthorn Road Caulfield, Inkerman St. area. Photo taken during early Oct. 1965. East track was complete by 9/10/1965 (Electric Traction 11/1965). 1421.1 - Hawthorn Road, looking north from Inkerman St. SW6 953 outbound. 1421.2 - Hawthorn Road between Inkerman St and Balaclava Road - SW6 853 outbound, passing an inbound tram. Note steel-wood cross over bridge between the two tracks. See P.Winspur note - and Electric Traction Nov. 1965 and data sheet for Reg. Item 1418trams, tramways, hawthorn road, caulfield, trackwork, mmtb, tram 953 -
 Ballarat Tramway Museum
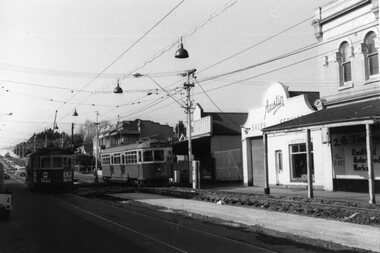
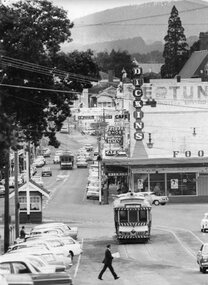
Photograph - Black & White Photograph/s, Peter Bruce, Digital image - "City Loop and Bridge St", 1971
Yields information about the buildings and trams in view from Lydiard St looking east along Bridge St.Black and white photograph of SEC No. 31 and two other single truckers in the City Loop at the bottom end of Sturt St. near Grenville St and another single trucker in Bridge St. heading west, just after leaving the junction with Main and Victoria Sts. Has the Grenville St. tramway shelter. Telephoto lens used from about the intersection with Lydiard St. looking east. Has "Dickins" store and other shops in the background. Tram 31 shows the destination of City and has a Twin Lakes sign as well. Photograph by Peter Bruce, 1971. Digital image added 7/7/10. Peter Bruce title "City Loop and Bridge St"trams, tramways, sturt st, city loop, bridge st, dickins, tram 31 -
 Ballarat Tramway Museum
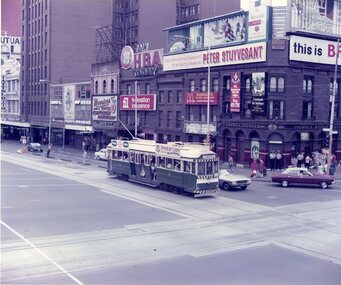
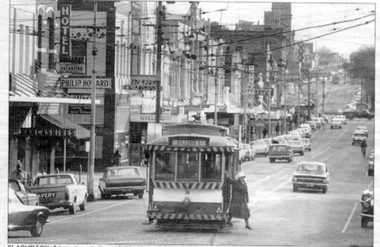
Newspaper, Alison Wynd, "Ballarat trams must pay their own way: Hiscock", 7/01/1997 12:00:00 AM
Item written by Alison Wynd in The Courier, Ballarat, page 7 on 7/1/1997 reporting on a statement by the Chairman of the Ballarat Tourism Board, Peter Hiscock that trams would have run profitably if they were reintroduced to Ballarat Streets. Comments on possible staging, tourist and engineering studies and market. Includes a photo of SEC No. 31 with a Victoria St. destination at the junction in Bridge St with the Mount Pleasant line, with a women stepping from the tram. An adjacent item reports on the appointment of Robin Cooper as Victorian Transport Minister to replace Mr Alan Brown.feasibility study, ballarat city tramway, ballarat revival, transport minister -
 Ballarat Tramway Museum
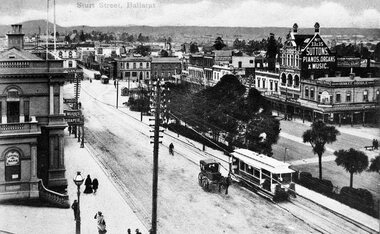
Photograph - Black & White Photograph/s, c1905
Black and white print with negative (N148) of an ESCo tram descending the Sturt St. hill from Lydiard St. North towards Grenville St. Photograph taken from possibly the post office. looking south east. Photo taken soon after opening as tram is not fitted with a destination box. Has horse drawn vehicle and person on bicycle travelling up hill alongside the tram indicating traffic arrangements at the time. Post office steps in photograph as well as Sutton store, Yankee Doodle store and Morris draper shop. Photo title "Sturt St. Ballarat". Another two tramcars at end of Bridge St. Copy negative and photograph by John Phillips of a Postcard High Res Images added 5/3/2011. Original neg scanned at hi res and updated 11/5/2020.trams, tramways, sturt st, esco, grenville st, bridge st