Showing 102 items matching " hawthorn rd caulfield"
-
 Melbourne Tram Museum
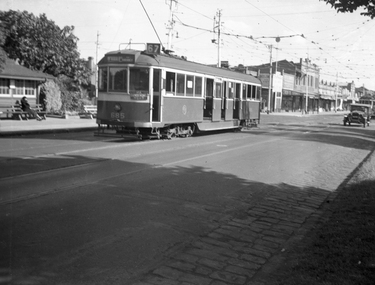
Negative - Copy - CW5 685 Hawthorn Road, Balaclava Junction, early to mid 1940s
Black and white photograph of CW5 685 in Hawthorn Road with Caulfield Park in the background, just before Balaclava Junction. Tram has white strips on the bumper and under the cab windows. Photo during the early to mid 1940's. Tram has an Auxiliary board "Via Dandenong Rd" and showing, Route 67. At the time, Route 67 ran from St Kilda ran from Balaclava Junction to St Kilda, Acland St via Dandenong Road. Ceased in 1955. See 3599 for a poor print.Yields information about the use of L class trams.Copy negative of a black and white photographtramcars, tramways, caulfield, hawthorn road, cw5 class, balaclava junction, route 67., tram 685 -
 Melbourne Tram Museum
Slide, Keith Caldwell, 16/03/1962 12:00:00 AM
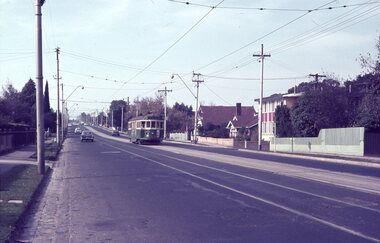
Agfa colour slide, cardboard mount, photo by Keith Caldwell March 1963 of W5 810 in bound in Dandenong Road Caulfield showing St Kilda Junction, no route number followed by SW6 901 route 64 to the city. Shows the centre median strip. 810 has an advert for Ferris Car Radios and a second person in the cab."Dandenong Rd March 63" in blue ink.trams, tramways, st kilda junction, route 64, dandenong rd, sw6 class, w5 class, tram 901, tram 810 -
 Melbourne Tram Museum
Map, Melbourne & Metropolitan Tramways Board (MMTB), Set of 15 tram route maps, 1977 to 1979
Series of 15 colour route maps for various tram lines or groups of tram lines for the MMTB. Some have the Transport Information Centre telephone printed on them, others have a label stuck on. Some are finished with a plastic laminate finish on either one or both sides. Show the major cross streets, parks, schools, other tram routes, major stop numbers and railway lines. Two copies of each held unless noted otherwise. .1 - Mont - Albert City - R11/77, shows routes 43. 47. 45. 44 .2 - Malvern, East Malvern, Carnegie and East Brighton Tram Routes (from St Kilda Junction) - R1/79 - shows routes 5, 3, 67, 66, 61, 62 and 64. .3 - Swanston St tram guide - R1/79 - lists all routes and route numbers that branch or cross Swanston St between Grattan St and St Kilda Junction. .4 - St Kilda Rd Tram Routes R12/77 - details South Melbourne Beach, route 1 and route 2 and St Kilda Beach routes 15, 16 and 55 otherwise shows were the various routes branch off St Kilda Road. Copy 1 has "P14909" in pencil in the bottom right hand corner. .5 - Kew - St Kilda Beach - R1/79 - Route 69. .6 - Footscray - Moonee Ponds - R3/81 - Route 82 .7 - Flinders St tram routes - R5/78 - North Balwyn, East Burwood, routes 48, 40, 41, Hartwell, 28, 74 and 75 .8 - William St tram routes - Route 55, 56 and 63 - South Melbourne Depot and Domain. copy 2 has "P14913" in bottom right hand corner. .9 - Toorak Camberwell and Glen Iris tram routes with Camberwell Junction and Malvern Town Hall, R1/79, routes 8, 7, 6, 72 and 73 shown. .10 - Swanston St tram routes - R12/77 - shows all the Swanston St routes, including East Coburg and Moreland. .11 - Bourke St tram routes - R4/77 - East Brunswick Blyth St and East Preston Tyler St and intermediate routes, routes 95, 96, 97, 90, 89 and 88. .12 - as for .11, dated 1/85, showing extension to La Trobe University - has Metropolitan Transit logo. Only 1 copy held. Also shows route 92 and 87. .13 - Batman Ave tram routes - R9/77 - Wattle Park, North Richmond and Prahran - routes 70, 71, 78 and 79. .14 - City route guide - R9/77 - showing all route numbers and destinations that passed through the CBD. .15 - Elizabeth St tram routes - R12/77 - Essendon Airport, West Maribyrnong, North Coburg lines, routes 50, 58, 60, 54, 57, 52. 49, 59, 18, 20 and 19. Copy 1 has "P14905" in pencil in bottom left hand corner.trams, tramways, maps, route guide, route numbers, routes, mont albert, route 43, route 47, route 45, route 44, route 42, malvern burke rd, east preston, carnegie, east brighton, south caulfield, route 5, route 3, route 67, route 62, route 64, route 66, glenhuntly tram depot, swanston st, st kilda rd, south melbourne beach, st kilda beach, route 1, route 2, route 15, route 16, route 55, kew- cotham road, route 69, route 79, route 82, footscray, moonee ponds, flinders st, north balwyn, kew, east burwood, burwood, hartwell, richmond, route 48, route 40, route 41, route 28, route 74, route 75, route 56, route 63, william st, west coburg, toorak, camberwell, glen iris, malvern town hall, route 72, route 73, route 7, route 8, bourke st, route 6, route 95, route 96, route 97, route 90, route 89, route 89, east preston, east brunswick, la trobe university, clifton hill, route 92, route 87, route 70, route 71, route 78, route 79, north richmond, prahran, wattle park, essendon airport, west maribyrnong, north coburg, route 50, route 58, route 60, route 54, route 57, route 52, route 49, route 59, route 18, route 20, route 19, batman ave -
 Melbourne Tram Museum
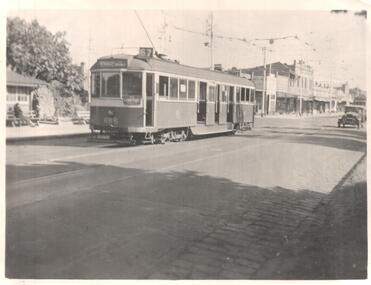
Photograph - Black & White Photograph/s, early to mid 1940's
Black and white photograph of CW5 685 in Hawthorn Road with Caulfield Park in the background, just before Balaclava Junction. Tram has white strips on the bumper and under the cab windows. Photo during the early to mid 1940's. Tram has an Auxiliary board "Via Dandenong Rd" and showing, Route 67. At the time, Route 67 ran from St Kilda ran from Balaclava Junction to St Kilda, Acland St via Dandenong Road. Ceased in 1955. See Reg item 815 for details. See 6791 for a copy negative.trams, tramways, cw5 class, balaclava junction, hawthorn rd, route 67, tram 685 -
 Melbourne Tram Museum
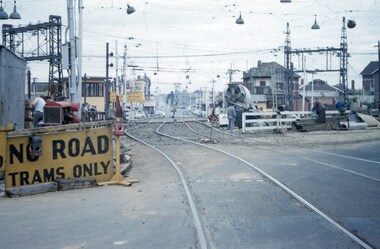
Slide - Set of 5, John Webster, 17/10/1959 12:00:00 AM
Set of five Colour slides, Kodak, brown cardboard of the removal of the Elsternwick Level crossing on 17-10-1959 .1 - looking east along Glenhuntly Road, showing the level crossing, concrete truck and road protection signs and the temporary track. .2 - W2 287 traversing the temporary track over the level crossing. Tram has the destination of route 4B, Sth Caulfield via Glenhuntly Road. Also has adverts for APEX and Fitwear socks. .3 - ditto on the crossing. .4 - ditto past the crossing. .5 - W2 551 (Carnegie Route 4) and L 103 (City route 4B) on the level crossing. 551 has adverts for Castle Vintage Sherry and Apex. 103 has adverts for Remy Martin Brandy, Alongside is a Victorian Railways sign advertising trains to the city.Hand writing on rear in ink; .1 - 17-10-59 - KFH1 .2 - KFH 1a .3 - KFH 1b .4 - KFH 1c .5 - KFH 1etrams, tramways, elsternwick, level crossings, railway squares, w2 class, l class, carnegie, south caulfield, glenhuntly rd, tram 287, tram 551, tram 103 -
 Melbourne Tram Museum
Slide - Set of 7, John Webster, 17/10/1959 12:00:00 AM
Set of seven Colour slides, Kodak, brown cardboard of the removal of the Elsternwick Level crossing on 28-5-1960 .1 - looking down into he cutting through the old goods yard - has the platform being installed. .2 - X2 675 crossing the new bridge with the level crossing in the background. .3 - L103, to the city, route 4, with the conductor watching the trolley pole. Has an advert for white horse whiskey. .4 - W2 269, route 4 to Carnegie, on the level crossing. Has a building in the background, advertising Esquire car sales. .5 - A Tait train on the crossing no gates in operation. .6 - ditto, to Sandringham .7 - W6 965, route 4 to the City on the crossing. Has two railway hoardings in the background advertising BP Benzol petrol and Saunders Pure Malt extract and part of a sign for Penfolds. The tram has an advert for Porsche cars. Note the tram stop sign on the small post alongside the tram.Hand writing on rear in ink; .1 - 28-5-60 - Railway cutting for underpass at Elsternwick Vic. .2 - ditto, tram 675 on temporary tracks in Glenhuntly Road, Elsternwick Vic. .3 - tram 103 on temporary tracks in Glenhuntly Road, Elsternwick Vic. .4 - tram 269 on temporary tracks in Glenhuntly Road, Elsternwick Vic. .5 - Elsternwick station new crossing .6 - Temporary track Elsternwick Vic .7 - Tram 965 at temporary stop at Elsternwick Vic.trams, tramways, elsternwick, level crossings, railway squares, w2 class, l class, carnegie, south caulfield, glenhuntly rd, w6 class, vr -
 Melbourne Tram Museum
Album - Robert Thomson Slide Collection, "Melbourne 1965 April Box 1"
Photo - see pdf file for further information. Number Brief Description RT107 Whitehorse Road - tram 378 - "City" - route 42 RT108 Malvern Depot - tram 947 - "Malv Tn Hall" - route 6B RT109 tram 7 RT110 tram 7 RT111 North Fitzroy - tram 980 - East Brunswick - Blyth St - route 96 RT112 North Fitzroy - tram 980 - East Brunswick - Blyth St - route 96 RT113 Hawthorn Depot - tram 17 RT114 Location ? tram 471 - "City" - route 7 RT115 Deepdene - tram 848 - "City" - route 42 RT116 Wattle Pk Ter - tram 368 - "City" - route 70 RT117 East Brighton Ter - tram 105 - "East Brighton via Caulfield" - route 64 RT118 Simpson St Siding - tram 889 - "Spencer St" - route 48 & tram 249 -"Football" RT119 Swan St Relay - tram 517 - "Wattle Park Elgar Rd" - route 70 RT120 tram 401 - "City" - route 70 - Swan St RT121 tram 401 - "Wattle Park Elgar Rd" - route 70 - Swan St RT122 tram 330 - "City" - route 70 - Swan St Demonstrates the work of Robert Thomson in photography, collection and/or production of slidesAssembled album in a black presentation folder of 16 colour slides, collected or produced by Robert Thomson. All photographs have been scanned and placed on the Museum's G drive. A list of all photographs with details has been compiled. melbourne, tramways, trams -
 Melbourne Tram Museum
Magazine, Glen Eira Historical Society, "Glen Eira Historical Society Newsletter", 2015
Parts of the Glen Eira Historical Society Newsletter" for an issue during 2015 containing an item written by Keith Stodden, titled "Our local tram services: a few thoughts" covering early horse tram services, cable trams, PMTT, Point Ormond, Glen Huntly depot, Elsternwick, routes and Truganini Road. Has a photo showing the former tramway poles at Elsternwick Park.trams, tramways, caulfield, horse trams, glen eira, glenhuntly tram depot, point ormond, tram routes, pmtt, truganini rd -
 Melbourne Tram Museum
Slide - Set of 17 - Tramway Shelters, Robert Green, c1990
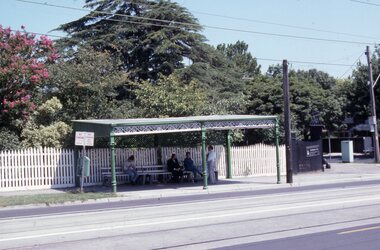
Set of 17 colour slides of tramway shelters, poles, and substations by Robert Green c1990. Shelters by the PMTT, HTT and MMTB 1 Tramway Shelter (PMTT) - Cnr Balaclava and Orrong Road, Caulfield 2 - ditto 3 - Tramway Shelter (PMTT) - Cnr. Cotham Road and Burke Road, Deepdene 4 - Tramway Shelter (PMTT) - Cnr. Cotham Road and Burke Road, Deepdene with telephone box alongside. 5 - Cnr. Malvern Rd and Orrong Road, Toorak 6 - Cnr. Malvern Rd and Orrong Road, Toorak 7 - Cnr. Dandenong Road and Hawthorn Road, Caufield 8 - ditto 9 - PMTT Substation - Rusden Street, Elsternwick 10 - PMTT poles cnr. Dandenong Road and Wattletree Road 11 - Tram shelter (HTT) Riversdale Road and Highfield Road - Camberwell - Highfield Park 12 - Tram shelter (HTT) Riversdale Road and Wattlevalley Road, Camberwell 13 - ditto 14 - Tram shelter (HTT) Camberwell Road, cnr Bowen St. Camberwell. 15 - Tram Shelter (HTT) Camberwell Depot, Riversdale Road, Hawthorn 16 - Merri Creek Bridge, St. Georges Road, North Fitzroy 17 - Merri Creek Bridge, St. Georges Road, North Fitzroy - foundation stone Yields information about Melbourne's tramway stop shelters and other infrastructure.Set of 17 Kodak colour slides in plastic mounts.tramways, shelters, caufield, deepdene, toorak, orrong road, cotham road, balaclava road, pmtt, htt, mmtb, riversdale road, camberwell depot, merri creek bridge, foundation stone, dandenong road, poles, rusden st, substations, hawthorn road, st.georges road -
 Melbourne Tram Museum
Photograph - Black & White, David Menzies, Tram 245 Normanby Rd Caulfield Races, c1975
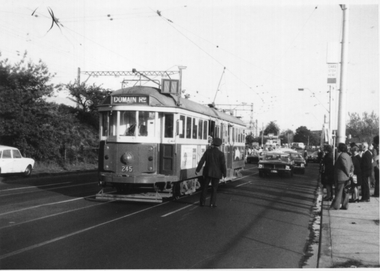
Black and white print of W2 class tram 245 picking up passengers in Normanby Road after a race meeting at Caulfield. The tram has the destination of Domain Road. Many punters wait on the kerb while an Inspector supervises.Yields information about the Caulfield Race Traffic.Black and White photograph - printed on plain paper with photographers stamp and notes on rear.Has stamp of David Menzies on rear. and in ink "Caulfield Races '75"tramways, trams, mmtb, caulfield, normanby road, tram 245, domain road, w2 class, race traffic -
 Melbourne Tram Museum
Document - Press Release, Melbourne & Metropolitan Tramways Board (MMTB), "Press Statement", Jun. 1982
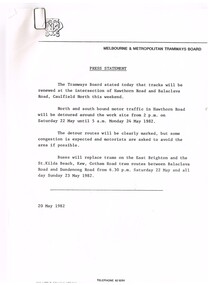
Set of four MMTB Press Statements or Press Releases with MMTB letterhead. Photocopied onto A4 paper. 1. Renewal of tracks - Caulfield North - 20/5/1982. 2. Maintenance of railway crossing - Riversdale Road - 15/6/1982. 3. Maintenance of Bridge Rd and Church St Richmond - 1/6/1982 4. Maintenance work in Pascoe Vale Road, Moonee Ponds - 16/6/1982Item 4 has a handwritten note in ink "NB now half a "Grand Union" at Sydney Road & Moreland Rd"trams, tramways, mmtb, trackwork, road works, news broadcasts -
 Melbourne Tram Museum
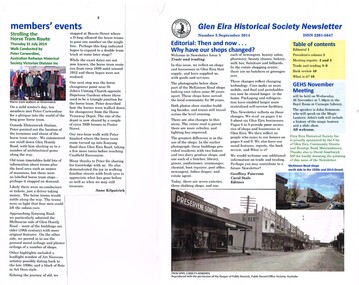
Magazine, Glen Eira Historical Society, "Glen Eira Historical Society Newsletter", Sep. 2014
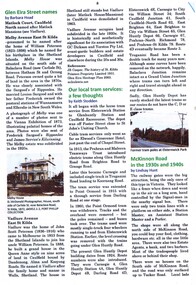
Parts OF the Glen Eira Historical Society Newsletter" for September 2014 with items on the McKinnon Road shopping centre, a report on a talk by Ian Jenkin of the ARHS Vic Div about the Caulfield horse tramway and the PMTT and a report of a walk along the horse tram route conducted by Peter Carwardine of the ARHS in July 2014. Includes a donation note from Member Keith Stodden, dated 25-9-2014trams, tramways, caulfield, horse trams, glen eira, mckinnon rd