Showing 797 items matching " laurie "
-
 Monbulk RSL Sub Branch
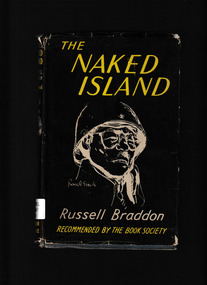
Book, Werner Laurie, The naked island, 1954
... Werner Laurie...The naked island Book Werner Laurie Russell Braddon ...Story of the Malayan Campaign of 1942 and subsequent captivity in the hands of the Japanese from a private soldier's point of view.Ill, p.266.non-fictionStory of the Malayan Campaign of 1942 and subsequent captivity in the hands of the Japanese from a private soldier's point of view. world war 1939 – 1945 - prisons and prisoners - japanese, prisoners of war - australia -
 Port Melbourne Historical & Preservation Society
Photograph - The Official Opening of Rothman's tobacco products new Victorian Distribution Centre 1963, Laurie RICHARDS, 7 Feb 1963
... Laurie RICHARDS...Photograph The Official Opening of Rothman's tobacco products new Victorian Distribution Centre 1963. Laurie RICHARDS ...Photograph of L - R unknown, Cr Mel FENNELL, Cr Les TURNER, Deputy Chairman of Rothmans of Pall Mall, Sir Kenneth COLE, at the Official Opening of' the company's Victorian Distribution Centre in Port Melbourne situated on Lorimer Street near Ingles Street Fishermen's Bend.B & W photograph of two City of Port Melbourne Councillors & the Chairman of Rothmans of Pall Mall (Australia) Ltd.On reverse pasted label with printed Compliments of Rothmans Of Pall Mall typed inscription : On the occasion of the Official Opening of the Rothmans new Victorian Distribution Centre on 7th February 1963. Handwritten - from Right to Left , ? , Cr Mel FERRELL, Cr Les TURNER, Sir Kenneth COLE (Deputy Chairman)leslie stanley turner, local government - city of port melbourne, rothmans of pall mall distribution centre, henry melville fennell, sir kenneth cole, built environment - commercial -
 Glenelg Shire Council Cultural Collection
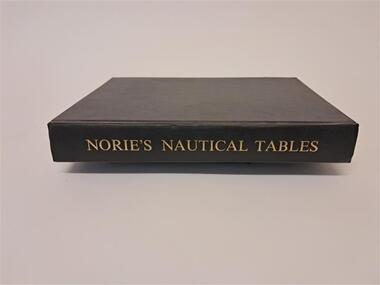
Book - Norie's Nautical Tables, Imray, Laurie, Norie & Wilson Ltd, 1981
... Imray, Laurie, Norie & Wilson Ltd....Norie's Nautical Tables Book Norie's Nautical Tables Imray, Laurie, Norie & Wilson Ltd. ...This book contains nautical tables such as the Suns Total Correction, Table of the angles of the Mariner's Compass, Traverse Table, Logs. of Trig. Functions, Haversines, Hour angle etc.Black covered hard cover book. 546 pages plus an index.non-fictionThis book contains nautical tables such as the Suns Total Correction, Table of the angles of the Mariner's Compass, Traverse Table, Logs. of Trig. Functions, Haversines, Hour angle etc.nautical, angles, compass, logs, functions -
 Ballarat Tramway Museum
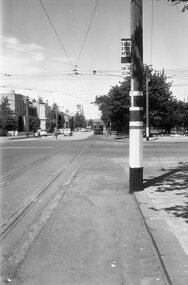
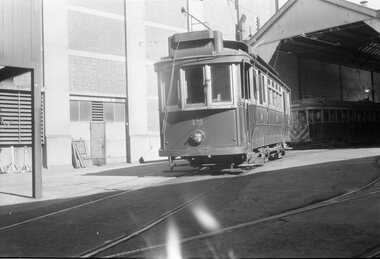
Negative - Corner Drummond and Sturt Street tram stop, Laurie Gallop, mid 1950s
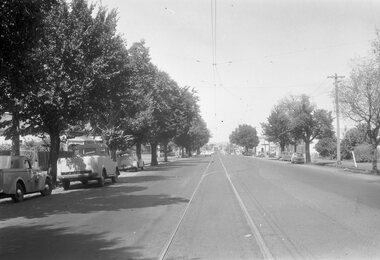
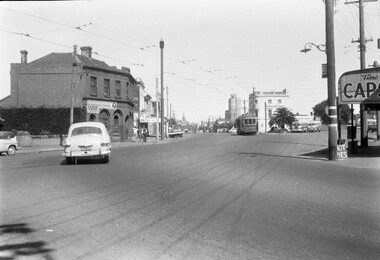
... Laurie Gallop...Tram Stops tramways Sturt St Drummond St End Of Section Sign tram stop Sign Black and white Negative - 120 size Negative Corner Drummond and Sturt Street tram stop Laurie Gallop ...Photo shows the inbound tram stop pole on the Northwest corner of Sturt and Drummond Streets in Ballarat. Note the vertical "End Section" sign along with the usual "End of Section" and "Cars stop here" sign at this compulsory tram stop. Another stop can be see on the other side of Drummond St along with No. 14 on its way to the City. Yields information about the tram stop at the corner of Sturt and Drummond St and signage.Black and white Negative - 120 sizetram stops, tramways, sturt st, drummond st, end of section sign, tram stop, sign -
 Ballarat Tramway Museum
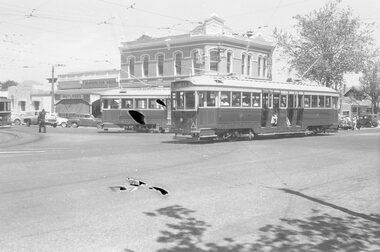
Negative - Hospital corner - Drummond and Sturt Streets, Laurie Gallop, 1950s
... Laurie Gallop...Tram Stops tramways Sturt St Drummond St tram 25 tram 35 conductor Black and white Negative - 120 size Negative Hospital corner - Drummond and Sturt Streets Laurie Gallop ...The photo shows three trams at Hospital Corner, during the mid to late1950s. Tram 35 turns from Drummond Street South on its way to Lydiard St North. Another bogie tram is turning into Drummond St South while No. 25 waits at the tram stop. A conductor can be seen walking forward with a point bar. In the background is the sign for Rimmiington Bros Butchers and the Southern Cross Hotel. The negative has been damaged - photographer unknown.Yields information about the tram operations at Hospital Corner Ballarat.Black and white Negative - 120 sizetram stops, tramways, sturt st, drummond st, tram 25, tram 35, conductor -
 Ballarat Tramway Museum
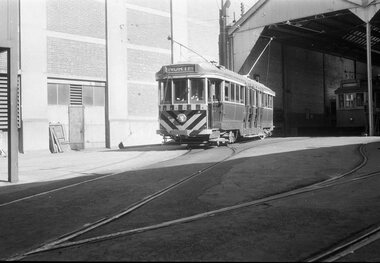
Negative - Tram 33 Geelong depot, Laurie Gallop, early 1956
... Laurie Gallop...Yields information about the Geelong operations toward the closure of the tram system. tramways Geelong Geelong depot tram 33 Black and white Negative - 120 size Negative Tram 33 Geelong depot Laurie Gallop ...Photo shows Geelong 33 on No. 5 road at Geelong depot being driven out with the destination set to North. One of a set of photos was taken between 15/2/1956 and 3/3/1956 when services operated only between Belmont and North before the final closure of the Belmont route on 25/31956 and that bogie tram 31 is not shown on the board, having gone to Ballarat on 15/2/1956 - see item 5554. See item 8213 for an article on the Geelong system by Keith Kings. Yields information about the Geelong operations toward the closure of the tram system.Black and white Negative - 120 sizetramways, geelong, geelong depot, tram 33 -
 Ballarat Tramway Museum
Negative - Geelong scrubber at depot, Laurie Gallop, early 1956
... Laurie Gallop...Yields information about the Geelong operations toward the closure of the tram system and in particular the Geelong scrubber or track cleaning tram. tramways Geelong Geelong depot Scrubber Geelong 16 geelong 19 Black and white Negative - 120 size Negative Geelong scrubber at depot Laurie Gallop ...The photo shows the Geelong scrubber on the front of No. 2 road with No. 16 behind and No. 19 alongside. One of a set of photos was taken between 15/2/1956 and 3/3/1956 when services operated only between Belmont and North before the final closure of the Belmont route on 25/31956 and that bogie tram 31 is not shown on the board, having gone to Ballarat on 15/2/1956 - see item 5554. See item 8213 for an article on the Geelong system by Keith Kings. Yields information about the Geelong operations toward the closure of the tram system and in particular the Geelong scrubber or track cleaning tram.Black and white Negative - 120 sizetramways, geelong, geelong depot, scrubber, geelong 16, geelong 19 -
 Ballarat Tramway Museum
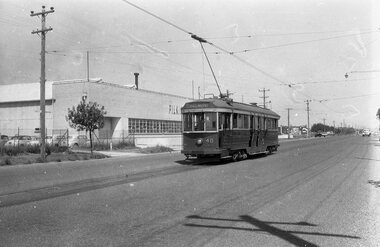
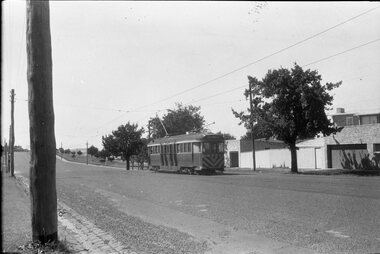
Negative - Tram 40 at the North terminus, Laurie Gallop, early 1956
... Laurie Gallop...Yields information about the Geelong operations toward the closure of the tram system and the North terminus. tramways Geelong Geelong depot tram 40 North Black and white Negative - 120 size Negative Tram 40 at the North terminus Laurie Gallop ...Photo shows Geelong tram 40 at the North Terminus, with the Pilkington glass factory behind. The tram has the destination of Belmont. One of a set of photos was taken between 15/2/1956 and 3/3/1956 when services operated only between Belmont and North before the final closure of the Belmont route on 25/31956 and that bogie tram 31 is not shown on the board, having gone to Ballarat on 15/2/1956 - see item 5554. See item 8213 for an article on the Geelong system by Keith Kings. Yields information about the Geelong operations toward the closure of the tram system and the North terminus.Black and white Negative - 120 sizetramways, geelong, geelong depot, tram 40, north -
 Ballarat Tramway Museum
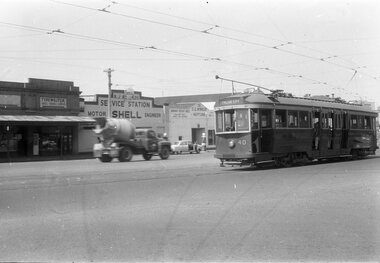
Negative - Tram 40 - Mercer St, city end, early 1956
... Laurie Gallop...Yields information about the Geelong operations toward the closure of the tram system. tramways Geelong tram 40 North Mercer St Black and white Negative - 120 size Negative Tram 40 - Mercer St, city end Laurie Gallop ...Photo shows Geelong tram 40 Mercer St, city end. The tram has the destination of North. In the background is a typewriter shop, R J Reynolds? Shell service station and S G Winkler Service station with a Neptune sign. The driver has his hand on the air brake and the controller with the front driver's window open. One of a set of photos was taken between 15/2/1956 and 3/3/1956 when services operated only between Belmont and North before the final closure of the Belmont route on 25/31956 and that bogie tram 31 is not shown on the board, having gone to Ballarat on 15/2/1956 - see item 5554. See item 8213 for an article on the Geelong system by Keith Kings. Yields information about the Geelong operations toward the closure of the tram system.Black and white Negative - 120 sizetramways, geelong, tram 40, north, mercer st -
 Ballarat Tramway Museum
Negative - SECV Geelong tram 19 at Geelong Depot, Laurie Gallop, early 1956
... Laurie Gallop...Yields information about the Geelong operations toward the closure of the tram system. tramways Geelong Geelong depot tram 19 Black and white Negative - 120 size Negative SECV Geelong tram 19 at Geelong Depot Laurie Gallop ...Photo shows Tram 19 at Geelong Depot One of a set of photos was taken between 15/2/1956 and 3/3/1956 when services operated only between Belmont and North before the final closure of the Belmont route on 25/31956 and that bogie tram 31 is not shown on the board, having gone to Ballarat on 15/2/1956 - see item 5554. See item 8213 for an article on the Geelong system by Keith Kings. Yields information about the Geelong operations toward the closure of the tram system.Black and white Negative - 120 sizetramways, geelong, geelong depot, tram 19 -
 Ballarat Tramway Museum
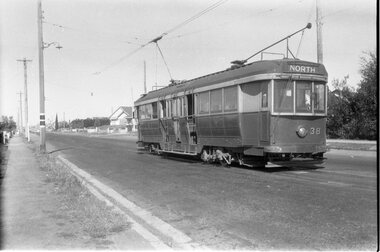
Negative - SECV Geelong tram 38 Mercer Street, Laurie Gallop, early 1956
... Laurie Gallop...Yields information about the Geelong operations toward the closure of the tram system. tramways Geelong tram 38 Mercer St Black and white Negative - 120 size Negative SECV Geelong tram 38 Mercer Street Laurie Gallop ...Photo shows Tram 38 Mercer Street, near The Esplanade with the destination of Belmont. One of a set of photos was taken between 15/2/1956 and 3/3/1956 when services operated only between Belmont and North before the final closure of the Belmont route on 25/31956 and that bogie tram 31 is not shown on the board, having gone to Ballarat on 15/2/1956 - see item 5554. See item 8213 for an article on the Geelong system by Keith Kings. Yields information about the Geelong operations toward the closure of the tram system.Black and white Negative - 120 sizetramways, geelong, tram 38, mercer st -
 Ballarat Tramway Museum
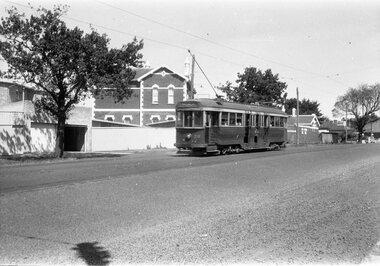
Negative - Geelong Belmont terminus tram 38, Laurie Gallop, early 1956
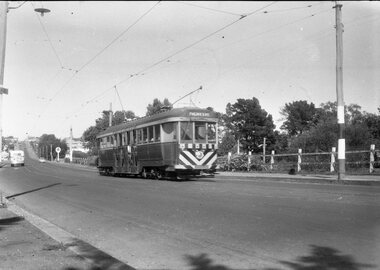
... Laurie Gallop...Tram Stops tramways High St Geelong tram 38 Belmont Black and white Negative - 120 size Negative Geelong Belmont terminus tram 38 Laurie Gallop ...Photo shows Geelong No. 38 at the Belmont terminus, High Street with the return destination of North. Note the compulsory tram stop on the left-hand pole. One of a set of photos was taken between 15/2/1956 and 3/3/1956 when services operated only between Belmont and North before the final closure of the Belmont route on 25/31956 and that bogie tram 31 is not shown on the board, having gone to Ballarat on 15/2/1956 - see item 5554. See item 8213 for an article on the Geelong system by Keith Kings. Yields information about the Belmont tram terminus prior to closure.Black and white Negative - 120 sizetram stops, tramways, high st, geelong, tram 38, belmont -
 Ballarat Tramway Museum
Negative - Geelong tram inbound Mercer Street, Laurie Gallop, early 1956
... Laurie Gallop...Tram Stops tramways Geelong Mercer St tram 33 Black and white Negative - 120 size Negative Geelong tram inbound Mercer Street. Laurie Gallop ...Photo shows a Geelong tram inbound in Mercer Street, near The Esplanade. Tram has the destination of Belmont. Based on the running board at item 8267, most likely No. 33. One of a set of photos was taken between 15/2/1956 and 3/3/1956 when services operated only between Belmont and North before the final closure of the Belmont route on 25/31956 and that bogie tram 31 is not shown on the board, having gone to Ballarat on 15/2/1956 - see item 5554. See item 8213 for an article on the Geelong system by Keith Kings. Yields information about tramway operations prior to closure of the Geelong system.Black and white Negative - 120 sizetram stops, tramways, geelong, mercer st, tram 33 -
 Ballarat Tramway Museum
Negative - Moorabool St, looking south at the Kardinia Park loop, Laurie Gallop, early 1956
... Laurie Gallop...Yields information about the Geelong tram system. tramways Geelong Moorabool St Kardinia Park loop Black and white Negative - 120 size Negative Moorabool St, looking south at the Kardinia Park loop Laurie Gallop ...Photo shows Moorabool St, looking south at the Kardinia Park loop. One of a set of photos was taken between 15/2/1956 and 3/3/1956 when services operated only between Belmont and North before the final closure of the Belmont route on 25/31956 and that bogie tram 31 is not shown on the board, having gone to Ballarat on 15/2/1956 - see item 5554. See item 8213 for an article on the Geelong system by Keith Kings. Yields information about the Geelong tram system.Black and white Negative - 120 sizetramways, geelong, moorabool st, kardinia park loop -
 Ballarat Tramway Museum
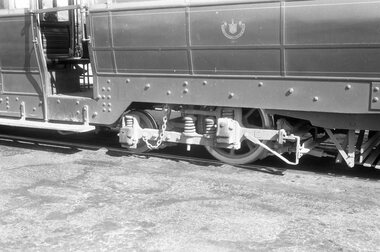
Negative - Brill 22E bogie or truck - Geelong tramcar, Laurie Gallop, early 1956
... Laurie Gallop...Yields information about the Geelong bogie trams. tramways Geelong Brill 22E Maximum Traction Bogie Trams Black and white Negative - 120 size Negative Brill 22E bogie or truck - Geelong tramcar Laurie Gallop ...Photo shows Brill 22E Maximum Traction bogie or truck - Geelong tramcar, has the SEC logo on the side of the tramcar in the view. One of a set of photos was taken between 15/2/1956 and 3/3/1956 when services operated only between Belmont and North before the final closure of the Belmont route on 25/31956 and that bogie tram 31 is not shown on the board, having gone to Ballarat on 15/2/1956 - see item 5554. See item 8213 for an article on the Geelong system by Keith Kings. Yields information about the Geelong bogie trams.Black and white Negative - 120 sizetramways, geelong, brill 22e, maximum traction, bogie trams -
 Ballarat Tramway Museum
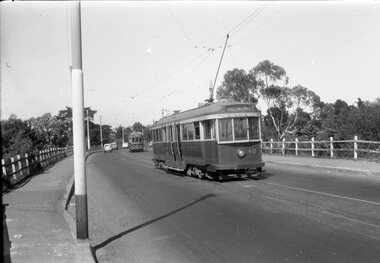
Negative - Geelong trams 33 & 40 Barwon Bridge, Laurie Gallop, early 1956
... Laurie Gallop...Yields information about the Geelong operations toward the closure of the tram system. tramways Geelong Moorabool St tram 33 tram 40 Barwon River Black and white Negative - 120 size Negative Geelong trams 33 & 40 Barwon Bridge. Laurie Gallop ...Photo shows Geelong trams 33 & 40 in Moorabool St just south of the Barwon Bridge on the long crossing loop. Based on the running board at item 8267, most likely tram No. 33. One of a set of photos was taken between 15/2/1956 and 3/3/1956 when services operated only between Belmont and North before the final closure of the Belmont route on 25/31956 and that bogie tram 31 is not shown on the board, having gone to Ballarat on 15/2/1956 - see item 5554. See item 8213 for an article on the Geelong system by Keith Kings. Yields information about the Geelong operations toward the closure of the tram system.Black and white Negative - 120 sizetramways, geelong, moorabool st, tram 33, tram 40, barwon river -
 Ballarat Tramway Museum
Negative - Geelong 38 and welding truck - Moorabool St, Laurie Gallop, early 1956
... Laurie Gallop...Yields information about the Geelong operations toward the closure of the tram system. tramways Geelong tram 38 Moorabool St welding truck track repairs Black and white Negative - 120 size Negative Geelong 38 and welding truck - Moorabool St Laurie Gallop ...Photo shows Geelong 38 south bound to Belmont and welding truck - Moorabool St between Myers and McKillop Streets. The welding with the power supply from the overhead would most likely be repairing a broken joint. One of a set of photos was taken between 15/2/1956 and 3/3/1956 when services operated only between Belmont and North before the final closure of the Belmont route on 25/31956 and that bogie tram 31 is not shown on the board, having gone to Ballarat on 15/2/1956 - see item 5554. See item 8213 for an article on the Geelong system by Keith Kings. Yields information about the Geelong operations toward the closure of the tram system.Black and white Negative - 120 sizetramways, geelong, tram 38, moorabool st, welding truck, track repairs -
 Ballarat Tramway Museum
Negative - Tram 40 - Moorabool & Malop Streets, Laurie Gallop, early 1956
... Laurie Gallop...Yields information about the Geelong operations toward the closure of the tram system. tramways Geelong Moorabool St Malop St tram 40 Black and white Negative - 120 size Negative Tram 40 - Moorabool & Malop Streets Laurie Gallop ...Photo shows Geelong 40 on its way to North Geelong, turning from Moorabool St into Malop St. In the background are now the National Mutual and Market Square buildings. One of a set of photos was taken between 15/2/1956 and 3/3/1956 when services operated only between Belmont and North before the final closure of the Belmont route on 25/31956 and that bogie tram 31 is not shown on the board, having gone to Ballarat on 15/2/1956 - see item 5554. See item 8213 for an article on the Geelong system by Keith Kings. Yields information about the Geelong operations toward the closure of the tram system.Black and white Negative - 120 sizetramways, geelong, moorabool st, malop st, tram 40 -
 Ballarat Tramway Museum
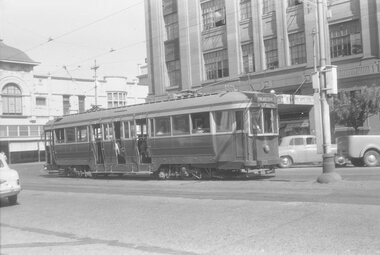
Negative - Geelong tram 36 Mercer St, Laurie Gallop, early 1956
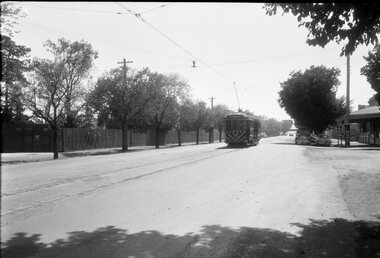
... Laurie Gallop...Yields information about the Geelong operations toward the closure of the tram system. tramways Geelong Mercer St tram 36 tram stops Black and white Negative - 120 size Negative Geelong tram 36 Mercer St Laurie Gallop ...Photo shows Geelong tram 36 outbound to North in Mercer St at Ginn St. In the background is a shop selling Franklins Lemon Swish, a four & Twenty Pie shop, Toppa Ice cream, a Coca Cola truck, a Hotel advertising Richmond Lager, three parked buses and a shop advertising hot pies. On the pole is a tram stop with a metal "CARS STOP HERE" sign. On the left-hand side of the photograph a surveyor can be seen at work.Yields information about the Geelong operations toward the closure of the tram system.Black and white Negative - 120 sizetramways, geelong, mercer st, tram 36, tram stops -
 Ballarat Tramway Museum
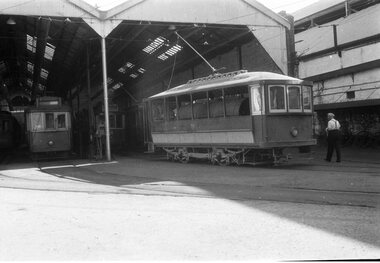
Negative - Geelong depot tram 10 and wheels, Laurie Gallop, early 1956
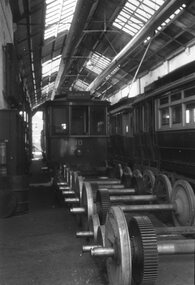
... Laurie Gallop...Yields information about the Geelong operations toward the closure of the tram system. tramways Geelong depot tram 10 wheels Black and white Negative - 120 size Negative Geelong depot tram 10 and wheels Laurie Gallop ...Photo shows Geelong tram 10 in the depot showing a destination of East with 6 wheelsets in front of it and other tramcars alongside. Wheel flanges appear to be worn and may have been readied to go to Ballarat or Bendigo for further use after turning.Yields information about the Geelong operations toward the closure of the tram system.Black and white Negative - 120 sizetramways, geelong, depot, tram 10, wheels -
 Ballarat Tramway Museum
Negative - Geelong tram at Balliang St loop in Moorabool St, Laurie Gallop, early 1956
... Laurie Gallop...Yields information about the Geelong operations toward the closure of the tram system. tramways Geelong Belmont Moorabool St Crossing Loop Black and white Negative - 120 size Negative Geelong tram at Balliang St loop in Moorabool St Laurie Gallop ...Photo shows a Geelong tram to North in Moorabool St at the Balliang St / Forser St loop in Moorabool St. In the background is a Caltex Service station and a bus. See also item 8299 for the trailing photograph.Yields information about the Geelong operations toward the closure of the tram system.Black and white Negative - 120 sizetramways, geelong, belmont, moorabool st, crossing loop -
 Ballarat Tramway Museum
Negative - Geelong tram at Balliang St loop in Moorabool St, Laurie Gallop, early 1956
... Laurie Gallop...Yields information about the Geelong operations toward the closure of the tram system. tramways Geelong Belmont Moorabool St Black and white Negative - 120 size Negative Geelong tram at Balliang St loop in Moorabool St Laurie Gallop ...Photo shows a Geelong tram to North in Moorabool St at the Balliang St / Forser St loop in Moorabool St. Has the rail over bridge in the far distance. See also item 8298 for the approaching photo.Yields information about the Geelong operations toward the closure of the tram system.Black and white Negative - 120 sizetramways, geelong, belmont, moorabool st -
 Ballarat Tramway Museum
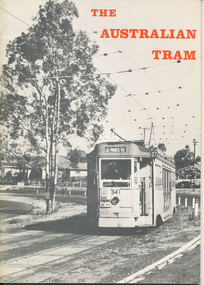
Book, Howard Clark and W. Laurie Williams, "The Australian Tram", 1969
... Howard Clark and W. Laurie Williams..."The Australian Tram" Book Howard Clark and W. Laurie Williams ...Features photographs of trams in 11 Australian cities, glossy paper, with introduction and captions. Cities included: Sydney, Brisbane, Melbourne, Ballarat, Bendigo, Adelaide, Perth, Fremantle, Kalgoorlie, Launceston and Hobart.Demonstrates an early AETA publication about Australian Tramway systems.Book - 24 pages, including heavier card covers.trams, tramways, sydney, brisbane, melbourne, ballarat, bendigo, adelaide, perth, fremantle, kalgoorlie, launceston, hobart -
 Brunswick Community History Group
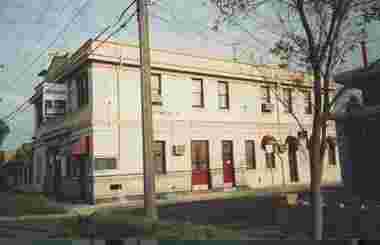
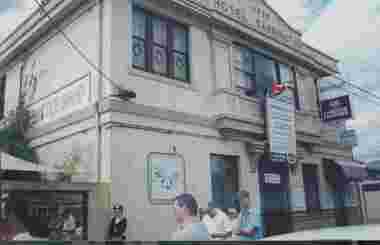
Photograph - Carrington Hotel, Brunswick West, Laurie Cunningham, 2001
... Laurie Cunningham...Photograph Carrington Hotel, Brunswick West Laurie Cunningham ...Auction day, Carrington Hotel, 152 Union Street, Brunswick West, Wed 5 Dec 2001. Bottle shop is on the left of the beer garden. -
 Brunswick Community History Group
Photograph - Carrington Hotel, Brunswick West, Laurie Cunningham, 2001
... Laurie Cunningham...Photograph Carrington Hotel, Brunswick West Laurie Cunningham ...Nelson Alexander sign on front of Carrington Hotel, 152 Union Street, Brunswick West, 2001. -
 Brunswick Community History Group
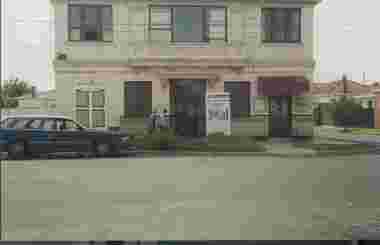
Photograph - Carrington Hotel, Brunswick West, Laurie Cunningham, 2001
... Laurie Cunningham...Photograph Carrington Hotel, Brunswick West Laurie Cunningham ...Carrington Hotel, 152 Union Street, Brunswick West. Trinity Street frontage (facing west) 2001. -
 Brunswick Community History Group
Photograph - Carrington Hotel, Brunswick West, Laurie Cunningham, 2001
... Laurie Cunningham...Photograph Carrington Hotel, Brunswick West Laurie Cunningham ...Auction day, Carrington Hotel, 152 Union Street, Brunswick West, Wed 5 Dec 2001. -
 Brunswick Community History Group
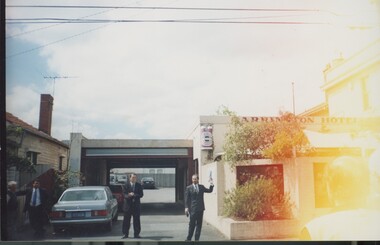
Photograph - Carrington Hotel, Brunswick West, Laurie Cunningham, 2001c
... Laurie Cunningham...Photograph Carrington Hotel, Brunswick West Laurie Cunningham ...Carrington Hotel, 152 Union Street, Brunswick West prior to sale, April 2001. See also 2023.078 and 2023.118 to 126. -
 Brunswick Community History Group
Photograph - Brunswick Community History Group 20th Birthday, Laurie Cunningham, 2003
... Laurie Cunningham...Photograph Brunswick Community History Group 20th Birthday Laurie Cunningham ...Brunswick Community History Group's 20th birthday celebrations, 2003. Cake and beverages. -
 Brunswick Community History Group
Photograph - Carrington Hotel, Brunswick West, 2001
... Laurie Cunningham...Photograph Carrington Hotel, Brunswick West Laurie Cunningham ...Carrington Hotel, 152 Union Street, Brunswick West, with auction sign. Union Street frontage, 2001.