Showing 326 items
matching view st. bendigo
-
 Bendigo Historical Society Inc.
Photograph - NATIONAL TRUST, SUBMISSION FOR THE PRESERVATION OF CERTAIN POST SUPPORTED VERANDAHS IN BENDIGO
Loose page book contains photos and descriptions of cast iron verandah's deemed worthy of preservation in the City of Bendigo. Buildings include: shamrock Hotel, Dr. Long's surgery, Cnr. Mundy and McCrae Sts., Batchelder, 346 McCrae St., Bendigo, Favaloro's, 139 Pall mall, Bendigo Jockey Club, pall Mall, View Point Hotel, Johnson, 274 High St.,Hopetoun Hotel, 147 Mitchell St., Cumberland Hotel, 279 Williamson St., Limerick Castle Hotel, Williamson St., BUFS Dispensary, 75 View St., Rifle Brigade Hotel, 137 View St., Goldmines Hotel, Marong Road, Manchester Arms Hotel, 302 Eaglehawk Rd., Victoria Hotel, 48 High St., Eaglehawk.cottage, miners, bendigo, heritage, verandahs, cast iron work, wrought iron -
 Bendigo Historical Society Inc.
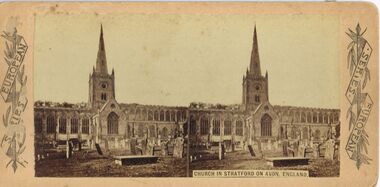
Photograph - HARRIS COLLECTION: STEREOSCOPIC VIEWS, Nineteenth Century
Stereoscopic Views, European Series. 1. Church in Stratford on Avon England. 2. Abbotsford , Scotland. 3. Shaw's Botanical Garden, St Louis, Mo.European Seriespostcard -
 Bendigo Historical Society Inc.
Document - PEARCE COLLECTION: ACCOUNTS A WILSON
Collection of Accounts, 1912 - A Wilson, Plumber, Gasfitter and General Mechanic, View St.business, retail, general, a wilson -
 Bendigo Historical Society Inc.
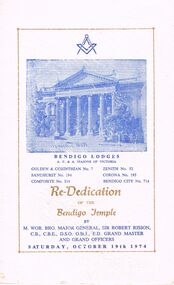
Document - RE-DEDICATION OF THE BENDIGO TEMPLE, VIEW STREET, BENDIGO, 19 October 1974
a/ Re-Dedication of the Bendigo Temple, View Street, Bendigo. By M. Wor. Bro. Major General, Sir Robert Risson, C.B.E., D.S.O. O.St.J., E.D. Grand Master and Grand Officers. Saturday, October 19th 1974. Bendigo Lodges A. F. & A. Masons of Victoria. Golden & Corinthian No. 7, Zenith No. 52, Sandhurst No. 194, Corona No. 195, Composite No. 314, Bendigo City No. 714. Re-Dedication Team Presiding Officer: M.W.Bro. Sir. Robert Risson, G.M. Deputy Grand Master R.W.Bro. C. R. B. James, D.G.M. Grand Master of Ceremonies V.W.Bro. L. Retchford, G.D.C. Senior Grand Warden R.W.Bro. L. G. Grant, S.G.W. Junior Grand Warden R.W.Bro. A. J. L. W. Greenwood, J.G.W.Grand Chaplain V.W.Bro. Rev. J.R. Lawton, G.Chap. Grand Supt. Of Works V.W.Bro. F. C. Galbraith, G I.Wkgs. Grand Secretary R.W.Bro. G. W. Jackson, P.D.G.M., G.Sec. Grand Deacons for Dedication Wor.Bro. B. A. McMillian, S.G.D. and Wor.Bro. D. E. Plaisted, J.G.D. Grand Sword Bearer Wor.Bro. J. R. Evans, G.Swd.B. Gand Organist Wor.Bro. J. N. Cowan, G.Org. Grand Pursuivant Wor.Bro. A. A. Eagle, A.G.Purs. Grand Herald Wor. Bro. P. J. Grenfell, P.G.Std.B., G.Her. Censer Stewards Wor. Bro. H. J. Blunden, G.Stwd. And Wor.Bro. B. D. Cross, G.Stwd. Historical, Brief History on Bendigo Masonic Temple, View Street, Bendigo, 1874-1974. Local historian, Bro. J. N. Macartney, in his book had this to say:- ''The Masonic Hall is by far the grandest building in Sandhurst (Bendigo), and a fitting and right noble home for such an Order to place their ark in. The building is one on the pure Corinthian order, lofty without, and spacious within; therein is the finest Assembly Hall out of Melbourne Town Hall. What an imposing façade, with its tapering columns rearing the graceful acanthus-leaf capitals 40 feet. . . . With the growth of Freemasonry in Bendigo, new Craft Lodges were established, as were lodges of higher degrees. At present the following lodges use the Temple and hall facilities:- Golden & Corinthian Lodge No. 7. Zenith Lodge, No. 52. Sanhurst Lodge, No. 194. Corona Lodge No. 195. The Lodge Composite, No. 314. Bendigo City Lodge, No. 714. The Bendigo Lodge of Mark Master Masons, No. 12. Royal Golden Chapter, No. 3. The Bendigo Royal Ark Mariner Lodge, No. 12. The Bendigo Conclave, No. 143. Bendigo Masonic Lodge of Instruction, No. 14. Bendigo Sovereign Council, No. 16. Bendigo Sovereign Chapter No. 32. The National Trust of Australia has done much to preserve our heritage for the succeeding generations. In 1972 the Masonic Temple and Hall Received their ''D'' Classification. . . Program. Toasts and Harmony. Bro. C. Phillips. Wor. Bro. D. L. Killian, P.J.G.D. Bro. R. D. McPherson. b/ (letter) 3 Brodie St. Bendigo 3550. 28.10.1974. The Secretary, Bendigo Branch, RHSV, Bendigo. Dear Miss Parry, Bendigo Masonic Hall, The enclosed programme contains a short history of the above, and comes to your Society with the compliments of the Board of Management of the Bendigo Masonic Hall. Yours sincerely, Alex M Stone.a/ re-dedication of the bendigo temple, view street, bendigo. by m. wor. bro. major general, sir robert risson, c.b.e., d.s.o. o.st.j., e.d. grand master and grand officers. saturday, october 19th 1974. bendigo lodges a. f. & a. masons of victoria. golden & corinthian no. 7, zenith no. 52, sandhurst no. 194, corona no. 195, composite no. 314, bendigo city no. 714. re-dedication team presiding officer: m.w.bro. sir. robert risson, g.m. deputy grand master r.w.bro. c. r. b. james, d.g.m. grand master of ceremonies v.w.bro. l. retchford, g.d.c. senior grand warden r.w.bro. l. g. grant, s.g.w. junior grand warden r.w.bro. a. j. l. w. greenwood, j.g.w.grand chaplain v.w.bro. rev. j.r. lawton, g.chap. grand supt. of works v.w.bro. f. c. galbraith, g i.wkgs. grand secretary r.w.bro. g. w. jackson, p.d.g.m., g.sec. grand deacons for dedication wor.bro. b. a. mcmillian, s.g.d. and wor.bro. d. e. plaisted, j.g.d. grand sword bearer wor.bro. j. r. evans, g.swd.b. gand organist wor.bro. j. n. cowan, g.org. grand pursuivant wor.bro. a. a. eagle, a.g.purs. grand herald wor. bro. p. j. grenfell, p.g.std.b., g.her. censer stewards wor. bro. h. j. blunden, g.stwd. and wor.bro. b. d. cross, g.stwd. historical, brief history on bendigo masonic temple, view street, bendigo, 1874-1974. local historian, bro. j. n. macartney, ''the masonic hall the grandest building in sandhurst (bendigo), corinthian order, finest assembly hall. golden & corinthian lodge no. 7. zenith lodge, no. 52. sanhurst lodge, no. 194. corona lodge no. 195. the lodge composite, no. 314. bendigo city lodge, no. 714. the bendigo lodge of mark master masons, no. 12. royal golden chapter, no. 3. the bendigo royal ark mariner lodge, no. 12. the bendigo conclave, no. 143. bendigo masonic lodge of instruction, no. 14. bendigo sovereign council, no. 16. bendigo sovereign chapter no. 32. national trust of australia preserve our heritage. in 1972 received their ''d'' classification. . . program. toasts and harmony. bro. c. phillips. wor. bro. d. l. killian, p.j.g.d. bro. r. d. mcpherson. b/ (letter) 3 brodie st. bendigo 3550. 1974. bendigo branch, rhsv, bendigo. miss parry, programme short history board of management of the bendigo masonic hall., alex m stone. -
 Bendigo Historical Society Inc.
Document - THE STUDENT PRINCE, CAPITAL THEATRE, 15 June, 1972
The Student Prince, Capital Theatre, View Street, Bendigo. For a six night season: Thursday 15th, Friday 16th, Saturday 17th and Thursday 22nd, Friday 23, Saturday 24th June, 1972. Bendigo Operatic Society: Mr J McK. Cannon, Mr F Trewarne, Miss Ann Ball, Mr L Spencely, Mrs P Lyon. Committee: Mesdames J Cannon, M Reed, Misses P McCraken & M Welch, Messrs. J Beaumont, J Boquest, G Daws. Photos: Producer-Max Collis, Assistant Producer, Ballet & Wardrobe Mistress-Madge Welch, Assistant Pianist-Edith John, Musical Director-Gwen Grose, Society Pianist- Ruth Gorman. Photos of cast: Margaret McQueenie, John Boquest, John McCormack, Graham Bumford, Graeme Daws, Annette Beckwith, Jill James, Ferd Lorenz, Shane Brennan, Patricia Lyon, Max Rule, Ian Beckwith, John Tonkin, Michael Filippini, Valerie Griffiths, Jim Feteris. Synopsis if Story. Synopsis of Scenes. Bendigo Operatic Society Presents by arrangement with Allan's Music (Australia) Pty. Ltd. ''The Student Prince'' A Max Collis Production. Music by Sigmond Romburg. Book & Lyrics by Dorothy Donnelly. Stage Manager Malcolm Cannon. Musical Director Gwen Grose. Choreography Madge Welch. Wardrobe Miss M Welch, Mrs A Ball. Cast: Kerry Hogan Brian Fitzpatrick, Garry Burns, Alan Petrie, Graham Bumford, John McCormick, John Boquest, Graeme Daws, Annette Beckwith Margaret McQueenie, Michael Filippini, Nicholas Kasterovic, Max Rule, Graham Bumford, Ian Beckwith, Ferd Lorenz, Shane Brennan, Jill James, Patricia Lyon, Valerie Griffiths, Jim Feteris, John Tonkin. Time _ Spring 1860. Female Chorus: Marion Alcock, Ann Ball, Wilma Baldwin, Dorothy Field, Ann Garrat, Dawn Moncrieff, Coral Rivett, Lois Semmens, Marilyn Storey, Marion Wright. Male Chorus: Garry Burns, Edmund, Burke, Peter Edgley, Brian Fitzpatrick, Jim Feteris, Kerry Hogan, Ross Jones, Nicholas Kasterovic, Bernie Keogh, John Keogh, Alan Petrie, Fred Trewarne, Philip Wilkin. Ballet: Dianne Austin, Annette Basset, Wendy Kent, Jocelyn Lyon, Lyn Rowe, Ann Rendell, Helen Southby, Pauline Waugh. Publicity Officer: Mrs J Cannon. Scenery & Properties: M & J Cannon, J Moncrieff, R Spicer. Art Work: M Cannon, S James, B Agnew, Tony Lorenz, J Hall, Karl Steinberg. Prompt: Mrs J Cannon. Lighting: L Reed, H Bridges & T Vincent. Make-up: Mrs H Cannon & Mrs D Coia. Hairdressing: Ross Coiffure. House Manager: Garry McDonald. Bendigo Concert Orchestra Violins: Mrs R Weldon, Mrs A Boulton, Mrs M Robbins, Mrs C Messer, Mr C Gill, Mr J Jordan, Mr P Phillips, Mr T French. Violas: Mr E Jarrett, Mr H Werry. Cellos: Mrs C Bubb. Bass: Mr S Anderson. Flute: Mr C Bubb. Clarinets: Mr R Holyoake. Trombones: Mr W Neuman. Trumpets: Mr D Gray, Mr David Gray, Mr Ian De Araugc. Percussion: Mr Brian Beale. Pianoforte: Mrs P Gorman. Songs From ''The Student Prince'' (wording). Acknowledgement; Bendigo Advertiser, BCV8, 3BO, 3CV, St Mary's. Advertisements through last half of program: Don Semmens Photographic Studio, The Copper Pot Licensed Restaurant, Ross Coiffure Beatty Salon. A and b are both the same copy a in the better of the copies as b is lightly faded. Otherwise excellent condition.program, music, bedigo operatic society, the student prince, capital theatre, view street, bendigo. 15th, 16th, 17th 22nd, 23, 24th june, 1972. bendigo operatic society: mr j mck. cannon, mr f trewarne, miss ann ball, mr l spencely, mrs p lyon. committee: mesdames j cannon, m reed, misses p mccraken & m welch, messrs. j beaumont, j boquest, g daws. photos: producer-max collis, assistant producer, ballet & wardrobe mistress-madge welch, assistant pianist-edith john, musical director-gwen grose, society pianist- ruth gorman. photos of cast: margaret mcqueenie, john boquest, john mccormack, graham bumford, graeme daws, annette beckwith, jill james, ferd lorenz, shane brennan, patricia lyon, max rule, ian beckwith, john tonkin, michael filippini, valerie griffiths, jim feteris. synopsis if story. synopsis of scenes. bendigo operatic society presents by arrangement with allan's music (australia) pty. ltd. ''the student prince'' a max collis production. music by sigmond romburg. book & lyrics by dorothy donnelly. stage manager malcolm cannon. musical director gwen grose. choreography madge welch. wardrobe miss m welch, mrs a ball. cast: kerry hogan brian fitzpatrick, garry burns, alan petrie, graham bumford, john mccormick, john boquest, graeme daws, annette beckwith margaret mcqueenie, michael filippini, nicholas kasterovic, max rule, graham bumford, ian beckwith, ferd lorenz, shane brennan, jill james, patricia lyon, valerie griffiths, jim feteris, john tonkin. time _ spring 1860. female chorus: marion alcock, ann ball, wilma baldwin, dorothy field, ann garrat, dawn moncrieff, coral rivett, lois semmens, marilyn storey, marion wright. male chorus: garry burns, edmund, burke, peter edgley, brian fitzpatrick, jim feteris, kerry hogan, ross jones, nicholas kasterovic, bernie keogh, john keogh, alan petrie, fred trewarne, philip wilkin. ballet: dianne austin, annette basset, wendy kent, jocelyn lyon, lyn rowe, ann rendell, helen southby, pauline waugh. publicity officer: mrs j cannon. scenery & properties: m & j cannon, j moncrieff, r spicer. art work: m cannon, s james, b agnew, tony lorenz, j hall, karl steinberg. prompt: mrs j cannon. lighting: l reed, h bridges & t vincent. make-up: mrs h cannon & mrs d coia. hairdressing: ross coiffure. house manager: garry mcdonald. bendigo concert orchestra violins: mrs r weldon, mrs a boulton, mrs m robbins, mrs c messer, mr c gill, mr j jordan, mr p phillips, mr t french. violas: mr e jarrett, mr h werry. cellos: mrs c bubb. bass: mr s anderson. flute: mr c bubb. clarinets: mr r holyoake. trombones: mr w neuman. trumpets: mr d gray, mr david gray, mr ian de araugc. percussion: mr brian beale. pianoforte: mrs p gorman. songs from ''the student prince'' (wording). acknowledgement; bendigo advertiser, bcv8, 3bo, 3cv, st mary's. advertisements: don semmens photographic studio, the copper pot licensed restaurant, ross coiffure beatty salon. -
 Bendigo Historical Society Inc.
Photograph - COLOUR PHOTO OF ALEXANDRA FOUNTAIN: VIEW STREET, BENDIGO, c2001
Colour photo of Alexandra Fountain, View Street, Bendigo - taken April 2001 - looking north to View Street - source Gordon & Wendy Willa, Deakin St LockingtonWendy Willaphotograph, streetscape, bendigo, alexandra fountain , view street , bendigo -
 Bendigo Historical Society Inc.
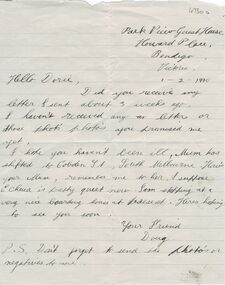
Document - HAND: WRITTEN LETTER ON NOTE PAPER DATED 1.2.1940, 1.2.1940
Hand - written letter on grey, lined note paper dated 1.2.1940 from Doug at Park View Guest House, Howard Place Bendigo to Miss Dorothy Shang, 155 High St, Echuca Victoria. / Envelope - same coloured paper post marked Bendigo 2.2.1940 / red 2 penny postage stamp - appears to be 1937 KGVI 2d Scarlet King George VI. Strip of white paper indicating the birthday of Edith Lund as 25th July, and the name King George VI.document, park view guest house howard place bendigo / 1937 kgvi 2d scarlet king george vi stamp -
 Bendigo Historical Society Inc.
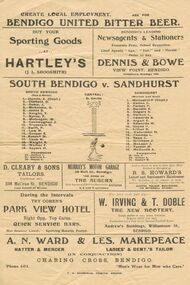
Document - RANDALL COLLECTION: BENDIGO FOOTBALL LEAGUE SPONSORS, 1926
... Sporting Goods (J.L.Shoosmith); Dennis & Bowe View Point, Bendigo... Goods (J.L.Shoosmith); Dennis & Bowe View Point, Bendigo ...Document, Bendigo Football League , Sponsors.Hartley's Sporting Goods (J.L.Shoosmith); Dennis & Bowe View Point, Bendigo, Newsagents & Stationers;D. Cleary & Sons, Tailors, 358 McCrea St, Bendigo; Murray's Motor Garage, 58 Bull St, Bendigo; R.S.Howard's Ladies & Gentlemen's Hairdresser, 114 Mitchell St, Bendigo;Park View Hotel Right Opp. Top Gates; W. Irving & T.Doble , The New Bootery, Andrew's Buildings Williamson St., Bendigo; A.N.Ward & Les. Makepeace, Ladies & Gents Tailor(In Conjunction) Charing Cross, Bendigo;South Bendigo V. Sandhurst,game; 6 O'Clock Lager - Ginger Tonik;Webster's Williamson Street, Bendigo; Suttons, Pall Mall, Bendigo; Brasier & Co, Railway Station, Bendigo, Heavy Machinery & Houses Removed; ''Dug Out'' Thomas & Newell, Complete Home Furnishers, Opp. Savings Bank; Capital Theatre, Book at Suttons or Ring 696.F.H.Sparkman, Printer, Arcade.document, names of bendigo pioneers -
 Bendigo Historical Society Inc.
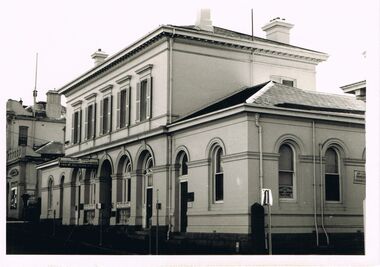
Photograph - RANDALL COLLECTION: SANDHURST TRUSTEES BUILDING, VIEW STREET, BENDIGO
Photograph, Sandhurst Trustees Building, View Street, Bendigo. Sign on the front of building reads; Your Will? Sandhurst Trustees, View St., Real Estate Pty Ltd.photograph, building, sandhurst trustees -
 Bendigo Historical Society Inc.
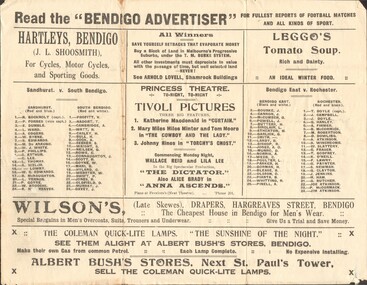
Newspaper - RANDALL COLLECTION: THE BENDIGO ADVERTISER FOR FULLEST REPORTS OF FOOTBALL MATCHES, 1923
Newspaper, The Bendigo Advertiser for fullest reports of Football matches and all kinds of sport.Hartleys, Bendigo; Arnold Lovell , Shamrock Buildings; Leggo's Tomato Soup; Princess Theatre; Wilson's Drapers, Hargreaves St, Bendigo;Albert Bush's Stores, Bendigo; Sandhurst V. South Bendigo; Bendigo East V. Rochester; T.E.Turner, The Electrical Shop; J..Friswell , Bendigo's Leading Butcher; Shamrock Tobacco Store; H.R.Hughan's View point News Agent; Les Pascoe Saddler Hargreaves St.; Cambridge Press; After the Match have a pasty at Percy Smith's Opposite Law Courts. Bendigo Football Premiership Records from 1880 to 1922.newspaper, bendigo advertiser, football records -
 Bendigo Historical Society Inc.
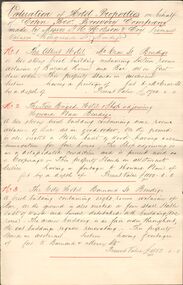
Financial record - COHN BROTHERS COLLECTION: HANDWRITTEN VALUATIONS OF HOTELS
394 c, Six handwritten pinned pages including abstract and Valuation of Hotel Properties on behalf Cohn Bros Brewery Company made by Messrs G M Hobson & Co licensed valuers Hargreaves St Bendigo dated 10/11/91 and signed G M Hobson. Nineteen hotels are valued. 1. Albert Hotel. 2. Fire Brigade Hotel. 3. City Hotel. 4. British & American. 5. Hustlers Reef. 6. Garden Gully. 7. Universal. 8. Brougham Arms. 9. Victoria. 10. United Kingdom. 11. West End. 12. View Bend. 13. Sparrowhawk. 14. Greyhound. 15. Normandy. 16 Noahs Ark. 17. Saw Mill. 18. Royal. 19. South Elmore. Total value £14305.00bendigo, industry, cohn bros brewery -
 Bendigo Historical Society Inc.
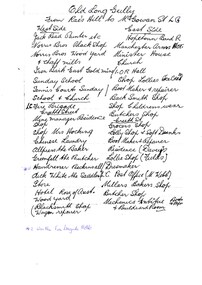
Document - LONG GULLY HISTORY GROUP COLLECTION: OLD LONG GULLY FROM RAE'S HILL TO MCGOWAN ST
Titled Old Long Gully From Rae's Hill to McGowan St. LG. West Side - Jack Read Painter etc, Norris Bros Black Shop, Norris Bros Wood Yard & Chaff Mills, Iron Bark East Gold Mine, Sunday School, Tennis Courts Sunday School & Church, LG Fire Brigade, Creeth Street, Mine Managers Residence, Shop, Shop Mrs Hocking, Chinese Laundry, Allpress the Baker, Greenfell the Butcher, Hairdresser Beckinsall was the Fire Brigade Hotel, Dick White the Saddler, Store, Hotel Rose of Australia, Woodyard, Blacksmith Shop Wagon Repairer, Hotel Kocks (Pioneer Hotel), 2 China Shops owned by Chinese, Hotel Silver mines Hotel, Police Station, Grocers Shop (per? Reef Mine Hotel) E Bryant, Mine Windmill, Church Residence, Minister. East Side - Hopetoun Band R, Manchester Arms Hotel, Minister House, Church, IOR Hall, Shop Lollies Icecream, Boot Maker & Repairer, Back Smith Shop, Shop Childrens Wear, Butchers Shop, Creeth Street, Grocers Shop, Lolly Shop & Soft Drinks, Boot Maker & Repairer, Residence (Davey's), Lollie Shop (Fields), Dressmaker, LG Post Office (M Webb), Millars Bakers Shop, Butcher Shop, Mechanics Institute Books & Paper & Billiard Room, Connell the Baker, Dr SElby, Pentreath Organ Builder & Tuner, Blacksmith Shop, Hexagon Toilet, Kocks Machine Shop, Kocks Mine Office, Kocks Material Shop, Police Station, Dyson's Dam Warm waer, Air Station, Mine Battery stone crusher 80 head approx, Kocks Mine, Needle Mine. Some notes written at the end - Norm Shotples used to have Barber Shop - he has gone to Queensland, Violet Street started off as the German School, Wells Street used to run through Victorian Consol ? the other side, Comet Hill would like a visit. Contact Helen Gorlay at Violet Street would line to some video. Alan has good info on the Long Gully School. Betty has book. Views of Bendigo. Frank Cusack - Bendigo Trust. Bendigo School Hisking? School, Violet Street. Older levels lo?ing at Architecture.bendigo, history, long gully history group, the long gully history group - old long gully from rae's hill to mcgowan st, jack read, norris bros, iron bark east gold mine, long gully fire brigade, mrs hicking, allpress, greenfell, beckinsall, dick white, rose of australia, hopetoun band r, manchester arms hotel, ior hall, davey's, fields, m webb, millars, mechanics institute & billiard room, kocks pioneer hoel, silver mines hotel, e bryant, windmill mine, pere? reef mine hotel, connell, dr selby, pentreath, kocks machine shop, kocks mine office, kocks material shop, dyson's dam, kocks mine, needle mine, norm shotples, german school, victoria consols, helen gorlay, long gully school, frank cusack, bendigo trust -
 Bendigo Historical Society Inc.
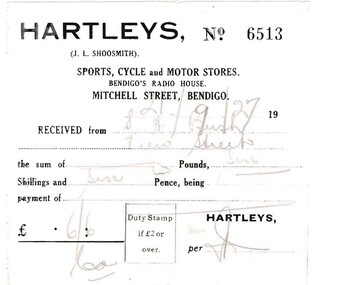
Document - BUSH COLLECTION: BUSINESS ACCOUNTS AND RECEIPTS, 1920 - 1930
Collection of approximately 74 accounts, 1925 - 1928, and receipts issued to S. A. Bush from various businesses in Bairnsdale and Bendigo. Invoices from: Hartleys, Mitchell Street, Bendigo. W. Rasmussen, for wood Bendigo Timber Co., Mollison Street and Williamson St. J. Kitchen & Sons Limited, Candle and soap manufacturers Stilwells, House furnishers, William Lunn, Painter, Pall Mall, Bendigo.Hargreaves Street, Bendigo W. McWiliams, wood merchant, 15 Milroy Street, Bendigo. Victorian Railways Commissioners, wood carting H.J. Fraser, A.N.A. building, View Street, Bendigo R.O Henderson, Beehive Pty Ltd., Pall Mall, Bendigo F.C. Cross, Furnishing, Andrew's Building, Hargreaves Street, Bendigo. Albert Bush's Produce Stores, Chaff Mills, Williamson Street, Bendigo. Bendigo Timber Coy. Mollison Street, Bendigo Buckell & Jeffrey, Railway Station, Bendigo C. Button, Carrier, 204 William Street, Bendigo. Furniture packed and stored. (invoice has photo of canvas covered cart. Written on side of cart' Furniture Packed and Stored, The Big Button' . ) W. Irving, House furnishing, 211 Mitchell Street, Bendigo Hartley's Bendigo, Len Shoosmith W. Koska, 297 Williamson Street Albert Bush's Stores, (next St. Paul's Tower) Williamson Street, Bendigo. W.J. Knight, Waggon and Lorry Builder, William Street, Bendigo William Lunn, Bendigo Glass, Pall Mall, Bendigo. Sandhurst and Northern District Trustees, Bendigo Cockings, Drapers, Pall Mall, Bendigo A. Fraser, 178 Carpenter Street, Bendigo W. Irving, furniture store, 211 Mitchell Street, Bendigo Myers, Pall Mall, Bendigo R.C. Eagle, wood merchant, Barnard Street, Bendigo W. McWilliams, wood merchant. W.H Osborn & Co., 130 Williamson Street, Bendigo Campbell & Connelly & Co., High Street, Bendigo H. McWilliams, cartage contractor, 15 Mitchell (?) Street Bendigo. H. Gray, 257 Barnard Street, Bendigo (Singer Sewing Machines) J.D. Allen, 'Whitehall" Sorrento (accommodation 4 weeks) W. McWilliams, for soil and sand.person, individual, bush collection - personal -
 Bendigo Historical Society Inc.
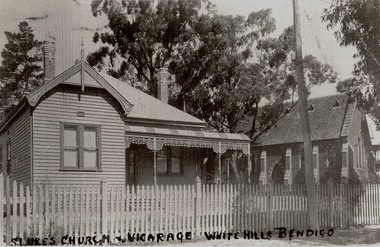
Photograph - ST LUKE'S ANGLICAN VICARAGE AND CHURCH, WHITE HILLS, c.1920
Copy of black and white photograph showing view of weatherboard double-fronted house, decorative ? Boards, verandah lacework, decorative brick chimneys ??. Roof, double-hung windows. Brick church adjacent, vented slate roof, buttressed walls, Gothic windows. Picket fence along footpath. SEC? pole. Trees in background. Inscriptions: on front in Indian ink written across bottom of image 'St Luke's Church and vicarage, White Hills Bendigo'.buildings, church, st lukes, white hills -
 Bendigo Historical Society Inc.
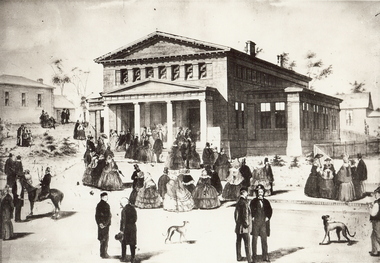
Photograph - TEMPERANCE HALL, VIEW ST
Black and white photograph . Enlargement of illustration of original Temperance Hall, View St. Building with four column portico. Groups of people gathered in foreground (street and footpath) and LHS mid-ground (spare block). History of object: James Lerk March, 2000. Illustration of the Bendigo Temperance Hall designed' in 1860 by Vahland and Getzschmann. The Warden's Court is on the left. This section (minus the portico) is still in situ'.buildings, temperance hall -
 Bendigo Historical Society Inc.
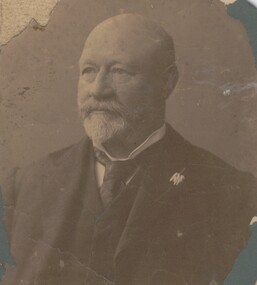
Photograph - MALE PORTAIT -WILLIAM LEES, early 1900
sepia portrait of Mr. William Lees, wearing coat, vest, tie under cutaway collar, vandyke style beard and moustache. Some hair above ears, sans on top. On back in ball point ' Mr. W. Lees, First Manager, Union Bank View Street, Bendigo.' Died 1913. On back P668.T. Humphries & Co., 26 a? Collins St., Melbourne/person, individual -
 Bendigo Historical Society Inc.
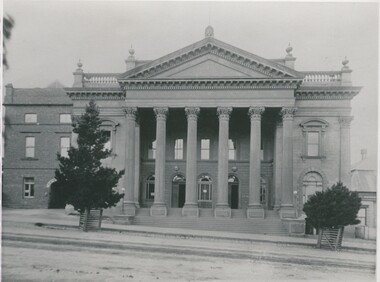
Photograph - MASONIC HALL (CAPITAL THEATRE), prior 1888
Black and white photograph. Street view of (Capital Theatre) Masonic Hall with two trees with wood guards. On reverse: MP 261, RHSV stamp. History of object: (Ref I. Wild 6/2000) View St, prior to 1888 (no tramlines)place, building, capital theatre -
 Bendigo Historical Society Inc.
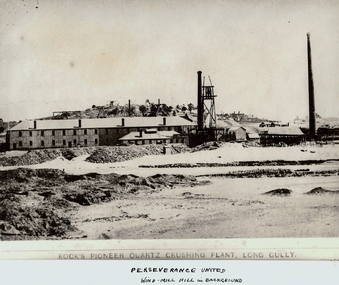
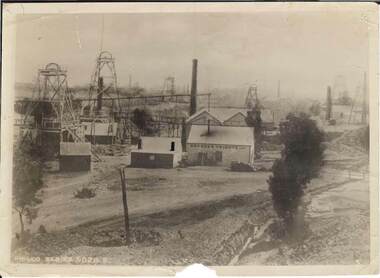
Photograph - KOCK'S PIONEER QUARTZ CRUSHING PLANT
Black and white photograph. View of large mining plant and associated chimneys. Open (waste) area in foreground. Low hill in background. Inscriptions: on front 'Kock's Pioneer Quartz Crushing Plant, Long Gully', Perserverance United Windmill Hill in background'. On back - 'A Richardson, 29 Harrison St, Bendigo'.mining, crushing & milling, kock's pioneer quartz crushing plant, bendigo, mines and mining, mines, mine, mining, crushing plant, landscape, mining landscape, quartz, perserverance united windmill -
 Bendigo Historical Society Inc.
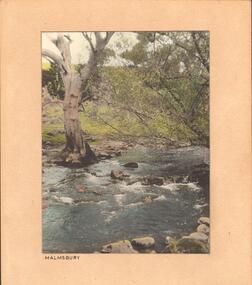
Photograph - STREAM AT MALMSBURY
Photograph, hand tinted. Stream at Malmsbury (Coliban River). History: with note 'Photographs from Mrs Ella Bourke, 131 Barnard St, Bendigo, ph 438269'. Photographs Francis (Frank) Thomas Kennedy'. James Lerk 'Coliban River'??Francil (Frank) Thomas Kennedyplace, landscape view, see also 2001.152.01, 2001.153.01, 2001.154.01, 2001.157.01, 2001.158.01, 2001.159.01, 2001.160.01, 2001.162.01 -
 Bendigo Historical Society Inc.
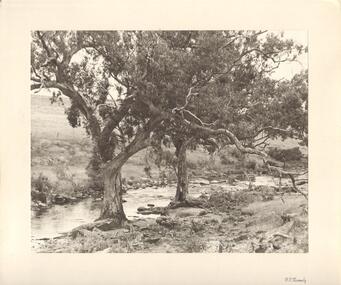
Photograph - TWO LARGE TREES AT EDGE OF CREEK
Black and white photograph. Textured paper of scene on creek, with two attractive trees at water's edge, possibly Bendigo Creek. Sheep in background. Inscriptions: on front - BR corner printed 'FT Kennedy'. On back - hand written in pencil 'Bendigo' rubber stamp 'Frank T Kennedy'. History: James Lerk 22/;6/2001 'Tom Kennedy was a Bendigo man with an interest in photography. With note 'Photographs from Mrs Ella Bourke, 131 Barnard St Bendigo. Ph 438269'. 'Photographs 'Francis (Frank) Thomas Kennedy'.Frank Tom? Kennedyplace, landscape view, see also 2001.153.01, 2001.154.01, 2001.157.01, 2001.158.01, 2001.159.01, 2001.160.01, 2001.161.01, 2001.15.162.01 -
 Bendigo Historical Society Inc.
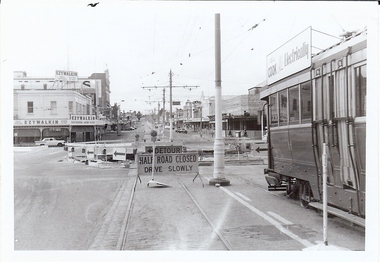
Photograph - BASIL MILLER COLLECTION: TRAMWAY RECONSTRUCTION
Two black and white photographs of bridge/road works being undertaken next the the Alexandra Fountain. Each photograph has been taken from opposite sides of the tram shown in the photograph. Both views are looking up Mitchell St. 'Ezywalkin' signs above shop on left corner. Photograph 'b' has large white area on left side. Reverse: 'a' 'C922' stamped in black , bottom edge. 'b' 'C922' stamped in black bottom edge. Both photographs have a 'Kodak paper' printed in grey at angle across back..person, individual, basil miller -
 Bendigo Historical Society Inc.
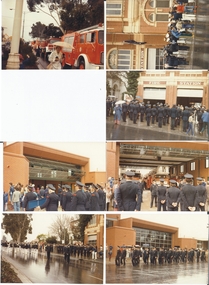
Photograph - BENDIGO FIRE BRIGADE, 16.6.1984
Coloured photos of transfer from Bendigo Fire Station in View Street Bendigo to the new fire station in Hargreaves St. (a) FireBrigade band members participating in formal ceremony in front of the old fire brigade station in View St. ( b ) A line of fire trucks participating in the transfer process. ( c ) Officers participating in formal ceremony in front of the old fire station in View St. Dudley House is partially obscured beside it. In the foreground are some onlookers on what appears to be a wet day in Bendigo. (d) Officers and band members taking part in the ceremony in front of the old fire station. (e) Officers marching past new fire station. ( f ) Officers on parade at new fire station with some onlookers present. ( g ) Officers on parade at new fire station. There are three fire trucks in the background.organization, government, bendigo fire brigade, bendigo, photographs, service, fire brigade, fire fighting, community services -
 Bendigo Historical Society Inc.
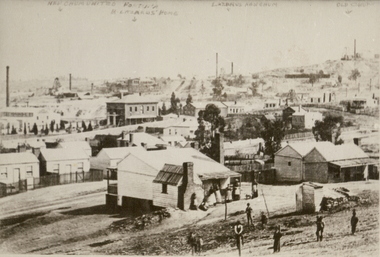
Photograph - BENDIGO: LANDSCAPE VIEW - NEW CHUM MINE, 1875
... PLACE Landscape view bendigo N.J. Caire black and white photo ...black and white photo ( copy ) view of portion of Bendigo showing weatherboard cottages, large brick houses, mine chimneys, poppet legs, adults in foreground. On image handwritten on top ' New Chum United, Fortuna, B. Lazarus home, Lazarus New Chum, Old Chum. On back in pen ' New Chum Mines, Lansell's Fortuna in background, J.B. Lazarus' home in middle distance.' A. Richardson, 29 Harrison St.,N.J. Caireplace, landscape view, bendigo -
 Bendigo Historical Society Inc.
Photograph - DEVONSHIRE GROUP OF MINES,1896
Black and white photograph. View across mining area showing at least 9 poppet head, 11 chimneys and many buildings associated with the mines. C to L - flume, wood stacks, mullock heaps. On back hand written in pencil and ink: 'Devonshire Group about 1880', 'Eaglehawk', 'Duchess Tr4ibute', 'South Devonshire', 'Princess Alexandra', 'United Devonshire', 'Pheonix' (sic), 'South St Mungo' (crossed out), 'hopewell', 'St Mungo' (crossed out), 'Duchess of Edinburgh' etc. 'At rear of Calfornia Hill State School', 'A Richardson, 29 Harrison St, Bendigo', Circular blue stamp 'Royal Historial Sociaty of Victoria, Bendigo Branch', 'MNG 70'.James Lerk 26/11/1999place, mining site, see also 2000.426.01, 2000.437.01, 2000.438.01, 2000.439.01, 2000.504.01, 2000.507.01, 2000.509.01 -
 Bendigo Historical Society Inc.
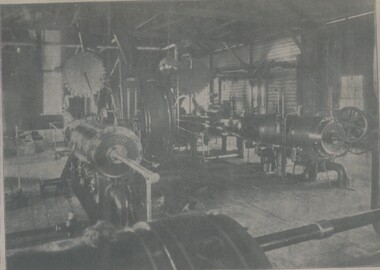
Photograph - NEW MOON MINE WINDING ENGINE
black and white photo : interior of shed showing winding gear. On front: ' View of winding plant at the Mine ( printed ) New Moon ( handwritten & Signature AR ) On back in biro ' winding engine - New Moon Mine 1906. Makers Harkness & Co., Bendigo. ' Written in biro bottom right ' A. Richardson, 29 Harrison St., Bendigo. .organization, business, new moon mine -
 Bendigo Historical Society Inc.
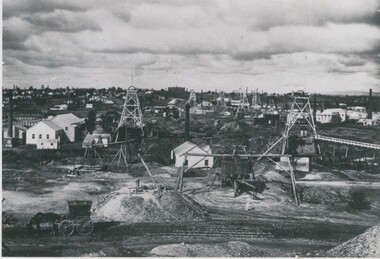
Photograph - ST. MUNGO AND DEVONSHIRE GROUP OF MINES, 1888
black and white photograph: St, Mungo and Devonshire Group of Mines, looking south, California Gully Primary School in the background. Mng 25 ( black pen ) also in black ball point pen ' The St. Mungo and Devonshire group of Mines, Eaglehawk, looking south 1888. Foreground left - cab, windlass, whip and whim. Left to right, Old St. Mungo, Sadova, Background, The Deveonshire mines . At rear, Califronia Gully State School. View from Snob's Hill, in foreground. St. Mungo and Sadowa with the Lady Barkly in the distance, whilst to the right of the Lady Barkly is the joint battery of the South St. Mungo and Lady Barkly Companies, then follows the South St. Mungo mine, The Uinicorn, and the Phoenix, and in the background, the Devonshire Group ( as identified by J. Lerk in Bendigo's Gold Mining History 1851 - 1954 )organization, business, st. mungo and devonshire mines -
 Bendigo Historical Society Inc.
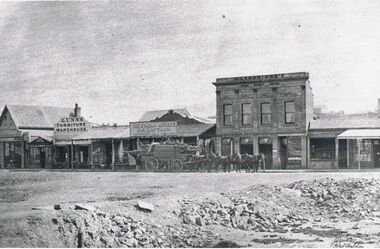
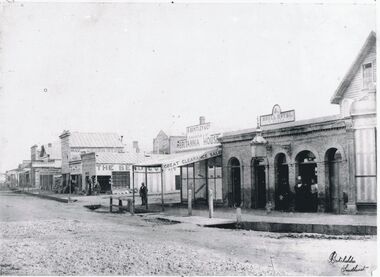
Photograph - VIEW POINT
Black and white copy of original photo by Batchelder, taken in 1861. View point/Charing Cross, looking towards Forest St., View shows H. Joseph's Assay Office, Lunn's furniture warehouse., S.F. Bastard, Victoria House, draper and silk mercer, Langridge's View Point Hotel, Williamson wholesale butcher. A horse drawn wagon laden with timber in centre of photo. Batchdelder signature in bottom rh corner. Batchelder photos were commissioned by the Sandhurst Borough Council in 1861.Batchelderplace, streetscape, view point -
 Bendigo Historical Society Inc.
Photograph - CHARING CROSS/FOREST STREET: BENDIGO, 1860's
Black and white photo: copy. Streetscape at Charing Cross - side street is Forest Street, roadway to left of Forest St. is High St. Roadway to right of Forest Street is View Place. . On back 'Batchelder, Sandhurst, lower RH of image, in grey lead top RH on back No. 7 ' Busineses include J.B.Loridan steam chaff mills Hay & Corn Store The Benndigo Tin Shop Forest Street R.Bentley & Co Britannia House Royal Hotel Batchelder PhotoBatchelder Sandhurstplace, streetscape -
 Bendigo Historical Society Inc.
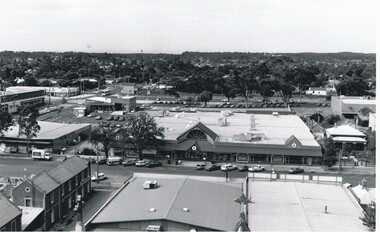
Photograph - AERIAL VIEW BENDIGO, 1995
Black and white photo: aerial view Mollison St., Jewel Shopping complex ( Noelene Wild 7/2000 ) from St. Paul's tower ? Mollison St. left to right foreground. 'B22A' black lead on rear.Peter Hyettplace, aerial view of bendigo -
 Bendigo Historical Society Inc.
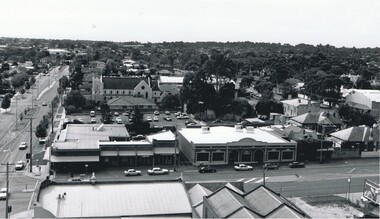
Photograph - AERIAL VIEW: BENDIGO, 1995
Black and white photo: aerial view from St. Paul's church tower showing Bush's store in foreground. St. Andrew's church middle distance, Myers St. at left front to middle distance. Williamson St. left to right foreground.Peter Hyettplace, aerial view of bendigo