Showing 154 items
matching blue bowl
-
 Flagstaff Hill Maritime Museum and Village
Domestic object - Jug
The Process of Making Pottery Decorating, Firing, Glazing, Making, Technical There is a rhythm and flow to clay. It can’t be done all at once! Even the making process! It can take weeks to get everything done, especially if you can only work on your pottery once a week! Even though we have three hour classes, it’s often just not enough time! Here is an overview of some of the processes so you have a bit more grasp on some of the technical stuff! Step One – Design There are SO many ideas out there for making stuff in clay! From delicate porcelain jewellery, through to heavy sculptural work and everything in between. Deciding your direction is sometimes not that easy – when you first start, try everything, you will naturally gravitate to the style that you enjoy! The options and variations are endless and can get a wee bit overwhelming too! Check in with me before you start to ensure your ideas will work, what order you might do things, how you could achieve the look you are seeking and any other technical data required! Step Two – Making Clay is thixotropic. This means that as you work with it, the clay first gets sloppier and wetter, before is begins to dry in the atmosphere. For most things, you simply can’t do all parts of the project at once. An example of work order might look like: Get last weeks work out from the shelves Prepare clay for today’s work – roll your clay, prepare balls for throwing, make the first stage of a pinch pot) Clean up last week’s work and put it on the shelf for bisque firing Check that you have any glazing to do – and do enough of it that you will have time to finish your main project Do the next step of your next project – there might be a further step that can’t be complete immediately, in that case, wrap your work well and put onto the shelves. Letting your work rest for a while can really help keep your work clean and professional looking. Many things require bagging under plastic to keep it ready for work the next week – put your name on the outside of the bag so you can find your work easily. We have stickers and markers. Consider how you want to decorate your work – coloured slip can be applied at a fairly wet stage (remembering that it will make your work even wetter!). Trying to apply slip to dry clay won’t work! If you want to do sgraffito – you will need to keep the work leather hard (a state of dryness where you can still work the clay with a little effort and a little water and care). Step Three – Drying Most of the time your work can go into the rack uncovered to let it dry out for the following week. If you want to continue forming or shaping you will need to double bag your work – put your work on a suitable sized bat and put the bat in a bag so the base of the bag is under the bat, then put another bag over the top of the work and tuck the top of the bag under the bat. If you want to trim (or turn) your thrown work the following week, it should also be double bagged. If your work is large, delicate, or of uneven thicknesses, you should lightly cover your work for drying. When considering the drying process, bare in mind the weather, humidity and wind! The hotter and dryer, the faster things dry and work can dry unevenly in the shelves – this can lead to cracking – another time to lightly cover your work for drying. Step Four – Trimming and Cleaning Up Your work is dry! It is called greenware now and it is at it’s most fragile! Handle everything with two hands. I often refer to soft hands – keep everything gentle and with your fingers spread as much as possible. Try to not pick up things like plates too much, and always with both hands! Before your work can be bisque fired it should be “cleaned up”. You work won’t go into the kiln if it has sharp edges – when glazed, sharp edges turn into razor blades! Use a piece of fly wire to rub the work all over – this will scratch a little so be light handed. Use a knife or metal kidney to scrape any areas that require a bit more dynamic treatment than the fly wire offers! Finally, a very light wipe over with a slightly damp sponge can help soften and soothe all of your edges and dags! Trimming thrown work: If you are planning to trim (or turn) your thrown work (and you should be), make sure you bag it well – your work should be leather hard to almost dry for easiest trimming. Use this step to finish the work completely – use a metal kidney to polish the surface, or a slightly damp sponge to give a freshly thrown look. Wipe the sponge around the rim after trimming, and check the inside of the pot for dags! Trimming slip cast work: Usually I will trim the rims of your work on the wheel the following day to make that stage easier, however you will still need to check your work for lumps and bumps. Last but not least – check that your name is still clearly on the bottom of your work. Step Five – Bisque Firing When the work is completely dry it can go into the bisque kiln. The bisque kiln is fired to 1000°C. This process burns off the water in the clay as well as some of the chemically bound water. The structure of the clay is not altered that much at this temperature. Inside the bisque kiln, the work is stacked a little, small bowl inside a larger bowl and onto a heavy plate. Smaller items like decorations or drink coasters might get stacked several high. Consideration is paid to the weight of the stack and shape of the work. A bisque kiln can fire about one and a half times the amount of work that the glaze kiln can fire. The firing takes about 10 hours to complete the cycle and about two days to cool down. Once it has been emptied the work is placed in the glaze room ready for you to decorate! Step Six – Glazing Decorating your work with colour can be a lot of fun – and time consuming! There are three main options for surface treatment at this stage: Oxide Washes Underglazes Glazes Washes and underglazes do not “glaze” the work – It will still need a layer of glaze to fully seal the clay (washes don’t need glaze on surfaces not designed for food or liquid as they can gloss up a little on their own). Underglazes are stable colourants that turn out pretty much how they look in the jar. They can be mixed with each other to form other colours and can be used like water colours to paint onto your work. Mostly they should have a clear glaze on top to seal them. Oxides are a different species – the pink oxide (cobalt) wash turns out bright blue for instance. They don’t always need a glaze on top, and some glazes can change the colour of the wash! The glazes need no other “glaze” on top! Be careful of unknown glaze interactions – you can put any combination of glaze in a bowl or on a plate, but only a single glaze on the outside of any vertical surface! Glazes are a chemical reaction under heat. We don’t know the exact chemicals in the Mayco glazes we use. I can guess by the way they interact with each other, however, on the whole, you need to test every idea you have, and not run the test on a vertical surface! Simply put, glaze is a layer of glass like substance that bonds with the clay underneath. Clay is made of silica, alumina and water. Glaze is made of mostly silica. Silica has a melting point of 1700°C and we fire to 1240°C. The silica requires a “flux” to help it melt at the lower temperature. Fluxes can be all sorts of chemicals – a common one is calcium – calcium has a melting point of 2500°C, however, together they both melt at a much lower temperature! Colourants are metal oxides like cobalt (blue), chrome (green through black), copper (green, blue, even red!), manganese (black, purple and pink) iron (red brown), etc. Different chemicals in the glaze can have dramatic effects. for example, barium carbonate (which we don’t use) turns manganese bright pink! Other elements can turn manganese dioxide brown, blue, purple and reddish brown. Manganese dioxide is a flux in and of itself as well. So, glazes that get their black and purple colours, often interact with other glazes and RUN! Our mirror black is a good example – it mixes really well with many glazes because it fluxes them – causes them to melt faster. It will also bring out many beautiful colours in the glazes because it’s black colouring most definitely comes from manganese dioxide! Glaze chemistry is a whole subject on it’s own! We use commercial Mayco glazes on purpose – for their huge range of colour possibilities, stability, cool interactions, artistic freedom with the ability to easily brush the glazes on and ease of use. We currently have almost 50 glazes on hand! A major project is to test the interactions of all glazes with each other. That is 2,500 test tiles!!!! I’m going to make the wall behind the wheels the feature wall of pretty colours! Step Seven – Glaze (Gloss or sometimes called “Glost”) Firing Most of the time this is the final stage of making your creation (but not always!) The glaze kiln goes to 1240°C. This is called cone 6, or midrange. It is the low end of stoneware temperatures. Stoneware clays and glazes are typically fired at cone 8 – 10, that is 1260 – 1290°C. The energy requirement to go from 1240°C to 1280°C is almost a 30% more! Our clay is formulated to vitrify (mature, turn “glass-like”) at 1240°, as are our glazes. A glaze kiln take around 12 hours to reach temperature and two to three days to cool down. Sometimes a third firing process is required – this is for decoration that is added to work after the glaze firing. For example – adding precious metals and lustres. this firing temperature is usually around 600 – 800°C depending upon the techniques being used. There are many students interested in gold and silver trims – we will be doing this third type of firing soon! After firing your work will be in the student finished work shelves. Remember to pay for it before you head out the door! There is a small extra charge for using porcelain clay (it’s more than twice the price of regular clay), and for any third firing process! Once your work has been fired it can not turn back into clay for millennia – so don’t fire it if you don’t like it! Put it in the bucket for recycling. https://firebirdstudios.com.au/the-process-of-making-pottery/The form of the jug has been in use for many centuries.Stoneware jug. Two tone brown glaze with pierced lip behind spout. Spout chipped.None.flagstaff hill, warrnambool, shipwrecked-coast, flagstaff-hill, flagstaff-hill-maritime-museum, maritime-museum, shipwreck-coast, flagstaff-hill-maritime-village, jug, ceramic jug -
 City of Moorabbin Historical Society (Operating the Box Cottage Museum)
Domestic object - Kitchen Equipment, crockery 'Real Old Willow', Early 20th Century
Earthenware, 2 teacups, 2 saucers, 2 side plates and 1 cereal bowl with side plate in 'Real Old Willow' pattern. Traditional dark blue Willow Pattern, with hand-painted gold rims. Small Willow Pattern cameo at the base inside each cup.Pattern Number 8025. Small Willow Pattern cameo at the base inside each cup.ornaments, earthenware, booths pty ltd, tunstall, england, early settlers, pioneers, moorabbin, bentleigh, cheltenham, ormond, market gardeners -
 Bendigo Historical Society Inc.
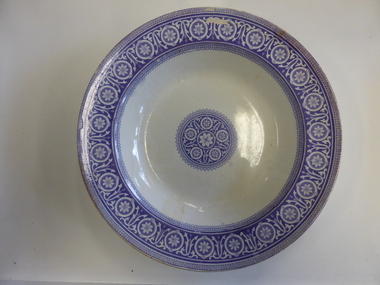
Domestic Object - SOUP BOWL
Blue and white china soup bowl, heavily decorated around rim and with a rosette on base, marked on bottom with letter Q in a garland of flowers.Mosaic JBdomestic equipment, food consumption, kitchen -
 National Vietnam Veterans Museum (NVVM)
Domestic Object, Bowl
... Ceramic food bowl, grey glaze with blue Asian pattern... Ceramic food bowl, grey glaze with blue Asian pattern Bowl ...Ceramic food bowl, grey glaze with blue Asian patternfood bowl, pinnaroo -
 Port Melbourne Historical & Preservation Society
Domestic object - Coasters, Port Melbourne Bowling Club, 1970s
From the collection of the late Fred WindussFour aluminium coasters from the collection of the late Fred WINDUSS - two gold plated and two silver plated, with Port Melbourne Bowling Club insignia; mounted on blue felt in a black card pouch. Impression of Yarra River with West Gate Bridge in foreground and City in background, edge of a bowl on right handsport - lawn bowls, frederick robert winduss, port melbourne bowling club -
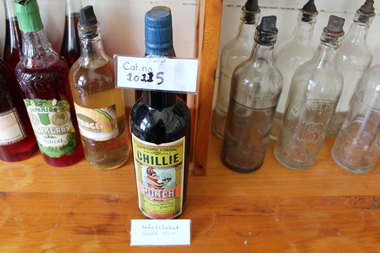 Coal Creek Community Park & Museum
Chillie Punch
Dark Blue Seal Label has a man Wearing a Hat and Holding a flaming bowlChillie Punch 1 PT.S FL 025 No 1245. Guaranteed under the pure food Act. 1908. N.S .W by oppy Bros. Condobrolin -
 Bendigo Historical Society Inc.
Domestic Object - CHINA BOWL
Blue and white small boat shaped china bowl heavily decorated with floral gilding.Hand Painted Japan I E Codomestic equipment, table setting, bowl -
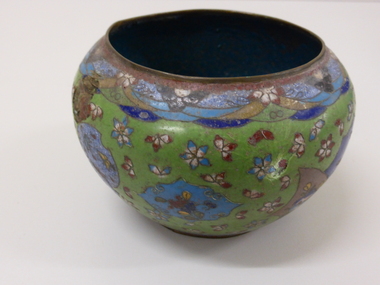 Bendigo Historical Society Inc.
Decorative object - CLOISONNE BOWL
Squat Cloisonne bowl/vase decorated with flowers & butterflies in shades of blue,green,yellow with inside and base turquoise.ornaments, cloisonne, vase -
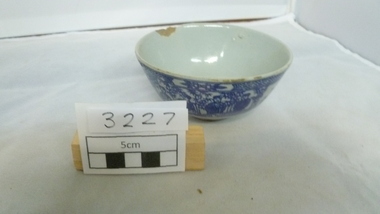
Donald History and Natural History Group operating the Donald Court House Museum
Bowl #1
Georgie's food bowlPorcelain bowk with blue circular line around rim. The centre of the bowl is decorated with a blue and brown motif of 2 children playing.Base stamped "Made in Japan".porcelain bowl, georgie ah ling, donald, market gardener, food bowl -
Dutch Australian Heritage Centre Victoria
Delft blue ashtray (asbakje in Delfts blauw)
... . Upper edge decorated with blue arrows, three floral motifs ...Dutch were formerly heavy smokers, and many brought ashtrays as part of their luggage when they migrated.Delftware with its traditional is collected by both Dutch and touristsScalloped-edged shallow ashtray with three cigarette rests and a pair of tiny clogs on the edge. Upper edge decorated with blue arrows, three floral motifs inside bowl, rural scene with windmill on on bottom of bowl. On underside: superimposed with crown, handpainted in Delftsblauw, 119.ashtray; delftware -
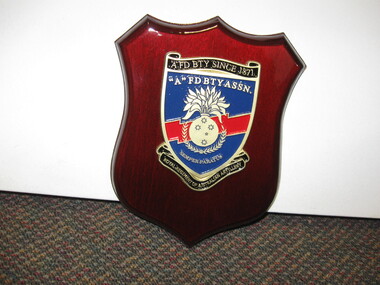 National Vietnam Veterans Museum (NVVM)
Plaque
A wooden shield. In the midle there is an insignia with the following details. "AFD BTY SINCE 1871" ""A" FD BTY ASSN" On a blue and red background there is leaves in a bowl and under this reads "Semper Paratus" At the bottom of the insigna reads Royal Regiment Of Australian Artilleryshield, royal regiment of australian artillery -
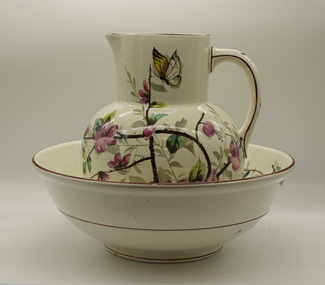 Clunes Museum
Domestic object - JUG AND BASIN SET
... floral design China Bowl - white with pink, blue, green and brown... background, pink, green, blue and brown floral design China Bowl ...China Jug - white background, pink, green, blue and brown floral design China Bowl - white with pink, blue, green and brown floral design Jug, marked with sticker "60" Stamped on base WE in circle, indecipherable stamp Bowl, base marked 2 ?? IVO 2015hygiene, grooming -
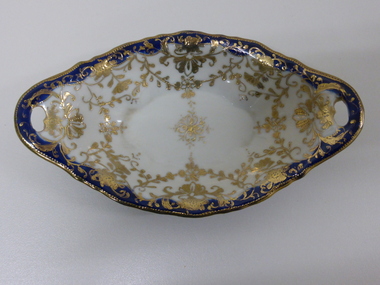
Clunes Museum
Award - TROPHY
Epergne - silver base and handle with figures embossed. Three receptacles, white frosted glass with pink fluted edges, yellow, blue, wine, green sprays of flowers. 1 large centre bowl and two conical shaped side receptacles.Clunes Fire Brigadetrophy, clunes fire brigade -
Tatura Irrigation & Wartime Camps Museum
Souvenir - Glass Bowl, Tatura
Small clear glass bowl with a coloured photo of a tree lined street. A blue sky with the words Tatura in written in black.Tatura -
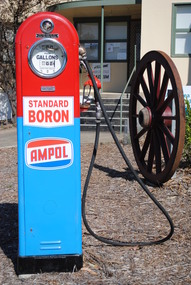 Anglesea and District Historical Society
Petrol Bowser, Restored Ampol Wayne Petrol Bowser, Estimated 1950's and 1960's
Ampol Wayne Petrol Bowser - metal, painted red top-half and blue bottom - back and front identical with authentic logos placed below the glass encaseddial showing quantity and cost of fuel dispensed. Above dial is smaller circular bowl showing fuel level. One side showing metal fittings for dispensing fuel and attaching hose and both sides have Ampol logos on lower half. Pump bolted to concrete pad for display.Silver plaque with "WAYNE" below dispensing dial. Decal 'showing "Ampol" logo' on all sides and 'BORON" front and back. Plaque reading 'THIS BOWL MUST BE FULL/BEFORE AND AFTER DELIVERY" on front and back under small bowl. Sticker reading 'THIS FUEL MAY CONTAIN/LEAD AND IS TO BE USED/AS MOTOR FUELD ONLY".ampol, petrol bowsers, service stations -
 Tatura Irrigation & Wartime Camps Museum
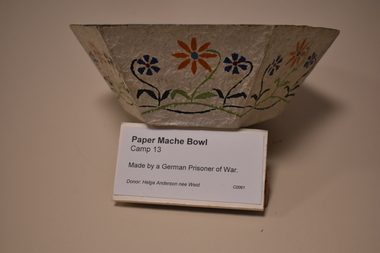
Bowl, 1940's
Made by a German prisoner of war at Camp 13Hexagon shaped paper mache bowl. White outside, dark green inside, painted on the outside are navy blue and orange flowers, navy and green stemsbowl, paper mache, anderson h, camp 13, murchison, tatura, camps, handmade, papier, mache, helga anderson -
 Wangaratta Art Gallery
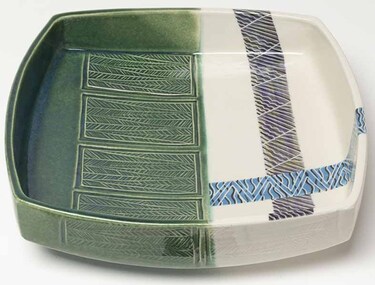
Ceramic, Tom Strachan, Untitled Bowl, 2004
... A hand sculpture ceramic square bowl glazed in green, blue... A hand sculpture ceramic square bowl glazed in green, blue, white ...Wangaratta Art Gallery CollectionA hand sculpture ceramic square bowl glazed in green, blue, white and grey featuring an pattern engraved and stamped into the glaze. Design of the bowl is based on the 16th Century Japanese Oribe ware.tom strachan, after 16th c japanese oribe ware, ceramic bowl -
 Nillumbik Shire Council
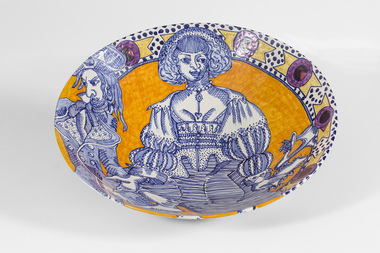
Ceramic (bowl): Alexandra COPELAND, Alexandra Copeland, Vanity, 1/9/1994
This bowl is part of a series completed in 1994 on the subject of the sin of 'Vanity' / A smug looking woman flirts coquettishly with a manservant who helps her to put on her shoes / The people depicted on the bowl are dressed in 18th century costumes / The court of Marie Antoinette of France is evoked / The blue and white drawing is in the style of 18th century woodblock prints and was drawn freehand / The bowl is signed and dated on the base / The technique is traditional tin glaze (majolica, maiolica or delft) / Coloured oxides were painted onto a clear glaze which had been opacified with tin oxide, and then fired at 900 degrees / The bowl was exhibited at Christine Abrahams Gallery, Melbourne in 1994 / A bowl from the 'Vanity' series is held in the Collection of the Queen Victoria Museum and Art Gallery in Launceston, Tasmania. Copeland's parents are John and Betty Hipwell, one of the founding members of Potters Cottage (an influential ceramic collective that grew out of Nillumbik) / Copeland grew up surrounded by this artform. Reg Preston (another founding member of Potter's Cottage) introduced her to the Majolica technique which has influenced her ceramic work to this day / This bowl is characteristic of Copeland's speciality and mastery of the Majolica technique. This bowl is hand painted with an image of a couple flirting (man-left side and woman-centre) in 18th century French dress / Decorative circle and polka dot pattern along the rim and underside of the bowl / The bowl is predominantly painted in cobalt blue and orange colour using the Majolica (maiolica or delft) technique; a traditional tinglaze method of application. Coloured oxides are painted onto a clear glaze which has been opacified with tin oxide / The bowl is then fired at 900 degrees.Underside has in colbalt blue artist signature and date / 'A. Copeland . 1.9.1994'.copeland, earthenware, majolica, potters cottage, vanity, bowl, eighteen century, french, marie antoinette -
 Whitehorse Historical Society Inc.
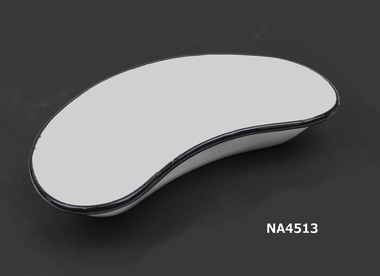
Functional object - Kidney Bowl
Medical kidney dish used by William Harrison, a member of St. John's Ambulance. Equipment used when attending public functions. Used at Morton Park and Blackburn Football Club. 1946+White enamel kidney dish with blue/black edging.|Oral History is at NP3400 and Transcription is at ND6056Geddes Pharmacy - Carlton/G.H. Zeal/English mademedicine, nursing -
 Whitehorse Historical Society Inc.
Leisure object - Child's Tea Set
Child's china tea set - white with blue edge and flowered pattern. Comprising: tea pot with lid, milk jug with one handle, 1 cup, 1 bowl, 1 oval plate, 1 oval plate, 3 saucers, 5 plates. 13 parts make up the setdomestic items, crockery, toys, dolls' accessories -
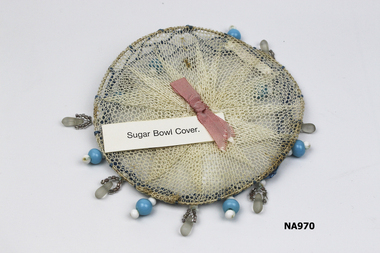 Whitehorse Historical Society Inc.
Textile - Sugar Bowl Cover
... Circular net sugar bowl cover. Wire frame. Blue crocheted... Mitcham melbourne domestic items crockery Circular net sugar bowl ...Circular net sugar bowl cover. Wire frame. Blue crocheted netting holding crystal, blue and white beadsdomestic items, crockery -
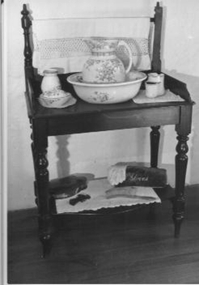 Whitehorse Historical Society Inc.
Domestic object - Wash Set
Six piece crockery personal wash set comprising large bowl, large jug, 3 piece soap set with bowl, perforated inlay piece and lid and small jug possibly for toothbrush. White China with pink and blue flowers and brown leaves. Wash bowl and jug.domestic items, ablutions, crockery -
 Whitehorse Historical Society Inc.
Leisure object - Child's Enamelled tea set, c1920
Donated by Mrs. Doris Mattingly, a long time Secretary of N.H.S. Doris played with the tea set as a child in her family home at Murtoa in the Wimmera, Victoria.Blue enamel child's tea set with white speckle. it consists of one teapot with lid, one sugar bowl with lid, one milk jug, six cups and five saucers.toys, general -
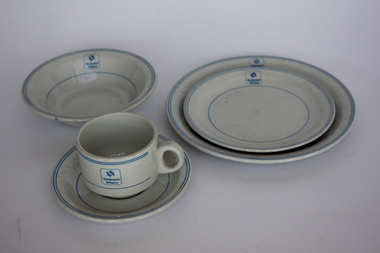 Dandenong/Cranbourne RSL Sub Branch
Veteran Affairs Crockery, Various 8/88 6/85 3/86 4/87
Veteran Affairs Crockery consisting of- Dinner plate,Bread plate,Bowl and Cup & Saucer.White with two blue circles on outer edges and blue circle half way down.. Square Veterans Affairs label in blue on each item. (5 Items)Blue Square outline with Veterans Affairs printed in blue inside.On base of items-Bristile Made in Australia Dates various dates 8/88-6/85-3/86-4/87. -
 South Gippsland Shire Council
Bowl, Sculptured, Flotsam & Jetsam, 2004
Sculptured bowl made by Ann Parry; winner of the Welshpool Art & Craft Show 2004. The bowl is created in various shades of blue with cream frothy lining the base. Features sculptured shells and shaped pieces affixed to sides. Silver trim in parts. -
 South Gippsland Shire Council
Bowl, Boxed, Chinese bowl, 1990s
Small "Chinese Black Pottery" bowl in presentation case. Green/blue satin fabric case featuring Chinese design. Gold bow on lid. red velvet lining. Chinese text label inside lid. -
 Ballarat Tramway Museum
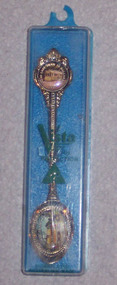
Souvenir - Teaspoon, Perfection Plate, BTPS Teaspoon - tram 40 and 1, early 1990's
Souvenir Teaspoon featuring Ballarat tram No. 40 as the last ram in 1971 in an inset at the top of the tea spoon, and No. 1 Horse tram 1887 in the bowl of the teaspoon contained within a plastic case. The teaspoon made by Perfection Plate, of the Vista style or type. The case has blue plastic base, with clear top with the words "Vista by perfection" printed do top. On the rear of the case is the wording "Perfection". The teaspoon is silver plated, with the tram in a picture 15mm diameter on top and oval shaped in the bowl about 25mm long. The teaspoon is marked "Vista" on the rear, with "Perfection Plate Australia" along the handle of the spoon. Tea spoon is 112mm long x 25mm wide. Case is 125mm high, 32mm wide, by 16mm deep. Made early 1990's? Second copy added 19-6-2017 - no case from donation of S. Hall - see related documents for email chain. trams, tramways, teaspoons, sales items, btps -
 Bendigo Historical Society Inc.
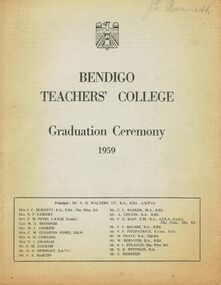
Document - LA TROBE UNIVERSITY BENDIGO COLLECTION: BENDIGO TEACHERS' COLLEGE GRADUATION CEREMONY 1959
A faded blue document titled "Bendigo Teachers' College Graduation Ceremony 1959". Also on the front page is a list of the staff working at the college. On the inside page is the "Significance of the Ceremony" and "Order of Ceremony". The welcome to visitors was given by Mr. F. M. Courtis and the 'Graduation Book' was presented to Mr. A. L. Harris by Miss J. C. Burnett. Mr. C. L. Barker made the final call of the 1959 roll. Congratulations were offered by Cr. H. W. Snell J.P., Cr. P.V. Bowles the President of Strathfieldsaye Shire and Mr. E. P. Seymour, Head Teacher of Violet Street State School. The Occasional Address was presented by Mr. J. G. Greening Chief Inspector of Primary Schools. The following page contains a list of the "Students of 1958-59". The back page has the "Principal's Charge". There is also a type written insertion containing the graduation songs. Bolton Bros. Print, Bendigo. The College staff are - Mr. S. H. Walters (Principal), Miss J. C. Burnett, Mrs. N. F. Fawdry, Mrs. F. M. Petri, Miss. M. G. Bremner, Mrs. D. J. Andrew, Miss C. M. Oughton Jones, Miss B. H. Cowling, Miss V. J. Graham, Mr. F. M. Courtis, Mr. D. A. Newbury, Mr. F. X, Martin, Mr. C. L. Barker, Mr. A. Linton, Mr. F. G. East, Mr. T. J. McCabe, Mr. P. F. Fitzpatrick, Mr. M. Pratt, Mr. W. Bernoth, Mr. R. L. Strauch, Mr. R. E. Wittman and Mr. C. Houston. The students of 1958-59 are Raymond Arthur Aisbett, James Allen, Wyn Margaret Barber, Lawrence Alexander Bernard, Gwenda Rosalie Blandford, Brian John Bourke, Dorothy Frances Burns, Alan Charles Bush, Melva Grace Campbell, Janet Frances Ceveri, Aileen Heather Cole, Dorothy Irene Comer, Francis James Comer, Pamela Wendy Cooper, Richard Mary Cotter, Laurence Peter Curtain, Desma Maree Derrick, John Michael Deviny, Aileen Mary Doolan, Sandra Dawn Downie, Jean Rosemary Feltscheer, Janette Rosemary Finnin, Valerie Joy Freeman, Thomas Joseph Gibson, Dorothy Helen Gray, Judith Anne Gray, Mary Catherine Gread, Leslie Brian Grenfell, Helen Elizabeth Hipwell, Helen Mary Hurley, Peter Geoffrey Hyden, Alan Clifford Inglis, Valerie Margaret Lindell, Bruce Henry Lohrey, Douglas Ernest Lynch, Hilary Ann McGrath, Barry Alexander McWha, Ann Marjorie Matulin, Margaret Joan Mossop, Moira Anne Mullins, Nildo John Munari, Verna Margaret Osterfield, Ruth Lorraine Phillips, Richard John Pywell, Michael Lynton Ramm, Nola Wendy Reyne, Gilda Jane Richards, Margaret Elizabeth Rilen, Keith James Rodda, Gary William Rodgers, Brendon Gordon Smith, Ronald Noel Teasdale, Mary Veronica Wharton, Kaye Dianne Whinfield and David William Williams.bendigo, education, bendigo teachers' college graduatio, la trobe university bendigo collection, collection, bendigo teachers' college, bendigo, education, teaching, teachers, students, bendigo teachers' college students, bendigo teachers' college staff, tertiary education, teacher training, graduation, graduands, graduation ceremony, book -
Queenscliffe Maritime Museum
Domestic object - Tableware
Retrieved from sea bed by local diverOne cognac bottle and two blue and white bowlsBoutelleau and Co on cognac bottleshipwrecks, salvage, bottle, bowl, tableware -
 Bendigo Historical Society Inc.
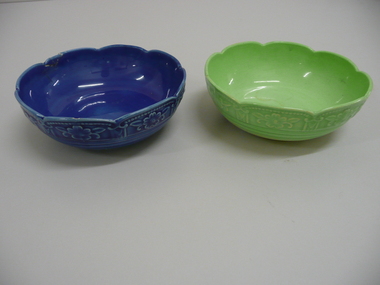
Functional object - TWO CHINA BOWLS
Two small china bowls with embossed floral pattern & scalloped rims, one blue & one green.Mamitomo ware made in Japandomestic equipment, table setting, bowl