Showing 174 items matching "cable grip"
-
 Ballarat Tramway Museum
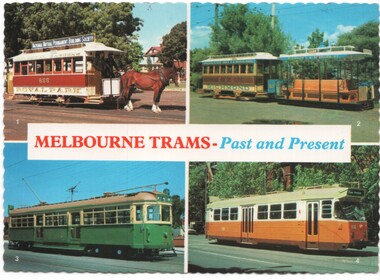
Postcard, Scancolor and Tramway Museum Society of Victoria, "Melbourne Trams - Past and Present", mid 1980's
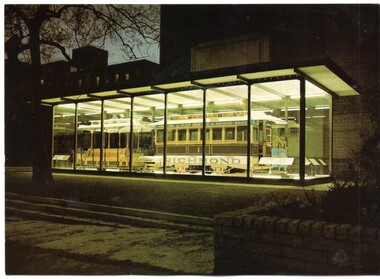
Postcard - four panel, colour, titled "Melbourne Trams - Past and Present", featuring trams: Royal Park horse tram 256 Richmond cable tram W7 class tram - 1022 Z3 class tram 116 On rear is TMSV image, details of the TMSV Bylands, produced by Scancolor, Melbourne, CS1482. Has 33 cent stamp, postmarked for the Centenary of Cable Car Services, 11/11/1985 with a grip included and stamped "100 years of Melbourne trams carried on Commemorative official trip from Flinders St, Melbourne to Richmond Town Hall, November 11, 1985" in blue ink in the bottom right hand corner.trams, tramways, postcards, centenary, cable trams, stamps, horse tram, w7 class, z3 class -
 Ballarat Tramway Museum
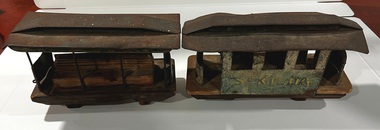
Model - Toy cable tram set, c1900
Built as a toy, either by a well resourced home workshop or by a toy maker. Have been well used or loved with missing wheels and damaged roof. Possibly dates from the early 1900s. St Kilda was a popular destination for Melbourne cable trams. Demonstrates a toy cable tram set.Cable tram set made from wood and pressed metal. Grip car or dummy has remnants of paint (green and gold) on the sides, holes for wheels on the two wood blocks on the underside. Has an eye hook at one end and a hole for another at the other end. Seat made from timber with a steel wire or rod to represent a grip lever. Metal secured to wood base with nails. Has four metal Staunchions on either side. Trailer similar construction with sides stamped or cut from sheet steel with holes at either end for a eye or hook and wheels. Roof on both items has been pressed and assembled. The trailer has painted on one side "St Kilda" and the remnants of a similar word on the other side.cable trams, toys, trams, st kilda -
 Ballarat Tramway Museum
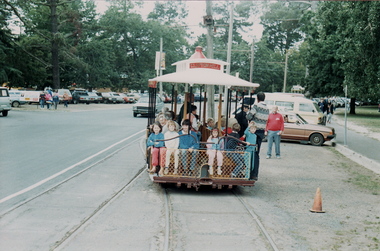
Photograph - Digital image Set of 2, Chris Phillips, Mar.1987
Digital image - set of two - of the Newton Williams and Darryl Hawksworth motorised cable tram set operating in Wendouree Parade during the 1987 March Begonia Festival. .1 - grip car running around the trailer in the loop. .2 - grip car and trailer 171 in the loop with tram 40 behind.trams, tramways, btps, cable trams, begonia festival, gardens loop, wendouree parade, tram 40, tram 171 -
 Ballarat Tramway Museum
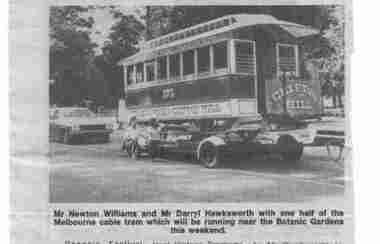
Newspaper, The Courier Ballarat, "What's on this Weekend", 6/03/1987 12:00:00 AM
Small item about the BTPS operating a motorised cable tram set during the 1987 Begonia Festival, with cable trailer 171 arriving.Newspaper clipping, from The Courier, 6-3-1987, from the What's on this weekend Section, about the BTPS operating a Melbourne cable tram set the forthcoming weekend as part of the Begonia Festival. Has a photo of cable trailer 171 on the trailer prior to unloading. Appears to be Peter Winspur and Alan Bradley alongside the trailer. Notes Newton Williams and Darryl Hawksworth as the owners of the grip car and trailer respectively.btps, cable trams, begonia festival -
 Melbourne Tram Museum
Negative, Ellis Collection, 1930s
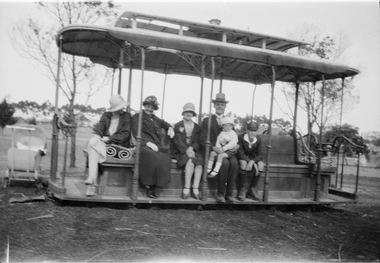
... Trams tramways Cable Trams Edwards Lake Grip Tram Reservoir ...Negative (120) of a Grip car body in a park with a family sitting on the tram. Could be the Ellis family. Caption to donation sheet says Edwards Lake, Reservoir late 1930's. See image htd3621i1 and i2 for an image of Inspector Ellis.trams, tramways, cable trams, edwards lake, grip tram, reservoir -
 Melbourne Tram Museum
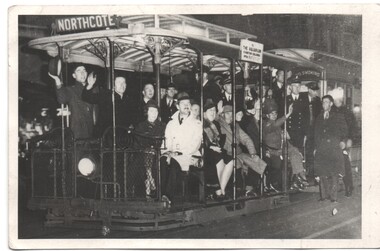
Photograph - Set of two - last Bourke St cable car, Department of Infrastructure (DOI), 26/10/1940
Photos of the last Bourke St cable tram service to Northcote with crews and inspectors. Has a sign on the side regarding the Aquarium. Date of photograph 26-10-1940. Well known newspaper photograph - actual origin to be determined. .1 - another photo of the same event of the grip car itself. Photo from the Collection of the Department of Infrastructure now with the Public Records Office - image number H439. Note: this photo is now out of copyright and was not an original VR photograph, but one copied from another source and collected as their Heritage series. 2nd copy of .1 added 16/3/2021 and a 3rd copy ex Keith Kings added 18-7-2021Yields information about the last cable tram service to Northcote and marked the end of the cable tram system in Melbourne.Black and white photograph - copy prints.1 has Department of Infrastructure copy right stamp on rear and number "H 439" in ink on rear and "1-17" 2nd copy of .1 has "Latrobe The Aquarium cable tram" in ink on top edge, "1940" and "Brimson" along lower edge. 3rd copy of .1 has stamped TMSV Sales on rear.trams, tramways, closure, cable trams, northcote, bourke st -
 Melbourne Tram Museum
Book - Cable tram records - book 1 of 4, Alf Twentyman, c1940 to 1985
First of four documents compiled by Alf Twentyman about the history of Melbourne cable trams. On the inside of the rear cover has a table of contents - see image 1. Includes sketches of San Francisco grips, sketches of destination signs on the cable cars, Auburn Road and Kew horse tram timetables rolling stock, sketch of St Kilda Road, Victoria Parade - Brunswick St, listing of ropes and their life spans, tables of cars out for various depots, timetables, list of visitors to Northcote, new MMTB rolling stock listing.Demonstrates the recording and drawing work of Alf Twentyman and his notes.Exercise book - part ruled - part plain pages - 92 numbered pages + fawn coloured covers, centre stapled.tramways, cable trams, alf twentyman, history, track plans, records -
 Ballarat Tramway Museum
Album - Postcards & Photographs - Vic Solomons and others - Australian Tramways, Vic Solomons, 2023
Contains 184 images of postcards and photographs collected primarily by Vic Solomons of Sydney, with others from the collection of Wal Jack and Warren Doubleday. Covers almost all of Australia's tramway systems. 1 Post Card Hay St Perth Looking East No 3 Unknown Perth 2 Post Card Cars 30 & 90 both on Route 19 pass in Barrack St looking South Perth WA 1935.02.18 Perth 3 Post Card Hay St Looking East Perth WA Unknown Perth 4 Post Card William St Perth WA Unknown Perth 5 Post Card Perth from Shaftsbury Hotel Unknown Perth 6 Post Card Hay St Perth WA Looking East Unknown Perth 7 Post Card Barrack St Perth Unknown Perth 8 Post Card Murray Views No 3 High St Showing Town Hall Fremantle WA Unknown Fremantle 9 Post Card High St Fremantle WA Unknown Fremantle 10 Post Card View of Bolder City Golden Mile in the Background (Section No 1) 1908.08.20 Kalgoolie 11 Post Card Hannan St Kalgoolie 1900.08.19 Kalgoolie 12 Post Card Hannan St Kalgoolie WA (No 2) Unknown Kalgoolie 13 Post Card Intersection Hannan & Maritana Sts Kalgoolie WA Unknown Kalgoolie 14 Post Card Hannan St Kalgoolie Unknown Kalgoolie 15 Post Card Lane Street Bolder City Unknown Kalgoolie 16 Post Card Hobart Double Deck Tram Unknown Hobart 17 Post Card Macquarie St Hobart Unknown Hobart 18 Photo Liverpool Street Hobart Unknown Hobart 19 Photo Hobart 21 Unknown Hobart 20 Photo Hobart 14 in Elizabeth St Hobart Unknown Hobart 21 Post Card Macquarie St Hobart Unknown Hobart 22 Post Card Macquarie St Hobart Tas Unknown Hobart 23 Photo Double Decker Tram 3 at G.P.O. Hobart Tas No 31 Unknown Hobart 24 Post Card Double Decker Tram 19 Hobart Tas A B Series No 24 Unknown Hobart 25 Photo Hobart Municipal Tramways Tas No 95 Unknown Hobart 26 Post Card Elizabeth St Hobart Unknown Hobart 27 Post Card Elizabeth St Hobart Unknown Hobart 28 Post Card Elizabeth St Hobart Unknown Hobart 29 Post Card Elizabeth St Hobart Tas Unknown Hobart 30 Post Card HMT 21 with crew at Beach Road Terminus Unknown Hobart 31 Post Card HMT 9 & another with crew at Beach Road Terminus. Front cover photo of Destination GPO 1921.01.00 Hobart 32 Post Card Cascade Road and Mount Wellington Hobart Unknown Hobart 33 Post Card Elizabeth St Hobart Unknown Hobart 34 Post Card Elizabeth St Hobart Unknown Hobart 35 Post Card Elizabeth St Hobart 1915.04.07 Hobart 36 Post Card Macquarie St Hobart Tas Unknown Hobart 37 Post Card Macquarie St showing Post Office Hobart 1908.03.12 Hobart 38 Post Card Hobart Municipal Tramways 21 Unknown Hobart 39 Post Card Elizabeth St Hobart Tas Unknown Hobart 40 Post Card Liverpool Street Hobart Unknown Hobart 41 Post Card Electric Tram Launceston Tas 446 W J Little Photo 1919.02.08 Launbceston 42 Post Card Launceston Tram no 3 1911.08.30 Launbceston 43 Post Card Launceston Tram no 3 passes tram No 1 Unknown Launbceston 44 Post Card Tram 6 at Trevallyn a popular suburb Launceston Tasmania Unknown Launbceston 45 Post Card Tram 7 at Trevallyn Road Terminus Launceston Tasmania Unknown Launbceston 46 Post Card Tram 4 in Brisbane St Launceston Unknown Launbceston 47 Post Card Tram 9 in Brisbane St Launceston Tasmania Unknown Launbceston 48 Post Card Camerom Street Launceston Tasmania Unknown Launbceston 49 Post Card Murray Views No 15 Jetty Road Glenelg Terminus 1962-02-08 Adelaide 50 Post Card Bay Tram at Jetty Road Terminus Glenelg SA Unknown Adelaide 51 Post Card Tram 3 in King William Street Adelaide S Aust Unknown Adelaide 52 Post Card Valentine Series No 3065 The Old Horse Tram Victor Harbour Unknown Victor Harbour 53 Post Card Bourke Street Melbourne with Cable Car Looking East 1904.04.25 Melbourne 54 Post Card Opening of New Electric Tramway Elsternwick 1913-11-13 Melbourne 55 Post Card Cable trams in Clarendon St Sth Melb Unknown Melbourne 56 Post Card Pall Mall from Charing Cross Bendigo Unknown Bendigo 57 Post Card Tram 4 & 7 pass at The Fountain and Mitchell Street Bendigo Vic Rose Series P 3198 Unknown Bendigo 58 Post Card M&MTB 133 at Charing Cross bound for Eaglehawk Bendigo Vic Murray Views No 45 Unknown Bendigo 59 Post Card Pall Mall Bendigo Vic Unknown Bendigo 60 Post Card Charing Cross & Mitchell St Bendigo Trams passing 1919.00.00 Bendigo 61 Post Card Pall Mall Looking East Unknown Bendigo 62 Post Card Electric Trams and City Hotel Bendigo Vic Unknown Bendigo 63 Post Card Moorabool Street Geelong V 23 Unknown Geelong 64 Post Card Murray Views No 3 Moorabool Street Geelong Vic Unknown Geelong 65 Post Card The Rose Series P 2487 Ryrie Street Geelong Vic Unknown Geelong 66 Post Card Southern Cross Series 2696 Ryrie Stret Geelong Vic Unknown Geelong 67 Post Card The Rose Series P 1490 Ryrie Street Geelong Vic 1920-03-04 Geelong 68 Post Card Valentine Series No 1568 Lower Sturt Street Ballarat Unknown Ballarat 69 Post Card Rose Series P 1710 Sturt Street Ballarat Victoria Unknown Ballarat 70 Post Card Sturt Street Ballarat Victoria Unknown Ballarat 71 Post Card Horse Tram In Sturt Street Ballarat 1905.11.10 Ballarat 72 Post Card Sturt Street Ballarat Looking North-West Unknown Ballarat 73 Post Card Shoppes Square Sturt Street Ballarat Looking North Unknown Ballarat 74 Post Card Junction Sturt and Lydiard Streets Ballarat 1909-09-01 Ballarat 75 Post Card The Electric Supply Co Souvenir Tram Ticket No 3085of the opening of Electric System August 18 1905 1905.08.18 Ballarat 76 Post Card Sturt Street Ballarat Victoria 1907.11.25 Ballarat 77 Post Card Off to the Gardens Electric Tram Ballarat Unknown Ballarat 78 Post Card Sturt Street Ballarat 1907.04.16 Ballarat 79 Post Card Sturt Street Ballarat Looking East Electric tram with Double Deck Trailer 1911.04.17 Ballarat 80 Post Card Sturt Street Ballarat Looking East Unknown Ballarat 81 Post Card Sturt Street Ballarat Looking West 1911.03.01 Ballarat 82 Post Card Town Hall and Sturt Street Ballarat Unknown Ballarat 83 Post Card Lydiard Street Ballarat 1906.11.23 Ballarat 84 Post Card Looking North along Adelaide Street from George Street Brisbane Sidues Series No 764 Unknown Brisbane 85 Post Card Looking South along Queen Street from the Creek Street Intersection Brisbane Qld Sirues Series No 1379 Unknown Brisbane 86 Post Card George Street from near Supreme Court Brisbane Unknown Brisbane 87 Post Card Queen and Eagle Streets Brisbane 1907.07.04 Brisbane 88 Post Card Queen Street showing His Majesty’s Theatre Brisbane Unknown Brisbane 89 Post Card Queen Street Treasury Building 1908.01.20 Brisbane 90 Post Card G P O and Queen Street Brisbane Unknown Brisbane 91 Post Card Queen Street Brisbane Looking from Wharf Street Unknown Brisbane 92 Post Card Customs House Brisbane 1905.02.16 Brisbane 93 Post Card Queen St Brisbane 1905.09.16 Brisbane 94 Post Card Queen St Brisbane 1907.11.19 Brisbane 95 Post Card Treasury Buildings Brisbane Unknown Brisbane 96 Post Card Queen and Eagle Streets Brisbane Unknown Brisbane 97 Post Card The Valley Corner Brisbane Unknown Brisbane 98 Post Card Brisbane Queen Street opposite General Post Office Unknown Brisbane 99 Post Card North Quay and Milton Beach Brisbane Q Unknown Brisbane 100 Post Card Victoria Bridge Brisbane South Side 1907.08.14 Brisbane 101 Post Card Victoria Bridge Brisbane Unknown Brisbane 102 Post Card Breakfast Creek Bridge Brisbane Q Unknown Brisbane 103 Post Card Melbourne Street Station South Brisbane Queensland Unknown Brisbane 104 Post Card General Post Office Queen Street Brisbane 1955.09.23 Brisbane 105 Post Card Customs House Brisbane 1904.11.04 Brisbane 106 Post Card Queen St Brisbane 1919.11.00 Brisbane 107 Post Card Queen St Brisbane Sidues Series No 627 Unknown Brisbane 108 Post Card Creek Street Brisbane Queensland Unknown Brisbane 109 Post Card Customs House and Garden Reach Brisbane Queensland 1910.00.08 Brisbane 110 Post Card Queen and Creek Streets Brisbane 1909.06.07 Brisbane 111 Post Card Queensland National Bank andd Queen Street Brisbane Queensland Unknown Brisbane 112 Post Card Queen Street and Treasury Buildings Brisbane 0000.09.07 Brisbane 113 Post Card Queen Street showing “Courier” Buildings Brisbane Unknown Brisbane 114 Post Card Intersection George & Roma Streets Brisbane Q 1916.05.11 Brisbane 115 Post Card Adelaide Street Brisbane Q Unknown Brisbane 116 Post Card G P O Queen Street Brisbane Q Unknown Brisbane 117 Post Card Treasury Building Brisbane 1906.03-20 Brisbane 118 Post Card Queen and Eagle Streets Brisbane 1907.02.01 Brisbane 119 Post Card Queen St Brisbane Unknown Brisbane 120 Post Card Queen St Brisbane Q Unknown Brisbane 121 Post Card Victoria Bridge Brisbane 1906.07.30 Brisbane 122 Post Card An Unusual View showing Head of Queen Street Victoria Bridge & South SideSuburbs Brisbane Q Unknown Brisbane 123 Post Card Petries Bight Brisbane Q Unknown Brisbane 124 Post Card South End Victoria Bridge Brisbane Q Unknown Brisbane 125 Post Card Customs House Brisbane Unknown Brisbane 126 Post Card Photo of toastrack car circa 1910 Unknown Brisbane 127 Post Card Treasury Buildings Brisbane Unknown Brisbane 128 Post Card East Street Rockhampton with Steam Tram & trailer Unknown Rockhampton 129 Post Card Post Office Rockhampton with steam tram Unknown Rockhampton 130 Post Card East Street Rockhampton with Steam Trams Rose Series P 7154 Unknown Rockhampton 131 Post Card William Street Rockhampton Rose Series P 7156 Unknown Rockhampton 132 Post Card Central East Street Rockhampton Q with Steam Trams Unknown Rockhampton 133 Photo Sturt St Ballarat Unknown Ballarat 134 Photo Bridge Street Ballarat Unknown Ballarat 135 Post Card George St Sydney Unknown Sydney 136 Post Card Elizabeth St Sydney Unknown Sydney 137 Post Card Railway Square Unknown Sydney 138 Post Card Sydney Harbor Bridge - pending receipt 139 Post Card Kings Cross - Mowbray Series with description on rear from C Roy G Field Unknown Sydney 140 Post Card Kings Cross - Mowbray Series with description on rear from C Roy G Field Unknown Sydney 141 Post Card Central Railway Station Sydney - Rose Series P6033 1954-01-26 Sydney 142 Post card William Street Darlinghurst looking towards City - Rose Series P6602 unknown Sydney 143 Post Card Circular Quay Sydney - Rose Series P6680 Unknown Sydney 144 Post Card View at Manly NSW - Rose Series B1003 Unknown Sydney 145 Post Card Hunter St Newcastle NSW - Rose Series P7843 Unknown Newcastle 146 Post Card Bank Corner Newcastle NSW - Mowbray Series No. 155 Unknown Newcastle 147 Post Card Hunter St Newcastle NSW Unknown Newcastle 148 Post Card Criterion Hotel Hunter St Newcastle NSW Unknown Newcastle 149 Photo Horse tram at Newtown Station 1894 to 1898 - PTC photo c1894 Newtown 150 Photo Steam tram motor No 3 at Railway Square 1879 1879 Sydney 151 Photo Railway steam tram c1900 with a horse drawn double deck bus c1900 Sydney 152 Photo Steam motor 5A and doubled deck bus Unknown Sydney 153 Photo Steam motor 53A with detail notes on rear 1922 Sydney 154 Photo Cable tram set at Milsons Point ferry terminal c1900 Sydney 155 Photo Early Sydney electric car - Ocean St - Rose Bay Unknown Sydney 156 Photo George St looking souoth c1905 c1905 Sydney 157 Photo Tram 165 at Circular Quay Unknown Sydney 158 Photo Tramcar ferry or transporter at The Spit Unknown Sydney 159 Photo tram 882 George St at Marti Place, 1937 1937 Sydney 160 Photo Tram 826 Railway Sq area Unknown Sydney 161 Photo Railway Sq in background, Broadway with double decker bus and toastrack car late 1930s Sydney 162 Photo Coupled St Pitt St? - photo Ben Parle Feb. 1950 Sydney 163 Photo Electric tram No. 2 - North Sydney with side trolley pole running Unknown Sydney 164 Photo George St - Horden's Corner Unknown Sydney 165 Photo George St at Martin Place c1920 Sydney 166 Photo Castlereagh St Sydney c1928 c1928 Sydney 167 Photo Railway Sqare c1920 c1920 Sydney 168 Photo Darling St Countereweight Unknown Sydney 169 Photo Trolley bus depot Unknown Sydney 170 Photo Trolley bus No. 14 Unknown Sydney 171 Photo Newcastle Railway Station with steam tram - Wharf Road?? Unknown Newcastle 172 Photo High St West Maitland - steam tram Unknown Maitland 173 Photo High St West Maitland - steam tram Unknown Maitland 174 Post Card Argent St near tram terminal Broken Hill NSW c1900 Broken Hill 175 postcard Argent St looking south Broken Hill - with Ken Magor's notes on rear Unknown Broken Hill 176 Photo Toronto - steam tram 61A Unknown Toronto 177 Photo 124A trial run 1911? Sutherland - Cronulla line 1911 Sutherland 178 Photo 103A at a tram stop Unknown Sydney 179 Photo Cable tram set at Crows Nest terminus grip car 12, trailer 22 Unknown Sydney 180 Photo Cable tram Queens Square Sydney 1903 Sydney 181 Photo cars 2078 and 2077 Chatswood late 1950s Sydney 182 Photo car 1877 Balmain area late 1950s Sydney 183 Photo Trolley bus - Rockdale destination Late 1950s Sydney 184 Photo Broken Hill steam tram - motor 18A North Tram Unknown Broken Hill 185 Photo Millars Point Sydney NSW - ferry/tram interchange, unknown Sydney All items imaged including the rear or back where there was writing of information. All files stored on the Museum's Photo Collections directory. Demonstrates through the medium of many images, Australian tramway systems and Ballarat's place in them.Album - heavy card covers, plastic lined with postcard or 6x4 photo sleeves.australia, tramways, postcards, photographs, steam trams, horse trams, cable trams, trolley buses -
 Melbourne Tram Museum
Photograph - Black and White Cable tram Brunswick Depot Sydney Road
Photograph shows a cable tram or cable train, consisting of a grip car or dummy along with a bogie trailer (No. 473) outside the Brunswick cable tram or car house with seven gripmen or conductors and possibly a manager around the grip car. The grip car has the destination of Royal Park. Yields information about the Brunswick cable line and the Brunswick Depot. Black and White Cable tram Brunswick Depot Sydney Road reproduced from a Newspaper.sydney road, trams, tramways, cable trams, brunswick depot, crews, grip men, conductors, tram 473 -
 Melbourne Tram Museum
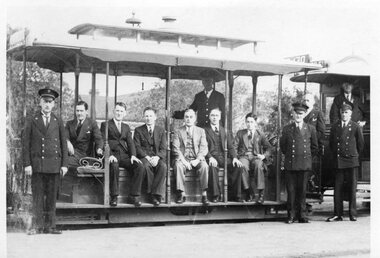
Photograph - Black and White - group cable tram employees 1940?
Photograph shows a group of three tramway inspectors, seven office or management staff, a grip man and conductor on a cable tram set possibly at ? depot prior to the closure of the cable system in October 1940. Related to Reg Item 6122, a large group photo taken with the same background location. The Poster see Reg Item 6368 contains this photo - "Official & Clerical Staff at Clifton Hill - last line to operate"Yields information about the type of uniforms or office clothing worn by cable tram staff prior to the closure of the cable tram system.Photograph - Black and White of a group of 12 cable tram employees - Inspectors, Office staff and crew 1940trams, tramways, cable trams, car houses, inspectors, grip men, conductors, clothing, suits, clifton hill -
 Melbourne Tram Museum
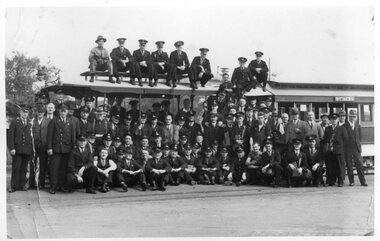
Photograph - Black and White - large group cable tram employees 1940?
The photograph shows a large group of about 80 cable tram workers or employees, officers, managers, inspectors, crew, and depot or car house workers on a cable tram. Note the destination on the trailer or cable car "via Smith St. Possibly taken prior to the closure of the cable tram system in October 1940 and could be at the Clifton Hill depot or car house. Photo used in a poster, Melbourne Tramways Past and Present - with the caption Depot Employees at Clifton Hill at Final Stage Oct. 1940 This photograph is Public Records Office photo H179 in the Victorian Railways collection.Yields information about the type of uniforms or office clothing worn by cable tram staff prior to the closure of the cable tram system, the type of and number of employee's at a depot. This is unlikely to include all the staff on the day.Photograph - Black and White of a large group of cable tram workers Clifton Hill Oct. 1940trams, tramways, cable trams, car houses, inspectors, grip men, conductors, workmen, group photo, mmtb, clifton hill depot -
 Melbourne Tram Museum
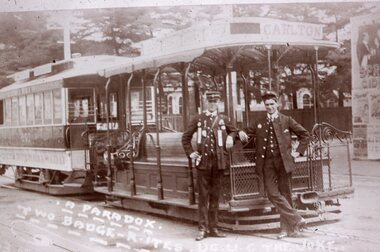
Slide - Black and white - reproduction - Carlton cable tram and crews, 1912
Reproduction slide of a photograph of a cable tram, trailer number 201, with the destination or Carlton with the grip man and conductor standing in front of the tram. Both are young men. The conductor is adorned with his safety pins and trip slips, that he would punch a hole in when he sold or collected a fare. The bell punch in the conductor's right hand would sound a bell to indicate the fare had been collected. There is a church vicarage in the background - at Prahran terminus in Chapel Street outside Trinity church. Underneath the photo is written "A Paradox: two Badger ?" which is a reference to the General Strike in Brisbane of Jan 1912 by Brisbane Tramway Company workers over the wearing of Union badges which was strongly opposed by the Company Manager Joesph 'Boss' Badger. See also item 7485 for a similar-themed photograph about the Badger. At the time there was a major industrial or arbitration case before Mr Justice Higgins regarding Australian tramways employees and their working conditions.Demonstrate cable tram uniforms and cable tram trip slips that were used to account for fare collection and has a close association with an event in Brisbane that led to a General Strike.Kodachrome cardboard duplicate slide - Black and white - reproduction - Carlton cable tram and crews - 1910s? "CB7" in penciltrams, tramways, cable trams, carlton, bell punch, unifoms, crews, grip men, conductors, prahran, tram 201, unions, brisbane, joesph badger -
 Melbourne Tram Museum
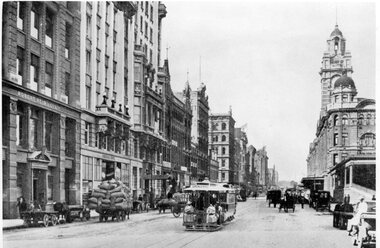
Photograph - Black and White - Flinders St looking east - 1915c
Photo of Flinders St looking east from about Queen Street, c1915. Has many horse drawn vehicles and one cable tram with two ladies riding on the front of the grip car. In the view are Robert Reid & Co, Commerce House, Finks building and Flinders St Station. The station was completed in 1909. Commerce House or the Commercial Travellers Association building was completed in 1913 - see reference.Yields information about Flinders Street between Queen and Elizabeth Streets.Photograph - Black and White - Flinders St looking east - 1915c from near Queen Street.tramways, trams, cable cars, flinders street, commerce house, cta building, flinders street station -
 Melbourne Tram Museum
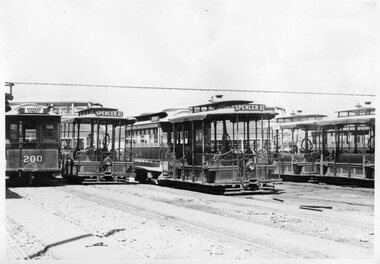
Photograph - Black and White - cable cars parked at North Fitzroy depot, Melbourne & Metropolitan Tramways Board (MMTB), 1940
The photograph shows a number of grip cars (dummies with their grip mechanisms lifted) and trailers (Nos. 200 and 512) stored or parked in the open at North Fitzroy depot at about the time of closure of the cable tram system on 26 Oct. 1940. At least three double decker buses are in the background. . This Photo is included in the poster - The Passing of the Melbourne Cable tramways - See Reg Item 6367Yields information about cable trams or cars.Photograph - Black and White - cable cars parked at North Fitzroy depottramways, trams, cable trams, north fitzroy, mmtb, buses, mmtb buses, north fitzroy depot, td5c class, double deck buses -
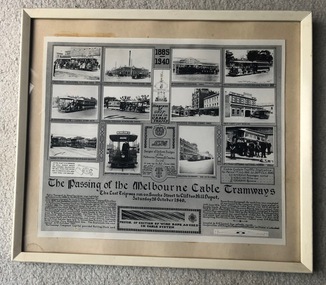 Melbourne Tram Museum
Photograph - Framed, Melbourne & Metropolitan Tramways Board (MMTB), "The passing of the Melbourne Cable Tramways", 1940
"The passing of the Melbourne Cable Tramways", featuring photographs of first cable tram, Fitzroy power house, cable trams in the street, Nicholson St, the No. 1 tram entering the National Museum, some historic notes on the construction of the system, its operations, MMTB takeover, a drawing of the grip and of the badges and buttons used and an image of the cable used. Notes that it was compiled by A. R. Turnbull with co-operation of F. King, K.L.Mackenzie and H. G de Mamiel. Original poster prepared by the MMTB and presented to the State Library or the Museum of Victoria at the time of closure. See Reg Item 6367 for another photograph and 6368 for another poster of the time - Melbourne tramways past and present posterYields information about the Melbourne cable tram system and its history. Frame - wooden outside painted white, glazed with clear glass, off white card backing with brown paper on rear, brass wire hanging wire with small eye hooks the side., containing a photo titled "The passing of the Melbourne Cable Tramways"tramways, cable trams, melbourne, tramcars, closure, museums -
 Melbourne Tram Museum
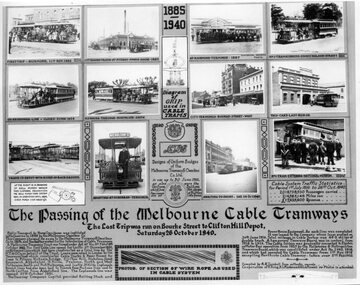
Photograph - Black and White, Melbourne & Metropolitan Tramways Board (MMTB), "The passing of the Melbourne Cable Tramways", 1940
"The passing of the Melbourne Cable Tramways", featuring photographs of first cable tram, Fitzroy power house, cable trams in the street, Nicholson St, the No. 1 tram entering the National Museum, some historic notes on the construction of the system, its operations, MMTB takeover, a drawing of the grip and of the badges and buttons used and an image of the cable used. Notes that it was compiled by A. R. Turnbull with co-operation of F. King, K.L.Mackenzie and H. G de Mamiel. Original poster prepared by the MMTB and presented to the State Library or the Museum of Victoria at the time of closure. See Reg Item 2854 for a framed photograph and 6368 for another poster of the time - Melbourne tramways past and present poster Yields information about the Melbourne cable tram system and its history. Photograph - of a MMTB Poster titled - "The passing of the Melbourne Cable Tramways"tramways, trams, cable trams, closure, museums, melbourne -
 Melbourne Tram Museum
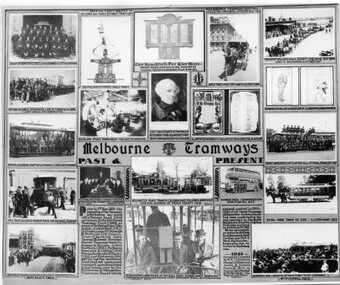
Photograph - Black and White, Melbourne & Metropolitan Tramways Board (MMTB), "Melbourne Tramways Past & Present", 1943
"Melbourne Tramways Past & Present" - set of photos, drawings and notes of (Left to Right, Top to Bottom), Cable tram Richmond Depot employees 1909, Grip mechanism, Photo of the WW1 Honour Board, a horse cab carrying revenue to a bank, Transporting a cable by horse, installing cable to the Windsor line by T Warr & Co 1891, Nicholson St Power House interior, Chief Magistrate of Port Phillip settlement 1836 to 1939 who lived in a house now occupied by Head Office Building, illuminated address to F B Clapp, retirement 1916, drawings by Hal Gye & David Low of J G Roberts Cable Manager, Official & Clerical Staff at Clifton Hill - last line to operate, Depot Employees at Clifton Hill at Final Stage Oct 1940, No. 1 tram becomes Museum piece for National Museum, Australias First Conductresses Aug 1941, Instructor G S Boardman, Decorated peace tram in celebration following armistice 1919, Double deck bus with Conductresses, Royal Park Zoo tram, Openings of PMTT 1910, text box history of the bodies that formed the MMTB, Peter Henry ABC Broadcaster 3-7-1940 on a cable tram, and opening of HTT in 1916. Original poster prepared by the MMTB in 1943 See Reg Item 2854 for a framed photograph and 6367 for another poster of the time - Melbourne tramways past and present poster. See Reg Items 6358, 6122, 6121, 6354 and 6774 for individual photographs.Yields information about the Melbourne tram system and its history to 1943Photograph - of a MMTB Poster titled "Melbourne Tramways Past & Present"tramways, trams, cable trams, richmond, honour board, cash transport, cable ropes, clifton hill, nicholson st, winding house, f b clapp, conductresses, peace tram, double deck buses, zoo horse tram, pmtt, htt, abc -
 Melbourne Tram Museum
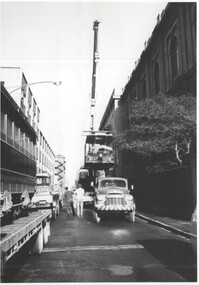
Photograph - Cable tram set No. 1 being moved to Preston Workshops, Keith Kings, 8-9-1974
The series of photos show the transport of the cable tram set from the Science Museum to Preston Workshops where it was repainted before returning to the Museum. and displayed in a glass case in Russell St.Yields information about the movement of cable tram set from the Science Museum to Preston Workshops.Set of three photographs of cable tram set being moved from the Science Museum to Preston Workshops 1 - the grip car being lifted out of its shed at the Museum 2 - both vehicles loaded onto semi trailers - Lonsdale St at the corner with Russell St. 3 - the tram set in the lifting shop at Preston WorkshopsDetailed description on rear. K S Kings stamp with his photo numbers - 135-18, 20 and 27 tramways, cable trams, tram 1, science museum, preston workshops -
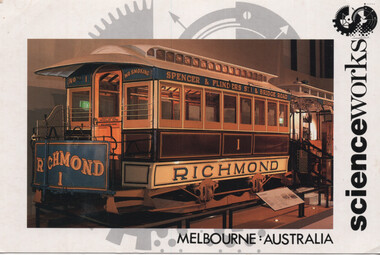 Melbourne Tram Museum
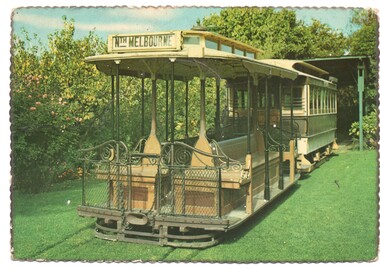
Postcard - Cable tram saloon trailer 1 at Scienceworks, Nucolorvue Publishing, c2000
Colour postcard of MTCo Cable trailer or saloon tram at Scienceworks Spotswood. Has the grip car in front of it.Yields information about Cable tram set No. 1Full colour postcard, divided back Nu-color-vue - Classic collection - 140815 NCV 8720tramways, trams, scienceworks, cable trams, tram 1 -
 Melbourne Tram Museum
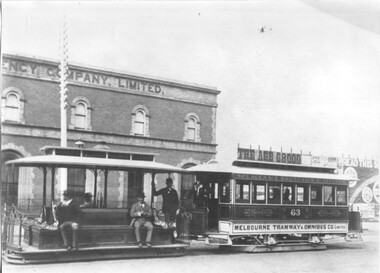
Photograph - Black and white - cable tram Collins St at Spencer St, John William Lindt, c1890
Photo of a cable tram set - saloon trailer No. 63 in Collins St at Spencer St. The grip car is not fitted with staunchions and there are no destination signs on it. The trailer is lettered for the "Spencer & Brunswick St Fitzroy" route with its rocker panel highly decorated. In the background are a building for the Agency Company Limited and an advert on a hoarding for The Age newspaper. The grip man and conductor are standing on their respective platforms. Photo possibly soon after the line opened on 2-10-1886. Photo by John William Lindt c1890 - see reference. Yields information about cable trams in Collins St.Black and white photograph on paper.trams, tramways, cable trams, collins st, spencer st, tram 63, j w lindt -
 Melbourne Tram Museum
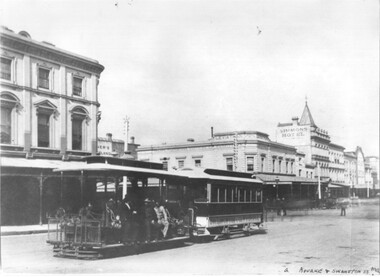
Photograph - Black and white - cable tram Bourke & Swanston Sts
Photo of a cable tram set - at the corner of Swanston and Bourke St. The saloon trailer is possibly No. 162 and is lettered for the Collingwood and Clifton Hill route. The grip car is yet to be fitted with staunchions on its sides or destination signs. In the background is the Leviathan store, Simons Hotel and Coles Book Arcade. Photo possibly soon after the line opened on 10-8-1887.Yields information about cable trams in Bourke St.Black and white photograph on paper."Bourke & Swanston Mel" in bottom right hand corner.trams, tramways, cable trams, bourke st, swanston st, leviathan store -
 Bendigo Historical Society Inc.
Equipment - MODEL OF MINING CAGE
A lot of safety cages were developed in 1800s. Grippers on the cages acted to prevent the cages from "free fall" when the cables broke.Model of mining cage, metal construction, with safety cage not in working order.bendigo, gold mining, mining cage model -
 Bendigo Historical Society Inc.
Equipment - MODEL OF MINING CAGE
A lot of safety cages were developed in 1800s. Grippers on the cages acted to prevent the cages from "free fall" when the cables broke.Model of mining cage, metal construction, with safety cage in working order with ore truck. Made by Benedict Branch, won a medal at the Juvenile Tasmanian Industrial Exhibition (1883)bendigo, gold mining, mining cage model -
 Melbourne Tram Museum
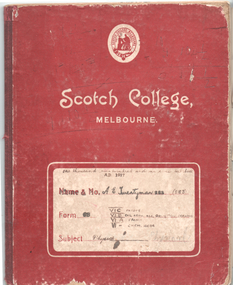
Book - Cable tram records - book 4 of 4, Alf Twentyman, 1918
This is the fourth of four documents compiled by Alf Twentyman about the history of Melbourne cable trams. Lists cars (trailer and grips) observed 1917 and 1918 and other notes. Alf's notes on Physics remain in the book, though not scanned.Demonstrates the recording and drawing work of Alf Twentyman and his notes.Exercise book - printed for Scotch College, ruled in a graph paper format - 40 pages with red card covers.Has been used for Physics lessons tramways, cable trams, alf twentyman, history, records -
 Melbourne Tram Museum
Postcard, Nu-color-Vue, Cable car set, c1980's
.1 - Postcard - full colour with serrated edge - Nu-color-Vue - co produced with the TMSV - of the A. E. Twentyman cable set at his Northcote home. The rear is printed in brown ink - card number NCV 234, with place for stamp. gives detail of the tram, the photograph location, the TMSV logo and the Nucolorvue on the left hand side and that photo is courtesy of Wrappings Pty Ltd. .2 - similar photo but with Alf's second saloon tram in the view and details but with card number NCV 905 and photo credited to A. E. Twentyman. .3 - same photo as .1, but glued into a Nu-color-Vue produced greeting card with a cut out for the caption on the rear of the card - has the Wrappings Pty Ltd. photograph credit with raised gold printing. Has been used to send Christmas Greetings to Brian Weedon, signed by Ron Scholten and has the TMSV Sales stamp on the inside. .4 - 2nd copy of postcard - on rear - Has 33 cent stamp, postmarked for the Centenary of Cable Car Services, 11/11/1985 with a grip included and stamped "100 years of Melbourne trams carried on Commemorative official trip from Flinders St, Melbourne to Richmond Town Hall, November 11, 1985" in blue ink in the bottom right hand corner.trams, tramways, postcards, cable trams, northcote, tmsv, greetings cards, centenary, stamps -
 Melbourne Tram Museum
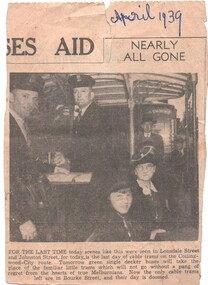
Newspaper, The Herald, final day of operation of Collingwood cable trams, 15/4/1939
Newspaper Clipping - from a newspaper a photograph of the final day of operation of Collingwood cable trams in Lonsdale Street, noting that buses take over tomorrow. Has a photo of passengers with the Gripman and the Conductor on the grip. Time line book gives the closure at 15/4/1939. Refer to Reg Item 1806 for a photo of services being closed in Lonsdale St. Newspaper not known at the time of cataloguing could be The Herald, as it mentions "today" in the photo caption.Has "April 1939" written in ink on the top edge.trams, tramways, cable trams, lonsdale st, collingwood, gripmen, conductors, closure -
 Melbourne Tram Museum
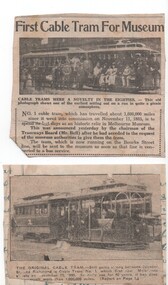
Newspaper, "First Cable Tram for Museum", 1940
Set of two newspaper cuttings regarding the first cable tram set in Melbourne. .1 - Original cutting and copy with a photo of the cable tram set 1 still operating in Melbourne - undated, notes it has been in daily use for 40 years - c1925. Has a photo of the tram showing its different support structure on the grip car. The cutting has been glued to a piece of scrap of paper which has handwriting on both sides in ink . A copy of the cutting has been trimmed in the corners. .2 - Cutting from a unknown Melbourne Newspaper - titled "First Cable Tram for Museum", reporting that cable car set 1 has been donated to the Melbourne Museum by the MMTB. Quotes the Chairman Mr. Bell. Noted that the car set was running on the Bourke St line. Cutting costs. 1940. Photo in cutting not of the cable car set itself. A short report appears in The Argus 29/11/1940, page 3, accessed 16-11-2016, that the cable car set was taken to the Museum of Victoria the previous day.trams, tramways, cable trams, museum, closure, donations, tram 1 -
 Melbourne Tram Museum
Postcard, La Trobe Collection, State Library of Victoria, Cable tram display at Box Hill, c1980
Postcard - black and white reproduction of a wall poster used by the Box Hill - Doncaster Tramway, includes sketch of Doncaster Tower, one of the tram cars and timetable. See Reg Item 699 and 198. Printed for the State Library of Victoria, by John Sands - Number PC11. Divided back, caption, printing information and bar code where a stamp would go. Robert Green advised by email 20-1-2018: "The tram in Russell Street was unveiled by the Premier, R J Hamer, on 1 May 1975. The ceremony was attended by F R Kirby, the Chairman of the M&MTB, and the Chairman (Judge Leckie) and Director (R H Fowler) of the Science Museum of Victoria." The tram was removed from the glass case when further development to the buildings occurred and temporarily relocated to Box Hill for the centenary of the Doncaster Tramway. 2nd copy of postcard - on rear - Has 33 cent stamp, postmarked for the Centenary of Cable Car Services, 11/11/1985 with a grip included and stamped "100 years of Melbourne trams carried on Commemorative official trip from Flinders St, Melbourne to Richmond Town Hall, November 11, 1985" in blue ink in the top left hand corner.trams, tramways, box hill, posters, timetables, doncaster, postcards, cable trams -
 Melbourne Tram Museum
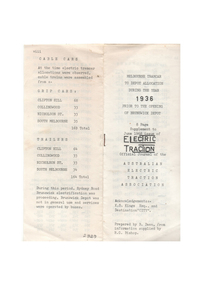
Administrative record - Depot List, Australian Electric Traction Association (AETA), "Allocation of Tramcars 1936", 1968
Depot list - book formed from 2 sheets, centre stapled with a single stapled titled "Melbourne tramcar to depot allocation during the year 1936 prior to the opening of Brunswick Depot" Published as a supplement to June 1968 issue. Prepared by B. Dwan from information supplied by R. G. Bishop. On the rear has a list of the number of grip cars and trailers at Clifton Hill, Collingwood, Nicholson St and South Melbourne.trams, tramways, preston workshops, lists, tramcars, lists, depots, depot allocation, brunswick, cable trams -
 Melbourne Tram Museum
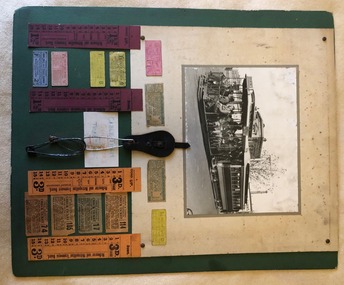
Ephemera - Ticket/s, Melbourne & Metropolitan Tramways Board (MMTB), "Cable Tram Conductor's Ticket Pins", c1930
Poster - featuring a photo of a cable tram in Elizabeth St at Pelham St, 12 small cable tram tickets and four bell punch tickets, along with a leather button ticket pin holder and four safety pins. Items placed on a large sheet of cardboard with a green overlay. The photo, pin holder and four small tickets and the bell punch strip tickets glued onto a off white sheet with brass folded pins securing the items to the green card. The rest of the tickets glued to the green card. Underneath is a small sign with the words in blue and red colours "Cable Tram Conductor's Ticket Pins". Photo - grip car - well loaded showing destination of Brunswick and a sign on the side "Direct to Football". Behind the Gripman is a conductor. Bogie cable trailer 480. In the background is the building on the corner of Elizabeth St and Pelham St (still there in 2018) and in the background is Evan Evans the flag makers building. 192H x 248W - has silver fish damage along top edge, lifting in the top left hand corner from the backing sheet and minor edge damage. Dirt marks Small Tickets from Top left hand to Bottom right hand. Tickets 1, 4 to 8 - torn from a strip - pre-purchased? Tickets 9 to 12, torn from a block. Each Ticket has been separately imaged. T1 - 1 1/2d City Tram ticket - Trip Slip -MTO-Co - pink card with purple ink - faded, punched - 27H x 59W T2 - Transfer, MMTB, from Carlton and Prahran lines to other lines as indicated by punch marks with times by the quarter hour - green print on off white card - 31H x 71W - faded. T3 - as above - but not so faded, part town in bottom left hand corner. T4 - 1 1/2d - cable tram section ticket - MMTB - brown print on yellow card - not punched - 24H x 58W T5 - as for 1 - but MMTB - green print on yellow card - heavily creased - 26H x 57W T6 - similar to 5, smaller dimensions and not heavily creased. T7 - 1 1/2d general ticket - detailing lines or section - red ink on pink card - 26H x 56W T8 - 2d - MTCo - Adult or two children under 12, single, black ink on blue card - 24H x 58W T9 - Prahran and Toorak cable tramways check ticket - transfer - conditions on ticket - has 114 in top right hand corner, orange paper, black ink, MMTB - 36H x 67W. T10 - Carlton and Prahran - as for 9, with 17 in top right hand corner, grey paper with black printing - 38H x 65W. T11 - Carlton, N. Carlton, Prahran, St Kilda - as above - 105, brown paper, black ink - 38H x 65W T12 - as for 9, but with 74 in top right hand corner - 35H x 71W Strip tickets - left to right S1 - 1 1/2D, bell punch type - 15 fares - purple card black printing - Up ticket - 182H x 39W S2 - ditto - down direction, no conductor details - 182H x 37W S3 - ditto - 3d, Up direction, orange card, black print - 182H x 39W - has some dirt marks S4 - ditto - 3d down direction - 138H x 38W - has some dirt marks. Leather buckle - cut leather with a strip to secure the pins - button hole on the base with four safety pins placed into it. Pins have rust marks and general deterioration. Leather - 90H x 45W, pins - 3 about 90H x 25W and one 55H x 16W. See Reg Item 1923 for the use of the pins and leather buckle.trams, tramways, cable trams, brunswick, elizabeth st, football, tickets, conductors, mmtb, mto co, transfer tickets, tram 480, trip slips