Showing 182 items
matching drinking water.
-
 Halls Gap & Grampians Historical Society
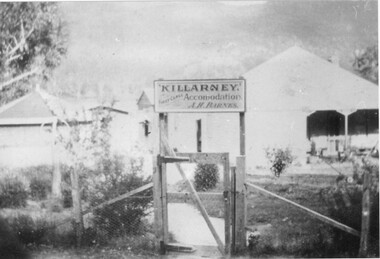
Photograph - B/W, C 1918
Kept by A H Barnes, 1922-1924 name changed to Grampians House kept by Miss Allison and Miss Porter 1924-1925 kept by Mrs Anderson Grampians House - The earliest record of Grampians House was recorded in 1918 when the property was known as "Killarney" listed in the Country, Hotel and Boarding House Guide and Tourists handbook. The listing notes it as being kept my Mr A H Barnes The property consisted of 29 acres, the house of 8 rooms, kitchen, bathroom, vestibule, front and side passages, with verandah on front and side of building, also 3 roomed cottage with bathroom, 5 chalets containing 7 bedrooms, storeroom,wash house, water and gas laid on throughout. 4 stall stables and feed house, buggy shed for three buggies, motor shed for 4 cars, cow shed, and yards and pens. Local resident Mrs E Watson who attended school in the nearby public hall remembers going to a side window of the house and being able to purchase biscuits, sweets and drinks. The 1922-24 Handbook the listing was changed to "Grampians House" kept by Misses Allison and Porter. The 1924-25 Handbook listed "Grampians House" being kept by Mrs Anderson.Photo of original building of 8 rooms Proprietor A H BarnesFuji Film Pictor Paperaccommodation, guesthouses, killarney, grampian hosue -
 Kiewa Valley Historical Society
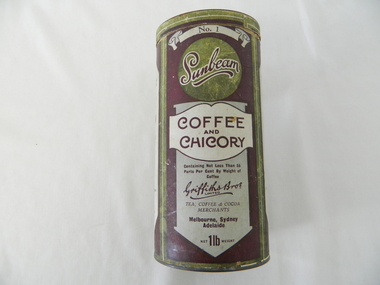
Container Tin Cylindrical
This item was produced by a Melbourne Tea, Coffee and Cocoa Merchant importers(1898-1960). It was a time when local production of, coffee had yet not begun. Imports from India and the Asian region had dominance in the market place. The blending of coffee with chicory was a cheaper method of providing a flavour enriched drink which was marketed as "containing not less than 55 parts per cent by weight of coffee" The coffee weighed heavier than the chicory. This was a time before strict accurate consumer information/content became mandatory and legally enforceable.This empty container of "Sunbeam" Coffee and Chicory finely ground "instant - just add boiling water" beverage was the start of the "fast" breakfast drink. The use of grinding the coffee beans and percolation to obtain the final drink was at the start of the rural sector's decreasing the time for casual drinking. The once casual countryside psyche was now (mid to late 1900's) becoming more "on the go".This cylindrical container (coffee and chicory) is constructed from pressed cardboard with both ends enclosed by tin(pressed) lid and bottom. The outside wrapping is promotional and descriptive in the colours of purple background and information label areas with purple lettering on a white and silver background. The cylinder is made from 2 mm pressed cardboard.Main label " No.1" underneath "Sunbeam" underneath "COFFEE and CHICORY" UNDERNEATH "Containing Not Less than %% Parts Per Cent By Weight of Coffee" underneath in Hand Writing" Griffiths Bros Limited", below this "TEA ,COFFEE & COCOA MERCHANTS" Below this" Mellbourne, Sydney, Adelaide" and lastly "net 1lb weight". Alternate side "The Following Well Known Economical & Flavoury Teas" underneath this "Packed Specially For The Trade" underneath "SUNBEAM & VICTORY SIGNAL COCOA" and in smaller print "Absolutely Pure, Made in Australia" underneath Equal To The Best Imported"breakfast containers, food storage, instant coffee, speed breakfasts, domestic -
 Kiewa Valley Historical Society
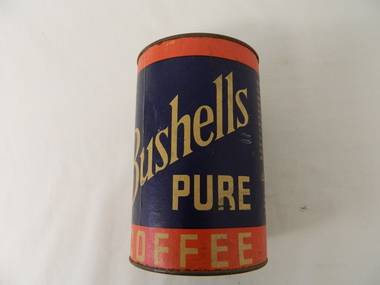
Tin Bushells, after 1937
Bushells tea and coffee producers started in Brisbane(1883) and expanded to Sydney, Melbourne(1899), Fremantle and finally to Auckland(1937). Like other Pacific Island sourced condiments Tea and coffee were a lot easier to import than British or European goods. Local Australian industries were starting to develop and grow to overcome the long transportation times and the high costs of goods from traditional suppliers. Bushells Pty Ltd is a prime example.This "Bushells" Coffee tin is a good example of Australian "grown" condiment suppliers serving the "whole" of the Australian marketplace. Rural areas were not neglected and the purchase price for goods were a reasonable levels. Kiewa Valley experienced a population growth from the late 1940's and due to the migrant works in the Kiewa Hydro Scheme the greater use of coffee was initiated. Rural areas, on the whole, where the population was more connected to some degree with a British heritage lineage were predominately tea drinkers. The American film productions, however, screened in Australia post 1950's showing a greater degree of coffee drinking "stars" had a long term effect upon the drinking habits of the rural populous. This round tin of coffee with lid is made from pressed steel lid framed top and bottom. Sturdy cylindrical body is made of cardboard. Paper information label is pasted onto the container with promotional and logo information.In large print and on opposite sides are two manufacturers labels.The topprint and on a diagonal slant in gold letters on a dark blue background is "BUSHELLS" underneath this "PURE" and below this on a red background "COFFEE". On one side in smaller print "EASY TO MAKE" and below this "Use one dessert-spoonful for each cup of coffee desired. Place in the pot and pour over it fresh water briskly boiling. Let stand for five minutes, then strain". Below this "1 IB. net" and underneath is a signature "BUSHELLS" below this in small print "Pty. Ltd." Below this, in a vertical row are"SYDNEY MELBOURNE fREMANTLE AUCKLAND"coffee and tea processors and distributors, hot drink suppliers -
 Ringwood and District Historical Society
Biography, Ringwood and District Historical Society, Interview notes - short biography on Miss Daisy Paddock, teacher at Ringwood State School, circa 1970s, c.1970s
Single page of notes/interview record of Miss Daisy Paddock, teacher at the Ringwood State School in Greenwood Avenue (now Federation Estate) - Interview write-up by Ringwood History Group.Transcript: "Miss Janet Daisy Paddock She was an extremely well-liked and well-regarded teacher at the old RW State School in Greenwood Ave (Now Federation Estate). She taught between the years of 1927 until 1941, then again after the war from 1951 until final retirement in 1961. In fact she was so liked that her former pupils formed "The 2997 Club" , which met in her honour every year for a meal (and, of course, their guest of honour). 2997 was the RW SS number. In some of her letters about early life in RW, she recalls the RW Mail being produced and printed in a small wooden building in Adelaide St. [Adelaide St is officially no longer on the RW map but it went from the highway nearly to Mullum Creek, between Melbourne St and Warrandyte Road.^ In fact there is an unmarked 100 metres of road that is on the west side of Officeworks that ends in a roundabout at the bottom of Eastland carpark. I don't believe it is exactly in the same position as the old Adelaide Street but it pretty close. That would put the old Mail office in the vicinity of the Maroondah Council service centre in Eastland.] She also recalls that there were nearly a dam on every corner. In fact, I recall in my 1950s/60s childhood that there were still many dams around. As I previously mentioned, with the RW-Mitcham claybelt, there wasn't much top soil and the orange clay is very fine, so when the banks of the dam get wet, it wass very slippery. I often remember playing around in those dams, as most boys did in those days. A friend and I spied an old bath used to water some horses so after some trial and errors we made it waterproof and fashioned a couple of paddles out of wooden fence pailings. The first launch in the local dam was fine and we managed to manouver through the bullrushes into the middle. The only thing that I forgot about was that I had a d<^ that went everywhere with me and, rather than bark from the bank, he swam over to us and tried to get aboard. Bath tubs are not known for their seaworthness and he tipped us all in the drink. Of course the bath sank like a rock. We scrambled on the bank and he added insult to injury when, as all dogs do, gave the usual shake and sprayed us with water. My mind often comes back to one dam right next to the Croydon pub - that provided water to the Magg's orchard - dug in the usual fashion on about 3 metres deep scraped in the local clay, it was at this dam in the early sixties that a young boy drowned. After that we were pretty careful around dams. Going back to Daisy's memories, she recalls that the kids often started late on Monday mornings as Monday was Market Day at RW. They used to watch the stock being herded into the yards and people getting off the steam trains. Her family home was at Gruyere and her father used to drive to RW market and stop midway at the Burnt Bridge hotel and rest the horses. [I suspect that he may have watered other things besides the horses.] They eventually moved to RW in Thanet St. Miss Paddock still remembers the old RW school at the corner of RW St and Whitehorse Road, it was very small so they built the new school in Greenwood Ave. RW had a population of around 2,(K)0 when Daisy became an Assistant Class Five. She used to walk through the open paddocks, surrounded by bush and orchards. She goes on to say that the bush was alive with wildlife and a natural playground for the children. Miss Paddock was a member of the Soroptomist Club in RW (equivalent to Rotary), active in the church and local community. At our archives, we have a plaque that grac^ the entrance to the school, naming it the Miss Daisy Paddock library, in honour of a great woman in our city." -
 Flagstaff Hill Maritime Museum and Village
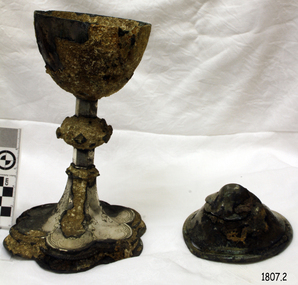
Ceremonial object - Ciborium and Lid, Before 1855
Ciborium is the ancient Greek word for the cup-shaped seed vessel of the Egyptian water lily "nelumbium speciosum" and came to describe a drinking cup made from that seed casing. These vessels were particularly common in ancient Egypt and the Greek East. The word "'ciborium'" was also used in classical Latin to describe such cups. In medieval Latin, and in English, "Ciborium" more commonly refers to a covered container used in Roman Catholic, Anglican, Lutheran and related churches to store the consecrated hosts of the sacrament of Holy Communion. It resembles the shape of a chalice but its bowl is more round than conical and takes its name from its cover, surmounted by a cross or other sacred design. This ciborium is part of a Communion Set that was recovered from the wreck of the Schomberg in 1975 after 120 years in the sea. Five years later during the cleaning of the ciborium, a diamond ring was found secreted in the underside of the ciborium's lid. This ring has since come to be called the Schomberg Diamond and is also on display as part of the Flagstaff Hill Museums Schomberg collection. In 1975, divers from Flagstaff Hill (Peter Ronald, former Director of Flagstaff Hill, Colin Goodall and Gary Hayden), found an ornate communion set at the Schomberg wreck site. The set comprised a jug, the ciborium, a chalice and a plate. The ciborium remained untouched for a number of years before restoration began and the marine growth was removed. In 1980 a piece of the lid broke off, revealing a glint of gold. As museum staff carefully examined the lid and removed marine growth, they found a diamond ring, which is currently on display in the Great Circle Gallery at Flagstaff Hill. The collection also holds ship fittings and equipment, personal effects, a lithograph, tickets as well as photographs from the Schomberg. ABOUT THE SCHOMBERG (October 6 to December 27, 1855)- When the ship Schomberg was launched in 1855, she was considered the most perfect clipper ship ever to be built. James Baine’s Black Ball Line had commissioned her for their fleet of passenger liners. The Aberdeen builders designed her to sail faster than the clippers designed the three-masted wooden clipper ship to be fast. The timber used for the diagonal planking was British oak with layers of Scottish larch. This luxury emigrant vessel was designed for superior comfort. She had ventilation ducts to provide air to the lower decks and a dining saloon, smoking room, library and bathrooms for the first-class passengers. The master for Schomberg’s maiden voyage was Captain ‘Bully’ Forbes. He drunkenly predicted at her launch that he would make the journey between Liverpool and Melbourne in 60 days. Schomberg departed Liverpool on 6 October 1855 with 430 passengers and 3000 tons of cargo including iron rails and equipment intended the build the Geelong Railway and a bridge over the Yarra from Melbourne to Hawthorn. The poor winds slowed Schomberg’s sail across the equator. She was 78 days out of Liverpool when she ran aground on a sand spit near Peterborough, Victoria, on 27 December; the sand spit and currents were not marked on Forbes’s map. The ship’s Chief Officer spotted the coastal steamer SS Queen at dawn and sent a signal. The master of the SS Queen approached the stranded vessel and all of Schomberg’s passengers safely disembarked.This ciborium is significant as an example of an item in common use in the mid-19th century that is still in use today. It is also important for it relationship with the famous Schomberg Diamond that was discovered by accident, hidden inside it. The ciborium is particularly significant in that along with other items from the wreck helped in part to have the legislation changed to protect shipwrecks, with far tighter controls being employed to oversee the salvaging of wreck sites around our coast. This salvaged item forms part of the Schomberg collection at Flagstaff Hill maritime museum. The collection as a whole is of historical and archaeological significance at a State level. Flagstaff Hill’s collection of artefacts from the Schomberg is also significant for its association with the Victorian Heritage Registered Schomberg shipwreck (VHR S 612). The collection is of additional significance because of the relationship between the objects salvaged, as together they help us to interpret the story of the Schomberg. The collection as a whole is historically significant for representing aspects of Victoria's maritime history and its potential to interpret social and historical themes from society at the time of the wreck.Silver engraved Ciborium or chalice with lid, part of the five-piece Communion Set. The chalice is a round cup with a long stem and a floral-shaped base with embossed decoration. It has a matching round lid that comes to a rounded apex on top. Engravings on chalice feature flowers and a Fleur-de-lis pattern.flagstaff hill, flagstaff hill maritime museum and village, warrnambool, maritime museum, maritime village, great ocean road, shipwreck coast, schomberg, 1855, clipper ship, james baines & co, black ball line, luxury ship, emigrant ship, captain forbes, bully forbes, ss queen, peterborough shipwreck, communion set, religious service, communion service, ceremonial service, mass, ciborium, chalice, schomberg diamond -
 Flagstaff Hill Maritime Museum and Village
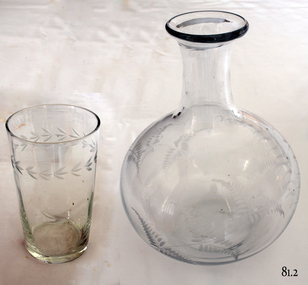
Domestic object - Water Carafe and Tumbler, 1850 -1900
Carafe believed to be of the mid to late Victorian era and used as a bedside water carafe however the tumbler is possibly not of the same era could be later. These sets were in fashion from the 1700s filled with water and used if the owner required a drink during the night. however the subject item would have been made after 1850 as glass etching started to be used on glass from around this period.The carafe is most likely a vintage example of a Victorian bedside water container and for that is significant. The item was made in England.Bedside water carafe, onion-shaped, with a glass tumbler. The hand-blown set is clear crystal glass with an acid-etched fern decoration on both pieces. flagstaff hill, warrnambool, shipwrecked coast, flagstaff hill maritime museum, maritime museum, shipwreck coast, flagstaff hill maritime village, great ocean road, carafe and tumbler set, blown glass carafe and tumbler, hand made glass, carafe, tumbler, bedside set -
 Flagstaff Hill Maritime Museum and Village
Functional object - Service Bell, 1855
... gallons of water for washing and drinking. She also carried 17,000... for fowls and pigs, plus 90,000 gallons of water for washing ...This service bell was recovered from the wreck of the ship Schomberg. The Schomberg was a large three-masted full-ship rigged wooden ship built in 1855 by Alexander Hall and Co in Aberdeen, Scotland for James Baines' famous Black Ball Line at £43,103. The vessel was 288 feet (88 meters) in length, with a beam of 45 feet (14 meters), a depth of 29.5 feet (8.99 meters) of 2,284 tons. The mainmast was 210 feet (64 meters) high and she carried 3.3 acres of sail. The vessel was constructed with three skins. One planked fore and aft, and two diagonally planked, fastened together with screw-threaded trunnels (wooden rails). The Schomberg is one of only three clipper wrecks in Victorian waters that operated the England to Australia run. While the other two, Empress of the Sea and Lightning, were built by the famous American shipbuilder, Donald Mac Kay. Schomberg was an attempt to build a faster ship than Mac Kay and a vessel fast enough to break the sailing record to Australia. The Schomberg sailed on her maiden voyage from Liverpool on 6 October 1855, under the command of Captain James Forbes, on its maiden voyage to Australia with a general cargo, jewellery, spirits, machinery, and 2,000 tons of iron rails and equipment intended to build the Melbourne to Geelong Railway and a bridge over the Yarra from Melbourne to Hawthorn. She also carried a cow for fresh milk, pens for fowls and pigs, plus 90,000 gallons of water for washing and drinking. She also carried 17,000 letters and 31,800 newspapers. There were approximately 473 passengers and a crew of 105. It was hoped that Schomberg would make Melbourne in sixty days, setting a record for the voyage, but light winds at the equator dashed those expectations. The ship sighted Moonlight Head in south west Victoria on Christmas Day but through a deadly combination of wind, currents and unmarked sand spits, the vessel gently ran aground on 26 December 1855 on a spit that juts into Newfield Bay, just east of Curdies Inlet, and the present town of Peterborough. Fortunately, the SS Queen was nearby and managed to save all passengers and crew. The steamers Keera and Maitland were dispatched to salvage the passenger's baggage and the more valuable cargo. Other salvage attempts were made, but deteriorating weather made the work impossible, and within two weeks the Schomberg's hull was broken up and the vessel abandoned. The wrecking of the Schomberg caused quite the public stir particularly in light of the fact the vessel was supposed to be, the most perfect clipper ship ever built. Captain Forbes was charged in the Supreme Court under suspicion that he was playing cards with two female passengers below decks when his ship ran aground. Despite a protest meeting, two inquiries and the court proceedings, he was found not guilty and cleared of all charges. In 1975, divers from Flagstaff Hill, including Peter Ronald, found an ornate communion set at the wreck. The set comprised a jug, two chalices, a plate and a lid. The lid did not fit any of the other objects and in 1978 a piece of the lid broke off, revealing a glint of gold. As museum staff carefully examined the lid and removed marine growth, they found a diamond ring, which is currently on display in the Great Circle Gallery at the Flagstaff Hill Maritime museum that also displays ship fittings and equipment, personal effects. Most of the artefacts were salvaged from the wreck by Peter Ronald, former director of Flagstaff Hill.The Schomberg has historical significance as one of the first luxurious ships built to bring emigrants to Australia to cash in on the gold rush era. And is included on the Victorian Heritage Register (VHR S612). The collection of Schomberg artefacts held at Flagstaff Hill Museum is primarily significant because of the relationship between these recovered items having a high potential to interpret the story of the Schomberg and its foundering during a storm. The shipwreck is of additional historically significance for representing aspects of Victoria’s shipping history and for its association with the first passenger ship, which was designed not only to be the fastest and most luxurious of its day but foundered on its maiden voyage to Australia.Bell; small service bell, brass, with heavy encrustation. Bell has a square loop at the top. The bell was recovered from the wreck of the Schomberg.Nonewarrnambool, flagstaff-hill, flagstaff-hill-maritime-museum, shipwreck-coast, flagstaff-hill-maritime-village, schomberg, shipwrecked-artefact, clipper ship, black ball line, 1855 shipwreck, aberdeen clipper ship, captain forbes, peterborough shipwreck, ss queen, bell, service bell -
 Flagstaff Hill Maritime Museum and Village
Domestic object - Bowl, Late 19th or early 20th Century
The Process of Making Pottery Decorating, Firing, Glazing, Making, Technical There is a rhythm and flow to clay. It can’t be done all at once! Even the making process! It can take weeks to get everything done, especially if you can only work on your pottery once a week! Even though we have three hour classes, it’s often just not enough time! Here is an overview of some of the processes so you have a bit more grasp on some of the technical stuff! Step One – Design There are SO many ideas out there for making stuff in clay! From delicate porcelain jewellery, through to heavy sculptural work and everything in between. Deciding your direction is sometimes not that easy – when you first start, try everything, you will naturally gravitate to the style that you enjoy! The options and variations are endless and can get a wee bit overwhelming too! Check in with me before you start to ensure your ideas will work, what order you might do things, how you could achieve the look you are seeking and any other technical data required! Step Two – Making Clay is thixotropic. This means that as you work with it, the clay first gets sloppier and wetter, before is begins to dry in the atmosphere. For most things, you simply can’t do all parts of the project at once. An example of work order might look like: Get last weeks work out from the shelves Prepare clay for today’s work – roll your clay, prepare balls for throwing, make the first stage of a pinch pot) Clean up last week’s work and put it on the shelf for bisque firing Check that you have any glazing to do – and do enough of it that you will have time to finish your main project Do the next step of your next project – there might be a further step that can’t be complete immediately, in that case, wrap your work well and put onto the shelves. Letting your work rest for a while can really help keep your work clean and professional looking. Many things require bagging under plastic to keep it ready for work the next week – put your name on the outside of the bag so you can find your work easily. We have stickers and markers. Consider how you want to decorate your work – coloured slip can be applied at a fairly wet stage (remembering that it will make your work even wetter!). Trying to apply slip to dry clay won’t work! If you want to do sgraffito – you will need to keep the work leather hard (a state of dryness where you can still work the clay with a little effort and a little water and care). Step Three – Drying Most of the time your work can go into the rack uncovered to let it dry out for the following week. If you want to continue forming or shaping you will need to double bag your work – put your work on a suitable sized bat and put the bat in a bag so the base of the bag is under the bat, then put another bag over the top of the work and tuck the top of the bag under the bat. If you want to trim (or turn) your thrown work the following week, it should also be double bagged. If your work is large, delicate, or of uneven thicknesses, you should lightly cover your work for drying. When considering the drying process, bare in mind the weather, humidity and wind! The hotter and dryer, the faster things dry and work can dry unevenly in the shelves – this can lead to cracking – another time to lightly cover your work for drying. Step Four – Trimming and Cleaning Up Your work is dry! It is called greenware now and it is at it’s most fragile! Handle everything with two hands. I often refer to soft hands – keep everything gentle and with your fingers spread as much as possible. Try to not pick up things like plates too much, and always with both hands! Before your work can be bisque fired it should be “cleaned up”. You work won’t go into the kiln if it has sharp edges – when glazed, sharp edges turn into razor blades! Use a piece of fly wire to rub the work all over – this will scratch a little so be light handed. Use a knife or metal kidney to scrape any areas that require a bit more dynamic treatment than the fly wire offers! Finally, a very light wipe over with a slightly damp sponge can help soften and soothe all of your edges and dags! Trimming thrown work: If you are planning to trim (or turn) your thrown work (and you should be), make sure you bag it well – your work should be leather hard to almost dry for easiest trimming. Use this step to finish the work completely – use a metal kidney to polish the surface, or a slightly damp sponge to give a freshly thrown look. Wipe the sponge around the rim after trimming, and check the inside of the pot for dags! Trimming slip cast work: Usually I will trim the rims of your work on the wheel the following day to make that stage easier, however you will still need to check your work for lumps and bumps. Last but not least – check that your name is still clearly on the bottom of your work. Step Five – Bisque Firing When the work is completely dry it can go into the bisque kiln. The bisque kiln is fired to 1000°C. This process burns off the water in the clay as well as some of the chemically bound water. The structure of the clay is not altered that much at this temperature. Inside the bisque kiln, the work is stacked a little, small bowl inside a larger bowl and onto a heavy plate. Smaller items like decorations or drink coasters might get stacked several high. Consideration is paid to the weight of the stack and shape of the work. A bisque kiln can fire about one and a half times the amount of work that the glaze kiln can fire. The firing takes about 10 hours to complete the cycle and about two days to cool down. Once it has been emptied the work is placed in the glaze room ready for you to decorate! Step Six – Glazing Decorating your work with colour can be a lot of fun – and time consuming! There are three main options for surface treatment at this stage: Oxide Washes Underglazes Glazes Washes and underglazes do not “glaze” the work – It will still need a layer of glaze to fully seal the clay (washes don’t need glaze on surfaces not designed for food or liquid as they can gloss up a little on their own). Underglazes are stable colourants that turn out pretty much how they look in the jar. They can be mixed with each other to form other colours and can be used like water colours to paint onto your work. Mostly they should have a clear glaze on top to seal them. Oxides are a different species – the pink oxide (cobalt) wash turns out bright blue for instance. They don’t always need a glaze on top, and some glazes can change the colour of the wash! The glazes need no other “glaze” on top! Be careful of unknown glaze interactions – you can put any combination of glaze in a bowl or on a plate, but only a single glaze on the outside of any vertical surface! Glazes are a chemical reaction under heat. We don’t know the exact chemicals in the Mayco glazes we use. I can guess by the way they interact with each other, however, on the whole, you need to test every idea you have, and not run the test on a vertical surface! Simply put, glaze is a layer of glass like substance that bonds with the clay underneath. Clay is made of silica, alumina and water. Glaze is made of mostly silica. Silica has a melting point of 1700°C and we fire to 1240°C. The silica requires a “flux” to help it melt at the lower temperature. Fluxes can be all sorts of chemicals – a common one is calcium – calcium has a melting point of 2500°C, however, together they both melt at a much lower temperature! Colourants are metal oxides like cobalt (blue), chrome (green through black), copper (green, blue, even red!), manganese (black, purple and pink) iron (red brown), etc. Different chemicals in the glaze can have dramatic effects. for example, barium carbonate (which we don’t use) turns manganese bright pink! Other elements can turn manganese dioxide brown, blue, purple and reddish brown. Manganese dioxide is a flux in and of itself as well. So, glazes that get their black and purple colours, often interact with other glazes and RUN! Our mirror black is a good example – it mixes really well with many glazes because it fluxes them – causes them to melt faster. It will also bring out many beautiful colours in the glazes because it’s black colouring most definitely comes from manganese dioxide! Glaze chemistry is a whole subject on it’s own! We use commercial Mayco glazes on purpose – for their huge range of colour possibilities, stability, cool interactions, artistic freedom with the ability to easily brush the glazes on and ease of use. We currently have almost 50 glazes on hand! A major project is to test the interactions of all glazes with each other. That is 2,500 test tiles!!!! I’m going to make the wall behind the wheels the feature wall of pretty colours! Step Seven – Glaze (Gloss or sometimes called “Glost”) Firing Most of the time this is the final stage of making your creation (but not always!) The glaze kiln goes to 1240°C. This is called cone 6, or midrange. It is the low end of stoneware temperatures. Stoneware clays and glazes are typically fired at cone 8 – 10, that is 1260 – 1290°C. The energy requirement to go from 1240°C to 1280°C is almost a 30% more! Our clay is formulated to vitrify (mature, turn “glass-like”) at 1240°, as are our glazes. A glaze kiln take around 12 hours to reach temperature and two to three days to cool down. Sometimes a third firing process is required – this is for decoration that is added to work after the glaze firing. For example – adding precious metals and lustres. this firing temperature is usually around 600 – 800°C depending upon the techniques being used. There are many students interested in gold and silver trims – we will be doing this third type of firing soon! After firing your work will be in the student finished work shelves. Remember to pay for it before you head out the door! There is a small extra charge for using porcelain clay (it’s more than twice the price of regular clay), and for any third firing process! Once your work has been fired it can not turn back into clay for millennia – so don’t fire it if you don’t like it! Put it in the bucket for recycling. https://firebirdstudios.com.au/the-process-of-making-pottery/ The bowl is an example of kitchenware used in the 19th century and still in use today.Bowl white ceramic. Crack on side. Badly stained.Backstamp very faint and unable to be read.flagstaff hill, warrnambool, shipwrecked-coast, flagstaff-hill, flagstaff-hill-maritime-museum, maritime-museum, shipwreck-coast, flagstaff-hill-maritime-village, mixing bowl, food preparation, kitchen equipment, ceramic -
 Flagstaff Hill Maritime Museum and Village
Domestic object - Bowl
The Process of Making Pottery Decorating, Firing, Glazing, Making, Technical There is a rhythm and flow to clay. It can’t be done all at once! Even the making process! It can take weeks to get everything done, especially if you can only work on your pottery once a week! Even though we have three hour classes, it’s often just not enough time! Here is an overview of some of the processes so you have a bit more grasp on some of the technical stuff! Step One – Design There are SO many ideas out there for making stuff in clay! From delicate porcelain jewellery, through to heavy sculptural work and everything in between. Deciding your direction is sometimes not that easy – when you first start, try everything, you will naturally gravitate to the style that you enjoy! The options and variations are endless and can get a wee bit overwhelming too! Check in with me before you start to ensure your ideas will work, what order you might do things, how you could achieve the look you are seeking and any other technical data required! Step Two – Making Clay is thixotropic. This means that as you work with it, the clay first gets sloppier and wetter, before is begins to dry in the atmosphere. For most things, you simply can’t do all parts of the project at once. An example of work order might look like: Get last weeks work out from the shelves Prepare clay for today’s work – roll your clay, prepare balls for throwing, make the first stage of a pinch pot) Clean up last week’s work and put it on the shelf for bisque firing Check that you have any glazing to do – and do enough of it that you will have time to finish your main project Do the next step of your next project – there might be a further step that can’t be complete immediately, in that case, wrap your work well and put onto the shelves. Letting your work rest for a while can really help keep your work clean and professional looking. Many things require bagging under plastic to keep it ready for work the next week – put your name on the outside of the bag so you can find your work easily. We have stickers and markers. Consider how you want to decorate your work – coloured slip can be applied at a fairly wet stage (remembering that it will make your work even wetter!). Trying to apply slip to dry clay won’t work! If you want to do sgraffito – you will need to keep the work leather hard (a state of dryness where you can still work the clay with a little effort and a little water and care). Step Three – Drying Most of the time your work can go into the rack uncovered to let it dry out for the following week. If you want to continue forming or shaping you will need to double bag your work – put your work on a suitable sized bat and put the bat in a bag so the base of the bag is under the bat, then put another bag over the top of the work and tuck the top of the bag under the bat. If you want to trim (or turn) your thrown work the following week, it should also be double bagged. If your work is large, delicate, or of uneven thicknesses, you should lightly cover your work for drying. When considering the drying process, bare in mind the weather, humidity and wind! The hotter and dryer, the faster things dry and work can dry unevenly in the shelves – this can lead to cracking – another time to lightly cover your work for drying. Step Four – Trimming and Cleaning Up Your work is dry! It is called greenware now and it is at it’s most fragile! Handle everything with two hands. I often refer to soft hands – keep everything gentle and with your fingers spread as much as possible. Try to not pick up things like plates too much, and always with both hands! Before your work can be bisque fired it should be “cleaned up”. You work won’t go into the kiln if it has sharp edges – when glazed, sharp edges turn into razor blades! Use a piece of fly wire to rub the work all over – this will scratch a little so be light handed. Use a knife or metal kidney to scrape any areas that require a bit more dynamic treatment than the fly wire offers! Finally, a very light wipe over with a slightly damp sponge can help soften and soothe all of your edges and dags! Trimming thrown work: If you are planning to trim (or turn) your thrown work (and you should be), make sure you bag it well – your work should be leather hard to almost dry for easiest trimming. Use this step to finish the work completely – use a metal kidney to polish the surface, or a slightly damp sponge to give a freshly thrown look. Wipe the sponge around the rim after trimming, and check the inside of the pot for dags! Trimming slip cast work: Usually I will trim the rims of your work on the wheel the following day to make that stage easier, however you will still need to check your work for lumps and bumps. Last but not least – check that your name is still clearly on the bottom of your work. Step Five – Bisque Firing When the work is completely dry it can go into the bisque kiln. The bisque kiln is fired to 1000°C. This process burns off the water in the clay as well as some of the chemically bound water. The structure of the clay is not altered that much at this temperature. Inside the bisque kiln, the work is stacked a little, small bowl inside a larger bowl and onto a heavy plate. Smaller items like decorations or drink coasters might get stacked several high. Consideration is paid to the weight of the stack and shape of the work. A bisque kiln can fire about one and a half times the amount of work that the glaze kiln can fire. The firing takes about 10 hours to complete the cycle and about two days to cool down. Once it has been emptied the work is placed in the glaze room ready for you to decorate! Step Six – Glazing Decorating your work with colour can be a lot of fun – and time consuming! There are three main options for surface treatment at this stage: Oxide Washes Underglazes Glazes Washes and underglazes do not “glaze” the work – It will still need a layer of glaze to fully seal the clay (washes don’t need glaze on surfaces not designed for food or liquid as they can gloss up a little on their own). Underglazes are stable colourants that turn out pretty much how they look in the jar. They can be mixed with each other to form other colours and can be used like water colours to paint onto your work. Mostly they should have a clear glaze on top to seal them. Oxides are a different species – the pink oxide (cobalt) wash turns out bright blue for instance. They don’t always need a glaze on top, and some glazes can change the colour of the wash! The glazes need no other “glaze” on top! Be careful of unknown glaze interactions – you can put any combination of glaze in a bowl or on a plate, but only a single glaze on the outside of any vertical surface! Glazes are a chemical reaction under heat. We don’t know the exact chemicals in the Mayco glazes we use. I can guess by the way they interact with each other, however, on the whole, you need to test every idea you have, and not run the test on a vertical surface! Simply put, glaze is a layer of glass like substance that bonds with the clay underneath. Clay is made of silica, alumina and water. Glaze is made of mostly silica. Silica has a melting point of 1700°C and we fire to 1240°C. The silica requires a “flux” to help it melt at the lower temperature. Fluxes can be all sorts of chemicals – a common one is calcium – calcium has a melting point of 2500°C, however, together they both melt at a much lower temperature! Colourants are metal oxides like cobalt (blue), chrome (green through black), copper (green, blue, even red!), manganese (black, purple and pink) iron (red brown), etc. Different chemicals in the glaze can have dramatic effects. for example, barium carbonate (which we don’t use) turns manganese bright pink! Other elements can turn manganese dioxide brown, blue, purple and reddish brown. Manganese dioxide is a flux in and of itself as well. So, glazes that get their black and purple colours, often interact with other glazes and RUN! Our mirror black is a good example – it mixes really well with many glazes because it fluxes them – causes them to melt faster. It will also bring out many beautiful colours in the glazes because it’s black colouring most definitely comes from manganese dioxide! Glaze chemistry is a whole subject on it’s own! We use commercial Mayco glazes on purpose – for their huge range of colour possibilities, stability, cool interactions, artistic freedom with the ability to easily brush the glazes on and ease of use. We currently have almost 50 glazes on hand! A major project is to test the interactions of all glazes with each other. That is 2,500 test tiles!!!! I’m going to make the wall behind the wheels the feature wall of pretty colours! Step Seven – Glaze (Gloss or sometimes called “Glost”) Firing Most of the time this is the final stage of making your creation (but not always!) The glaze kiln goes to 1240°C. This is called cone 6, or midrange. It is the low end of stoneware temperatures. Stoneware clays and glazes are typically fired at cone 8 – 10, that is 1260 – 1290°C. The energy requirement to go from 1240°C to 1280°C is almost a 30% more! Our clay is formulated to vitrify (mature, turn “glass-like”) at 1240°, as are our glazes. A glaze kiln take around 12 hours to reach temperature and two to three days to cool down. Sometimes a third firing process is required – this is for decoration that is added to work after the glaze firing. For example – adding precious metals and lustres. this firing temperature is usually around 600 – 800°C depending upon the techniques being used. There are many students interested in gold and silver trims – we will be doing this third type of firing soon! After firing your work will be in the student finished work shelves. Remember to pay for it before you head out the door! There is a small extra charge for using porcelain clay (it’s more than twice the price of regular clay), and for any third firing process! Once your work has been fired it can not turn back into clay for millennia – so don’t fire it if you don’t like it! Put it in the bucket for recycling. https://firebirdstudios.com.au/the-process-of-making-pottery/ This bowl is an example of kitchenware used in the 19th century and still in use today.Bowl white ceramic plain that has two sets of edging around lip. Inside bowl has plaster designed to look like cooking mixture.flagstaff hill, warrnambool, shipwrecked-coast, flagstaff-hill, flagstaff-hill-maritime-museum, maritime-museum, shipwreck-coast, flagstaff-hill-maritime-village, kitchen equipment, ceramic -
 Flagstaff Hill Maritime Museum and Village
Domestic object - Bowl, J & G Meakin, Late 19th or early 20th Century
The Process of Making Pottery Decorating, Firing, Glazing, Making, Technical There is a rhythm and flow to clay. It can’t be done all at once! Even the making process! It can take weeks to get everything done, especially if you can only work on your pottery once a week! Even though we have three hour classes, it’s often just not enough time! Here is an overview of some of the processes so you have a bit more grasp on some of the technical stuff! Step One – Design There are SO many ideas out there for making stuff in clay! From delicate porcelain jewellery, through to heavy sculptural work and everything in between. Deciding your direction is sometimes not that easy – when you first start, try everything, you will naturally gravitate to the style that you enjoy! The options and variations are endless and can get a wee bit overwhelming too! Check in with me before you start to ensure your ideas will work, what order you might do things, how you could achieve the look you are seeking and any other technical data required! Step Two – Making Clay is thixotropic. This means that as you work with it, the clay first gets sloppier and wetter, before is begins to dry in the atmosphere. For most things, you simply can’t do all parts of the project at once. An example of work order might look like: Get last weeks work out from the shelves Prepare clay for today’s work – roll your clay, prepare balls for throwing, make the first stage of a pinch pot) Clean up last week’s work and put it on the shelf for bisque firing Check that you have any glazing to do – and do enough of it that you will have time to finish your main project Do the next step of your next project – there might be a further step that can’t be complete immediately, in that case, wrap your work well and put onto the shelves. Letting your work rest for a while can really help keep your work clean and professional looking. Many things require bagging under plastic to keep it ready for work the next week – put your name on the outside of the bag so you can find your work easily. We have stickers and markers. Consider how you want to decorate your work – coloured slip can be applied at a fairly wet stage (remembering that it will make your work even wetter!). Trying to apply slip to dry clay won’t work! If you want to do sgraffito – you will need to keep the work leather hard (a state of dryness where you can still work the clay with a little effort and a little water and care). Step Three – Drying Most of the time your work can go into the rack uncovered to let it dry out for the following week. If you want to continue forming or shaping you will need to double bag your work – put your work on a suitable sized bat and put the bat in a bag so the base of the bag is under the bat, then put another bag over the top of the work and tuck the top of the bag under the bat. If you want to trim (or turn) your thrown work the following week, it should also be double bagged. If your work is large, delicate, or of uneven thicknesses, you should lightly cover your work for drying. When considering the drying process, bare in mind the weather, humidity and wind! The hotter and dryer, the faster things dry and work can dry unevenly in the shelves – this can lead to cracking – another time to lightly cover your work for drying. Step Four – Trimming and Cleaning Up Your work is dry! It is called greenware now and it is at it’s most fragile! Handle everything with two hands. I often refer to soft hands – keep everything gentle and with your fingers spread as much as possible. Try to not pick up things like plates too much, and always with both hands! Before your work can be bisque fired it should be “cleaned up”. You work won’t go into the kiln if it has sharp edges – when glazed, sharp edges turn into razor blades! Use a piece of fly wire to rub the work all over – this will scratch a little so be light handed. Use a knife or metal kidney to scrape any areas that require a bit more dynamic treatment than the fly wire offers! Finally, a very light wipe over with a slightly damp sponge can help soften and soothe all of your edges and dags! Trimming thrown work: If you are planning to trim (or turn) your thrown work (and you should be), make sure you bag it well – your work should be leather hard to almost dry for easiest trimming. Use this step to finish the work completely – use a metal kidney to polish the surface, or a slightly damp sponge to give a freshly thrown look. Wipe the sponge around the rim after trimming, and check the inside of the pot for dags! Trimming slip cast work: Usually I will trim the rims of your work on the wheel the following day to make that stage easier, however you will still need to check your work for lumps and bumps. Last but not least – check that your name is still clearly on the bottom of your work. Step Five – Bisque Firing When the work is completely dry it can go into the bisque kiln. The bisque kiln is fired to 1000°C. This process burns off the water in the clay as well as some of the chemically bound water. The structure of the clay is not altered that much at this temperature. Inside the bisque kiln, the work is stacked a little, small bowl inside a larger bowl and onto a heavy plate. Smaller items like decorations or drink coasters might get stacked several high. Consideration is paid to the weight of the stack and shape of the work. A bisque kiln can fire about one and a half times the amount of work that the glaze kiln can fire. The firing takes about 10 hours to complete the cycle and about two days to cool down. Once it has been emptied the work is placed in the glaze room ready for you to decorate! Step Six – Glazing Decorating your work with colour can be a lot of fun – and time consuming! There are three main options for surface treatment at this stage: Oxide Washes Underglazes Glazes Washes and underglazes do not “glaze” the work – It will still need a layer of glaze to fully seal the clay (washes don’t need glaze on surfaces not designed for food or liquid as they can gloss up a little on their own). Underglazes are stable colourants that turn out pretty much how they look in the jar. They can be mixed with each other to form other colours and can be used like water colours to paint onto your work. Mostly they should have a clear glaze on top to seal them. Oxides are a different species – the pink oxide (cobalt) wash turns out bright blue for instance. They don’t always need a glaze on top, and some glazes can change the colour of the wash! The glazes need no other “glaze” on top! Be careful of unknown glaze interactions – you can put any combination of glaze in a bowl or on a plate, but only a single glaze on the outside of any vertical surface! Glazes are a chemical reaction under heat. We don’t know the exact chemicals in the Mayco glazes we use. I can guess by the way they interact with each other, however, on the whole, you need to test every idea you have, and not run the test on a vertical surface! Simply put, glaze is a layer of glass like substance that bonds with the clay underneath. Clay is made of silica, alumina and water. Glaze is made of mostly silica. Silica has a melting point of 1700°C and we fire to 1240°C. The silica requires a “flux” to help it melt at the lower temperature. Fluxes can be all sorts of chemicals – a common one is calcium – calcium has a melting point of 2500°C, however, together they both melt at a much lower temperature! Colourants are metal oxides like cobalt (blue), chrome (green through black), copper (green, blue, even red!), manganese (black, purple and pink) iron (red brown), etc. Different chemicals in the glaze can have dramatic effects. for example, barium carbonate (which we don’t use) turns manganese bright pink! Other elements can turn manganese dioxide brown, blue, purple and reddish brown. Manganese dioxide is a flux in and of itself as well. So, glazes that get their black and purple colours, often interact with other glazes and RUN! Our mirror black is a good example – it mixes really well with many glazes because it fluxes them – causes them to melt faster. It will also bring out many beautiful colours in the glazes because it’s black colouring most definitely comes from manganese dioxide! Glaze chemistry is a whole subject on it’s own! We use commercial Mayco glazes on purpose – for their huge range of colour possibilities, stability, cool interactions, artistic freedom with the ability to easily brush the glazes on and ease of use. We currently have almost 50 glazes on hand! A major project is to test the interactions of all glazes with each other. That is 2,500 test tiles!!!! I’m going to make the wall behind the wheels the feature wall of pretty colours! Step Seven – Glaze (Gloss or sometimes called “Glost”) Firing Most of the time this is the final stage of making your creation (but not always!) The glaze kiln goes to 1240°C. This is called cone 6, or midrange. It is the low end of stoneware temperatures. Stoneware clays and glazes are typically fired at cone 8 – 10, that is 1260 – 1290°C. The energy requirement to go from 1240°C to 1280°C is almost a 30% more! Our clay is formulated to vitrify (mature, turn “glass-like”) at 1240°, as are our glazes. A glaze kiln take around 12 hours to reach temperature and two to three days to cool down. Sometimes a third firing process is required – this is for decoration that is added to work after the glaze firing. For example – adding precious metals and lustres. this firing temperature is usually around 600 – 800°C depending upon the techniques being used. There are many students interested in gold and silver trims – we will be doing this third type of firing soon! After firing your work will be in the student finished work shelves. Remember to pay for it before you head out the door! There is a small extra charge for using porcelain clay (it’s more than twice the price of regular clay), and for any third firing process! Once your work has been fired it can not turn back into clay for millennia – so don’t fire it if you don’t like it! Put it in the bucket for recycling. https://firebirdstudios.com.au/the-process-of-making-pottery/This bowl was made by renowned pottery company J & G Meakin of England. The firm was established in the mid-1800's. The bowl is an example of kitchenware used in the 19th century and still in use today.Bowl; white ceramic, round and tapering inwards towards base. Made by J and G Meakin England.On base, 'Ironstone China Reg SOL 391413' with symbolflagstaff hill, flagstaff hill maritime museum and village, warrnambool, maritime museum, maritime village, great ocean road, shipwreck coast, mixing bowl, food preparation, j & g meakin, pottery, stoke-on-trent, kitchen equipment, ceramic -
 Flagstaff Hill Maritime Museum and Village
Functional object - Watch Chains, ca 1855
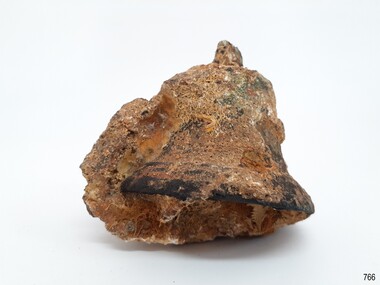
... for fowls and pigs, plus 90,000 gallons of water for washing... and pigs, plus 90,000 gallons of water for washing and drinking ...The concretion of silver watch chains was recovered from the wreck of the Schomberg over one hundred years later. Schomberg was a large three-masted full-ship rigged wooden ship built in 1855 by Alexander Hall and Co in Aberdeen, Scotland for James Baines' famous Black Ball Line at £43,103. The vessel was 288 feet (88 meters) in length, with a beam of 45 feet (14 meters), a depth of 29.5 feet (8.99 meters) of 2,284 tons. The mainmast was 210 feet (64 meters) high and she carried 3.3 acres of sail. The vessel was constructed with three skins. One planked fore and aft, and two diagonally planked, fastened together with screw-threaded trunnels (wooden rails). The Schomberg is one of only three clipper wrecks in Victorian waters that operated the England -to- Australia run. While the other two, Empress of the Sea and Lightning, were built by the famous American shipbuilder, Donald Mac Kay. Schomberg was an attempt to build a faster ship than Mac Kay and a vessel fast enough to break the sailing record to Australia. The Schomberg sailed on her maiden voyage from Liverpool on 6 October 1855, under the command of Captain James Forbes, on its maiden voyage to Australia with general cargo, jewellery, spirits, machinery, and 2,000 tons of iron rails and equipment intended to build the Melbourne to Geelong Railway and a bridge over the Yarra from Melbourne to Hawthorn. She also carried a cow for fresh milk, pens for fowls and pigs, plus 90,000 gallons of water for washing and drinking. She also carried 17,000 letters and 31,800 newspapers. There were approximately 473 passengers and a crew of 105. It was hoped that Schomberg would make Melbourne in sixty days, setting a record for the voyage, but light winds at the equator dashed those expectations. The ship sighted Moonlight Head in southwest Victoria on Christmas Day but through a deadly combination of wind, currents and unmarked sand spits, the vessel gently ran aground on 26 December 1855 on a spit that juts into Newfield Bay, just east of Curdies Inlet, and the present town of Peterborough. Fortunately, the SS Queen was nearby and managed to save all passengers and crew. The steamers Keera and Maitland were dispatched to salvage the passenger's baggage and the more valuable cargo. Other salvage attempts were made, but deteriorating weather made the work impossible, and within two weeks the Schomberg's hull was broken up and the vessel abandoned. The wrecking of the Schomberg caused quite a public stir, particularly in light of the fact the vessel was supposed to be, the most perfect clipper ship ever built. Captain Forbes was charged in the Supreme Court under suspicion that he was playing cards with two female passengers below decks when his ship ran aground. Despite a protest meeting, two inquiries and the court proceedings, he was found not guilty and cleared of all charges. In 1975, divers from Flagstaff Hill, including Peter Ronald, found an ornate communion set at the wreck. The set comprised a jug, two chalices, a plate and a lid. The lid did not fit any of the other objects and in 1978 a piece of the lid broke off, revealing a glint of gold. As museum staff carefully examined the lid and removed marine growth, they found a diamond ring, which is currently on display in the Great Circle Gallery at the Flagstaff Hill Maritime Museum that also displays ship fittings and equipment, and personal effects. Most of the artefacts were salvaged from the wreck by Peter Ronald, former director of Flagstaff Hill.The Schomberg has historical significance as one of the first luxurious ships built to bring emigrants to Australia to cash in on the gold rush era. And is included on the Victorian Heritage Register (VHR S612). The collection of Schomberg artefacts held at Flagstaff Hill Museum is primarily significant because of the relationship between these recovered items having a high potential to interpret the story of the Schomberg and its foundering during a storm. The shipwreck is of additional historically significance for representing aspects of Victoria’s shipping history and for its association with the first passenger ship, which was designed not only to be the fastest and most luxurious of its day but foundered on its maiden voyage to Australia.Conglomerated cluster of silver watch chains, encased in concretion at both ends (1 chain is separated). They were recovered from the wreck of the Schomberg.warrnambool, flagstaff-hill, flagstaff-hill-maritime-museum, shipwreck-coast, flagstaff-hill-maritime-village, schomberg, shipwrecked-artefact, clipper ship, black ball line, 1855 shipwreck, aberdeen clipper ship, captain forbes, peterborough shipwreck, ss queen, watch chain -
 Flagstaff Hill Maritime Museum and Village
Accessory - Badge, Before 1855
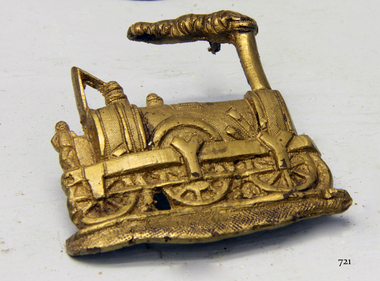
... for fowls and pigs, plus 90,000 gallons of water for washing... gallons of water for washing and drinking. She also carried 17,000 ...The badge recovered from the Schomberg wreck is believed to depict one of the first steam engines. The engine's design by Charles Tayleur & Co. was to be produced for the Great Western Railway in England. The first nineteen of these locomotives were ordered by Isambard Kingdom Brunel for the Great Western Railway including six 2-2-2 Charles Tayleur locomotives. They were built by Charles Tayleur and Company, which later the Vulcan Foundry. The locomotives were unsuccessful and were rapidly supplemented by the Star Class locomotives ordered by Daniel Gooch once he had been appointed as the Locomotive Engineer. As built, they comprised two groups of three, the first group, was delivered in 1837. This locomotive was the first to run on the Great Western Railway when it was tested on 28 December 1837 from its shed at West Drayton. It was withdrawn in 1843 but was rebuilt as a 2-2-2T tank locomotive and returned to service in 1846, running in this form until 1868. It survived for two more years at Reading as a stationary boiler. It is named after the workshops where it was built, which themselves were named after the Roman god of fire. (Although a supposition, it is possible that the owner was a passenger on the ill-fated Schomberg and that they worked either for the Great Western Railway or the Vulcan Foundry that made the engine in the 1830s.) Wreck of the Schomberg: Schomberg was a large three-masted full-ship rigged wooden ship built in 1855 by Alexander Hall and Co in Aberdeen, Scotland for James Baines' famous Black Ball Line at £43,103. The vessel was 288 feet (88 meters) in length, with a beam of 45 feet (14 meters), a depth of 29.5 feet (8.99 meters) of 2,284 tons. The mainmast was 210 feet (64 meters) high and she carried 3.3 acres of sail. The vessel was constructed with three skins. One planked fore and aft, and two diagonally planked, fastened together with screw-threaded trunnels (wooden rails). The Schomberg is one of only three clipper wrecks in Victorian waters that operated the England to Australia run. While the other two, Empress of the Sea and Lightning, were built by the famous American shipbuilder, Donald Mac Kay. Schomberg was an attempt to build a faster ship than Mac Kay and a vessel fast enough to break the sailing record to Australia. The Schomberg sailed on her maiden voyage from Liverpool on 6 October 1855, under the command of Captain James Forbes, on its maiden voyage to Australia with a general cargo, jewellery, spirits, machinery, and 2,000 tons of iron rails and equipment intended to build the Melbourne to Geelong Railway and a bridge over the Yarra from Melbourne to Hawthorn. She also carried a cow for fresh milk, pens for fowls and pigs, plus 90,000 gallons of water for washing and drinking. She also carried 17,000 letters and 31,800 newspapers. There were approximately 473 passengers and a crew of 105. It was hoped that Schomberg would make Melbourne in sixty days, setting a record for the voyage, but light winds at the equator dashed those expectations. The ship sighted Moonlight Head in southwest Victoria on Christmas Day but through a deadly combination of wind, currents, and unmarked sand spits, the vessel gently ran aground on 26 December 1855 on a spit that juts into Newfield Bay, just east of Curdies Inlet, and the present town of Peterborough. Fortunately, the SS Queen was nearby and managed to save all passengers and crew. The steamers Keera and Maitland were dispatched to salvage the passenger's baggage and the more valuable cargo. Other salvage attempts were made, but deteriorating weather made the work impossible, and within two weeks the Schomberg's hull was broken up and the vessel abandoned. The wrecking of the Schomberg caused quite a public stir, particularly in light of the fact the vessel was supposed to be, the most perfect clipper ship ever built. Captain Forbes was charged in the Supreme Court under suspicion that he was playing cards with two female passengers below decks when his ship ran aground. Despite a protest meeting, two inquiries, and the court proceedings, he was found not guilty and cleared of all charges. In 1975, divers from Flagstaff Hill, including Peter Ronald, found an ornate communion set at the wreck. The set comprised a jug, two chalices, a plate, and a lid. The lid did not fit any of the other objects and in 1978 a piece of the lid broke off, revealing a glint of gold. As museum staff carefully examined the lid and removed marine growth, they found a diamond ring, which is currently on display in the Great Circle Gallery at the Flagstaff Hill Maritime Museum that also displays ship fittings and equipment, and personal effects. Most of the artefacts were salvaged from the wreck by Peter Ronald, former director of Flagstaff Hill.The Schomberg has historical significance as one of the first luxurious ships built to bring emigrants to Australia to cash in on the gold rush era. And is included on the Victorian Heritage Register (VHR S612). The collection of Schomberg artefacts held at Flagstaff Hill Museum is primarily significant because of the relationship between these recovered items having a high potential to interpret the story of the Schomberg and its foundering during a storm. The shipwreck is of additional historical significance for representing aspects of Victoria’s shipping history and for its association with the first passenger ship, which was designed not only to be the fastest and most luxurious of its day but foundered on its maiden voyage to Australia.Gold coloured brass badge depicting an 1840's steam engine or locomotive with the figure of a fireman standing on the back. Smoke is coming from the smokestack. The reverse has three holes, possible where a mounting pin or fastener was attached. The badge was recovered from the wreck of the Schomberg.warrnambool, flagstaff-hill, flagstaff-hill-maritime-museum, shipwreck-coast, flagstaff-hill-maritime-village, schomberg, shipwrecked-artefact, clipper ship, black ball line, 1855 shipwreck, captain forbes, ss queen, badge, charles tayleur, great western railway, vulcan foundry, isambard kingdom brunel, locomoive, brooch -
 Flagstaff Hill Maritime Museum and Village
Domestic object - Thimble, Circa 1855
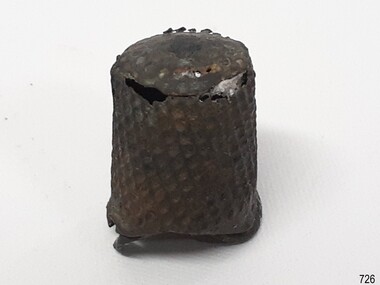
... gallons of water for washing and drinking. She also carried 17,000... and pigs, plus 90,000 gallons of water for washing and drinking ...The thimble was recovered from the wreck of the vessel, Schomberg. The Schomberg was a large three-masted full-ship rigged wooden ship built in 1855 by Alexander Hall and Co in Aberdeen, Scotland for James Baines' famous Black Ball Line at £43,103. The vessel was 288 feet (88 meters) in length, with a beam of 45 feet (14 meters), a depth of 29.5 feet (8.99 meters) of 2,284 tons. The mainmast was 210 feet (64 meters) high and she carried 3.3 acres of sail. The vessel was constructed with three skins. One planked fore and aft, and two diagonally planked, fastened together with screw-threaded trunnels (wooden rails). The Schomberg is one of only three clipper wrecks in Victorian waters that operated the England to Australia run. While the other two, Empress of the Sea and Lightning, were built by the famous American shipbuilder, Donald Mac Kay. Schomberg was an attempt to build a faster ship than Mac Kay and a vessel fast enough to break the sailing record to Australia. The Schomberg sailed on her maiden voyage from Liverpool on 6 October 1855, under the command of Captain James Forbes, on its maiden voyage to Australia with general cargo, jewellery, spirits, machinery, and 2,000 tons of iron rails and equipment intended to build the Melbourne to Geelong Railway and a bridge over the Yarra from Melbourne to Hawthorn. She also carried a cow for fresh milk, pens for fowls and pigs, plus 90,000 gallons of water for washing and drinking. She also carried 17,000 letters and 31,800 newspapers. There were approximately 473 passengers and a crew of 105. It was hoped that Schomberg would make Melbourne in sixty days, setting a record for the voyage, but light winds at the equator dashed those expectations. The ship sighted Moonlight Head in southwest Victoria on Christmas Day but through a deadly combination of wind, currents and unmarked sand spits, the vessel gently ran aground on 26 December 1855 on a spit that juts into Newfield Bay, just east of Curdies Inlet, and the present town of Peterborough. Fortunately, the SS Queen was nearby and managed to save all passengers and crew. The steamers Keera and Maitland were dispatched to salvage the passenger's baggage and the more valuable cargo. Other salvage attempts were made, but deteriorating weather made the work impossible, and within two weeks the Schomberg's hull was broken up and the vessel abandoned. The wrecking of the Schomberg caused quite the public stir particularly in light of the fact the vessel was supposed to be, the most perfect clipper ship ever built. Captain Forbes was charged in the Supreme Court under suspicion that he was playing cards with two female passengers below decks when his ship ran aground. Despite a protest meeting, two inquiries and the court proceedings, he was found not guilty and cleared of all charges. In 1975, divers from Flagstaff Hill, including Peter Ronald, found an ornate communion set at the wreck. The set comprised a jug, two chalices, a plate and a lid. The lid did not fit any of the other objects and in 1978 a piece of the lid broke off, revealing a glint of gold. As museum staff carefully examined the lid and removed marine growth, they found a diamond ring, which is currently on display in the Great Circle Gallery at the Flagstaff Hill Maritime museum that also displays ship fittings and equipment, personal effects. Most of the artefacts were salvaged from the wreck by Peter Ronald, former director of Flagstaff Hill.The Schomberg has historical significance as one of the first luxurious ships built to bring emigrants to Australia to cash in on the gold rush era. And is included on the Victorian Heritage Register (VHR S612). The collection of Schomberg artefacts held at Flagstaff Hill Museum is primarily significant because of the relationship between these recovered items having a high potential to interpret the story of the Schomberg and its foundering during a storm. The shipwreck is of additional historically significance for representing aspects of Victoria’s shipping history and for its association with the first passenger ship, which was designed not only to be the fastest and most luxurious of its day but foundered on its maiden voyage to Australia. Thimble, metal, some of the dimples are corroded through. flagstaff hill, flagstaff hill maritime museum and village, warrnambool, maritime museum, maritime village, great ocean road, shipwreck coast, schomberg, shipwreck coast. schomberg, 1855, peterborough shipwreck, artefact, thimble, sewing accesdory, sewing equipment, haberdashery, finger protection -
 Blacksmith's Cottage and Forge
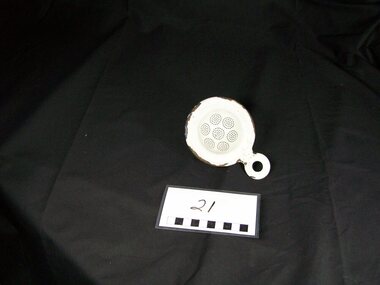
Strainer, Tea, 1920 (estimated); Approx. 1920
A tea strainer is a type of strainer that is placed over or in a teacup to catch tea leaves. When tea is brewed in the traditional manner in a teapot, the tea leaves are not contained in teabags, but rather are freely suspended in the water. As the leaves themselves may be distasteful, it is usual to filter them out with a tea strainer. Strainers usually fit into the top of the cup to catch the leaves as the tea is poured. Some deeper tea strainers can also be used to brew single cups of tea, much as teabags or brewing baskets are used - the strainer full of leaves is set in a cup to brew the tea, and then removed, along with the spent tea leaves, when the tea is ready to drink. By using a tea strainer in this way, the same leaves can be used to brew multiple cups. Tea strainer use declined in the 20th century with mass production of the tea bag, but is still preferred among connoisseurs who claim that keeping the leaves packed in a bag, rather than freely circulating, inhibits diffusion. Many assert that inferior ingredients, namely dust quality tea, are often used in tea bags. Tea strainers are usually either sterling silver, stainless steel, or china. Strainers often come in a set, with the strainer part and a small saucer for it to sit in between cups. Tea strainers in themselves have often been turned into artistic masterpieces of the silver- and goldsmith's craft, as well as rarer specimens of fine porcelain. Brewing baskets (or infusing baskets) resemble tea strainers, but are more typically put in the top of a teapot to contain the tea leaves during brewing. There is no definitive boundary between a brewing basket and a tea strainer, and the same tool might be used for both purposes. Tea strainers are also used by patients trying to pass a kidney stone. The patient urinates through the strainer, thereby ensuring that, if a stone is passed, it will be caught for evaluation and diagnosis. Source: www.wikipedia.net This item has historical significance in the evolution of Tea drinking.The Strainer being needed if a cup of tea was to be poured without tea leaves being present in the tea liquid.As Tea bags have been introduced into everyday life tea strainers are an item of the past. This particular tea strainer was an item for everyday useage.White enamel tea strainer, round in shape with flange edges, 7 small circle areas of perforations in the concave area of the utensil, a small perforated handle (same material) at one outer area of the item.domestic, kitchen, food, preparation, white, enamel, tea, strainer, beverage, perforated, utensil, round, flanges, leaves -
 Eltham District Historical Society Inc
Negative - Photograph, Eltham, Main Road near station, c.1910
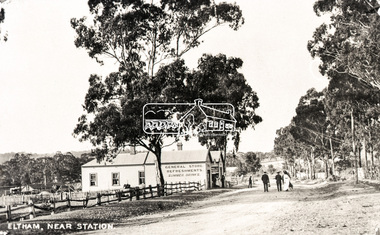
View looking north along Main Road, Eltham from near present day Dudley Street. On the immediate left is the railway station. The large weatherboard building on the bend (opposite present-day Arthur Street) with signs for General Store, Refreshments and Summer Drinks painted on the side is Luther and Ada Haley’s General Store and Bakery, built 1902. This was the first building in what is now Eltham’s present shopping town centre. Haley previously ran the General Store and Bakery on the corner of Main Road and York Street until his lease expired and the premises were bought by Mrs Sarah Burgoyne in 1902. The store later was known as Staff's Store. Followed by the saleyards, entrance to station, slaughter yard and William J Capewell’s butcher shop. Contained within the saleyards facing the street, a small shelter with the name H.H. Clark upon it. Horace Harold Clark was the son of Eltham State School’s first Head Teacher, David George Clark. As well as being a farmer, he was an Estate Agent and conducted auction sales, presumably from this shelter. On the eastern (right) side of Main Street is Haley’s Paddock, which was used on occasions for community picnics. Capable of holding 10,000 people, with ample shade and hilly surroundings it was an ideal place for any community gathering such as the State Schools’ Picnic in 1904. A worker from the bakery store is standing in the gateway at the rear of the store observing the photographer. People in the ‘Sunday Best’ are milling in front of the bakery or strolling down the centre of Main Road. The picture was most likely taken on a Sunday. With the opening of the railway to Eltham in 1902, Melbourne residents would regularly enjoy a Sunday excursion journey on the train to Eltham for a day’s outing to the countryside or beyond to Hurstbridge from 1912 when the railway was extended. Picture dated as c.1910 based on similar picture published in the Weekly Times, Feb. 1912. Cross Ref: 609 (looking south), 612, 611 (later stage), 613.Negative black and white film 120 6x9 format 2 stripsAgfa APX 100baker, butcher, eltham, eltham railway station, eltham sale yards, eltham slaughter yard, eltham town centre, general store, haley's paddock, hot water, luther haley, luther haley general store, m.m. clark, main road, railway station, shire of eltham pioneers photograph collection, shops, sign, staffs general store, summer drinks, w.j. capewell -
 Federation University Historical Collection
Photograph - Photograph - Black and White, Photographs of Ballarat Buildings by Geoff Biddington, 1967, 1967
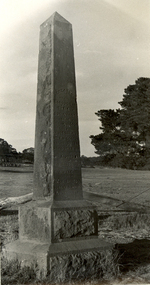
Geoff Biddington took numerous photos around Ballarat and District. He was an active member of the Ballarat Branch of the National Trust. 48 black and white photographs of Ballarat buildings. 1. National Bank, Buninyong 2. Gas Light Standard, Geelong Road, Mount Clear 3. Water Hydrant 4. Former Police Station, Camp Street 5. Cast Iron Drinking Fountain, Eureka Stockade 6. Buninyong Gold Discovery Monument 7. Ballarat Old Cemetery Gates 8. Ballarat East Post office 9. Carriers Arms, Doveton Street North 10. North Star Hotel, Lydiard Street North 11.Lake View Hotel 12. Former Ballarat Gaol, Gate Two 13. Beaufort House 14. Smythesdale Post Office 15. Ballan Timber Building 16. National Mutual Building, Sturt Street 17. Craig's Hotel Doors 18. Her Majesty's Theatre Stage 19 & 20. Ballarat Botanical Gardens Statuary House 21 & 22. Stonemason at work 23. Methodist Church School (1867) Humffray Street 24 & 25. Methodist Church, Brown Hill 26. Queen St Statue,Sturt Street 27-29. Sturt Street Fountain 30. Moore Statue, Sturt Street 31. Hede Statue, Sturt Street 32. George V Statue (Victor Greenhalgh), Sturt Street 33-35. Peter Lalor Statue, Sturt Street 36. Art Deco Statue, Sturt Street 37. Beaufort Bandstand 38. Ranger Barracks, Curtis Street, Ballarat 39. Smeaton Mill and Bridge 40. Hepburn Graveyard, Smeaton 41-45 - Ballarat Tram Ride (possibly last) 46-48. Taking up the Ballarat Tram Tracks, 1967 .49. Melbourne House, Sebastopolgeoff biddington, biddington, buninyong, mount clear, police, gold, cemetery, hotels, ballarat gaol, beaufort house, smythesdale, ballan, theatre, statue, statues, statuary, peter lalor, ranger barracks, smeaton mill, smeaton bridge, hepburn, tram, sebastopol, craig's, her majesty's theatre, smeaton, hepburn graveyard, gold monument, queen victoria statue, ballarat, foodland, ballarat, ballarat buildings, former eagle hotel, former ballarat police station, gold discovery, craig's hotel, buninyong gold discovery obelisk -
 Federation University Historical Collection
Postcard - Sepia, The Diving Stone in the Great Roman Bath, Bath, Somerset
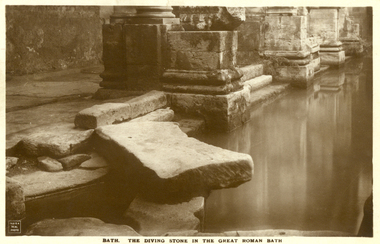
The Great Bath is a massive pool, lined with 45 sheets of lead, and filled with hot spa water. It once stood in an enormous barrel-vaulted hall that rose to a height of 40 metres. For many Roman visitors this may have been the largest building they had ever entered in their life. The bath is 1.6 metres deep, which was ideal for bathing, and it has steps leading down on all sides. Niches around the baths would have held benches for bathers and possibly small tables for drinks or snacks. A large flat slab of stone is set across the point where hot water flows into the bath. It is known today as the diving stone. The Roman Baths complex is a site of historical interest in the English city of Bath. The house is a well-preserved Roman site for public bathing. The Roman Baths themselves are below the modern street level. There are four main features: the Sacred Spring, the Roman Temple, the Roman Bath House and the Museum, holding finds from Roman Bath. The buildings above street level date from the 19th century. Sepia postcard of a section of the Great Roman Bath at Bath, Somerset featuring the Diving Stone.printed verso: The Diving Stone in the great roman bath. The Diving stone, at the north-west corner of the great Roman Bath, still shows where the feet of bygone bathers wore away its surface. The hot mineral waters flowed into the bath through a channel under this stone. chatham-holmes family collection, bath, great roman bath, swimming pool -
 Flagstaff Hill Maritime Museum and Village
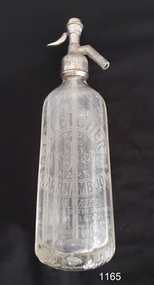
Soda Syphon, 1900-1930’s
This soda syphon (or siphon) was distributed by John Fletcher of Warrnambool, and made by the British Syphon Mfg. Co. Ltd. of London between the 1900s-1930s. It comprises a multi-sided clear glass bottle, an internal glass tube and a metal release valve and spout on the top. It was used to dispense pressurised, effervescent soda water. It was often used as an alternative to water or added to fruit juices and cordials. The text on this bottle states that it remains the property of the retailer, John Fletcher, and must be returned to him. Customers were asked for a deposit on the bottle, which would be refunded when the bottle was exchanged or continued as the deposit on a fresh bottle. Returned bottles would be cleaned and recharged with the gas and sold again. Soda syphon are bottles, glass or metal, with a release valve and spout on the top. The valve lever on the top of the syphon, when depressed, causes the gas in the syphon to force the water up through the tube and out of the spout. The bottle’s mechanism gives the water an effervescent quality to make bubbly drinks such as sparkling mineral water, soda water and sparkling water. ABOUT JOHN FLETCHER John Fletcher bought the Union Cordial Factory in Koroit Street, Warrnambool that was previously owned by John Davis. Fletcher operated the factory as J Fletcher, John Fletcher and Fletcher’s. He eventually sold his business and stock in 1930 to Ralph Reeves, who may have continued using Fletcher’s supply of drink containers before renewing them with stock showing his own brand. The soda syphon is representative of drink containers used in the later 19th and early 20th century. It also represents the system of returnable, recyclable containers. Soda syphon (or siphon). Glass bottle, clear, multi sided, tapered from a heavy glass base to a narrower shoulder, with glass tube at centre connected to metal pump mechanism at the top. Has elaborate frosted label for J. Fletcher of Warrnambool. Made by the British Syphon Mfg. Co. Ltd. London. Bottle remains the property of John Fletcher, Warrnambool.Metal syphon has impressed "J FLETCHER" and logo "S S" in centre of two concentric circles with text between circles "BRITISH SYPHON MFG. CO. LTD. LONDON". Etched into glass "J. FLETCHER / WARRNAMBOOL", "TRADE "[stylised] F" / MARK", "SODA WATER", "THIS SYPHON IS THE PROPERTY / OF JOHN FLETCHER / WARRNAMBOOL AND CONNOT BE / AND CONNOT BE LEGALLY USED BY OTHERS / BRITISH SYPHON CO. TLD. LONDON / - - - - "flagstaff hill, warrnambool, shipwrecked coast, flagstaff hill maritime museum, maritime museum, shipwreck coast, flagstaff hill maritime village, great ocean road, john fletcher, fletcher, john fletcher of warrnambool, soda siphon, soda syphon, british syphon mfg co ltd of london, soft drinks, soda drinks -
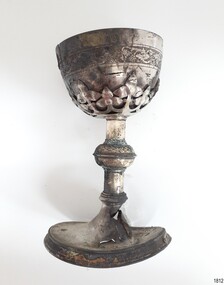 Flagstaff Hill Maritime Museum and Village
Ceremonial object - Chalice, 1855 or earlier
... gallons of water for washing and drinking. She also carried 17,000... for fowls and pigs, plus 90,000 gallons of water for washing ...In 1975, divers from Flagstaff Hill, found an ornate communion set used to celebrate the Eucharist or holy communion by a number of different Christian faiths was recovered from the wreck of the Schomberg. The set comprised a jug, two chalices, a plate and a lid. The lid did not fit any of the other objects and in 1978 a piece of the lid broke off, revealing a glint of gold. As museum staff carefully examined the lid and removed marine growth, they found a diamond ring, which is currently on display in the Great Circle Gallery at Flagstaff Hill. The collection of artefacts from the Schomberg also contains ship fittings and equipment, personal effects, a lithograph, tickets and a photograph from the Schomberg. Most of the artefacts were salvaged from the wreck by Peter Ronald a former director of Flagstaff Hill maritime museum. The Schomberg was a large three-masted full-ship rigged wooden ship built in 1855 by Alexander Hall and Co in Aberdeen, Scotland for James Baines' famous Black Ball Line at £43,103. The vessel was 288 feet (88 meters) in length, with a beam of 45 feet (14 meters), a depth of 29.5 feet (8.99 meters) of 2,284 tons. The mainmast was 210 feet (64 meters) high and she carried 3.3 acres of sail. The vessel was constructed with three skins. One planked fore and aft, and two diagonally planked, fastened together with screw-threaded trunnels (wooden rails). The Schomberg is one of only three clipper wrecks in Victorian waters that operated the England to Australia run. While the other two, Empress of the Sea and Lightning, were built by the famous American shipbuilder, Donald Mac Kay. Schomberg was an attempt to build a faster ship than Mac Kay and a vessel fast enough to break the sailing record to Australia. The Schomberg sailed on her maiden voyage from Liverpool on 6 October 1855, under the command of Captain James Forbes, on its maiden voyage to Australia with a general cargo, jewellery, spirits, machinery, and 2,000 tons of iron rails and equipment intended to build the Melbourne to Geelong Railway and a bridge over the Yarra from Melbourne to Hawthorn. She also carried a cow for fresh milk, pens for fowls and pigs, plus 90,000 gallons of water for washing and drinking. She also carried 17,000 letters and 31,800 newspapers. There were approximately 473 passengers and a crew of 105. It was hoped that Schomberg would make Melbourne in sixty days, setting a record for the voyage, but light winds at the equator dashed those expectations. The ship sighted Moonlight Head in south west Victoria on Christmas Day but through a deadly combination of wind, currents and unmarked sand spits, the vessel gently ran aground on 26 December 1855 on a spit that juts into Newfield Bay, just east of Curdies Inlet, and the present town of Peterborough. Fortunately, the SS Queen was nearby and managed to save all passengers and crew. The steamers Keera and Maitland were dispatched to salvage the passenger's baggage and the more valuable cargo. Other salvage attempts were made, but deteriorating weather made the work impossible, and within two weeks the Schomberg's hull was broken up and the vessel abandoned. The wrecking of the Schomberg caused quite the public stir particularly in light of the fact the vessel was supposed to be, the most perfect clipper ship ever built. Captain Forbes was charged in the Supreme Court under suspicion that he was playing cards with two female passengers below decks when his ship ran aground. Despite a protest meeting, two inquiries and the court proceedings, he was found not guilty and cleared of all charges. In 1975, divers from Flagstaff Hill, including Peter Ronald, found an ornate communion set at the wreck. The set comprised a jug, two chalices, a plate and a lid. The lid did not fit any of the other objects and in 1978 a piece of the lid broke off, revealing a glint of gold. As museum staff carefully examined the lid and removed marine growth, they found a diamond ring, which is currently on display in the Great Circle Gallery at the Flagstaff Hill Maritime museum that also displays ship fittings and equipment, personal effects. Most of the artefacts were salvaged from the wreck by Peter Ronald, former director of Flagstaff Hill.This chalice is significant as an example of an item in common use in the mid-19th century that is still in use today. The Schomberg has historical significance as one of the first luxurious ships built to bring emigrants to Australia to cash in on the gold rush era. And is included on the Victorian Heritage Register (VHR S612). The collection of Schomberg artefacts held at Flagstaff Hill Museum is primarily significant because of the relationship between these recovered items having a high potential to interpret the story of the Schomberg and its foundering during a storm. The shipwreck is of additional historical significance for representing aspects of Victoria’s shipping history and for its association with the first passenger ship, which was designed not only to be the fastest and most luxurious of its day but foundered on its maiden voyage to Australia.Chalice; electroplated silver metal over metal, possibly nickle. The chalice has a wide bowl with an outer layer of intricately cut metal on the underside and a ribbon-like border of grapes and grapevine leaves is etched around it. It is supported by a tall stem with a circular knob partway down its length, and the stem is attached to a round base that is hollow underneath. The decorative pattern around the perimeter of the base is repeated on the knob on the stem. The base also has a pattern of lines around the vertical edge. There is a white sticker attached to the underside of the base. Its inscription is undecipherable. The chalice is part of a Communion set that was recovered from the wreck of the Schomberg. White sticker attached to the base of the chaliceflagstaff hill, flagstaff hill maritime museum and village, warrnambool, maritime museum, maritime village, great ocean road, shipwreck coast, schomberg, 1855, clipper ship, james baines & co, black ball line, luxury ship, emigrant ship, captain forbes, bully forbes, ss queen, peterborough shipwreck, communion set, religious service, communion service, ceremonial service, mass, chalice -
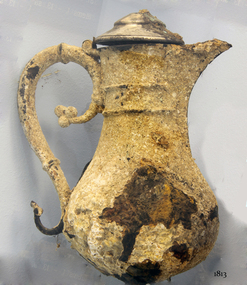 Flagstaff Hill Maritime Museum and Village
Ceremonial object - Cruet and lid, 1855 or earlier
... gallons of water for washing and drinking. She also carried 17,000... for fowls and pigs, plus 90,000 gallons of water for washing ...In 1975, divers from Flagstaff Hill, found an ornate communion set used to celebrate the Eucharist or holy communion by a number of different Christian faiths was recovered from the wreck of the Schomberg. The set comprised a cruet or jug, two chalices, a plate and a lid. The lid did not fit any of the other objects and in 1978 a piece of the lid broke off, revealing a glint of gold. As museum staff carefully examined the lid and removed marine growth, they found a diamond ring, which is currently on display in the Great Circle Gallery at Flagstaff Hill. The collection of artefacts from the Schomberg also contains ship fittings and equipment, personal effects, a lithograph, tickets and a photograph from the Schomberg. Most of the artefacts were salvaged from the wreck by Peter Ronald a former director of Flagstaff Hill maritime museum. The Schomberg was a large three-masted full-ship rigged wooden ship built in 1855 by Alexander Hall and Co in Aberdeen, Scotland for James Baines' famous Black Ball Line at £43,103. The vessel was 288 feet (88 meters) in length, with a beam of 45 feet (14 meters), a depth of 29.5 feet (8.99 meters) of 2,284 tons. The mainmast was 210 feet (64 meters) high and she carried 3.3 acres of sail. The vessel was constructed with three skins. One planked fore and aft, and two diagonally planked, fastened together with screw-threaded trunnels (wooden rails). The Schomberg is one of only three clipper wrecks in Victorian waters that operated the England-to-Australia run. While the other two, Empress of the Sea and Lightning, were built by the famous American shipbuilder, Donald Mac Kay. Schomberg was an attempt to build a faster ship than Mac Kay and a vessel fast enough to break the sailing record to Australia. The Schomberg sailed on her maiden voyage from Liverpool on 6 October 1855, under the command of Captain James Forbes, on its maiden voyage to Australia with general cargo, jewellery, spirits, machinery, and 2,000 tons of iron rails and equipment intended to build the Melbourne to Geelong Railway and a bridge over the Yarra from Melbourne to Hawthorn. She also carried a cow for fresh milk, pens for fowls and pigs, plus 90,000 gallons of water for washing and drinking. She also carried 17,000 letters and 31,800 newspapers. There were approximately 473 passengers and a crew of 105. It was hoped that Schomberg would make Melbourne in sixty days, setting a record for the voyage, but light winds at the equator dashed those expectations. The ship sighted Moonlight Head in southwest Victoria on Christmas Day but through a deadly combination of wind, currents and unmarked sand spits, the vessel gently ran aground on 26 December 1855 on a spit that juts into Newfield Bay, just east of Curdies Inlet, and the present town of Peterborough. Fortunately, the SS Queen was nearby and managed to save all passengers and crew. The steamers Keera and Maitland were dispatched to salvage the passenger's baggage and the more valuable cargo. Other salvage attempts were made, but deteriorating weather made the work impossible, and within two weeks the Schomberg's hull was broken up and the vessel abandoned. The wrecking of the Schomberg caused quite a public stir, particularly in light of the fact the vessel was supposed to be, the most perfect clipper ship ever built. Captain Forbes was charged in the Supreme Court under suspicion that he was playing cards with two female passengers below decks when his ship ran aground. Despite a protest meeting, two inquiries and the court proceedings, he was found not guilty and cleared of all charges. In 1975, divers from Flagstaff Hill, including Peter Ronald, found an ornate communion set at the wreck. The set comprised a jug, two chalices, a plate and a lid. The lid did not fit any of the other objects and in 1978 a piece of the lid broke off, revealing a glint of gold. As museum staff carefully examined the lid and removed marine growth, they found a diamond ring, which is currently on display in the Great Circle Gallery at the Flagstaff Hill Maritime Museum that also displays ship fittings and equipment, and personal effects. Most of the artefacts were salvaged from the wreck by Peter Ronald, former director of Flagstaff Hill.This object is significant as an example of an item in common use in the mid-19th century that is still in use today. The Schomberg has historical significance as one of the first luxurious ships built to bring emigrants to Australia to cash in on the gold rush era. And is included on the Victorian Heritage Register (VHR S612). The collection of Schomberg artefacts held at Flagstaff Hill Museum is primarily significant because of the relationship between these recovered items having a high potential to interpret the story of the Schomberg and its foundering during a storm. The shipwreck is of additional historical significance for representing aspects of Victoria’s shipping history and for its association with the first passenger ship, which was designed not only to be the fastest and most luxurious of its day but foundered on its maiden voyage to Australia.Cruet and lid; electroplated silver metal over metal, possibly nickle. The cruet has a wide bowl large handle .The round domed lid has a pattern around the border. The cruet and lid are part of a Communion set that was recovered from the wreck of the Schomberg.warrnambool, flagstaff-hill, flagstaff-hill-maritime-museum, shipwreck-coast, flagstaff-hill-maritime-village, schomberg, shipwrecked-artefact, clipper ship, black ball line, 1855 shipwreck, aberdeen clipper ship, captain forbes, peterborough shipwreck, ss queen, schomberg jug or cruet, jug or cruet, schomberg communion set, jug, cruet and lid, cruet, communion set, religious service, communion service, ceremonial service, mass -
 Flagstaff Hill Maritime Museum and Village
Ceramic - Stoneware Bottle, Alexander Hall and Son, ca. 1855
... gallons of water for washing and drinking. She also carried 17,000... and pigs, plus 90,000 gallons of water for washing and drinking ...Schomberg was a large three-masted full-ship rigged wooden ship built in 1855 by Alexander Hall and Co in Aberdeen, Scotland for James Baines' famous Black Ball Line at £43,103. The vessel was 288 feet (88 meters) in length, with a beam of 45 feet (14 meters), a depth of 29.5 feet (8.99 meters) of 2,284 tons. The mainmast was 210 feet (64 meters) high and she carried 3.3 acres of sail. The vessel was constructed with three skins. One planked fore and aft, and two diagonally planked, fastened together with screw-threaded trunnels (wooden rails). The Schomberg is one of only three clipper wrecks in Victorian waters that operated the England to Australia run. While the other two, Empress of the Sea and Lightning, were built by the famous American shipbuilder, Donald Mac Kay. Schomberg was an attempt to build a faster ship than Mac Kay and a vessel fast enough to break the sailing record to Australia. The Schomberg sailed on her maiden voyage from Liverpool on 6 October 1855, under the command of Captain James Forbes, on its maiden voyage to Australia with a general cargo, jewellery, spirits, machinery, and 2,000 tons of iron rails and equipment intended to build the Melbourne to Geelong Railway and a bridge over the Yarra from Melbourne to Hawthorn. She also carried a cow for fresh milk, pens for fowls and pigs, plus 90,000 gallons of water for washing and drinking. She also carried 17,000 letters and 31,800 newspapers. There were approximately 473 passengers and a crew of 105. It was hoped that Schomberg would make Melbourne in sixty days, setting a record for the voyage, but light winds at the equator dashed those expectations. The ship sighted Moonlight Head in south west Victoria on Christmas Day but through a deadly combination of wind, currents and unmarked sand spits, the vessel gently ran aground on 26 December 1855 on a spit that juts into Newfield Bay, just east of Curdies Inlet, and the present town of Peterborough. Fortunately, the SS Queen was nearby and managed to save all passengers and crew. The steamers Keera and Maitland were dispatched to salvage the passenger's baggage and the more valuable cargo. Other salvage attempts were made, but deteriorating weather made the work impossible, and within two weeks the Schomberg's hull was broken up and the vessel abandoned. The wrecking of the Schomberg caused quite the public stir particularly in light of the fact the vessel was supposed to be, the most perfect clipper ship ever built. Captain Forbes was charged in the Supreme Court under suspicion that he was playing cards with two female passengers below decks when his ship ran aground. Despite a protest meeting, two inquiries and the court proceedings, he was found not guilty and cleared of all charges. In 1975, divers from Flagstaff Hill, including Peter Ronald, found an ornate communion set at the wreck. The set comprised a jug, two chalices, a plate and a lid. The lid did not fit any of the other objects and in 1978 a piece of the lid broke off, revealing a glint of gold. As museum staff carefully examined the lid and removed marine growth, they found a diamond ring, which is currently on display in the Great Circle Gallery at the Flagstaff Hill Maritime museum that also displays ship fittings and equipment, personal effects. Most of the artefacts were salvaged from the wreck by Peter Ronald, former director of Flagstaff Hill.The Schomberg has historical significance as one of the first luxurious ships built to bring emigrants to Australia to cash in on the gold rush era. And is included on the Victorian Heritage Register (VHR S612). The collection of Schomberg artefacts held at Flagstaff Hill Museum is primarily significant because of the relationship between these recovered items having a high potential to interpret the story of the Schomberg and its foundering during a storm. The shipwreck is of additional historically significance for representing aspects of Victoria’s shipping history and for its association with the first passenger ship, which was designed not only to be the fastest and most luxurious of its day but foundered on its maiden voyage to Australia.Stoneware Bottle, wide mouthed, covered in white encrustation, recovered from the wreck of the Schomberg. warrnambool, flagstaff-hill, flagstaff-hill-maritime-museum, shipwreck-coast, flagstaff-hill-maritime-village, schomberg, shipwrecked-artefact, clipper ship, black ball line, 1855 shipwreck, aberdeen clipper ship, captain forbes, peterborough shipwreck, stoneware bottle, james baines, black ball, container, clay bottle -
 Flagstaff Hill Maritime Museum and Village
Equipment - Bilge Pump Barrel, Alexander Hall and Son, 1855
... for fowls and pigs, plus 90,000 gallons of water for washing... and pigs, plus 90,000 gallons of water for washing and drinking ...This bilge pump barrel is part of the ship's bilge pump machinery. Bilge or water can find its way into the hull of a ship and if it is not removed the ship will eventually sink. The bilge pump is designed to efficiently remove the bilge water. The Schomberg was a large three-masted full-ship rigged wooden ship built in 1855 by Alexander Hall and Co in Aberdeen, Scotland for James Baines' famous Black Ball Line at £43,103. The vessel was 288 feet (88 meters) in length, with a beam of 45 feet (14 meters), a depth of 29.5 feet (8.99 meters) of 2,284 tons. The mainmast was 210 feet (64 meters) high and she carried 3.3 acres of sail. The vessel was constructed with three skins. One planked fore and aft, and two diagonally planked, fastened together with screw-threaded trunnels (wooden rails). The Schomberg is one of only three clipper wrecks in Victorian waters that operated the England to Australia run. While the other two, Empress of the Sea and Lightning, were built by the famous American shipbuilder, Donald Mac Kay. Schomberg was an attempt to build a faster ship than Mac Kay and a vessel fast enough to break the sailing record to Australia. The Schomberg sailed on her maiden voyage from Liverpool on 6 October 1855, under the command of Captain James Forbes, on its maiden voyage to Australia with general cargo, jewellery, spirits, machinery, and 2,000 tons of iron rails and equipment intended to build the Melbourne to Geelong Railway and a bridge over the Yarra from Melbourne to Hawthorn. She also carried a cow for fresh milk, pens for fowls and pigs, plus 90,000 gallons of water for washing and drinking. She also carried 17,000 letters and 31,800 newspapers. There were approximately 473 passengers and a crew of 105. It was hoped that Schomberg would make Melbourne in sixty days, setting a record for the voyage, but light winds at the equator dashed those expectations. The ship sighted Moonlight Head in southwest Victoria on Christmas Day but through a deadly combination of wind, currents and unmarked sand spits, the vessel gently ran aground on 26 December 1855 on a spit that juts into Newfield Bay, just east of Curdies Inlet, and the present town of Peterborough. Fortunately, the SS Queen was nearby and managed to save all passengers and crew. The steamers Keera and Maitland were dispatched to salvage the passenger's baggage and the more valuable cargo. Other salvage attempts were made, but deteriorating weather made the work impossible, and within two weeks the Schomberg's hull was broken up and the vessel abandoned. The wrecking of the Schomberg caused quite a public stir, particularly in light of the fact the vessel was supposed to be, the most perfect clipper ship ever built. Captain Forbes was charged in the Supreme Court under suspicion that he was playing cards with two female passengers below decks when his ship ran aground. Despite a protest meeting, two inquiries and the court proceedings, he was found not guilty and cleared of all charges. In 1975, divers from Flagstaff Hill, including Peter Ronald, found an ornate communion set at the wreck. The set comprised a jug, two chalices, a plate and a lid. The lid did not fit any of the other objects and in 1978 a piece of the lid broke off, revealing a glint of gold. As museum staff carefully examined the lid and removed marine growth, they found a diamond ring, which is currently on display in the Great Circle Gallery at the Flagstaff Hill Maritime museum that also displays ship fittings and equipment, and personal effects. The Schomberg has historical significance as one of the first luxurious ships built to bring emigrants to Australia to cash in on the gold rush era. And is included on the Victorian Heritage Register (VHR S612). The collection of Schomberg artefacts held at Flagstaff Hill Museum is primarily significant because of the relationship between these recovered items having a high potential to interpret the story of the Schomberg and its foundering during a storm. The shipwreck is of additional historically significance for representing aspects of Victoria’s shipping history and for its association with the first passenger ship, which was designed not only to be the fastest and most luxurious of its day but foundered on its maiden voyage to Australia.Bilge pump barrel,; brass cylinder with screw thread at the base and fittings on one side. A piece of the ship's timber is attached. The object was recovered from the wreck of the shipo Schomberg. Nonewarrnambool, flagstaff-hill, flagstaff-hill-maritime-museum, shipwreck-coast, flagstaff-hill-maritime-village, schomberg, shipwrecked-artefact, clipper ship, black ball line, 1855 shipwreck, aberdeen clipper ship, captain forbes, peterborough shipwreck, ss queen, bilge pump, ship's plumbing, bilge pump barrel, bilge -
 Flagstaff Hill Maritime Museum and Village
Domestic object - Plate
The Process of Making Pottery Decorating, Firing, Glazing, Making, Technical There is a rhythm and flow to clay. It can’t be done all at once! Even the making process! It can take weeks to get everything done, especially if you can only work on your pottery once a week! Even though we have three hour classes, it’s often just not enough time! Here is an overview of some of the processes so you have a bit more grasp on some of the technical stuff! Step One – Design There are SO many ideas out there for making stuff in clay! From delicate porcelain jewellery, through to heavy sculptural work and everything in between. Deciding your direction is sometimes not that easy – when you first start, try everything, you will naturally gravitate to the style that you enjoy! The options and variations are endless and can get a wee bit overwhelming too! Check in with me before you start to ensure your ideas will work, what order you might do things, how you could achieve the look you are seeking and any other technical data required! Step Two – Making Clay is thixotropic. This means that as you work with it, the clay first gets sloppier and wetter, before is begins to dry in the atmosphere. For most things, you simply can’t do all parts of the project at once. An example of work order might look like: Get last weeks work out from the shelves Prepare clay for today’s work – roll your clay, prepare balls for throwing, make the first stage of a pinch pot) Clean up last week’s work and put it on the shelf for bisque firing Check that you have any glazing to do – and do enough of it that you will have time to finish your main project Do the next step of your next project – there might be a further step that can’t be complete immediately, in that case, wrap your work well and put onto the shelves. Letting your work rest for a while can really help keep your work clean and professional looking. Many things require bagging under plastic to keep it ready for work the next week – put your name on the outside of the bag so you can find your work easily. We have stickers and markers. Consider how you want to decorate your work – coloured slip can be applied at a fairly wet stage (remembering that it will make your work even wetter!). Trying to apply slip to dry clay won’t work! If you want to do sgraffito – you will need to keep the work leather hard (a state of dryness where you can still work the clay with a little effort and a little water and care). Step Three – Drying Most of the time your work can go into the rack uncovered to let it dry out for the following week. If you want to continue forming or shaping you will need to double bag your work – put your work on a suitable sized bat and put the bat in a bag so the base of the bag is under the bat, then put another bag over the top of the work and tuck the top of the bag under the bat. If you want to trim (or turn) your thrown work the following week, it should also be double bagged. If your work is large, delicate, or of uneven thicknesses, you should lightly cover your work for drying. When considering the drying process, bare in mind the weather, humidity and wind! The hotter and dryer, the faster things dry and work can dry unevenly in the shelves – this can lead to cracking – another time to lightly cover your work for drying. Step Four – Trimming and Cleaning Up Your work is dry! It is called greenware now and it is at it’s most fragile! Handle everything with two hands. I often refer to soft hands – keep everything gentle and with your fingers spread as much as possible. Try to not pick up things like plates too much, and always with both hands! Before your work can be bisque fired it should be “cleaned up”. You work won’t go into the kiln if it has sharp edges – when glazed, sharp edges turn into razor blades! Use a piece of fly wire to rub the work all over – this will scratch a little so be light handed. Use a knife or metal kidney to scrape any areas that require a bit more dynamic treatment than the fly wire offers! Finally, a very light wipe over with a slightly damp sponge can help soften and soothe all of your edges and dags! Trimming thrown work: If you are planning to trim (or turn) your thrown work (and you should be), make sure you bag it well – your work should be leather hard to almost dry for easiest trimming. Use this step to finish the work completely – use a metal kidney to polish the surface, or a slightly damp sponge to give a freshly thrown look. Wipe the sponge around the rim after trimming, and check the inside of the pot for dags! Trimming slip cast work: Usually I will trim the rims of your work on the wheel the following day to make that stage easier, however you will still need to check your work for lumps and bumps. Last but not least – check that your name is still clearly on the bottom of your work. Step Five – Bisque Firing When the work is completely dry it can go into the bisque kiln. The bisque kiln is fired to 1000°C. This process burns off the water in the clay as well as some of the chemically bound water. The structure of the clay is not altered that much at this temperature. Inside the bisque kiln, the work is stacked a little, small bowl inside a larger bowl and onto a heavy plate. Smaller items like decorations or drink coasters might get stacked several high. Consideration is paid to the weight of the stack and shape of the work. A bisque kiln can fire about one and a half times the amount of work that the glaze kiln can fire. The firing takes about 10 hours to complete the cycle and about two days to cool down. Once it has been emptied the work is placed in the glaze room ready for you to decorate! Step Six – Glazing Decorating your work with colour can be a lot of fun – and time consuming! There are three main options for surface treatment at this stage: Oxide Washes Underglazes Glazes Washes and underglazes do not “glaze” the work – It will still need a layer of glaze to fully seal the clay (washes don’t need glaze on surfaces not designed for food or liquid as they can gloss up a little on their own). Underglazes are stable colourants that turn out pretty much how they look in the jar. They can be mixed with each other to form other colours and can be used like water colours to paint onto your work. Mostly they should have a clear glaze on top to seal them. Oxides are a different species – the pink oxide (cobalt) wash turns out bright blue for instance. They don’t always need a glaze on top, and some glazes can change the colour of the wash! The glazes need no other “glaze” on top! Be careful of unknown glaze interactions – you can put any combination of glaze in a bowl or on a plate, but only a single glaze on the outside of any vertical surface! Glazes are a chemical reaction under heat. We don’t know the exact chemicals in the Mayco glazes we use. I can guess by the way they interact with each other, however, on the whole, you need to test every idea you have, and not run the test on a vertical surface! Simply put, glaze is a layer of glass like substance that bonds with the clay underneath. Clay is made of silica, alumina and water. Glaze is made of mostly silica. Silica has a melting point of 1700°C and we fire to 1240°C. The silica requires a “flux” to help it melt at the lower temperature. Fluxes can be all sorts of chemicals – a common one is calcium – calcium has a melting point of 2500°C, however, together they both melt at a much lower temperature! Colourants are metal oxides like cobalt (blue), chrome (green through black), copper (green, blue, even red!), manganese (black, purple and pink) iron (red brown), etc. Different chemicals in the glaze can have dramatic effects. for example, barium carbonate (which we don’t use) turns manganese bright pink! Other elements can turn manganese dioxide brown, blue, purple and reddish brown. Manganese dioxide is a flux in and of itself as well. So, glazes that get their black and purple colours, often interact with other glazes and RUN! Our mirror black is a good example – it mixes really well with many glazes because it fluxes them – causes them to melt faster. It will also bring out many beautiful colours in the glazes because it’s black colouring most definitely comes from manganese dioxide! Glaze chemistry is a whole subject on it’s own! We use commercial Mayco glazes on purpose – for their huge range of colour possibilities, stability, cool interactions, artistic freedom with the ability to easily brush the glazes on and ease of use. We currently have almost 50 glazes on hand! A major project is to test the interactions of all glazes with each other. That is 2,500 test tiles!!!! I’m going to make the wall behind the wheels the feature wall of pretty colours! Step Seven – Glaze (Gloss or sometimes called “Glost”) Firing Most of the time this is the final stage of making your creation (but not always!) The glaze kiln goes to 1240°C. This is called cone 6, or midrange. It is the low end of stoneware temperatures. Stoneware clays and glazes are typically fired at cone 8 – 10, that is 1260 – 1290°C. The energy requirement to go from 1240°C to 1280°C is almost a 30% more! Our clay is formulated to vitrify (mature, turn “glass-like”) at 1240°, as are our glazes. A glaze kiln take around 12 hours to reach temperature and two to three days to cool down. Sometimes a third firing process is required – this is for decoration that is added to work after the glaze firing. For example – adding precious metals and lustres. this firing temperature is usually around 600 – 800°C depending upon the techniques being used. There are many students interested in gold and silver trims – we will be doing this third type of firing soon! After firing your work will be in the student finished work shelves. Remember to pay for it before you head out the door! There is a small extra charge for using porcelain clay (it’s more than twice the price of regular clay), and for any third firing process! Once your work has been fired it can not turn back into clay for millennia – so don’t fire it if you don’t like it! Put it in the bucket for recycling. https://firebirdstudios.com.au/the-process-of-making-pottery/Ceramics have evolved over thousands of years.White earthenware dinner plate. Crazing evident all over.Backstamped ‘Made in England S LTD’flagstaff hill, warrnambool, shipwrecked-coast, flagstaff-hill, flagstaff-hill-maritime-museum, maritime-museum, shipwreck-coast, flagstaff-hill-maritime-village, ceramics, tableware -
 Flagstaff Hill Maritime Museum and Village
Domestic object - Plate, Johnson Bros
The Process of Making Pottery Decorating, Firing, Glazing, Making, Technical There is a rhythm and flow to clay. It can’t be done all at once! Even the making process! It can take weeks to get everything done, especially if you can only work on your pottery once a week! Even though we have three hour classes, it’s often just not enough time! Here is an overview of some of the processes so you have a bit more grasp on some of the technical stuff! Step One – Design There are SO many ideas out there for making stuff in clay! From delicate porcelain jewellery, through to heavy sculptural work and everything in between. Deciding your direction is sometimes not that easy – when you first start, try everything, you will naturally gravitate to the style that you enjoy! The options and variations are endless and can get a wee bit overwhelming too! Check in with me before you start to ensure your ideas will work, what order you might do things, how you could achieve the look you are seeking and any other technical data required! Step Two – Making Clay is thixotropic. This means that as you work with it, the clay first gets sloppier and wetter, before is begins to dry in the atmosphere. For most things, you simply can’t do all parts of the project at once. An example of work order might look like: Get last weeks work out from the shelves Prepare clay for today’s work – roll your clay, prepare balls for throwing, make the first stage of a pinch pot) Clean up last week’s work and put it on the shelf for bisque firing Check that you have any glazing to do – and do enough of it that you will have time to finish your main project Do the next step of your next project – there might be a further step that can’t be complete immediately, in that case, wrap your work well and put onto the shelves. Letting your work rest for a while can really help keep your work clean and professional looking. Many things require bagging under plastic to keep it ready for work the next week – put your name on the outside of the bag so you can find your work easily. We have stickers and markers. Consider how you want to decorate your work – coloured slip can be applied at a fairly wet stage (remembering that it will make your work even wetter!). Trying to apply slip to dry clay won’t work! If you want to do sgraffito – you will need to keep the work leather hard (a state of dryness where you can still work the clay with a little effort and a little water and care). Step Three – Drying Most of the time your work can go into the rack uncovered to let it dry out for the following week. If you want to continue forming or shaping you will need to double bag your work – put your work on a suitable sized bat and put the bat in a bag so the base of the bag is under the bat, then put another bag over the top of the work and tuck the top of the bag under the bat. If you want to trim (or turn) your thrown work the following week, it should also be double bagged. If your work is large, delicate, or of uneven thicknesses, you should lightly cover your work for drying. When considering the drying process, bare in mind the weather, humidity and wind! The hotter and dryer, the faster things dry and work can dry unevenly in the shelves – this can lead to cracking – another time to lightly cover your work for drying. Step Four – Trimming and Cleaning Up Your work is dry! It is called greenware now and it is at it’s most fragile! Handle everything with two hands. I often refer to soft hands – keep everything gentle and with your fingers spread as much as possible. Try to not pick up things like plates too much, and always with both hands! Before your work can be bisque fired it should be “cleaned up”. You work won’t go into the kiln if it has sharp edges – when glazed, sharp edges turn into razor blades! Use a piece of fly wire to rub the work all over – this will scratch a little so be light handed. Use a knife or metal kidney to scrape any areas that require a bit more dynamic treatment than the fly wire offers! Finally, a very light wipe over with a slightly damp sponge can help soften and soothe all of your edges and dags! Trimming thrown work: If you are planning to trim (or turn) your thrown work (and you should be), make sure you bag it well – your work should be leather hard to almost dry for easiest trimming. Use this step to finish the work completely – use a metal kidney to polish the surface, or a slightly damp sponge to give a freshly thrown look. Wipe the sponge around the rim after trimming, and check the inside of the pot for dags! Trimming slip cast work: Usually I will trim the rims of your work on the wheel the following day to make that stage easier, however you will still need to check your work for lumps and bumps. Last but not least – check that your name is still clearly on the bottom of your work. Step Five – Bisque Firing When the work is completely dry it can go into the bisque kiln. The bisque kiln is fired to 1000°C. This process burns off the water in the clay as well as some of the chemically bound water. The structure of the clay is not altered that much at this temperature. Inside the bisque kiln, the work is stacked a little, small bowl inside a larger bowl and onto a heavy plate. Smaller items like decorations or drink coasters might get stacked several high. Consideration is paid to the weight of the stack and shape of the work. A bisque kiln can fire about one and a half times the amount of work that the glaze kiln can fire. The firing takes about 10 hours to complete the cycle and about two days to cool down. Once it has been emptied the work is placed in the glaze room ready for you to decorate! Step Six – Glazing Decorating your work with colour can be a lot of fun – and time consuming! There are three main options for surface treatment at this stage: Oxide Washes Underglazes Glazes Washes and underglazes do not “glaze” the work – It will still need a layer of glaze to fully seal the clay (washes don’t need glaze on surfaces not designed for food or liquid as they can gloss up a little on their own). Underglazes are stable colourants that turn out pretty much how they look in the jar. They can be mixed with each other to form other colours and can be used like water colours to paint onto your work. Mostly they should have a clear glaze on top to seal them. Oxides are a different species – the pink oxide (cobalt) wash turns out bright blue for instance. They don’t always need a glaze on top, and some glazes can change the colour of the wash! The glazes need no other “glaze” on top! Be careful of unknown glaze interactions – you can put any combination of glaze in a bowl or on a plate, but only a single glaze on the outside of any vertical surface! Glazes are a chemical reaction under heat. We don’t know the exact chemicals in the Mayco glazes we use. I can guess by the way they interact with each other, however, on the whole, you need to test every idea you have, and not run the test on a vertical surface! Simply put, glaze is a layer of glass like substance that bonds with the clay underneath. Clay is made of silica, alumina and water. Glaze is made of mostly silica. Silica has a melting point of 1700°C and we fire to 1240°C. The silica requires a “flux” to help it melt at the lower temperature. Fluxes can be all sorts of chemicals – a common one is calcium – calcium has a melting point of 2500°C, however, together they both melt at a much lower temperature! Colourants are metal oxides like cobalt (blue), chrome (green through black), copper (green, blue, even red!), manganese (black, purple and pink) iron (red brown), etc. Different chemicals in the glaze can have dramatic effects. for example, barium carbonate (which we don’t use) turns manganese bright pink! Other elements can turn manganese dioxide brown, blue, purple and reddish brown. Manganese dioxide is a flux in and of itself as well. So, glazes that get their black and purple colours, often interact with other glazes and RUN! Our mirror black is a good example – it mixes really well with many glazes because it fluxes them – causes them to melt faster. It will also bring out many beautiful colours in the glazes because it’s black colouring most definitely comes from manganese dioxide! Glaze chemistry is a whole subject on it’s own! We use commercial Mayco glazes on purpose – for their huge range of colour possibilities, stability, cool interactions, artistic freedom with the ability to easily brush the glazes on and ease of use. We currently have almost 50 glazes on hand! A major project is to test the interactions of all glazes with each other. That is 2,500 test tiles!!!! I’m going to make the wall behind the wheels the feature wall of pretty colours! Step Seven – Glaze (Gloss or sometimes called “Glost”) Firing Most of the time this is the final stage of making your creation (but not always!) The glaze kiln goes to 1240°C. This is called cone 6, or midrange. It is the low end of stoneware temperatures. Stoneware clays and glazes are typically fired at cone 8 – 10, that is 1260 – 1290°C. The energy requirement to go from 1240°C to 1280°C is almost a 30% more! Our clay is formulated to vitrify (mature, turn “glass-like”) at 1240°, as are our glazes. A glaze kiln take around 12 hours to reach temperature and two to three days to cool down. Sometimes a third firing process is required – this is for decoration that is added to work after the glaze firing. For example – adding precious metals and lustres. this firing temperature is usually around 600 – 800°C depending upon the techniques being used. There are many students interested in gold and silver trims – we will be doing this third type of firing soon! After firing your work will be in the student finished work shelves. Remember to pay for it before you head out the door! There is a small extra charge for using porcelain clay (it’s more than twice the price of regular clay), and for any third firing process! Once your work has been fired it can not turn back into clay for millennia – so don’t fire it if you don’t like it! Put it in the bucket for recycling. https://firebirdstudios.com.au/the-process-of-making-pottery/Ceramics have evolved over thousands of years.A white earthenware side plate with a gadroon edge. Has water marks and chips on front.‘Johnson Bros England Reg No 15587’flagstaff hill, warrnambool, shipwrecked-coast, flagstaff-hill, flagstaff-hill-maritime-museum, maritime-museum, shipwreck-coast, flagstaff-hill-maritime-village, johnson bros, ceramics, tableware -
 Flagstaff Hill Maritime Museum and Village
Domestic object - Plate, Alfred Meakin
The Process of Making Pottery Decorating, Firing, Glazing, Making, Technical There is a rhythm and flow to clay. It can’t be done all at once! Even the making process! It can take weeks to get everything done, especially if you can only work on your pottery once a week! Even though we have three hour classes, it’s often just not enough time! Here is an overview of some of the processes so you have a bit more grasp on some of the technical stuff! Step One – Design There are SO many ideas out there for making stuff in clay! From delicate porcelain jewellery, through to heavy sculptural work and everything in between. Deciding your direction is sometimes not that easy – when you first start, try everything, you will naturally gravitate to the style that you enjoy! The options and variations are endless and can get a wee bit overwhelming too! Check in with me before you start to ensure your ideas will work, what order you might do things, how you could achieve the look you are seeking and any other technical data required! Step Two – Making Clay is thixotropic. This means that as you work with it, the clay first gets sloppier and wetter, before is begins to dry in the atmosphere. For most things, you simply can’t do all parts of the project at once. An example of work order might look like: Get last weeks work out from the shelves Prepare clay for today’s work – roll your clay, prepare balls for throwing, make the first stage of a pinch pot) Clean up last week’s work and put it on the shelf for bisque firing Check that you have any glazing to do – and do enough of it that you will have time to finish your main project Do the next step of your next project – there might be a further step that can’t be complete immediately, in that case, wrap your work well and put onto the shelves. Letting your work rest for a while can really help keep your work clean and professional looking. Many things require bagging under plastic to keep it ready for work the next week – put your name on the outside of the bag so you can find your work easily. We have stickers and markers. Consider how you want to decorate your work – coloured slip can be applied at a fairly wet stage (remembering that it will make your work even wetter!). Trying to apply slip to dry clay won’t work! If you want to do sgraffito – you will need to keep the work leather hard (a state of dryness where you can still work the clay with a little effort and a little water and care). Step Three – Drying Most of the time your work can go into the rack uncovered to let it dry out for the following week. If you want to continue forming or shaping you will need to double bag your work – put your work on a suitable sized bat and put the bat in a bag so the base of the bag is under the bat, then put another bag over the top of the work and tuck the top of the bag under the bat. If you want to trim (or turn) your thrown work the following week, it should also be double bagged. If your work is large, delicate, or of uneven thicknesses, you should lightly cover your work for drying. When considering the drying process, bare in mind the weather, humidity and wind! The hotter and dryer, the faster things dry and work can dry unevenly in the shelves – this can lead to cracking – another time to lightly cover your work for drying. Step Four – Trimming and Cleaning Up Your work is dry! It is called greenware now and it is at it’s most fragile! Handle everything with two hands. I often refer to soft hands – keep everything gentle and with your fingers spread as much as possible. Try to not pick up things like plates too much, and always with both hands! Before your work can be bisque fired it should be “cleaned up”. You work won’t go into the kiln if it has sharp edges – when glazed, sharp edges turn into razor blades! Use a piece of fly wire to rub the work all over – this will scratch a little so be light handed. Use a knife or metal kidney to scrape any areas that require a bit more dynamic treatment than the fly wire offers! Finally, a very light wipe over with a slightly damp sponge can help soften and soothe all of your edges and dags! Trimming thrown work: If you are planning to trim (or turn) your thrown work (and you should be), make sure you bag it well – your work should be leather hard to almost dry for easiest trimming. Use this step to finish the work completely – use a metal kidney to polish the surface, or a slightly damp sponge to give a freshly thrown look. Wipe the sponge around the rim after trimming, and check the inside of the pot for dags! Trimming slip cast work: Usually I will trim the rims of your work on the wheel the following day to make that stage easier, however you will still need to check your work for lumps and bumps. Last but not least – check that your name is still clearly on the bottom of your work. Step Five – Bisque Firing When the work is completely dry it can go into the bisque kiln. The bisque kiln is fired to 1000°C. This process burns off the water in the clay as well as some of the chemically bound water. The structure of the clay is not altered that much at this temperature. Inside the bisque kiln, the work is stacked a little, small bowl inside a larger bowl and onto a heavy plate. Smaller items like decorations or drink coasters might get stacked several high. Consideration is paid to the weight of the stack and shape of the work. A bisque kiln can fire about one and a half times the amount of work that the glaze kiln can fire. The firing takes about 10 hours to complete the cycle and about two days to cool down. Once it has been emptied the work is placed in the glaze room ready for you to decorate! Step Six – Glazing Decorating your work with colour can be a lot of fun – and time consuming! There are three main options for surface treatment at this stage: Oxide Washes Underglazes Glazes Washes and underglazes do not “glaze” the work – It will still need a layer of glaze to fully seal the clay (washes don’t need glaze on surfaces not designed for food or liquid as they can gloss up a little on their own). Underglazes are stable colourants that turn out pretty much how they look in the jar. They can be mixed with each other to form other colours and can be used like water colours to paint onto your work. Mostly they should have a clear glaze on top to seal them. Oxides are a different species – the pink oxide (cobalt) wash turns out bright blue for instance. They don’t always need a glaze on top, and some glazes can change the colour of the wash! The glazes need no other “glaze” on top! Be careful of unknown glaze interactions – you can put any combination of glaze in a bowl or on a plate, but only a single glaze on the outside of any vertical surface! Glazes are a chemical reaction under heat. We don’t know the exact chemicals in the Mayco glazes we use. I can guess by the way they interact with each other, however, on the whole, you need to test every idea you have, and not run the test on a vertical surface! Simply put, glaze is a layer of glass like substance that bonds with the clay underneath. Clay is made of silica, alumina and water. Glaze is made of mostly silica. Silica has a melting point of 1700°C and we fire to 1240°C. The silica requires a “flux” to help it melt at the lower temperature. Fluxes can be all sorts of chemicals – a common one is calcium – calcium has a melting point of 2500°C, however, together they both melt at a much lower temperature! Colourants are metal oxides like cobalt (blue), chrome (green through black), copper (green, blue, even red!), manganese (black, purple and pink) iron (red brown), etc. Different chemicals in the glaze can have dramatic effects. for example, barium carbonate (which we don’t use) turns manganese bright pink! Other elements can turn manganese dioxide brown, blue, purple and reddish brown. Manganese dioxide is a flux in and of itself as well. So, glazes that get their black and purple colours, often interact with other glazes and RUN! Our mirror black is a good example – it mixes really well with many glazes because it fluxes them – causes them to melt faster. It will also bring out many beautiful colours in the glazes because it’s black colouring most definitely comes from manganese dioxide! Glaze chemistry is a whole subject on it’s own! We use commercial Mayco glazes on purpose – for their huge range of colour possibilities, stability, cool interactions, artistic freedom with the ability to easily brush the glazes on and ease of use. We currently have almost 50 glazes on hand! A major project is to test the interactions of all glazes with each other. That is 2,500 test tiles!!!! I’m going to make the wall behind the wheels the feature wall of pretty colours! Step Seven – Glaze (Gloss or sometimes called “Glost”) Firing Most of the time this is the final stage of making your creation (but not always!) The glaze kiln goes to 1240°C. This is called cone 6, or midrange. It is the low end of stoneware temperatures. Stoneware clays and glazes are typically fired at cone 8 – 10, that is 1260 – 1290°C. The energy requirement to go from 1240°C to 1280°C is almost a 30% more! Our clay is formulated to vitrify (mature, turn “glass-like”) at 1240°, as are our glazes. A glaze kiln take around 12 hours to reach temperature and two to three days to cool down. Sometimes a third firing process is required – this is for decoration that is added to work after the glaze firing. For example – adding precious metals and lustres. this firing temperature is usually around 600 – 800°C depending upon the techniques being used. There are many students interested in gold and silver trims – we will be doing this third type of firing soon! After firing your work will be in the student finished work shelves. Remember to pay for it before you head out the door! There is a small extra charge for using porcelain clay (it’s more than twice the price of regular clay), and for any third firing process! Once your work has been fired it can not turn back into clay for millennia – so don’t fire it if you don’t like it! Put it in the bucket for recycling. https://firebirdstudios.com.au/the-process-of-making-pottery/Ceramics have evolved over thousands of years.Earthenware dessert plate, cream colour. Made by Alfred Meakin, England. Backstamped ‘Alfred Meakin England’. flagstaff hill, warrnambool, shipwrecked-coast, flagstaff-hill, flagstaff-hill-maritime-museum, maritime-museum, shipwreck-coast, flagstaff-hill-maritime-village, alfred meakin, ceramics, earthenware, kitchenware -
 Flagstaff Hill Maritime Museum and Village
Domestic object - Jug
The Process of Making Pottery Decorating, Firing, Glazing, Making, Technical There is a rhythm and flow to clay. It can’t be done all at once! Even the making process! It can take weeks to get everything done, especially if you can only work on your pottery once a week! Even though we have three hour classes, it’s often just not enough time! Here is an overview of some of the processes so you have a bit more grasp on some of the technical stuff! Step One – Design There are SO many ideas out there for making stuff in clay! From delicate porcelain jewellery, through to heavy sculptural work and everything in between. Deciding your direction is sometimes not that easy – when you first start, try everything, you will naturally gravitate to the style that you enjoy! The options and variations are endless and can get a wee bit overwhelming too! Check in with me before you start to ensure your ideas will work, what order you might do things, how you could achieve the look you are seeking and any other technical data required! Step Two – Making Clay is thixotropic. This means that as you work with it, the clay first gets sloppier and wetter, before is begins to dry in the atmosphere. For most things, you simply can’t do all parts of the project at once. An example of work order might look like: Get last weeks work out from the shelves Prepare clay for today’s work – roll your clay, prepare balls for throwing, make the first stage of a pinch pot) Clean up last week’s work and put it on the shelf for bisque firing Check that you have any glazing to do – and do enough of it that you will have time to finish your main project Do the next step of your next project – there might be a further step that can’t be complete immediately, in that case, wrap your work well and put onto the shelves. Letting your work rest for a while can really help keep your work clean and professional looking. Many things require bagging under plastic to keep it ready for work the next week – put your name on the outside of the bag so you can find your work easily. We have stickers and markers. Consider how you want to decorate your work – coloured slip can be applied at a fairly wet stage (remembering that it will make your work even wetter!). Trying to apply slip to dry clay won’t work! If you want to do sgraffito – you will need to keep the work leather hard (a state of dryness where you can still work the clay with a little effort and a little water and care). Step Three – Drying Most of the time your work can go into the rack uncovered to let it dry out for the following week. If you want to continue forming or shaping you will need to double bag your work – put your work on a suitable sized bat and put the bat in a bag so the base of the bag is under the bat, then put another bag over the top of the work and tuck the top of the bag under the bat. If you want to trim (or turn) your thrown work the following week, it should also be double bagged. If your work is large, delicate, or of uneven thicknesses, you should lightly cover your work for drying. When considering the drying process, bare in mind the weather, humidity and wind! The hotter and dryer, the faster things dry and work can dry unevenly in the shelves – this can lead to cracking – another time to lightly cover your work for drying. Step Four – Trimming and Cleaning Up Your work is dry! It is called greenware now and it is at it’s most fragile! Handle everything with two hands. I often refer to soft hands – keep everything gentle and with your fingers spread as much as possible. Try to not pick up things like plates too much, and always with both hands! Before your work can be bisque fired it should be “cleaned up”. You work won’t go into the kiln if it has sharp edges – when glazed, sharp edges turn into razor blades! Use a piece of fly wire to rub the work all over – this will scratch a little so be light handed. Use a knife or metal kidney to scrape any areas that require a bit more dynamic treatment than the fly wire offers! Finally, a very light wipe over with a slightly damp sponge can help soften and soothe all of your edges and dags! Trimming thrown work: If you are planning to trim (or turn) your thrown work (and you should be), make sure you bag it well – your work should be leather hard to almost dry for easiest trimming. Use this step to finish the work completely – use a metal kidney to polish the surface, or a slightly damp sponge to give a freshly thrown look. Wipe the sponge around the rim after trimming, and check the inside of the pot for dags! Trimming slip cast work: Usually I will trim the rims of your work on the wheel the following day to make that stage easier, however you will still need to check your work for lumps and bumps. Last but not least – check that your name is still clearly on the bottom of your work. Step Five – Bisque Firing When the work is completely dry it can go into the bisque kiln. The bisque kiln is fired to 1000°C. This process burns off the water in the clay as well as some of the chemically bound water. The structure of the clay is not altered that much at this temperature. Inside the bisque kiln, the work is stacked a little, small bowl inside a larger bowl and onto a heavy plate. Smaller items like decorations or drink coasters might get stacked several high. Consideration is paid to the weight of the stack and shape of the work. A bisque kiln can fire about one and a half times the amount of work that the glaze kiln can fire. The firing takes about 10 hours to complete the cycle and about two days to cool down. Once it has been emptied the work is placed in the glaze room ready for you to decorate! Step Six – Glazing Decorating your work with colour can be a lot of fun – and time consuming! There are three main options for surface treatment at this stage: Oxide Washes Underglazes Glazes Washes and underglazes do not “glaze” the work – It will still need a layer of glaze to fully seal the clay (washes don’t need glaze on surfaces not designed for food or liquid as they can gloss up a little on their own). Underglazes are stable colourants that turn out pretty much how they look in the jar. They can be mixed with each other to form other colours and can be used like water colours to paint onto your work. Mostly they should have a clear glaze on top to seal them. Oxides are a different species – the pink oxide (cobalt) wash turns out bright blue for instance. They don’t always need a glaze on top, and some glazes can change the colour of the wash! The glazes need no other “glaze” on top! Be careful of unknown glaze interactions – you can put any combination of glaze in a bowl or on a plate, but only a single glaze on the outside of any vertical surface! Glazes are a chemical reaction under heat. We don’t know the exact chemicals in the Mayco glazes we use. I can guess by the way they interact with each other, however, on the whole, you need to test every idea you have, and not run the test on a vertical surface! Simply put, glaze is a layer of glass like substance that bonds with the clay underneath. Clay is made of silica, alumina and water. Glaze is made of mostly silica. Silica has a melting point of 1700°C and we fire to 1240°C. The silica requires a “flux” to help it melt at the lower temperature. Fluxes can be all sorts of chemicals – a common one is calcium – calcium has a melting point of 2500°C, however, together they both melt at a much lower temperature! Colourants are metal oxides like cobalt (blue), chrome (green through black), copper (green, blue, even red!), manganese (black, purple and pink) iron (red brown), etc. Different chemicals in the glaze can have dramatic effects. for example, barium carbonate (which we don’t use) turns manganese bright pink! Other elements can turn manganese dioxide brown, blue, purple and reddish brown. Manganese dioxide is a flux in and of itself as well. So, glazes that get their black and purple colours, often interact with other glazes and RUN! Our mirror black is a good example – it mixes really well with many glazes because it fluxes them – causes them to melt faster. It will also bring out many beautiful colours in the glazes because it’s black colouring most definitely comes from manganese dioxide! Glaze chemistry is a whole subject on it’s own! We use commercial Mayco glazes on purpose – for their huge range of colour possibilities, stability, cool interactions, artistic freedom with the ability to easily brush the glazes on and ease of use. We currently have almost 50 glazes on hand! A major project is to test the interactions of all glazes with each other. That is 2,500 test tiles!!!! I’m going to make the wall behind the wheels the feature wall of pretty colours! Step Seven – Glaze (Gloss or sometimes called “Glost”) Firing Most of the time this is the final stage of making your creation (but not always!) The glaze kiln goes to 1240°C. This is called cone 6, or midrange. It is the low end of stoneware temperatures. Stoneware clays and glazes are typically fired at cone 8 – 10, that is 1260 – 1290°C. The energy requirement to go from 1240°C to 1280°C is almost a 30% more! Our clay is formulated to vitrify (mature, turn “glass-like”) at 1240°, as are our glazes. A glaze kiln take around 12 hours to reach temperature and two to three days to cool down. Sometimes a third firing process is required – this is for decoration that is added to work after the glaze firing. For example – adding precious metals and lustres. this firing temperature is usually around 600 – 800°C depending upon the techniques being used. There are many students interested in gold and silver trims – we will be doing this third type of firing soon! After firing your work will be in the student finished work shelves. Remember to pay for it before you head out the door! There is a small extra charge for using porcelain clay (it’s more than twice the price of regular clay), and for any third firing process! Once your work has been fired it can not turn back into clay for millennia – so don’t fire it if you don’t like it! Put it in the bucket for recycling. https://firebirdstudios.com.au/the-process-of-making-pottery/The form of the jug has been in use for many centuries.Stoneware jug. Two tone brown glaze with pierced lip behind spout. Spout chipped.None.flagstaff hill, warrnambool, shipwrecked-coast, flagstaff-hill, flagstaff-hill-maritime-museum, maritime-museum, shipwreck-coast, flagstaff-hill-maritime-village, jug, ceramic jug -
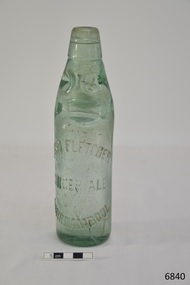 Flagstaff Hill Maritime Museum and Village
Container - Bottle, c. 1905
... drinks such as ginger ale, soda water and fruit drinks. Hiram... the fizz in carbonated drinks such as ginger ale, soda water ...This bottle once contained John Fletcher’s ginger cordial. It was found in August 2014 in the sand dunes at Levy's Point, near McKinnon's quarry, Warrnambool. ABOUT JOHN FLETCHER of WARRNAMBOOL John Fletcher Cordial (or Beverage) Co . Warrnambool, supplied cordial and aerated drinks to the Western district of Victoria. John Fletcher was named as a cordial manufacturer in the Warrnambool Standard of June 13th 1895, when he attended a Publican’s Association meeting. Mr John Fletcher, aerated water and cordial manufacturer of Koroit Street Warrnambool, had a summary of his factory printed in a short article in the Advocate, Melbourne, in February 1901. The article said “one of the most complete plants outside the metropolis … spacious … well appointed …old-established business … noted for the excellence of the quality … a trial [of the beverage] is solicited.” John Fletcher and Harold Caffin, trading as J.S. Rowley & co cordial manufacturers in 1903; were prosecuted in September 1903 when the Board of Health found an analysed sample of Raspberry Vinegar to contain coal tar colouring, which could be injurious to health, particularly to the kidneys. The factory was still in operation in December 1924, when sadly, Mr S. Fletcher, who was carrying bottles of aerated water at Mr John Fletcher’s cordial factory, sustained an eye injury when one of the bottles burst. Later the eye had to be removed at the Warrnambool Base Hospital. ABOUT CODD BOTTLES During the mid-to-late 1800s there were many inventions to keep the fizz in carbonated drinks such as ginger ale, soda water and fruit drinks. Hiram Codd, an English engineer invented a successful process that he patented as “Codd’s patented globe stopper bottle” in 1872. The Codd-neck bottle (commonly called Codd or marble bottle) is manufactured in two parts. The body of the bottle is cast in two sections. At the time of joining the sections a glass marble and rubber seal are inserted into the neck section. The lip is then applied to the top of the bottle. The Codd bottle is filled upside down as the pressure of the gas from the carbonated liquid holds the marble up and out of the way. When the bottle stands upright the gas pushes the marble up against the washer, creating a firm seal to keep the fizz inside. The bottle is opened by pushing the marble down firmly to allow some of the gas to escape. The marble drops down and is caught in a depression formed in the neck. When the bottle is tilted to pour or drink the liquid the marble rests in a dimple. Some have said that the bottle as a character, the shape having a face with its mouth keeping the marble out of the drink and eyes that catch the marble so that it doesn’t roll into the mouth of the drinker. The Codd bottle was expensive to produce and children loved to destroy the marbles to play with the marbles inside. Many shops and factories added a deposit to the cost of buying the drink to encourage children to return the bottles rather than break it for the marble. Codd bottles are still being produced in India and Japan for soft drinks. A Codd bottle with the same markings as this one is valued on today’s Australian auction sites from $35 - $75 AUD. Bottle, aqua/green glass, with glass marble inside. John Fletcher's Ginger Ale, Warrnambool. Container is often called a "Codd neck bottle", “marble bottle” or “Codd’s patent bottle”. Bottle made by Dobson. Inscription on bottle and base. c. 1905Marks moulded into glass; "JOHN FLETCHER / GINGER ALE / WARRNAMBOOL" and “DOBSON” and on base “G”. flagstaff hill, warrnambool, shipwrecked coast, flagstaff hill maritime museum, maritime museum, shipwreck coast, flagstaff hill maritime village, great ocean road, codd bottle, codd neck bottle, marble bottle, ginger beer bottle, john fletcher soft drinks, warrnambool soft drinks and cordials, john fletcher cordial (or beverage) co ., codd neck bottle, glass stopper bottle, hiram codd, antique bottle, harold caffin, john fletcher -
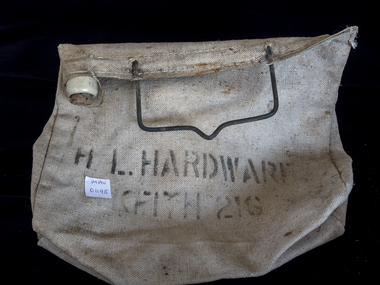 City of Moorabbin Historical Society (Operating the Box Cottage Museum)
Personal Effects, canvas water bag, 20thC
... . The water bag like this was the source of drinking water for market ...The Water supply in Moorabbin Shire was from streams - Elster Creek - and wells so that all people , -settlers, market gardeners, and travellers - needed to take a container with them when they were away from the household.. The Canvas water bag was convenient, easy to make and could be hung on a tree branch or carried on the horse, wagon, plough or later on the bumper bar of a car or truck. The canvas water bag allowed any wind or airflow to cool down the water, even on very hot days, 21G could be 21Gills = 5pints= 2Quarts = 1/2 Gallon approx. and suitable for a day working in the field = 4 Litres similar to a mineral water bottle today.The water bag like this was the source of drinking water for market gardeners in Moorabbin Shire either when working in the fields or .travelling to the markets with their wagons loaded with produce.A canvas water bag, with an iron handle and plastic or bakelite drinking spout.H.L. HARDWARE / ...KFITH 21G, water bags, elster creek, horse drawn wagons, early settlers, market gardeners, cooking utensils, castiron cooking pots, blacksmiths, moorabbin shire, bentleigh, mckinnon, highett, cheltenham, melbourne, -
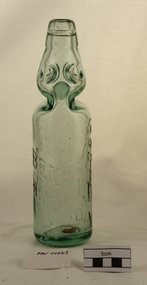 City of Moorabbin Historical Society (Operating the Box Cottage Museum)
Container - Manufactured glass, Codd bottle, c1888
... england carbonated water soft drink mineral water bennetts ...The Codd Bottle was first invented by English manufacturer, Hiram Codd at Barnsley in 1870. The groove inside the top of the bottle held a rubber ring. A small glass balll was held against this ring by the pressure of the 'pop' or 'fizzy' carbonated drink inside the bottle. This style of bottle was widely manufactured and used in the production of mineral waters and lemonade. The glass has a slight green tint, known as aqua glass, and is what the Victorian era produced as 'clear glass'This glass Codd bottle with glass ball and partial rubber ring was probably imported from England by Bennetts Pty. Ltd of Richmond, Victoria for their Lemonade and sold as refreshment to early settlers of Moorabbin Shire c1880A slightly green tinted, glass bottle with a groove inside the top which held a rubber ring, against which, the small glass ball inside the bottle was held by the pressure of the 'fizzy' drink inside.BENNETTS / LEMONADE diagonally across bottlecodd hiram, glass manufacture, glass bottles, moorabbin, brighton, barnsley england, carbonated water, soft drink, mineral water, bennetts lemonade maker, richmond, early settlers, market gardeners, melbourne -
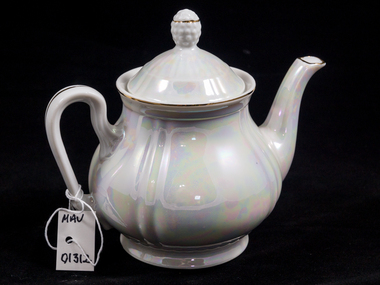 City of Moorabbin Historical Society (Operating the Box Cottage Museum)
Kitchen Equuipment, Teapot 20thC, 20thC
Teaspoons of Loose Leaf Tea are placed in the china or earrthenware teapot then boiling water is added with the lid replaced an infusion occurs. Holding the handle the hot drink is poured from the spout through a strainer into a cup, mug or pannekin and milk, sugar or lemon may be added This drink was very popular with early settlers in Moorabbin Shire. The Temperance Society built a Tea Palace in Mentone - now Kilbreda College. The tea leaf was imported from Sri Lanka (Ceylon) and stored in tall silos in Melbourne where it was packaged and delivered to grocery stores.The early settlers in Moorabbin Shire enjoyed a well brewed pot of tea several times during the day.An opaque white china teapottea leaf, teapot, china crockery, earthenware, tea palaces, mentone, bentleigh, moorabbin shire, cheltenham, ceylon, temperance society, billy tea,