Showing 224 items matching "four weeks"
-
 Eltham District Historical Society Inc
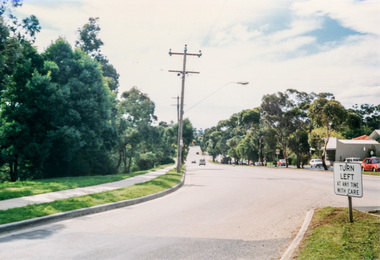
Photograph, Looking north along Bridge Street, Eltham from Main Road; 15 April 1989, 15/04/1989
[from EDHS Newsletter No. 65, March, 1989:] ELTHAM HERITAGE WALK The Society's contribution to Heritage Week this year will be a guided walk around Eltham featuring a number of buildings and locations of historical and environmental interest. Three dates are listed as official Heritage Week events, Sundays 16th and 23rd April and Saturday 22nd. In addition, there will be a walk on Saturday 15th for Society Members. All walks will start at 1:00 p.m. in Panther Place near Shillinglaw Cottage. Each will take about four hours and the distance is about 5km. Old photos of locations visited will be available for viewing.Colour photographactivities, bridge street, eltham, heritage excursion, main road -
 Eltham District Historical Society Inc
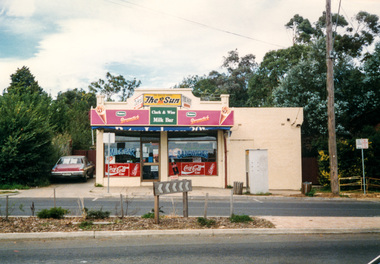
Photograph, Clark and Wise, Milk Bar, former Burgoyne shop, 820 Main Road, Eltham; 15 April 1989, 15/04/1989
[from EDHS Newsletter No. 65, March, 1989:] ELTHAM HERITAGE WALK The Society's contribution to Heritage Week this year will be a guided walk around Eltham featuring a number of buildings and locations of historical and environmental interest. Three dates are listed as official Heritage Week events, Sundays 16th and 23rd April and Saturday 22nd. In addition, there will be a walk on Saturday 15th for Society Members. All walks will start at 1:00 p.m. in Panther Place near Shillinglaw Cottage. Each will take about four hours and the distance is about 5km. Old photos of locations visited will be available for viewing.Colour photographactivities, heritage excursion, main road, burgoyne store, milk bar, shops -
 Eltham District Historical Society Inc
Photograph, Former CBA bank, 810 Main Road, Eltham near John Street; 15 April 1989, 15/04/1989
[from EDHS Newsletter No. 65, March, 1989:] ELTHAM HERITAGE WALK The Society's contribution to Heritage Week this year will be a guided walk around Eltham featuring a number of buildings and locations of historical and environmental interest. Three dates are listed as official Heritage Week events, Sundays 16th and 23rd April and Saturday 22nd. In addition, there will be a walk on Saturday 15th for Society Members. All walks will start at 1:00 p.m. in Panther Place near Shillinglaw Cottage. Each will take about four hours and the distance is about 5km. Old photos of locations visited will be available for viewing.Colour photographactivities, heritage excursion, main road, eltham, john street, cba bank -
 Eltham District Historical Society Inc
Photograph, Uniting Church, cnr Main Road and John Street, Eltham; 15 April 1989, 15/04/1989
[from EDHS Newsletter No. 65, March, 1989:] ELTHAM HERITAGE WALK The Society's contribution to Heritage Week this year will be a guided walk around Eltham featuring a number of buildings and locations of historical and environmental interest. Three dates are listed as official Heritage Week events, Sundays 16th and 23rd April and Saturday 22nd. In addition, there will be a walk on Saturday 15th for Society Members. All walks will start at 1:00 p.m. in Panther Place near Shillinglaw Cottage. Each will take about four hours and the distance is about 5km. Old photos of locations visited will be available for viewing.Colour photographactivities, heritage excursion, main road, eltham, john street, uniting church -
 Eltham District Historical Society Inc
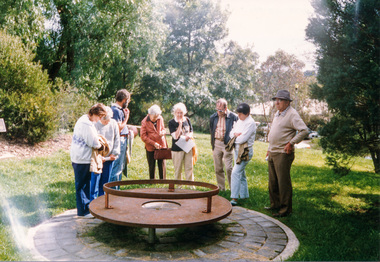
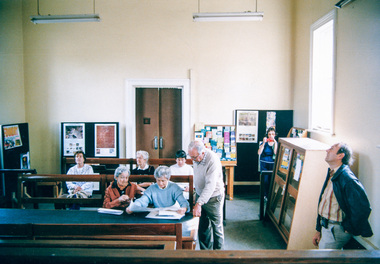
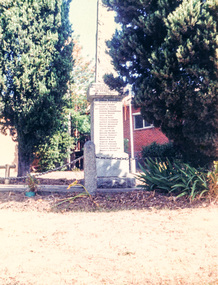
Photograph, Monument and Time Capsule, Eltham Community Centre, cnr Main Road and Pitt Street, Eltham; 15 April 1989, 15/04/1989
L-R: Phyllis McDonald, Dolly Smith, Russell Yeoman, Joyce McMahon, Opal Smith, Brian Smith, Lu Robertson, Jack Shallard [from EDHS Newsletter No. 65, March, 1989:] ELTHAM HERITAGE WALK The Society's contribution to Heritage Week this year will be a guided walk around Eltham featuring a number of buildings and locations of historical and environmental interest. Three dates are listed as official Heritage Week events, Sundays 16th and 23rd April and Saturday 22nd. In addition, there will be a walk on Saturday 15th for Society Members. All walks will start at 1:00 p.m. in Panther Place near Shillinglaw Cottage. Each will take about four hours and the distance is about 5km. Old photos of locations visited will be available for viewing.Colour photographheritage excursion, main road, eltham, 150th anniversary monument, 20th anniversary, activities, eltham community centre, pitt street, plaques, time capsule -
 Eltham District Historical Society Inc
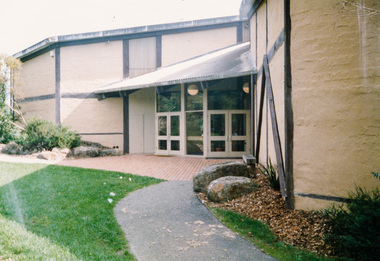
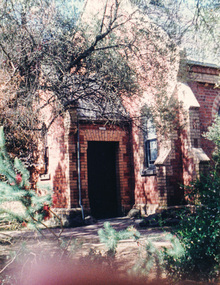
Photograph, Eltham Community Centre; 15 April 1989, 15/04/1989
[from EDHS Newsletter No. 65, March, 1989:] ELTHAM HERITAGE WALK The Society's contribution to Heritage Week this year will be a guided walk around Eltham featuring a number of buildings and locations of historical and environmental interest. Three dates are listed as official Heritage Week events, Sundays 16th and 23rd April and Saturday 22nd. In addition, there will be a walk on Saturday 15th for Society Members. All walks will start at 1:00 p.m. in Panther Place near Shillinglaw Cottage. Each will take about four hours and the distance is about 5km. Old photos of locations visited will be available for viewing.Colour photographheritage excursion, activities, eltham community centre -
 Eltham District Historical Society Inc
Photograph, Eltham Hotel, cnr Main Road and Pitt Street; 15 April 1989, 15/04/1989
[from EDHS Newsletter No. 65, March, 1989:] ELTHAM HERITAGE WALK The Society's contribution to Heritage Week this year will be a guided walk around Eltham featuring a number of buildings and locations of historical and environmental interest. Three dates are listed as official Heritage Week events, Sundays 16th and 23rd April and Saturday 22nd. In addition, there will be a walk on Saturday 15th for Society Members. All walks will start at 1:00 p.m. in Panther Place near Shillinglaw Cottage. Each will take about four hours and the distance is about 5km. Old photos of locations visited will be available for viewing.Colour photographheritage excursion, activities, main road, eltham hotel -
 Eltham District Historical Society Inc
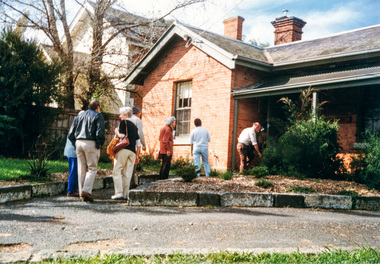
Photograph, Former Police Residence, 728 Main Road, Eltham; 15 April 1989, 15/04/1989
[from EDHS Newsletter No. 65, March, 1989:] ELTHAM HERITAGE WALK The Society's contribution to Heritage Week this year will be a guided walk around Eltham featuring a number of buildings and locations of historical and environmental interest. Three dates are listed as official Heritage Week events, Sundays 16th and 23rd April and Saturday 22nd. In addition, there will be a walk on Saturday 15th for Society Members. All walks will start at 1:00 p.m. in Panther Place near Shillinglaw Cottage. Each will take about four hours and the distance is about 5km. Old photos of locations visited will be available for viewing.Colour photographheritage excursion, activities, main road, police residence -
 Eltham District Historical Society Inc
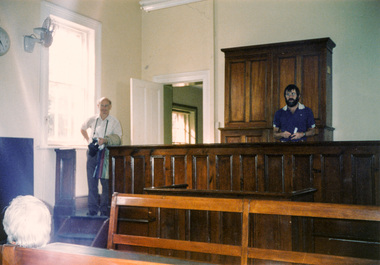
Photograph, Eltham Courthouse, 730 Main Road, Eltham; 15 April 1989, 15/04/1989
L-R: Doug Orford, Russell Yeoman [from EDHS Newsletter No. 65, March, 1989:] ELTHAM HERITAGE WALK The Society's contribution to Heritage Week this year will be a guided walk around Eltham featuring a number of buildings and locations of historical and environmental interest. Three dates are listed as official Heritage Week events, Sundays 16th and 23rd April and Saturday 22nd. In addition, there will be a walk on Saturday 15th for Society Members. All walks will start at 1:00 p.m. in Panther Place near Shillinglaw Cottage. Each will take about four hours and the distance is about 5km. Old photos of locations visited will be available for viewing.Colour photographheritage excursion, activities, doug orford, russell yeoman, eltham courthouse -
 Eltham District Historical Society Inc
Photograph, Eltham Courthouse, 730 Main Road, Eltham; 15 April 1989, 15/04/1989
[from EDHS Newsletter No. 65, March, 1989:] ELTHAM HERITAGE WALK The Society's contribution to Heritage Week this year will be a guided walk around Eltham featuring a number of buildings and locations of historical and environmental interest. Three dates are listed as official Heritage Week events, Sundays 16th and 23rd April and Saturday 22nd. In addition, there will be a walk on Saturday 15th for Society Members. All walks will start at 1:00 p.m. in Panther Place near Shillinglaw Cottage. Each will take about four hours and the distance is about 5km. Old photos of locations visited will be available for viewing.Colour photographheritage excursion, activities, eltham courthouse, opal smith, sue law -
 Eltham District Historical Society Inc
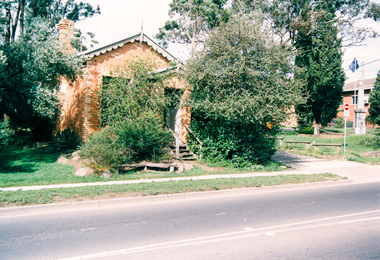
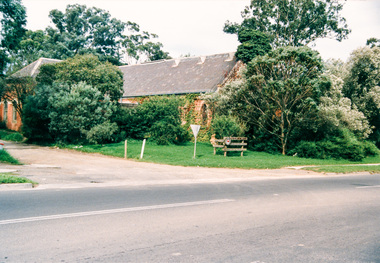
Photograph, Jarrold Cottage, Main Road, Eltham, opposite Dalton Street; 15 April 1989, 15/04/1989
[from EDHS Newsletter No. 65, March, 1989:] ELTHAM HERITAGE WALK The Society's contribution to Heritage Week this year will be a guided walk around Eltham featuring a number of buildings and locations of historical and environmental interest. Three dates are listed as official Heritage Week events, Sundays 16th and 23rd April and Saturday 22nd. In addition, there will be a walk on Saturday 15th for Society Members. All walks will start at 1:00 p.m. in Panther Place near Shillinglaw Cottage. Each will take about four hours and the distance is about 5km. Old photos of locations visited will be available for viewing.Colour photographheritage excursion, activities, eltham, jarrold cottage, main road -
 Eltham District Historical Society Inc
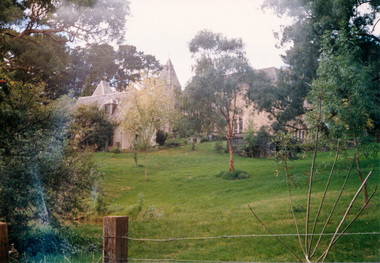
Photograph, Montsalvat; 15 April 1989, 15/04/1989
[from EDHS Newsletter No. 65, March, 1989:] ELTHAM HERITAGE WALK The Society's contribution to Heritage Week this year will be a guided walk around Eltham featuring a number of buildings and locations of historical and environmental interest. Three dates are listed as official Heritage Week events, Sundays 16th and 23rd April and Saturday 22nd. In addition, there will be a walk on Saturday 15th for Society Members. All walks will start at 1:00 p.m. in Panther Place near Shillinglaw Cottage. Each will take about four hours and the distance is about 5km. Old photos of locations visited will be available for viewing.Colour photographheritage excursion, activities, montsalvat -
 Eltham District Historical Society Inc
Photograph, War Memorial at front of Eltham RSL, Main Road, Eltham, April 1989, 1989
[from EDHS Newsletter No. 65, March, 1989:] ELTHAM HERITAGE WALK The Society's contribution to Heritage Week this year will be a guided walk around Eltham featuring a number of buildings and locations of historical and environmental interest. Three dates are listed as official Heritage Week events, Sundays 16th and 23rd April and Saturday 22nd. In addition, there will be a walk on Saturday 15th for Society Members. All walks will start at 1:00 p.m. in Panther Place near Shillinglaw Cottage. Each will take about four hours and the distance is about 5km. Old photos of locations visited will be available for viewing.Colour photographeltham rsl sub-branch, main road -
 Eltham District Historical Society Inc
Photograph, Uniting Church, cnr Main Road and John Street, Eltham, April 1989, 1989
[from EDHS Newsletter No. 65, March, 1989:] ELTHAM HERITAGE WALK The Society's contribution to Heritage Week this year will be a guided walk around Eltham featuring a number of buildings and locations of historical and environmental interest. Three dates are listed as official Heritage Week events, Sundays 16th and 23rd April and Saturday 22nd. In addition, there will be a walk on Saturday 15th for Society Members. All walks will start at 1:00 p.m. in Panther Place near Shillinglaw Cottage. Each will take about four hours and the distance is about 5km. Old photos of locations visited will be available for viewing.Colour photographjohn street, main road, uniting church -
 Learmonth and District Historical Society Inc.
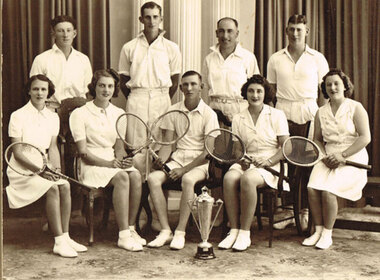
Photo - Learmonth, Learmonth Tennis Team Winners 1941, 1941
Written in the Melbourne "ARGUS" newspaper on the 17th February 1941 under "COUNTRY SPORTS - TENNIS". In the B Grade contests for the Norman Grills Cup Learmonth No. 2 (E. Blain, J. Blain), W. McIntyre, L. Hucker, The Misses M. Ryan, D. Grills, J. Thomas and D. Dean d. Garibaldi. These players were all from the Learmonth and Weatherboard districts.A sepia photo on cardboard backing 12 x 9 1/2 inches. The photo itself is 7 1/2 x 5 3/4 inches in a landscape shape. There are 5 men and four women tennis players, all holding tennis rackets with a Premiership Cup at their feet.Learmonth No. 2 Country Week Tennis Team. Winners Season 1941. Names L-R Back row. L. Hucker (Vic, Capt.), W. McIntyre (Weatherboard), L. Rasdell, E. Blain. L-R Front row. Miss D. Dean (Mrs Toleman), Miss J. Thomas (Mrs Lyttle. Weatherboard), J. Blain (Capt.), Miss D. Grills (Mrs David Baird), Miss M. Ryan (Mrs Harrison. Weatherboard). Photographer - Thornton, Richards & Co, Ballarat.learmonth. tennis team, 1941, hucker, mcintyre, rasdell. blain, dean, thomas, grills, ryan -
 Flagstaff Hill Maritime Museum and Village
Domestic object - Bowl, Late 19th or early 20th Century
The Process of Making Pottery Decorating, Firing, Glazing, Making, Technical There is a rhythm and flow to clay. It can’t be done all at once! Even the making process! It can take weeks to get everything done, especially if you can only work on your pottery once a week! Even though we have three hour classes, it’s often just not enough time! Here is an overview of some of the processes so you have a bit more grasp on some of the technical stuff! Step One – Design There are SO many ideas out there for making stuff in clay! From delicate porcelain jewellery, through to heavy sculptural work and everything in between. Deciding your direction is sometimes not that easy – when you first start, try everything, you will naturally gravitate to the style that you enjoy! The options and variations are endless and can get a wee bit overwhelming too! Check in with me before you start to ensure your ideas will work, what order you might do things, how you could achieve the look you are seeking and any other technical data required! Step Two – Making Clay is thixotropic. This means that as you work with it, the clay first gets sloppier and wetter, before is begins to dry in the atmosphere. For most things, you simply can’t do all parts of the project at once. An example of work order might look like: Get last weeks work out from the shelves Prepare clay for today’s work – roll your clay, prepare balls for throwing, make the first stage of a pinch pot) Clean up last week’s work and put it on the shelf for bisque firing Check that you have any glazing to do – and do enough of it that you will have time to finish your main project Do the next step of your next project – there might be a further step that can’t be complete immediately, in that case, wrap your work well and put onto the shelves. Letting your work rest for a while can really help keep your work clean and professional looking. Many things require bagging under plastic to keep it ready for work the next week – put your name on the outside of the bag so you can find your work easily. We have stickers and markers. Consider how you want to decorate your work – coloured slip can be applied at a fairly wet stage (remembering that it will make your work even wetter!). Trying to apply slip to dry clay won’t work! If you want to do sgraffito – you will need to keep the work leather hard (a state of dryness where you can still work the clay with a little effort and a little water and care). Step Three – Drying Most of the time your work can go into the rack uncovered to let it dry out for the following week. If you want to continue forming or shaping you will need to double bag your work – put your work on a suitable sized bat and put the bat in a bag so the base of the bag is under the bat, then put another bag over the top of the work and tuck the top of the bag under the bat. If you want to trim (or turn) your thrown work the following week, it should also be double bagged. If your work is large, delicate, or of uneven thicknesses, you should lightly cover your work for drying. When considering the drying process, bare in mind the weather, humidity and wind! The hotter and dryer, the faster things dry and work can dry unevenly in the shelves – this can lead to cracking – another time to lightly cover your work for drying. Step Four – Trimming and Cleaning Up Your work is dry! It is called greenware now and it is at it’s most fragile! Handle everything with two hands. I often refer to soft hands – keep everything gentle and with your fingers spread as much as possible. Try to not pick up things like plates too much, and always with both hands! Before your work can be bisque fired it should be “cleaned up”. You work won’t go into the kiln if it has sharp edges – when glazed, sharp edges turn into razor blades! Use a piece of fly wire to rub the work all over – this will scratch a little so be light handed. Use a knife or metal kidney to scrape any areas that require a bit more dynamic treatment than the fly wire offers! Finally, a very light wipe over with a slightly damp sponge can help soften and soothe all of your edges and dags! Trimming thrown work: If you are planning to trim (or turn) your thrown work (and you should be), make sure you bag it well – your work should be leather hard to almost dry for easiest trimming. Use this step to finish the work completely – use a metal kidney to polish the surface, or a slightly damp sponge to give a freshly thrown look. Wipe the sponge around the rim after trimming, and check the inside of the pot for dags! Trimming slip cast work: Usually I will trim the rims of your work on the wheel the following day to make that stage easier, however you will still need to check your work for lumps and bumps. Last but not least – check that your name is still clearly on the bottom of your work. Step Five – Bisque Firing When the work is completely dry it can go into the bisque kiln. The bisque kiln is fired to 1000°C. This process burns off the water in the clay as well as some of the chemically bound water. The structure of the clay is not altered that much at this temperature. Inside the bisque kiln, the work is stacked a little, small bowl inside a larger bowl and onto a heavy plate. Smaller items like decorations or drink coasters might get stacked several high. Consideration is paid to the weight of the stack and shape of the work. A bisque kiln can fire about one and a half times the amount of work that the glaze kiln can fire. The firing takes about 10 hours to complete the cycle and about two days to cool down. Once it has been emptied the work is placed in the glaze room ready for you to decorate! Step Six – Glazing Decorating your work with colour can be a lot of fun – and time consuming! There are three main options for surface treatment at this stage: Oxide Washes Underglazes Glazes Washes and underglazes do not “glaze” the work – It will still need a layer of glaze to fully seal the clay (washes don’t need glaze on surfaces not designed for food or liquid as they can gloss up a little on their own). Underglazes are stable colourants that turn out pretty much how they look in the jar. They can be mixed with each other to form other colours and can be used like water colours to paint onto your work. Mostly they should have a clear glaze on top to seal them. Oxides are a different species – the pink oxide (cobalt) wash turns out bright blue for instance. They don’t always need a glaze on top, and some glazes can change the colour of the wash! The glazes need no other “glaze” on top! Be careful of unknown glaze interactions – you can put any combination of glaze in a bowl or on a plate, but only a single glaze on the outside of any vertical surface! Glazes are a chemical reaction under heat. We don’t know the exact chemicals in the Mayco glazes we use. I can guess by the way they interact with each other, however, on the whole, you need to test every idea you have, and not run the test on a vertical surface! Simply put, glaze is a layer of glass like substance that bonds with the clay underneath. Clay is made of silica, alumina and water. Glaze is made of mostly silica. Silica has a melting point of 1700°C and we fire to 1240°C. The silica requires a “flux” to help it melt at the lower temperature. Fluxes can be all sorts of chemicals – a common one is calcium – calcium has a melting point of 2500°C, however, together they both melt at a much lower temperature! Colourants are metal oxides like cobalt (blue), chrome (green through black), copper (green, blue, even red!), manganese (black, purple and pink) iron (red brown), etc. Different chemicals in the glaze can have dramatic effects. for example, barium carbonate (which we don’t use) turns manganese bright pink! Other elements can turn manganese dioxide brown, blue, purple and reddish brown. Manganese dioxide is a flux in and of itself as well. So, glazes that get their black and purple colours, often interact with other glazes and RUN! Our mirror black is a good example – it mixes really well with many glazes because it fluxes them – causes them to melt faster. It will also bring out many beautiful colours in the glazes because it’s black colouring most definitely comes from manganese dioxide! Glaze chemistry is a whole subject on it’s own! We use commercial Mayco glazes on purpose – for their huge range of colour possibilities, stability, cool interactions, artistic freedom with the ability to easily brush the glazes on and ease of use. We currently have almost 50 glazes on hand! A major project is to test the interactions of all glazes with each other. That is 2,500 test tiles!!!! I’m going to make the wall behind the wheels the feature wall of pretty colours! Step Seven – Glaze (Gloss or sometimes called “Glost”) Firing Most of the time this is the final stage of making your creation (but not always!) The glaze kiln goes to 1240°C. This is called cone 6, or midrange. It is the low end of stoneware temperatures. Stoneware clays and glazes are typically fired at cone 8 – 10, that is 1260 – 1290°C. The energy requirement to go from 1240°C to 1280°C is almost a 30% more! Our clay is formulated to vitrify (mature, turn “glass-like”) at 1240°, as are our glazes. A glaze kiln take around 12 hours to reach temperature and two to three days to cool down. Sometimes a third firing process is required – this is for decoration that is added to work after the glaze firing. For example – adding precious metals and lustres. this firing temperature is usually around 600 – 800°C depending upon the techniques being used. There are many students interested in gold and silver trims – we will be doing this third type of firing soon! After firing your work will be in the student finished work shelves. Remember to pay for it before you head out the door! There is a small extra charge for using porcelain clay (it’s more than twice the price of regular clay), and for any third firing process! Once your work has been fired it can not turn back into clay for millennia – so don’t fire it if you don’t like it! Put it in the bucket for recycling. https://firebirdstudios.com.au/the-process-of-making-pottery/ The bowl is an example of kitchenware used in the 19th century and still in use today.Bowl white ceramic. Crack on side. Badly stained.Backstamp very faint and unable to be read.flagstaff hill, warrnambool, shipwrecked-coast, flagstaff-hill, flagstaff-hill-maritime-museum, maritime-museum, shipwreck-coast, flagstaff-hill-maritime-village, mixing bowl, food preparation, kitchen equipment, ceramic -
 Flagstaff Hill Maritime Museum and Village
Domestic object - Bowl
The Process of Making Pottery Decorating, Firing, Glazing, Making, Technical There is a rhythm and flow to clay. It can’t be done all at once! Even the making process! It can take weeks to get everything done, especially if you can only work on your pottery once a week! Even though we have three hour classes, it’s often just not enough time! Here is an overview of some of the processes so you have a bit more grasp on some of the technical stuff! Step One – Design There are SO many ideas out there for making stuff in clay! From delicate porcelain jewellery, through to heavy sculptural work and everything in between. Deciding your direction is sometimes not that easy – when you first start, try everything, you will naturally gravitate to the style that you enjoy! The options and variations are endless and can get a wee bit overwhelming too! Check in with me before you start to ensure your ideas will work, what order you might do things, how you could achieve the look you are seeking and any other technical data required! Step Two – Making Clay is thixotropic. This means that as you work with it, the clay first gets sloppier and wetter, before is begins to dry in the atmosphere. For most things, you simply can’t do all parts of the project at once. An example of work order might look like: Get last weeks work out from the shelves Prepare clay for today’s work – roll your clay, prepare balls for throwing, make the first stage of a pinch pot) Clean up last week’s work and put it on the shelf for bisque firing Check that you have any glazing to do – and do enough of it that you will have time to finish your main project Do the next step of your next project – there might be a further step that can’t be complete immediately, in that case, wrap your work well and put onto the shelves. Letting your work rest for a while can really help keep your work clean and professional looking. Many things require bagging under plastic to keep it ready for work the next week – put your name on the outside of the bag so you can find your work easily. We have stickers and markers. Consider how you want to decorate your work – coloured slip can be applied at a fairly wet stage (remembering that it will make your work even wetter!). Trying to apply slip to dry clay won’t work! If you want to do sgraffito – you will need to keep the work leather hard (a state of dryness where you can still work the clay with a little effort and a little water and care). Step Three – Drying Most of the time your work can go into the rack uncovered to let it dry out for the following week. If you want to continue forming or shaping you will need to double bag your work – put your work on a suitable sized bat and put the bat in a bag so the base of the bag is under the bat, then put another bag over the top of the work and tuck the top of the bag under the bat. If you want to trim (or turn) your thrown work the following week, it should also be double bagged. If your work is large, delicate, or of uneven thicknesses, you should lightly cover your work for drying. When considering the drying process, bare in mind the weather, humidity and wind! The hotter and dryer, the faster things dry and work can dry unevenly in the shelves – this can lead to cracking – another time to lightly cover your work for drying. Step Four – Trimming and Cleaning Up Your work is dry! It is called greenware now and it is at it’s most fragile! Handle everything with two hands. I often refer to soft hands – keep everything gentle and with your fingers spread as much as possible. Try to not pick up things like plates too much, and always with both hands! Before your work can be bisque fired it should be “cleaned up”. You work won’t go into the kiln if it has sharp edges – when glazed, sharp edges turn into razor blades! Use a piece of fly wire to rub the work all over – this will scratch a little so be light handed. Use a knife or metal kidney to scrape any areas that require a bit more dynamic treatment than the fly wire offers! Finally, a very light wipe over with a slightly damp sponge can help soften and soothe all of your edges and dags! Trimming thrown work: If you are planning to trim (or turn) your thrown work (and you should be), make sure you bag it well – your work should be leather hard to almost dry for easiest trimming. Use this step to finish the work completely – use a metal kidney to polish the surface, or a slightly damp sponge to give a freshly thrown look. Wipe the sponge around the rim after trimming, and check the inside of the pot for dags! Trimming slip cast work: Usually I will trim the rims of your work on the wheel the following day to make that stage easier, however you will still need to check your work for lumps and bumps. Last but not least – check that your name is still clearly on the bottom of your work. Step Five – Bisque Firing When the work is completely dry it can go into the bisque kiln. The bisque kiln is fired to 1000°C. This process burns off the water in the clay as well as some of the chemically bound water. The structure of the clay is not altered that much at this temperature. Inside the bisque kiln, the work is stacked a little, small bowl inside a larger bowl and onto a heavy plate. Smaller items like decorations or drink coasters might get stacked several high. Consideration is paid to the weight of the stack and shape of the work. A bisque kiln can fire about one and a half times the amount of work that the glaze kiln can fire. The firing takes about 10 hours to complete the cycle and about two days to cool down. Once it has been emptied the work is placed in the glaze room ready for you to decorate! Step Six – Glazing Decorating your work with colour can be a lot of fun – and time consuming! There are three main options for surface treatment at this stage: Oxide Washes Underglazes Glazes Washes and underglazes do not “glaze” the work – It will still need a layer of glaze to fully seal the clay (washes don’t need glaze on surfaces not designed for food or liquid as they can gloss up a little on their own). Underglazes are stable colourants that turn out pretty much how they look in the jar. They can be mixed with each other to form other colours and can be used like water colours to paint onto your work. Mostly they should have a clear glaze on top to seal them. Oxides are a different species – the pink oxide (cobalt) wash turns out bright blue for instance. They don’t always need a glaze on top, and some glazes can change the colour of the wash! The glazes need no other “glaze” on top! Be careful of unknown glaze interactions – you can put any combination of glaze in a bowl or on a plate, but only a single glaze on the outside of any vertical surface! Glazes are a chemical reaction under heat. We don’t know the exact chemicals in the Mayco glazes we use. I can guess by the way they interact with each other, however, on the whole, you need to test every idea you have, and not run the test on a vertical surface! Simply put, glaze is a layer of glass like substance that bonds with the clay underneath. Clay is made of silica, alumina and water. Glaze is made of mostly silica. Silica has a melting point of 1700°C and we fire to 1240°C. The silica requires a “flux” to help it melt at the lower temperature. Fluxes can be all sorts of chemicals – a common one is calcium – calcium has a melting point of 2500°C, however, together they both melt at a much lower temperature! Colourants are metal oxides like cobalt (blue), chrome (green through black), copper (green, blue, even red!), manganese (black, purple and pink) iron (red brown), etc. Different chemicals in the glaze can have dramatic effects. for example, barium carbonate (which we don’t use) turns manganese bright pink! Other elements can turn manganese dioxide brown, blue, purple and reddish brown. Manganese dioxide is a flux in and of itself as well. So, glazes that get their black and purple colours, often interact with other glazes and RUN! Our mirror black is a good example – it mixes really well with many glazes because it fluxes them – causes them to melt faster. It will also bring out many beautiful colours in the glazes because it’s black colouring most definitely comes from manganese dioxide! Glaze chemistry is a whole subject on it’s own! We use commercial Mayco glazes on purpose – for their huge range of colour possibilities, stability, cool interactions, artistic freedom with the ability to easily brush the glazes on and ease of use. We currently have almost 50 glazes on hand! A major project is to test the interactions of all glazes with each other. That is 2,500 test tiles!!!! I’m going to make the wall behind the wheels the feature wall of pretty colours! Step Seven – Glaze (Gloss or sometimes called “Glost”) Firing Most of the time this is the final stage of making your creation (but not always!) The glaze kiln goes to 1240°C. This is called cone 6, or midrange. It is the low end of stoneware temperatures. Stoneware clays and glazes are typically fired at cone 8 – 10, that is 1260 – 1290°C. The energy requirement to go from 1240°C to 1280°C is almost a 30% more! Our clay is formulated to vitrify (mature, turn “glass-like”) at 1240°, as are our glazes. A glaze kiln take around 12 hours to reach temperature and two to three days to cool down. Sometimes a third firing process is required – this is for decoration that is added to work after the glaze firing. For example – adding precious metals and lustres. this firing temperature is usually around 600 – 800°C depending upon the techniques being used. There are many students interested in gold and silver trims – we will be doing this third type of firing soon! After firing your work will be in the student finished work shelves. Remember to pay for it before you head out the door! There is a small extra charge for using porcelain clay (it’s more than twice the price of regular clay), and for any third firing process! Once your work has been fired it can not turn back into clay for millennia – so don’t fire it if you don’t like it! Put it in the bucket for recycling. https://firebirdstudios.com.au/the-process-of-making-pottery/ This bowl is an example of kitchenware used in the 19th century and still in use today.Bowl white ceramic plain that has two sets of edging around lip. Inside bowl has plaster designed to look like cooking mixture.flagstaff hill, warrnambool, shipwrecked-coast, flagstaff-hill, flagstaff-hill-maritime-museum, maritime-museum, shipwreck-coast, flagstaff-hill-maritime-village, kitchen equipment, ceramic -
 Flagstaff Hill Maritime Museum and Village
Domestic object - Bowl, J & G Meakin, Late 19th or early 20th Century
The Process of Making Pottery Decorating, Firing, Glazing, Making, Technical There is a rhythm and flow to clay. It can’t be done all at once! Even the making process! It can take weeks to get everything done, especially if you can only work on your pottery once a week! Even though we have three hour classes, it’s often just not enough time! Here is an overview of some of the processes so you have a bit more grasp on some of the technical stuff! Step One – Design There are SO many ideas out there for making stuff in clay! From delicate porcelain jewellery, through to heavy sculptural work and everything in between. Deciding your direction is sometimes not that easy – when you first start, try everything, you will naturally gravitate to the style that you enjoy! The options and variations are endless and can get a wee bit overwhelming too! Check in with me before you start to ensure your ideas will work, what order you might do things, how you could achieve the look you are seeking and any other technical data required! Step Two – Making Clay is thixotropic. This means that as you work with it, the clay first gets sloppier and wetter, before is begins to dry in the atmosphere. For most things, you simply can’t do all parts of the project at once. An example of work order might look like: Get last weeks work out from the shelves Prepare clay for today’s work – roll your clay, prepare balls for throwing, make the first stage of a pinch pot) Clean up last week’s work and put it on the shelf for bisque firing Check that you have any glazing to do – and do enough of it that you will have time to finish your main project Do the next step of your next project – there might be a further step that can’t be complete immediately, in that case, wrap your work well and put onto the shelves. Letting your work rest for a while can really help keep your work clean and professional looking. Many things require bagging under plastic to keep it ready for work the next week – put your name on the outside of the bag so you can find your work easily. We have stickers and markers. Consider how you want to decorate your work – coloured slip can be applied at a fairly wet stage (remembering that it will make your work even wetter!). Trying to apply slip to dry clay won’t work! If you want to do sgraffito – you will need to keep the work leather hard (a state of dryness where you can still work the clay with a little effort and a little water and care). Step Three – Drying Most of the time your work can go into the rack uncovered to let it dry out for the following week. If you want to continue forming or shaping you will need to double bag your work – put your work on a suitable sized bat and put the bat in a bag so the base of the bag is under the bat, then put another bag over the top of the work and tuck the top of the bag under the bat. If you want to trim (or turn) your thrown work the following week, it should also be double bagged. If your work is large, delicate, or of uneven thicknesses, you should lightly cover your work for drying. When considering the drying process, bare in mind the weather, humidity and wind! The hotter and dryer, the faster things dry and work can dry unevenly in the shelves – this can lead to cracking – another time to lightly cover your work for drying. Step Four – Trimming and Cleaning Up Your work is dry! It is called greenware now and it is at it’s most fragile! Handle everything with two hands. I often refer to soft hands – keep everything gentle and with your fingers spread as much as possible. Try to not pick up things like plates too much, and always with both hands! Before your work can be bisque fired it should be “cleaned up”. You work won’t go into the kiln if it has sharp edges – when glazed, sharp edges turn into razor blades! Use a piece of fly wire to rub the work all over – this will scratch a little so be light handed. Use a knife or metal kidney to scrape any areas that require a bit more dynamic treatment than the fly wire offers! Finally, a very light wipe over with a slightly damp sponge can help soften and soothe all of your edges and dags! Trimming thrown work: If you are planning to trim (or turn) your thrown work (and you should be), make sure you bag it well – your work should be leather hard to almost dry for easiest trimming. Use this step to finish the work completely – use a metal kidney to polish the surface, or a slightly damp sponge to give a freshly thrown look. Wipe the sponge around the rim after trimming, and check the inside of the pot for dags! Trimming slip cast work: Usually I will trim the rims of your work on the wheel the following day to make that stage easier, however you will still need to check your work for lumps and bumps. Last but not least – check that your name is still clearly on the bottom of your work. Step Five – Bisque Firing When the work is completely dry it can go into the bisque kiln. The bisque kiln is fired to 1000°C. This process burns off the water in the clay as well as some of the chemically bound water. The structure of the clay is not altered that much at this temperature. Inside the bisque kiln, the work is stacked a little, small bowl inside a larger bowl and onto a heavy plate. Smaller items like decorations or drink coasters might get stacked several high. Consideration is paid to the weight of the stack and shape of the work. A bisque kiln can fire about one and a half times the amount of work that the glaze kiln can fire. The firing takes about 10 hours to complete the cycle and about two days to cool down. Once it has been emptied the work is placed in the glaze room ready for you to decorate! Step Six – Glazing Decorating your work with colour can be a lot of fun – and time consuming! There are three main options for surface treatment at this stage: Oxide Washes Underglazes Glazes Washes and underglazes do not “glaze” the work – It will still need a layer of glaze to fully seal the clay (washes don’t need glaze on surfaces not designed for food or liquid as they can gloss up a little on their own). Underglazes are stable colourants that turn out pretty much how they look in the jar. They can be mixed with each other to form other colours and can be used like water colours to paint onto your work. Mostly they should have a clear glaze on top to seal them. Oxides are a different species – the pink oxide (cobalt) wash turns out bright blue for instance. They don’t always need a glaze on top, and some glazes can change the colour of the wash! The glazes need no other “glaze” on top! Be careful of unknown glaze interactions – you can put any combination of glaze in a bowl or on a plate, but only a single glaze on the outside of any vertical surface! Glazes are a chemical reaction under heat. We don’t know the exact chemicals in the Mayco glazes we use. I can guess by the way they interact with each other, however, on the whole, you need to test every idea you have, and not run the test on a vertical surface! Simply put, glaze is a layer of glass like substance that bonds with the clay underneath. Clay is made of silica, alumina and water. Glaze is made of mostly silica. Silica has a melting point of 1700°C and we fire to 1240°C. The silica requires a “flux” to help it melt at the lower temperature. Fluxes can be all sorts of chemicals – a common one is calcium – calcium has a melting point of 2500°C, however, together they both melt at a much lower temperature! Colourants are metal oxides like cobalt (blue), chrome (green through black), copper (green, blue, even red!), manganese (black, purple and pink) iron (red brown), etc. Different chemicals in the glaze can have dramatic effects. for example, barium carbonate (which we don’t use) turns manganese bright pink! Other elements can turn manganese dioxide brown, blue, purple and reddish brown. Manganese dioxide is a flux in and of itself as well. So, glazes that get their black and purple colours, often interact with other glazes and RUN! Our mirror black is a good example – it mixes really well with many glazes because it fluxes them – causes them to melt faster. It will also bring out many beautiful colours in the glazes because it’s black colouring most definitely comes from manganese dioxide! Glaze chemistry is a whole subject on it’s own! We use commercial Mayco glazes on purpose – for their huge range of colour possibilities, stability, cool interactions, artistic freedom with the ability to easily brush the glazes on and ease of use. We currently have almost 50 glazes on hand! A major project is to test the interactions of all glazes with each other. That is 2,500 test tiles!!!! I’m going to make the wall behind the wheels the feature wall of pretty colours! Step Seven – Glaze (Gloss or sometimes called “Glost”) Firing Most of the time this is the final stage of making your creation (but not always!) The glaze kiln goes to 1240°C. This is called cone 6, or midrange. It is the low end of stoneware temperatures. Stoneware clays and glazes are typically fired at cone 8 – 10, that is 1260 – 1290°C. The energy requirement to go from 1240°C to 1280°C is almost a 30% more! Our clay is formulated to vitrify (mature, turn “glass-like”) at 1240°, as are our glazes. A glaze kiln take around 12 hours to reach temperature and two to three days to cool down. Sometimes a third firing process is required – this is for decoration that is added to work after the glaze firing. For example – adding precious metals and lustres. this firing temperature is usually around 600 – 800°C depending upon the techniques being used. There are many students interested in gold and silver trims – we will be doing this third type of firing soon! After firing your work will be in the student finished work shelves. Remember to pay for it before you head out the door! There is a small extra charge for using porcelain clay (it’s more than twice the price of regular clay), and for any third firing process! Once your work has been fired it can not turn back into clay for millennia – so don’t fire it if you don’t like it! Put it in the bucket for recycling. https://firebirdstudios.com.au/the-process-of-making-pottery/This bowl was made by renowned pottery company J & G Meakin of England. The firm was established in the mid-1800's. The bowl is an example of kitchenware used in the 19th century and still in use today.Bowl; white ceramic, round and tapering inwards towards base. Made by J and G Meakin England.On base, 'Ironstone China Reg SOL 391413' with symbolflagstaff hill, flagstaff hill maritime museum and village, warrnambool, maritime museum, maritime village, great ocean road, shipwreck coast, mixing bowl, food preparation, j & g meakin, pottery, stoke-on-trent, kitchen equipment, ceramic -
 Glen Eira Historical Society
Article - Queen’s Birthday Honours
This file contains two items about Glen Eira residents who have received Queen’s Birthday Honours: 1/An article entitled ‘Heart-felt award’ by Jenny Ling, published in the Caulfield Leader on 15/06/2010. The article states that four Glen Eira residents were awarded Queen’s Birthday Honours that week, and discusses the work of two of them, Associate Professor Harry Mond and Noel Levin, both of Caulfield North Mond, who received an Order of Australia for service to medicine is given particular focus, and also gives brief comments in the article. 2/An article entitled ‘Surgeon a cut above’ by Jenny Ling, published in the Caulfield/Port Phillip Leader on 14/06/2011. The article focuses on neurosurgeon professor Jeffrey Rosenfeld of Caulfield North, who was appointed a Member of the Order of Australia for service to medicine. The article discusses Rosenfeld’s work, both in Australia and overseas, and includes brief comment by Rosenfeld on the honour. Also included is a photo, in colour, of Rosenfeld speaking to students at Toorak Primary, taken by Steven Crabtree.mond harry associate professor, levin noel, rosenfeld jeffery professor, caulfield north, riding for the disabled, jewish community, crabtree steven, ling jenny, order of australia, association of victoria, queen’s birthday, doctors, cardiology, neurosurgery, honours lists -
 Federation University Historical Collection
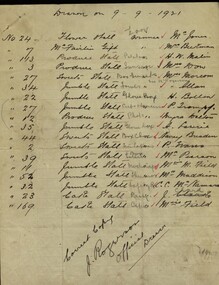
Handwritten document, Ballarat Junior Technical School - Records of raffle results - 1921, 09/09/1921 and 10/10/1921
Ballarat Junior Technical School opened in 1913. It was located at the Dana Street State School. As numbers grew a larger building was needed. Plans were drawn and a school built within the grounds of the School of Mines. Students started at this new school in 1921. It was officially opened on 9 September 1921 by Sir Alexander, resident of Creswick, local member for North Ballarat and the Minister for Education. He also opened the School Fair which coincided with the buildings ceremony. This was a fair on a grand scale and lasted two days and nights. Staff and students worked for weeks making articles for sale. A parent's committee led by Mr J Rogerson, a local police detective, had been organizing for months. Money raised funded the dodge-ball court, purchased a typewriter, a second-hand piano, an inter-room telephone system, an epidiascope and film projector. Four pages of lined paper showing handwritten results for raffles held at Ballarat Junior Technical Schhool in 1921. Pages held together with a dressmaker's pin.J Rogerson, official drawerballarat junior technical school, dana street primary school, ballarat school of mines, 1921, sir alexander, school fair, parent's committee, j rogerson, police detective, dodge-ball court, typewriter, piano, telephone system, epidiascope, film projector -
 Flagstaff Hill Maritime Museum and Village
Domestic object - Plate
The Process of Making Pottery Decorating, Firing, Glazing, Making, Technical There is a rhythm and flow to clay. It can’t be done all at once! Even the making process! It can take weeks to get everything done, especially if you can only work on your pottery once a week! Even though we have three hour classes, it’s often just not enough time! Here is an overview of some of the processes so you have a bit more grasp on some of the technical stuff! Step One – Design There are SO many ideas out there for making stuff in clay! From delicate porcelain jewellery, through to heavy sculptural work and everything in between. Deciding your direction is sometimes not that easy – when you first start, try everything, you will naturally gravitate to the style that you enjoy! The options and variations are endless and can get a wee bit overwhelming too! Check in with me before you start to ensure your ideas will work, what order you might do things, how you could achieve the look you are seeking and any other technical data required! Step Two – Making Clay is thixotropic. This means that as you work with it, the clay first gets sloppier and wetter, before is begins to dry in the atmosphere. For most things, you simply can’t do all parts of the project at once. An example of work order might look like: Get last weeks work out from the shelves Prepare clay for today’s work – roll your clay, prepare balls for throwing, make the first stage of a pinch pot) Clean up last week’s work and put it on the shelf for bisque firing Check that you have any glazing to do – and do enough of it that you will have time to finish your main project Do the next step of your next project – there might be a further step that can’t be complete immediately, in that case, wrap your work well and put onto the shelves. Letting your work rest for a while can really help keep your work clean and professional looking. Many things require bagging under plastic to keep it ready for work the next week – put your name on the outside of the bag so you can find your work easily. We have stickers and markers. Consider how you want to decorate your work – coloured slip can be applied at a fairly wet stage (remembering that it will make your work even wetter!). Trying to apply slip to dry clay won’t work! If you want to do sgraffito – you will need to keep the work leather hard (a state of dryness where you can still work the clay with a little effort and a little water and care). Step Three – Drying Most of the time your work can go into the rack uncovered to let it dry out for the following week. If you want to continue forming or shaping you will need to double bag your work – put your work on a suitable sized bat and put the bat in a bag so the base of the bag is under the bat, then put another bag over the top of the work and tuck the top of the bag under the bat. If you want to trim (or turn) your thrown work the following week, it should also be double bagged. If your work is large, delicate, or of uneven thicknesses, you should lightly cover your work for drying. When considering the drying process, bare in mind the weather, humidity and wind! The hotter and dryer, the faster things dry and work can dry unevenly in the shelves – this can lead to cracking – another time to lightly cover your work for drying. Step Four – Trimming and Cleaning Up Your work is dry! It is called greenware now and it is at it’s most fragile! Handle everything with two hands. I often refer to soft hands – keep everything gentle and with your fingers spread as much as possible. Try to not pick up things like plates too much, and always with both hands! Before your work can be bisque fired it should be “cleaned up”. You work won’t go into the kiln if it has sharp edges – when glazed, sharp edges turn into razor blades! Use a piece of fly wire to rub the work all over – this will scratch a little so be light handed. Use a knife or metal kidney to scrape any areas that require a bit more dynamic treatment than the fly wire offers! Finally, a very light wipe over with a slightly damp sponge can help soften and soothe all of your edges and dags! Trimming thrown work: If you are planning to trim (or turn) your thrown work (and you should be), make sure you bag it well – your work should be leather hard to almost dry for easiest trimming. Use this step to finish the work completely – use a metal kidney to polish the surface, or a slightly damp sponge to give a freshly thrown look. Wipe the sponge around the rim after trimming, and check the inside of the pot for dags! Trimming slip cast work: Usually I will trim the rims of your work on the wheel the following day to make that stage easier, however you will still need to check your work for lumps and bumps. Last but not least – check that your name is still clearly on the bottom of your work. Step Five – Bisque Firing When the work is completely dry it can go into the bisque kiln. The bisque kiln is fired to 1000°C. This process burns off the water in the clay as well as some of the chemically bound water. The structure of the clay is not altered that much at this temperature. Inside the bisque kiln, the work is stacked a little, small bowl inside a larger bowl and onto a heavy plate. Smaller items like decorations or drink coasters might get stacked several high. Consideration is paid to the weight of the stack and shape of the work. A bisque kiln can fire about one and a half times the amount of work that the glaze kiln can fire. The firing takes about 10 hours to complete the cycle and about two days to cool down. Once it has been emptied the work is placed in the glaze room ready for you to decorate! Step Six – Glazing Decorating your work with colour can be a lot of fun – and time consuming! There are three main options for surface treatment at this stage: Oxide Washes Underglazes Glazes Washes and underglazes do not “glaze” the work – It will still need a layer of glaze to fully seal the clay (washes don’t need glaze on surfaces not designed for food or liquid as they can gloss up a little on their own). Underglazes are stable colourants that turn out pretty much how they look in the jar. They can be mixed with each other to form other colours and can be used like water colours to paint onto your work. Mostly they should have a clear glaze on top to seal them. Oxides are a different species – the pink oxide (cobalt) wash turns out bright blue for instance. They don’t always need a glaze on top, and some glazes can change the colour of the wash! The glazes need no other “glaze” on top! Be careful of unknown glaze interactions – you can put any combination of glaze in a bowl or on a plate, but only a single glaze on the outside of any vertical surface! Glazes are a chemical reaction under heat. We don’t know the exact chemicals in the Mayco glazes we use. I can guess by the way they interact with each other, however, on the whole, you need to test every idea you have, and not run the test on a vertical surface! Simply put, glaze is a layer of glass like substance that bonds with the clay underneath. Clay is made of silica, alumina and water. Glaze is made of mostly silica. Silica has a melting point of 1700°C and we fire to 1240°C. The silica requires a “flux” to help it melt at the lower temperature. Fluxes can be all sorts of chemicals – a common one is calcium – calcium has a melting point of 2500°C, however, together they both melt at a much lower temperature! Colourants are metal oxides like cobalt (blue), chrome (green through black), copper (green, blue, even red!), manganese (black, purple and pink) iron (red brown), etc. Different chemicals in the glaze can have dramatic effects. for example, barium carbonate (which we don’t use) turns manganese bright pink! Other elements can turn manganese dioxide brown, blue, purple and reddish brown. Manganese dioxide is a flux in and of itself as well. So, glazes that get their black and purple colours, often interact with other glazes and RUN! Our mirror black is a good example – it mixes really well with many glazes because it fluxes them – causes them to melt faster. It will also bring out many beautiful colours in the glazes because it’s black colouring most definitely comes from manganese dioxide! Glaze chemistry is a whole subject on it’s own! We use commercial Mayco glazes on purpose – for their huge range of colour possibilities, stability, cool interactions, artistic freedom with the ability to easily brush the glazes on and ease of use. We currently have almost 50 glazes on hand! A major project is to test the interactions of all glazes with each other. That is 2,500 test tiles!!!! I’m going to make the wall behind the wheels the feature wall of pretty colours! Step Seven – Glaze (Gloss or sometimes called “Glost”) Firing Most of the time this is the final stage of making your creation (but not always!) The glaze kiln goes to 1240°C. This is called cone 6, or midrange. It is the low end of stoneware temperatures. Stoneware clays and glazes are typically fired at cone 8 – 10, that is 1260 – 1290°C. The energy requirement to go from 1240°C to 1280°C is almost a 30% more! Our clay is formulated to vitrify (mature, turn “glass-like”) at 1240°, as are our glazes. A glaze kiln take around 12 hours to reach temperature and two to three days to cool down. Sometimes a third firing process is required – this is for decoration that is added to work after the glaze firing. For example – adding precious metals and lustres. this firing temperature is usually around 600 – 800°C depending upon the techniques being used. There are many students interested in gold and silver trims – we will be doing this third type of firing soon! After firing your work will be in the student finished work shelves. Remember to pay for it before you head out the door! There is a small extra charge for using porcelain clay (it’s more than twice the price of regular clay), and for any third firing process! Once your work has been fired it can not turn back into clay for millennia – so don’t fire it if you don’t like it! Put it in the bucket for recycling. https://firebirdstudios.com.au/the-process-of-making-pottery/Ceramics have evolved over thousands of years.White earthenware dinner plate. Crazing evident all over.Backstamped ‘Made in England S LTD’flagstaff hill, warrnambool, shipwrecked-coast, flagstaff-hill, flagstaff-hill-maritime-museum, maritime-museum, shipwreck-coast, flagstaff-hill-maritime-village, ceramics, tableware -
 Flagstaff Hill Maritime Museum and Village
Domestic object - Plate, Johnson Bros
The Process of Making Pottery Decorating, Firing, Glazing, Making, Technical There is a rhythm and flow to clay. It can’t be done all at once! Even the making process! It can take weeks to get everything done, especially if you can only work on your pottery once a week! Even though we have three hour classes, it’s often just not enough time! Here is an overview of some of the processes so you have a bit more grasp on some of the technical stuff! Step One – Design There are SO many ideas out there for making stuff in clay! From delicate porcelain jewellery, through to heavy sculptural work and everything in between. Deciding your direction is sometimes not that easy – when you first start, try everything, you will naturally gravitate to the style that you enjoy! The options and variations are endless and can get a wee bit overwhelming too! Check in with me before you start to ensure your ideas will work, what order you might do things, how you could achieve the look you are seeking and any other technical data required! Step Two – Making Clay is thixotropic. This means that as you work with it, the clay first gets sloppier and wetter, before is begins to dry in the atmosphere. For most things, you simply can’t do all parts of the project at once. An example of work order might look like: Get last weeks work out from the shelves Prepare clay for today’s work – roll your clay, prepare balls for throwing, make the first stage of a pinch pot) Clean up last week’s work and put it on the shelf for bisque firing Check that you have any glazing to do – and do enough of it that you will have time to finish your main project Do the next step of your next project – there might be a further step that can’t be complete immediately, in that case, wrap your work well and put onto the shelves. Letting your work rest for a while can really help keep your work clean and professional looking. Many things require bagging under plastic to keep it ready for work the next week – put your name on the outside of the bag so you can find your work easily. We have stickers and markers. Consider how you want to decorate your work – coloured slip can be applied at a fairly wet stage (remembering that it will make your work even wetter!). Trying to apply slip to dry clay won’t work! If you want to do sgraffito – you will need to keep the work leather hard (a state of dryness where you can still work the clay with a little effort and a little water and care). Step Three – Drying Most of the time your work can go into the rack uncovered to let it dry out for the following week. If you want to continue forming or shaping you will need to double bag your work – put your work on a suitable sized bat and put the bat in a bag so the base of the bag is under the bat, then put another bag over the top of the work and tuck the top of the bag under the bat. If you want to trim (or turn) your thrown work the following week, it should also be double bagged. If your work is large, delicate, or of uneven thicknesses, you should lightly cover your work for drying. When considering the drying process, bare in mind the weather, humidity and wind! The hotter and dryer, the faster things dry and work can dry unevenly in the shelves – this can lead to cracking – another time to lightly cover your work for drying. Step Four – Trimming and Cleaning Up Your work is dry! It is called greenware now and it is at it’s most fragile! Handle everything with two hands. I often refer to soft hands – keep everything gentle and with your fingers spread as much as possible. Try to not pick up things like plates too much, and always with both hands! Before your work can be bisque fired it should be “cleaned up”. You work won’t go into the kiln if it has sharp edges – when glazed, sharp edges turn into razor blades! Use a piece of fly wire to rub the work all over – this will scratch a little so be light handed. Use a knife or metal kidney to scrape any areas that require a bit more dynamic treatment than the fly wire offers! Finally, a very light wipe over with a slightly damp sponge can help soften and soothe all of your edges and dags! Trimming thrown work: If you are planning to trim (or turn) your thrown work (and you should be), make sure you bag it well – your work should be leather hard to almost dry for easiest trimming. Use this step to finish the work completely – use a metal kidney to polish the surface, or a slightly damp sponge to give a freshly thrown look. Wipe the sponge around the rim after trimming, and check the inside of the pot for dags! Trimming slip cast work: Usually I will trim the rims of your work on the wheel the following day to make that stage easier, however you will still need to check your work for lumps and bumps. Last but not least – check that your name is still clearly on the bottom of your work. Step Five – Bisque Firing When the work is completely dry it can go into the bisque kiln. The bisque kiln is fired to 1000°C. This process burns off the water in the clay as well as some of the chemically bound water. The structure of the clay is not altered that much at this temperature. Inside the bisque kiln, the work is stacked a little, small bowl inside a larger bowl and onto a heavy plate. Smaller items like decorations or drink coasters might get stacked several high. Consideration is paid to the weight of the stack and shape of the work. A bisque kiln can fire about one and a half times the amount of work that the glaze kiln can fire. The firing takes about 10 hours to complete the cycle and about two days to cool down. Once it has been emptied the work is placed in the glaze room ready for you to decorate! Step Six – Glazing Decorating your work with colour can be a lot of fun – and time consuming! There are three main options for surface treatment at this stage: Oxide Washes Underglazes Glazes Washes and underglazes do not “glaze” the work – It will still need a layer of glaze to fully seal the clay (washes don’t need glaze on surfaces not designed for food or liquid as they can gloss up a little on their own). Underglazes are stable colourants that turn out pretty much how they look in the jar. They can be mixed with each other to form other colours and can be used like water colours to paint onto your work. Mostly they should have a clear glaze on top to seal them. Oxides are a different species – the pink oxide (cobalt) wash turns out bright blue for instance. They don’t always need a glaze on top, and some glazes can change the colour of the wash! The glazes need no other “glaze” on top! Be careful of unknown glaze interactions – you can put any combination of glaze in a bowl or on a plate, but only a single glaze on the outside of any vertical surface! Glazes are a chemical reaction under heat. We don’t know the exact chemicals in the Mayco glazes we use. I can guess by the way they interact with each other, however, on the whole, you need to test every idea you have, and not run the test on a vertical surface! Simply put, glaze is a layer of glass like substance that bonds with the clay underneath. Clay is made of silica, alumina and water. Glaze is made of mostly silica. Silica has a melting point of 1700°C and we fire to 1240°C. The silica requires a “flux” to help it melt at the lower temperature. Fluxes can be all sorts of chemicals – a common one is calcium – calcium has a melting point of 2500°C, however, together they both melt at a much lower temperature! Colourants are metal oxides like cobalt (blue), chrome (green through black), copper (green, blue, even red!), manganese (black, purple and pink) iron (red brown), etc. Different chemicals in the glaze can have dramatic effects. for example, barium carbonate (which we don’t use) turns manganese bright pink! Other elements can turn manganese dioxide brown, blue, purple and reddish brown. Manganese dioxide is a flux in and of itself as well. So, glazes that get their black and purple colours, often interact with other glazes and RUN! Our mirror black is a good example – it mixes really well with many glazes because it fluxes them – causes them to melt faster. It will also bring out many beautiful colours in the glazes because it’s black colouring most definitely comes from manganese dioxide! Glaze chemistry is a whole subject on it’s own! We use commercial Mayco glazes on purpose – for their huge range of colour possibilities, stability, cool interactions, artistic freedom with the ability to easily brush the glazes on and ease of use. We currently have almost 50 glazes on hand! A major project is to test the interactions of all glazes with each other. That is 2,500 test tiles!!!! I’m going to make the wall behind the wheels the feature wall of pretty colours! Step Seven – Glaze (Gloss or sometimes called “Glost”) Firing Most of the time this is the final stage of making your creation (but not always!) The glaze kiln goes to 1240°C. This is called cone 6, or midrange. It is the low end of stoneware temperatures. Stoneware clays and glazes are typically fired at cone 8 – 10, that is 1260 – 1290°C. The energy requirement to go from 1240°C to 1280°C is almost a 30% more! Our clay is formulated to vitrify (mature, turn “glass-like”) at 1240°, as are our glazes. A glaze kiln take around 12 hours to reach temperature and two to three days to cool down. Sometimes a third firing process is required – this is for decoration that is added to work after the glaze firing. For example – adding precious metals and lustres. this firing temperature is usually around 600 – 800°C depending upon the techniques being used. There are many students interested in gold and silver trims – we will be doing this third type of firing soon! After firing your work will be in the student finished work shelves. Remember to pay for it before you head out the door! There is a small extra charge for using porcelain clay (it’s more than twice the price of regular clay), and for any third firing process! Once your work has been fired it can not turn back into clay for millennia – so don’t fire it if you don’t like it! Put it in the bucket for recycling. https://firebirdstudios.com.au/the-process-of-making-pottery/Ceramics have evolved over thousands of years.A white earthenware side plate with a gadroon edge. Has water marks and chips on front.‘Johnson Bros England Reg No 15587’flagstaff hill, warrnambool, shipwrecked-coast, flagstaff-hill, flagstaff-hill-maritime-museum, maritime-museum, shipwreck-coast, flagstaff-hill-maritime-village, johnson bros, ceramics, tableware -
 Flagstaff Hill Maritime Museum and Village
Domestic object - Plate, Alfred Meakin
The Process of Making Pottery Decorating, Firing, Glazing, Making, Technical There is a rhythm and flow to clay. It can’t be done all at once! Even the making process! It can take weeks to get everything done, especially if you can only work on your pottery once a week! Even though we have three hour classes, it’s often just not enough time! Here is an overview of some of the processes so you have a bit more grasp on some of the technical stuff! Step One – Design There are SO many ideas out there for making stuff in clay! From delicate porcelain jewellery, through to heavy sculptural work and everything in between. Deciding your direction is sometimes not that easy – when you first start, try everything, you will naturally gravitate to the style that you enjoy! The options and variations are endless and can get a wee bit overwhelming too! Check in with me before you start to ensure your ideas will work, what order you might do things, how you could achieve the look you are seeking and any other technical data required! Step Two – Making Clay is thixotropic. This means that as you work with it, the clay first gets sloppier and wetter, before is begins to dry in the atmosphere. For most things, you simply can’t do all parts of the project at once. An example of work order might look like: Get last weeks work out from the shelves Prepare clay for today’s work – roll your clay, prepare balls for throwing, make the first stage of a pinch pot) Clean up last week’s work and put it on the shelf for bisque firing Check that you have any glazing to do – and do enough of it that you will have time to finish your main project Do the next step of your next project – there might be a further step that can’t be complete immediately, in that case, wrap your work well and put onto the shelves. Letting your work rest for a while can really help keep your work clean and professional looking. Many things require bagging under plastic to keep it ready for work the next week – put your name on the outside of the bag so you can find your work easily. We have stickers and markers. Consider how you want to decorate your work – coloured slip can be applied at a fairly wet stage (remembering that it will make your work even wetter!). Trying to apply slip to dry clay won’t work! If you want to do sgraffito – you will need to keep the work leather hard (a state of dryness where you can still work the clay with a little effort and a little water and care). Step Three – Drying Most of the time your work can go into the rack uncovered to let it dry out for the following week. If you want to continue forming or shaping you will need to double bag your work – put your work on a suitable sized bat and put the bat in a bag so the base of the bag is under the bat, then put another bag over the top of the work and tuck the top of the bag under the bat. If you want to trim (or turn) your thrown work the following week, it should also be double bagged. If your work is large, delicate, or of uneven thicknesses, you should lightly cover your work for drying. When considering the drying process, bare in mind the weather, humidity and wind! The hotter and dryer, the faster things dry and work can dry unevenly in the shelves – this can lead to cracking – another time to lightly cover your work for drying. Step Four – Trimming and Cleaning Up Your work is dry! It is called greenware now and it is at it’s most fragile! Handle everything with two hands. I often refer to soft hands – keep everything gentle and with your fingers spread as much as possible. Try to not pick up things like plates too much, and always with both hands! Before your work can be bisque fired it should be “cleaned up”. You work won’t go into the kiln if it has sharp edges – when glazed, sharp edges turn into razor blades! Use a piece of fly wire to rub the work all over – this will scratch a little so be light handed. Use a knife or metal kidney to scrape any areas that require a bit more dynamic treatment than the fly wire offers! Finally, a very light wipe over with a slightly damp sponge can help soften and soothe all of your edges and dags! Trimming thrown work: If you are planning to trim (or turn) your thrown work (and you should be), make sure you bag it well – your work should be leather hard to almost dry for easiest trimming. Use this step to finish the work completely – use a metal kidney to polish the surface, or a slightly damp sponge to give a freshly thrown look. Wipe the sponge around the rim after trimming, and check the inside of the pot for dags! Trimming slip cast work: Usually I will trim the rims of your work on the wheel the following day to make that stage easier, however you will still need to check your work for lumps and bumps. Last but not least – check that your name is still clearly on the bottom of your work. Step Five – Bisque Firing When the work is completely dry it can go into the bisque kiln. The bisque kiln is fired to 1000°C. This process burns off the water in the clay as well as some of the chemically bound water. The structure of the clay is not altered that much at this temperature. Inside the bisque kiln, the work is stacked a little, small bowl inside a larger bowl and onto a heavy plate. Smaller items like decorations or drink coasters might get stacked several high. Consideration is paid to the weight of the stack and shape of the work. A bisque kiln can fire about one and a half times the amount of work that the glaze kiln can fire. The firing takes about 10 hours to complete the cycle and about two days to cool down. Once it has been emptied the work is placed in the glaze room ready for you to decorate! Step Six – Glazing Decorating your work with colour can be a lot of fun – and time consuming! There are three main options for surface treatment at this stage: Oxide Washes Underglazes Glazes Washes and underglazes do not “glaze” the work – It will still need a layer of glaze to fully seal the clay (washes don’t need glaze on surfaces not designed for food or liquid as they can gloss up a little on their own). Underglazes are stable colourants that turn out pretty much how they look in the jar. They can be mixed with each other to form other colours and can be used like water colours to paint onto your work. Mostly they should have a clear glaze on top to seal them. Oxides are a different species – the pink oxide (cobalt) wash turns out bright blue for instance. They don’t always need a glaze on top, and some glazes can change the colour of the wash! The glazes need no other “glaze” on top! Be careful of unknown glaze interactions – you can put any combination of glaze in a bowl or on a plate, but only a single glaze on the outside of any vertical surface! Glazes are a chemical reaction under heat. We don’t know the exact chemicals in the Mayco glazes we use. I can guess by the way they interact with each other, however, on the whole, you need to test every idea you have, and not run the test on a vertical surface! Simply put, glaze is a layer of glass like substance that bonds with the clay underneath. Clay is made of silica, alumina and water. Glaze is made of mostly silica. Silica has a melting point of 1700°C and we fire to 1240°C. The silica requires a “flux” to help it melt at the lower temperature. Fluxes can be all sorts of chemicals – a common one is calcium – calcium has a melting point of 2500°C, however, together they both melt at a much lower temperature! Colourants are metal oxides like cobalt (blue), chrome (green through black), copper (green, blue, even red!), manganese (black, purple and pink) iron (red brown), etc. Different chemicals in the glaze can have dramatic effects. for example, barium carbonate (which we don’t use) turns manganese bright pink! Other elements can turn manganese dioxide brown, blue, purple and reddish brown. Manganese dioxide is a flux in and of itself as well. So, glazes that get their black and purple colours, often interact with other glazes and RUN! Our mirror black is a good example – it mixes really well with many glazes because it fluxes them – causes them to melt faster. It will also bring out many beautiful colours in the glazes because it’s black colouring most definitely comes from manganese dioxide! Glaze chemistry is a whole subject on it’s own! We use commercial Mayco glazes on purpose – for their huge range of colour possibilities, stability, cool interactions, artistic freedom with the ability to easily brush the glazes on and ease of use. We currently have almost 50 glazes on hand! A major project is to test the interactions of all glazes with each other. That is 2,500 test tiles!!!! I’m going to make the wall behind the wheels the feature wall of pretty colours! Step Seven – Glaze (Gloss or sometimes called “Glost”) Firing Most of the time this is the final stage of making your creation (but not always!) The glaze kiln goes to 1240°C. This is called cone 6, or midrange. It is the low end of stoneware temperatures. Stoneware clays and glazes are typically fired at cone 8 – 10, that is 1260 – 1290°C. The energy requirement to go from 1240°C to 1280°C is almost a 30% more! Our clay is formulated to vitrify (mature, turn “glass-like”) at 1240°, as are our glazes. A glaze kiln take around 12 hours to reach temperature and two to three days to cool down. Sometimes a third firing process is required – this is for decoration that is added to work after the glaze firing. For example – adding precious metals and lustres. this firing temperature is usually around 600 – 800°C depending upon the techniques being used. There are many students interested in gold and silver trims – we will be doing this third type of firing soon! After firing your work will be in the student finished work shelves. Remember to pay for it before you head out the door! There is a small extra charge for using porcelain clay (it’s more than twice the price of regular clay), and for any third firing process! Once your work has been fired it can not turn back into clay for millennia – so don’t fire it if you don’t like it! Put it in the bucket for recycling. https://firebirdstudios.com.au/the-process-of-making-pottery/Ceramics have evolved over thousands of years.Earthenware dessert plate, cream colour. Made by Alfred Meakin, England. Backstamped ‘Alfred Meakin England’. flagstaff hill, warrnambool, shipwrecked-coast, flagstaff-hill, flagstaff-hill-maritime-museum, maritime-museum, shipwreck-coast, flagstaff-hill-maritime-village, alfred meakin, ceramics, earthenware, kitchenware -
 Flagstaff Hill Maritime Museum and Village
Domestic object - Jug
The Process of Making Pottery Decorating, Firing, Glazing, Making, Technical There is a rhythm and flow to clay. It can’t be done all at once! Even the making process! It can take weeks to get everything done, especially if you can only work on your pottery once a week! Even though we have three hour classes, it’s often just not enough time! Here is an overview of some of the processes so you have a bit more grasp on some of the technical stuff! Step One – Design There are SO many ideas out there for making stuff in clay! From delicate porcelain jewellery, through to heavy sculptural work and everything in between. Deciding your direction is sometimes not that easy – when you first start, try everything, you will naturally gravitate to the style that you enjoy! The options and variations are endless and can get a wee bit overwhelming too! Check in with me before you start to ensure your ideas will work, what order you might do things, how you could achieve the look you are seeking and any other technical data required! Step Two – Making Clay is thixotropic. This means that as you work with it, the clay first gets sloppier and wetter, before is begins to dry in the atmosphere. For most things, you simply can’t do all parts of the project at once. An example of work order might look like: Get last weeks work out from the shelves Prepare clay for today’s work – roll your clay, prepare balls for throwing, make the first stage of a pinch pot) Clean up last week’s work and put it on the shelf for bisque firing Check that you have any glazing to do – and do enough of it that you will have time to finish your main project Do the next step of your next project – there might be a further step that can’t be complete immediately, in that case, wrap your work well and put onto the shelves. Letting your work rest for a while can really help keep your work clean and professional looking. Many things require bagging under plastic to keep it ready for work the next week – put your name on the outside of the bag so you can find your work easily. We have stickers and markers. Consider how you want to decorate your work – coloured slip can be applied at a fairly wet stage (remembering that it will make your work even wetter!). Trying to apply slip to dry clay won’t work! If you want to do sgraffito – you will need to keep the work leather hard (a state of dryness where you can still work the clay with a little effort and a little water and care). Step Three – Drying Most of the time your work can go into the rack uncovered to let it dry out for the following week. If you want to continue forming or shaping you will need to double bag your work – put your work on a suitable sized bat and put the bat in a bag so the base of the bag is under the bat, then put another bag over the top of the work and tuck the top of the bag under the bat. If you want to trim (or turn) your thrown work the following week, it should also be double bagged. If your work is large, delicate, or of uneven thicknesses, you should lightly cover your work for drying. When considering the drying process, bare in mind the weather, humidity and wind! The hotter and dryer, the faster things dry and work can dry unevenly in the shelves – this can lead to cracking – another time to lightly cover your work for drying. Step Four – Trimming and Cleaning Up Your work is dry! It is called greenware now and it is at it’s most fragile! Handle everything with two hands. I often refer to soft hands – keep everything gentle and with your fingers spread as much as possible. Try to not pick up things like plates too much, and always with both hands! Before your work can be bisque fired it should be “cleaned up”. You work won’t go into the kiln if it has sharp edges – when glazed, sharp edges turn into razor blades! Use a piece of fly wire to rub the work all over – this will scratch a little so be light handed. Use a knife or metal kidney to scrape any areas that require a bit more dynamic treatment than the fly wire offers! Finally, a very light wipe over with a slightly damp sponge can help soften and soothe all of your edges and dags! Trimming thrown work: If you are planning to trim (or turn) your thrown work (and you should be), make sure you bag it well – your work should be leather hard to almost dry for easiest trimming. Use this step to finish the work completely – use a metal kidney to polish the surface, or a slightly damp sponge to give a freshly thrown look. Wipe the sponge around the rim after trimming, and check the inside of the pot for dags! Trimming slip cast work: Usually I will trim the rims of your work on the wheel the following day to make that stage easier, however you will still need to check your work for lumps and bumps. Last but not least – check that your name is still clearly on the bottom of your work. Step Five – Bisque Firing When the work is completely dry it can go into the bisque kiln. The bisque kiln is fired to 1000°C. This process burns off the water in the clay as well as some of the chemically bound water. The structure of the clay is not altered that much at this temperature. Inside the bisque kiln, the work is stacked a little, small bowl inside a larger bowl and onto a heavy plate. Smaller items like decorations or drink coasters might get stacked several high. Consideration is paid to the weight of the stack and shape of the work. A bisque kiln can fire about one and a half times the amount of work that the glaze kiln can fire. The firing takes about 10 hours to complete the cycle and about two days to cool down. Once it has been emptied the work is placed in the glaze room ready for you to decorate! Step Six – Glazing Decorating your work with colour can be a lot of fun – and time consuming! There are three main options for surface treatment at this stage: Oxide Washes Underglazes Glazes Washes and underglazes do not “glaze” the work – It will still need a layer of glaze to fully seal the clay (washes don’t need glaze on surfaces not designed for food or liquid as they can gloss up a little on their own). Underglazes are stable colourants that turn out pretty much how they look in the jar. They can be mixed with each other to form other colours and can be used like water colours to paint onto your work. Mostly they should have a clear glaze on top to seal them. Oxides are a different species – the pink oxide (cobalt) wash turns out bright blue for instance. They don’t always need a glaze on top, and some glazes can change the colour of the wash! The glazes need no other “glaze” on top! Be careful of unknown glaze interactions – you can put any combination of glaze in a bowl or on a plate, but only a single glaze on the outside of any vertical surface! Glazes are a chemical reaction under heat. We don’t know the exact chemicals in the Mayco glazes we use. I can guess by the way they interact with each other, however, on the whole, you need to test every idea you have, and not run the test on a vertical surface! Simply put, glaze is a layer of glass like substance that bonds with the clay underneath. Clay is made of silica, alumina and water. Glaze is made of mostly silica. Silica has a melting point of 1700°C and we fire to 1240°C. The silica requires a “flux” to help it melt at the lower temperature. Fluxes can be all sorts of chemicals – a common one is calcium – calcium has a melting point of 2500°C, however, together they both melt at a much lower temperature! Colourants are metal oxides like cobalt (blue), chrome (green through black), copper (green, blue, even red!), manganese (black, purple and pink) iron (red brown), etc. Different chemicals in the glaze can have dramatic effects. for example, barium carbonate (which we don’t use) turns manganese bright pink! Other elements can turn manganese dioxide brown, blue, purple and reddish brown. Manganese dioxide is a flux in and of itself as well. So, glazes that get their black and purple colours, often interact with other glazes and RUN! Our mirror black is a good example – it mixes really well with many glazes because it fluxes them – causes them to melt faster. It will also bring out many beautiful colours in the glazes because it’s black colouring most definitely comes from manganese dioxide! Glaze chemistry is a whole subject on it’s own! We use commercial Mayco glazes on purpose – for their huge range of colour possibilities, stability, cool interactions, artistic freedom with the ability to easily brush the glazes on and ease of use. We currently have almost 50 glazes on hand! A major project is to test the interactions of all glazes with each other. That is 2,500 test tiles!!!! I’m going to make the wall behind the wheels the feature wall of pretty colours! Step Seven – Glaze (Gloss or sometimes called “Glost”) Firing Most of the time this is the final stage of making your creation (but not always!) The glaze kiln goes to 1240°C. This is called cone 6, or midrange. It is the low end of stoneware temperatures. Stoneware clays and glazes are typically fired at cone 8 – 10, that is 1260 – 1290°C. The energy requirement to go from 1240°C to 1280°C is almost a 30% more! Our clay is formulated to vitrify (mature, turn “glass-like”) at 1240°, as are our glazes. A glaze kiln take around 12 hours to reach temperature and two to three days to cool down. Sometimes a third firing process is required – this is for decoration that is added to work after the glaze firing. For example – adding precious metals and lustres. this firing temperature is usually around 600 – 800°C depending upon the techniques being used. There are many students interested in gold and silver trims – we will be doing this third type of firing soon! After firing your work will be in the student finished work shelves. Remember to pay for it before you head out the door! There is a small extra charge for using porcelain clay (it’s more than twice the price of regular clay), and for any third firing process! Once your work has been fired it can not turn back into clay for millennia – so don’t fire it if you don’t like it! Put it in the bucket for recycling. https://firebirdstudios.com.au/the-process-of-making-pottery/The form of the jug has been in use for many centuries.Stoneware jug. Two tone brown glaze with pierced lip behind spout. Spout chipped.None.flagstaff hill, warrnambool, shipwrecked-coast, flagstaff-hill, flagstaff-hill-maritime-museum, maritime-museum, shipwreck-coast, flagstaff-hill-maritime-village, jug, ceramic jug -
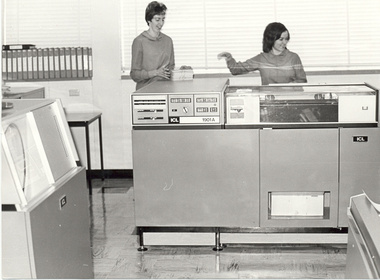 Federation University Historical Collection
Photograph - Computer, ICL1901A computer, 1969
Photographs taken of the first computer of Ballarat School of Mines / Ballarat Institute of Advanced Education Mount Helen Campus. This mainframe computer was purchased in 1969 for $116,000 and set up in the First Stage Engineering building (later F Building). It was the first operational teaching facility on the new campus. The initial computer centre staff were Arch McKinnon ad Manager and Judy Wilson as Key Punch Operator.. In 1972 Brian Dixon operated this computer for a night or two a week. He obtained an operators certificate as part of a Maths course at Ballarat College of Advanced Education, and lecturer Arch McKinnon offered Brian Dixon a night job.Four photographs relating to the ICL1911A computer. The computer was known as 'George' and called itself 'George'. .1) Two women standing behind a large ICL1901A .2) A woman in Ballarat School of Mines uniform stands behind an ICL computer item .3) & .5) Three women in a mainframe computer room .4) a woman operates a card punch machine .3 and .4 are shown in the Ballarat School of Mines Handbook, 1970, page 57computer, key punch, punch cards, icl1901a, g. durand, judith wilson, vivvian gay, jane henderson, brian dixon -
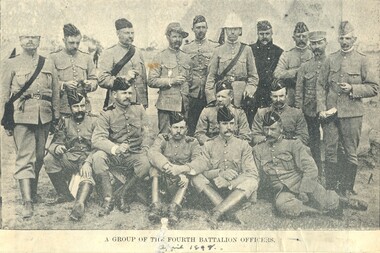 Federation University Historical Collection
Image, Fourth Battalion, 1898, 1898
The fourth Battalion appears to be made up of Castlemaine and Bendigo Residents.Four magazine photographs. .1) Kitchen of the Fourth Battalion .2) Cadet Display at the Exhibition Ground, Jubilee Week, 1887 .3) 4th Battalion in Quarter Formation. .4) A group of Fourth Battalion officers, 1898 VersO - Certificate of the Royal Geographical Society of Australasiaarmed services, fourth battalion, cadets, voluntary regiment, kitchen, exhibition grounds, militia -
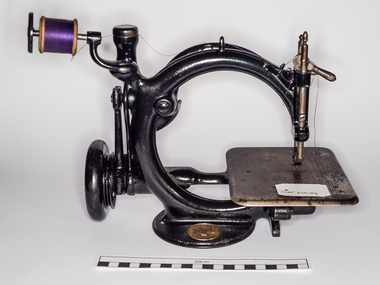 City of Moorabbin Historical Society (Operating the Box Cottage Museum)
Functional object - Sewing machine, Wilcox & Gibbs, c1870
Willcox and Gibbs: Serial No. 158679. The Willcox & Gibbs Sewing Machine Company was founded in 1857 by James E. A. Gibbs and James Willcox and opened its London Office in 1859 at 135 Regent Street . By 1871 the Company's Chief Office for Europe was at 150 Cheapside, London, this office was later moved (post 1885) to 94 - 96 Wigmore Street, then 37 & 39 Moorgate Street (by 1891 to post 1907) and later 20 Fore Street, London . Right from the initial production the manufacturing of the Company's single thread, chain stitch machine was undertaken by Brown & Sharpe, Rhode Island and this continued up until 1948. A special hand crank mechanism was produced in England for the European market, but the general design of the Willcox & Gibbs remained essentially the same throughout its production. The only major improvement was in 1875 when the glass tension discs were replaced with an automatic tension device which ensured the machine could not get out of adjustment. In addition to the domestic hand and treadle machines the company produced a wide range of industrial models. The Company finally closed in 1973. This Willcox & Gibbs came complete with its wooden carry case. The machine was made in America in the late 1860's but it has the ornate hand crank produced at Coalbrookdale near Telford, England which was, in Victorian times, renown for producing high quality ornate iron castings. This machine has the glass tension discs which were used on domestic models until 1875. The Willcox & Gibbs badge is located on the rear of the base casting and it also has a deep wooden base. The cloth plate has various American patent dates, four dating between 1857 & 1860 relating to J. E. A. Gibbs, three dating between 1860 & 1864 relating to Chas H. Willcox (son of James Willcox), the machine was also licensed under five other patents including the infamous Elias Howe patent of 1846. There are only two English patents one for J. E. A Gibbs and the other for James Willcox. In 1887 a W & G Sewing Machine sold in England for 6 pounds , with its box and bits, at a time when the average wage was less than 10/- shillings per week. The early settlers of Moorabbin Shire had to be self sufficient making their own clothes, tableware, bed coverings, furnishings and equipment. The women were skilled dressmakers and craft workers.Willcox and Gibbs: Serial No. 158679. A single thread, chain stitch Sewing Machine with a special hand crank mechanism produced in England for the European market, and the glass tension discs which were used on domestic models until 1875. This Willcox & Gibbs came complete with its wooden carry case. The machine was made in America c1870 but it has the ornate hand crank produced at Coalbrookdale near Telford, England which was, in Victorian times, renown for producing high quality ornate iron castings. This machine has the glass tension discs which were used on domestic models until 1875. The Willcox & Gibbs badge is located on the rear of the base casting and it also has a deep wooden base. The Willcox & Gibbs badge is located on the rear of the base castingsewing machines, early settlers, pioneers, moorabbin, brighton, gibbs james, willcox james, willcox henry, new york, america, dressmaking, mateial, machine makers, wrought iron work, telford england -
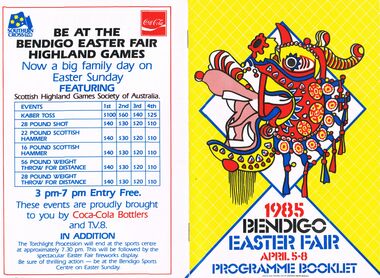 Bendigo Historical Society Inc.
Document - BENDIGO EASTER FAIR 1985, 5 April 1985
Bendigo Easter Fair 1985, April 5-8. Programme Booklet. Friday: Sun Loon Display, Easter Bowling Carnival, Rotary Easter Art Show, Book Bazaar, Model Railroaders Exhibition, Dudley House, Exhibition of Dolls, Embroiderers Guild, Art Gallery. Saturday: Mardi-Gras Street Carnival, Busking, Outdoor Theatre, Arts & Music, Bendigo Theatre Company, Cynthia Holland & Bendigo Talent Club Sun Loong Display, Rotary Art Show, Handcraft Bazaar, Motorcycle Show-Sandhurst Historic Vehicle Club Trams, Central Deborah, Dudley House, Exhibition Dolls, Antique Fair, Model Railroaders, Fire Brigades' Carnival for Children, Horse & Harness Parade, Book Bazaar, Bowling Carnival, Football, Photographic Exhibition, Family Activities, Cinema 180, Exhibition of Paintings silver furniture & porcelain, Embroiders Guild. Sunday: Horse Spectacular, Model Railroaders, Rotary Art Show, Handcraft Bazaar, Antique & Historical Display of Arms Weapons & Military, Antique Fair, Torchlight Procession, Awakening of Dragon, Exhibition of Dolls, Dudley House, Trams, Central Deborah, Book Bazaar, Mardi-Gras Street Carnival, Hargreaves Mall, Motorcycle Show, Photographic Exhibition, Family Activities, Cinema 180, Art Gallery, Embroiderers Guild. Monday: Philatelic Society Exhibition, Rotary Art Show, Handcraft Bazaar, Antique Fair, Model Railroaders, Bendigo District Bowling Assn. Easter Bowling Carnival, Exhibition of Dolls, Dudley House Bendigo Branch Royal Historical Society, Trams, Central Deborah, Motorcycle Show, Antique and Historical Display of Arms Weapons & Militaria, Mardi-Gras Street Carnival, Hargreaves Mall, Gala Street Procession, Carnival For Children, Sun Loong on Display, Photographic Exhibition, Fusion, Cinema 180, Art Gallery, Embroiders Guild. Church Services in Bendigo City Area During Easter (listings for Thursday, Good Friday, Eater Saturday, Easter Day). The Bendigo & District Tourism Association Welcomes you to Victoria's Premier Town. Listing of events over Easter with map to guide all around. Bendigo Easter Fair Incorporated Phone: (054) 43 9191Bendigo Easter Fair Inc. would like to thank the Ministry for the Arts for its continued assistance over the past 11 years. 3 1/2 pages of information on the Bendigo Easter Fair and its rich history dating back to 1871. The first Fair was held to aid 2 charities: Bendigo Base Hospital and the Home and Hospital for the Aged (Benevolent Asylum). Gone are the days of the Fancy Bazaar, Fat Baby Contest and the greasy Pig Chase, many tradition remain the same. Links to the Chinese community date back to when the first settlers arrived seeking gold. This gives the Fair its unique quality and Brings visitors in their thousands each Easter. The Monday Procession has always been the most famous as many old photographs show. Some photos taken before the turn of the century. Many made the journey to Bendigo from Melbourne and outlying districts. Visitors line the route to see floats, bands, and the once a year appearance of the Chinese Dragon, ''Sun Loong'' or ''New Dragon''. The longest Imperial Dragon in the World; 300ft plus in length. His predecessor, ''Long'', is acclaimed as the worlds oldest Imperial Dragon. Easter Saturday Procession has taken form of a Horse and Harness Parade, attracting and immense variety of entrants. The torchlight Procession on Sunday evening includes fireworks, Fire Brigades, Fire Trucks, firemen, marching girls and illuminated floats. The Army has helped with the procession since around the time of Federation. 15th Transport Squadron (15 Tpt. Sqdn.), processions are assembled & dispatched with Army efficiency. Marshalling the Monday Procession this year will be done by the Army as well as our own Easter Fair marshalls with a new communications system.1930 the Popular Girl contest was introduced. The four main streets of Bendigo, Pall Mall, Mitchell Street, Hargreaves Street and Williamson Street (formerly View Street), sponsored their particular girl by means of raffles, street stalls and a variety of fund raising. The winner was the one that raised the most money, and was announced from the balcony of the Shamrock Hotel, by the Mayor of Bendigo on Easter Saturday Night. The Popular girl contest is still held with a lot of the fund raising now done by service clubs and voluntary organizations. 1984 fund raising efforts, in excess of $50,000 was distributed to charities in our area. The combined Bendigo Brigades' record support for the Easter Fair goes back of many years in a variety of ways. Bendigo people are known for their love of sport and the choice in the city is very wide. There will be no Easter Sports Carnival this year but Easter Fair will still be holding functions at the Bendigo Sports Centre in Park Road. Bendigo city centre will be alive with stalls, raffles and rides of every description over the three days of sports, Sat-Sun. Hargreaves Mall will be the focus of relaxation, buskers, community theatre, arts with craft activity & musical entertainment. The Rotary Club of Bendigo and the Easter Fair Society had had independent Arts Shows but in 1981amalgamate their shows. 1981 Rotary Club of Bendigo added the Antique Fair to the Easter Program, held in the RSL Memorial Hall, Pall Mall. Last year some event were cancelled, but last year's Fair was quite a success. With many outdoor activities, the weather plays a vital role. It has been necessary to alter some venues in the past years, with Easter being a week early in April this year we are looking forward to fine conditions. The Chinese and Bendigo Easter Fair, The First Chinese arrived on the goldfields in mid 1850's in teams or groups to work the rich alluvial gold fields of Dai Gum San (Big Gold Mountain). Most were of poorer class from the district of See Yup, an area of four villages near the provincial capital Canton (Kwangchow). By far the largest group came from the village of Toi Shan. The alluvial gold quickly petered out so by the time of the first Bendigo Easter Fair in 1871 most Chinese had either left for richer fields or turned to other pursuits such as stores, market gardens, laundries, herbalists etc.. Many of course had died on the fields from the rigors of mining of diseases not encountered in their homeland. The Benevolent Asylum (Home & Hospital for the age) and Bendigo Base Hospital had become places of rest, help and haven for old, sick and lonely Chinese. SO when the idea was mooted to hold a charity fair to raise money for these worthy establishments, the Chinese were only too happy to join with the Easter Fair Society in this charitable work. It has for over 113 years. Chinese showed their costumes, scenery, and weapons of warfare, but it was not until 1892, that the first of the 5 loongs (dragons) appeared.. . The pageant was marshalled by Mr T Chapman and headed by Mr Moody, attired in habiliments of a most gorgeous character on a gaily caparisoned horse, and his get up as a Chinese grandee was perfect. . . Tom toms , bagpipes. . Wind instrument resembling a clarinet. . Bagpipes,.. The Weekly Advertiser, Friday, April 22,1892. . . Today the Chinese Association, made up of descendants and families of the early Chinese and associate members, carries on the charitable works of their predecessors. A Little Of Dragons, We have all heard of St. George Bendigo dragons (loongs) have none of these characteristics, in fact they have only brought good to Bendigo. There are 3 chief species of Chinese Dragons of which ''The Lung'' (Loong) is the most powerful. It is also the spiritual dragon which produces wind and rain. It has 9 resemblances, the head of a camel, horns of a deer, eyes of a rabbit ears of a cow, neck of a snake, belly of a frog, scales of a carp, claws of a hawk and palm of a tiger. Loong is a vegetarian, favourite food pomelo (ooluk), the father of our modern grapefruit. The abode, according to legend is the sky or water. He is also deaf, thus requiring loud noises to awaken him and to keep him awake. . . Number of claws they have represent rank. Dragons have 2, 3, 4 or 5 claws, the latter being reserved for the Emperor. Loong and Sun Loong have both five claw dragons. Bendigo has had 5 or 6 dragons, the number being confused by the fact each dragon was called 'Loong'. Today Three dragons remain in Bendigo, Loong, Sun Loong, and Yar Loong. Loong is the oldest Imperial Dragon in the world. He continued his walk through the streets of Bendigo til his retirement in 1970. He was created in Fat Shan in the Peoples Republic of China. Built of. . . Sun Loong replaced Loong after the 2 dragon procession of 1970. Created by Mr Law On, . . Yar Loong is a night dragon, came in 1930's. . . Long history of dragons. . The Birth Of A Dragon. . . To awaken A Dragon. . . The Easter Monday Chinese Procession. . . Procession divided into 6 sections,.. The Easter Monday Procession comprises,… over 350 people. Conclusion It is hoped that in the near future a museum can be built to house the priceless regalia gathered together over the last century and a half by the Bendigo Chinese Association. Advertisements; Historic Bendigo Pottery, Mim's Restaurant, Antique Fair (Rotary), The Copper Pot, Sandhurst Town (Develop Victoria Council Tourism Award 1983-1985), Bendigo Motor Co. (Mazda), Diggers, Chaplin's, Bendigo's Dunny Diner, Arakoon, Quin's Bluebird, Allara Motor Lodge, Lakeview Motor Inn, The Armoured Car Company, Gillies, Mardi Gras Street Carnival, Handcraft Bazaar, Art Show (Rotary) Bendigo Model Railroaders (Easter Exhibition), Bendigo Easter Fair Highland Games brought to you by TV8 and Coca-Cola Bottlers. Design and Finished Art By Graphics Group, Bendigo.Graphics Group Bendigoevent, easter fair, bendigo easter fair incorporated, bendigo easter fair 1985, april 5-8. programme. friday: sun loon display, easter bowling carnival, rotary easter art show, book bazaar, model railroaders exhibition, dudley house, exhibition of dolls, embroiderers guild, art gallery. saturday: mardi-gras street carnival, busking, outdoor theatre, arts & music, bendigo theatre company, cynthia holland & bendigo talent club sun loong display, rotary art show, handcraft bazaar, motorcycle show-sandhurst historic vehicle club trams, central deborah, dudley house, exhibition dolls, antique fair, model railroaders, fire brigades' carnival for children, horse & harness parade, book bazaar, bowling carnival, football, photographic exhibition, family activities, cinema 180, exhibition of paintings silver furniture & porcelain, embroiders guild. sunday: horse spectacular, model railroaders, rotary art show, handcraft bazaar, antique & historical display of arms weapons & military, antique fair, torchlight procession, awakening of dragon, exhibition of dolls, dudley house, trams, central deborah, book bazaar, mardi-gras street carnival, hargreaves mall, motorcycle show, photographic exhibition, family activities, cinema 180, art gallery, embroiderers guild. monday: philatelic society exhibition, rotary art show, handcraft bazaar, antique fair, model railroaders, bendigo district bowling assn. easter bowling carnival, exhibition of dolls, dudley house bendigo branch royal historical society, trams, central deborah, motorcycle show, antique and historical display of arms weapons & militaria, mardi-gras street carnival, hargreaves mall, gala street procession, carnival for children, sun loong on display, photographic exhibition, fusion, cinema 180, art gallery, embroiders guild. church services bendigo city easter , eater saturday bendigo & district tourism association victoria's premier town. bendigo easter fair incorporated bendigo easter fair rich history 1871. base hospital and the home and hospital for the aged (benevolent asylum). fancy bazaar, fat baby contest greasy pig chase, many old photographs floats, bands, chinese dragon, ''sun loong'' or ''new dragon''. the longest imperial dragon in the world; 300ft plus in length easter saturday procession horse harness parade. torchlight procession on sunday evening includes fireworks, fire brigades, fire trucks, firemen, marching girls and illuminated floats. army helped federation. 15th transport squadron (15 tpt. sqdn). monday procession by the army 1930 popular girl contest introduced. four main streets, pall mall, mitchell street, hargreaves street williamson street. winner announced shamrock hotel, easter saturday night. popular girl contest fund raising service clubs voluntary organizations. 1984 fund raising efforts, in excess $50, 000 distributed to charities. combined bendigo brigades'. no easter sports carnival holding functions bendigo sports centre in park road. stalls, raffles three days sports, sat-sun. relaxation, buskers, community theatre, arts with craft activity & musical rotary club of bendigo easter fair society independent arts shows in 1981amalgamate antique fair, held last year some event cancelled. with many outdoor activities, weather plays vital role. alter some venues in the past, easter being a week early first chinese arrived goldfields in mid 1850's dai gum san (big gold mountain). see yup, canton (kwangchow). toi shan. first easter fair in 1871 for richer fields other pursuits stores, market gardens, laundries, herbalists etc. benevolent asylum (home & hospital for the age) bendigo base hospital had become places of rest, help and haven for old, chinese. charity fair to raise money, chinese join easter fair society in this charitable work. costumes, scenery, weapons of warfare, 1892, the first of the 5 loongs. marshalled by mr t chapman by mr moody, caparisoned horse, chinese grandee. tom toms, wind instrument. bagpipes, advertiser, april 22, 1892. chinese association, descendants chinese and associate charitable works. st. george ''the lung'' most powerful. spiritual dragon wind rain. 9 resemblances, camel, deer, rabbit cow, snake, frog, carp, hawk tiger. a vegetarian, pomelo (ooluk), the abode, legend is the sky or water. deaf loud noises to keep him awake. claws represent rank. 2, 3, 4 or 5 claws, reserved for emperor. had 5 or 6 dragons called 'loong'. three dragons loong, sun loong, yar loong. loong oldest imperial dragon in the world. retirement 1970. created in fat shan peoples republic of china. built of. sun loong, loong 2 dragon procession 1970. created mr law on, yar loong a night dragon1930's.history dragons. birth of a dragon. awaken a dragon. easter monday chinese procession divided 6 sections 350 people. priceless regalia last century bendigo chinese association. advertisements; historic bendigo pottery, mim's restaurant, antique fair (rotary), the copper pot, sandhurst town (develop victoria council tourism award 1983-1985), bendigo motor co. (mazda), diggers, chaplin's, bendigo's dunny diner, arakoon, quin's bluebird, allara motor lodge, lakeview motor inn, armoured car company, gillies, mardi gras street carnival, handcraft bazaar, art show model railroaders highland games tv8 coca-cola. art by graphics group -
 Bendigo Historical Society Inc.
Document - NORMAN OLIVER COLLECTION: MAYOR'S NOTES 1964
The Norman Oliver collection. Norman Oliver was three times Mayor of Bendigo - 1950-51, 1964-65, 1970-71. 1. Two covering pages, with handwriting in blue pen. Mayor's Notes 1964, and Contents of File - Mayor's Notes 1964, Bendigo, Local Government, Town Planning, Water - Coliban Area, Business - marketing, etc., Speech for Graduation of Nurses. 2. Four typed pages of undated Mayor's Notes which make reference to the first week as Mayor, and learning of his appointment on 29 August. Topics include : a council business meeting dealing with the use of the Garden Gully sports facilities, the Housing Commission garden competition, Royal Commission on supply and consumption of liquor, neighbourhood disputes regarding drainage issues and owner responsibility, Rotary Club slide presentation on Bendigo past and present, tenders to Council for supply of a range of materials, Art Gallery Committee meeting (noting the need for careful selection policy re. donations and borrowings).bendigo, council, speech notes, norman joseph oliver , councillor norman oliver. mayor of bendigo. bendigo art gallery. rotary clubs - bendigo. royal commission on supply and consumption of liquor. -
 Bendigo Historical Society Inc.
Photograph - BILL ASHMAN COLLECTION: FOUR BUOY HOUSE UNIT
Black and white photo by Vincent Kelly. Typed on the back: Four Buoy house unit. Dish in picture is an old iron dish which has been used for fowls to drink out of. The photo speaks for it self. After a few weeks treatment by pouring in a dipper full of Scalebuoy Water daily the results of the process can be seen. Note the patches where the scale formations have been removed. The photographer's name - Vincent Kelly Bendigo is imprinted in the bottom left corner.sciences, instruments - general, scalebuoy, bill ashman collection - correspondence, four buoy house unit, vincent kelly