Showing 188 items
matching gate post
-
 Ballarat Heritage Services
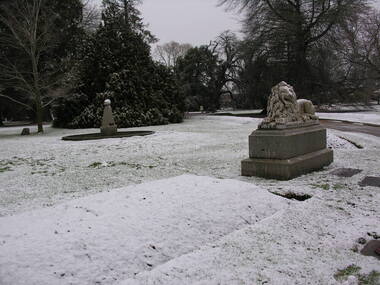
Photograph - Photograph - Colour, Snow in Botanical Gardens, Ballarat, c2007
Two marble lions located just inside the entrance gates (Also known as the Morey Gates) to the Ballarat Botanical Gardens were donated by David Ham MLC in 1893.Snow in Botanical Gardens, Ballaratballarat botanical gardens, snow, pavilion, lion -
 Ballarat Heritage Services
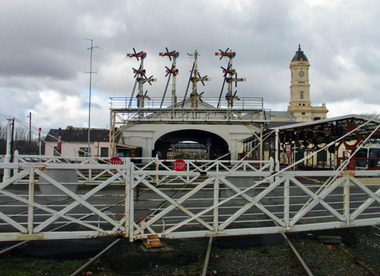
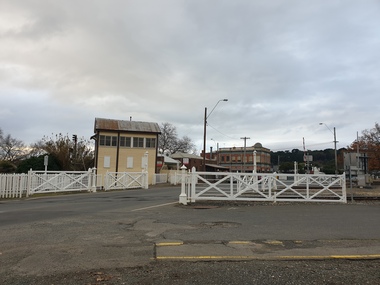
Photograph - Digital photographs, L.J. Gervasoni, Railway Gates Ballarat, c2013
Colour photograph of operational railway gates across Lydiard Street North, Ballarat.ballarat, ballarat railway station, gates, railway gates, heritage, cultural landscape, crossing, signals -
 Ballarat Heritage Services
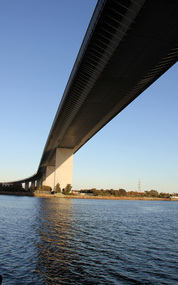
Digital photographs, L.J. Gervasoni, Under the west gate, c2016
yarra river, melbourne, west gate, west gate bridge, bridge -
 Ballarat Heritage Services
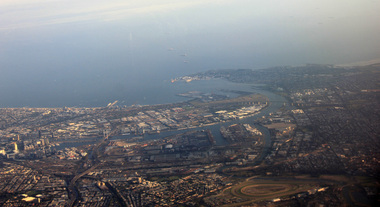
Aerial digital photograph, L.J. Gervasoni, Mouth of the Yarra River and Westgate on approach to Melbourne's Tullamarine Airport, 2016
hoto taken from flight in to Melbourne International airport.Digital aerial image of Melbourne, Victoria.aerial, landscape, cityscape, mouth, yarra river, west gate bridge, aerial photograph -
 Ballarat Heritage Services
Digital Photograph, L.J. Gervasoni, Melbourne CBD on approach Melbourne Airport, 2016, 2016
Digital Image showing the Melnourne Business District from the air.aerial, melbourne, mouth, yarra river, west gate bridge, inner west -
 Ballarat Heritage Services
Photograph, L.J. Gervasoni, Mouth of the Yarra River from the air, 2016
Digital Image showing an aerial view of the mouth of the Yarra River from the airaerial, melbourne, mouth, yarra, river, port phillip bay, flemington, docklands, bolte bridge, west gate bridge -
 Ballarat Heritage Services
Digital photographs, L.J. Gervasoni, Yarra River Melbourne Docklands Westgate Bridge, 2015
Digital Imagesyarra river melbourne docklands, yarra river, dock, docklands, shipping, port, channel, water, west gate bridge, bridge -
 Ballarat Heritage Services
digital photographs, Lisa Gervasoni, Lady Northcote, 2014 - 2016
lady northcote, childrens, farm, british, settlement scheme, school, gates -
 Ballarat Heritage Services
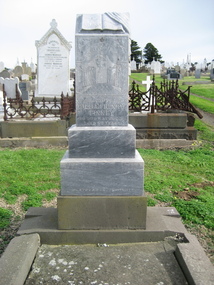
Photograph - Colour, Clare Gervasoni, William Henry Finney Gravestone, Warrnambool Cemetery, 27/07/2009
Willima Finney died on 20 May 1911, aged 60 years.Headstone for William Finney in the Warrnambool Cemetery. Includes sculptural anchor, open gates, open book, draped cloth, arch, masonic symbol.cemetery art, headstone art -
 Ballarat Heritage Services
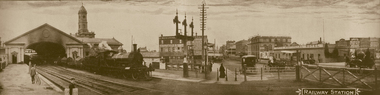
Photograph - Image - Black and White, Ballarat Railway Station, c1904, c1904
The Ballarat to Melbourne Railway line opened in 1862.Black and white panoramic view of the Ballarat Railway Station. A steam train is about to cross Lydiard Street North, and the railway gates are shut to prevent cars crossing the tracks. ballarat railway station, signals, railway track, provincial hotel, railway gates -
 Ballarat Heritage Services
Photograph, Clare Gervasoni, Gates into Brookside Farm, 21/01/2021
A photograph and two videos showing the gates into Brookside Homestead taken from the public roadway.brookside, farm, stable -
 Ballarat Heritage Services
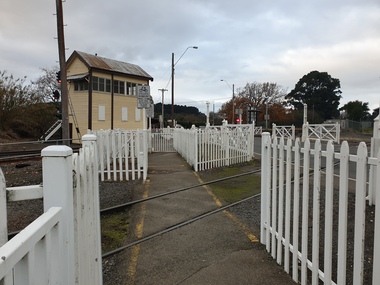
Photograph, Clare Gervasoni, Peel Street Ballarat Railway Gates, 2023
... Ballarat Heritage Services PO Box 2209 Bakery Hill Post ...Peel Street Ballarat Railway Gates and signal box.railway gates, ballarat east, signal box, peel street -
 Ballarat Heritage Services
Photograph, Clare Gervasoni, Peel Street Ballarat Railway Gates, 2023
... Ballarat Heritage Services PO Box 2209 Bakery Hill Post ...Peel Street Ballarat Railway Gates and signal box.railway gates, ballarat east, signal box, peel street -
 Ballarat Heritage Services
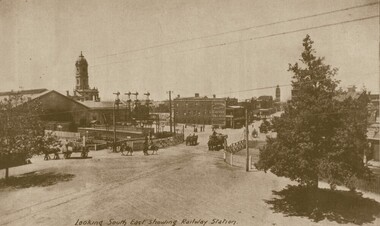
Photograph - Image, Looking South East Showing the Ballarat Railway Station
Ballarat looking South East from the Ballarat Railway Station. ballarat railway station, ballarat railway gates, lydiard street ballarat, reid's coffee palace, lydiard street north -
 Ballarat Heritage Services
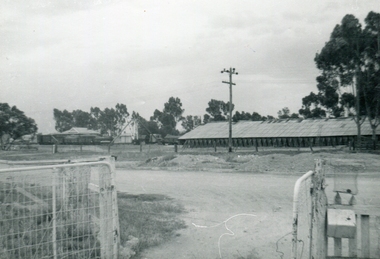
Photograph - Image - Black and White, Shedding
... Ballarat Heritage Services PO Box 2209 Bakery Hill Post ...Black and white image of a large shed with a gate in the foreground.shed, gate, farm, agriculture -
 Ballarat Heritage Services
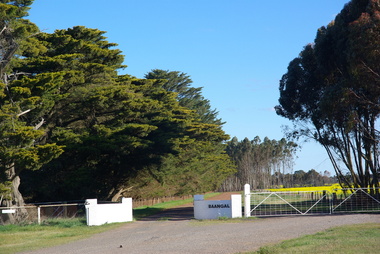
Photograph - Colour, Entrance to Baangal, 2014, 07/09/2014
Colour photographs showing the gates to the property known as Baangal.baangal -
 Ballarat Heritage Services
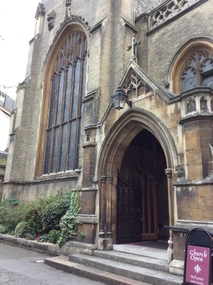
Digital photograph, Church, Lancaster Gate, UK, 2016, 19/09/2016
Oscar Wilde married in this church 29 May 1884. See plaqueoscar wilde, church -
 Ballarat Heritage Services
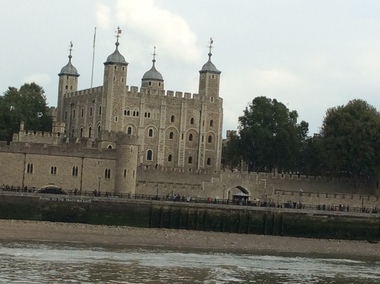
Digital photograph, Tower of London showing Traitor's Gate, 2016, 09/2016
tower of london, traitor's gate, london -
 Ballarat Heritage Services
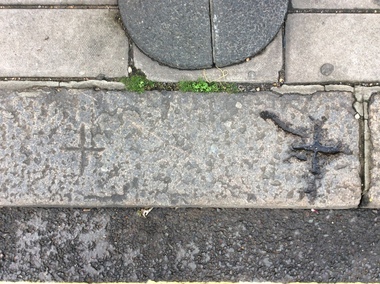
Digital Photograph, Dorothy Wickham, Marks on edging near gutters, Lancaster Gate, London, UK, 2016, 19/09/2016
masons marks, lancaster gate, london, stone -
 Whitehorse Historical Society Inc.
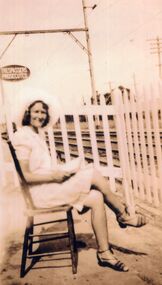
Print - Photograph, Windsor Family, c1940
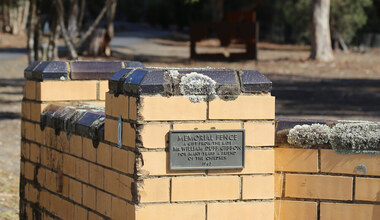
By1880 most railway crossings were identified by a sign, although at very busy crossings a watchman was posted. Eventually most stations were manned and gates were installed. The watchman was generally housed in a small wooden or brick building with a clear view of the single line. The next stage was mechanical closing of the gates, using a lever situated in a shed behind the gatehouse. By 1956 automatic barriers had been installed. A working model of the gate style crossing can be seen at New Street Brighton.A collection of 12 black and white photographs of the Windsor family who lived in the gatehouse next to the Tunstall station. The stationmaster Ernest Windsor was also responsible for track maintenance between Ringwood and Middleborough Road Box Hill. His wife Betty Jean Windsor was gatekeeper for 2 years. On the back of each photograph are the names of the family members in the photo.Catherine Ann Windsor (born 1897), John Ernest (Ern) WIndsor, Catherine (Kitty) Windsor (born 1919), Patricia Janette WIndsor (born 1935) Tunstall Railway Gatesstationmasters, tunstall station, windsor ernest, windsor catherine, windsor patricia, windsor betty, windsor catherine (kitty) -
 Ballarat Heritage Services
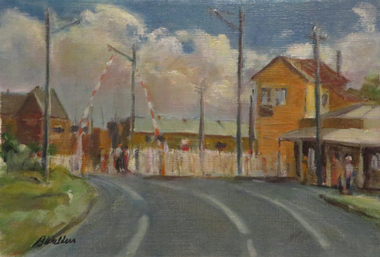
Artwork, Railway Gates at Humffray Street North, Ballarat, c2014
... Ballarat Heritage Services PO Box 2209 Bakery Hill Post ...Photograph of an oil painting on paper of the railway gates at Humffray Street North, Ballarat.railway gates, ballarat railway, humffray street railway gates -
 Inverloch Historical Society
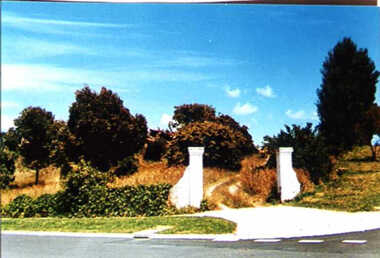
001027 - Photograph - Inverloch - Pine Lodge gate posts - possibly 1985 - from James Wyeth
... gate posts - possibly 1985 - from James Wyeth ... -
 Mt Dandenong & District Historical Society Inc.
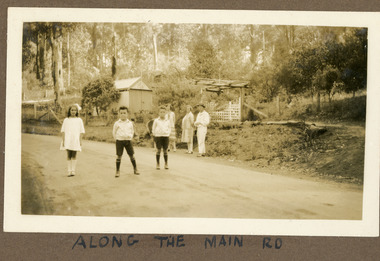
Photograph
... them is a wire and post fence with wooden gate and a shed. Bush... of the road are two women and a man. Behind them is a wire and post ...The photograph is from the album of Ivy Child. The road featured called the 'Main Road' is what we know know as Mt Dandenong Tourist Road. It has been made but not tarred. The identity of the people is unknown. Ivy May Child (1910 – 1989) was the daughter of Arthur Edward (Ted) Child (1878 – 1964) and Ethel May Madden (1888 – 1970). Ted Child was the son of Matthew Francis Child (1839 – 1933) and Martha Jeeves (1857 – 1926). He was the grandson of one of the early pioneers Francis Child. Ivy grew up on the family property on Childs Road and took many photographs. Most of these are glued into her photo album. The album covered the years from c1927 – 1932. Ivy married Henry William Burgess (1906 – 1968) in 1944. The photographs remain in their original state in the album with individual copies made. Sepia coloured photograph showing a stretch of road with two young boys and a girl standing in the middle. Behind them, standing on the edge of the road are two women and a man. Behind them is a wire and post fence with wooden gate and a shed. Bush is visible in the background.Handwritten below the photograph in the album: ALONG THE MAIN ROADivy child, main road, mt dandenong tourist road, tourist road, kalorama -
 Southern Sherbrooke Historical Society Inc.
Information Folder - Germans Gully & Church of Freedom
Information folder containing items pertaining to the history of Germans Gully & Church of Freedom. Contents: -2 photos, gates of Church of Freedom -photocopy, sketch by Barbara Smith dated 29 October 02 of stone huts formerly on the property -article, "Fool around with scarlett!", Australian Post, 6 July 1972, re. John Wilson (colour copies in A3 folio #1 marked VSSH 71) -letter, Mother Superior Anne Beatrice, Church of Freedom LTD to Cr. M. Douglas, dated October 1983, requesting an audience with the council of the Shire of Sherbrooke. Attatched are biographical notes on John Wilson and his family -Memorandum of Association, Church of Freedom -Property report, 141 Mt Morton Rd, Belgrave Heights, from Victorian Government website -plan of survey, Crown Allotment 70, Parish of Narree Worran, showing Mt Morton Rd -Letter, dated 3 October 2005, from Gore Historical Museum & Hokonui Heritage Research Centre, Gore, New Zealand, to Mrs Eva Evans, Milton, New Zealand, re. John Charles Wilson, and covering the next three items -Funeral notice for John Wilson -Biographical entry for John Wilson from "Southern People - A Dictionary of Otago Southland Biography", 2 sheets -Biographical details from "Waitaki & Districts - A History", 1 sheetjohn wilson, church of freedom, germans gully, international bio colour naturopathic centre, wilson family -
 Southern Sherbrooke Historical Society Inc.
Photograph, Monbulk Road, Belgrave
Groups of people are standing on Monbulk Road, up from Belgrave. In the background are four women abreast walking away. There are two men, a young boy and a woman standing together in the middle ground and two younger women closer to the camera, standing beside a cart (with only a large cartwheel visible). There may be another man speaking to them. There is a path going up the hill to the right, with fence posts on the high side and a closed gate at the top. On the left of the photo there is a house below the road. There are two water tanks which look new. It may be the same house as appears in other photos in this collection. Another building is visible in the distance. -
 Ballarat Tramway Museum
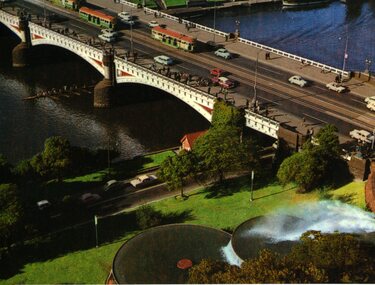
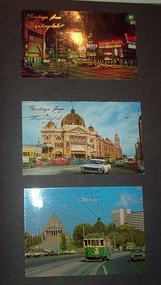
Postcard, Murfett Pty Ltd, Princes Bridge Melbourne, c1968
Colour postcard of Princes Bridge and South Gate Fountain Melbourne, late 1960's. Postcard shows the southern end of the Princes Bridge, has 3 W2's on bridge, each with marker lights and the South Gate fountains, existing at the time of the photograph. Since replaced by the Arts Centre. On rear is printed caption, giving details of the location, the date of the fountain construction (1959), stamp placement area and publishers details and post card number (8P 1053-2), National View by Murfett Publishers.On top edge near stamp area in black ink "1968".trams, tramways, melbourne, southgate, princes bridge, mmtb -
 Ballarat Tramway Museum
Slide - 35mm slide/s - set of 25, Noel Simons, 26/02/1972 12:00:00 AM
Set of 25 transparencies taken on 26/2/1972 on Kodak mounts. 1204.1 - Bendigo No. 5 - just arrived at Manchester Loop near Havilah Road, Long Gully. Photo taken after tram has passed photographer. 1204.2 - No. 26 in Backhaus St. Long Gully passing William St, en route to Quarry Hill. Photo taken after tram has passed photographer. 1204.3 - No. 5 climbing the High St. Hill Eaglehawk, heading for Quarry Hill with the buildings on the West side of High St. in the background, including the Eaglehawk Town Hall. 1204.4 - as for 1204.3, but tram close up. 1204.5 - as for 1204.3, but after tram has passed photographer. 1204.6 - No. 5 at intersection of Mt Korong Road Ironbark and Calder Highway, with the AMPOL service 'station in the background. Photo taken after tram has passed photographer. 1204.7 - No. 26 en route to Quarry Hill shortly after leaving Needle Loop, passing William St., Long Gully. 1204.8 - No. 5 at California Gully Loop, picking up a passenger, with the shops at Long Gully in the background. Photo taken after tram has passed photographer. 1204.9 - No. 5 in Long Gully, en route to Quarry Hill. Photo taken after tram has passed photographer. 1204.10 - No. 2 at Eaglehawk terminus with the Eaglehawk Town Hall and Post Office in the background. Tram has two SEC roof ads. 1204.11 - No. 2 at Eaglehawk terminus, close up. 1204.12 - as for 1204.11, but through the park gates. 1204.13 - as for 1204.11, but with tram stop shelters in the foreground and buildings on the West side of High St in the background. 1204.14 - No. 2 in Mt. Korong Rd, midway between California Gully Loop and Needle Loop. Photo taken after tram has passed photographer. 1204.15 - No. 5 in Long Gully, en route to Quarry Hill. 1204.16 - as for 1204.15, but with trams departed loop. Has an ESSO service station in the background. 1204.17 - No. 26 leaves Charing Cross up View St.. Photo taken after tram has passed photographer. Has Armstrong Tyre Service, Cohns Drinks ad on a building and the T&G building in the background. Also Firestone ads on the tyre service building. 1204.18 - No. 5 waits at Charing Cross with the Alexandra Fountain in the background. Tram has two SEC roof ads, 'Everything s fine in my all electric kitchen' and 'Electricity Best for Cooking'. Has RACV, Colonial Mutual Life buildings in the background and the planting areas around Charing Cross gardens in the foreground. 1204.19 - No. 21 en route to North Bendigo arrives at Charing Cross, with passengers waiting to board. No. 5 in the background. In the background is the Fountain Gate Plaza building and the City Family Hotel. 1204.20 - as for 1204.19, but with No. 7 en route to Golden Square. 1204.21 - as for 1204.19, but closer up. 1204.22 - as for 1204.18 1204.23 - No. 25 in Nolan St. near the crossing of Bendigo Creek, running a special tram tour. 1204.24 - No. 25 on a special charter, in Weeroona Ave. at Cnr of Caledonia St. passing the Gas works. 1204.25 - Nos. 25 (showing Golden Square), 7 and 26 at Charing Cross. Has fountain in the background.Information written on in blue ink and date stamped on purple ink. 1204.1 - "No. 5 at Manchester Loop, near Havilah Rd. Long Gully." 1204.2 - "No. 26 in Backhaus St. Long Gully passing William St." 1204.3 - "No. 5 in High St. Eaglehawk." 1204.4 - "No. 5 in High St. Eaglehawk." 1204.5 - "No. 5 in High St. Eaglehawk." 1204.6 - "No. 5 in Mt. Korong Rd., Ironbark, passing Calder Highway Junctn." 1204.7 - "No. 26 shortly after leaving Needle Loop, passing William St., Long Gully. No. 5 cresting hill in distance." 1204.8 - "No. 5 at California Gully Loop." 1204.9 - "No. 5 in Long Gully" 1204.10 - "No. 2 at Eaglehawk terminus." 1204.11 - "No. 2 at Eaglehawk terminus." 1204.12 - "No. 2 at Eaglehawk terminus." 1204.13 - "No. 2 at Eaglehawk terminus." 1204.14 - "No. 2 in Mt. Korong Rd, midway between California Gully Loop and Needle Loop. 1204.15 - "Nos. 2 and 26 crossing at Long Gully." 1204.16 - "No. 26 leaves Long Gully loop for Eaglehawk as No. 2 pulls out of the far end towards Bendigo" 1204.17 - "No. 26 beginning the climb up View St. from Charing Cross." 1204.18 - "No. 5 at Charing Cross." 1204.19 - "No 21 arrives at Charing Cross from Golden Square while No. 5 awaits departure time for Eaglehawk." 1204.20 - "Nos. 7, 21, and 2 (behind which is No. 5) at Charing Cross." 1204.21 - "Nos. 7, 21, and 2 at Charing Cross." 1204.22 - "No. 5 at Charing Cross." 1204.23 - "No. 25 in Nolan St. near Bendigo creek crossing" 1204.24 - "No. 25 in Weeroona Ave. at cnr of Caledonia St." 1204.25 - "Nos. 25, 7, 26 and 2 (behind 26) at Charing Cross."tramways, trams, bendigo, eaglehawk, long gully, california gully, charing cross, north bendigo, tram 2, tram 5, tram 7, tram 21, tram 25, tram 26 -
 Ballarat Tramway Museum
Album - Photo Album, Newstar, 1960s to 1970's
Photographic album containing 39 Colour postcards of Melbourne trams. The album consists of 30 leaves of dark grey heavy paper with three creases on left hand side of sheet, bound into a heavy bluey grey folder, embossed in gold 'Scrap Book" and bound with bluey grey string with two holes. The cover has been embossed with a the blue grey in swirls. Inside of back cover is a white label, "A New Star Product", with a please ask for No. with "425" stamped on. Postcards have been glued into the album. Entries have been kept to a single line - cards are able to be dated from buildings, whether the trams have marker lights, types of motor cars and general Melbourne history. Image files in page number order. Image 15 is of book. All taken with a electronic camera. Page 1 - Night photo - Flinders and Swanston St. - with "Greetings from Huntingdale" embossed in gold. Flinders St. station, with "Greetings from Huntingdale" embossed in gold. (post 1972 ) St. Kilda road with the Shrine of Remembrance in the background and W2 453 inbound on route 6. (post 1974) Page 2 - Bourke St, looking from Parliament House westwards, with Z8 inbound - after 13/8/1975 on route 89. Bourke St, looking east from Queen St., night photo, early 1970's. Princes Bridge looking towards Flinders St. Station Page 3 - Flinders St. Station, from Princes Gate buildings, - Photo E. Ludwig, John Hinde Studios. Bourke St. from Queen St, looking east, late 1960's - all W's. - W7 1026 east bound on route 88. Flinders St and Swanston St. corner, from Princes Bridge - night photo - W5 756 northbound route 15. Page 4 - W2 584 inbound route 64, St. Kilda Road and Nolan St., late 1960s - photograph. Princes Bridge, looking over Yarra River to the east. (pre Concert Hall) St. Kilda Road, with Shine of Remembrance in background, W2 303 inbound route 4D, mid 1960's. Page 5 - Flinders and Swanston St, W2 530 outbound route 8, early 1970's. Swanston and Collins St., W2 596 westbound in Collins St. City Square built - 1st version. (post 1972) St Kilda Road, with Shine in background, W2 298 and others, route 8 and 72. (post 1972) Page 6 - Flinders and Swanston St., W2, inbound route 5 on a wet evening. (mid 1970's) W2 515 outbound, Collins St., late 1960's, with Town Hall in background. (early 1970's, prior to lights) Collins St. looking west at Russell St with W2 637outbound route 42, early 1960's. Page 7 - Swanston St looking south at Little Bourke, W2's 373 route 67 and 374?(route 5), southbound, early 1970's Flinders St. Station, looking west in Flinders St., early 1970's, at dusk. Melbourne Town Hall with City Square from the North West (early 1970's) Page 8 - Bourke St looking east from Queen St. with W7 1005 inbound on route 96 - early 1970's. Bourke St. looking west from Exhibition St. with W6 976 outbound on route 95 - early 1970's. Swanston St. looking south from Lonsdale, with W2 484 on route 64, W2 228 and W2 364 in photo - early 1970's. Page 9 - Swanston looking south from north of Lonsdale St with many tramcars in photo - mid 1970's. St Kilda Road, with Shrine in background, W2 345 outbound route 4, SW6 913 inbound route 4 - prior to 1970. St Kilda Road, with Shrine in background, with trams in photo - early 1970's. (Photo loose in album - National View postcard by Murfett Ltd. Aust.) Page 10 - Postcard - TMSV? of 1041 and cable car set at Preston Workshops. 1041 in Bourke St., looking east from Queen St. - early 1970's - 1974? Collins St. looking east from Elizabeth St. with W2 253 inbound route 11, and W2 224 outbound - rout 47, early 1970's Page 11 - TMSV Postcard, X217 in Dandenong Road with L class in background. Shrine of Remberance from BP building, looking towards the city with St. Kilda Road on the left. Princes Gate and Flinders St. from the SEC buildings in Flinders St. looking south east - mid 1960's. Page 12 - Swanston St. at Flinders St. looking north at dusk. Flinders St. station at Swanston St with trams crossing at intersection - late 1960's Flinders St. station with W2 327 outbound. Page 13 - Temporary City Square at Collins and Swanston St. with tramcars at intersection. Wellington Parade (Mugs Alley), looking towards the City, with W2 546 inbound on route 38 - mid to late 1960's. Page 14 - Swanston St. looking south, at Lonsdale St, W2 432 inbound route 7 - late 1960's or early 1970's. Partly loose in album - National View postcard by Murfett Ltd. Aust. trams, tramways, photo album, melbourne, postcards -
 Ballarat Tramway Museum
Photograph - Colour Photograph/s - set of 25, Austin Brehaut, 7/04/2000 12:00:00 AM
Yields information about various locations in Ballarat in March 2000 for comparison with previous photographs.Set of 25 colour photographs taken by Austin Brehaut on 7 April 2000 showing various locations that Ballarat trams once ran in, for use in a BTM presentation, named "Ballarat Past and Present" at the COTMA 2000 Ballarat Conference. All on Fujicolour Crystal Archive Paper. On rear in blue ink is the date, location and where relevant a reference number to photo locations that the author of the presentation had requested. Letter from Austin, filed with the worksheet for Reg. Item 1772. 1773.1 - Base Hospital, Cnr Drummond St. North and Mair St. .2 - Hospital Corner - Base Hospital Along Drummond St. North .3 - St John of God Hospital, cnr Mair and Drummond St. Nth. .4 - Hospital Corner, looking South East from Base Hospital .5 - Gardens at Loop (Wendouree Parade) .6 - Gardens Loop and Shelter .7 - Shelter at Gardens Loop .8 - Bridge Mall looking west .9 - Lower Victoria St. along Bridge St .10 - Railway crossing, Ballarat Station, with gates open .11 - Victoria St. hill facing west .12 - Railway crossing, Lydiard St. North .13 - Railway crossing, Ballarat Station, with gates closed .14 - Lydiard St. North terminus from cemetery .15 - Lydiard St. North at Macarthur St. .16 - Lydiard St. North at Sturt St facing South East - Post Office on left .17 - Looking north along Lydiard St at Sturt St .18 - Sturt and Lydiard Sts corner from Post Office .19 - Centre plantation Sturt St. looking east .20 - Sturt St. West near Ballarat and Clarendon College .21 - Sturt St. West facing west at Russell St. .22 - Victoria St. terminus .23 - Victoria St. terminus .24 - St Alipius Church, Victoria St. .25 - Junction of tramline and Phoenix foundry railway in Sturt St. at Armstrong St. (transferred from roadway) See Reg item 4645 and 4646 for the 2010 comparisons.See Aboveballarat, hospital corner, gardens loop, railway crossing, lydiard st. north, sturt st, phoenix foundry, armstrong st., victoria st., sturt st. west -
 Ballarat Tramway Museum
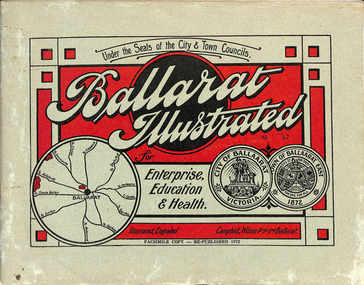
Book, "Ballarat Illustrated", 1972
Original c 1914 (see below), facsimile copy - re-published 1972. Original features photos of Ballarat City and Town, its buildings, parks and the various industries and organisations that were in Ballarat at the time of publication, including ESCo. Many photos features ESCo trams. Photos sepia toned. Has some red colour block printing on the front cover and rear, for Star Oil Engines. On inside back cover is a map with the places of interest and tram route map, marked in red. Pages are un-numbered. Original published by Ballarat East Town Council and Ballaarat City Council. On cover has number stamped in black in, "No. 87" (assume facsimile copy No.). Photos with publication show tram No. 21, built 1913 and ESCo photo page shows Mr. Pringle as Manager. Mr Pringle became manager in January 1911, As there is no photos of the "Avenue of Honour", or other mention of the first world war, assume original published about 1913 or 1914. Original shows Engravings and printing by "Campbell Wilson Prop Ltd, Ballarat". See Other Information as well for more listing details. High Resolution image added 31/8/2012 of i2 of ESCo page and i3 for Ballarat identies and sheet i4 extracted for Mr Pringle. PDF scan of full document added 21/5/2019 - see images btm633-1i.pdf and btm633-2i.pdf Notes on "Ballarat Illustrated" Reg. Item No. 733 From notes made by Neville Gower 12/1/1997 Cover: Inside front cover: Last paragraph, "Facilities for Travelling" - Electric trams serve all parts of Ballarat. Page 3: Street Scene, Municipal Town Hall, showing tram wiring Page 7: Street Scene, Lydiard St. North, intersection and tramway centre, with ESCo tram No. 21 in the bottom photo. Other photos features trams as well in Sturt St and Lydiard St. North. Page 9: Street Scene, Top photo of Sturt St. from Lydiard St. looking east, shows piles on right-hand side of road. Car parked by Post Office has a car registration number "9007". Bottom photo, an tram climbing hill, shows double trolley in the street, with early English type of pull offs. Page 13: Street Scenes and Historic Buildings: One of five photos, shows Victoria St. looking East, with tram track prominent in photo and how stone work was set up about the rails and overhead poles. Page 23: Street scene, Gardens North Entrance gates, shows details of gates near St. Aidans Drive. Note double trolley wire on poles, and style of insulators. No trams in photo, three ladies walking down the track. Page 37: Street Scene; Lydiard St views, top left hand photo, shows Railway station and railway gates with signal gantry and horse drawn vehicles. Tram tracks apparent. Bottom left hand photo shows Lydiard St. North, near Post Office, double track with centre poles - Single wire per track. Top right hand photo, showing Cemetery gates in background. Bottom right hand photo - from north end of Lydiard St. South, looking north, with an ESCo tram in background. Also has a parked car on left hand side. Page 45: Street Scenes - Bridge St; top photo at west end of Bridge St. with ESCo No. 11 with possibly double trolley wire in photo. Bottom photo at east end of Bridge St. with tram in background, shows junction. Double trolley heading out to Mt. Pleasant, single trolley for Victoria St. Page 45: Street Scenes - Bridge St; top photo at west end of Bridge St. with ESCo No. 11 with possibly double trolley wire in photo. Bottom photo at east end of Bridge St. with tram in background, shows junction. Double trolley heading out to Mt. Pleasant, single trolley for Victoria St. Page 61: Street Scenes and Historic Buildings - Public Institutions Ballarat - top left hand photo of the Hospital shows some tram track in foreground, with double trolley wire. Top right photo is of the Orphanage, the name of the tram terminus for many years. Page 68: Electric Supply Co. of Victoria's pages - top photo showing powerhouse in background, across the lake, can hardly see anything for the trees, except for the chimney. Bottom photos of the steam Turbo Generators and the switchboard. Gives Mr. P.J. Pringle as Chief Engineer and General Manager. He took over in Jan. 1911. Page 69: Ballarat East Views - features photo of Black Hill open cut, Ballarat East Railway Station, Ballarat Fire Station and "Victoria St. looking East", repeat of photo printed on page 12, but slightly darker. Image on system includes fire station and railway station, - Ballarat East. Page 78: Series of photos of various Ballarat VIP's of the era, fourth one in on top line features "P.J.Pringle, Electric Supply Co." Inside Back cover - map of Ballarat including tram lines and places of interest marked in red. Gives a detailed photographic presentation of Ballarat in 1914.80 page book with, in addition, light green card covers, titled "Ballarat Illustrated". Loose copy of page 9 and 10 held.trams, tramways, ballarat, local history, heritage buildings, esco