Showing 469 items
matching south pole
-
 Ballarat Tramway Museum
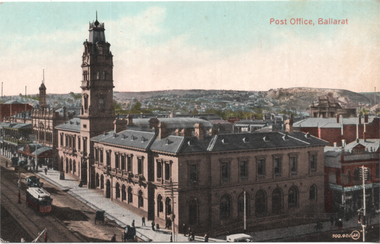
Postcard, Post Office Ballarat, c1910
Coloured image of the intersection of Sturt and Lydiard Streets looking north along Lydiard St. North giving a high view of the Post Office building with its tower. Has an ESCo tram southbound in Lydiard St North, a motor car and several horse-drawn vehicles. Shows the verandahs along Lydiard St, centre poles, and looks towards a rather desolate Black Hill following extensive mining works. The Post Office time ball is in the down position. Possibly c1910. Summerscales building - photographer, postcards is next door to the Post Office in Sturt St. On the rear is a handwritten note from Wal Jack to Ken Magor about the tram in the photo, the time ball on the post office flagstaff, Railway station tower to the left of the Post Office, carriage sheds in the long building behind the oval type roof of old mining exchange. See item 8411 for a coloured version. Yields information about the intersection of Sturt and Lydiard Streets in the early ESCo era and the Post Office building.Postcard - black and white- divided back, undated - Valentine & Sons, Printed in Great Britain. Card Number "20-2"Notes by Wal Jack on the rear - see image 2nd image.sturt street, post office, ballarat, tramways, lydiard st, esco, black hill -
 Ballarat Tramway Museum
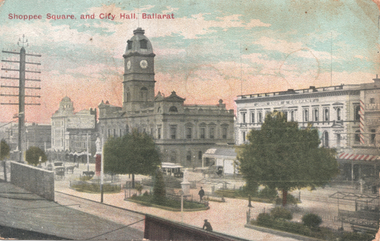
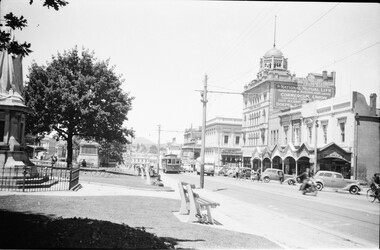
Postcard, "Shoppee Square and City Hall, Ballarat", c1909
Photo looks over Shoppee Square (Central median area) in Sturt St between Armstrong and Doveton Streets, with the Town Hall and John Snow & Company (Snows) building in the view, along with the national mutual building. An ESCo tram is westbound on the south side of Sturt St. Note the telegraph pole on the left side of the photo. One the rear is a birthday message to a person in Hamilton Newcastle. It is dated 29/11/1909.Yields information about Sturt St Ballarat and Shoppee's square.Postcard colour, Divided back. No publisher's name on rear though has a publisher mark in the top centre - a six pointed star with a central motif.See image 2 for letter.tramways, trams, esco, sturt st, shoppee's square -
 Ballarat Tramway Museum
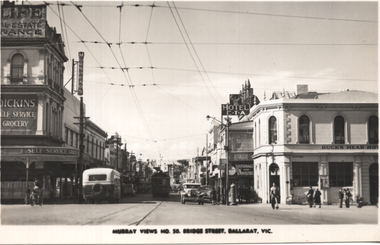
Postcard, Murray Views, "Murray Views No. 50 Bridge Street Ballarat Vic", 1948
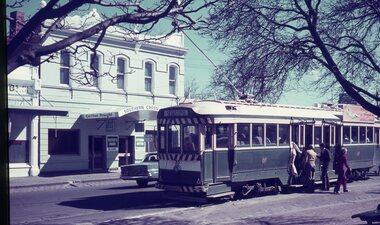
Photo shows the view looking east along Bridge St from Grenville St. Bogie tram 35 is in the shadows. A bus is entering Bridge St, In the view are Dickins Self service grocery, Morseheads store, CTA Hotel, and the Bucks Head Hotel. On the rear, Wal Jack to Ken Magor of Newcastle has written "No. 35 bogie to Victoria St, 1948. Bridge St from Sturt and Grenville Sts. Note two green lights on the span pole under neon sign which guards the Bridge St (bottom light) and Victoria St single track. Mt Pleasant light is on opposite side pole. No. 35 is standing at the old city terminus up to 1937."Yields information about Bridge St Ballarat and its various buildings.Postcard black and white, divided back, with a handwritten note on rear.See image 2 for details of the handwritten note by Wal Jack on the rear. tramways, trams, bridge st, tram 35, buses, dickins, bucks head hotel -
 Ballarat Tramway Museum
Postcard, Valentine & Sons Publishing Co, "Lydiard Street showing George Hotel Ballarat", 1931
Valentine Series postcard of the early 1930s of No. 27 inbound in Lydiard St Nth. Valentine series No. 1492, with the caption "Lydiard Street showing George Hotel, Ballarat". See page 59 of The Golden City and its Tramways and for the photo itself. Photo shows the wooden centre poles, street lighting, tram 27 in ESCo colour scheme, and buildings on the west side of Lydiard St North, including the George Hotel, A.M. Palmer & Co Chemist, Wm Hiscock Dentist and other buildings. A horse-drawn cart and two motor cars parked at the kerb. See 3893 for a digital image and reproduction photograph.Yields information about Lydiard St Nth in the 1930's, the centre poles, traffic and the appearance of the trams.Postcard black and white, divided back. Card No. 1492Has on the rear in pencil "KT" and "to be copied" tramways, trams, tram 27, lydiard st nth, george hotel, centre poles -
 Ballarat Tramway Museum
Slide - 35mm slide/s, Dave Simpson, late 1960's early 1970's
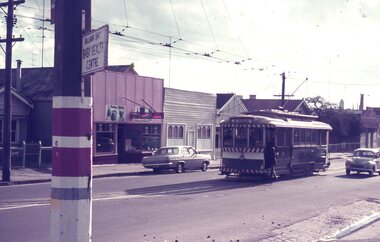
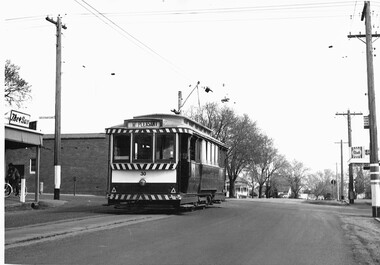
Yields information about Main Road, just before the intersection with Barkly St.One 35mm slide Anscochrome white plastic mounts of No. 13 with the destination of Mt Pleasant in Main Road, just before the intersection with Barkly St. with "Fish and Chips" shop in the background. Has a Tarax advert on the shop. (This shop was subsequently rebuilt with a car park next door, but is (27-8-16) now closed. In the foreground is a painted tram stop on a pole with a direction sign for the Ballarat East Baby Health Centre.tramways, trams, main road, mt pleasant, tram 13 -
 Ballarat Tramway Museum
Slide - 35mm slide/s - set of 3, Dave Simpson, trams in Sturt St near Hospital Corner, late 1960's early 1970's
.1 -No. 35, outbound to Sebastopol with the Southern Cross Hotel in the background. Has signs for Fosters Larger, Carlton Draught and Victoria Bitter. Has a number of passengers boarding the tram. .2 - at Hospital corner with the signal system control box for the Forest City signals in the foreground on a pole. Has marking for Sebastopol, Sturt St West and Drummond St North? written on the box. Above this is a sign advising passengers that trams depart this point for The Gardens, View Point and Sebastopol. In the background is J. A. Malpass Hairdresser shop. See item 8900 for the actual switch. .3 - No. 35 turning into Drummond St south with the bottle shop on the south east corner in the background.Yields information about Hospital corner and the switch for the Forest City signalling system controls.Set of three 35mm slides - AGFA dark blue / white plastic mounts of trams in Sturt St near Hospital Corner. tramways, trams, sturt st, hotels, hospital corner, forest city signals, signs, tram 35 -
 Ballarat Tramway Museum
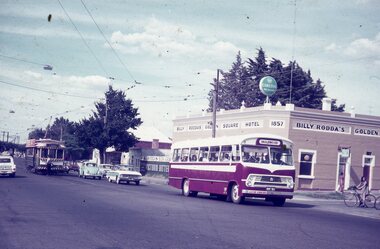
Slide - 35mm slide/s, Dave Simpson, tram 21 at Golden Square, late 1960's early 1970's
One 35mm slides - AGFA dark blue / white plastic mounts of tram 21 at Golden Square with the driver changing the pole. Has Billy Roddas Golden Square Hotel in the background with Carlton Draught and Victoria Bitter adverts. In the photo is a bus with the destination of Inglewood. tramways, trams, golden square, buses, hotels, crews, drivers, tram 21 -
 Ballarat Tramway Museum
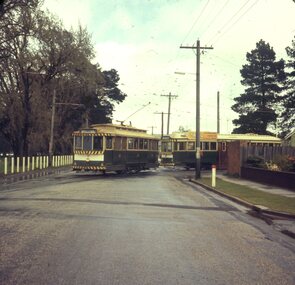
Slide - 27 mm sq slide/s - set of 7, Lilian Butler, Mt Pleasant line, Sep. 1971
Yields information about the streetscapes of Stones Corner to Mt Pleasant route and in particular buildings and people that crewed the trams.Set of seven Colour 27 x 27 mm slide in a Kodachrome cardboard mount. .1 - Tram turning onto the Mt Pleasant line at Stones Corner - Bridge St, Main Road .2 - Main Road looking south with Inland Body Works building on the left and Ampol Service Station .3 - Mt Pleasant terminus with the butcher shop on the left and the diary on the right - shows the terminating tram track .4 - Conductor changing pole. .5 - Putting pole on the overhead .6 - Conductor (D O'Leary - No. 38) standing in front of tram and Motorman or driver (N. Hall - No. 43) .7 - ditto with number visible. See Reg item 3425 for crew lists. Slide mount date September 1971. Photo from the collection of Lilian Butler.ballarat, tramways, trams, stones corner, main road, mt pleasant, crews, drivers, conductors, trolley poles, tram 41 -
 Ballarat Tramway Museum
Slide - 27 mm sq slide/s - set of 2, Lilian Butler, No. 30 towing a bogie tram with the trolley poles and lifeguards removed, Sep. 1971
Yields information about the SEC Wendouree Parade depot and the activities at the depot after closure.Set of two Colour 27 x 27 mm slides in Fuji film, processed by Hanimex white cardboard mounts. .1 - view of the SEC depot front with three and four roads doors, shows the sign and the small personnel door open. .2 - No. 30 towing a bogie tram with the trolley poles and lifeguards removed (possibly No. 37 but looks more like an ex HTT car) onto Wendouree Parade to be loaded. Photo from the collection of Lilian Butler.ballarat, tramways, trams, sec depot, depot, wendouree parade, closure, tramcars, loading trams, scrubber, tram 37 -
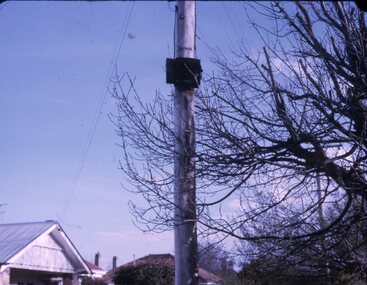 Ballarat Tramway Museum
Slide - 27 mm sq slide/s, Lilian Butler, Forest City signal box on a pole, Oct. 1971
Yields information about the appearance tram signals on the Ballarat system.Kodachrome cardboard slide of tramway Forest City signal box on a pole. Slide dated Oct. 1971. Photo from the collection of Lilian Butler. ballarat, tramways, trams, signals, forest city signals -
 Ballarat Tramway Museum
Slide - 27 mm sq slide/s - set of 4 - crews, Lilian Butler, Tram crews, 1971
Set of four Kodachrome colour slides - what cardboard mounts of: .1 - I. Wallis? standing alongside the tram stop and end of section sign pole at the intersection of Sturt and Lydiard Streets. See also Reg Item 6462 for colour print. .2 - A. Turnball? mowing a lawn with a hand lawn mower. See also Reg Item 6465 for colour print. .3 - Colour print of Conductor D. Chambers (9) and Driver D. Domaschenz (24) standing in front of tram 14. See also Reg Item 6459 for a colour print. .4 - Conductors W. Davies?, S. Davies and driver A. Jeffreys at the Sturt St city stop, August or September 1971. See also Reg Item 6463 for a colour print. Photo from the collection of Lilian Butler. Names based on list given in Reg Item 3425. See also Reg Item 1861 for group photograph. Slides have a date of Sept. 1971. ballarat, tramways, trams, crews, motormen, conductors, city -
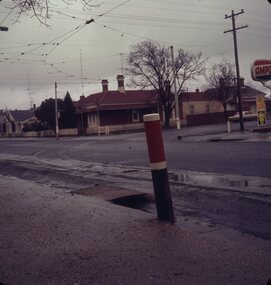 Ballarat Tramway Museum
Slide - 27 mm sq slide/s - set of 3, Lilian Butler, Sturt St and Ripon Sts, 1971
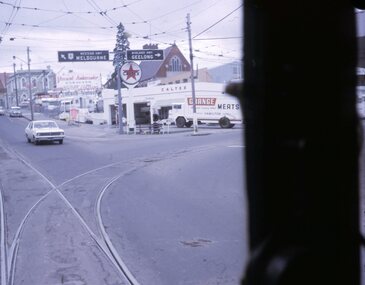
Yields information about Ripon St, Talbot St.Set of 3 Hanimex slides - what cardboard mounts: 1 - View Point line junction at Ripon St, looking north west with short tram stop pole and Ampol service station sign on the right. 2 - Water column North West corner of Sturt Street and Talbot Street (opposite the Fire Station). Column long gone. (Advised by Neville Britton 26/9/2016 - by e-mail) 3 - looking west - South side of Sturt St. Photo from the collection of Lilian Butlerballarat, tramways, trams, sturt st, view point, ripon st, tram stops -
 Ballarat Tramway Museum
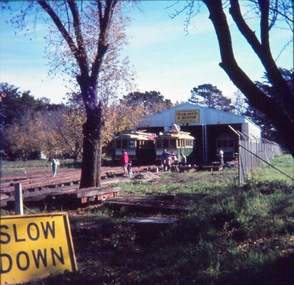
Slide - 35mm slide/s - set of 8, John Theodore, 1972 - 1974
Yields information about depot activities of the BTPS in building the depot fan and access track.Set of 8 AGFA blue and white plastic mount 27mm sq slides of various works at the BTPS depot during 1972 / 1974. .1 - View looking from roadway showing depot, and various works at the depot - 26 and 27 out front. .2 - Sawing timber sleepers to length - Noel Forster, Barry McCandlish, Bill Kingsley .3 - Ballasting the access track - Rolf Jinks and Clyde Croft .4 - working on the roof of 27 - Geoff Cargeeg and others. .5 - break time. .6 - Bob Prentice and Geoff Cargeeg? on roof of 27 .7 - ditto .8 - Interior photo of 27Various notations by John as to the slide number and the trams in pencil and ink.tramways, trams, btps, depot, track construction, trolley poles, interiors, tram 26, tram 27 -
 Ballarat Tramway Museum
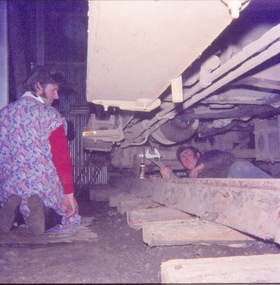
Photograph - Digital image Set of 7, John Theodore, c1973
Yields information about the activities inside the depot by the BTPS showing difficulties and the provision of overhead troughing.Set of 7 digital images scanned from 35mm slides of early activities at the BTPS depot c1973. .1 - Noel Forster assisting another member adjust the brakes on a bogie tram inside the depot. .2 - cleaning old paint off a bracket arm with a kerosene blow torch. .3 - repainted trolley pole base at the depot .4 - interior view after the troughing has been positioned. .5 - ditto .6 - view of the depot from the overhead truck - 26, 28 and 40, one road yet to be commenced. .7 - interior view of the depot with workers - Peter Rees, Andrew Cook and Graeme Jordantrams, tramways, btps, trackwork, depot, tramcars, overhead, tram 26, tram 27, tram 40 -
 Ballarat Tramway Museum
Photograph - Digital image, John Theodore, c1973
Yields information about the BTPS constructing No. 1 road at the depot.Digital images scanned from 35mm slides of the construction of 1 road points, first half of 1973. Points and crossings installed and poles installed. Little segments of rail have been laid out to indicate the position of the track.trams, tramways, btps, trackwork, depot, overhead -
 Ballarat Tramway Museum
Photograph - Digital image, 1960's
Yields information about the appearance of the City tram terminus during the early 1960's.Digital images scanned from 35mm slides, possibly a copy slide obtained by John Theodore from the BTPS Sales of tram 21 at the City Terminus. Has the destination of Mt Please and an SEC Electric Cooking advert. In the background is the Town Hall. In front of the tram is the short tram stop pole and a conductor? standing by the front door.trams, tramways, sturt st, city, tram stops, tram 21 -
 Ballarat Tramway Museum
Negative - Set of 3, Campbell Duncan, 28/12/1970 12:00:00 AM
Yields information about the terminus at Sebastopol and signage.Set of three photographs of No. 26 at the Sebastopol terminus - 28/12/1970 .1 - 26 at the terminus, looking north. Has a Bliss Bombs roof advert - "Share bliss - make a friend". Tram has the destination of Lydiard St North. .2 - Tram timetable sign at the terminus, with a "Cars stop here" sign and the Fosters sign in the background. .3 - No. 26 at the terminus with the driver turning the pole.trams, tramways, albert st, signs, sebastopol, drivers, tram 26 -
 Ballarat Tramway Museum
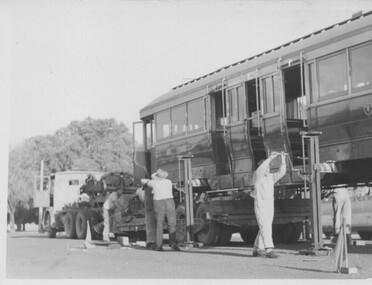
Photograph - Black & White Photograph/s set of 2, Charles Craig, 27/03/1956 12:00:00 AM
Yields information about the transportation of a bogie tram from Geelong to Ballarat following closure of the Geelong system.Set of two photographs of the loading of an SEC bogie tram in Geelong. Though no number shown, letter from Bob Lilburn to Charles Craig - 7-2-1971 identifies the tram as Geelong 40, being loaded on 27-3-1956 (See Reg Item 6747 and 8527 for other photographs) Would appear the trolley pole bases have been removed. .1 - tram on jacks with semi trailer partly under the tram - maximum traction bogie on the turntable section of the semi trailer. .2 - the bogie being craned on with a Fowler mobile crane. Tram became Ballarat 43. trams, tramways, geelong, transport, loading trams, tram 40 -
 Ballarat Tramway Museum
Photograph - Black & White Photograph/s, Charles Craig, mid 1950's
Photograph of ex Geelong No. 39 in Ryrie St at Moorabool St looking west. Tram has the destination of West. Shows the centre poles and the shops in the street. Two prints held - one large and one small. trams, tramways, geelong, ryrie st, moorabool st, tram 39 -
 Ballarat Tramway Museum
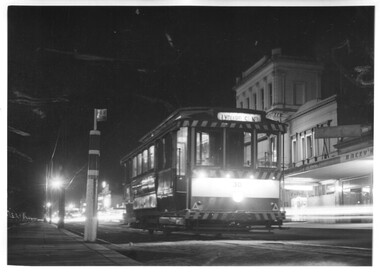
Photograph - Black & White Photograph/s, Charles Craig, early 1970's
Yields information about the use of the appearance of City terminus and vehicles during the early 1970's and demonstrates night photography.Black and white photograph of Ballarat tram 30 at the City terminus at night. Tram has the destination of Lydiard St North. In the background is the SEC offices and Racey's store. The small stop pole with the End of Section sign is in the photograph. Photo by Charles Craig possibly early 1970's. trams, tramways, sturt st, city, night photo, tram 30 -
 Ballarat Tramway Museum
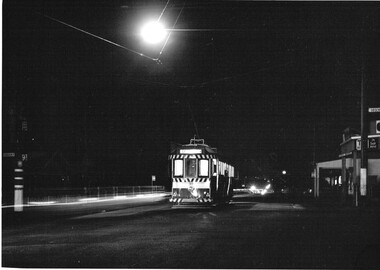
Photograph - Black & White Photograph/s, Charles Craig, 1971
Yields information about the appearance and use of the bogie trams at night.Black and white photograph of No. 43 at the city terminus at night. In the view is the short tram stop and End of Section pole. Tram has the destination of Mt Pleasant. Photo by Charles Craig - during 1971. trams, tramways, city, sturt st, night photo, tram 43 -
 Ballarat Tramway Museum
Photograph - Black & White Photograph/s set of 2, Charles Craig, 1971
Yields information about the appearance and use of the Mt Pleasant terminus at night.Set of two black and white photographs of No. 39 at the Mt Pleasant terminus, Barkly St. Have the shop at the terminus and the directional sign to the Observatory in the view, along with the tram stop pole. Adverts for TV week and Peter's Ice Cream are visible on the shop. Photo by Charles Craig - during August 1971 as one of the photos has the new bus stop sign in the view. trams, tramways, mt pleasant, barkly st, night photo, tram stops, bus stops, tram 39 -
 Ballarat Tramway Museum
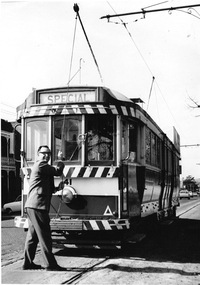
Photograph - Black & White Photograph/s, Charles Craig, 1971
Has a strong association with the photographer and demonstrates enthusiasts changing trolley poles on special trams.Black and white photographs of Charles Craig lowering trolley pole on No. 41, while running a Special at Hospital Corner in Sturt St. Photo with Charles Camera. trams, tramways, hospital corner, trolley poles, special trams, tram 41 -
 Ballarat Tramway Museum
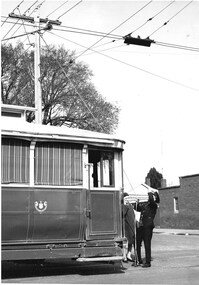
Photograph - Black & White Photograph/s, Charles Craig, 1971
Has a strong association with the crewman and demonstrates the work in placing a trolley pole on the overhead.Black and white photographs of the conductor (or motorman) placing the trolley pole of a single trucker on the overhead, shielding his eyes, at the Mt Pleasant terminus, corner of Cobden and Barkly Streets. A lady in a hat is speaking to him. Photo shows the trolley pole positioning device in the overhead. Possibly No. 30, see Reg item 6803. Photo by Charles Craig, probably August 1971.trams, tramways, trolley poles, mt pleasant, conductors, tram 30 -
 Ballarat Tramway Museum
Photograph - Black & White Photograph/s, Charles Craig, 1971
Yields information about the Mt Pleasant terminus just before the closure of the SEC operated system,Black and white photographs of No. 30 at the Mt Pleasant terminus, with the shops on each corner in the view. Adverts for The Sun, Streets Ice Cream. Pole on the right hand side has a "Car Stop Here" and "End of Section" sign. Tram has the destination of Mt. Pleasant. Photo by Charles Craig, probably August 1971.trams, tramways, barkly st, mt pleasant, signs, tram 30 -
 Ballarat Tramway Museum
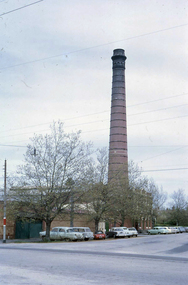
Photograph - Digital image, W. J. Llewelyn, c1980
Yields information about the Ballarat Power Station A prior to the demolition of the chimney.Colour digital images taken by W. J. Llewelyn of Ballarat A Power Station, Wendouree Parade and Ripon Street with the chimney standing late 1950's or early 1960's. Note the tram stop pole in the left hand side.trams, tramways, ballarat a power station, wendouree parade, ripon st, sec -
 Ballarat Tramway Museum
Photograph - Black & White Photograph/s, Negative, Ellis Collection, c1950
Yields information about the appearance of Sturt St c1950 and the Lydiard St intersection.Black and white photograph of a single trucker west bound in Sturt St at Lydiard St North. Note the bus alongside the tram. Has the National Mutual building and Commonwealth Bank buildings. Sign on the National Mutual building advertising Commercial Union Insurance and Doepel and Lilley Real Estate. Bracket arms are of the type that required the pole to be cut into. c1950. Item donated comprised negative 1095, A4 print and laminated A4 print. Negative scanned at 2400dpi. On the top edge of one of the prints "same as 1094"trams, tramways, ballarat, sturt st, secv, lydiard st, tram 30 -
 Ballarat Tramway Museum
Photograph - Black & White Photograph/s, Negative, Ellis Collection, c1950
Yields information about the appearance of Bridge St and the use of the trams c1950.Black and white photograph of a bogie tram 22 west bound in Bridge St. Has a group of ladies on either side of the road waiting to board? Note the signs on the poles on either side of the roadway. Has the Waratah Motors, Roger David stores on the west side of the street. c1950. Note the road lifting over the Yarrowee River bridge. The two signs on either side of the road "No Parking over 1 hour Park 1 Foot from kerb" Negative number 1140. Negative scanned at 2400dpi. On the top edge of one of the prints "same as 1094"trams, tramways, ballarat, bridge st, signs, tram 22 -
 Ballarat Tramway Museum
Photograph - Black & White Photograph/s, Negative, Ellis Collection, c1950
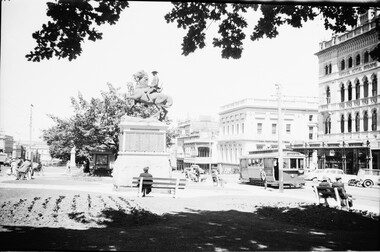
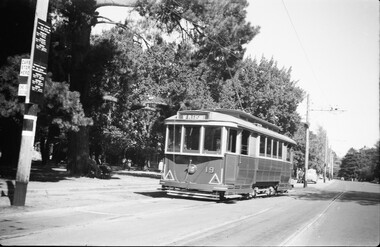
Yields information about the appearance of Sturt St and Lydiard St intersection c1950 and the use of the trams.Black and white photograph of No. 12, Sturt St West in Sturt St at Lydiard St North. Has the National Mutual building and Commonwealth Bank buildings. Bracket arms are of the type that required the pole to be cut into. c1950. Has the Boer War Memorial in the view. Item donated comprised negative 1141, A4 print and laminated A4 print. Negative scanned at 2400dpi. On the top edge of one of the prints "Sturt St Ballarat 1950 no print required"trams, tramways, ballarat, sturt st, secv, lydiard st, statues, tram 12 -
 Ballarat Tramway Museum
Photograph - Black & White Photograph/s, Negative, Ellis Collection, c1950
Yields information about the appearance of the Gardens Crossing Loop and tram 19.Black and white photograph of tram 19 leaving Gardens Loop with the destination of Mt Pleasant. Note the tram stop pole behind the tram, fitted with timetable boards, stop sign and section sign. Item donated comprised negative 1144, A4 print and laminated A4 print. Negative scanned at 2400dpi. See Reg Item 3376 for another print - noted that it was from the Ellis Collection. On the top edge of one of the prints "Wendouree Parade 1950 have print"trams, tramways, gardens loop, wendouree parade, tram stops, tram 19