Showing 121 items matching "sunk ship"
-
 Port Fairy Historical Society Museum and Archives
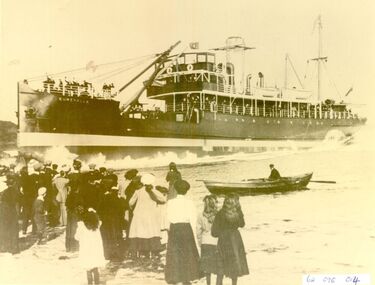
Photograph, S.S.Eumeralla
EUMERALLA 906 gross tons, 489 net. Lbd: 190' x 30'1" x 12'5". Steel steamship built by Scott of Kinghorn Ltd, Kinghorn for the Western District Steam Ship Co Ltd., Melbourne. This concern may have been a subsidiary of Howard Smith Ltd, at least held some connection. Powered by a triple expansion engine producing 97 horsepower and of 2 single ended boilers, coal fired. Employed on the Western districts of Victora - Melbourne in passenger-cargo capacity. World War 1 disrupted trade and she spent much time 'laid up'. 1920 owned by Australian Steamships Pty Ltd (Howard Smith). 1928 again laid up, 1934 sold to Young & Co., Sydney who probably acted as agents for Asian interests when she was renamed Mow Li No. 2 in 1934-5. Under that name she sunk at Tinghai on the 12th July 1935 This photograph was almost certainly not taken at Port Fairy but it did work through the Port Fairy Port. sepia photographs.s.eumeralla, ship, boat, sea, moyne river -
 Vision Australia
Medal - Object, Le Bureau du Conseil de Paris, Freedom of the City of Paris medal, 1972
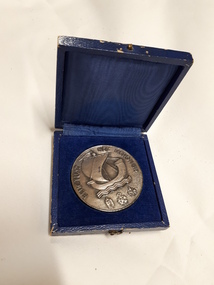
"The Council Office of Paris in its session of 13th March 1972 awarded Monsieur Hugh Jeffrey the silver medal of the City of Paris." Dated 20th March 1972. Embossed on one side with the City of Paris's motto (Fluctuat nec mergitur) around a sailing ship above three badges (the Legion of Honour, the Croix de Guerre and the Ordre de la Liberation). The reverse side has 'Ville de Paris' (City of Paris) above an inscription 'Paris a Hugh Jeffrey 1972'.1 medallion in blue medal boxFluctuat nec mergitur (Tossed but not sunk)hugh jeffrey, awards -
 Falls Creek Historical Society
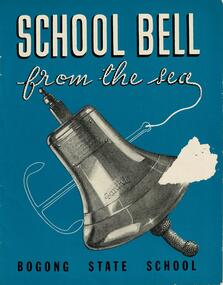
Booklet - School Bell from the sea - Bogong State School
This booklet tells the story of the bell from the "S. S. Santhia" and how it came to Bogong State School, Victoria. "Santhia" belonged to the British India Line. On 6th November 1943 she was in service as a troopship when she caught fire and capsized at No. 3 Garden Reach Jetty, Calcutta. Due to the additional weight of water pumped into her to extinguish the fire, "Santhia" heeled over and remained in the mud of the River Hooghly until a successful salvage was completed in January 1946. The salvage operation was carried out by Captain J. P. Williams of Melbourne and his team of Australian divers nine and a half months after the commencement of operations. "Santhia" was the sixty seventh ship salvaged by Captain Williams. "Santhia's" Bell was presented by Captain Williams to Mr G.G. Jobbins, Chairman of Commissioners for installation at Bogong State School. The ceremony of presenting the bell took place on 21st February 1947. The bell bears the following inscription:- "Presented to G.G.Jobbins, Esq., Chairman, State Electricity Commission, by Captain J.P. Williams for Bogong School, on December 6th, 1946. This bell was recovered from the wreck of the "S.S.Santhia" sunk in the Hooghly River, Calcutta, and raised by an Australian salvage party."This booklet is significant because it documents an unusual event linking Bogong State School to a World War II salvage operation.A booklet consisting of images and text which tells the story of S.S. Santhia, of her sinking while in service as a troopship, of her subsequent salvage and how her bell came to Bogong State School in Victoria's High Country. The booklet consists of 12 pages including the cover. It consists of text and images. Primarily printed in black and white, the booklet uses blue boxes to highlight text including titles and explanation of images. The cover is blue with white text and features an image of the bell of the S. S. Santhia.Inside front cover: THIS BOOKLET is presented by THE STATE ELECTRICITY COMMISSION OF VICTORIA to the children of BOGONG STATE SCHOOLbogong state school, s.s.santhia, santhia bell -
 Melbourne Legacy
Letter, Actions of the AIF in Greece and Crete told by SG Savige 1941, 1941
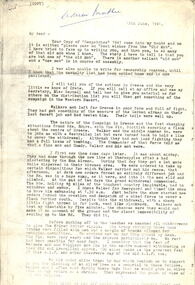
A typed letter designed to be copied and circulated to members of Stan Savige's 'old mob' recounting events in Greece and Crete in 1941. Legatee Savige was deployed in Greece and this letter recounts the withdrawal of his company and those of Walker and Wrigley. He mentions Thermopylae, Kalamai, and evacuation via the ship Costa Rica, which was bombed by German planes and sunk, which resulted in Walker's mob being lost. It starts addressed to Dear Guthridge, who has not been identified.A first hand account of the campaign in Greece during 1941, and an important link to Legatee Stan Savige, the founder of Legacy.Cream foolscap paper x 4 pages with black type transcription of a letter by Stan Savige in 1941.stan savige, world war two, crete, greece -
 Melbourne Legacy
Letter, Actions of the AIF in Greece and Crete told by SG Savige 12 June 1941, 1941
A typed letter designed to be copied and circulated to members of Stan Savige's 'old mob' recounting events in Greece and Crete in 1941. Legatee Savige was deployed in Greece and this letter recounts the withdrawal of his company and those of Walker and Wrigley. He mentions Thermopylae, Kalamai, and evacuation via the ship Costa Rica, which was bombed by German planes and sunk. The name Aaron (or Adrian) Beattie is handwritten on the first page so perhaps it is his copy of the letter.A first hand account of the campaign in Greece during 1941, and an important link to Legatee Stan Savige, the founder of Legacy.Cream foolscap paper x 4 pages with black type transcription of a letter by Stan Savige in 1941.Handwritten in blue pen on centre top of first page "Aaron Beattie".stan savige, world war two, crete, greece -
 Melbourne Legacy
Letter, Actions of the AIF in Greece and Crete told by SG Savige 1941, 1941
A typed letter designed to be copied and circulated to members of Stan Savige's 'old mob' recounting events in Greece and Crete in 1941. Legatee Savige was deployed in Greece and this letter recounts the withdrawal of his company and those of Walker and Wrigley. He mentions Thermopylae, Kalamai, and evacuation via the ship Costa Rica, which was bombed by German planes and sunk, which resulted in Walker's mob being lost. The cover letter is a copy from 1973 when Legatee Stan Poppins donated the letter to Ivan Layton, CEO of Legacy for the Archives.A first hand account of the campaign in Greece during 1941, and an important link to Legatee Stan Savige, the founder of Legacy.Cream foolscap paper x 4 pages with black type transcription of a letter by Stan Savige in 1941 and a cover letter written by Stan Poppins to Ivan Layton in 1973.Handwritten on top of cover letter 'Archives' showing it was intended to be donated to the archives.stan savige, world war two, crete, greece -
 Wangaratta RSL Sub Branch
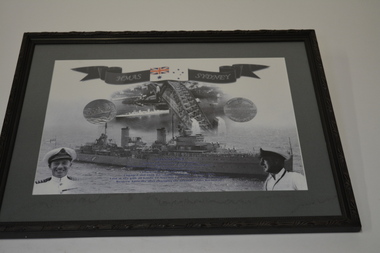
Print - Framed Print, HMAS Sydney
HMAS Sydney built by Swan Hunter and Wigham Richardson Ltd., Wallsend on Tyne, United Kingdom Launched 22 September 1934 Engaged and sunk Bartolmeo Colleom 19 July 1940. On 19 November 1941 South West of Carnarvon Western Australia she was lost at sea with all hands after engaging the German raider Kormoran. On 19 November 1941, HMAS Sydney, a light cruiser of the Royal Australian Navy with an impressive record of war service, was lost following a battle with the German raider HSK Kormoran in the Indian Ocean off the Western Australian coast. The loss of the Sydney with its full war complement of 645 remains Australia’s worst naval disaster. The Kormoran was also sunk, but 317 of its crew of 397 were rescued. The fate of the Sydney remains one of Australia’s greatest wartime mysteries; even the location of the wrecks was not established until 2008.Black plastic frame with moulded pattern with grey mount containing photograph of ship and Sydney Harbour BridgeBanner - HMAS Sydney HMAS Sydney built by Swan Hunter and Wigham Richardson Ltd., Wallsend on Tyne, United Kingdom Launched 22 September 1934 Engaged and sunk Bartolmeo Colleom 19 July 1940 Lost at sea with all hands 19 November 1941 South West of Carnarvon Western Australia after engaging the German raider Kormoran. hmas sydney, ww2 -
 Bendigo Military Museum
Leisure object - CARDS, PLAYING WW2, 1939-40
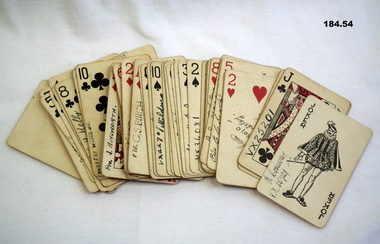
Frederick Birkin No VX32484 enlisted in the 2nd AIF on 25.6.40 age 24 years. Attached to 2/22nd Batt known as “Lark Force” they were stationed in Rabaul awaiting a possible attack by the Japanese. The attack came in early 1942. Birkin was taken POW and his death was on 1.7.42. Numbers escaped, others were massacred at the TOL Plantation and many more of the total Force and civilians lost their lives on the Japanese prison ship “Montivedeo Maru” which was sunk by an American Submarine on 1.7.42. A small number survived this. The cards were all written on the back with name and number of men in Birkins unit prior to embarkation to Rabaul. All were traceable as to their fate or transfer to another unit prior to embarkation. Refer also 182.2, 183. Set of playing cards, red in colour, with 2 white figures sword fighting. Owned by Frederick Birkin.Cards have been written on reverse, in ink, by colleagues of Fred Birkin.documents, cards, personal effects, leisure activities -
 Glenelg Shire Council Cultural Collection
Artwork, other, BRIGIT THOMAS, Lady Nelson, c. 2015
From - theladynelson.org.au T The original Lady Nelson was built at Deptford, in England, in 1799, for service to the Transport Office on the River Thames. She was designed with sliding keels (centre boards), a device invented by Captain John Schank of the Royal Navy to allow surveying in rivers and shallow water ways. On completion she was selected for exploration services in the Colony of New South Wales and sailed for Port Jackson on 18 March 1800 under the command of Lieutenant James Grant. A brig of 60 tons, she carried a crew comprising the commander, two mates and twelve seaman. As she left the River Thames sailors on nearby ships ridiculed her because of her size and shape, calling her, as she sailed past, 'His Majesty's Tinderbox'. At Portsmouth on the 9th February 1800 she was fitted with four brass carriage guns, three to four pounders, in addition to the two guns already on board. Because of the heavy load she was carrying she was very low in the water, having only two feet nine inches freeboard amidships. The ship finally left Portsmouth on 17th March 1800 as part of an East Indian Convoy. From 1800 to 1825 the Lady Nelson operated around the Australian Coast and fulfilled a variety of roles including exploration, surveying, forming settlements, shifting goods and people around the colonies and capturing pirates. She played pivotal roles in the European settlement of Hobart, Northern Tasmania, Melbourne, Newcastle, Port Macquarie and Northern Territory. Those onboard charted much of Bass Strait, Port Philip, Newcastle, Port Macquarie and (with the Investigator) the coasts of northern New South Wales and southern Queensland. She also has links to other locations around the East Coast such as Trial Bay in NSW and the Mt Gambier area of SA. After 25 years of service while trading on the island of Baba the Lady Nelson was overrun by the islanders, the crew was killed and the ship stripped and later burnt and sunk. A replica of the Lady Nelson was built in the 1980s.Image of a tall ship in sail. The ship is flying both the Aboriginal flag and the Australian Flag. It sails on a calm sea. There are figures on the deck - four in total. The image is mounted on cream board and framed in dark timber. Etching, hand coloured,.Front: 'Lady Nelson A/P BT' - hand written, pencil in between etching and mount Back: Artist's business card glued to back of etching, lower left hand corner:ady nelson, femal artists, female artist, women -
 Warrnambool and District Historical Society Inc.
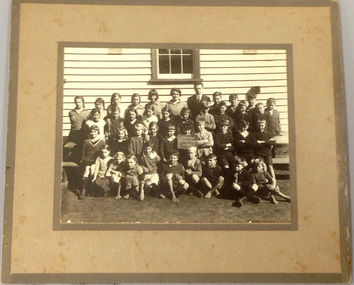
Photograph, Naringal School 1932, C 1932
... division in 1941. and was lost at sea when the ship "Viner Brook... division in 1941. and was lost at sea when the ship "Viner Brook ...The Naringal school was originally known as Tallangatta S S when it was opened in 1877. The era of this photograph saw enrolments increase from around 39 to 59. Headteacher at the time and in this photograph is Mr Wellman. One of its most eminent past pupils was Sister Mona Wilson who was also sewing mistress for a short time before commencing nursing training. She sailed with the 8th division in 1941. and was lost at sea when the ship "Viner Brook " was sunk after being bombed by the Japanese. The Naringal Primary School was burnt to the ground in the Ash Wednesday Bushfires 1983. An interesting depiction of a country school's enrolment in the 1930's. Having been taken in the time of the Great Depression. As the school was destroyed in the Ash Wednesday Bushfires, in 1983 so surviving items relating to the school are limited. Small black and white photograph mounted on fawn card with darker border on the edge and also around the photograph. It depicts 38 children with teacher in back row. Naringal School No 1839, 1932 on board.naringal, tallangatta victoria, mr wellman naringal, naringal primary school 1932 -
 Melbourne Tram Museum
Document - Report, Tramway Board, Dalgety and Co, "Lives of North Melbourne City Section ropes during 1917-18", 1918
... /1919) for damage on a section of rope that was on a ship...) for damage on a section of rope that was on a ship that was sunk ...Report - six sheets, were paper clipped together, three foolscap (marked 4370A) and two quarto sheets (marked 4370C) titled "Lives of North Melbourne City Section ropes during 1917-18", regarding a claim made through Dalgety and Company (3/1/19 and 6/1/1919) for damage on a section of rope that was on a ship that was sunk by enemy action. Has a three page report on the cable life and insurance claim made by the Tramway Board in 1918, looking at the life of the cable compared to previous ropes. Quite a detailed study made and costs incurred. A small sheet (marked 4370B) has pencil notations - was pinned to the top of the two Dalgety and Co letters..1 - has stamp "Copy to Engineer" in top left hand corner.trams, tramways, cable trams, reports, cables, insurance, world war 1 -
 Mission to Seafarers Victoria
Painting - Oil painting, Madeline M.Ravenna Lewellin, Start Point Light, Devonshire, 1875
This painting was inspired by an original painting by Wilhelm Melby held at the National Gallery of Victoria. Melby is a Danish artist (1824-1882). It depicts a famous Devonshire coastal region famous now for its lighthouse and the pick up point for the pilot when entering waters approaching Dartmouth. The sailing vessels pre-date the construction of the famous lighthouse. Over the centuries the view would have been familiar to many sailors as they left or approached the English mainland and south coast ports in the English Channel. Madeline Mary Ravenna Lewellin (1854 – 24 November 1944) was born in Victoria to Dr John Henry Hill Lewellin, a physician, and Grace Elizabeth (née Danneby). She was one of five daughters, and the family lived in Prahran. Lewellin's brother, Captain Herbert Gordon Hill Lewellin, was a commander in the P. and O. fleet (apprentice on the Romanoff, Lieutenant RNR on the HMS Arethusa in 1899, RMS Mongolia in 1913 sunk in 1917, Naldera in 1920). She studied painting at the National Gallery School in 1879 under Eugene von Guerard. She's also known for collecting and painting specimens, and became a member of the Field Naturalists Club of Victoria in 1885. In 1884 she won a silver medal for her studies of fungi. She collected plants for Australian botanist Ferdinand von Mueller, and the variety of Dicrastylis lewellinii (Purple sand-sage) is named after her. Miss Lewellin, who had a love of the sea and ships as subject matter is listed in 1910 as a donor as a 10/6 member donating to the motor launch fund and in 1918 as a working member of the Ladies Harbour Lights Guild which involved regular volunteer shifts at the Mission to Seamen on canteen and other duties.Marine art, Maritime artThis oil painting has a dark polished wood and gold leaf slip. The painting depicts two masted boats. The choppy sea takes up the lower-third of the painting, and the other two-thirds of the image of made up of stormy grey clouds. A rocky cliff face can be seen on the right-hand side of the painting. A small church can be seen on the hillside. The ship on the left third of the painting sits on the horizon line of the sea. The centre ship with two masts appears to be leaning to the right and its deck is exposed to the viewer showing four men attempting to handle the masts and rigging. The left-hand ship with three masts is surrounded by two grey distant silhouetted mast ships. There are three seagulls at the upper left-centre of the image. There are another three gulls down on the lower-left of the image. Front: ENGRAVED PLAQUE: Start Point Light. Devonshire. SIGNATURE: After W. Melby / M.M.R Lewellin. 1875. Reverse: IN BLACK MARKER PEN: * Hang from two points * WHITE STICKER WITH CONSERVATOR DETAILS: Art Conservation Frames / 118 Bridport Street, Albert Park, VIC, 3206 / 9696 9066 / artconservationframers.com.aupainting, ships, mast, church, sea, storm, oil painting, seagulls, madeline r. lewellin, artwork-paintings, ngv, wilhelm melby, eugene von guerard, botanist, rms mongolia, captain herbert gordon hill lewellin (1862-1935), paddy lewellin, reproduction -
 Wangaratta RSL Sub Branch
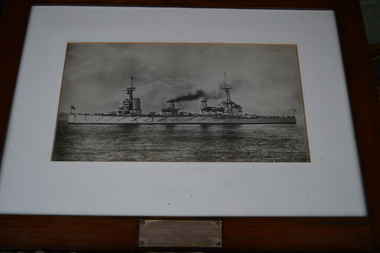
Print - Framed Print, HMAS Australia
With the outbreak of the First World War, HMAS Australia became the flagship of the naval force that captured the German colonies in the southern Pacific. She led a force which captured Rabaul on 13 September 1914 before proceeding to Samoa. With no German forces left in the South Pacific, Australia was deployed to the United Kingdom. En route she sank the German ship Eleanore Woermann. On 8 February 1915 she became flagship of the 2nd Battle-cruiser Squadron of the Royal Navy's Grand Fleet. Australia's service with the Grand Fleet consisted of a series of frequent patrols and exercises. She was twice rammed, firstly on 22 April 1916 by HMS New Zealand. This led to her missing the Battle of Jutland which, considering the disastrous losses in the Battle-cruiser Force, may well have been fortunate. She was rammed again by HMS Repulse in December 1917. Australia carried out experimental aircraft operations in 1918 and led the port column of the Grand Fleet at the surrender of the German High Seas Fleet. Returning home in 1919, Australia suffered a mutiny upon reaching Fremantle, Western Australia. Quite obsolete, she became a training vessel in Westernport until scuttled off Sydney Heads on 12 April 1924.The Australian Navy's first flagship, the battle cruiser HMAS Australia (I) was the centrepiece of the 'Fleet Unit', whose acquisition signalled the RAN's arrival as a credible ocean going force. Ordered from John Brown and Company in March 1910, construction began three months later with the total cost of the ship and fittings expected to be some £2 million. The Commonwealth Government decided upon the name Australia, and it proved a popular choice, carefully avoiding any suggestion of favouritism towards any one Australian State. The ship's badge maintained the national theme by featuring the Federation Star overlaid by a naval crown, while the motto 'Endeavour' reflected the ideal of the Australian spirit and recalled Lieutenant James Cook's ship of 1768-71.Timber frame of black and white print of a ship at sea.Imperial War Museum Photograph HMAS AUSTRALIA - RAN FLAGSHIP First flagship of the Royal Austrlian Navy 1913-1920 Sunk under the terms of the Washington Treaty 12th April 1924 This frame is made of teak from her deckhmas australia, ww1 -
 Wangaratta RSL Sub Branch
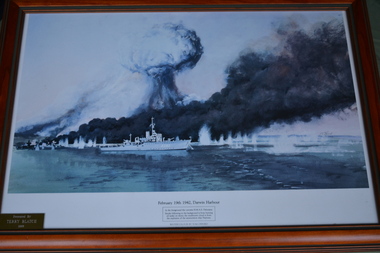
Print - Framed Print, February 19th 1942, Darwin Harbour
Image depicting the explosion of a ship, filled with TNT and ammunition, hit during the first Japanese air raid on Australia's mainland, at Darwin on 19 February 1942. In the foreground is HMAS Deloraine which survived unscathed. On that day, 236 people were killed when 242 Japanese aircraft, in two separate raids, attacked the town, ships in Darwin's harbour and the town's two airfields in an attempt to prevent the Allies from using them as bases to contest the invasion of Timor and Java during World War II. MV Neptuna was a 5,952 ton cargo motor vessel. and was 1 of 11 sunk during the Japanese air raid on Darwin on 19 February 1942. In January 1942 HMAS Deloraine evaded an attack by the Japanese submarine I-124 north-west of Darwin and was jointly credited with the submarines' sinking after she inflicted the initial damage. The Bombing of Darwin, also known as the Battle of Darwin, on 19 February 1942 was the largest single attack ever mounted by a foreign power on Australia. Brown timber frame containing blue black and white print of ships being bombed.February 19th 1942, Darwin Harbour In the foreground the corvette HMAS Deloraine. Smoke billowing in the background is from burning oil tanks on shore, the mushroom cloud is from the explosionof the ammunition ship Neptuna. Watercolour by Tom Offordbombing of darwin, battle of darwin, 19 february 1942, ww2, mv neptuna, hmas deloraine -
 Warrnambool and District Historical Society Inc.
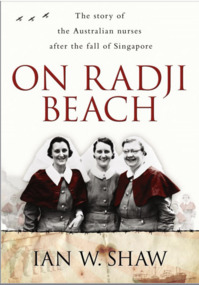
Book - On Radji Beach
... , was killed when the ship ‘Vyner Brooke’ was sunk by the Japanese..., was killed when the ship ‘Vyner Brooke’ was sunk by the Japanese ...This book by Ian Shaw is about the Australian nurses who were evacuated from Singapore after it fell to the Japanese in 1942 and their subsequent fates. Two of the nurses, Wilma Oram and Mona Wilton trained at the Warrnambool Hospital. Wilma Oram survived the war but Mona Wilton, born in Willaura near Warrnambool, was killed when the ship ‘Vyner Brooke’ was sunk by the Japanese in 1942. Mona Wilton was a member of the Australian Army Nursing Service and had been part of the 13th Australian General Hospital unit in Singapore. A Mona Wilton memorial window is now in the Warrnambool Hospital (South West Health Care). This book is of interest as it contains the stories of those Australian nurses who served and died in World War Two after the fall of Singapore in 1942 and in particular it has the stories of those nurses who trained at the Warrnambool Hospital before the advent of war. The story of Mona Winton’s war experiences and her death is of special significance as she was born in the Warrnambool district. This is a soft cover book of 370 pages. The cover has a colour photograph of three nurses on the front and printing on the back. The book contains a prologue, three sections of text, a postscript, a bibliography and an index. A middle section contains several black and white photographs. mona wilton, world war two nurse, world war two, warrnambool -
 Flagstaff Hill Maritime Museum and Village
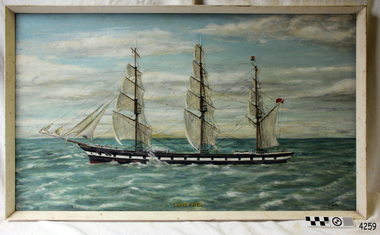
Painting - Vessel, Sailing Ship, C Smith, artist, Loch Ard, late 20th century
HISTORY OF THE LOCH ARD The LOCH ARD belonged to the famous Loch Line which sailed many ships from England to Australia. Built in Glasgow by Barclay, Curdle and Co. in 1873, the LOCH ARD was a three-masted square rigged iron sailing ship. The ship measured 262ft 7" (79.87m) in length, 38ft (11.58m) in width, 23ft (7m) in depth and had a gross tonnage of 1693 tons. The LOCH ARD's main mast measured a massive 150ft (45.7m) in height. LOCH ARD made three trips to Australia and one trip to Calcutta before its final voyage. LOCH ARD left England on March 2, 1878, under the command of Captain Gibbs, a newly married, 29 year old. She was bound for Melbourne with a crew of 37, plus 17 passengers and a load of cargo. The general cargo reflected the affluence of Melbourne at the time. On board were straw hats, umbrella, perfumes, clay pipes, pianos, clocks, confectionary, linen and candles, as well as a heavier load of railway irons, cement, lead and copper. There were items included that intended for display in the Melbourne International Exhibition in 1880. The voyage to Port Phillip was long but uneventful. At 3am on June 1, 1878, Captain Gibbs was expecting to see land and the passengers were becoming excited as they prepared to view their new homeland in the early morning. But LOCH ARD was running into a fog which greatly reduced visibility. Captain Gibbs was becoming anxious as there was no sign of land or the Cape Otway lighthouse. At 4am the fog lifted. A man aloft announced that he could see breakers. The sheer cliffs of Victoria's west coast came into view, and Captain Gibbs realised that the ship was much closer to them than expected. He ordered as much sail to be set as time would permit and then attempted to steer the vessel out to sea. On coming head on into the wind, the ship lost momentum, the sails fell limp and LOCH ARD's bow swung back. Gibbs then ordered the anchors to be released in an attempt to hold its position. The anchors sank some 50 fathoms - but did not hold. By this time LOCH ARD was among the breakers and the tall cliffs of Mutton Bird Island rose behind the ship. Just half a mile from the coast, the ship's bow was suddenly pulled around by the anchor. The captain tried to tack out to sea, but the ship struck a reef at the base of Mutton Bird Island, near Port Campbell. Waves broke over the ship and the top deck was loosened from the hull. The masts and rigging came crashing down knocking passengers and crew overboard. When a lifeboat was finally launched, it crashed into the side of LOCH ARD and capsized. Tom Pearce, who had launched the boat, managed to cling to its overturned hull and shelter beneath it. He drifted out to sea and then on the flood tide came into what is now known as LOCH ARD Gorge. He swam to shore, bruised and dazed, and found a cave in which to shelter. Some of the crew stayed below deck to shelter from the falling rigging but drowned when the ship slipped off the reef into deeper water. Eva Carmichael had raced onto deck to find out what was happening only to be confronted by towering cliffs looming above the stricken ship. In all the chaos, Captain Gibbs grabbed Eva and said, "If you are saved Eva, let my dear wife know that I died like a sailor". That was the last Eva Carmichael saw of the captain. She was swept off the ship by a huge wave. Eva saw Tom Pearce on a small rocky beach and yelled to attract his attention. He dived in and swam to the exhausted woman and dragged her to shore. He took her to the cave and broke open case of brandy which had washed up on the beach. He opened a bottle to revive the unconscious woman. A few hours later Tom scaled a cliff in search of help. He followed hoof prints and came by chance upon two men from nearby Glenample Station three and a half miles away. In a state of exhaustion, he told the men of the tragedy. Tom returned to the gorge while the two men rode back to the station to get help. By the time they reached LOCH ARD Gorge, it was cold and dark. The two shipwreck survivors were taken to Glenample Station to recover. Eva stayed at the station for six weeks before returning to Ireland, this time by steamship. In Melbourne, Tom Pearce received a hero's welcome. He was presented with the first gold medal of the Royal Humane Society of Victoria and a £1000 cheque from the Victorian Government. Concerts were performed to honour the young man's bravery and to raise money for those who lost family in the LOCH ARD disaster. Of the 54 crew members and passengers on board, only two survived: the apprentice, Tom Pearce and the young woman passenger, Eva Carmichael, who lost all of her family in the tragedy. Ten days after the LOCH ARD tragedy, salvage rights to the wreck were sold at auction for £2,120. Cargo valued at £3,000 was salvaged and placed on the beach, but most washed back into the sea when another storm developed. The wreck of LOCH ARD still lies at the base of Mutton Bird Island. Much of the cargo has now been salvaged and some was washed up into what is now known as LOCH ARD Gorge. Cargo and artefacts have also been illegally salvaged over many years before protective legislation was introduced. One of the most unlikely pieces of cargo to have survived the shipwreck was a Minton porcelain peacock - one of only nine in the world. The peacock was destined for the Melbourne International Exhibition in 1880. It had been well packed, which gave it adequate protection during the violent storm. Today, the Minton peacock can be seen at the Flagstaff Hill Maritime Museum in Warrnambool. From Australia's most dramatic shipwreck it has now become Australia's most valuable shipwreck artefact and is one of very few 'objects' on the Victorian State Heritage Register. Flagstaff Hill’s collection of artefacts from LOCH ARD is significant for being one of the largest collections of artefacts from this shipwreck in Victoria. It is significant for its association with the shipwreck, which is on the Victorian Heritage Register (VHR S417). The collection is significant because of the relationship between the objects, as together they have a high potential to interpret the story of the LOCH ARD. The LOCH ARD collection is archaeologically significant as the remains of a large international passenger and cargo ship. The LOCH ARD collection is historically significant for representing aspects of Victoria’s shipping history and its potential to interpret sub-theme 1.5 of Victoria’s Framework of Historical Themes (living with natural processes). The collection is also historically significant for its association with the LOCH ARD, which was one of the worst and best known shipwrecks in Victoria’s history. Painting of 1873 sailing ship the "Loch Ard". Oil painting on board behind glass, framed in white painted timber. Artist is C Smith. Inscription on back. "Loch Ard launched 1873, sunk near Pt Campbell, with loss of 52 lives 1878" "C. Smith" "Loch Ard" flagstaff hill, warrnambool, shipwrecked coast, flagstaff hill maritime museum, maritime museum, shipwreck coast, flagstaff hill maritime village, great ocean road, loch line, loch ard, captain gibbs, eva carmichael, tom pearce, loch ard gorge, maritime oil painting, c. smith, sailing vessel -
 Flagstaff Hill Maritime Museum and Village
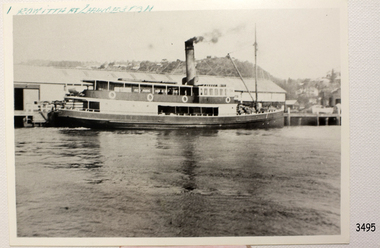
Photograph - Vessel, Steam Ship, S.S. Rowitta, Early 20th century
The subject of this photograph is the S.S.Rowilla, a passenger steam ferry built in Hobart for use in Tasmania's rivers, the Derwent and the Tamar. The photograph shows her docked at the Charles Street Wharf in Launceston. The S.S. Rowitta was built by Purdon & Featherstone, at Battery Point, Hobart (Tasmania) in 1909 from Huon Pine and Kauri planking. Her final configuration included three masts and a ship rig. S.S. Rowitta took its first voyage from Hobart to Launceston in 1909 and operated for 30 years as a passenger ferry on the Tamar and Derwent Rivers. She also served as a freighter, an army supply ship, a luxury charter ferry and a floating restaurant as well as a prawn boat at Lakes Entrance. (She has also been named “Sorrento” and “Tarkarri”.). In the very early days of Flagstaff Hill ‘Rowitta’ was purchased from Lakes Entrance by Warrnambool City Council and the Victorian State Government for $20,000. The Rowitta had a hull configuration very similar to a local boat named the SPECULANT, which played a key role in the Port of Warrnambool in the early 1900s. The Speculant was the largest ship ever registered with Warrnambool as her home port. Local owner and trader P J McGennan & Co, (Peter McGennan) used her as a freight carrier to Melbourne and timber trader between New Zealand and Victoria. She sunk at Cape Otway in 1911 on a voyage to Melbourne. In 1974 Rowitta was delivered to Port Fairy and then later sailed to Warrnambool’s Breakwater where she was lifted out of Lady Bay and loaded onto the back of a long transport truck and slowly and carefully driven along Pertobe Road, through the Surfside Caravan Park and over the railway line, into Flagstaff Hill’s Maritime Village. Transfer arrangements were coordinated by Jack Morse, of Morse Engineering, a member of the Flagstaff Hill Planning Board, and Ken Goyen, a local crane operator. The ‘Rowitta’ was originally acquired to be rebuilt to match the original SPECULANT. When finances became tight in 1976 a review of all plans ended in the decision to restore the “Rowitta” to her original configuration. She was then restored, renamed the original name of “Rowitta” and installed in the Village’s Harbour Lake to become one of the popular vessels on display for visitors to enjoy. It was the decision of the Advisory Committee to Flagstaff Hill to have Rowitta demolished in April 2015 due to extensive deterioration. Items associated with the Rowitta continue to be held in Flagstaff Hill Maritime Village’s Collection.The photograph of the passenger ferry S.S. Rowitta.is significant for its association with Tasmanian history from the early to mid-1900s. It is also connected to the history of the Rowitta, which was a large exhibit on display at Flagstaff Hill Maritime Village from the museum’s early beginnings until the vessel’s end of life 40 years later. The Rowitta represents the importance of coastal traders to transport, trade and communication along the coast of Victoria, between states, and in Australia before rail and motor vehicles. The vessel was an example of a ferry built in the early 20th century that served many different roles over its lifetime of over 100 years. Black and white photograph of the steamship S.S. Rowitta at Charles Street Wharf, Launceston. It shows the vessel docked at the Charles Street Wharf in Launceston. Smoke is coming from its funnel and there are people on board. There is a handwritten inscription on the top edge of the photograph. The vessel was built in 1909 by Purdon & Featherstone, Hobart. Blue-green handwriting on top left margin "ROWITTA AT LAUNCESTON"flagstaff hill, warrnambool, shipwrecked-coast, flagstaff-hill, flagstaff-hill-maritime-museum, maritime-museum, shipwreck-coast, flagstaff-hill-maritime-village, photograph, s.s. rowitta, charles street wharf,, launceston., purdon & featherstone, rowitta, tarkarri, speculant, purdon & featherstone of hobart, passenger ferry 1909, sorrento -
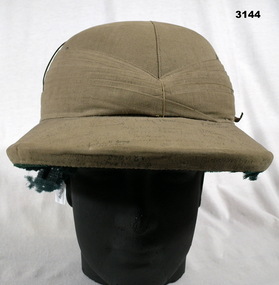 Bendigo Military Museum
Headwear - HELMET, PITH
This hat was sent home to Laanecoorie, from Malaya, in 1941 by Driver Cyril John Johnson VX36298, 1 Coy A.A.S.C whilst a POW. Cyril enlisted in the 2nd AIF on 17.6.1940 age 22 years 2 months. Posted to 8th Div Petrol Coy Seymour 25.7.1940, hospital 12.8.1940 with Mumps, rejoin unit 31.8.1940, embark for overseas 2.2.1941, disembark Singapore 19.2.1941. He is listed as missing on 16.2.1942 and later listed as POW in a Thai Camp no date. (He was on the Burma Railway) Last entry on his records states Presumed to be dead 12.9.1944 SWPA. (South West Pacific Area) He with hundreds of others were on the Japanese prison ship Rakuyo Maru to Japan when it was sunk by an American submarine. The hand written signatures on the hat include high ranking AIF Officers, major local Officials and dozens of 8th Division AIF soldiers. British pattern Pith Helmet, khaki coloured cotton cloth with brown leather strap over the top. Large quantity of hand written names on top. Inside rim has green felt lining. Dome section is plaited red silk with manufacturer's label at crest. Hat band is brown leather.On top written in pen & ink: Many army numbers & names of soldiers and some dignitaries.. On top written in ink: To Dad etc from Cyril.military equipment - army, costume - male headwear -
 Flagstaff Hill Maritime Museum and Village
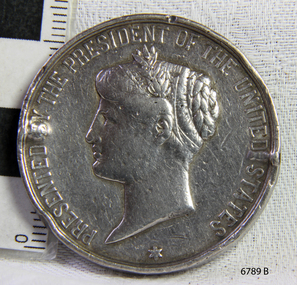
Award - Medal, Nelson Johnson, November 1880
This medal for bravery, for rescue of the crew from the shipwreck “Eric the Red” on 4th September 1880, was awarded to one of the crew of the steamer S.S. Dawn by the President of the United States in July 1881. The medal is engraved with the name “Nelson Johnson” (the anglicised version of his Swedish name Neils Frederick Yohnson). It was donated to Flagstaff Hill Maritime Village in 2013 by Nelson’s granddaughter. Nelson had migrated from Sweden to Sydney in 1879. The next year in 1880, aged 24, he was a seaman on the steamship Dawn and involved in the rescue of the survivors of the Eric the Red. Nelson Johnson was a crew member of the S.S. Dawn and was one of the rescue team in the dinghy in the early morning of September 4th 1880. Medals were awarded to the Captain and crew of the S.S. Dawn by the President of the United States, through the Consul-general (Mr Oliver M. Spencer), in July 1881 “ … in recognition of their humane efforts in rescuing the 23 survivors of the American built wooden sailing ship, the Eric the Red, on 4th September 1880.” The men were also presented with substantial monetary rewards and gifts. The city of Warrnambool’s care of the survivors was also mentioned by the President at the presentation, saying that “the city hosted and supported the crew ‘most graciously’. Previously, a week after the shipwreck, the Australian Government had also conveyed its thanks to the Captain and crew of the S.S. Dawn “Captain Griffith Jones, S.S. Dawn, The Hon. Mr Clark desires that the thanks of the Government should be conveyed to you for the prompt, persevering and seamanlike qualities displayed by you, your officers and crew in saving the number of lives you did on the occasion referred to. The hon. The Commissioner has also been pleased to award you a souvenir in commemoration of the occasion, and a sum of 65 pounds to be awarded to your officers and crew according to annexed scale. I am, &c, W Collins Rees, for and in the absence of the Chief Harbour Master.” The Awards are as follows: - Crew of DAWN'S lifeboat-Chief Officer, Mr G. Peat, 15 pounds; boat's crew-G. Sterge, A.B., 5 pounds; T. Hammond, A.B., 5 pounds; J. Black, A.B., 5 pounds; H. Edwards, A.B., 5 pounds. Dinghy's Crew-Second Officer, Mr Christie, 10 pounds; boat's crew -F. Lafer, A.B., 5 pounds; W. Johnstone, A.B., 5 pounds; Mr Lear, provedore, 5 pounds; Mr Dove, purser, 5 pounds. Captain Jones receives a piece of plate. (from “Wreck of the ship Eric the Red” by Jack Loney) The medal’s history, according to the Editor of ‘E-Sylum’ (the newsletter of The Numismatic Bibliomania Society “… appears to be an example of an 1880 State Department medal, catalogued as LS-3 (page 322 of R. W. Julian's book, Medals of the United States Mint: The First Century 1792-1892). The reverse is mostly blank for engraving, surrounded by a thin wreath. It was designed by George Morgan, chief engraver for the Philadelphia Mint, and struck in gold, silver and bronze. The one pictured here (in The Standard newspaper, 2nd July 2013) appears to be silver.” The following is an account of the events which led to the awarding of this medal. The American ship Eric the Red was a wooden, three-masted clipper ship. She had 1,580 tons register and was the largest full-rigged ship built at Bath, Maine, USA in 1871. She was built and registered by Arthur Sewall, later to become the partnership E. & A. Sewall, the 51st ship built by this company. The annually-published List of Merchant Vessels of the U.S. shows Bath was still the home port of Eric the Red in 1880. The vessel was named after the Viking discoverer, Eric ‘the Red-haired’ Thorvaldsson, who was the first European to reach the shores of North America (in 980AD). The ship Eric the Red at first traded in coal between America and Britain, and later traded in guano nitrates from South America. In 1879 she was re-metalled and was in first-class condition. On 10th June 1880 (some records say 12th June) Eric the Red departed New York for Melbourne and then Sydney. She had been commissioned by American trade representatives to carry a special cargo of 500 exhibits (1400 tons) – about a quarter to a third of America’s total exhibits - for the U.S.A. pavilion at Melbourne’s first International Exhibition. The exhibits included furniture, ironmongery, wines, chemicals, dental and surgical instruments, paper, cages, bronze lamp trimmings, axles, stamped ware, astronomical and time globes, samples of corn and the choicest of leaf tobacco. Other general cargo included merchandise such as cases of kerosene and turpentine, brooms, Bristol's Sarsaparilla, Wheeler and Wilson sewing machines, Wheeler’s thresher machine, axe handles and tools, cases of silver plate, toys, pianos and organs, carriages and Yankee notions. The Eric the Red left New York under the command of Captain Zaccheus Allen (or some records say Captain Jacques Allen) and 24 other crew including the owner’s son third mate Ned Sewall. There were also 2 saloon passengers on board. The ship had been sailing for an uneventful 85 days and the voyage was almost at its end. As Eric the Red approached Cape Otway there was a moderate north-west wind and a hazy and overcast atmosphere. On 4th September 1880 at about 1:30 am Captain Allen sighted the Cape Otway light and was keeping the ship 5-6 miles offshore to stay clear of the hazardous Otway Reef. However, he had badly misjudged his position. The ship hit the Otway Reef about 2 miles out to sea, southwest of the Cape Otway light station. Captain Allen ordered the wheel to be put ‘hard up’ thinking that she might float off the reef. The sea knocked the helmsman away from the wheel, broke the wheel ropes and carried away the rudder. The lifeboats were swamped, the mizzenmast fell, with all of its riggings, then the mainmast also fell and the ship broke in two. Some said that the passenger Vaughan, who was travelling for his health and not very strong, was washed overboard and never seen again. The ship started breaking up. The forward house came adrift with three of the crew on it as well as a longboat, which the men succeeded in launching and keeping afloat by continually bailing with their sea boots. The captain, the third mate (the owner’s son) and others clung to the mizzenmast in the sea. Then the owner’s son was washed away off the mast. Within 10 minutes the rest of the ship was in pieces, completely wrecked, with cargo and wreckage floating in the sea. The captain encouraged the second mate to swim with him to the deckhouse where there were other crew but the second mate wouldn’t go with him. Eventually, the Captain made it to the deckhouse and the men pulled him up. At about 4:30 am the group of men on the deckhouse saw the lights of a steamer and called for help. At the same time, they noticed the second mate and the other man had drifted nearby, still on the spur, and pulled them both onto the wreck. The coastal steamer SS Dawn was returning to Warrnambool from Melbourne, and its sailing time was different to its usual schedule. She was built in 1876 and bought by the Portland and Belfast Steam Navigation Co. in 1877. At the time of this journey, she was commanded by Captain Jones and was sailing between Melbourne and Portland via Warrnambool. The provedore the Dawn, Benjamin Lear, heard cries of distress coming through the portholes of the saloon. He gave the alarm and the engines were stopped. Cries could be heard clearly, coming from the land. Captain Jones sent out crew in two boats and fired off rockets and blue lights to illuminate the area. They picked up the three survivors who were in the long boat from Eric the Red. Two men were picked up out of the water, one being the owner’s son who was clinging to floating kerosene boxes. At daylight, the Dawn then rescued the 18 men from the floating portion of the deckhouse, which had drifted about 4 miles from where they’d struck the reef. Shortly after the rescue the deckhouse drifted onto breakers and was thrown onto rocks at Point Franklin, about 2 miles east of Cape Otway. Captain Jones had signalled to Cape Otway lighthouse the number of the Eric the Red and later signalled that there was a wreck at Otway Reef but there was no response from the lighthouse. The captain and crew of the Dawn spent several more hours searching unsuccessfully for more survivors, even going back as far as Apollo Bay. On board the Dawn the exhausted men received care and attention to their needs and wants, including much-needed clothing. Captain Allen was amongst the 23 battered and injured men who were rescued and later taken to Warrnambool for care. Warrnambool’s mayor and town clerk offered them all hospitality, the three badly injured men going to the hospital for care and others to the Olive Branch Hotel, then on to Melbourne. Captain Allen’s leg injury prevented him from going ashore so he and three other men travelled on the Dawn to Portland. They were met by the mayor who also treated them all with great kindness. Captain Allen took the train back to Melbourne then returned to America. Those saved were Captain Zaccheus Allen (or Jacques Allen), J. Darcy chief mate, James F. Lawrence second mate, Ned Sewall third mate and owner’s son, John French the cook, C. Nelson sail maker, Clarence W. New passenger, and able seamen Dickenson, J. Black, Denis White, C. Herbert, C. Thompson, A. Brooks, D. Wilson, J. Ellis, Q. Thompson, C. Newman, W. Paul, J. Davis, M. Horenleng, J. Ogduff, T. W. Drew, R. Richardson. Four men had lost their lives; three of them were crew (Gus Dahlgreen ship’s carpenter, H. Ackman steward, who drowned in his cabin, and George Silver seaman) and one a passenger (J. B. Vaughan). The body of one of them had been found washed up at Cape Otway and was later buried in the lighthouse cemetery; another body was seen on an inaccessible ledge. Twelve months later the second mate James F. Lawrence, from Nova Scotia passed away in the Warrnambool district; an obituary was displayed in the local paper. Neither the ship nor its cargo was insured. The ship was worth about £15,000 and the cargo was reportedly worth £40,000; only about £2,000 worth had been recovered. Cargo and wreckage washed up at Apollo Bay, Peterborough, Port Campbell, Western Port and according to some reports, even as far away as the beaches of New Zealand. The day after the wreck the government steamship Pharos was sent from Queenscliff to clear the shipping lanes of debris that could be a danger to ships. The large midship deckhouse of the ship was found floating in a calm sea near Henty Reef. Items such as an American chair, a ladder and a nest of boxes were all on top of the deckhouse. As it was so large and could cause danger to passing ships, Captain Payne had the deckhouse towed towards the shore just beyond Apollo Bay. Between Apollo Bay and Blanket Bay, the captain and crew of Pharos collected Wheeler and Wilson sewing machines, nests of boxes, bottles of Bristol’s sarsaparilla, pieces of common American chairs, axe handles, a Wheelers’ Patent thresher and a sailor’s trunk with the words “A. James” on the front. A ship’s flag-board bearing the words “Eric the Red” was found on the deckhouse; finally, those on board the Pharos had the name of the wrecked vessel. During this operation, Pharos came across the government steamer Victoria and also a steamer S.S. Otway, both of which were picking up flotsam and wreckage. A whole side of the hull and three large pieces of the other side of the hull, with some of the copper sheathing stripped off, had floated onto Point Franklin. Some of the vessels' yards and portions of her masts were on shore. The pieces of canvas attached to the yards and masts confirmed that the vessel had been under sail. The beach there was piled with debris several feet high. There were many cases of Diamond Oil kerosene, labelled R. W. Cameron and Company, New York. There were also many large planks of red pine, portions of a small white boat and a large, well-used oar. Other items found ashore included sewing machines (some consigned to ‘Long and Co.”) and notions, axe and scythe handles, hay forks, wooden pegs, rolls of wire (some branded “T.S” and Co, Melbourne”), kegs of nails branded “A.T. and Co.” from the factory of A. Field and Son, Taunton, Massachusetts, croquet balls and mallets, buggy fittings, rat traps, perfumery, cutlery and Douay Bibles, clocks, bicycles, chairs, a fly wheel, a cooking stove, timber, boxes, pianos, organs and a ladder. (Wooden clothes pegs drifted in for many years). There seemed to be no personal luggage or clothing. The Pharos encountered a long line, about one and a half miles, of f locating wreckage about 10 miles off land, southeast of Cape Otway, and in some places about 40 feet wide. It seemed that more than half of it was from Eric the Red. The ship’s crew rescued 3 cases that were for the Melbourne Exhibition and other items from amongst the debris. There were also chairs, doors, musical instruments, washing boards, nests of trunks and flycatchers floating in the sea. Most of the goods were saturated and smelt of kerosene. A section of the hull lies buried in the sand at Parker River Beach. An anchor with a chain is embedded in the rocks east of Point Franklin and a second anchor, thought to be from Eric the Red, is on display at the Cape Otway light station. (There is a photograph of a life belt on the verandah of Rivernook Guest House in Princetown with the words “ERIC THE RED / BOSTON”. This is rather a mystery as the ship was registered in Bath, Maine, USA.) Parts of the ship are on display at Bimbi Park Caravan Park and at Apollo Bay Museum. Flagstaff Hill Maritime Village also has part of the helm (steering wheel), a carved wooden sword (said to be the only remaining portion of the ship’s figurehead; further research is currently being carried out), a door, a metal rod, samples of wood and this medal awarded for the rescue of the crew. Much of the wreckage was recovered by the local residents before police and other authorities arrived at the scene. Looters went to great effort to salvage goods, being lowered down the high cliff faces to areas with little or no beach to collect items from the wreckage, their mates above watching out for dangerous waves. A Tasmanian newspaper reports on a court case in Stawell, Victoria, noting a man who was caught 2 months later selling tobacco from the wreckage of Eric the Red. Some of the silverware is still treasured by descendants of Mr Mackenzie who was given these items by officials for his help in securing the cargo. The gifts included silver coffee and teapots, half a dozen silver serviette rings and two sewing machines. A Mr G.W. Black has in his possession a medal and a purse that was awarded to his father, another Dawn crew member who was part of the rescue team. The medal is similarly inscribed and named “To John Black ….” (from “Shipwrecks” by Margaret E. Mackenzie, 3rd edition, published 1964). The wreck and cargo were sold to a Melbourne man who salvaged a quantity of high-quality tobacco and dental and surgical instruments. Timbers from the ship were salvaged and used in the construction of houses and shed around Apollo Bay, including a guest house, Milford House (since burnt down in bushfires), which had furniture, fittings and timber on the dining room floor from the ship. A 39.7-foot-long trading ketch, the Apollo, was also built from its timbers by Mr Burgess in 1883 and subsequently used in Tasmanian waters. It was the first attempt at shipbuilding in Apollo Bay. In 1881 a red light was installed about 300 feet above sea level at the base of the Cape Otway lighthouse to warn ships when they were too close to shore; It would not be visible unless a ship came within 3 miles from it. This has proved to be an effective warning. Nelson Johnson married Elizabeth Howard in 1881 and they had 10 children, the father of the medal’s donor being the youngest. They lived in 13 Tichbourne Place, South Melbourne, Victoria. Nelson died in 1922 in Fitzroy Victoria, age 66. In 1895 the owners of the S.S. Dawn, the Portland and Belfast Steam Navigation Co., wound up and sold out to the Belfast Company who took over the Dawn for one year before selling her to Howard Smith. She was condemned and sunk in Suva in 1928. The State Library of Victoria has a lithograph in its collection depicting the steamer Dawn and the shipwrecked men, titled. "Wreck of the ship Eric the Red, Cape Otway: rescue of the crew by the Dawn". The medal for bravery is associated with the ship the “The Eric the Red which is historically significant as one of Victoria's major 19th century shipwrecks. (Heritage Victoria Eric the Red; HV ID 239) The wreck led to the provision of an additional warning light placed below the Cape Otway lighthouse to alert mariners to the location of Otway Reef. The site is archaeologically significant for its remains of a large and varied cargo and ship's fittings being scattered over a wide area. The site is recreationally and aesthetically significant as it is one of the few sites along this coast where tourists can visit identifiable remains of a large wooden shipwreck, and for its location set against the background of Cape Otway, Bass Strait, and the Cape Otway lighthouse.“ (Victorian Heritage Database Registration Number S239, Official Number 8745 USA) This medal was awarded to Nelson Johnson by the U.S. President for bravery in the rescue of the Eric the Red crew. The obverse of the round, solid silver medal has an inscription around the rim. In the centre of the medal is the head of Liberty to the left, hair in a bun, with a sprig of leaves in the top left of a band around her head. There is a 6-pointed star below the portrait, between the start and end of the inscription. There are two raised areas on the rim, horizontally opposite each other, from the edge to just below the lettering and coinciding with the holes drilled in the edge. Slightly right of the top is a round indentation in the rim. The reverse has a wreath of leaves as a border, joined at the bottom by a ribbon bow. In the centre of the medal is an inscription, decorated with 3-pronged design and dots. The edge is plain with 2 small, rough and uneven holes horizontally opposite to each other, as though they had been used for mounting the medal at some stage. The medal has a matte finish on both sides and is slightly pitted and scratched.“PRESENTED BY THE PRESIDENT OF THE UNITED STATES” around the perimeter of the obverse of the medal. “TO / Nelson Johnson, / seaman of the British, / str “Dawn”, for bravery, / at risk of life, / in / rescuing the crew of / the American Ship / “Eric the Red.” “M” on obverse, truncation of the portraitwarrnambool, flagstaff hill, flagstaff hill maritime village, maritime museum, shipwreck coast, great ocean road, shipwreck artefact, eric the red, zaccheus allen, sewall, 1880, melbourne exhibition, cape otway, otway reef, victorian shipwreck, medal, nelson johnson, neils frederick yohnson, s.s. dawn, george morgan, hero -
 Tatura Irrigation & Wartime Camps Museum
Artwork, other - Photocopy of Painting, Arandora Star
Arandora Star was used to transport internees from England to Canada and was sunk by a German U Boat off the coast of Ireland in 1940. Donated by Marco Gazzi who was an Italian survivor and later on the DuneraFramed photocopy of watercolour painting of Arandora Star.arandora star, internees transport ship, dunera, marco gazzi -
 Flagstaff Hill Maritime Museum and Village
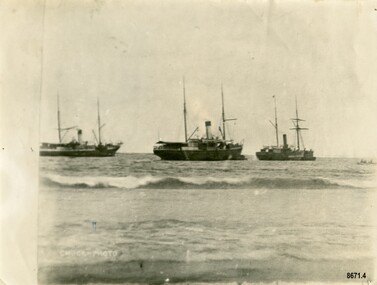
Photograph - Steamers - Julia Percy, Dawn and Coorong, Chuck Photo Ballarat, Circa 1885
This photograph was one of ten photographs donated to Flagstaff Hill Maritime Museum and Village by Fred Trewartha. Frederick John Fox Trewartha (Fred) was a well-known Warrnambool businessman. He was born in Beeac near Geelong in 1920 and came to Warrnambool with his family as a very young child. He was apprenticed to his father John, as a saddler and later opened his own shop on Raglan Parade. He then moved into working with tarpaulins and canvases for the trucking industry. Fred was keenly interested in photography (and was a member of the Warrnambool Cine Club), yachting and boat building. He kept his yacht moored at Port Fairy for many years and participated in sailing events locally and interstate. He also built boats with his sons. He had the opportunity to meet many older sailors and it's thought this photo (and others in the set) may have been given to him by one of these men. Fred Trewartha died in 2016 in Warrnambool. Shipping was the cheapest and most practical means of carrying produce and goods during the period 1840-1890. Regular domestic steamer services commenced in the Warrnambool district in the late 1850’s and by 1870 the passenger trade was booming. Four coastal traders made regular stops at Warrnambool in the 1880's - S. S. Julia Percy, S. S. Dawn, S. S. Nelson and S. S. Casino. The S.S. Julia Percy (later named Leeuwin) was an iron passenger-cargo steam ship built in 1876. At one point in time the Julia Percy would sail from Warrnambool to Melbourne every Friday and return from Melbourne to Warrnambool every Tuesday. The cost of a return ticket for a Saloon Fare was £1.0.0. The Julia Percy was built in Glasgow by Thomas Wingate & Company, Whiteinch, in 1876 for the Warrnambool Steam Packet Company, which commissioned it for trade in Victoria’s western district. It was first registered in Warrnambool, Victoria in 1876. Two steamships, the Julia Percy and the Nelson, collided on 25th December 1881. The Julia Percy was at that time owned by its first owners, the Warrnambool Steam Packet Company, and she sailed under the command of Captain Chapman. It had left Melbourne the evening of 24th December, with about 150 passengers, sailing in fine weather through Port Phillip Heads around 9pm. It was headed for Warrnambool, Belfast (now named Port Fairy) and Portland. The Julia Percy was off Apollo Bay when Captain Chapman was woken by the ship’s whistle after midnight, the steamer Nelson being on a collision course with the Julia Percy. The Nelson struck Julia Percy midship. Boats were lowered from the ship (apart from a damaged lifeboat) and about 30-40 of the passengers boarded the Nelson. The engine room and the forehold were checked and found clear of water. The company manager, Mr. Evans, had been on the Nelson, so he boarded and inspected the Julia Percy and the decision was made to continue on to Warrnambool with the passengers as there appeared to be no immediate danger. However, Captain Thomas Smith said the Nelson was taking on water, so Julia Percy followed it for about an hour towards Melbourne on standby in case of need. Then Julia Percy turned around towards Warrnambool again. Shortly afterwards the Nelson turned to follow her, the ships stopped and passengers were returned to Julia Percy, and three from Julia Percy boarded the Nelson. Both ships proceeded on their way. Julia Percy passed Cape Otway light afterwards, signaling that there had been a collision. It was discovered later that one of the passengers was missing, then thought to have boarded the Nelson but later thought to have fallen into the sea and drowned while trying to jump from Julia Percy to Nelson. There had been 3 tickets purchased under the same name of that passenger “Cutler”; a father, son and friend named Wordsworth, which had caused quite some confusion. No further mishap occurred to either ship and both the Julia Percy and the Nelson reached their destinations safely. An enquiry was instigated by the Victoria Steam Navigation Board regarding the cause of the accident between the two steamships, in connection with the death of Cutler who was supposed to have lost his life by the collision. The enquiry resulted in Captain Thomas Smith having his master's certificate suspended for six months. The Julia Percy changed hands several times. Its next owner was the Western Steam Navigation Co (1887), managed by Mr. T.H. Osborne (the company’s office was on the corner of Timor and Liebig Streets - its north-western wall is now part of the current Warrnambool Regional Art Gallery.) The Melbourne Steamship Co became the next owners (1890), followed by William Howard Smith and Sons (1901) for use in Queensland coastal trades and then it was bought by George Turnbull in 1903 and used for local mail contract in Western Australia. The Julia Percy was sold to the Melbourne Steamship Company Ltd. (1906) and re-named the “Leeuwin” but continued in her Western Australian coastal run. It was converted into a coal hulk in Melbourne in 1910 as a result of damaged caused when it was driven against the jetty at Dongara during a gale. The ship was eventually dismantled and scuttled off Port Phillip Heads on 28 December 1934. The steamship "Dawn" was a 522-ton coastal trader built in 1876 and the vessel operated around the Victorian west coast from 1877 until 1898 for the Portland & Belfast Steam Navigation Co. sailing between Melbourne and Portland, via Warrnambool. The vessel was then owned in October 1885 by the renamed company, Belfast & Koroit Steam Navigation Co., until March 1896 when its ownership moved to W Howard Smith & Sons Ltd. This Melbourne company used the ship to service most ports around Australia. Captain F. Chapman took over from Captain Jones and served on the SS Dawn from 1898 until 1900 when he took command of the SS Casino. On September 4th 1880, the three masted clipper ship, "Eric the Red" struck Otway Reef, near Cape Otway. The S. S. Dawn, under the command of Captain Jones, was returning to Warrnambool from Melbourne, its sailing time different to its usual schedule. The provedore of the Dawn, Benjamin Lear, heard cries of distress coming through the portholes of the saloon. He gave the alarm and the engines were stopped. Cries could be heard clearly, coming from the land. Captain Jones sent out crew in two boats, and fired off rockets and blue lights to illuminate the area. They picked up the three survivors who were in the long boat from "Eric the Red". Two men were picked up out of the water, one being the owner’s son who was clinging to floating kerosene boxes. At daylight the Dawn then rescued the 18 men from the floating portion of the deckhouse, which had drifted about 4 miles from where they’d struck the reef. Shortly after the rescue the deckhouse drifted onto breakers and was thrown onto rocks at Point Franklin, about 2 miles east of Cape Otway. Captain Jones had signalled to Cape Otway lighthouse the number of the Eric the Red and later signalled that there was a wreck at Otway Reef but there was no response from the lighthouse. The captain and crew of the Dawn spent several more hours searching unsuccessfully for more survivors, even going back as far as Apollo Bay. On board the Dawn the exhausted men received care and attention to their needs and wants, including much needed clothing. Four men (three crew and one passenger) died. A week after the shipwreck, the Australian Government had also conveyed its thanks to the Captain and crew of the S.S. Dawn - “Captain Griffith Jones, S.S. Dawn, The Hon. Mr Clark desires that the thanks of the Government should be conveyed to you for the prompt, persevering and seamanlike qualities displayed by you, your officers and crew in saving the number of lives you did on the occasion referred to. The Hon. The Commissioner has also been pleased to award you a souvenir in commemoration of the occasion, and a sum of 65 pounds to be awarded to your officers and crew according to annexed scale. I am, &c, W Collins Rees, for and in the absence of the Chief Harbour Master.” The Awards are as follows: - Crew of DAWN'S lifeboat-Chief Officer, Mr G. Peat, 15 pounds; boat's crew-G. Sterge, A.B., 5 pounds; T. Hammond, A.B., 5 pounds; J. Black, A.B., 5 pounds; H. Edwards, A.B., 5 pounds. Dinghy's Crew-Second Officer, Mr Christie, 10 pounds; boat's crew -F. Lafer, A.B., 5 pounds; W. Johnstone, A.B., 5 pounds; Mr Lear, provedore, 5 pounds; Mr Dove, purser, 5 pounds. Captain Jones receives a piece of plate. (from “Wreck of the ship Eric the Red” by Jack Loney). Medals of Bravery were awarded to the Captain and crew of the S.S. Dawn by the President of the United States, through the Consul-general (Mr Oliver M. Spencer), in July 1881 “ … in recognition of their humane efforts in rescuing the 23 survivors of the American built wooden sailing ship, the Eric the Red, on 4th September 1880.” The men were also presented with substantial monetary rewards and gifts. The city of Warrnambool’s care of the survivors was also mentioned by the President at the presentation, saying that “the city hosted and supported the crew ‘most graciously’. The Medal of Bravery awarded to Nelson Johnson is in the collection at Flagstaff Hill Maritime Museum and Village in Warrnambool. Prior to 1882, and the arrival of the S. S. Casino, the "Dawn" was the only steamer to be able to navigate up the Moyne River at Port Fairy and unload at the wharf. The other regular steamers had to anchor in the bay instead. In February 1891 (as reported in The Age newspaper) the "Dawn" became the first vessel to berth alongside the newly completed Warrnambool Breakwater. The occasion was celebrated with a number of prominent townspeople assembling on board to "participate of a glass of wine". In 1895 the owners of the S.S. Dawn, the Portland and Belfast Steam Navigation Co., wound up and sold out to the Belfast Company who took over the Dawn for one year before selling it to Howard Smith. It took over the Melbourne to Warrnambool run in 1906 when the S. S. Flinders was sold. The S. S. Dawn was condemned and sunk in Suva in 1928. The State Library of Victoria has a lithograph in its collection depicting the steamer Dawn and the shipwrecked men, titled. "Wreck of the ship Eric the Red, Cape Otway: rescue of the crew by the Dawn". The third ship depicted in the photograph was thought to be the S. S. Coorong but there was a question mark next to its name. The photograph was thought to have been taken in 1885 and it's possible the S.S. Coorong was working in Clarence River, N. S. W. by this time. The steamer "Coorong" was built in 1862 by J. G. Lawrie of Glasgow. It was an "iron screw" steamer of 304 tons. It had many owners including Joseph Darwent of Adelaide (1863 - 1871), McMeckan Blackwood and Company, Melbourne (1871 - 1877), Mount Gambier Steamship Company Ltd. (1877 - 1881). William Whineham, Port Adelaide (1882), John See and Company, Sydney (1884 - 1892) and the North Coast Steam Navigation Company Ltd, Sydney (1892 - 1910). In 1911 it was hulked in Sydney Harbour and in 1921 it was being used as a coal hulk at Sydney. It had been originally imported into South Australia for the Port Augusta trade (primarily transporting goods needed by the early settlers) however the owners recognized that it had too much space for that purpose, so it was moved to work on the Adelaide to Melbourne line. Its passenger accommodation was enlarged and it enjoyed a "first class reputation" and by 1874 had made 313 voyages between Melbourne and Adelaide. Its captains included Captain McLean, Captain Ashton and Captain Dowell. In 1867, when 25 miles west of Cape Otway, while travelling from Adelaide to Melbourne, it came across the crew of the schooner "Black Watch" who had abandoned ship after it began quickly taking on water. The crew (six men) were able to get away in a small boat with a compass, chart and few candles. They were "excessively cold from exposure to the weather" when the S. S. Coorong picked them up. In 1877 the Coorong ran aground when entering the Outer Harbour at Adelaide (but was not damaged) and in 1882 it was stranded (for a short time) near Curdies Inlet (Victoria) with some slight damage to its bottom plates. Note - A ship with the same name "Coorong" (a coal carrying barque) was often on the Newcastle / Wollongong to Adelaide route also stopped several times in Warrnambool in the mid 1880's. The photograph has the label "Chuck Photos" printed on the front. Thomas Foster Chuck (born 1826 in London) was a photographer and entrepreneur who arrived in Victoria in 1861. The following year he produced and toured a "Grand Moving Diarama" of dramatic painted scenes from the Burke and Wills expedition. By 1866 he had established a photography studio in Daylesford and later he returned to Melbourne where he opened a studio in the Royal Arcade. In 1874 a collection of Chuck's photographs won a gold medal at the Annual International Exhibition in London. Throughout the 1870's he took over 700 individual photographs of prominent citizens for his historical photographic montage titled "Historical Pictures of the Explorers and Early Colonists of Victoria" which is now in the collection of the National Library of Australia. By 1888 he had sold his Melbourne studio and had established a studio in Ballarat (with his son Thomas Henry Chuck). In 1886 they produced an album titled "Warrnambool and District 1886, Western Hotel - J. Fox proprietor" containing over sixty large photographs of local coastal scenes and seascapes, for the use of patrons of the Western Hotel. This photo (of the three steamers in Lady Bay) was taken at this time and is in the album. Thomas Chuck died on December 7th, 1898, in Albert Park, Melbourne and his son Thomas Henry continued to operate the photography studio in Ballarat into the 1920's.This photograph is a significant record of several of the well-known coastal traders (S. S. Julia Percy, S. S. Dawn and possibly S. S. Coorong) that sailed along the southwest coast of Victoria for many years - transporting goods and passengers between Melbourne and Warrnambool in the 1880's. They are also significant in the role they played in the history of Warrnambool and the other coastal ports they visited as well as being examples of the dangers and hazards associated with navigating the waters along the southern coast of Australia. It is also a good example of a photograph taken by a well-known and significant photographer of that era.Black and white photograph of three steam ships anchored in Lady Bay, Warrnambool. They each have a funnel and two masts and are side on to the beach. A small rowboat with a crew can be seen on the far right. The words "CHUCK-PHOTO" are on the bottom left of the photograph. On the back of the photograph is the name and telephone number of the donor (handwritten in black ball point pen) and the names of the three steamships and date written in uppercase letters in dark blue ink. There is a four-figure number stamped in the centre of the back.Front - "CHUCK-PHOTO" Back - Name of donor and telephone number "6944" "JULIA PERCY, DAWN & KOORONG(?) IN LADY BAY 1885"flagstaff hill maritime museum and village, warrnambool, great ocean road, fred trewartha, s. s. julia percy, s. s. dawn, s. s. nelson, s. s. casino, leeuwin, steamer, steamship, coastal trader, warrnambool steam packet company, captain chapman, victorian steam navigation board, western steam navigation company, melbourne steamship company, william howard smith and sons, portland and belfast steam navigation company, w howard smith and sons ltd, eric the red, captain jones, medal of bravery, rescue, moyne river, warrnambool breakwater, lady bay, s. s. coorong, mount gambier steamship company, black watch, thomas foster chuck, chuck photos, chuck photography -
 Flagstaff Hill Maritime Museum and Village
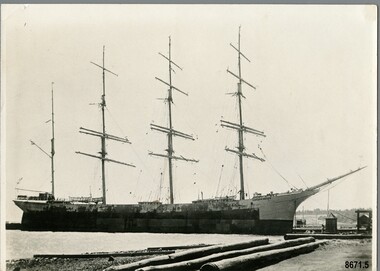
Photograph - Vessel "Strathgryfe", late 19th or early 20th century
This photograph was one of ten photographs donated to Flagstaff Hill Maritime Museum and Village by Fred Trewartha. Frederick John Fox Trewartha (Fred) was a well-known Warrnambool businessman. He was born in Beeac near Geelong in 1920 and came to Warrnambool with his family as a very young child. He was apprenticed to his father John, as a saddler and later opened his own shop on Raglan Parade. He then moved into working with tarpaulins and canvases for the trucking industry. Fred was keenly interested in photography (and was a member of the Warrnambool Cine Club), yachting and boat building. He kept his yacht moored at Port Fairy for many years and participated in sailing events locally and interstate. He also built boats with his sons. He had the opportunity to meet many older sailors and it's thought this photo (and others in the set) may have been given to him by one of these men. Fred Trewartha died in 2016 in Warrnambool. The "Strathgryfe" was a four masted steel barque built in 1890 by "Russell and Company", Port Glasgow and was owned by Duncan McGillivray (The Strathgryfe Ship Company Limited), Greenock. It arrived in Melbourne in December 1891 from New York. Between 1891 and 1910 it carried merchandise in and out of Australia to ports around the world - Melbourne to London (1892), Newcastle to San Francisco (1894), Capetown to Newcastle (1894), New York to Shanghai (1897), New York to Melbourne (1898), Frederickstadt to Melbourne (1899), Liverpool to Sydney (1900), San Francisco to Brisbane (1903), Newcastle to Pisagna, Chile (1905) and Rotterdam to Melbourne (1910). It carried breadstuffs from San Francisco, coal from Newcastle, wool from Sydney, saltpetre from Hamburg and wheat from Brisbane and Melbourne as well as a variety of general merchandise. In 1898, whilst on route between New York and Melbourne, it came across the Captain and crew of the missing barque "Glen Huntley" which had been reported as "lost" several months earlier. They had been marooned at Tristan D'Acunha (a remote group of volcanic islands in the South Atlantic ocean). Captain McIntyre, of the Strathgryfe, offered to bring Captain Shaw (of the Glen Huntly) on to Melbourne with them but the "old mariner" decided to stay on with his crew till arrangements could be made for rescuing the whole of them. In 1899, when in Melbourne, seven of its crew refused to go to sea in it due to its unsafe conditions. They said the vessel was unseaworthy and that the rigging was unsafe and the lifeboats, not watertight. The Captain (Donald McIntyre) denied the allegations and produced a marine surveyor's certificate as evidence of the condition of the vessel. The men were sentenced to three weeks imprisonment. In 1901 there was a fire on board the Strathgryfe just after it left Sydney for London which resulted in many bales of wool being destroyed. In 1902 it was beached at Shellback island (near Wilson's promontory) for several weeks and had to be considerably dismantled in order to lighten its load enough to allow tugs to pull it back into deep water. In 1910 it was sold to a German firm and renamed "Margretha". It continued to operate in Australian ports until 1914 when it left Sydney for the English Channel with 42,438 bags of wheat. However owing to W.W.1 breaking out, it made for the port of St Michael's where it remained for twenty-one months. Later it was seized by the Portuguese Government and renamed "Graciosa" and was leased back to the English Government. It was sunk by two German submarines in 1918.This photograph is significant as a record of the world wide mercantile trade Australia was engaged in at the end of the nineteenth century and beginning of the twentieth century.Black and white photograph of a four masted barque moored at a dock. The rigging and two lifeboats are clearly visible. Three large timber logs are in the foreground. On the back of the photograph, the donor's name and telephone number have been written in black ballpoint pen and the name of the ship has been handwritten (incorrectly) in pencil in cursive script.Back of Photo - donor's name and telephone number "Strarthgryfe" [Strathgryfe] / "late" / "Margurita" [Margretha]flagstaff hill maritime museum and village, warrnambool, great ocean road, shipwreck coast, strathgryfe, barque, steel barque, margretha, graciosa, frederick trewartha, mercantile trade, russell and company, merchandise, cargo ship, glen huntly, w. w. 1 -
 Alfred Hospital Nurses League - Nursing History Collection
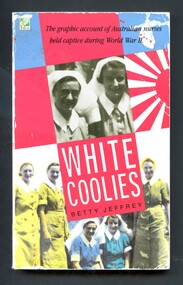
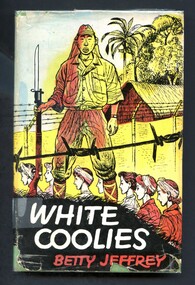
Book, Betty Jeffrey 1908-2000, White Coolies, 1988
... the fall of Singapore. Two days later their ship was bombed ...n 1942 a group of sixty-five Australian Army nursing sisters was evacuated from Malaya aboard the Vyner Brooke, a few days before the fall of Singapore. Two days later their ship was bombed and sunk by the Japanese. Of the fifty-three survivors who scrambled ashore, twenty-one were murdered and the remaining thirty-two were taken prisoner. The book is the engrossing record kept by one of the sisters, Betty Jeffrey, during the three grueling years of imprisonment that followed. It is an amazing story of survival and deprivation in the harshest of conditions.Book has a red white and Malaya 1941, Nursing Sisters of cover, tile printed in white and author's name printed in black on front cover. On the front cover is a coloured black and white photograph "Malaya 1941, Nursing Sisters of 2/4 Clearing Station, 8 Division. Title and author's name also printed in white on spine. The back cover has a summary of the booknon-fictionn 1942 a group of sixty-five Australian Army nursing sisters was evacuated from Malaya aboard the Vyner Brooke, a few days before the fall of Singapore. Two days later their ship was bombed and sunk by the Japanese. Of the fifty-three survivors who scrambled ashore, twenty-one were murdered and the remaining thirty-two were taken prisoner. The book is the engrossing record kept by one of the sisters, Betty Jeffrey, during the three grueling years of imprisonment that followed. It is an amazing story of survival and deprivation in the harshest of conditions.world war 1939-1945 prisoners of war, nurses -
 Alfred Hospital Nurses League - Nursing History Collection
Book - Illustrated Book, Betty Jeffrey 1908-2000 et al, White Coolies, 1954
... later their ship was bombed and sunk by the Japanese ...In 1942 a group of sixty-five Australian Army nursing sisters was evacuated from Malaya aboard the Vyner Brooke, a few days before the fall of Singapore. Two days later their ship was bombed and sunk by the Japanese. Of the fifty-three survivors who scrambled ashore, twenty-one were murdered and the remaining thirty-two were taken prisoner. The book is the engrossing record kept by one of the sisters, Betty Jeffrey, during the three grueling years of imprisonment that followed. It is an amazing story of survival and deprivation in the harshest of conditions.Illustrated book with dustjacket. Book has a light green cover, with an image of a compass embossed in gold. on the front. The tile author's surname and publisher's name are embossed in gold on the spine. Dust jacket has multicoloured illustration by J.P.L Kickhefer on front and spine: group of women, some with head scarves walking behind a ?prison guard, barbed wire topped fence in front of and behind group. In the background is a hut and tropical plants. Title (white print) and authors name (red print) appear on a black background at base of front of dustjacket. Title, author's and publisher's names are printed in black on spinenon-fictionIn 1942 a group of sixty-five Australian Army nursing sisters was evacuated from Malaya aboard the Vyner Brooke, a few days before the fall of Singapore. Two days later their ship was bombed and sunk by the Japanese. Of the fifty-three survivors who scrambled ashore, twenty-one were murdered and the remaining thirty-two were taken prisoner. The book is the engrossing record kept by one of the sisters, Betty Jeffrey, during the three grueling years of imprisonment that followed. It is an amazing story of survival and deprivation in the harshest of conditions.world war 1939-1945 prisoners of war, betty jeffrey -
 Flagstaff Hill Maritime Museum and Village
Document - Menu, Bill of Fare ship Schomberg, circa 1855 - May 12 1856
A “Bill of Fare” is a menu or list of food offered for a meal. This Bill of Fare from the sailing ship Schomberg is handwritten in pen in hard-to-read script on the printed pages specifically for the Schomberg ship, of the Black Ball Line of Australian Packets. (‘Packets’ were vessels that had a regular trade run of cargo, passengers and mail; the sailing ship Schomberg was designed for long voyages between England and Australia.) These menus posed a puzzle as they have the handwritten dates of, May 10 and 12, 1856, by which time the Schomberg had sunk (she sunk on December 26, 1855). The donor of these pages of Bill of Fare is a stamp collector from Melbourne. He came across the menus in a package that he bought in 1980 at a stamp auction in Tasmania. He decided to give the menus to Flagstaff Hill this year during his annual family holiday in Warrnambool. A 1981 newspaper article about this donation included an interview with Flagstaff Hill’s curator Mr Peter Ronald, who said that the stationery of these menus is genuine. He went on to say that there would have been much stationery printed for use on the Schomberg although she sank on her maiden voyage. These menus could have been written at a dated late because the surplus Schomberg stationery could have been used for menus on other ships. We will probably never be sure of the answer but none-the-less the pages are still connected to the Schomberg. Below is what we believe the menu consists of although some of the writing is indecipherable - - - - - - - - - - - - - - - - - - - - - - - - - - - - - - - - - - - - - (first menu) Roast Mutton Boiled Mutton? Ox Tail Mulligatawny? Or possibly Ox Tail Vegetables? Mutton Pies? ------------------------------- Vegetables Potatoes ---------------------------------- Dessert Fruit Puddings? Saturday May 10, 1856 - - - - - - - - - - - - - - - - - - - - - - - - - - - - - - - - - - - - AND - - - - - - - - - - - - - - - - - - - - - - - - - - - - - - - - - - - - (second menu) Boiled Mutton Roast Mutton? Roast Geese? Ox Tail?? Calves Head Broth? ------------------------------- Vegetables Potatoes ------------------------------- Dessert Tarts? Rice Pudding? ?...Maids?? Monday May 12, 1856 - - - - - - - - - - - - - - - - - - - - - - - - - - - - - - - - - - - - Background of “SCHOMBERG” When SCHOMBERG was launched in July, 1855, she was considered the “Noblest ship that ever floated on water.” SCHOMBERG’s owners, the Black Ball Line (one of three companies by that name), commissioned the ship for their fleet of passenger liners. She was built by Alexander Hall of Aberdeen, UK at a cost of £43,103. She was constructed with 3 skins: one planked fore and aft, and two diagonally planked, fastened together with screw threaded trunnels (wooden rails). Her first class accommodation was luxurious: velvet pile carpets; large mirrors; rosewood; birds-eye maple; mahogany; soft furnishings of gold satin damask; an oak-lined library; and a piano. Overall she had accommodation for 1000 passengers. SCHOMBERG’s 34 year old master, Captain James ‘Bully’ Forbes, had promised Melbourne in 60 days at the launch, "with or without the help of God." James Nicol Forbes was born in Aberdeen in 1821 and rose to fame with his record-breaking voyages on the famous Black Ball Line ships MARCO POLO and LIGHTNING. In 1852 in the MARCO POLO he made the record passage from London to Melbourne in 68 days. There were 53 deaths on the voyage but the great news was of the record passage by the master. In 1954 Captain Forbes took the clipper LIGHTNING to Melbourne in 76 days and back in 63 days, this was never beaten by a sailing ship. He often drove his crew and ship to breaking point to beat his own records. He cared little for the comfort of the passengers. On this, the SCHOMBERG’s maiden voyage, he was going to break records. SCHOMBERG departed Liverpool on her maiden voyage on 6 October 1855 flying the sign “Sixty Days to Melbourne”. She departed with 430 passengers and 3000 tons cargo including iron rails and equipment intended to build the Melbourne to Geelong Railway as well as a bridge over the Yarra from Melbourne to Hawthorn. She also carried a cow for fresh milk, pens for fowls and pigs, and 90,000 gallons of water for washing and drinking. SCHOMBERG also carried 17,000 letters and 31,800 newspapers. The ship and cargo was insured for $300,000, a fortune for the time. The winds were poor as she sailed across the equator, slowing SCHOMBERG’s journey considerably. Land was first sighted on Christmas Day, at Cape Bridgewater near Portland, and Captain Forbes followed the coastline towards Melbourne. Forbes was said to be playing cards when called by the Third Mate Henry Keen, who reported land about 3 miles off. Due in large part to Forbes regarding a card game as more important than his ship, SCHOMBERG eventually ran aground on a sand spit near Curdie's Inlet (about 56 km west of Cape Otway) on 26 December 1855, 78 days after leaving Liverpool. The sand spit and the currents were not marked on Forbes’s map. Overnight, the crew launched a lifeboat to find a safe place to land the ship’s passengers. The scouting party returned to SCHOMBERG and advised Forbes that it was best to wait until morning because the rough seas could easily overturn the small lifeboats. The ship’s Chief Officer spotted the steamer SS QUEEN at dawn and signalled it. The master of the SS QUEEN approached the stranded vessel and all of SCHOMBERG’s passengers and crew were able to disembark safely. The SCHOMBERG was lost and with her, Forbes’ reputation. The Black Ball Line’s Melbourne agent sent a steamer to retrieve the passengers’ baggage from the SCHOMBERG. Other steamers helped unload her cargo until the weather changed and prevented the salvage teams from accessing the ship. Later one plunderer found a case of Wellington boots, but alas, all were for the left foot! Local merchants Manifold & Bostock bought the wreck and cargo, but did not attempt to salvage the cargo still on board the ship. They eventually sold it on to a Melbourne businessman and two seafarers. In 1864 salvage efforts were abandoned after two men drowned when they tried to reach SCHOMBERG. Parts of the SCHOMBERG were washed ashore on the south island of New Zealand in 1870, nearly 15 years after the wreck. The wreck of the SCHOMBERG lies in almost 9 metres of water. Although the woodwork is mostly disintegrated, the shape of the ship can still be seen due to the remaining railway irons, girders and the ship’s frame. A variety of goods and materials can be seen surrounding the wreck, by divers. Flagstaff Hill holds many items salvaged from the SCHOMBERG including a ciborium (in which a diamond ring was concealed in concretion), communion set, ship fittings and equipment, personal effects, a lithograph, tickets and photograph from the SCHOMBERG. These Bills of Fare are significant due to their connection to Flagstaff Hill’s collection of artefacts from the Schomberg, which is significant for its association with the Victorian Heritage Registered shipwreck S612. The collection is primarily significant because of the relationship between the objects, as together they have a high potential to interpret the story of the Schomberg. The Schomberg collection is archaeologically significant as the remains of an international passenger ship. The shipwreck collection is historically significant for representing aspects of Victoria’s shipping history and its potential to interpret sub-theme 1.5 of Victoria’s Framework of Historical Themes (living with natural processes). The collection is also historically significant for its association with the shipwreck and the ship, which was designed to be fastest and most luxurious of its day. The Schomberg collection meets the following criteria for assessment: Criterion A: Importance to the course, or pattern, of Victoria’s cultural history. Criterion B: Possession of uncommon, rare or endangered aspects of Victoria’s cultural history. Criterion C: Potential to yield information that will contribute to an understanding of Victoria’s cultural history. Menu, or Bill of Fare, on cream coloured stationery from the sailing vessel “Schomberg”. Two rectangular pieces of paper, each bears the printed words “Black Ball Line of Australian Packets, Bill of Fare, Ship, Schomberg”, a printed symbol of the Black Ball line (a black ball on a red flag) and a decorative border. Both pages are handwritten, in similar but different sized writing, with a Bill of Fare and a date, Page (1) dated May 10th 1856 and (2) dated May 12th ’56, (Both dates are AFTER the Schomberg sank in December 26th 1855.) Both pages have three fold lines spaced across their width. To be used for the return voyage.Printed on the pages ““BLACK BALL LINE OF AUSTRALIAN PACKETS.” “Bill of Fare, / SHIP / “SCHOMBERG”.” Handwritten list of food, and on one page “Saturday May 10 1856” and on the other page “Monday May 12” warrnambool, peterborough, shipwrecked coast, shipwreck coast, flagstaff hill maritime museum, flagstaff hill maritime village, maritime museum, great ocean road, flagstaff hill, sailing ship schomberg, shipwreck schomberg, black ball line of australian packets, bill of fare schomberg, menu schomberg 1856, food mid-1800’s, food on ships mid-1800’s, menu, may 10, 1856, may 12, 1856 -
 Flagstaff Hill Maritime Museum and Village
Letter - Loch Ard Centenary Letter, Koroit Council, March 1978
... England to Melbourne, and the ship was sunk on the 1st June 1878... to Melbourne, and the ship was sunk on the 1st June 1878, with only two ...The Loch Ard was an iron hulled clipper, built in Scotland in 1873 and wrecked on the southwest coast of Victoria in 1878 at what is now known as Loch Ard Gorge, near Port Campbell. Fifty two crew and passengers died and only Tom Pierce and Eva Carmichael survived. The Loch Ard was the last sailing ship to lose emigrants' lives when negotiating the entrance to Bass Strait. One of the most unlikely pieces of cargo to have survived the shipwreck was a Minton porcelain peacock - one of only nine in the world. The peacock was destined for the Melbourne International Exhibition in 1880. It had been well packed, which gave it adequate protection during the violent storm. Today, the Minton peacock can be seen at the Flagstaff Hill Maritime Museum in Warrnambool. From Australia's most dramatic shipwreck it has now become Australia's most valuable shipwreck artefact and is one of very few 'objects' on the Victorian State Heritage Register. The Victorian History Advisory Council decided 1978 was an appropriate year to mark, not only the centenary of the sinking of the Loch Ard in 1878, but also commemorate the large part played by sailing ships in immigration, and through this, the development of Australia. The Victorian Government authorised the commemoration and a "Loch Ard Centenary Committee" was formed. It was established to create public interest and awareness for the 100th anniversary of the tragic Loch Ard shipwreck. Activities and events included student essays, exhibitions, videos, publications, competitions and historical information. A booklet called "Settlers Under Sail" by Don Charlwood was commissioned to be made available to all school children. The anchor of the Loch Ard was raised from the wreck and displayed at Port Campbell, a memorial plaque (erected by The National Park) was unveiled at Loch Ard Gorge, a special "Loch Ard Shipwreck Centennial Port Campbell" postmark was issued by the Post Office and a model ship competition was held. Flagstaff Hill Maritime Museum and Village, together with other local towns and shires along the south-west coast participated in many of these commemorative activities. This letter is a significant reminder (and recognition) of the importance the Loch Ard (and other immigrant ships) played in the settling of Victoria and the dangers faced by the settlers who came to Australia in these ships. Flagstaff Hill’s collection of artefacts from LOCH ARD is significant for being one of the largest collections of artefacts from this shipwreck in Victoria. It is significant for its association with the shipwreck, which is on the Victorian Heritage Register (VHR S417). The collection is significant because of the relationship between the objects, as together they have a high potential to interpret the story of the LOCH ARD. The LOCH ARD collection is archaeologically significant as the remains of a large international passenger and cargo ship. The LOCH ARD collection is historically significant for representing aspects of Victoria’s shipping history and its potential to interpret sub-theme 1.5 of Victoria’s Framework of Historical Themes (living with natural processes). The collection is also historically significant for its association with the LOCH ARD, which was one of the worst and best-known shipwrecks in Victoria’s history.Single page letter typed in blue ink, on behalf of Koroit Council, written on 14th March 1978 and addressed to the Chairman, Flagstaff Hill Maritime Village Advisory Board, in recognition of the "Loch Ard Centenary Commemoration 1878 - 1978". It has the "Borough of Koroit" stamp at the top of the page and a red "Borough of Koroit" seal on the bottom right-hand corner of the page. It is signed by the Mayor (Allan R. Waterson), a councillor (J. W. Smith) and the Town Clerk (Jim Macdonald). The letter is in a plain buff manilla folder labelled in blue type.Top left corner - "Address correspondence to:/TOWN CLERK / P.O. BOX 5/KOROIT, 3282" Top Centre - blue circular ink stamp of "BOROUGH OF KOROIT 1870" with coat of arms in the center Top right - "TOWN HALL,KOROIT/ PHONE KOROIT (055) 658230/After Hours (055) 658490" The letter is addressed to - "CR. J. S. Lindsay, /Chairman,/ Flagstaff Hill Maritime Village Advisory Board,/ WARRNAMBOOL. 3280" "LOCH ARD CENTENARY COMMEMORATION 1878 - 1978" (underlined) The letter begins - "It is with much pleasure that the Council of the Borough of Koroit, join with neighbouring municipalities, civic leaders and other organisations on this day, in commemorating the "Loch Ard" Shipwreck centenary. The "Loch Ard" operated as a cargo and passenger vessel for immigrants, for a period of five years, from 1873 to 1878. Its last voyage was from England to Melbourne, and the ship was sunk on the 1st June 1878, with only two survivors from passengers and crew of fifty-four. The celebrations being conducted throughout our district this day will help us all to remember and appreciate the determination and spirit shown by these people, for they had the faith to realise that their endeavours would be successful, even against great odds in comparison to present day standards and techniques, and their imprint on our history is record of this fact. This commemoration acknowledges the important role undertaken by sailing ships such as the "Loch Ard" and the vital role this ship played in the early settlement of the State of Victoria." The letter ends with -" the Common Seal of the Mayor, Councillors and Burgesses of the Borough of Koroit was hereunto affixed this 18th day of March, 1978." The letter is signed "Allan J. Waterson Mayor/J. W. Smith Councillor/ Jim Macdonald Town Clerk and a large red seal of the Borough of Koroit (with their coat of arms) is in the bottom right-hand corner. Front of manilla folder - "BOROUGH OF KOROIT / LOCH ARD CENTENARY COMMEMORATION/ 1878 - 1978" "4050" written in black ink top right-hand corner next to a scribbled out numberflagstaff hill maritime museum and village, warrnambool, great ocean road, shipwreck coast, loch ard, port cambell, shipwreck, commemorative committee, loch ard centenary, koroit council, commemorative letter, loch ard commemorative committee -
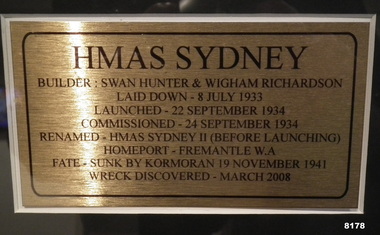 Bendigo Military Museum
Photograph - HMAS SYDNEY, FRAMED, Unknown
As per the explanation the HMAS Sydney II was launched in Sept 1934, sunk by the German Raider Kormoran on 19 November 1941, the wreck was discovered in March 2008. This item is on display inn the Bistro area of the Bendigo DRSL in Havilah RoadPhotos framed, the frame is timber Brown colour, at the top is the main photo of the ships crew on the decking of the HMAS Sydney II, centre is an explanation of the “Sydney’s building, commissioning and fate, at bottom LH side shows the “Sydney” at sea, the RH photo shows “Sydney” in front of the Sydney Harbour Bridge“HMAS SYDNEY”brsl, smirsl, bdrslinc -
 Flagstaff Hill Maritime Museum and Village
Letter - William Ferrier, 14th November 1905
The letter to William Ferrier of South Warrnambool from the Prime Minister and the Parliament of the Commonwealth recognised the significance of William’s brave and courageous lifesaving act to the people of Australia; “They all feel that your conduct was worthy of the best deeds done by British sailors in the past and they are proud to know that Australia can produce such as you.” The story of that brave rescue follows on below … The ship from which the sailors were rescued was the three-masted, iron and steel barquentine the La Bella, built in Norway in 1893. She was one of two iron and steel ships by Johan Smith, The company was one of the leading shipping families in Tvedestrand, Norway. She was significant to Norwegian shipping, being one of only 27 iron and steel ships ever built in Norway. She was registered in New Zealand and engaged from 1902 in inter-colonial trading of timber in the Pacific, between New Zealand and Australia and was often in Port Phillip Bay, Victoria. On 5th October 1905, the twelve-year-old La Bella left Lyttleton, New Zealand carrying a cargo of timber bound for Warrnambool, Australia. She was manned by a crew of twelve: the Master, (Captain Mylius, previously 1st Mate of La Bella, appointed Captain to La Bella on 6th February 1903) 2 Mates, Cook, six able seamen, one ordinary seaman and a boy. Bad weather en route caused her to shelter at Burnie on Tasmania's North West coast. On November 10th, the 37th day of her journey, La Bella approached Warrnambool. Captain Mylius steered her towards Lady Bay Channel in heavy south-west seas and evening mist. He ordered the helmsman to steer for the light. As the ship came round, a tremendous sea struck her on the port quarter, causing her to breach broadside in a north-westerly direction into breakers. The helm was brought round twice more, but each time heavy seas broke over her, the third time throwing the La Bella on to a submerged reef in Lady Bay now known as La Bella Reef (about 100 yards from the Warrnambool breakwater). The sea was so rough that it even wrenched a one-and-a-half ton anchor from its fastenings and into the sea. As Captain Mylius headed to the steel wheelhouse, intending to send up a rocket flare, a huge sea slammed the steel door into him (resulting in massive bruising front and back) Despite his injuries he still managed to set off a blue light, which he held up in his hands. La Bella’s lifeboats were filled with seawater and broke up on their chocks. The blue light was the first indication to people on the shore that there was a ship in distress. The Harbour Master, Captain Roe (who lived in the Harbour Master’s House opposite Flagstaff Hill), organised a group of volunteers to crew the lifeboat because the trained crew was unavailable; the crewmen were working on a steamer in Port Fairy at the time. He then poured oil onto the water to try and smooth the sea. At around 11 pm three of the crew took shelter in the steel forecastle but the sea crashed into it and broke it up. While the rest of the crew and onlookers watched helplessly in the moonlight the bodies were washed away into the sea, never to be seen again. Some of the crew lashed themselves to the weather rail to keep from being washed away. Watson, the ordinary seaman, became tangled in the rigging lines and was too weak to move, so the 2nd Mate, Robertson, put a line onto him so that he wouldn’t wash off. Around 11 pm three of the crew were unconscious from exhaustion. The situation on La Bella was becoming dangerous. The 2nd Mate moved to the ‘house’ and soon afterwards the ship slipped in the heavy sea. The lashings of the 1st Mate and the ‘boy’ Denham had kept them safe until about 2 am when they were washed overboard; no one was able to help. One by one, the exhausted crew were being washed overboard, too weak to hold on any longer. During the night the La Bella had broken into two and the deckhouse ran out towards the sea. Two more men drowned when trying to reach the lifeboat. By sunrise, the only survivors of the twelve were the Master, 2nd Mate and three seamen. Early in the morning, Captain Roe used the rocket apparatus on shore to try and shoot a line to the ship for a safer rescue but each attempt fell short of the target. Several attempts were made by the lifeboat to rescue the stricken sailors, but the rough conditions made this difficult for the boat to get close enough to the ship and the lifeboat had to return to shore. During a final attempt to reach the ship Captain Mylius ordered his men to jump into the sea. Leonard Robertson, 2nd mate, jumped and swam towards the lifeboat, taking hold of the boat hook offered to him. Oscar Rosenholme managed to reach the boat floating on a piece of timber from the ship’s load and a third survivor, Noake, also made the boat. Along with the lifeboat rescue crew, 25-year-old William Ferrier rowed his small dingy through the heavy seas and managed to rescue the Captain, whom he landed on the breakwater. Ferrier then returned to the ship to attempt a final rescue, losing his oars and rowlocks into the high sea. Using just a spare paddle he skulled towards the La Bella, reaching her stern in time to cut loose the lone surviving sailor, Payne, from the lashing that held him to the ship; the terrified sailor dropped from the ship and into the dingy. Shortly after the last man was rescued, the La Bella was lifted by a huge wave and crashed back down on the reef; she broke up and sank. The ordeal had lasted ten hours. The survivors were taken to the nearby Bay View Hotel and gratefully received warm food and clothing, medical attention and a place to sleep. In the following days, an unidentified body of a young person has washed ashore; it was either Watson or Denham. The body was buried in the Warrnambool cemetery with an appropriate gravestone and inscription. William Ferrier became a national hero as news of the daring rescue spread. In recognition of his bravery in the two daring rescues, he was awarded the Silver Medal for Bravery by the Royal Humane Society and was honoured in the letter from the Prime Minister and the Parliament of the Commonwealth, telegrams and a cheque for £20 from the Governor-General, over £150 subscribed by the public, including Warrnambool and district and readers of The Argus, and a gold medal from the Glenelg Dinghy Club of South Australia. Ferrier’s rescue efforts are one of the most heroic in Victoria’s shipwreck history. (William Ferrier’s son, Frank, received a similar award almost fifty years later when he helped rescue four members of the crew on the yacht Merlan after it ran on to a reef near the Point Lonsdale Lighthouse. ) The wreck of La Bella now lies on her port side in 13 metres of sheltered water inside the reef she struck. The bow section is relatively intact and part of the stern has drifted north-easterly towards the mouth of the Hopkins River. The reef the La Bella struck now bears its name. Those five rescued from the La Bella were Captain George Mylius, Leonard Robertson (2nd Mate, 21 years old), R. Payne, Oscar Rosenholme and Jack Noake. Those seven who lost their lives were Mr Coulson (1st mate), Charles Jackman (cook) Gustave Johnson, Pierre Johann and Robert Gent (all able seamen), Harry Watson (ordinary seaman) and Jack Denham (ship’s boy), Captain Mylius was found guilty of careless navigation; he had sailed into the bay without the services of a pilot. His Master Certificate was suspended for twelve months. Later he was also charged with the manslaughter of one of the crew who had died when the La Bella was wrecked but found not guilty. The event’s adverse publicity and damage to his career took a toll on his health and he died of a heart attack six months after the wreck; he was only thirty-seven. His body was buried in the Melbourne General Cemetery. The La Bella was “the best documented of all sailing ships owned in New Zealand”. Her record books, ship logs, correspondence and supporting papers are still available. At the time of the tragedy, she was owned by Messers David C.Turnbull and Co. of Timaru, New Zealand timber merchants and shipping agents, who had purchased her on 13th December 1901. A detailed account of the last journey of La Bella can be read in “Leonard Robertson, the Whangaroa & La Bella” written by Jack Churchouse, published in 1982 by Millwood Press Ltd, Wellington, NZ. As well as this letter, Flagstaff Hill’s La Bella Collection includes a photograph of the wrecked La Bella, a brass rail holder and a postcard of William Ferrier with four of the survivors. Some 15 – 17 ships are believed to have sunk in Lady Bay, but only two have been discovered on the seafloor; the “La Bella” and the “Edinburgh Castle”. Both wrecks are popular diving sites and are preserved as significant historical marine and marine archaeological sites. This original congratulatory letter sent to William Ferrier by the Prime Minister and Government of Australia demonstrates the importance attached to his efforts for Victoria and to Australia. The letter is part of the La Bella Collection and is significant at both a local and state level. Its connection to the La Bella shipwreck and the rescue of five survivors highlights the dangers of Victoria’s Shipwreck Coast. The letter to William Ferrier from the Australian Government acknowledges the bravery of ordinary Australians who risked their lives to save victims of shipwrecks along the coast. The letter is significant to the history of Warrnambool as it honours William Ferrier, a local fisherman whose descendants continue to live in the area. It highlights the way of life of people who lived in coastal towns in 19th century Victoria and the effects of shipwrecks upon them. The letter connects to the postcard of William Ferrier with four of the five rescued crew, the photograph of the wreck of the La Bella and the artefact from the wreck, the rail holder. This letter is significant because of its association with the sailing ship “La Bella”. The “La Bella” is of local and state and national significance. It is one of the only two shipwrecks discovered in Lady Bay, Warrnambool, out of the 15-17 shipwrecks in the bay. Letter to William Ferrier of South Warrnambool from the Prime Minister and Members of Parliament commending him on his bravery. The printed letterhead includes a coat of arms in the top centre and the official address. The letter is very neatly hand written in black pen and includes 4 signatures of Members of Parliament. The rectangular paper is cream coloured with some yellow/brown discolouring. It has the letterhead on the right hand side of it and the written letter begins below the letterhead. The paper has been folded so that the right side becomes the cover page of the letter. The writing is continued onto the inside right hand page of the folded paper and the writing ends here. There is more recent writing on the bottom right hand corner of the back page. The paper has been officially folded in half a total 3 times and there is heavy discolouration on the sections that form the front and back of the folded letter. There is a 4th fold line that is less pronounced that the other folds and would make the paper the size to fit into a pocket. At several fold creases the paper has worn through. The edges of the paper have minor tears. The printed coat of arms is that of the House of Representatives. Underneath is printed “The Parliament of the Commonwealth, / Parliament House / Melbourne”. The hand written, letter is dated “14th November, 1905” and addressed to “Mr. William Ferrier / South Warrnambool” The letter begins “The Speaker, the Prime Minister and Members of the Ministry and its supporters, the Leader and Members of the Opposition, the Leader and Members of the Labour Party, being all the Members of the House of Representatives of the Federal Parliament of Australia” … It continues “desire to express to you their appreciation of your bravery in skulling out to the wreck of the “La Bella” at Warrnambool on Saturday, 11th November, 1905, and recovering therefrom two of the crew who were in imminent danger of their lives. They all feel that your conduct was worthy of the best deeds done by British sailors in the past and they are proud to know that Australia can produce such as you.” The letter is “Signed on behalf of the Members – Speaker (Frederick Holder ), Deputy Leader of the Opposition (Joseph Cook ), Prime Minister (Alfred Deakin), Leader of the Labour Party ( J.C. Watson)” On the back of the letter is blue ink handwriting “OWNER / G. FERRIER / TO. BE. PHOTOGRAPHED / 27-4-76”la bella, william ferrier, bill ferrier, lady bay, 1905, 10th november 1905, 11th november 1905, parliament of the commonwealth, prime minister, australian government, new zealand, flagstaff hill, warrnambool, shipwrecked coast, flagstaff hill maritime museum, maritime museum, shipwreck coast, flagstaff hill maritime village -
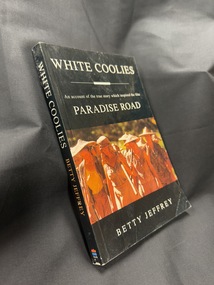 Returned Nurses RSL Sub-branch
Book, Betty Jeffrey (1908-2000), White Coolies : An account of the true story which inspired the film Paradise Road, 1997
... their ship was bombed and sunk by the Japanese. Of the fifty-thre ...'In 1942 a group of sixty-five Australian Army nursing sisters was evacuated from Malaya a few days before the fall of Singapore. Two days later their ship was bombed and sunk by the Japanese. Of the fifty-thre survivors who scrambled ashore, twenty-one were murdered and the remaining thirty-two taken prisoner. White Coolies is the engrossing record kept by one of the sisters, Betty Jeffrey, during the more than three gruelling years of imprisonment that followed. It is an amazing story of survival amid deprivation and the harshest of conditions. The women's ingenious and entertaining attempts ot make their lot more tolerable, and their comradeship as they suffered so much anguish, display their incredible endurance and strength in the face of adversity.' Back cover of bookBlack paperback book with white and orange writing on cover and spine and colour photograph on front covernon-fiction'In 1942 a group of sixty-five Australian Army nursing sisters was evacuated from Malaya a few days before the fall of Singapore. Two days later their ship was bombed and sunk by the Japanese. Of the fifty-thre survivors who scrambled ashore, twenty-one were murdered and the remaining thirty-two taken prisoner. White Coolies is the engrossing record kept by one of the sisters, Betty Jeffrey, during the more than three gruelling years of imprisonment that followed. It is an amazing story of survival amid deprivation and the harshest of conditions. The women's ingenious and entertaining attempts ot make their lot more tolerable, and their comradeship as they suffered so much anguish, display their incredible endurance and strength in the face of adversity.' Back cover of bookworld war two, wwii, ww2, australian army nurses, agnes betty jeffrey, betty jeffrey, paradise road, bangka island -
 Flagstaff Hill Maritime Museum and Village
Document - Ticket, voyage, P & O Branch Service, P & O, Australia via The Cape Service, Bef.3rd June 1929
The bearer of this ticket was George Thomas Henry Phillpot, who was only 17 years old when he sailed on the S.S. Ballarat (II), built in 1921. (The first S.S. Ballarat was built in 1911 and sunk after being hit by a torpedo in 1917 while serving during WWI). George relates his trip from England to Australia, summarised as follows: He caught a bus from Bolton to Manchester, in the north west U.K., then the train from Manchester to London and the boat train to Tilbury Docks (near Gravesend). On the morning of June 7th 1929, the ship S.S. Ballarat sailed down the Thames estuary and into the English Channel. The next port of call was Southampton, UK, to take on board some technical equipment. The S.S. Ballarat then sailed through the Bay of Biscay. Instead of taking the customary route around the Cape of Good Hope, this trip, on her maiden voyage, was through the Suez Canal. She sailed through the Straits of Gibraltar, into the Mediterranean Sea and on to Malta, where George and others paid a local boat owner to take them ashore for a short time. They then sailed to Port Said, stopping to load cargo, then at night through the Suez Canal. They woke up early the next morning to watch the locals working on the banks of the canal. The excessive heat on board the ship caused much illness. As they travelled through the Red Sea, the heat and the smell of oil also caused sickness. On they went through the Arabian Sea to Colombo, the capital of Sri Lanka (which at that time was called Ceylon). A Navigation Slip, donated together with this ticket, shows the coordinates for a location 16 miles from Colombo. They again went ashore for a meal at four-pence a head and a bottle of lemonade for a penny. George and another passenger walked to the slums area and were shocked at the state of it compared to Britain’s slums. They then sailed via the Indian Ocean to Fremantle, stopping again for goods to be unloaded. While ashore, they played a game of soccer against the ship’s crew. Then on to Port Adelaide via the Great Australian Bight. Here they shopped for suitable clothing under the advice of some Australian passengers. They then arrived at Port of Melbourne on July 20th 1929, and two days later (on George’s mother’s birthday). George left for Warrnambool. He received his Citizenship Award in 1971. He conducted an electrical retail business in Liebig Street for many years. His son William became principal of the accounting business Sinclair and Wilson, on the retirement of Bill Sinclair, and was actively involved in support of many community organisations. His daughter-in-law, Glenys Phillpot, is actively involved in the Warrnambool community and local government. George was one of 3 orphans on the S.S. Ballarat. (The daughter and son-in-law of one of the other orphans also live in Warrnambool.) Herbert B.G. Larkin, whose rubber-stamped name appears on the ticket, later migrated to Australia and passed away in NSW in 1944. Of Historical Significance, this ticket is for the ship’s maiden voyage via the Suez Canal route (previously the ship travelled via the Cape of Good Hope). It is also the only existing ticket for the "S.S. Ballarat"(3rd) in our collection. Socially, it shows the fare, luggage restrictions, conditions and weekly provisions for a third-class passenger’s voyage from London to Melbourne, which has research potential. This ticket is also of significance to the Local Community, giving the background of the ancestor of a local family. It was also of Personal Significance to the bearer as he kept and preserved it in his possession for at least 46 years before donating it to our museum, together with a Navigation Slip, a map and a summary of his journey to Australia.Third Class steerage Passenger’s Contract Ticket, accompanied by the Navigation Slip, for passage on board the P & O line’s steamer, S.S. Ballarat, to Australia via the Cape Service, from Port of London to Port of Melbourne. The ticket contract is printed on both sides of a thin paper page. The documents have been completed by hand, and the pages have creases as though they have been folded. Details include the date of sailing, amount paid, and the signature of the P & O Branch Service’s representative. The contract ticket lists weekly provisions for the voyage, a disclaimer of the shipping company, a list of dangerous goods not to be carried on board, and fines. The page has straight edges, top and bottom, and perforated edges on the sides; some perforation holes are complete. A small fleur de lies is printed along the inside of each perforation, forming a decorative left and right border. Stamps and inscriptions are on the contract ticket and navigation slip, which also has a black and white photo of a steam ship.The ticket has been stamped in black, No. ‘1040’. Handwritten details are in black pen and ink. Date of departure: ‘Seventh June [192]9’ for the cost of,’33’ [poind], and the sum of ‘33’ pounds is acknowledged as received. ‘Mr George T.H. PHILLPOT’, the age is written as ‘17’, equal to the status of ‘1’ adult, the total number of persons is ‘One’. The fare is handwritten in pen £’33’ and the total £’33’. It has a purple stamp ‘HERBT. B G LARKIN’ and a crossed out stamp ‘FREDERICK WHITE, A handwritten signature ‘_Seymore’. Under the signature, the date is stamped ‘3 JUNE 1929’.warrnambool, shipwrecked coast, flagstaff hill, flagstaff hill maritime museum, maritime museum, shipwreck coast, flagstaff hill maritime village, s.s.ballarat, phillpot, 7 june 1929, george phillpot, george t.h. phillpot, third class passenger, steerage passenger, herbert b g larkin, ticket, voyage, p & o, australia via the cape, cape of good hope, suez canal, passengers’ contract ticket, navigation slip, s.s. ballarat, steamship, 1929, 3-6-1929, 7-6-1929, third-class, steerage, port of london, port of melboune, 33 pounds, george thomas henry phillpot, herbt. b g larkin, _seymore, bolton, manchester, english channel, southampton, bay of biscay, straits of gibraltar, maritia, port said, arabian sea, colombo, sri lanka, ceylon, indian ocean, fremantle, port adelaide, citizenship, 1971, herbert b.g. larkin, s.s. ballarat ii,