Showing 2056 items matching "crossings"
-
 Melbourne Tram Museum
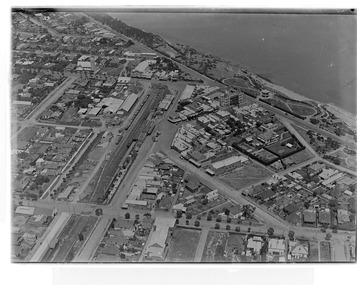
Photograph - Digital Image, Kevin O'Reilly, Sandringham" looking south over the Sandringham Railway station, mid 1920's
Image from CD (Compact Diskette for use in computers) - see Reg Item 135. Image titled "Sandringham" on CD, of looking south over the Sandringham Railway station, shows the interlocked gates at the level crossing, Sandringham tram depot, shopping centre, Tait train in the platform and the beach front. Mid 1920's?trams, tramways, sandringham, vr trams -
 Melbourne Tram Museum
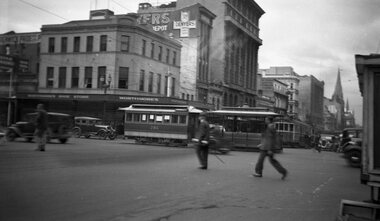
Negative - Cable tram in Lonsdale St crossing Swanston St, Wal Larsen, possibly 14/4/1939
Negative of a cable set in Lonsdale St crossing Swanston St, possibly on the last day of operation 14/4/1939. Trailer 286. Has in the background Worthmore's Shoe Store and Denyers depot or store. In Swanston St is a W2. Photographer could be Wal Larsen based on negative size - see Reg Item 5064.Written on rear of album print - "Cable and electric trams at corner of Lonsdale and Swanston Sts."trams, tramways, cable trams, lonsdale st, swanston st, tram 286 -
 Ballarat Tramway Museum
Photograph - Black and White - tram 11 Victoria St, A T Miles, 26/11/1969
Black and White - tram 11 in Victoria St crossing over the Eureka line bridge - former Buninyong railway line. Taken by A T Miles 26/11/1969. The tram has a Twin Lakes advert on the front. The destination has been changed for the return trip to the Gardens via Sturt St West.Yields information about services to Victoria St.Photograph - black and white print with notes on rear. A T Miles stamp and location and date notes.tramways, trams, tram 11, victoria st, eureka line, bridge, buninyong -
 Sunbury Family History and Heritage Society Inc.
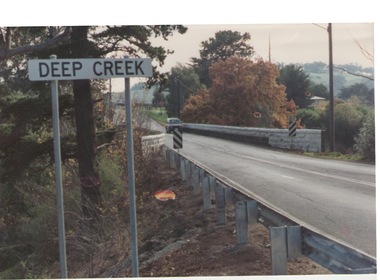
Photograph, Bulla, C 1980s
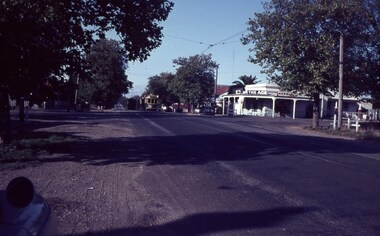
The photograph shows the approach to the Bulla Bridge at Deep Creek in the Township of Bulla. Immediately on crossing the bridge there is a sharp bend in the road and a step ascent up Bulla Hill through the cutting until level ground is reached. The photograph is looking to the NW. Deep Creek meets the Maribyrong River further downstream and closer to Keilor.The bridge and road replaced the ford crossing in 1869 that was downstream from the bridge.A coloured photograph of the approach to a bridge over the Deep Creek at Bulla along Sunbury Road. bulla bridge, deep creek, sunbury road -
 Melbourne Tram Museum
Photograph - Black and White, Epson Road Rail Bridge under construction, Early 1925
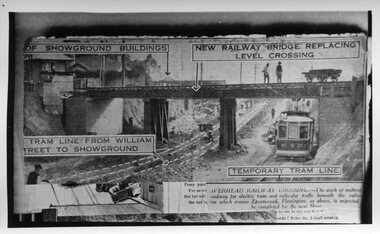
Image shows a newspaper photo of the MMTB U Class Tram 203 on temporary track at east side of excavation for underpass in Epson Road Flemington with Racecourse railway line to eliminate level crossing. The road was often closed to all traffic, including trams on race days by the railways. The work was completed in April 1925MMTB U Class trams were built for the former operator NMETL, with the photo showing an early level crossing abolition project. Black and White photo Epson Road Rail Bridge under construction with MMTB U Class tram on temporary track tramways, trams, epson road bridge, u class, flemington, tram 203 -
 Kiewa Valley Historical Society
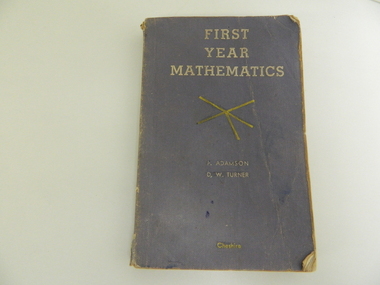
Book - Maths, F.W. Cheshire, First Year Mathematics, 1960
Educational Book used by students in Victoria for studying Mathematics. Davies are a local farming family attending school in the Kiewa Valley.Historical: Comparative study of Mathematics in different eras in Victoria. Provenance: The Davies family has been in the valley for generations.Faded purple cardboard cover with white writing and yellow lines In white: First / Year / Mathematics / 2 yellow lines at right angles crossing through centre with 1 added line coming to centre at an angle. / In white: P. Adamson / D. W. Turner / In yellow Cheshire Inside front cover 'Davies'education. mathematics. davies family. schools. -
 Lara RSL Sub Branch
Photograph, Set 4 photographs. and others for Torquay Light Horse camp, 1940
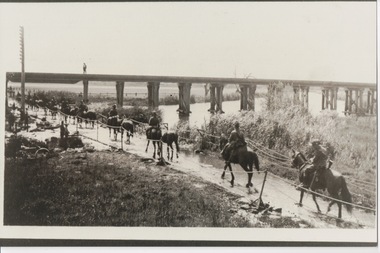
These images capture for all time Light Horsemen travelling through Geelong on their way to camp at Torquay for the last Group meeting in Australia . information following - details obtained from .........https://torquayhistory.com/light-horse-brigade/ On Australia Day, 1997, Sir John Young unveiled this plaque on Point Danger, Torquay. Torquay history, Light Horse Training Camp, WW2 Plaque at Pt. Danger Note----- (See images to view plaque) The plaque identifies a significant event in Torquay’s history and the sentiments of ‘change’ for the Light Horse Brigade – from horses to machines. In 1940 the four Light Horse Regiments (4th, 8th, 13th and 20th), some 5000 Light Horse and 2000 horses camped and trained at Torquay. Three other regiments, formerly mounted on horses, were also at Torquay ‘mounted’ on privately owned trucks and cars. Division troops included Artillery, Engineers, Signals, Field Ambulance and other branches of the Army necessary to enable a Division to function. It wasn’t just the sheer numbers of men coming to this little town that made the event significant, it was also the fact that the men of the Light Horse were dramatic, almost glamorous figures and it is easy to see their exploits as some splendid adventure. Horses have played a special role in the story of Australia. They were the only means of transport across this huge country, so it was necessary for everyone to have the ability to ride a horse. When war broke out in 1899 between Britain and the Boers of South Africa (“Boer” was Dutch for “farmer”) Australia sent troops to fight. At first Britain was wary of using untried, unprofessional colonial cavalrymen but soon saw that the slouch-hatted Australian “bushmen” were a match for the fast-moving and unconventional mounted commandos of the Boers. The Australians proved themselves to be expert rough-riding horsemen and good shots. Bush life had hardened them to go for long periods with little food and water. They also showed remarkable ability to find their way in a strange country and use its features for cover, in both attack and defence. By 1914, when Australia joined the war against Germany, there were 23 Light Horse regiments of militia volunteers. Many men from these units joined the Light Horse regiments of the Australian Imperial Force (AIF). Men were given remounts (if not using their own horses) – army horses bought by Commonwealth purchasing officers from graziers and breeders. These were called “walers” because they were a New South Wales stockhorse type – strong, great-hearted animals with the strains of the thoroughbred and semi-draught to give them speed, strength and stamina. On 1st November, 1914, Australia’s First Infantry Division and the first four Light Horse regiments sailed for England in a fleet of transport ships. The first of the Light Horse arrived at Gallipoli in May without their horses. Back with their horses after Gallipoli, they were formidable combatants across the Sinai and Palestine. Some British commanders observed that the light horseman moved with a “lazy, slouching gait, like that of a sleepy tiger” but described how the promise of battle “changes that careless gait, into a live athletic swing that takes him over the ground much quicker than other troops”. They had Light Horse, Torquay, training campdeveloped a reputation as formidable infantrymen. The Turks called them “the White Ghurkas” – a reference to their deadly skill with the bayonet. The Arabs called them “The Kings of the Feathers”. The plume had originally been a battle honour of the Queensland Mounted Infantry for their work in the shearer’s strike of 1891. During WW1 it was adopted by almost all the Light Horse Regiments. It was the proud badge of the light horseman. The most famous of their battles was the attack on Beersheba- the charge of the 4th Light Horse Brigade. Mounted infantrymen and their superb walers had carried out one of the most successful cavalry charges in history – against what seemed impossible odds. They surprised the Turks by charging cavalry-style, when they would normally have ridden close to an objective then dismounted to fight. The fall of Beersheba swung the battle tide against the Turks in Palestine; and changed the history of the Middle East. While 19 men from the Surf Coast Shire served with the 4th Light Horse over the course of WW1, only four were involved in the charge of Beersheba- John GAYLARD, Philip QUINN.(Winchelsea); Wallace FINDLAY (Anglesea); Harry TRIGG (Bambra). After the war, Light Horse units played a key role in the Australian Government’s compulsory military training programme. The Citizen Military Forces (C.M.F.) thrived on the glamour of the wartime Light Horse tradition, ignoring the possibility that motor vehicles would soon replace the horses. When training was no longer compulsory, the C.M.F. regiments declined and horses became more of a luxury during the 1930s depression years of poverty and unemployment. Some regiments were motorised. Then, in 1939, Australia joined Britain in another world war. Training was increased for the militia at both home bases and regional training camps. The camp at Torquay in 1940, commanded by Major General Rankin, was at Divisional strength. By the end of the camp some felt that the Division was ready for active service. Gradually, over the next four years, the Australian Light Horse units were mounted on wheels and tracks and the horses were retired. Six men enlisted at the Torquay camp and another 57 men and women enlisted at Torquay for service in WW2. Those who served in the Militia provided valuable Officers and NCOs and men for the armed services during the war. Each infantry division of the 2nd AIF had a Light Horse regiment attached to it. But the day of the Australian mounted soldier hadn’t quite passed. During World War II, Australia’s 6th Cavalry Regiment formed a mounted unit they called “The Kelly Gang” which did valuable scouting work. In New Guinea, a mounted Light Horse Troop did patrol duty and helped carry supplies. Some fully equipped walers were flown into Borneo for reconnaissance in rugged mountain country. But by the end of the war, in 1945, the horse had disappeared from the Australian Army. References: Australian Light Horse Association www.lighthorse.org.au National Australia Archives Australian War Memorial Surf Coast Shire WW1 memorials www.togethertheyserved.com The Light horse- a Cavalry under Canvas Light Horse, Training Camp, Torquay, WW2 Late in 1939 it was decided to set up a Lighthorse training camp in Torquay to train both men and horses for the battles of the Second World War. Horses, men and equipment came on special trains from all over Victoria and NSW, and as you would expect horseman came from areas such as Omeo and Sale, the Wimmera and the Western District. They arrived at the Geelong racecourse for watering in the Barwon River and then were ridden across the ford at the breakwater and began their 11 mile trek to Torquay. Light Horse, Training Camp, Torquay, WW2 Tent city By the end of January 1940 the camp at Torquay accommodated some 5000 men and 2500 horses of the Second Cavalry Division. The rows of horses, tents and huts near Blackgate Road were quite a sight. While the cavalrymen engaged in exercises on the land and on the beaches, many of the troops took over the Torquay School for special training of men and officers. Mr Bob Pettit local farmer and Councillor for the Barrabool Shire, wrote about the Light horse in the Surf Coast Community News in 1985 saying “They used to travel about the district riding four abreast in one long convoy. To my annoyance they went through my property and shut all the gates behind them. I had certain gates open to let stock in to the water holes and it would take me three -quarters of an hour to follow the horsemen up and put all the gates right again” he continued “the men from the Light Horse were here when the fire went through in March 1940. He recalled an incident when early one morning, as some one blew the bugle, a soldier putting a white sheet on the line frightened the horses. They panicked and ran off in all directions. Six went over the cliff near Bird Rock, five were never found, and the rest were gathered up after nearly a fortnight in the bush around Addiscott and Anglesea" Light Horse, Training Camp, Torquay, WW2, Geelong Parade Geelong parade The training camp culminated in a parade through the streets of Geelong on March 12th 1940. The salute was given at the Town Hall and the troops continued on a route to the You Yang’s for a training exercise. Note-----(see media section for photograph) The Camp was abandoned in mid 1940 as it was deemed unsuitable for training during winter and the cost of a permanent camp could not be justified if it could not be used all year. Historic.......Rare,,,Interpretive.Sepia photographs.set of four ....post card size ....Horses &LighthorsemenNo 1, Lighthorsemen Regiment Geelong 1940......No 2 Light Horse at Breakwater Geelong 1938 to 1940....No 3 Light Horse at Breakwater Geelong 1938 to 1940.....No 4 Light Horse crossing Breakwater camped at Geelong Showgrounds. These markings are on reverse of photographs.light horsemengeelong 1940., world war 2 -
 Whitehorse Historical Society Inc.
Headwear - Hat, 1930s
Hat belonged to Catherine (Kitty) Ann Windsor (born 23 Nov 1919 died 17 Nov 2002) in the 1930s. She was the grandmother of Rachael Cottle (Whitehorse Historical Society Secretary Aug 2011-2016). She was gate keeper at the Tunstall (Nunawading) railway gates crossing at Springvale Road during 1934 - 1952.A house was supplied for the keeper. The gates were closed to traffic from midnight till 5 a.m.Dusky pink felt skull cap shaped cap. Pearly white, gelatin sequins in the shape of a feather on one side.costume, female headwear -
 Ballarat Tramway Museum
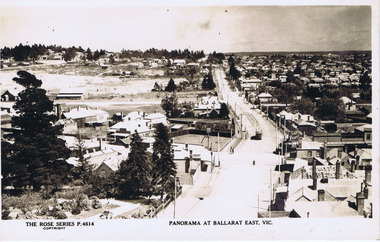
Photograph - Digital image, Rose Stereograph Co, "Panorama at Ballarat East Vic", c1914
Photo looks west from the Ballarat Fire Station (East) tower, and has a good view looking along Barkly St. Shows the crossing loop between Eastwood and Main St with one tram in the view. Wal has dated the photo as 1914 in his album notes. See item 8243 for an actual postcard. Yields information the buildings, buildings and scene looking west from the Fire Station tower along Barkly St. East BallaratDigital image of a postcard from an album compiled by Wal Jack, loaned to the Museum. The Rose Series Postcard No. P 4614. For rear of postcard - see second image.trams, tramways, esco, ballarat east, barkly st -
 Ballarat Tramway Museum
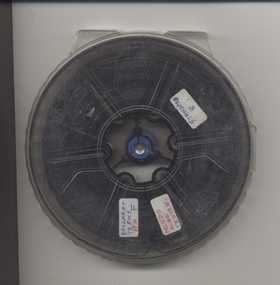
Film - Movie Film & Box, Kodak, 1960 to 1971
Yields information in movie film format of Ballarat trams in 1960 through to 1971, how the system operated and was used by people, including special trams., Yields information in movie film format of Ballarat trams in 1960 through to 1971, how the system operated and was used by people, including special trams.Movie film - 8mm, approx. 15 mins, without leader strip on a plastic reel, within a clear plastic case - Standard 8, titled "Ballarat Trams". See Reg Item 4957 for DVD and Mini DVD. Has been transferred to DVD - see Reg item 4957 Made by Arthur Hill. Also transferred to DVD by Rod Cook Oct. 2015, via Roger Greenwood for use in his DVD, "The City of Ballarat Trams, Gardens & Gold" of 2016. See Reg Item 6883. In Arthur's letter - on file - Made between 1960 and August 1971. Synopsis: based on time. Between 1960 and 1968 0:00 Trams Ahead sign before the Victoria St terminus with 20 at terminus 0.14 - No. 20 leaving Victoria St terminus and being followed along Victoria St by car and then passengers jointing the tram at a tram stop. 00.40 - No. 12 (c1960) in bound along Lydiard St North and arriving in the Gregory St loop. 00.56 - No. 12 and 14 crossing at Gregory St. 01.20 - No. 33 and a bogie car crossing at depot loop. 01.31 - No. 18 travelling along Wendouree Parade with the Lake in the background. 01.42 - No 41 at depot junction and running into the depot No. 2 road with a short sequence of a tramway signal. 02.17 - SEC Sign at the depot gate, shot of 41 in No. 2 road, with the lights other way around, Caution beware of trams sign and a red signal. 02.31- Timetable sign at Gardens Loop 02.36 - No. 30 arriving at Loop and view of a signal with no lights showing. 02.48 - Destination roll being changed through a number of destinations. 03.26 - No. 20 arriving at Carlton St loop with the Olympic monument in the background and the red signal light going out. 03.31 - a lady standing at the front of No. 20, with an ice cream in hand, and No. 17 arriving at the Carlton St loop with a short sped up sequence and No. 20 departing from the loop, followed by No. 17 leaving the loop, heading into the city. 03.41 - No. 13 inbound from Sebastopol crossing Albert St and heading into the city. 04.12 - view of signal and contactor, the light going green and the tram passing underneath. 04.24 - No. 12 at the Sebastopol terminus and departing. 04.51 - No. 12 crossing Albert St Sebastopol. 05.16 - Following No. 12 along Albert St, with Borough Offices in background initially. 05.28 - No. 12 arriving at the Grey St loop with No. 14 arriving at the loop from the city and both trams departing. March 1971 05.58 - No. 30 being followed along Barkly St, Mt Pleasant and the pole being turned at the terminus 06.32 - No. 30 picking up a lady passenger. 06.38 - view from the front of a tram, with the drivers hand and a cigarette, view from the back of the tram, along the Mt Pleasant route and running through the loop and then turning into Main St - has the Ballarat (East) fire station in one sequence, and finally running along Main St. 07.35 - view from tram, with car turning into Bridge St. and then running into Sturt St passed the Parking Loop, and along Sturt St. 08.32 - Points at Drummond St North being changed, doors changed over and the tram running along Drummond St. North, through the Mill St loop and into Macarthur St and in Wendouree Parade, with the Lake Wendouree in view and crossing No. 12 at the Depot Loop, with crews chatting, past the depot, a lady passenger getting off the tram near Forest St., and arriving at Gardens Loop with the same lady passenger who got on in Barkly St, getting off the tram. 11.09 - view of No. 30 at Gardens Loop, departing the loop. August 1971 11.30 - R761 crossing Melton (Exford Wier) on the special train to Ballarat and then the bridge between Ballan and Gordon Stations. 12.16 - View from the front of a tram, following No. 26 along Lydiard St North, crossing at Gregory St and returning to the City. 12.39 - No. 14 and one other tram running along Albert St to Sebastopol, crossing No. 21 at Grey St and then to Sebastopol terminus, crossing Albert St and return and running along Albert St. 13.36 - No. 26, 39 crossing 13 at Gardens Loop. 14.00 - view looking across Lake Wendouree. 14.07 - 26 arriving at Victoria St, running part of Destination roll, passengers getting off with hotel in the background, trolley pole being turned and then with 39 following tram along Victoria St, crossing at the King St Loop. 15.07 - view of a trolley pole tracking through the overhead at curve 15.10 - end. Written labels giving title information on reel.trams, tramways, ballarat, sebastopol, lydiard st north, victoria st, mt pleasant, lake wendouree, depot, tram 12, tram 13, tram 14, tram 17, tram 18, tram 21, tram 26, tram 33, tram 39, tram 41 -
 Bendigo Military Museum
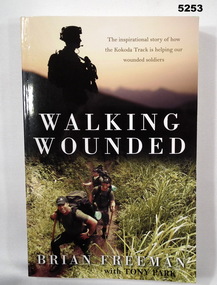
Book - BOOK, THE KOKODA TRACK & WOUNDED SOLDIERS, Brian FREEMAN with Tony PARK, "Walking Wounded", 2013
"Walking Wounded/ The Inspirational Story of how/ the Kokoda Track is helping our/ wounded soldiers"Soft cover book. Soft cover - cardboard, white, gold and black print on front, spine and back. Illustrated in colour photographs - front top silhouette of soldier. Bottom - a group walking along a track. Back - a group crossing a water course. 265 pages - paper, - cut, plain, off white. Illustrated colour photographs.books, history, ww2, new guinea -
 Bendigo Military Museum
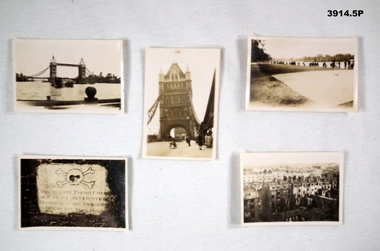
Memorabilia - PHOTOGRAPHS, 5) 1942
Photos taken by Frederick Gardner DAVEY whilst in UK, c.1942 Item re Frederick Gardner DAVEY DFC No 410533 RAAF. Refer Reg No 3536P for his service details.Series of 5 black / white photos depicting scenes of London & Brighton. .1) Tower Bridge with River Thames in foreground. .2) One of the Tower Bridge towers. People & vehicles crossing the bridge. .3) People sitting on the edge of the Serpentine River, Hyde Park. .4) Plaque. .5) View of a row of terrace houses in Brighton.Handwritten in black ink of back of each: .1) London Bridge .2) Tower Bridge, London .3) Serpentine, Hyde Park, London .4) Plaque in Tower of London .5) Roof top view of Brighton. End. 1942photography, london, wartime -
 Bendigo Historical Society Inc.
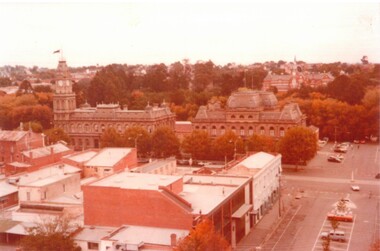
Photograph - TED BEATTIE COLLECTION: PHOTOGRAPHS, Pre 1980s
Four coloured photographs of Bendigo. a. Photo taken from the town hall tower looking over Bull Street towards Camp Hill. b. Conservatory and Gardens looking towards Bridge Street. c. Tram at North Bendigo Terminus with Steam Train on Railway Crossing. d. Fountain at Charing Cross looking towards Rosalind Park -
 Port Melbourne Historical & Preservation Society
Book, Sandridge Municipality Reports Legislative Committee, 1860
Municipality of Sandridge Reports and Drafts of By-Laws from 1860 to 1865. For example: By-Law No 1: To regulate by means of standing orders, the proceedings of the Municipal Council of Sandridge (1860) ; account of traffic at the Railway crossing at Ingles St (tallies of drays and cattle). Wide spined binder with hand written blue pages stuck in (some reports with tape)local government - municipal district of sandridge, local government - borough of sandridge, andrew plummer -
 Bendigo Historical Society Inc.
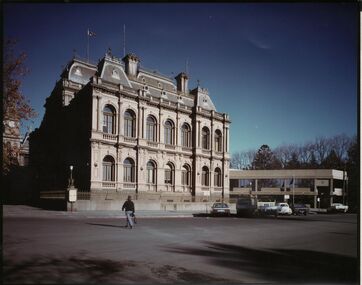
Photograph - AUSLEBROOK AND MARTIN COLLECTION: LAW COURTS, BULL STREET VIEW
Colour photo: Law Courts, Bendigo. Photo taken from Bull Street side of building, Police Station on RH side of image. Cars parked kerbside. Woman crossing Bull Street.. Stamped on back of photo 'Aulsebrook & Martin Pty Ltd., Photographers, 6 Ruth St., Golden Square 3555 Phone 054 437565bendigo, buildings, law courts, pall mall -
 Ballarat Tramway Museum
Photograph - Black & White Photograph/s set of 2, Charles Craig, tram No. 27 travelling to Sebastopol in Albert St, early 1950's
Yields information about the traffic and appearance of Albert St Sebastopol during the 1950's and the buildings on either side of the street.Set of two black and white photographs of trams Photo possibly early 1950's of No. 27 travelling to Sebastopol in Albert St. .1 - crossing the roadway near Ophir St with the Trinity Church in the background. .2 - Tram at the Sebastopol Terminus with the new housing on the left side of the roadway and the Royal Mail Hotel. Both photos by Charles Craig trams, tramways, albert st, sebastopol, ophir st, tram 27 -
 Ballarat Tramway Museum
Slide - 35mm slide/s - set of 3, Robert Thomson, 5/04/1969 12:00:00 AM
Yields information about Ballarat's trams during 1969, the Trambulance and the Victoria St line.Set of three AGFA blue / white plastic mount, colour slides of No. 21 as the 1969 "Trambulance" raising funds for the Ballarat Base Hospital in Victoria St Ballarat. No. 21 running a special service .1 - with St Alipius church in the background. .2 - ditto crossing tram 34 to Victoria St at the King St loop. .3 - ditto"5.4.69" in ink on all slidestramways, trams, victoria st, king st, tram 21, tram 34 -
 Ballarat Tramway Museum
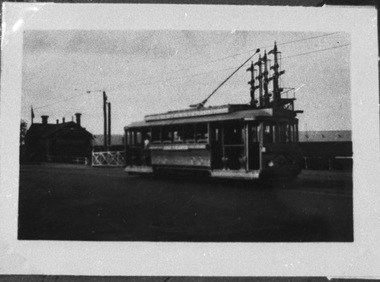
Negative - Copy, Wal Jack
Yields information about Ballarat 's tram that it decorated for the 1951 gold centenary celebrations in Lydiard St Nth.Copy negative of a black and white photograph from Ray Pearson Collection, taken by Dave Macartney in 1975c of Ballarat No. 23 decorated for the 1951 Gold centenary celebrations about to cross the railway level crossing in Lydiard St. Nth. Refer to image N869, Reg Item 7641 for a better image - updated 30/5/2020.trams, tramways, secv, gold centenary, gold tram, decorated trams, lydiard st nth, railway crossing -
 Ballarat Tramway Museum
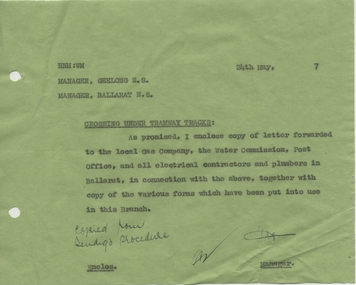
Document - Letter/s, State Electricity Commission of Victoria (SECV), "Crossing Under Tramway Tracks", May. 1937
Yields information about the correspondence that was sent from Ballarat from Geelong about underground services under tram tracks.Carbon copy of a letter on demi foolscap green paper (1 sheet) dated 24/5/1937 from the Ballarat SEC Manager to the Managers ES of Geelong and a copy to the Ballarat ES, forwarding correspondence regarding installation of services under tram tracks. Titled "Crossing Under Tramway Tracks", notes who received the documents locally.Has various initials and a note in ink "copied now Bendigo procedure"trams, tramways, letters, sec, tram track, geelong -
 Ballarat Tramway Museum
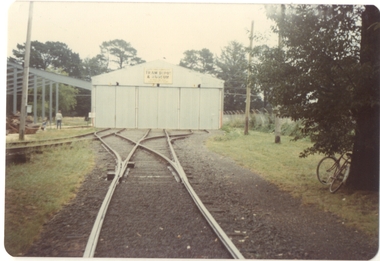
Photograph - Colour Print/s - set of 4, Stephen Butler, early 1979
Yields information about the construction of the BTPS Depot extensions early 1979.Set of 4 colour prints of tram the depot extensions being constructed early 1979 - steelwork erected, but no cladding due to the failure of the contractor. Printed on Kodak paper. .1 - view of shed and extension from level crossing .2 - ditto - from in front of new shed .3 - ditto .4 - looking along access track.trams, tramways, btps, depot extensions -
 Ballarat Tramway Museum
Slide - 35mm slide/s - set of 2, Donor?, 19/09/1971 12:00:00 AM
Yields information about the operation of SEC trams on the final day of the Sebastopol line. Yields information about the operation of SEC trams on the final day of the Sebastopol line.Set of two colour slides, 35mm Kodachrome, of the last day of trams on the Sebastopol line - 19/9/1971. .1 - No. 42, southbound to Sebastopol, south of the Albert St crossover. .2 - No. 35, southbound to Sebastopol, crossing Albert St at Ophir St with another tram in the distance. See donor details for further details of the photograph,tramways, trams, closure, albert st, sebastopol, ophir st, tram 42, tram 35 -
 Ballarat Tramway Museum
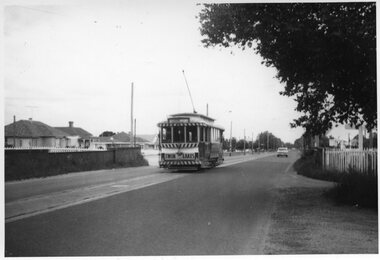
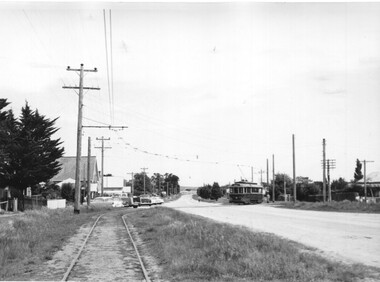
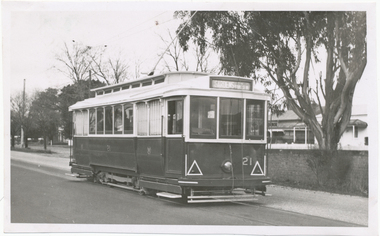
Photograph - Digital image, Wal Jack, 25/06/1957 12:00:00 AM
Yields information the appearance of the SEC tramcar No. 21, and the Victoria St landscape in 1957.Digital image from the Wal Jack Ballarat Album of trams No. 21 outbound in Victoria St before arriving at the terminus and crossing over the Buninyong Rail bridge. Tram has the destination of Gardens via Sturt St west. In the background is the bridge brickwork. Photo taken 25 June 1957. See image i2 for rear of photograph.on rear of photo in ink, "SEC Ballarat, No. 21 ex Adelaide No. 10, in Victoria St near terminus, 25 June '57" and "W.Jack photo Neg. to D. Colquhoun"trams, tramways, victoria st, tram 21 -
 Ballarat Tramway Museum
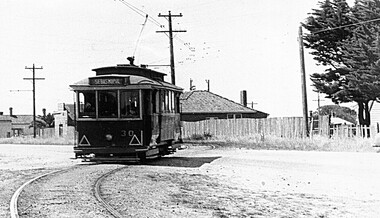
Photograph - Digital image, Late 1950's
Yields information the appearance and details about No. 30 and the Albert St road crossing in the late 1950's, in particular the road surface and the buildings.Digital scan from the Ben Parle collection of SEC No. 30 crossing Albert St Sebastopol, with the destination of Sebastopol - in particular the road surface and the buildings. Photo 1950's or early 1960 prior to introduction of dash canopy lighting. Has the houses either side of the street in view. Photo received with the Ben Parle slides 09/2004. trams, tramways, sebastopol, albert st, tram 30 -
 Bendigo Historical Society Inc.
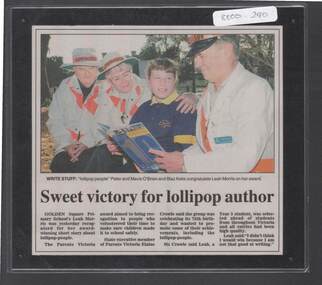
Photograph - GOLDEN SQUARE P.S. LAUREL ST. 1189 COLLECTION: LEAH MORRIS ARTICLE
Colour newspaper article attached to black board. Image shows Golden Square Primary School student Leah Morris who won a prize for a short story about lolly-pop people (crossing supervisors ) Prize awarded by Parents Victoria. In image Peter and Mavis O'Brien and Blaz Kelis congratulating Leah Morris on her award.education, primary, golden square laurel st p.s. -
 Ballarat Tramway Museum
Slide - 35mm slide/s, c1962
Distant photograph of three trams crossing at the Urquhart St. loop, Drummond St. south, two inbound, one outbound. Trams have lights, but not enlarged white strip on front dash. Bluestone milk bar on SW corner of photograph. See Reg Item 7762 for a photo taken at the same time - note the car mirror.'E' in blue inktramways, trams, urquhart st., drummond st. sth -
 Kew Historical Society Inc
Photograph - Outer Circle Railway Viaduct
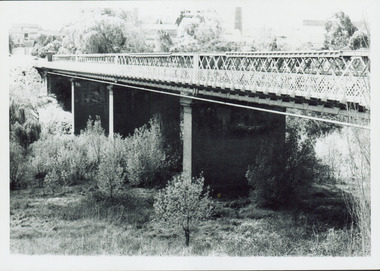
The heritage listed Fairfield Bridge was originally constructed for the Outer Circle Railway to bridge the Yarra River between East Kew and Fairfield stations. In the 1930s it was converted for vehicular traffic. In the 2010s a new concrete bridge was erected beside it to increase vehicular capacity.Print copy, enlarged from original snapshot, of the former railway viaduct crossing the Yarra and linking Kew and Fairfield. The original photo predates the conversion of the viaduct into the Chandler Highway Bridge in the 1930s, when the Bridge was adapted to carry vehicular traffic. The date on the reverse indicates the date of donation rather than the date on which the photograph was taken. CHANDLER HIGHWAY BRIDGE OVER RIVER / (ORIGINALLY PART OF OUTER CURCLE RAILWAY) / OCTOBER 1977railway viaduct -- kew (vic.), fairfield bridge, fairfield railway viaduct, outer circle railway, sir john monash -
 Melbourne Tram Museum
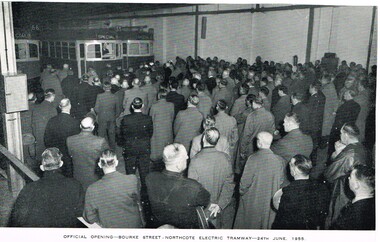
Photograph - Illustration, Melbourne & Metropolitan Tramways Board (MMTB), "Official Opening - Bourke Street - Northcote Electric Tramway - 24 June 1955", mid 1950's
Illustration, black and white, printed on gloss paper, reproduction of a MMTB report of photographs of the opening of the Northcote electric tramway line, East Preston Depot, 24 June 1955. May be from an MMTB Annual Report. Shows the people attending, virtually all men. Shows the nature of the crossing with the resilient inserts - it did not work as planned.trams, tramways, opening, east preston, northcote, bourke st -
 Melbourne Tram Museum
Postcard, Nu-color-Vue, Princes Bridge with Flinders St Station, c1950
Postcard photo of Princes Bridge with Flinders St Station, St Pauls Cathedral and Princes Bridge station with trams 896 and a W2 crossing the bridge southbound. Kodak photo but register poor. Appears c1950 given the vehicles. Divided back with places for stamp, address, correspondence and details. Nucolorvue Productions L10 with a Kodachrome productions note.trams, tramways, princes bridge, st paul's cathedral, flinders st station, tram 896 -
 Melbourne Tram Museum
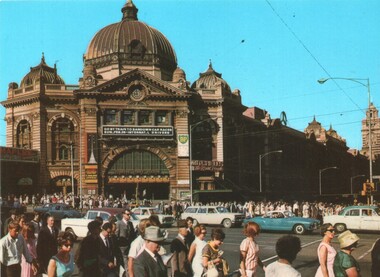
Postcard, Murfett Publishers, "Flinders Street Station", early 1960's
Postcard - Colour - National View by Murfett Publishers, BP1055 of the front of Flinders St Station, early 1960's. Many people crossing the intersection - no trams. Has a sign on the station, advertising car races at Sandown Park. On the rear - has a divided back, with National View by Murfett Publishers and logo, description of the station and number BP1055On the rear has the stamp of Graeme S Breydon - see image i2.trams, tramways, swanston st, flinders st station, flinders st -
 Melbourne Tram Museum
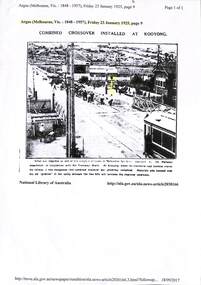
Newspaper, The Argus, "Combined Crossover installed at Kooyong", 23/01/1925 12:00:00 AM
Photocopy of an article from The Argus, 23/1/1925, page 9 extracted through Trove, titled "Combined Crossover installed at Kooyong" with a photograph of the level crossing, replacement of track leading up to the Tramway or Railway Square. The disc signal for trams has been highlighted in yellow. Item made by Robert Green 18/9/2017trams, tramways, victorian railways, glenferrie road, level crossings, tramway square, trackwork