Showing 968 items
matching glenferrie road -- hawthorn
-
 Melbourne Tram Museum
Photograph - Black & White Photograph/s, Lee A Ratten, mid 1940's
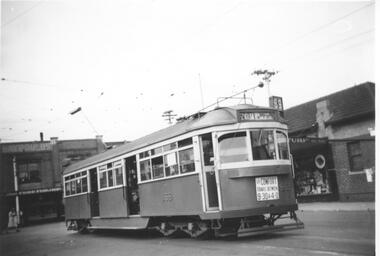
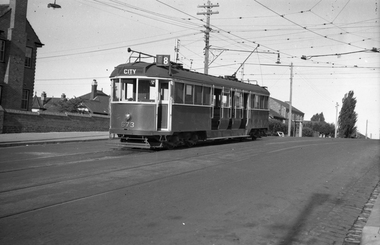
Black and white photograph of tramcar 869 in Glenferrie Road with Dash Canopy lighting. 1941 eleven SW6 class trams built by MMTB at Preston Workshops, numbers 866 to 876. Entered service 19 June 1941. Based at Malvern Depot c1948 to c1991. Advertisements in shop for Turf and Ardath. Sign on front of tram: "For comfort travel between 9:30 & 4:00" Tram has the destination of St Kilda Beach via Balaclava. Route number 69. Extensively damaged by fire in Church St at North Richmond terminus Tuesday, 14th November 2006. August 2014 transferred from Preston Workshops to Newport Workshops.trams, tramways, sw6 class, glenferrie rd, dash canopy lights, tram 869 -
 Melbourne Tram Museum
Photograph - Black & White Photograph/s, Lee A Ratten, c1950
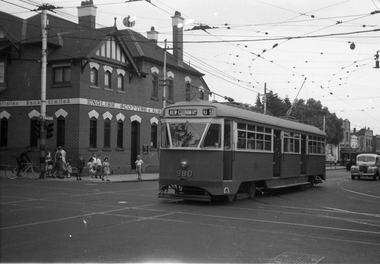
Black and white photograph of PCC class tram No 980 at Malvern Depot. Has an AETA tour sign on the front of the tram, indicating. The tram was built in 1950 by MMTB from equipment imported from the USA and a locally built body. See page 42 of Destination City 5th Edition for another photo of this tram in Glenferrie Road at Toorak Road in 1953.trams, tramways, pcc, malvern depot, aeta, tours, tram 980 -
 Melbourne Tram Museum
Slide, Keith Caldwell, 25/04/1964 12:00:00 AM
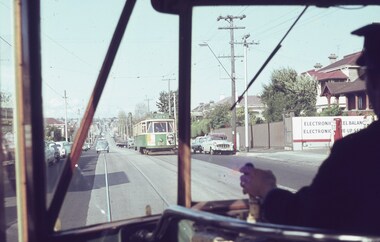
Agfa colour slide, blue / white plastic mount, photo by Keith Caldwell of the view from a Y1 tram in Riversdale Road, just east of Glenferrie Road with Y1 612 (city) coming the other way. 25/4/1964In ink "View from T1 25.4.64"trams, tramways, y1 class, riversdale rd, tram 612 -
 Melbourne Tram Museum
Slide, Keith Caldwell, 27/04/1964 12:00:00 AM
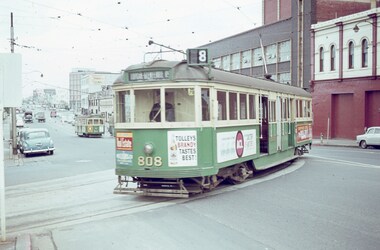
Agfa colour slide, blue / white plastic mount, photo by Keith Caldwell of W5 808 turning from Victoria St into Swanston St, route 8, Toorak - Glenferrie Road terminus. Tram has the adverts for Tolleys Brandy and ACL. In the background is SW6 951, route 4D and another tram in the Victoria St shunts. The Carlton United Brewery is in the background. 27/4/1964In ink "W5 27.4.64:"trams, tramways, route 8, w5 class, victoria st, toorak, tram 808, tram 951 -
 Melbourne Tram Museum
Slide, Keith Caldwell, March 1968?
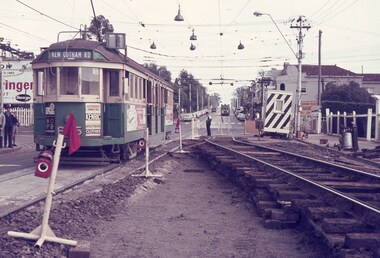
... Melbourne Tram Museum 8 Wallen Road Hawthorn melbourne ...Agfa colour blue white plastic mount slide, photo by Keith Caldwell of W2 605 or 625, southbound in Glenferrie Road, at the Kooyong level crossing. Glenferrie Road is being reconstructed with the north bound track in a temporary location. Tram has advert for Kenric clothes and Exide? batteries. The night watchman is watching the tram. His cabin is behind him.. The tram is showing (incorrectly) Kew Cotham Road destination. This is a Camberwell Depot tram bound for Malvern Town Hall assisting movement of School children in Glenferrie Road in the afternoon. Note the Camberwell Run number in the driver cab window. On the north bound track is possibly a SW6. Slide undated - c1968?trams, tramways, glenferrie rd, kooyong, level crossings, temporary track, w2 class, trackwork, kew- cotham road, tram 605, tram 625 -
 Melbourne Tram Museum
Slide, John Webster, 15/03/1960 12:00:00 AM
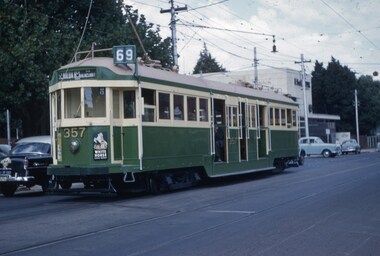
Colour slide, Kodak, white cardboard of Tram W2 357, with the number above the headlight, route 69, St Kilda Beach via Balaclava in Glenferrie Road Malvern. Has advert for White Horse Whiskey. Slide dated 15-3-60.Hand writing on rear in ink "15-3-60 - Tram 357, number raised, Glenferrie Road, Malvern Vic>"trams, tramways, st kilda beach, route 69, w2 class, glenferrie rd, tram 357 -
 Melbourne Tram Museum
Slide - Black and white reproduction photograph - PMTT tram 4 Glenferrie Road 1910
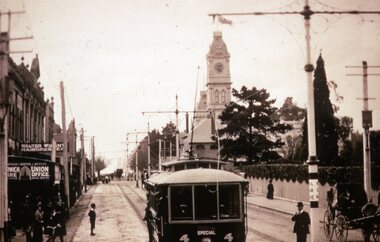
Photograph - PMTT tram 4 Glenferrie Road 1910, possibly undertaking testing prior to the official opening on 30/5/1910. Photo shows the centre of the road overhead support poles in Glenferrie Road and a "Hail Cars Here" sign. In the background is the Malvern Town Hall, signs for Norwich Union and Walter Wright Hairdresser.Yields information about the opening of the tram lines built by the PMTTKodachrome cardboard duplicate slide - Black and white reproduction photograph - PMTT tram 4 Glenferrie Road 1910 "MP5" in penciltrams, tramways, opening, tram 4, pmtt, glenferrie road, tram stop -
 Melbourne Tram Museum
Postcard - Seven panel Melbourne tram photographs, Nucolorvue Publishing, Melbourne's Trams, 2001
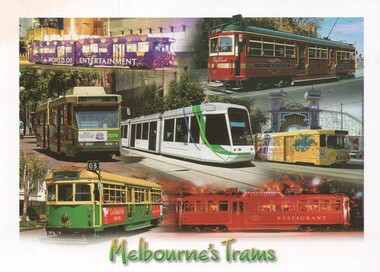
Postcard featuring seven Melbourne tramcars - B2 2111 in an all-over advertising livery for Crown "World of Entertainment" in 2001, SW6 957 City Circle, B2 2070 (Bundoora), C1 2004, B2 2019 (2001) advertising Luna Park outside Luna Park, W7 1005 (Toorak Glenferrie Rd, route 8) and an SW6 tram as one of the Restaurant trams. Nu-Color-Vue number 11ML580, NCV 13584Yields information about seven different types of Melbourne trams around 2001.Postcard colour - seven panel Melbourne tram photographs - Nu-Color-Vuetrams, tramways, tramcar restaurant, luna park, w7 class tram, sw6 class tram, b class tram, c1 class tram, advertising trams, tram 2111, tram 957, tram 2020, tram 2004, tram 2019, tram 1005 -
 Melbourne Tram Museum
Postcard - Shrine of Remembrance, St Kilda Road and W class trams, Australia Post, 1990
Postcard - an image of Shrine of Remembrance, St Kilda Road with three W class trams in the view. The postcard has had postage including international or worldwide prepaid. The stamp is 65c, the ANZAC tradition. The reference gives the date of the stamp as April 1990. Two of the trams: SW6 918 (Malvern Burke Road, Route 5), and SW6 944 (Toorak Glenferrie Road, Route 8). Another W class tram is behind.Demonstrates an iconic Melbourne image, the Shrine of Remembrance and W class trams in St Kilda Road.Postcard colour - Shrine of Remembrance, St Kilda Road and W class trams - with pre paid postage. Australia Posttrams, tramways, st kilda road, sw6 class trams, tram 918, tram 944, australia post, shrine of remembrance -
 Melbourne Tram Museum
Document - Set of 2, City of Melbourne, "Drivers or Conductors License", 1914
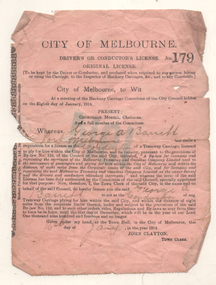
The City of Melbourne issued a License or Licence for Melbourne Tramway and Omnibus Co (MTOCo) drivers (gripmen) or conductors under their Hackney Carriage by-law No. 110. The cost was 5/- or five schillings. This practice ceased during 1917. 1 - License No. 179, was issued to George A Barrett of Port Melbourne who was a tram conductor on the 16/1/1914. The document is signed by John Clayton as Town Clerk. 2 - License No. 58, issued to Herb S Browne of Glenferrie, tram conductor on 14/1/1917 and signed by T Geo Ellery Town Clerk.Demonstrates a license issued by the City of Melbourne under their Hackney Carriage By-LawDocument - set of two - pink paper License No. 179 for 1914 and No. 58 for 1917Hand written name and datetramways, mtoco, license, licence, conductors, city of melbourne -
 Melbourne Tram Museum
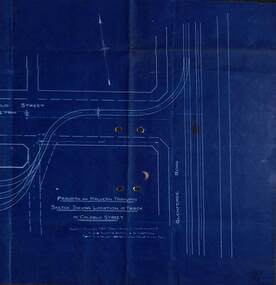
Drawing - PMTT, "Sketch shewing Location of track in Coldblo Street", 12/1908
The drawing shows a 3 road depot layout, with an access track from Glenferrie Road, referring to a letter and a point D on the drawing. Drawing dated 18-12-1908 is some 18 months before the PMTT opened with a 6 road depot and is possibly related to land acquisition. Yields information about PMTT depot planning in 1908.Blueprint of a drawing showing the track layout for the entry to Malvern Tram depot.tramcars, pmtt, malvern depot, trackwork -
 Melbourne Tram Museum
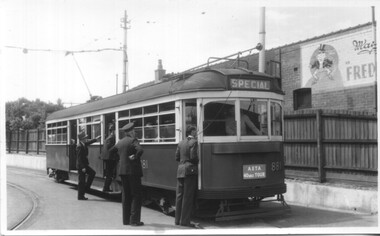
Photograph - Set of 5 Black & White - First AETA tour, 15-2-1947
... Melbourne Tram Museum 8 Wallen Road Hawthorn melbourne Set ...Set of five photographs of the first Australian Electric Traction Association (AETA) tram tour of Melbourne on 15/2/1947. See page 8 of the March 1947 issue of "Tram Tracks" for details of the tour and the MMTB Crew. 1 - SW6 881 about to leave Glen Huntly Depot 2 - Crossing Balaclava Junction 3 - Crossing the Kooyong railway level crossing in Glenferrie Road - has the railway signal box and gates in view. 4 - Turning into Riversdale Road from Glenferrie Road with the Stotts Business College building in the background. 5 - Just to the east of Yarra River Bridge in Swan Street with the Burnley Gardens on the right.Yields information about the first AETA tram tour in 1947Set of 5 Black and white photograph on paper. Two copies of each held.Each one of the set has a photographers file stamp on the rear, but no details filled in.trams, tramways, aeta, tram tours, tram 881, sw6 class, glen huntly, kooyong level crossing, glenferrie road, riversdale road, burnley, hawthorn, balaclava junction, glen huntly depot, hawthorn road, swan st -
 Melbourne Tram Museum
Photograph - Colour prints, Roy J Mitchell, 1979 to 2005
Set of 44 colour prints of photos taken by Roy Mitchell between 1979 and 2005 For a listing of the prints see htd5640list.pdf. Word file and scanning by Mal Rowe For individual photo images see: hawthtramcoll\photo_collections\htd5640-Roy_Mitchell-PartB images 25 to 69 and Roy Mitchell photos.docx Roy Mitchell photos.pdf RoyM25_Citadis-test-run_Plenty Rd_9Sep2001_Roy Mitchell.jpg RoyM26_Citadis-test-run_Plenty Rd_9Sep2001_Roy Mitchell.jpg RoyM27_3536_Glenferrie Rd_14Aug2004_Roy Mitchell.jpg RoyM28_3513_Swanston St_4Aug2004_Roy Mitchell.jpg RoyM29_3028_Brunswick St-siding_14Dec2002_Roy Mitchell.jpg RoyM30_1021_Park St_StKilda_24Dec2002_Roy Mitchell.jpg RoyM31_Berlin3007_Moomba_Swanston St_11Mar2002_Roy Mitchell.jpg RoyM32_Milan1692_Moomba_Swanston St_11Mar2002_Roy Mitchell.jpg RoyM33_3004_LaTrob eSt_11Mar2002_Roy Mitchell.jpg RoyM34_3004-under-test_Spencer St_29Jan2002_Roy Mitchell.jpg RoyM35_862_LaTrobe St_24Dec2002_Roy Mitchell.jpg RoyM36_018_Docklands_20Jan2003_Roy Mitchell.jpg RoyM37_018_Flinders St_20Jan2003_Roy Mitchell.jpg RoyM38_018_Simpson St-shunt_22Jan2003_Roy Mitchell.jpg RoyM39_018_Docklands_22Jan2003_Roy Mitchell.jpg RoyM40_946_Docklands-from-Flinders St_Roy Mitchell.jpg RoyM41_946_Park St_St Kilda 8Feb2003_Roy Mitchell.jpg RoyM42_282_Box Hill_4May2003_Roy Mitchell.jpg RoyM43_282_Box Hill_4May2003_Roy Mitchell.jpg RoyM44_Box Hill_looking west_4May2003_Roy Mitchell.jpg RoyM45_3501_S tKilda_18Jun2003_Roy Mitchell.jpg RoyM46_Box Hill_14Aug2004_Roy Mitchell.jpg RoyM47_3030-arriving-Box Hill_14Aug2004_Roy Mitchell.jpg RoyM48_1027_Dockland sDve_9Jan2005_Roy Mitchell.jpg RoyM49_939-442-937_Flinders St_5Mar2005_Roy Mitchell.jpg RoyM50_1019_LaTRobe St-HarbourEsplanade_3Aug2005_Roy Mitchell.jpg RoyM51_856-1039_Spring St_29Jul2009__Roy Mitchell.jpg RoyM52_209-2119_Carlisle-Acland Sts_30Jul1994__Roy Mitchell.jpg RoyM53_106_Spencer St_1May1994__Roy Mitchell.jpg RoyM54_1000_Bourke St_28April1994_Roy Mitchell.jpg RoyM55_V214_Spring-Flinders St_28Apr1994_Roy Mitchell.jpg RoyM56_231_Carlisle St_30Jul1994_Roy Mitchell.jpg RoyM57_5013_StKilda_LX-safety_29Jul2009_Roy Mitchell.jpg RoyM58_CollinsSt-bridge-from-Docklands_29Jul2009_Roy Mitchell.jpg RoyM59_104 Fitzroy St_1992_Roy Mitchell.jpg RoyM60_431_Spencer-into-Bourke St_28Apr1994_Roy Mitchell.jpg RoyM61_380_Spencer St_1May1994__Roy Mitchell.jpg RoyM62_186-10W_Batman Ave_30Jul1994_Roy Mitchell.jpg RoyM63_64_Nicholson St_11Jan1978_Roy Mitchell.jpg RoyM64_164_Simpson St-shunt_26Jan1981_Roy Mitchell.jpg RoyM65_164_Simpson St-shunt_26Jan1981_Roy Mitchell.jpg RoyM66_676_Batman Ave_1979_Roy Mitchell.jpg RoyM67_603_Batman Ave_Oct1974_Roy Mitchell.jpg RoyM68_2119_Spencer St_23Aug2002_Roy Mitchell.jpg RoyM69_151_Swanston St_23Aug2002_Roy Mitchell.jpgAll have information written on the rear of the photo by the photographer and the donor.trams, tramways, testing, c class, glenferrie rd, swanston st, brunswick st, park st, berlin, milan, moomba, la trobe st, spencer st, flinders st, simpson st, docklands, box hill, carlisle st, restaurant tram, harbour esplanade, spring st, acland st, bourke st, fitzroy st, batman ave, nicholson st, porto, tram 3536, tram 3513, tram 3028, tram 1021, tram 3007, tram 1692, tram 3004, tram 862, tram 018, tram 946, tram 282, tram 3030, tram 1027, tram 442, tram 939, tram 937, tram 1019, tram 856, tram 1039, tram 209, tram 2119, tram 106, tram 1000, tram 214, tram 231, tram 5013, tram 104, tram 431, tram 380, tram 187, tram 10w, tram 64, tram 164, tram 676, tram 603, tram 2119, tram 151 -
 Melbourne Tram Museum
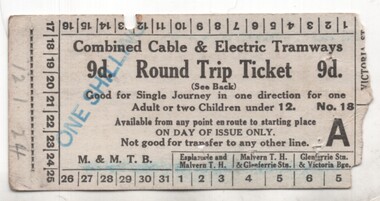
Ephemera - Ticket, Melbourne & Metropolitan Tramways Board (MMTB), "Combined Cable & electric Tramways Round Trip Ticket", c1923
Ticket - card - "Combined Cable & electric Tramways Round Trip Ticket", priced 9d, over stamped "One Schilling" for a round trip using St Kilda Road, Esplanade, Glenferrie Road, Cotham Road, Victoria St and Collins St. Has the conditions of travel on the rear. Has a dated of "12-1-24" on the left hand edge. Right hand edge has been partly torn away when issued.trams, tramways, cable trams, tickets, tourist tickets, round trip -
 Melbourne Tram Museum
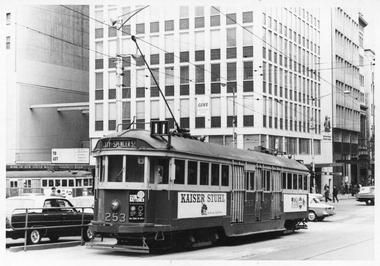
Photograph - Black and White photograph, Ellen Butland, Set of 53 photos, 1974 and 1998
... Melbourne Tram Museum 8 Wallen Road Hawthorn melbourne ...Set of 53 black and white photographs collected or taken by Ellen Butland - 1964 to 1975 For a listing of the prints see htd5720list.pdf. Word file and scanning by Gary Davey 5/2021 EB1 253 in Collins St, circa 1970 Ellen Butland.jpg EB2 349 on a tour in Dandenong Rd, circa 1975 Ellen Butland.jpg EB3 249 in William St, Center poles, demolition Menzies Hotel, c1970 Ellen Butland.jpg EB4 399 in Elizabeth St, TAA building in Franklin St. c1970 Ellen Butland.jpg EB5 410, 811, 397, 273, 526 Camberwell Depot, c1970 Ellen Butland.jpg EB6 388 & 852 in Riversdale Rd, c1967 Ellen Butland.jpg EB7 410 in Flinders St, c1970 Ellen Butland.jpg EB8 349 in Royal Park, c1973 Ellen Butland.jpg EB9 385 and AEC MK.VI bus in South Melbourne Depot, c1974 Ellen Butland.jpg EB10 606 in St Kilda Rd, c1973 Ellen Butland.jpg EB11 434 on a tour at South Melbourne Depot, c1974 Ellen Butand.jpg EB12 433 in Riversdale Rd, c1969 Ellen Butand.jpg EB13 418 in St Kida Rd, c1974 Ellen Butland.jpg EB14 432 & 273 in Camberwell Depot, c1968 Ellen Butland.jpg EB15 410, Cotham Rd Kew? c1968 Ellen Butland.jpg EB16 415 in Riversdale Rd, c1969 Ellen Butland.jpg EB17 418 in St Kilda Rd, c1968 Ellen Butand.jpg EB18 992 in Camberwell Depot, c1975 Ellen Butand.jpg EB19 983 in Bourke St, late 1968 Ellen Butland.jpg EB20 968 in Bourke St, late 1968 Ellen Butand.jpg EB21 9A Truck, c1969 Ellen Butland.jpg EB22 611at Batman Ave, c1964 Ellen Butland.jpg EB23 588 at South Melbourne Siding, c1968 Ellen Butland.jpg EB24 578 in Riversdale Rd, c1968 Ellen Butand.jpg EB25 507 at Camberwell Terminus, c1967 Ellen Butland.jpg EB26 674 in Swanston St, c1964 Ellen Butland.jpg EB27 681 on Route 56 in William St, c1969 Ellen Butland.jpg EB28 682 in Williamson Rd, c1971 Ellen Buckland.jpg EB29 772 in Elizabeth St, c1968 Ellen Butland.jpg EB30 776 on Route 69 Glenferrie Road at Henrietta St, c1968 Ellen Buckland.jpg EB31 786 at Footscray Terminus, c1972 Ellen Butland.jpg EB32 667 in Swanston St, c1958 Ellen Butland.jpg EB33 267 in St Kilda Rd, c1935 Ellen Butland.jpg EB34 900 and a L class at South Melbourne Depot, Jan 1975 Ellen Butland.jpg EB35 1003 in Spring St, c1965 Ellen Butland.jpg EB36 958 on Route 4, c1953 Ellen Butland.jpg EB37 1 and 7 in Victoria Parade, 1975 Ellen Butland.jpg EB38 3, 2 & 5 at Preston Workshops, 30-4-1975 Ellen Butland.jpg EB39 3 in Nicholson St, 30-4-1975 Ellen Butland.jpg EB40 3 in Queens Parade, 30-4-1975 Ellen Butland.jpg EB41 217 at Malvern Depot, 13-1-1974 Ellen Butland.jpg EB42 220 in Collins St, c1970 Ellen Butland.jpg EB43 225 in Swanston St, c1967 Ellen Butland.jpg EB44 233 in South Melbourne Per way yard, c1976 Ellen Butland.jpg EB45 242 in Brunswick Depot, c1968 Ellen Butland.jpg EB46 1007 in Bourke St, c1970 Ellen Butland.jpg EB47 1013 in Bourke St ,c1970 Ellen Butland.jpg EB48 1020 in LaTrobe St, c1969 Ellen Butland.jpg EB49 1025 in Collins St, c1969 Ellen Butland.jpg EB50 1037 in Collins St, c1970 Ellen Butland.jpg EB51 838 in South Melbourne Depot, c1975 Ellen Butland.jpg EB52 W2's and R10 recovery vehicle in Glenhuntly Depot, c1975 Ellen Butland.jpg EB53 1001 in Bourke St, c1970 Ellen Butland.jpgtrams, tramways, glenferrie road, collins st, dandenong rd, elizabeth st, st kilda rd, riversdale rd, batman ave, nicholson st, victoria parade, preston workshops, malvern depot, glenhuntly depot, camberwell depot, riversdale road, flinders st, tram 253, tram 606, tram 434, tram 433, tram 418, tram 432, tram 273, tram 410, tram 415, tram 418, tram 992, tram 983, tram 349, tram 968, tram 611, tram 588, tram 578, tram 507, tram 674, tram 681, tram 682, tram 772, tram 249, tram 776, tram 786, tram 667, tram 267, tram 900, tram 1003, tram 958, tram 1, tram 7, tram 3, tram 2, tram 5, tram 399, tram 217, tram 220, tram 225, tram 233, tram 242, tram 1007, tram 1013, tram 1020, tram 1025, tram 1037, tram 838, tram 1001, w2 class, w3 class, w4 class, w5 class, sw6 class, w6 class, w7 class, y1 class, x class, z1 class, tram 811, tram 397, tram 526, tram 385, tram 653, r10 vehicle, 9a truck, route 11, route 56, route 59, route 48, route 74, route 7, route 4, route 9a, route 9e, route 97 -
 Melbourne Tram Museum
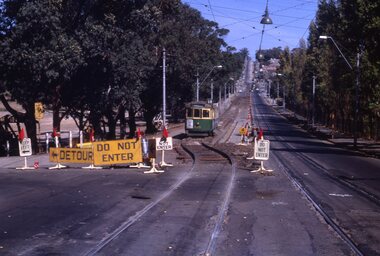
Slide - Set of 3, Keith Kings, 16/03/1968 12:00:00 AM
... Melbourne Tram Museum 8 Wallen Road Hawthorn melbourne ...Set of three 35mm Kodak white cardboard colour slide by Keith Kings of 16 or 17 /3/1968. .1 - W5 834 - on temporary track in Glenferrie Rd during relay looking, south to Kooyong railway station. .2 - photo showing the temporary track and the new 102 lb rail laid out pending welding. .3 - Photo showing W2 418 in Glenferrie Road and trackwork. Route 69" Has the Kooyong Tennis courts on the right hand side. See Keith's slide notes.Keith Kings stamp and number "20-1, 20-2 and 20-3", with details of exposure. .1 - "W5 834 - on temporary track in Glenferrie Rd during relay, south to Kooyong railway station. - 16/3/68" .2 - "Glenferrie Rd relay new 102 lb rail in approximate position in excavation. Ashes rolled as foundation. Temporary track on left. 17/3/68" .3 - temporary track at left being excavated and track drain laid. W2 418 on old track on right. 17/3/68"trams, tramways, glenferrie road, kooyong, trackwork, temporary track, w5 class, w2 class, route 69, tram 834, tram 418 -
 Melbourne Tram Museum
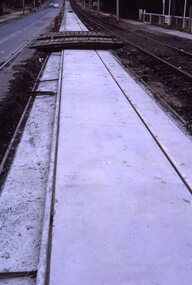
Slide - Set of 2, Keith Kings, 23/03/1968 12:00:00 AM
... Melbourne Tram Museum 8 Wallen Road Hawthorn melbourne ...35mm Kodak white cardboard colour slide by Keith Kings of 23/3/68 and 6/4/68. .1 - Glenferrie Road Kooyong track renewal showing the first section of completed track. Shows two road crossovers. .2 - ditto, showing one end of the new crossover with temporary track on the right. See Keith's slide notes.Keith Kings stamp and number "20-19" and "20-32", with details of exposure. 23/3/68 and 6/4/68. .1 - "New concrete trackwork in Glenferrie Rd north from Kooyong railway Xing ready to be brought into use. Temporary track still in use at right" .2 - "New design for xover in Glenferrie Rd, near cnr Gardiner Rd Kooyong, Removable sections form the road surface and facilitate maintenance and renewal."trams, tramways, glenferrie road, trackwork, temporary track, kooyong -
 Melbourne Tram Museum
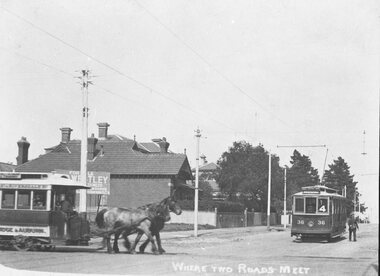
Negative, 1915/16
Copy negative of a photograph of the horse tram in Riversdale Road, meeting a P&MTT electric tram (No. 36) in Glenferrie Road, c1915. Has the photo caption underneath - "Where two roads meet". Print of this photo held in folder 195, See Reg Item 318 for another photograph, but poorer condition.trams, tramways, riversdale rd, glenferrie rd, horse trams, pmtt, tram 36 -
 Melbourne Tram Museum
Negative, Wal Jack, 16/02/1941 12:00:00 AM
Black and white negative, by Wal Jack, of No. W4 673 at the Toorak, Route 8 terminus at the corner of Toorak and Glenferrie Roads. The tram has a South Melbourne or Hanna St Run number. Photo dated 16-2-1941 in the Wal Jack album along with details of the location.trams, tramways, w4 class, toorak road, glenferrie road, route 8, hanna st depot, tram 673 -
 Melbourne Tram Museum
Newspaper, The Argus, "Combined Crossover installed at Kooyong", 23/01/1925 12:00:00 AM
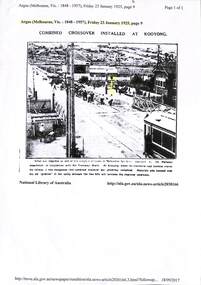
Photocopy of an article from The Argus, 23/1/1925, page 9 extracted through Trove, titled "Combined Crossover installed at Kooyong" with a photograph of the level crossing, replacement of track leading up to the Tramway or Railway Square. The disc signal for trams has been highlighted in yellow. Item made by Robert Green 18/9/2017trams, tramways, victorian railways, glenferrie road, level crossings, tramway square, trackwork -
 Melbourne Tram Museum
Negative, Wal Jack, c1950
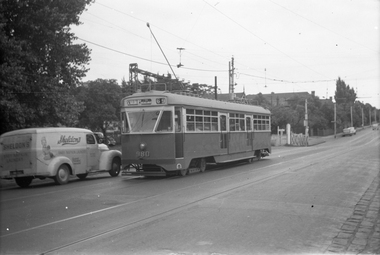
Black and white negative, by Wal Jack, of PCC 980, south bound in Glenferrie Road, , about to cross over the Kooyong Station Level crossing while running a route 69, St Kilda Beach. c1950. Alongside is a Sheldon's Baby Napkin Laundry van.trams, tramways, pcc class, glenferrie road, route 69, railway squares, level crossings, kooyong, tram 980 -
 Melbourne Tram Museum
Negative, Wal Jack, 9/02/1951 12:00:00 AM
Black and white negative, by Wal Jack, of PCC 980, northbound bound in Glenferrie Road at High Street with the destination of Kew Cotham Road. The Bank was replaced by a more modern looking building during the 1970's. In the background is the ES&A bank on the corner. Jane Nigro advised 9/9/2020: "1907 Photo of the E. S. & A. Bank on the corner of High Street and Glenferrie Road, Malvern. In 1885 land on corner of Glenferrie Road & High St. (40' x 150') was purchased by E.S. & A. Bank. A condition of sale was that the bank erect on the land a 'substantial brick building to be used as a branch bank', within 24 months. The E.S. & A. Bank, single-storey four roomed brick, was built in 1888. The first manager was Frederick Leonard. In 1907 a second storey, including residential quarters for the manager, was added to bank at a cost of £1400.The Bank was demolished in 1958-9and replaced with present building."trams, tramways, pcc class, glenferrie road, route 69, kew- cotham rd, tram 980 -
 Melbourne Tram Museum
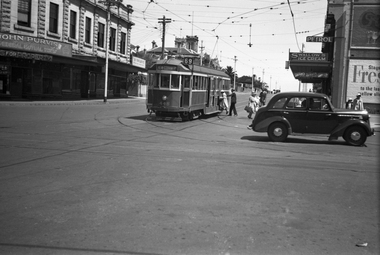
Negative, Wal Jack, 19/01/1941 12:00:00 AM
... Melbourne Tram Museum 8 Wallen Road Hawthorn melbourne ...Black and white negative by Wal Jack of W2 448 at the intersection of Glenferrie Road and Riversdale Road tram stop, with passengers boarding or having left the tram. Note the tram stop sign on the shop verandah. In the background is the building advertising John Purvis, Property sales and Federal Mutual life insurance. ON the opposite side is a Milk bar, advertising Swallow's Ice creamtrams, tramways, glenferrie road, riversdale road, w2 class, kew- cotham rd, route 69, passengers, tram 448 -
 Melbourne Tram Museum
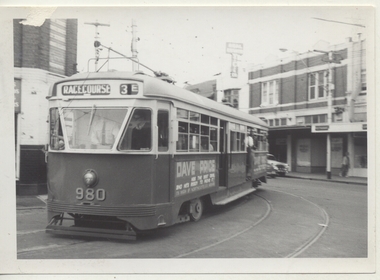
Photograph - Black & White Photograph/s, Chris Phillips, Feb. 1969
Black and white photograph of PCC 980 entering Malvern Depot, in Coldblo Road from Glenferrie Road, during a special tram tour, 9/2/1969. Photo by Chris Phillips. Showing Destination of Racecourse. Has a Dave Price advertisement on the side of the tram. ARE Tour ex South Melbourne depot. Printed on Kodak Paper.trams, tramways, mmtb, special trams, malvern depot, coldblo rd, tram 980, pcc class -
 Melbourne Tram Museum
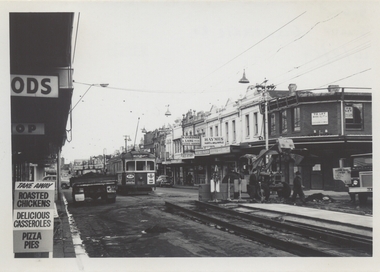
Photograph - Black & White Photograph/s, Chris Phillips, Sep. 1969
Black and white photograph of W5 816 in Glenferrie Road, looking south during the reconstruction of the Malvern Tram Depot lead, 14/9/1969. Taken by Chris Phillips, printed on Kodak Paper. Has a Haymes paint shop and K. Gardner and Lang Estate Agents shop in the background.On the rear in black ink "816 Stored Glenferrie Rd. 14/9/69"trams, tramways, mmtb, malvern depot, glenferrie rd, trackwork, tram 816 -
 Melbourne Tram Museum
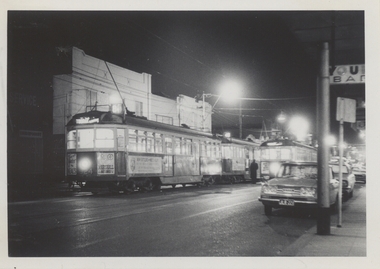
Photograph - Black & White Photograph/s, Chris Phillips, Sep. 1969
Black and white photograph, taken during the night, of W5's 819 and 775 stored with many other tramcars in Glenferrie Road, looking northwards during the reconstruction of the Malvern Tram Depot lead, 13/9/1969. Taken by Chris Phillips, printed on Kodak Paper. Tram 819 has drivers panel advertisement for Hilti, Hollins Austin Morris cars and 775 for Hollins Austin Morris cars and Sackville.On the rear in black ink "13/9/69"trams, tramways, mmtb, malvern depot, glenferrie rd, trackwork, tram 816 -
 Melbourne Tram Museum
Photograph - Black & White Photograph/s, Chris Phillips, Sep. 1969
Black and white photograph, taken during the night, of SW6 924 and other trams stored with many other tramcars in Glenferrie Road, during the reconstruction of the Malvern Tram Depot lead, 13/9/1969. Taken by Chris Phillips, printed on Kodak Paper. Tram 924 has drivers panel advertisement for Neals and Marshall Batteries.On the rear in black ink "13/"trams, tramways, mmtb, malvern depot, glenferrie rd, trackwork, tram 816 -
 Melbourne Tram Museum
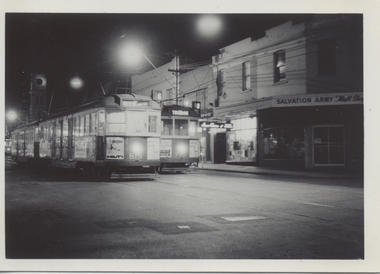
Photograph - Black & White Photograph/s, Chris Phillips, Sep. 1969
Black and white photograph, taken during the night, of W5's 819 and 775 stored with many other tramcars in Glenferrie Road, looking northwards during the reconstruction of the Malvern Tram Depot lead, 13/9/1969. Taken by Chris Phillips, printed on Kodak Paper. Tram 819 has drivers panel advertisement for Hilti, Hollins Austin Morris cars and 775 for Hollins Austin Morris cars and Sackville. Also in the background is the Salvation Army shop.On the rear in black ink "13/9/69"trams, tramways, mmtb, malvern depot, glenferrie rd, trackwork, tram 816 -
 Melbourne Tram Museum
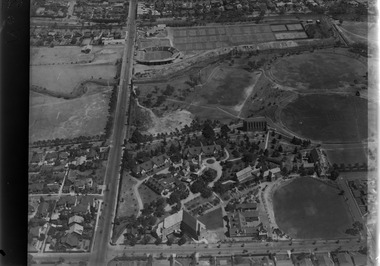
Photograph - Digital Image, Kevin O'Reilly, looking south over the Scotch College complex, Late 1920's
Image from CD (Compact Diskette for use in computers) - see Reg Item 135. Image titled "Scotch" on CD, of looking south over the Scotch College complex with Glenferrie Road on the left hand side of the photograph - Hawthorn. Has the Kooyong Tennis complex and station in the top of the photograph. A W class car can be seen southbound in Glenferrie Road, adjacent to the college. late 1920's?trams, tramways, kooyong, hawthorn, glenferrie rd -
 Melbourne Tram Museum
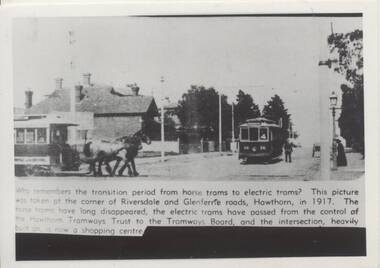
Photograph - Black & White Photograph/s, Tramway Museum Society of Victoria (TMSV), c1970
Black and white photo of a display panel at a TMSV event, showing the horse tram in Riversdale Road, meeting a P&MTT electric tram (No. 36) in Glenferrie Road, c1915. Has the photo caption underneath. Caption to the item says 1917, but given HTT dates, c1915. Photo reproduced c1970 by the TMSV from an original photo. See Reg Item 5081 for a negative image - far better.On the rear is a TMSV 332 Flinders St Melbourne stamp.trams, tramways, riversdale rd, glenferrie rd, horse trams, pmtt, tram 36