Showing 1645 items
matching release
-
 Moorabbin Air Museum
document (item) - John Wells Collection - see Description for details of photo collection
-
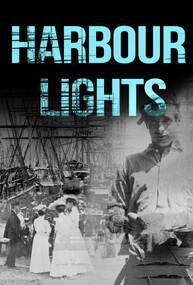 Mission to Seafarers Victoria
Film - Documentary, Wind and Sky Productions, Harbour Lights, 2019-2020
Synopsis: “In WW1 Melbourne a pioneering network of women at the Mission to Seafarers called the Ladies Harbour Lights Guild supported sailors who risked their lives at sea. The documentary “Harbour Lights” tells the remarkable story of the Ladies Harbour Lights Guild and the lives of seafarers in early 20th century Melbourne. It focuses on Melbourne’s iconic Mission to Seafarers building, its connection to the Great War and to a unique community of ships crew and volunteers. Featuring Melbourne historians, commentators, archivists and architects and rare footage and images of sailing and social life in and around the ports of Melbourne, this film will inform and connect audiences young and old.” Commissioned by Victorian Government The movie was produced in collaboration with the Mission to Seafarers Victoria. It was directed by Jary Nemo and written and produced by Lucinda Horrocks and Jary Nemo with executive producers Sue Dight and Gordon MacMillan. The film features: Jill Garner Kate Darian-Smith Chris McConville Janet Miller (curator) Gordon MacMillan (former seafarer and board committee member) Narrated by Sharon Turley. Music by Richard Chew (professor of the Arts Academy in Ballarat) The film was presented at several festival in Australia and abroad in 2020-2021. Credits: Narrator Sharon Turley Featuring (in order of appearance) Dr Chris McConville, Gordon MacMillan, Janet Miller, Professor Kate Darian-Smith and Jill Garner With Raul S Gantalao Jr, Escoto Lemuel, Ben Schroeder, Cinda Manins And Ian Fletcher, Yuan Jia, Uma Kothari, Gordon Lansley, William Reed and Cheka Samaranayake Directed by Jary Nemo Written and Produced by Lucinda Horrocks and Jary Nemo Music by Richard Chew Executive Producers Sue Dight and Gordon MacMillan Research advisors Geraldine Brault, Maria Culka, Professor Kate Darian-Smith, Ros Fletcher, Professor Uma Kothari, Dr Barbara Lemon, Catherine McLay, Dr Chris McConville, Janet Miller, Rick Mitchell, Duncan ‘John’ Perryman, Dr Annette Sheill and Peter Taylor Archival photographs, music and footage courtesy of Australian Red Cross Society, Central Highlands Libraries, Internet Archive, National Film and Sound Archive, National Library of Australia, Mackarness Family Personal Archives, Mission to Seafarers Victoria, Public Record Office Victoria, State Library of Victoria and US National Archives Music Harbour Lights. Music by Richard Chew. Westering. Music by Richard Chew. Twilight (Crépuscule) by Jules Massenet. Performed by Amelita Galli-Curci. I Love You So, Waltz from The Merry Widow by Franz Lehár. Performed by Elise Stephenson and Harry Macdonough with Orchestra. Harbour Lights 2. Music by Richard Chew. If I Could Fly by Walking Hearts featuring Jennifer Holm. Courtesy of Epidemic Sound. With thanks to Peter Barrow, Sarah Bartak, Lin Bender AM, Patty Braumueller, Csilla Csongvay, Emer Diviney, Moira Drew, Ian Fletcher, Ajith Jayasuriya, Ben Jones, Patience Jones, Cinda Manins, Madeleine Martiniello, Georgia Melville, Elisabeth Moglia, Tara Oldfield, Lyn Pasquier, Nigel Porteous, Rev’d Onofre (Inni) Punay, Dr Rosalie Triolo, Ben Schroeder, David Simpson, Cheka Samaranayake, Daria Wray, the Helen Macpherson Smith Trust and KPMG. A special thanks to The women of the Ladies Harbour Lights Guild 1906 to 1961 Produced in collaboration with The Mission to Seafarers Victoria Created with the support of The Victorian Government Licensing This film has been released under a Creative Commons BY-NC-ND 4.0 International license Acknowledgement of country Project production and development took place on the lands of the Kulin nation. We acknowledge Traditional Owners and pay our respects to Elders past, present and future. Production company A Wind & Sky Production Copyright with © Wind & Sky Productions MMXIX The film was launched on Wednesday 26th February 2020 at the Mission. Speech by Veterans Affairs. Amongst the guests were current and former volunteers (Maria Culka, Gordon MacMillan, Elisabeth Moglia), curators (Georgia Melville, Jay Miller, Geraldine Brault)18mn documentary mixed of photographs from teh collection and interviews about the Ladies Harbour Lights Guild work during WWIladies harbour lights guild, documentary, jay miller, janet miller, geraldine brault, lucinda horrocks, gordon macmillan, jary nemo, kate darian-smith, jill garner, chris mcconville, sharon turley, richard chew, footage, archive -
 Eltham District Historical Society Inc
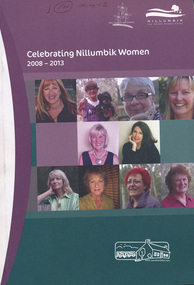
Book, Nillumbik Shire Council, Celebrating Nillumbik Women 2008-2013, 2013
This book was conceived by the Nillumbik Women's Network as a way of writing women into local history. When seeking nominations for the 2010 editon, the press release stated: Nillumbik Shire’s official histories don’t reflect the important but often unacknowledged contribution of local women to the development of the area. To redress this, the Nillumbik Women’s Network (NWN) initiated a small project, Celebrating Nillumbik women in late 2007.( For details of the Nillumbik Women’s Network refer to attachment) The NWN sought nominations of local women who had made, or continue to make, a significant contribution to the social and cultural life of our community. The brief profiles of the nominees were published in a booklet, which was launched at an International Women’s Day celebration in March 2008, and a second publication was produced in 2009. We continue to be inspired by the quality and activism of our local women. Many of the biographies tell of women’s contribution to the building of the ‘social’ infrastructure of the Shire. These stories complement the official historical accounts which primarily document men’s role in building the physical infrastructure of the Shire. One begins to develop a clearer picture of how women went about developing the services which we take for granted today, from the small kindergartens operating out of church halls to the wide ranging network of occasional and long day childcare care to the development of home based services for older frail and disabled residents of the area. They also tell of the bravery and resilience of women in their response to the devastating impact of the Black Saturday bushfires. This volume includes profiles of 23 women, 2013 Nominees in addition to those included since the project was launched in 2008. The 2008 nominations are: Wendy Alexander, Jane Ashton, Sharon Banner, Janet Boddy, Catherine Cervasio, Belinda Clarkson, Helen Coleman, Cathy Dean, Judy Duffy, Gwen Ford, Jenny Graves, Cath Giles, Meera Govil, Ona Henderson, Jill Jameson, Vicki Kaye, Mrs Kimber, Nerida Kirov, Jane Lauber, Pam Lawson, Anne Manne, Chris Marks, Elizabeth Marshall, Dawn McDonnell, Jenny Millar, Grace Mitchell, Jenni Mitchell, Michelle Molinaro, Joy Murphy, Rosie Murphy, Barbara Murray, Tracey Naughton, Josephine Norman, Pamela Pederson, Mary Robertson, Vicki Ruhr, Geraldine Sanderson, Dawn Shaw, Fiona Sievers, Myra Skipper, Selina Sutherland, Barbara Talbot, Marjorie Taylor, Julie Tipene-O’Toole, Susie Walker, Donna Zander. 2009: Jan Aitken, Rosemary Aitken – OAM, Edith Apted, Betty Anderson, Thelma Barkway, Diana Bassett-Smith, Jenneke Bateman-Korteweg, Amy Bryans, Sabi Buehler, Jenni Bundy, Audrey Cahn, Linda Cornelissen, Janice Crosswhite, Elean Dansey, Christine Durham Claire Fitzpatrick, Ailsa Fitzmaurice, Lucinda Flynn, Sheryl Garbutt MP, Fran Gronow, Ev Hales, Irene “Rennie” Harrison, Ena Jarvis, Heather Kaufmann. 1948-2007: Helen Kenney, Margot Knox – Pederson, Lois Loftus-Hills, Nina Mikhailovna Christesen AM (nee Maximov), Penny Mullinar, Gwayne Naug, Nanette Oates, Lisal O’Brien, Stella Reid, Laura Rohricht, Meg Russell, Sonia Skipper, Bronwyn South, Pauline Toner MP, Lisa Walton, Diana Warrell, Rachel Watt. The 2013 nominations are: Roslyn Addison, Sue Aldred, Lucy Anderson, Sue Arnold, Mary Avola, Anna Foletta, Morag Fraser, Danielle Green MP, Colleen Hackett, Pam Hayes, Barbara Joyce, Carol Leeson, Sandra and Bruce Poloni, Many Press, Carolyn Royse, Hannah Sky, Lorna Smith, Lynlee Tozer, Kilanthi Vassiliadis, Kerry Wailes, Gale Weiss, Irma Winton and Alexis Wright.This book is a significant in the recording of the contribution of local women to the development of the Shire of Nillumbik, especially for the time frame 2008 -- 2013. Historically women's stories generally have not been told at all, let alone their contributions acknowledged. This book profiles and documents women's stories that otherwise may not have been told.women, nillumbik women's network -
 Flagstaff Hill Maritime Museum and Village
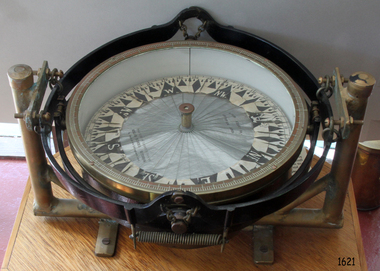
Compass, 1947-1950
Kelvin Company History: The origins of the company lie in the highly successful, if strictly informal, the relationship between William Thomson (1824-1907), Professor of Natural Philosophy at Glasgow University from 1846-1899 and James White, a Glasgow optical maker. James White (1824-1884) founded the firm of James White, who was an optical instrument maker in Glasgow in 1850. He was involved in supplying and mending apparatus for Thomson's university laboratory and working with him on experimental constructions. White was actually declared bankrupt in August 1861 and released several months later. In 1870, White was largely responsible for equipping William Thomson's laboratory in the new University premises at Gilmore hill. From 1876, he was producing accurate compasses for metal ships to Thomson's design during this period and this became an important part of his business in the last years of his life. He was also involved in the production of sophisticated sounding machinery that Thomson had designed to address problems encountered laying cables at sea, helping to make possible the first transatlantic cable connection. At the same time, he continued to make a whole range of more conventional instruments such as telescopes, microscopes and surveying equipment. White's association with Thomson continued until he died. After his death, his business continued under the same name, being administered by Matthew Edwards (until 1891 when he left to set up his own company). Thomson, who became Sir William Thomson and then Baron Kelvin of Largs in 1892, continued to maintain his interest in the business after James White's death in 1884, raising most of the capital needed to construct and equip new workshops in Cambridge Street, Glasgow. At these premises, the company continued to make the compass Thomson had designed during the 1870s and to supply it in some quantity, especially to the Admiralty. At the same time, the firm became increasingly involved in the design, production and sale of electrical apparatus. In 1899, Lord Kelvin resigned from his University chair and became, in 1900, a director in the newly formed limited liability company Kelvin & James White Ltd which had acquired the business of James White. At the same time Kelvin's nephew, James Thomson Bottomley (1845-1926), joined the firm. In 1904, a London branch office was opened which by 1915 had become known as Kelvin, White & Hutton Ltd . Kelvin & James White Ltd underwent a further change of name in 1913, becoming Kelvin Bottomley & Baird Ltd . Hughes Company History: Henry Hughes & Sons was founded in 1838 in London as a maker of chronographic and scientific instruments. The firm was incorporated as Henry Hughes & Sons Ltd in 1903. In 1923, the company produced its first recording echo sounder and in 1935, a controlling interest in the company was acquired by S Smith & Son Ltd resulting in the development and production of marine and aircraft instruments. Following the London office's destruction in the Blitz of 1941, a collaboration was entered into with Kelvin, Bottomley & Baird Ltd resulting in the establishing Marine Instruments Ltd. Following the formal amalgamation of Kelvin, Bottomley & Baird Ltd and Henry Hughes & Sons Ltd in 1947 to form Kelvin & Hughes Ltd., Marine Instruments Ltd then acted as regional agents in the UK for Kelvin & Hughes Ltd who were essentially now a part of Smith's Industries Ltd founded in 1944 and the successors of S Smith & Son Ltd. Kelvin & Hughes Ltd went on to develop various marine radar and echo sounders supplying the Ministry of Transport, and later the Ministry of Defence. The firm was liquidated in 1966 but the name was continued as Kelvin Hughes, a division of the Smiths Group. In 2002, Kelvin Hughes continues to produce and develop marine instruments for commercial and military use. This model compass is a good example of the commercial type of instruments made by Kelvin & Hughes after the world war 2, it was made in numbers for use on various types of shipping after the second world war and is not particularly rare or significant for it's type. Also it was made no earlier than 1947 as the firms of Kelvin, Bottomley & Baird Ltd and Henry Hughes & Sons Ltd who took over from Smith & Sons were not amalgamated until 1947. Given that Smith and Sons is engraved on the compass with Kelvin & Hughes it can be assumed that this compass was made during the company's transitional period to Kelvin & Hughes.Compass, marine or ship's card compass, gimble mounted, with inscriptions. Type is Lord Kelvin 10 inch compass card. Made in Great Britain by Kelvin Hughes Division of S. Smith & Sons (England) Ltd. "LORD KELVIN 10.", "COMPASS GRID", "MANUFACTURED IN GREAT BRITAIN BY", "KELVIN HUGHES DIVISION", "S. Smith & Sons (England) Ltd".flagstaff hill, warrnambool, shipwrecked-coast, flagstaff-hill, flagstaff-hill-maritime-museum, maritime-museum, shipwreck-coast, flagstaff-hill-maritime-village, marine compass, gimble compass, ship's compass, lord kelvin compass, smith and sons england ltd, henry hughes & son ltd london england, kelvin bottomley & baird ltd glasgow scotland, kelvin & hughes ltd, navigation instrument, scientific instrument, william thomson, james white, baron kelvin of largs -
 Flagstaff Hill Maritime Museum and Village
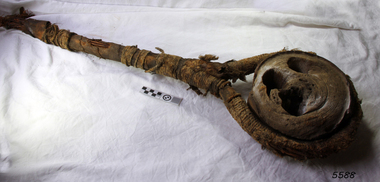
Deadeye, circa 1873
This example of a sailing ship’s ‘dead-eye’ is from the wreck of the LOCH ARD, which sank near Port Campbell in 1878. The vessel was an iron hulled clipper ship constructed for the Loch Line in 1873. It was part of a fleet of similar merchant ships owned by that company, which specialised in bringing passengers and goods from London via the Great Circle route to Melbourne, and returning to Britain via Cape Horn with the colony’s wool clip. Deadeyes were a common feature of sailing ship technology in the nineteenth century. They were a simple, cheap, and hard-wearing device that, in conjunction with another deadeye, provided an effective means of levering, or tightening, attached ropes and stays. Lower deadeyes were fixed to the sides of the ship by an encircling metal collar (inset in a flattish groove chiselled around the outer circumference of the disc), which was bolted to iron bars attached to the hull (called chain-plates). Upper deadeyes were looped by a strong hemp or wire rope (inset in a rounded groove carved around the outer circumference of the disc), which was joined to the bottom ends of the rigging which reached up to secure the masts into position (called shrouds or stays). Connecting a Lower deadeye to its corresponding Upper deadeye was a rope (called a lanyard) which looped up and down through the three “eyes” of each disc, to form a pulley system. The hitching of the two deadeyes with a looped lanyard provided the means of tightening, or loosening, the tension on the mast rigging ― essentially by pulling against the chain-plates bolted to the outside of the hull. It was a procedure that could be performed by sailors at sea and in emergencies. For example, after a gale the stays may have stretched and the masts worked loose, requiring retightening. Or, in the extreme circumstance of shipwreck, the lanyards might need to be released on the weather side, so that the masts fall away from the stricken vessel. HISTORY OF THE LOCH ARD The LOCH ARD belonged to the famous Loch Line which sailed many ships from England to Australia. Built in Glasgow by Barclay, Curdle and Co. in 1873, the LOCH ARD was a three-masted square rigged iron sailing ship. The ship measured 262ft 7" (79.87m) in length, 38ft (11.58m) in width, 23ft (7m) in depth and had a gross tonnage of 1693 tons. The LOCH ARD's main mast measured a massive 150ft (45.7m) in height. LOCH ARD made three trips to Australia and one trip to Calcutta before its final voyage. LOCH ARD left England on March 2, 1878, under the command of Captain Gibbs, a newly married, 29 year old. She was bound for Melbourne with a crew of 37, plus 17 passengers and a load of cargo. The general cargo reflected the affluence of Melbourne at the time. On board were straw hats, umbrella, perfumes, clay pipes, pianos, clocks, confectionary, linen and candles, as well as a heavier load of railway irons, cement, lead and copper. There were items included that intended for display in the Melbourne International Exhibition in 1880. The voyage to Port Phillip was long but uneventful. At 3am on June 1, 1878, Captain Gibbs was expecting to see land and the passengers were becoming excited as they prepared to view their new homeland in the early morning. But LOCH ARD was running into a fog which greatly reduced visibility. Captain Gibbs was becoming anxious as there was no sign of land or the Cape Otway lighthouse. At 4am the fog lifted. A man aloft announced that he could see breakers. The sheer cliffs of Victoria's west coast came into view, and Captain Gibbs realised that the ship was much closer to them than expected. He ordered as much sail to be set as time would permit and then attempted to steer the vessel out to sea. On coming head on into the wind, the ship lost momentum, the sails fell limp and LOCH ARD's bow swung back. Gibbs then ordered the anchors to be released in an attempt to hold its position. The anchors sank some 50 fathoms - but did not hold. By this time LOCH ARD was among the breakers and the tall cliffs of Mutton Bird Island rose behind the ship. Just half a mile from the coast, the ship's bow was suddenly pulled around by the anchor. The captain tried to tack out to sea, but the ship struck a reef at the base of Mutton Bird Island, near Port Campbell. Waves broke over the ship and the top deck was loosened from the hull. The masts and rigging came crashing down knocking passengers and crew overboard. When a lifeboat was finally launched, it crashed into the side of LOCH ARD and capsized. Tom Pearce, who had launched the boat, managed to cling to its overturned hull and shelter beneath it. He drifted out to sea and then on the flood tide came into what is now known as LOCH ARD Gorge. He swam to shore, bruised and dazed, and found a cave in which to shelter. Some of the crew stayed below deck to shelter from the falling rigging but drowned when the ship slipped off the reef into deeper water. Eva Carmichael had raced onto deck to find out what was happening only to be confronted by towering cliffs looming above the stricken ship. In all the chaos, Captain Gibbs grabbed Eva and said, "If you are saved Eva, let my dear wife know that I died like a sailor". That was the last Eva Carmichael saw of the captain. She was swept off the ship by a huge wave. Eva saw Tom Pearce on a small rocky beach and yelled to attract his attention. He dived in and swam to the exhausted woman and dragged her to shore. He took her to the cave and broke open case of brandy which had washed up on the beach. He opened a bottle to revive the unconscious woman. A few hours later Tom scaled a cliff in search of help. He followed hoof prints and came by chance upon two men from nearby Glenample Station three and a half miles away. In a state of exhaustion, he told the men of the tragedy. Tom returned to the gorge while the two men rode back to the station to get help. By the time they reached LOCH ARD Gorge, it was cold and dark. The two shipwreck survivors were taken to Glenample Station to recover. Eva stayed at the station for six weeks before returning to Ireland, this time by steamship. In Melbourne, Tom Pearce received a hero's welcome. He was presented with the first gold medal of the Royal Humane Society of Victoria and a £1000 cheque from the Victorian Government. Concerts were performed to honour the young man's bravery and to raise money for those who lost family in the LOCH ARD disaster. Of the 54 crew members and passengers on board, only two survived: the apprentice, Tom Pearce and the young woman passenger, Eva Carmichael, who lost all of her family in the tragedy. Ten days after the LOCH ARD tragedy, salvage rights to the wreck were sold at auction for £2,120. Cargo valued at £3,000 was salvaged and placed on the beach, but most washed back into the sea when another storm developed. The wreck of LOCH ARD still lies at the base of Mutton Bird Island. Much of the cargo has now been salvaged and some was washed up into what is now known as LOCH ARD Gorge. Cargo and artefacts have also been illegally salvaged over many years before protective legislation was introduced. One of the most unlikely pieces of cargo to have survived the shipwreck was a Minton porcelain peacock - one of only nine in the world. The peacock was destined for the Melbourne International Exhibition in 1880. It had been well packed, which gave it adequate protection during the violent storm. Today, the Minton peacock can be seen at the Flagstaff Hill Maritime Museum in Warrnambool. From Australia's most dramatic shipwreck it has now become Australia's most valuable shipwreck artefact and is one of very few 'objects' on the Victorian State Heritage Register. The shipwreck of the LOCH ARD is of State significance. Victorian Heritage Register S417. Flagstaff Hill’s collection of artefacts from LOCH ARD is significant for being one of the largest collections of artefacts from this shipwreck in Victoria. It is significant for its association with the shipwreck, which is on the Victorian Heritage Register (VHR S417). The collection is significant because of the relationship between the objects, as together they have a high potential to interpret the story of the LOCH ARD. The LOCH ARD collection is archaeologically significant as the remains of a large international passenger and cargo ship. The LOCH ARD collection is historically significant for representing aspects of Victoria’s shipping history and its potential to interpret sub-theme 1.5 of Victoria’s Framework of Historical Themes (living with natural processes). The collection is also historically significant for its association with the LOCH ARD, which was one of the worst and best known shipwrecks in Victoria’s history. A reasonably well-preserved ship’s deadeye with rust-stained wire loop-rope still attached. It retains portions of its original hemp cord and hessian wrapping. The flat sides of this thick wooden disc have three holes drilled through in a triangular configuration. The artefact is from the shipwreck of the LOCH ARD (1878). The survival of the loop-rope (wire cable) indicates it was an Upper Deadeye, connected to the shrouds (mast rigging).flagstaff hill, warrnambool, shipwrecked coast, flagstaff hill maritime museum, maritime museum, shipwreck coast, flagstaff hill maritime village, great ocean road, loch line, loch ard, captain gibbs, eva carmichael, tom pearce, glenample station, mutton bird island, loch ard gorge, deadeye, rigging -
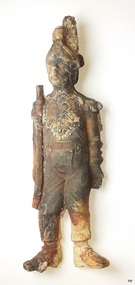 Flagstaff Hill Maritime Museum and Village
Leisure object - Toy Soldier, circa 1878
The toy soldier is a relic from the shipwreck of the LOCH ARD in 1878. It has a companion piece in the Flagstaff Hill collection. The toy soldier is unpainted, but the style of uniform, and the weapons carried (a musket and a basket-handled cutlass), indicate it is a representation of the Napoleonic Wars period from the beginning of the nineteenth century. Mass-produced toy soldiers made of cast metal (lead or tin) became popular during the 1800s. Heyde of Germany manufactured silhouette-shaped flat toy soldiers early in the century. Mignot of France released three-dimensional solid figures and later around 1893 W. Britain, a toy company became known for its die-cast lead toy soldiers. These innovations were designed to make sets of toy soldiers more affordable for middle and lower-class children, extending the market beyond the intricately made and hand-crafted replicas that were the preserve of the rich in the eighteenth century. Wooden military figures, specially carved and unpainted ones, were therefore not particularly common at the time when the Loch Ard foundered on Victoria’s southwest coast. Mignot was the first to sell unpainted soldiers, leaving their customers to fill in the colours according to their own patriotic preferences. It is, therefore, possible the two figures in the Flagstaff Hill collection were part of a new set intended for sale, rather than part of a passenger’s existing collection. Loch Ard History: The Loch Ard got its name from ”Loch Ard” a loch that lies to the west of Aberfoyle, and the east of Loch Lomond. It means "high lake" in Scottish Gaelic. The vessel belonged to the famous Loch Line which sailed many vessels from England to Australia. The Loch Ard was built in Glasgow by Barclay, Curle & Co. in 1873, the vessel was a three-masted square-rigged iron sailing ship that measured 79.87 meters in length, 11.58 m in width, and 7 m in depth with a gross tonnage of 1693 tons with a mainmast that measured a massive 45.7 m in height. Loch Ard made three trips to Australia and one trip to Calcutta before its fateful voyage. Loch Ard left England on March 2, 1878, under the command of 29-year-old Captain Gibbs, who was newly married. The ship was bound for Melbourne with a crew of 37, plus 17 passengers. The general cargo reflected the affluence of Melbourne at the time. Onboard were straw hats, umbrellas, perfumes, clay pipes, pianos, clocks, confectionery, linen and candles, as well as a heavier load of railway irons, cement, lead and copper. There were other items included that were intended for display in the Melbourne International Exhibition of 1880. The voyage to Port Phillip was long but uneventful. Then at 3 am on June 1, 1878, Captain Gibbs was expecting to see land. But the Loch Ard was running into a fog which greatly reduced visibility. Captain Gibbs was becoming anxious as there was no sign of land or the Cape Otway lighthouse. At 4 am the fog lifted and a lookout aloft announced that he could see breakers. The sheer cliffs of Victoria's west coast came into view, and Captain Gibbs realised that the ship was much closer to them than expected. He ordered as much sail to be set as time would permit and then attempted to steer the vessel out to sea. On coming head-on into the wind, the ship lost momentum, the sails fell limp and Loch Ard's bow swung back towards land. Gibbs then ordered the anchors to be released in an attempt to hold their position. The anchors sank some 50 fathoms - but did not hold. By this time the ship was among the breakers and the tall cliffs of Mutton Bird Island rose behind. Just half a mile from the coast, the ship's bow was suddenly pulled around by the anchor. The captain tried to tack out to sea, but the ship struck a reef at the base of Mutton Bird Island, near Port Campbell. Waves subsequently broke over the ship and the top deck became loosened from the hull. The masts and rigging came crashing down knocking passengers and crew overboard. When a lifeboat was finally launched, it crashed into the side of Loch Ard and capsized. Tom Pearce, who had launched the boat, managed to cling to its overturned hull and shelter beneath it. He drifted out to sea and then on the flood tide came into what is now known as Lochard Gorge. He swam to shore, bruised and dazed, and found a cave in which to shelter. Some of the crew stayed below deck to shelter from the falling rigging but drowned when the ship slipped off the reef into deeper water. Eva Carmichael a passenger had raced onto the deck to find out what was happening only to be confronted by towering cliffs looming above the stricken ship. In all the chaos, Captain Gibbs grabbed Eva and said, "If you are saved Eva, let my dear wife know that I died like a sailor". That was the last Eva Carmichael saw of the captain. She was swept off the ship by a huge wave. Eva saw Tom Pearce on a small rocky beach and yelled to attract his attention. He dived in and swam to the exhausted woman and dragged her to shore. He took her to the cave and broke the open case of brandy which had washed up on the beach. He opened a bottle to revive the unconscious woman. A few hours later Tom scaled a cliff in search of help. He followed hoof prints and came by chance upon two men from nearby Glenample Station three and a half miles away. In a complete state of exhaustion, he told the men of the tragedy. Tom then returned to the gorge while the two men rode back to the station to get help. By the time they reached Loch Ard Gorge, it was cold and dark. The two shipwreck survivors were taken to Glenample Station to recover. Eva stayed at the station for six weeks before returning to Ireland by steamship. In Melbourne, Tom Pearce received a hero's welcome. He was presented with the first gold medal of the Royal Humane Society of Victoria and a £1000 cheque from the Victorian Government. Concerts were performed to honour the young man's bravery and to raise money for those who lost family in the disaster. Of the 54 crew members and passengers on board, only two survived: the apprentice, Tom Pearce and the young woman passenger, Eva Carmichael, who lost her family in the tragedy. Ten days after the Lochard tragedy, salvage rights to the wreck were sold at auction for £2,120. Cargo valued at £3,000 was salvaged and placed on the beach, but most washed back into the sea when another storm developed. The wreck of Lochard still lies at the base of Mutton Bird Island. Much of the cargo has now been salvaged and some items were washed up into Lochard Gorge. Cargo and artefacts have also been illegally salvaged over many years before protective legislation was introduced in March 1982. One of the most unlikely pieces of cargo to have survived the shipwreck was a Minton majolica peacock- one of only nine in the world. The peacock was destined for the Melbourne 1880 International Exhibition. It had been well packed, which gave it adequate protection during the violent storm. Today the Minton peacock can be seen at the Flagstaff Hill Maritime Museum in Warrnambool. From Australia's most dramatic shipwreck, it has now become Australia's most valuable shipwreck artifact and is one of very few 'objects' on the Victorian State Heritage Register.The toy soldier represents a 19th-century child's interest in military history. The item is one of two toy soldiers recovered from the Loch Ard in Flagstaff Hill's collection. The shipwreck of the Loch Ard is of significance for Victoria and is registered on the Victorian Heritage Register ( S 417). Flagstaff Hill has a varied collection of artefacts from Loch Ard and its collection is significant for being one of the largest accumulations of artefacts from this notable Victorian shipwreck of which the subject items are a small part. The collections of objects give us a snapshot of how we can interpret the story of this tragic event. The collection is also archaeologically significant as it represents aspects of Victoria's shipping history, allowing us to interpret Victoria's social and historical themes. Through is associated with the worst and best-known shipwreck in Victoria's history.An unpainted, cream-coloured toy soldier, recovered from the Loch Ard. The figure wears a Napoleonic Wars-era uniform, a plumed helmet, a short jacket with tails, bib-front trousers with button closure, straps crossed at the front and back, and epaulettes. The figure is in marching posture with one foot extended forward, and is bearing a musket at the slope-arms position, with a sabre or cutlass slung behind. It is unable to stand on its own. There are reddish-brown and orange-brown stains on the head and body. The body has seams along both sides that are uneven at the lower leg. There is a hole in the back and the inside is hollow. The material has a rough texture.flagstaff hill, warrnambool, flagstaff hill maritime museum, shipwreck coast, flagstaff hill maritime village, great ocean road, loch ard, toy soldier, napoleonic uniforms, military toy, moulded soldier -
 Flagstaff Hill Maritime Museum and Village
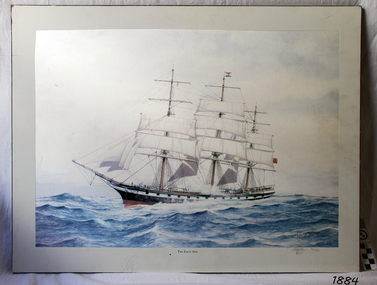
Print, The Loch Ard, 1993
ABOUT THE ARTIST – Philip James Gray “Philip is one of Australia’s leading maritime artists and his meticulous research and social commentary paintings of ships, such as, the Loch Ard and Schomberg form an important part of Warrnambool’s Flagstaff Hill Maritime Museum.” [ref. Dr Marion Manifold, Artist and Art Historian, 2014] Philip James Gray was born in London but has lived most of his life in Australia. He graduated from a London school of art as an illustrator, specialising in technical and scientific illustration as well as other commercial and applied art. He was also a student for a time of Fyffe Christie - British figurative artist, mural painter and humanitarian – who had a great influence on his career. Philip has always worked as a professional artist and illustrator. Many publications on maritime history have featured his work. His paintings have been released and sold all over the world as limited edition prints. The State Library of Victoria’s ‘Latrobe Collection’ holds two of his paintings. His street painting of ‘The Ashes Contest’ decorates the brick wall of Old Bakery Laneway in Sunbury and a Sunbury café owner commissioned him to paint the ‘Sunbury Pop Festival’ as a remembrance of local history. [ref. Sunbury Leader, Nov 15 2013] Philip has been an active member of the Sunbury Art Society in Victoria for several years, serving on the committee for some of that time and being involved in exhibitions. He enjoys helping new artists and sharing his skills and experience. [other references: Sunbury Art Society Inc. Oct-Nov 2012] HISTORY OF THE LOCH ARD The LOCH ARD belonged to the famous Loch Line which sailed many ships from England to Australia. Built in Glasgow by Barclay, Curdle and Co. in 1873, the LOCH ARD was a three-masted square rigged iron sailing ship. The ship measured 262ft 7" (79.87m) in length, 38ft (11.58m) in width, 23ft (7m) in depth and had a gross tonnage of 1693 tons. The LOCH ARD's main mast measured a massive 150ft (45.7m) in height. LOCH ARD made three trips to Australia and one trip to Calcutta before its final voyage. LOCH ARD left England on March 2, 1878, under the command of Captain Gibbs, a newly married, 29 year old. She was bound for Melbourne with a crew of 37, plus 17 passengers and a load of cargo. The general cargo reflected the affluence of Melbourne at the time. On board were straw hats, umbrella, perfumes, clay pipes, pianos, clocks, confectionary, linen and candles, as well as a heavier load of railway irons, cement, lead and copper. There were items included that intended for display in the Melbourne International Exhibition in 1880. The voyage to Port Phillip was long but uneventful. At 3am on June 1, 1878, Captain Gibbs was expecting to see land and the passengers were becoming excited as they prepared to view their new homeland in the early morning. But LOCH ARD was running into a fog which greatly reduced visibility. Captain Gibbs was becoming anxious as there was no sign of land or the Cape Otway lighthouse. At 4am the fog lifted. A man aloft announced that he could see breakers. The sheer cliffs of Victoria's west coast came into view, and Captain Gibbs realised that the ship was much closer to them than expected. He ordered as much sail to be set as time would permit and then attempted to steer the vessel out to sea. On coming head on into the wind, the ship lost momentum, the sails fell limp and LOCH ARD's bow swung back. Gibbs then ordered the anchors to be released in an attempt to hold its position. The anchors sank some 50 fathoms - but did not hold. By this time LOCH ARD was among the breakers and the tall cliffs of Mutton Bird Island rose behind the ship. Just half a mile from the coast, the ship's bow was suddenly pulled around by the anchor. The captain tried to tack out to sea, but the ship struck a reef at the base of Mutton Bird Island, near Port Campbell. Waves broke over the ship and the top deck was loosened from the hull. The masts and rigging came crashing down knocking passengers and crew overboard. When a lifeboat was finally launched, it crashed into the side of LOCH ARD and capsized. Tom Pearce, who had launched the boat, managed to cling to its overturned hull and shelter beneath it. He drifted out to sea and then on the flood tide came into what is now known as LOCH ARD Gorge. He swam to shore, bruised and dazed, and found a cave in which to shelter. Some of the crew stayed below deck to shelter from the falling rigging but drowned when the ship slipped off the reef into deeper water. Eva Carmichael had raced onto deck to find out what was happening only to be confronted by towering cliffs looming above the stricken ship. In all the chaos, Captain Gibbs grabbed Eva and said, "If you are saved Eva, let my dear wife know that I died like a sailor". That was the last Eva Carmichael saw of the captain. She was swept off the ship by a huge wave. Eva saw Tom Pearce on a small rocky beach and yelled to attract his attention. He dived in and swam to the exhausted woman and dragged her to shore. He took her to the cave and broke open case of brandy which had washed up on the beach. He opened a bottle to revive the unconscious woman. A few hours later Tom scaled a cliff in search of help. He followed hoof prints and came by chance upon two men from nearby Glenample Station three and a half miles away. In a state of exhaustion, he told the men of the tragedy. Tom returned to the gorge while the two men rode back to the station to get help. By the time they reached LOCH ARD Gorge, it was cold and dark. The two shipwreck survivors were taken to Glenample Station to recover. Eva stayed at the station for six weeks before returning to Ireland, this time by steamship. In Melbourne, Tom Pearce received a hero's welcome. He was presented with the first gold medal of the Royal Humane Society of Victoria and a £1000 cheque from the Victorian Government. Concerts were performed to honour the young man's bravery and to raise money for those who lost family in the LOCH ARD disaster. Of the 54 crew members and passengers on board, only two survived: the apprentice, Tom Pearce and the young woman passenger, Eva Carmichael, who lost all of her family in the tragedy. Ten days after the LOCH ARD tragedy, salvage rights to the wreck were sold at auction for £2,120. Cargo valued at £3,000 was salvaged and placed on the beach, but most washed back into the sea when another storm developed. The wreck of LOCH ARD still lies at the base of Mutton Bird Island. Much of the cargo has now been salvaged and some was washed up into what is now known as LOCH ARD Gorge. Cargo and artefacts have also been illegally salvaged over many years before protective legislation was introduced. One of the most unlikely pieces of cargo to have survived the shipwreck was a Minton porcelain peacock - one of only nine in the world. The peacock was destined for the Melbourne International Exhibition in 1880. It had been well packed, which gave it adequate protection during the violent storm. Today, the Minton peacock can be seen at the Flagstaff Hill Maritime Museum in Warrnambool. From Australia's most dramatic shipwreck it has now become Australia's most valuable shipwreck artefact and is one of very few 'objects' on the Victorian State Heritage Register. Flagstaff Hill’s collection of artefacts from LOCH ARD is significant for being one of the largest collections of artefacts from this shipwreck in Victoria. It is significant for its association with the shipwreck, which is on the Victorian Heritage Register (VHR S417). The collection is significant because of the relationship between the objects, as together they have a high potential to interpret the story of the LOCH ARD. The LOCH ARD collection is archaeologically significant as the remains of a large international passenger and cargo ship. The LOCH ARD collection is historically significant for representing aspects of Victoria’s shipping history and its potential to interpret sub-theme 1.5 of Victoria’s Framework of Historical Themes (living with natural processes). The collection is also historically significant for its association with the LOCH ARD, which was one of the worst and best known shipwrecks in Victoria’s history. Print of the sailing ship Loch Ard by artist Philip J. Gray, 1993. Depicts the Loch Ard in full sail at sea, figures on deck. Limited Edition number 54/925. Print is adhered to a piece of chipboard and is stamped by the framer, Ian's Picture Framing of Warrnambool.Signature of "Philip J. Gray" , "54/925" Stamped on back "IAN'S PICTURE FRAMING, 48 KEPLER STREET, WARRNAMBOOL 3280, PH: (055) 628 022, FAX: (055) 628 145"flagstaff hill, warrnambool, shipwrecked coast, flagstaff hill maritime museum, maritime museum, shipwreck coast, flagstaff hill maritime village, great ocean road, loch line, loch ard, captain gibbs, eva carmichael, tom pearce, glenample station, mutton bird island, loch ard gorge, print, philip j. gray -
 Flagstaff Hill Maritime Museum and Village
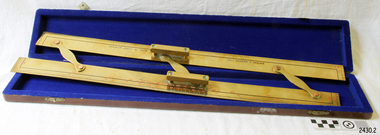
Parallel Rule, 1947-1950
Navigators use parallel rule with maps and charts for plotting a specific course on a chart. One long edge is used with the compass rose on the chart, aligning the centre of the rose with the desired direction around the edge of the rose. The compass bars are then ‘walked’ in and out across the map to the desired location so that lines can be plotted to represent the direction to be travelled. Kelvin Company History: The origins of the company lie in the highly successful and strictly informal relationship between William Thomson (1824-1907), Professor of Natural Philosophy at Glasgow University from 1846-1899 and James White, a Glasgow optical maker. James White (1824-1884) founded the firm of James White, an optical instrument maker in Glasgow in 1850 and was involved in supplying and mending apparatus for Thomson university laboratory and working with him on experimental constructions. White was declared bankrupt in August 1861 and released several months later. In 1870, White was largely responsible for equipping William Thomson laboratory in the new University premises at Gilmore hill. From 1876, he was producing accurate compasses for metal ships to Thomson design during this period and this became an important part of his business in the last years of his life. He was also involved in the production of sophisticated sounding machinery that Thomson had designed to address problems encountered laying cables at sea, helping to make possible the first transatlantic cable connection. At the same time, he continued to make a whole range of more conventional instruments such as telescopes, microscopes and surveying equipment. White's association with Thomson continued until he died. After his death, his business continued under the same name, being administered by Matthew Edwards until 1891 when he left to set up his own company. Thomson who became Sir William Thomson and then Baron Kelvin of Largs in 1892, continued to maintain his interest in the business after James White's death in 1884, raising most of the capital needed to construct and equip new workshops in Cambridge Street, Glasgow. At these premises, the company continued to make the compass Thomson had designed during the 1870s and to supply it in some quantity, especially to the Admiralty. At the same time, the firm became increasingly involved in the design, production and sale of electrical apparatus. In 1899, Lord Kelvin resigned from his University chair and became, in 1900, a director in the newly formed limited liability company Kelvin & James White Ltd which had acquired the business of James White. At the same time Kelvin's nephew, James Thomson Bottomley (1845-1926), joined the firm. In 1904, a London branch office was opened which by 1915 had become known as Kelvin, White & Hutton Ltd. Kelvin & James White Ltd underwent a further change of name in 1913, becoming Kelvin Bottomley & Baird Ltd. Hughes Company History: Henry Hughes & Sons were founded in 1838 in London as a maker of chronographic and scientific instruments. The firm was incorporated as “Henry Hughes & Sons Ltd” in 1903. In 1923, the company produced its first recording echo sounder and in 1935 a controlling interest in the company was acquired by S Smith & Son Ltd resulting in the development and production of marine and aircraft instruments. Following the London office's destruction in the Blitz of 1941, a collaboration was entered into with Kelvin, Bottomley & Baird Ltd resulting in the establishing “Marine Instruments Ltd”. Following the formal amalgamation of Kelvin, Bottomley & Baird Ltd and Henry Hughes & Sons Ltd in 1947 to form Kelvin & Hughes Ltd. Marine Instruments Ltd then acted as regional agents in the UK for Kelvin & Hughes Ltd who were essentially now a part of Smith's Industries Ltd founded in 1944 and the successors of S Smith & Son Ltd. Kelvin & Hughes Ltd went on to develop various marine radar and echo sounders supplying the Ministry of Transport, and later the Ministry of Defence. The firm was liquidated in 1966 but the name was continued as Kelvin Hughes, a division of the Smiths Group. In 2002, Kelvin Hughes continues to produce and develop marine instruments for commercial and military. This model parallel map ruler is a good example of the commercial diversity of navigational instruments made by Kelvin & Hughes after World War II. It was made in numbers for use by shipping after the second world war and is not particularly rare or significant for it's type. Also it was made no earlier than 1947 as the firms of Kelvin, Bottomley & Baird Ltd and Henry Hughes & Sons Ltd who took over from Smith & Sons were not amalgamated until 1947. It can therefor be assumed that this ruler was made during the company's transitional period to Kelvin & Hughes from Smith Industries Ltd.Brass parallel rule in wooden box with blue felt lining.Rule inscribed on front "Kelvin & Hughes Ltd" " Made in Great Britain"flagstaff hill, warrnambool, shipwrecked-coast, flagstaff-hill, flagstaff-hill-maritime-museum, maritime-museum, shipwreck-coast, flagstaff-hill-maritime-village, parallel rule, kelvin & hughes ltd, map ruler, plot direction, navigation, maps, echo sounder, kelvin & james white, lord kelvin, baron kelvin of largs, scientific instrument -
 Mission to Seafarers Victoria
Photograph - Photographs, Serie, Mission to Seafarers Victoria, The sea is all around us, 29 May 2015
EXHIBITION in the DOME The Sea is All Around Us - Margaret Woodward 11-21 May 2015 Dome Gallery – Mission to Seafarers, 717 Flinders Street, Melbourne, Australia. 37 º 49'21" S 144º 57'03"E Hours: Daily 11.00am - 4.00pm The sea is all around us is a multi-layered event which will create a memorable experience for those visiting the Dome Gallery and the Mission to Seafarers in Melbourne’s Docklands. The event will acknowledge and raise awareness of the working lives and journeys of seafarers by making visible their role in transporting commodities, materials and objects to and from Australia’s shores. This installation invites seafarers and visitors to participate in a global project which aims to witness sea journeys and trace the mobile life of seafarers and souvenirs. For a fortnight in May 2015, the Dome Gallery will become an architectural large scale compass, with the circular floor marking the intersection of its latitude and longitude (37 º 49'21" S 144º 57'03"E). Over these two weeks the Dome Gallery will be inscribed with marks recording journeys made by seafarers, recording destination and departure ports, home lands and waterways, and in doing so making visible a small segment of the global patterns of seafaring. Custom-made souvenirs designed for the installation will be given to seafarers as gestures of welcome and a memento of their visit. The souvenirs originating in Poland will continue their journey by sea, to destinations beyond the Dome becoming part of the global network of seafaring, with an invitation for seafarers to record their future journeys using QR code scanning technologies. It is hoped that by releasing the 200 limited edition souvenirs accompanying the seafarers the mobile life of souvenirs and seafarers will also become visible. For more information visit the website: sensingtheremote.net Margaret Woodward is Associate Professor of Design at Charles Sturt University For a fortnight in May 2015, Margaret Woodward was ‘in residence’ at the Mission to Seafarers Norla Dome Gallery with her participatory installation project "The Sea is All Around Us". The floor of the gallery became a large scale compass. Seafarers were welcomed to the gallery their ships, journeys and destinations were recorded and mapped on the floor drawing. Seafarers were welcomed with cake and souvenir mugs of tea. These mugs, a momento for the seafarers, were inscribed with a scannable QR code and an invitation for seafarers to record their journeys on a dedicated project website. Around 120 souvenirs are now continuing their journey by sea and seafarers have scanned the mugs from locations including Singapore, Brisbane, Fremantle, Adelaide, Busan and Johor! After the exhibition Margaret Woodward was able to follow the seafarers' whereabout: ""The Sea is all Around Us". I am in awe of where this project might go, well done Margaret. One week has passed since finishing up at the Mission to Seafarers Victoria. Today I check my website and can see that the cup-carrying seafarers are reaching warmer climates, they tell me it’s getting hot as some are already in Suva and Port Lautoka. I’ve watched the souvenirs travel and fan out from Melbourne, some West to Adelaide and Fremantle, others going north to Sydney Brisbane, Singapore and Busan. Another seafarer scans in from Changi Airport, excited to be going home for some time with his family in the Phillipines. I keep an eye on my ‘fleet’ of 22 ships that visited the Dome Gallery, and see where they are on the Live Shipping website, watch some of them sail up the coast of Western Australia and marvel at the steady pace this journey takes. I am so used to flying over coastlines and countries in a matter of hours, impatiently watching the tracking screen from my airline seat, this shipping pace seems so much more real, so much more of a passage. I feel connected to these ships, to the people on board, to know that an object has passed from my hands to theirs, now holding in it my cargo of concern."margaret woodward, installation, exhibition, norla dome, 2015, sea voyage, sea journey, cultural events -
 Eltham District Historical Society Inc
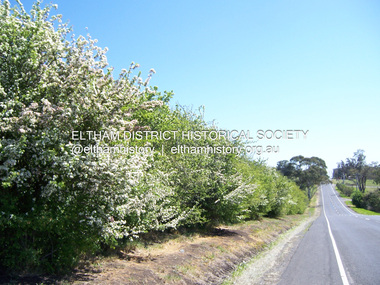
Photograph - Digital Photograph, Marguerite Marshall, Hawthorn hedges, Eltham-Yarra Glen Road, Kangaroo Ground, 3 October 2006
Hawthorn hedges are important reminders of Kangaroo Ground's Scottish heritage. They are Registered on the Victorian Heritage Register. They are "historically significant because the planting of hawthorn hedges reflects the adoption of Eurorpean farming techniques by the Kangaroo Ground population in the period following settlement and because the grid pattern of paddocks that the Hawthorn hedges define is very different to today's farm landscapes." Covered under Heritage Overlay, Nillumbik Planning Scheme. Published: Nillumbik Now and Then / Marguerite Marshall 2008; photographs Alan King with Marguerite Marshall.; p21 Hawthorn hedges bordering Kangaroo Ground’s gently rolling farmlands are important reminders of its Scottish heritage and are rare so close to Melbourne.1 As early as the 1840s newly arrived farmers from Scotland planted hawthorn hedges around their properties, to protect crops from the numerous kangaroos and wallabies. Many of these hedges survive today. These farmers had the good fortune to settle some of the most fertile land available for cropping in the Colony of Victoria. At that time the black volcanic soil could sustain an amazing two crops a year. By the mid 1850s, 500 acres (202ha) of wheat were growing in Kangaroo Ground. But the crops were threatened by kangaroos, which were so plentiful, that Surveyor-General, Robert Hoddle, named the district Kangaroo Ground in 1838. As post-and-rail fences proved inadequate barriers for the bounding kangaroos, the Scots planted hawthorn hedgerows as they had done in Scotland. Some also used the hedges to net birds, presumably for the table. Interestingly the farmers in the bordering townships of Panton Hill and Christmas Hills, did not plant hawthorn hedges around their properties. Perhaps it was because by the time they settled in the 1860s and 1870s most of the wildlife had been gunned down by residents.2 The canny Scots planted the hedges on public land outside their own farms, as the hedgerows could spread to about five yards (five m) in width. With this impenetrable barrier Kangaroo Ground’s industrious farmers flourished to gain the economic power that saw the Shire of Eltham governed from Kangaroo Ground for 79 years (1858-1937). The Scots jealously guarded their land, so hard to get in Scotland. That is why they refused to release any of it ‘for local roads to follow easier grades as was the case in surrounding districts where roads generally followed ridgelines or streams’.3 Instead the roads were built in accordance with the magnetic bearings of their first survey in 1847 whether that suited the steep topography or not. This could force traffic to diverge when wet through Greensborough and Diamond Creek. Until 1921, the Eltham-Yarra Glen Road beside Wellers Restaurant, ‘dipped down into the upper reaches of Stony Creek’.4 Later some corners were compulsorily cut for the increasing motor traffic. As late as the 1960s, corners were cut to form sweeping curves above and alongside the Kangaroo Ground Cemetery and opposite the Emergency Operations Centre. In the latter case, the farmers – understanding their hedgerows as important heritage – insisted upon their reinstatement to conform to the altered road alignment. Kangaroo Ground’s ancient manna gums also point to the district’s history and to that of the hedgerows. The Aboriginal people had transformed the original forests into grasslands with the fires they lit to attract kangaroos, (which the Scots were to exclude by planting hedgerows). But the Wurundjeri hunters left the gums (Eucalyptus vimminalis cygnetensis), on the grasslands as ‘stalking trees’ to hunt kangaroos. The hawthorn hedges in Kangaroo Ground were neglected for around 60 years from about the middle of the 20th century. Bushfires had created gaps and the hedgerows were not trimmed. Then in late 2005, local historian Mick Woiwod, formed a group to lobby the Nillumbik Shire to restore the hedges, which could last for many centuries. Some hedges in parts of Britain date back to AD 800.5 Although the original Scottish farmers have gone, the hedges are a reminder of when they flourished in the district, which has changed little in 150 years.This collection of almost 130 photos about places and people within the Shire of Nillumbik, an urban and rural municipality in Melbourne's north, contributes to an understanding of the history of the Shire. Published in 2008 immediately prior to the Black Saturday bushfires of February 7, 2009, it documents sites that were impacted, and in some cases destroyed by the fires. It includes photographs taken especially for the publication, creating a unique time capsule representing the Shire in the early 21st century. It remains the most recent comprehenesive publication devoted to the Shire's history connecting local residents to the past. nillumbik now and then (marshall-king) collection, eltham-yarra glen road, hawthorn hedgerow, kangaroo ground -
 Eltham District Historical Society Inc
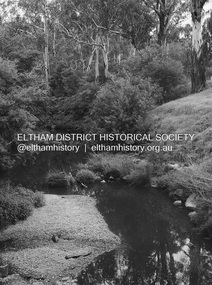
Photograph - Digital Photograph, Alan King, Diamond Creek, Barak Bushlands, Eltham, 2008
A habitat corridor and it strengthens the community. Published: Nillumbik Now and Then / Marguerite Marshall 2008; photographs Alan King with Marguerite Marshall.; p185 Barak Bushlands lie west of the Diamond Creek on the corner of Falkiner Street and busy, noisy Main Road. They form part of an important habitat corridor linking the Yarra River to the Kinglake National Park.1 Manna Gums, tawny frogmouths and platypuses are some of the indigenous plants and animals that have made their home there. The bushlands are the result of more than nine years of hard work by the local community with the Nillumbik Council, to transform a degraded flood plain into this refuge of natural beauty. In 1997, shortly after moving into the new Riverside Estate on Falkiner Street, Eltham, several residents noticed the sorry state of the Diamond Creek and surrounding area. Part of it was used as a cow paddock and although small patches of vegetation survived, the area was infested with weeds, rabbits, rubbish and drainage from the housing estate. At various times the 4.4 hectares had been used as a market garden and for shire stock piles. The residents began to restore the area by revegetating land along the Diamond Creek. In 1998 they established the Friends of the Diamond Creek Falkiner Street Reserve2 and 35 families joined from the 90-house Estate. Carolyn Mellor, as the Friends’ Land Manager, undertook a four-year horticulture course to guide this massive project for a volunteer organisation. Since 1999, she has been the Friends’ President. In 1999 the Friends urged the Nillumbik Council to undertake a feasibility study into establishing a wetland system and urban forest. Work began in 2002 with Nillumbik Council funding the project, supplemented by government grants. The Friends also received grants from Melbourne Water and Parks Victoria. Aided by the Friends and other community members, the Council created the Barak Bushlands consisting of a forest, a wetland, a bridge, a path and open space. The beautiful wetland treats most of the estate’s stormwater runoff. Storm water is filtered through plants in the wetland ponds then is released slowly into the billabong, before flowing into the Diamond Creek. The wetland also helps to minimise flooding and the improved water quality provides a flora and fauna habitat. The Friends and other volunteers planted more than 27,000 plants, more than one third of which they grew from seeds they collected at Lower Eltham and Wingrove Parks. Eltham High School students planted thousands of these through a Year Eight program introduced for this purpose. Other groups who assisted were: Green Corps, local Scouts and Guides – 2nd Montmorency, 1st Diamond Creek and 1st Eltham Cub Packs, Eltham College students, Eltham East Primary School, Landcare members, Eltham Lions Club and the Eltham Baptist Church. To maintain enthusiasm for the mammoth task, the Friends and other volunteers ‘adopted’ trees to water and wrote their names on the stakes. In 2004, to recognise the area’s original occupiers, the reserve was named Barak Bushlands. William Barak, who lived from 1824 to 1903, was the last chief of the Yarra Yarra tribe of the Wurundjeri-willam people. Traces of these original inhabitants remain in scar trees (bark sections removed to make a shield or canoe). That same year the Friends’ group was a finalist in the prestigious Federal Government, Banksia Environmental Awards. The Friends have also participated in Clean Up Australia, removing tonnes of rubbish and regularly testing the billabong, wetland and creek, for pollutants. For years the Friends, together with the Australian Platypus Conservancy, have tagged, measured and checked the health of platypuses from the Diamond and Mullum Mullum Creeks. With Latrobe University the Friends have conducted night walks to view owls, possums, bats and sugar gliders. Challenges for the council and the Friends continue with a large rabbit population, some vandalism, weed eradication and maintenance. However, thanks to this community effort, locals can now escape confined urban living on small blocks of land and enjoy the beauty of indigenous plants and animals. Working together has also strengthened the local community,This collection of almost 130 photos about places and people within the Shire of Nillumbik, an urban and rural municipality in Melbourne's north, contributes to an understanding of the history of the Shire. Published in 2008 immediately prior to the Black Saturday bushfires of February 7, 2009, it documents sites that were impacted, and in some cases destroyed by the fires. It includes photographs taken especially for the publication, creating a unique time capsule representing the Shire in the early 21st century. It remains the most recent comprehenesive publication devoted to the Shire's history connecting local residents to the past. nillumbik now and then (marshall-king) collection, barak bushlands, diamond creek (creek), eltham -
 City of Ballarat
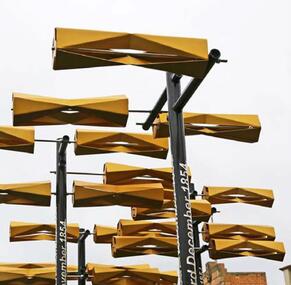
Artwork, other - Public Artwork, Aaron Robinson et al, Flow by Holly Grace and Aaron Robinson, 2014
Water is key to a thriving community and it is through the representation of water Flow enlivens the space at Bakery Hill. Historically ‘water races’ ran through the valleys of the Greater Ballarat area unearthing the minerals that forged prosperity and wealth. This water still flows today unearthing new possibilities for the community. Possibilities focusing on sustainability, ecology, health and prosperity. Flowing over the site a series of kinetic turbines flutter in the wind creating a contemporary water race. The interactive elements offer visual stimulation enticing people to connect with the artwork and in turn the surrounding spaces. Bakery Hill has great historical significance. It’s connection to the Eureka Stockade and the series of events that were to unfold during the 1850’s was to become the turning point in Australian political history. The placement of each turbine is to mirror a point of history in the timeline of events that occurred during the Eureka Stockade. The Water Race is a symbol of possibilities, the ones created by history and those of modern society. It is a visual timeline that can be read by traversing the site. The connecting turbines that flow and turn in sync are a representation of time passing and the interconnectedness of history with the community that surrounds it. The gateway to Bridge Mall is framed through the placement of each turbine allowing the sense of prosperity and wealth to flow through to the surrounding community. This gateway also references the significance of Bakery Hill reinvigorating the historical site by reconnecting it back to its town centre. The artwork is of aesthetic and historical significance to the people of BallaratTwelve steel turbines set on poles with dates attached and a large bronze 'timeline' plaqueFLOW/ Plotting the motion of Wind, Water, History and Time/ by Holly Grace and Aaron Robinson/ This site has great historical significance. It’s connection to the Eureka Stockade and the series of events that unfolded in the 1850’s was to become the turning point in Australian history. The placement of each turbine within this artwork mirrors a point of history in the events that led up to the Eureka Stockade. It is a visual timeline that can be read by traversing the site. The connecting turbines that flow and turn in sync are a representation of time passing. They are a symbol of the community’s connection to their history. 1851 June James Esmond makes the first discovery of gold in Victoria at Clunes./ 1st July The Port Phillip District separates from New South Wales and becomes the Colony of Victoria. It is still subject to British rule./ August Gold is discovered at Buninyong and at Golden Point, Ballarat. Lt-Governor La Trobe introduces the Gold Licence system in an attempt to reduce the colony’s debt./ 20th September First gold licences issued in Ballarat. / 1852 August/ Eureka Lead discovered on the Ballarat goldfields. December Charles La Trobe resigns as Lt-Governor but he is not relieved until 1854/ July – December/ Unrest builds on the various goldfields with protest meetings held in Bendigo and Castlemaine. Bendigo’s Red Ribbon Movement is active on the goldfields and the Bendigo Petition is presented to Lt-Governor./ December/ Charles Hotham is appointed Lt-Governor/ 1854 March/ A bill to extend the Elective Franchise is passed by the Legislative Council and sent to London for the assent of the British Parliament. 22nd June/ Lt-Governor Sir Charles Hotham arrives in Victoria. The colony faces mounting debt and Hotham orders weekly licence hunts in an attempt to increase income./ August/ Hotham is acclaimed during his visit to the Ballarat goldfield./ 13th September? Hotham orders twice-weekly licence hunts to further increase revenue./ September – October/ Miners are experiencing problems – no shafts bottomed on the Eureka Lead for five weeks./ 7th October/ James Scobie is murdered outside the Eureka Hotel. Many diggers believe that publican James Bentley is responsible./ 9th October/ At Scobie’s inquest, Bentley is acquitted, despite strong evidence of his guilt./ 10th October/ Father Smythe’s servant is beaten up by authorities and falsely arrested for not holding a licence./ 15th October/ Mass meeting of miners on Bakery Hill. Catholic miners meet after Mass. // 17th October/ A meeting of up to 10,000 Diggers is held near the Eureka Hotel to protest against Bentley’s acquittal. The meeting results in the burning of the hotel. Three diggers, Westerby, Fletcher and McIntyre, are arrested. Hotham dispatches 400 soldiers to Ballarat. 22nd October/ Another large meeting is held to address grievances. The Catholics send their leaders, Hayes, Kennedy and Manning to meet Rede. The Government Camp is under siege 11th November/ A public meeting on Bakery Hill results in the formal establishment of the Ballarat Reform League and adoption of the League’s proposals./ 21st November/ The enquiry into the Bentley affair is published. It recommends the dismissal of the judge and the establishment of a Royal Commission. 23rd November/ Westerby, Fletcher and McIntyre are convicted of burning the hotel. The Ballarat Reform League demands their release. 27th November/ A deputation from The Ballarat Reform League, including Humffray, Black and Kennedy, meet with Hotham to demand the release of the three prisoners. Hotham does not believe the diggers have the right to “demand anything”, Rede requests reinforcements in Ballarat. 28th November/ Miners attack the troop reinforcements and wagons passing near the Eureka diggings. A drummer boy is seriously wounded. 29th November/ A “Monster Meeting” attended by more than 10,000 diggers is held on Bakery Hill. The Southern Cross flag is flown for the first time. Peter Lalor addresses the miners and a number of diggers burn their licences. 30th November/ A licence hunt occurs in the morning at the order of Commissioner Rede. Another meeting of radical miners is held on Bakery Hill. Peter Lalor becomes leader of the diggers and calls for volunteers. Many diggers wear an oath to defend their rights and liberties under the Southern Cross flag. A number of diggers move to the Eureka Lead and start to erect a stockade. 3rd December In the early hours of Sunday morning 296 soldiers and police led by Captain Thomas proceed from the Government Camp to the Eureka Lead and attack the Stockade. 22 diggers and 7 military are officially listed as being killed. Many others are wounded. Approximately 120 diggers are arrested and marched to the Government Camp. 4th December/ Funeral of some of the fallen diggers and soldiers. Martial Law is proclaimed in Ballarat. Henry Seekamp, editor of the Ballarat Times is charged with seditious libel. 6th December/ Major General Sir Robert Nickle, commander-in-chief of the military forces in the Australian colonies, arrives in Ballarat. 9th December/ General Nickle repeals martial law. 14th December/ The Gold Fields Commission sits for the first time. 18th December/ The first Ballarat sitting of the Gold Fields Commission is held at Bath’s Hotel. 1855 23rd January/ Henry Seekamp is found guilt of sedition and sentenced to three months in prison. 22nd February/ The Eureka trials starts in Melbourne. February to March/ 13 prisoners are tried and acquitted amid great public rejoicing. 27th March Report of the Royal Commission recommends miners’ rights and significant reforms. 10th November/ Peter Lalor and John Basson Humffray are nominated for seats in the legislative Council. 31st December Sir Charles Hotham dies before his resignation takes effect. flow, aaron robinson, holly grace, public art, eureka stockade, bakery hill -
 Flagstaff Hill Maritime Museum and Village
Photograph - Portrait, about 1930
This photograph is of Angela Elizabeth Pearce, granddaughter of Tom Pearce - one of only 2 survivors from the shipwreck LOCH ARD. Angela Elizabeth Pearce had written in her grandfather’s Bible in childish handwriting the words “This Bible belongs to Angela E. Pearce”. Angela was born in England in 1925 and died in Woollahra N.S.W. in 1944, aged 19. She was one of Tom Pearce’s granddaughters. Her father, Robert Pearce was Tom’s second son. Tom Pearce is a famous hero, the rescuer of Eva Carmichael, the only other survivor from the 1878 shipwreck of the LOCH ARD. The Bible was given to Tom Pearce in recognition of his bravery at the wreck of the LOCH ARD. It is on loan to Flagstaff Hill Maritime Village from Parks Victoria. The ‘official’ inscription in the Bible reads, “Presented to Mr Thomas Pearce, In recognition of invaluable service performed in saving life when the Loch Ard was wrecked off the coast of Australia., by the Loyal Orange Institution of Victoria, Protestant Hall, Melbourne, August 1878” The photograph is accompanied by a letter, dated 4th May 2010, and is written by Angela’s cousin, Pamela Dormer of Devon, U.K. Her letter includes the words “Dear Mr Abbott, re Tom Pearce’s Bible, As you know, I have been in contact with Mr Peter Yarnis about means by which my grandfather’s presentation Bible can be released to be exhibited with his other effects, like the binoculars at Flagstaff Hill Museum. In the event that it will be, I have enclosed a photograph to join it. When my son Bill Dormer was at Port Campbell he was about to handle his great grandfather’s Bible and was surprised by a childish inscription opposite that of his presentation, which reads (I think this is the way it goes), THIS BIBLE IS THE PROPERTY OF ANGELA ELIZABETH PEARCE. Angela is my late cousin. Her father was Tom Pearce’s second son Robert Strasenburgh Pearce. I and my brother Raymond Simpson are the surviving grandchildren of Tom, by my mother Edith May Pearce, his only daughter. Angela and her mother, at the beginning of W.W.2, evacuated from England to Sydney, N.S.W. but sadly both were dead by early in the 60’s. Robert (my uncle Bobby) went down with his ship on the Malta Convoy, code named PEDESTAL, escorting with other ships the vital oil tanker OHIO to the island. (signed) Pamela Dormer” THE LOCH ARD’S STORY The sailing ship LOCH ARD was built in Glasgow in 1873 and belonged to the famous Loch Line. She made three trips to Australia and one trip to Calcutta before its final voyage which ended in tragedy near Port Campbell. The LOCH ARD left England on March 2, 1878, under the command of Captain Gibbs, a newly married, 29 year old. The ship carried a general cargo which reflected the affluence of Melbourne at the time. On board were straw hats, umbrella, perfumes, clay pipes, pianos, clocks, confectionary, linen and candles, as well as a heavier load of railway irons, cement, lead and copper. LOCH ARD also had a crew of 37, and 17 passengers. The voyage to Port Phillip was long but uneventful. At 3am on June 1, 1878, Captain Gibbs was expecting to see land and the passengers were becoming excited as they prepared to view their new homeland in the early morning. But LOCH ARD was running into a fog which greatly reduced visibility. Captain Gibbs was becoming anxious as there was no sign of land or the Cape Otway lighthouse. At 4am the fog lifted. A man aloft announced that he could see breakers. The sheer cliffs of Victoria's west coast came into view, and Captain Gibbs realised that the ship was much closer to them than expected. He ordered as much sail to be set as time would permit and then attempted to steer the boat out to sea. On coming head on into the wind, the ship lost momentum, the sails fell limp and LOCH ARD's bow swung back. Gibbs then ordered the anchors to be released in an attempt to hold its position. The anchors sank some 50 fathoms - but did not hold. By this time LOCH ARD was among the breakers, and the tall cliffs of Mutton Bird Island rose behind the ship. Just half a mile from the coast, the ship's bow was suddenly pulled around by the anchor. The captain tried to tack out to sea, but the ship struck a reef running out from Mutton Bird Island. Waves broke over the ship and the top deck was loosened from the hull. The masts and rigging came crashing down knocking passengers and crew overboard. It took time to free the lifeboats and when one was finally launched, it crashed into the side of LOCH ARD and capsized. Tom Pearce, who had launched the boat, managed to cling to its overturned hull and shelter beneath it. He drifted out to sea and then on the flood tide came into what is now known as LOCH ARD Gorge. He swam to shore, bruised and dazed and found a cave in which to shelter. Some of the crew stayed below deck to shelter from the falling rigging but drowned when the ship slipped off the reef into deeper water. Eva Carmichael had raced onto deck to find out what was happening only to be confronted by towering cliffs looming above the stricken ship. In all the chaos, Captain Gibbs grabbed Eva and said, "if you are saved Eva, let my dear wife know that I died like a sailor". That was the last Eva Carmichael saw of the captain. She was swept off the ship by a huge wave. Eva saw Tom Pearce on a small rocky beach and yelled to attract his attention. He dived in and swam to the exhausted woman and dragged her to shore. He took her to the cave and broke open a case of brandy which had washed up on the beach. He opened a bottle to revive the unconscious woman. A few hours later Tom scaled a cliff in search of help. He followed hoof prints and came by chance, upon two men from nearby Glenample Station three and a half miles away. In a state of exhaustion, he told the men of the tragedy. Tom returned to the gorge while the two men rode back to the station to get help. By the time they reached LOCH ARD Gorge, it was cold and dark. The two shipwreck survivors were taken to Glenample Station to recover. Eva stayed at the station for six weeks before returning to Ireland, this time by steamship. In Melbourne, Tom Pearce received a hero's welcome. He was presented with the first gold medal of the Royal Humane Society of Victoria and a £1000 cheque from the Victorian Government. Concerts were performed to honour the young man's bravery and to raise money for those who lost family in the LOCH ARD disaster. The media of the time had created one of Australia's first media celebrities. Everyone followed the story of Tom Pearce and Eva Carmichael with great interest and were disappointed when the two went their separate ways. It was felt by many that Tom should have proposed to Eva - given they had spent an evening together unsupervised in the cave and had drunk brandy to keep warm. Coleman Jacobs composed the music “The Young Hero Schottische” and dedicated it, by permission, to Mr. Thomas R. (Tom) Pearce. The sheet music was published in 1878 by the Messieurs Roberts, professors of dancing etc. Melbourne. It was on sale for 3/- (3 shillings) and in aid of the “LOCH ARD” fund. [This is Coleman Jacobs’ only surviving musical work Coleman Jacobs, accomplished pianist, musical performer, singer, composer, professor of music and music teacher, was born in 1827 and died on 4 July 1885, aged 58 years. Coleman Jacobs was buried in the Melbourne Cemetery (grave 461, Church of England section).] The wreck of LOCH ARD still lies at the base of Mutton Bird Island and much of the cargo has been salvaged. Some was washed up into what is now known as LOCH ARD Gorge following the shipwreck. Cargo and artefacts have also been illegally salvaged over many years before protective legislation was introduced. The photographic is of significance because of Tom Pearce and his association with the disaster of the LOCH ARD shipwreck, which is of State significance ― Victorian Heritage Register S417 Flagstaff Hill’s collection of artefacts from LOCH ARD is significant for being one of the largest collections of artefacts from this shipwreck in Victoria. It is significant for its association with the shipwreck, which is on the Victorian Heritage Register (VHR S417). The collection is significant because of the relationship between the objects, as together they have a high potential to interpret the story of the LOCH ARD. The LOCH ARD collection is archaeologically significant as the remains of a large international passenger and cargo ship. The LOCH ARD collection is historically significant for representing aspects of Victoria’s shipping history and its potential to interpret sub-theme 1.5 of Victoria’s Framework of Historical Themes (living with natural processes). The collection is also historically significant for its association with the LOCH ARD, which was one of the worst and best known shipwrecks in Victoria’s history. Photograph, sepia coloured, with accompanying letter. The photograph is a portrait of a young girl in a short sleeved top with a flower on her left shoulder. The girl is "Angela Elizabeth Pearce, granddaughter of Tom Pearce" as inscribed on back of photograph. Tom Pearce was one of two survivors of the 1878 shipwreck LOCH ARD. Included with the photograph is a letter from its donor, Pamela Joan Dormer, other granddaughter of Tom Pearce. The letter dated 4th May 2010 explains the connection between Angela Pearce and Tom Pearce's Bible.Back of photograph, written in blue pen “ANGELA ELIZABETH PEARCE / TOM PEARCE’S GRANDAUGHTER / PHOTO PRESENTED BY / HIS OTHER GRANDAUGHTER / PAMELA JOAN DORMER / 2010” Letter from Pamela Dormer verifying the connection between Angela Pearce and Tom Pearce’s Bible.flagstaff hill, warrnambool, shipwrecked coast, flagstaff hill maritime museum, maritime museum, shipwreck coast, flagstaff hill maritime village, great ocean road, angela pearce, tom pearce, thomas r pearce, eva carmichael, loch ard shipwreck, tom pearce bible, loch ard presentation bible, hero tom pearce, loyal orange institution of victoria, royal humane society of victoria, mutton bird island, coleman jacobs, the young hero schottische -
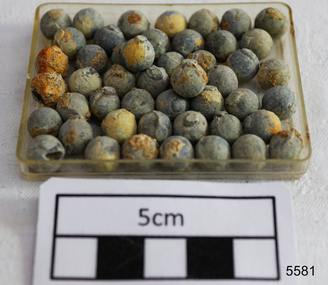 Flagstaff Hill Maritime Museum and Village
Weapon - Lead shot, Before 1878
The objects are a sample of medium caliber lead shot raised by Flagstaff Hill divers from the Loch Ard shipwreck site in 1976. Included in the vessel’s cargo manifest were 22 tonnes of lead shot, packed into her holds in cloth bags and wooden casks. These 49 pieces of 7 mm diameter lead shot are identical in size and smoothness. Each one also bears the same slightly raised square of residual metal left behind by the process of pouring molten lead into individual but identical moulds through a small (square) opening. These pieces of shot can be compared with contrast pieces in the Maritime Village collection, which are examples of shot tower pellet production; an industrial technique more suited to the creation of uniformly spherical balls that do not need subsequent trimming. In conventional shot tower production, lead is heated in a cauldron at the top of a 150-160 feet tower, and poured through a copper lattice that divides the metal into falling droplets. As these droplets fall, they spin into small spheres and gradually cool, before finishing in a pool of water at the bottom of the tower. However the maximum size of lead shot, and the economic efficiency of shot tower production, is limited by the practical height of the drop. Larger diameter lead shot must fall further in order to cool evenly and sufficiently to avoid shape distortion on hitting the water at the base. This sample of larger 7 mm lead shot, although mass produced, appears to have been manufactured under the traditional and more labour intensive mould system. They are therefore distinct from the other samples of smaller gauged and shot tower produced lead shot that were being imported on the Loch Ard . In terms of metallurgical technology these 7 mm shot are more closely related to an artifact in our Collection (No. 5241) — a forged set of pincers or pliers with two facing cups at the end. When the pincers are closed, the cups join to form a single mould. Molten lead is poured through a small (circular) opening left at the top of the mould. When cooled the pincers are opened, breaking the mould and releasing the lead shot. The excess metal left over from the pouring operation at the top of the ball is then trimmed off using the scissor like cutting edges on the inner side of the pliers handles. In this manner, individual shooters were able to make their own ammunition for their shotguns. History of the Loch Ard: The Loch Ard got it’s name from ”Loch Ard” a loch which lies to the west of Aberfoyle, and to the east of Loch Lomond. It means "high lake" in Scottish Gaelic.The vessel belonged to the famous Loch Line which sailed many vessels from England to Australia. The Loch Ard was built in Glasgow by Barclay, Curdle and Co. in 1873, the vessel was a three-masted square-rigged iron sailing ship that measured 79.87 meters in length, 11.58 m in width, and 7 m in depth with a gross tonnage of 1693 tons with a mainmast that measured a massive 45.7 m in height. Loch Ard made three trips to Australia and one trip to Calcutta before its fateful voyage. Loch Ard left England on March 2, 1878, under the command of 29-year-old Captain Gibbs, who was newly married. The ship was bound for Melbourne with a crew of 37, plus 17 passengers. The general cargo reflected the affluence of Melbourne at the time. Onboard were straw hats, umbrella, perfumes, clay pipes, pianos, clocks, confectionery, linen and candles, as well as a heavier load of railway irons, cement, lead and copper. There were other items included that were intended for display in the Melbourne International Exhibition of 1880. The voyage to Port Phillip was long but uneventful. Then at 3 am on June 1, 1878, Captain Gibbs was expecting to see land. But the Loch Ard was running into a fog which greatly reduced visibility. Captain Gibbs was becoming anxious as there was no sign of land or the Cape Otway lighthouse. At 4 am the fog lifted and a lookout aloft announced that he could see breakers. The sheer cliffs of Victoria's west coast came into view, and Captain Gibbs realised that the ship was much closer to them than expected. He ordered as much sail to be set as time would permit and then attempted to steer the vessel out to sea. On coming head-on into the wind, the ship lost momentum, the sails fell limp and Loch Ard's bow swung back towards land. Gibbs then ordered the anchors to be released in an attempt to hold its position. The anchors sank some 50 fathoms - but did not hold. By this time the ship was among the breakers and the tall cliffs of Mutton Bird Island rose behind. Just half a mile from the coast, the ship's bow was suddenly pulled around by the anchor. The captain tried to tack out to sea, but the ship struck a reef at the base of Mutton Bird Island, near Port Campbell. Waves subsequently broke over the ship and the top deck became loosened from the hull. The masts and rigging came crashing down knocking passengers and crew overboard. When a lifeboat was finally launched, it crashed into the side of Loch Ard and capsized. Tom Pearce, who had launched the boat, managed to cling to its overturned hull and shelter beneath it. He drifted out to sea and then on the flood tide came into what is now known as Loch Ard Gorge. He swam to shore, bruised and dazed, and found a cave in which to shelter. Some of the crew stayed below deck to shelter from the falling rigging but drowned when the ship slipped off the reef into deeper water. Eva Carmichael a passenger had raced onto the deck to find out what was happening only to be confronted by towering cliffs looming above the stricken ship. In all the chaos, Captain Gibbs grabbed Eva and said, "If you are saved Eva, let my dear wife know that I died like a sailor". That was the last Eva Carmichael saw of the captain. She was swept off the ship by a huge wave. Eva saw Tom Pearce on a small rocky beach and yelled to attract his attention. He dived in and swam to the exhausted woman and dragged her to shore. He took her to the cave and broke the open case of brandy which had washed up on the beach. He opened a bottle to revive the unconscious woman. A few hours later Tom scaled a cliff in search of help. He followed hoof prints and came by chance upon two men from nearby Glenample Station three and a half miles away. In a complete state of exhaustion, he told the men of the tragedy. Tom then returned to the gorge while the two men rode back to the station to get help. By the time they reached Loch Ard Gorge, it was cold and dark. The two shipwreck survivors were taken to Glenample Station to recover. Eva stayed at the station for six weeks before returning to Ireland by steamship. In Melbourne, Tom Pearce received a hero's welcome. He was presented with the first gold medal of the Royal Humane Society of Victoria and a £1000 cheque from the Victorian Government. Concerts were performed to honour the young man's bravery and to raise money for those who lost family in the disaster. Of the 54 crew members and passengers on board, only two survived: the apprentice, Tom Pearce and the young woman passenger, Eva Carmichael, who lost her family in the tragedy. Ten days after the Loch Ard tragedy, salvage rights to the wreck were sold at auction for £2,120. Cargo valued at £3,000 was salvaged and placed on the beach, but most washed back into the sea when another storm developed. The wreck of Loch Ard still lies at the base of Mutton Bird Island. Much of the cargo has now been salvaged and some items were washed up into Loch Ard Gorge. Cargo and artefacts have also been illegally salvaged over many years before protective legislation was introduced in March 1982. One of the most unlikely pieces of cargo to have survived the shipwreck was a Minton majolica peacock- one of only nine in the world. The peacock was destined for the Melbourne 1880 International Exhibition in. It had been well packed, which gave it adequate protection during the violent storm. Today the Minton peacock can be seen at the Flagstaff Hill Maritime Museum in Warrnambool. From Australia's most dramatic shipwreck it has now become Australia's most valuable shipwreck artifact and is one of very few 'objects' on the Victorian State Heritage Register. The shipwreck of the Loch Ard is of significance for Victoria and is registered on the Victorian Heritage Register Ref S 417. Flagstaff Hill has a varied collection of artefacts from Loch Ard and its collection is significant for being one of the largest accumulation of artefacts from this notable Victorian shipwreck. The collections object is to also give us a snapshot into history so we are able to interpret the story of this tragic event. The collection is also archaeologically significant as it represents aspects of Victoria's shipping history that allows us to interpret Victoria's social and historical themes of the time. The collections historically significance is that it is associated unfortunately with the worst and best-known shipwreck in Victoria's history. A quantity of forty-nine (49) loose round lead shot of 7 mm diameter retrieved from the wreck of the Loch Ard. All are smooth round spheres with the same small raised square of excess lead on one face.flagstaff hill, warrnambool, shipwrecked coast, flagstaff hill maritime museum, maritime museum, shipwreck coast, flagstaff hill maritime village, great ocean road, loch line, loch ard, captain gibbs, eva carmichael, tom pearce, glenample station, mutton bird island, loch ard gorge, shipwreck artefact, shot, lead shot, shot towers, shot mould, colonial imports, practical metallurgy -
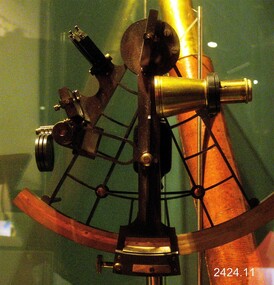 Flagstaff Hill Maritime Museum and Village
Instrument - Sextant, Late 20th Century
In 1941, the scientific instrument manufacturing firms of Henry Hughes & Son Ltd, London, England, and Kelvin Bottomley & Baird Ltd, Glasgow, Scotland, came together to form Kelvin & Hughes Ltd. Kelvin Company History: The origins of the company lie in the highly successful and strictly informal relationship between William Thomson (1824-1907), Professor of Natural Philosophy at Glasgow University from 1846-1899 and James White, a Glasgow optical maker. James White (1824-1884) founded the firm of James White, an optical instrument maker in Glasgow in 1850 and was involved in supplying and mending apparatus for Thomson university laboratory and working with him on experimental constructions. White was declared bankrupt in August 1861 and released several months later. In 1870, White was largely responsible for equipping William Thomson laboratory in the new University premises at Gilmore hill. From 1876, he was producing accurate compasses for metal ships to Thomson design during this period and this became an important part of his business in the last years of his life. He was also involved in the production of sophisticated-sounding machinery that Thomson had designed to address problems encountered laying cables at sea, helping to make possible the first transatlantic cable connection. At the same time, he continued to make a whole range of more conventional instruments such as telescopes, microscopes and surveying equipment. White's association with Thomson continued until he died. After his death, his business continued under the same name, being administered by Matthew Edwards (until 1891 when he left to set up his own company. Thomson who became Sir William Thomson and then Baron Kelvin of Largs in 1892, continued to maintain his interest in the business after James White's death. In 1884 raising most of the capital needed to construct and equip new workshops in Cambridge Street, Glasgow. At these premises, the company continued to make the compass Thomson had designed during the 1870s and to supply it in some quantity, especially to the Admiralty. At the same time, the firm became increasingly involved in the design, production and sale of electrical apparatus. In 1899, Lord Kelvin resigned from his University chair and became, in 1900, a director in the newly formed limited liability company Kelvin & James White Ltd which had acquired the business of James White. At the same time Kelvin's nephew, James Thomson Bottomley (1845-1926), joined the firm. In 1904, a London branch office was opened which by 1915 had become known as Kelvin, White & Hutton Ltd. Kelvin & James White Ltd underwent a further change of name in 1913, becoming Kelvin Bottomley & Baird Ltd. Hughes Company History: Henry Hughes & Sons were founded in 1838 in London as a maker of chronographic and scientific instruments. The firm was incorporated as “Henry Hughes & Sons Ltd” in 1903. In 1923, the company produced its first recording echo sounder and in 1935 a controlling interest in the company was acquired by S Smith & Son Ltd resulting in the development and production of marine and aircraft instruments. Following the London office's destruction in the Blitz of 1941, a collaboration was entered into with Kelvin, Bottomley & Baird Ltd resulting in the establishing “Marine Instruments Ltd”. Following the formal amalgamation of Kelvin, Bottomley & Baird Ltd and Henry Hughes & Sons Ltd in 1947 to form Kelvin & Hughes Ltd. Marine Instruments Ltd then acted as regional agents in the UK for Kelvin & Hughes Ltd who were essentially now a part of Smith's Industries Ltd founded in 1944 and the successors of S. Smith & Son Ltd. Kelvin & Hughes Ltd went on to develop various marine radar and echo sounders supplying the Ministry of Transport, and later the Ministry of Defence. The firm was liquidated in 1966 but the name was continued as Kelvin Hughes, a division of the Smiths Group. In 2002, Kelvin Hughes continues to produce and develop marine instruments for commercial and military. G. Falconer Company History: G Falconer (Hong Kong Ltd) appear to have had a retail presence in Hong Kong since 1885, according to the company website, and currently have a shop in the Peninsula Hotel. G Falconer was the Hong Kong selling agent for several British companies. Ross Ltd of 111 New Bond St London was one and the other was Kelvins Nautical Instruments. Falconers were primarily watchmakers, jewellers and diamond merchants.They were also agents for Admiralty Charts, Ross binoculars and telescopes, and sold English Silverware and High Class English Jewellery. In 1928 the company was operating from the Union Building opposite the Hong Kong general post office. It is unclear if the item is an original Sextant made by Kelvin prior to his amalgamation with Henry Hughes & Sons in 1941 as Kelvin appears to have only made compasses up to this date. If the Sextant can be established that it was made by Kelvin then it is very significant and a rare item made for and distributed through their Hong Kong selling agents G Falconer Ltd. There are many Sextants advertised for sale stating "Kelvin & Hughes 1917 model sextant". These can be regarded as replicas as the company was not formed until 1941 and production of marine instruments was not fully under way until after the war in 1947. Further investigation needs to be undertaken to accurately determine the provenance of this item. As the writer currently has the impression that the subject object was possibly made by Kelvin and Hughes in the mid to late 20th century or is a replica made by an unknown maker in the late 1970s. Purchased as an exhibition of marine navigational instruments for the Flagstaff Hill museum. The Sextant is a brass apparatus with filters and telescope lens, and comes with a wooden felt lined storage box. It is a doubly reflecting navigation instrument that measures the angular distance between two visible objects. The primary use of a sextant is to measure the angle between an astronomical object and the horizon for the purposes of celestial navigation.G Falconer and Co. Hong Kong (retailers of nautical equipmentflagstaff hill, warrnambool, shipwrecked-coast, flagstaff-hill, flagstaff-hill-maritime-museum, maritime-museum, shipwreck-coast, flagstaff-hill-maritime-village, sextant, kelvin & hughes ltd, hong kong, navigational instrument, g falconer, mariner's quadrants -
 Ballarat and District Irish Association
Image, Daniel O'Connell, the Great Irish Agitator, c1864, c1864
Daniel O’Connell was born near Cahirciveen, Co. Kerry, on 6 August 1775. His wealthy childless uncle adopted him at an early age and brought him up at Derrynane. He spoke Irish and was interested in the traditional culture of song and story still strong in Kerry at the time. He also understood how the rural mind worked which served him well in later years. In 1791 he was sent to school at St. Omer and Douai and what he saw there of the French Revolution left him with a life-long hatred of violence. He read law at Lincoln’s Inn (1794 -96) and continued his studies in Dublin where he was called to bar in 1798. He had soon built up an enormous practice. The 1798 rising and the terrible butchery that followed it confirmed his horror of violence. While he approved of the principles of the United Irishmen, their call for reform and for Catholic Emancipation, he disagreed with their methods. In 1815 O’Connell criticised harshly the Dublin corporation. O’Connell was challenged to a duel by one member D’Esterre. In the exchange of shots D’Esterre was killed and O’Connell vowed never to fight again. O’Connell was soon drawn into political action. Hopes of Catholic emancipation had been raised by promises given while the act of union was being passed. In 1823, O’Connell founded the Catholic Association. The aim of the organisation was to use all the legal means available to secure emancipation. It turned into a mass crusade with the support of the Catholic clergy. All members of the association paid a membership of a penny a month (the Catholic rent). This helped to raise a large fund. The Clare election in 1828 was a turning point. O’Connell, with the support of the forty-shilling freeholders, managed a huge victory against the government candidate. He was well supported by the clergy whose influence on the poor uneducated peasant class was enormous. The polling took place in Ennis at the old courthouse where the O’Connell monument now stands. At the final count, O’Connell was elected by a majority of about eleven hundred votes. The ascendancy party had suffered its first big knock since 1798. The whole country was aflame. The British Government feared a rising and granted Catholic emancipation in April 1829. The franchise was, however, raised to 10 pounds which excluded the forty-shilling freeholders. O’Connell was now the undisputed leader in Ireland and he gave up his practice at the bar to devote his time entirely to politics. At the King’s insistence, O’Connell was not allowed to take his seat until he had been re-elected for Clare. In February 1830, O’Connell became the first Catholic in modern history to sit in the House of Commons. For the rest of his life, he was supported by “The O’Connell Tribute”, a public collection out of which O’Connell paid all his expenses. O’Connell now decided to concentrate on winning repeal of the act of union and getting an Irish parliament for the Irish people. British political leaders feared repeal as they did not fear emancipation. They saw repeal of the Act of Union as the first step in the break-up of the act of union, as the spirit of the repeal movement was revived when the young Ireland writers wrote about it in the Nation. In 1841, O’Connell was elected Lord Mayor of Dublin and in 1843 the subscriptions to his Repeal Association, the Repeal “Rent” came to 48,400 pounds. He now began to organise monster meetings throughout the country. It is thought that three-quarters of a million people gathered on the hill of Tara to hear the man they called the “Liberator”. The government became alarmed at the strength of the Repeal Movement and a meeting which O’Connell had planned for 8 October 1843 in Clontarf, Dublin was banned. Huge crowds were already on their way when O’Connell called off the meeting to avoid the risk of violence and bloodshed. He was charged with conspiracy, arrested and sentenced to a year in jail and a fine of 2,000 pounds. The sentence was set aside after O’Connell had been three months in prison. When he was released he continued with his campaign for repeal. However, a turning point had been reached. The tactics that had won emancipation had failed. O’Connell was now almost seventy, his health failing and he had no clear plan for future action. There was discontent within the Repeal Association and the Young Irelanders withdrew. There was also some failure in the potato crop in the 1840’s, a sign of things to come in the Great Famine of 1845-1847. Aware of the fact that he had failed with his great goal, (the Repeal Movement), O’Connell left Ireland for the last time in January 1847. He made a touching speech in the House of Commons in which he appealed for aid for his country. In March, acting on the advice of his doctor, he set out to Italy. Following his death in Genoa on 15 May 1847, his body was returned to Ireland and buried in Glasnevin Cemetery. [http://www.clarelibrary.ie/eolas/coclare/people/daniel.htm, accessed 13/12/2013]Portrait of a man known as Daniel O'Connell.ballarat irish, daniel o'connell, o'connell -
 8th/13th Victorian Mounted Rifles Regimental Collection
Born digital image, September 1993
The Dibb Report into mainland defence of Australia,1986, among other things identified the requirement for protection of key assets in Northern Australia and the possibility of involving Army Reserve (Ares) units in this thus releasing regular forces for offensive operations. Dibb also pointed out that this defined role would result in a huge lift in Ares morale. In June 1988, the 3rd Division (3Div) conducted a Tactical Exercise without Troops (TEWT), Exercise ‘Distant Trumpet’ in the Katherine- Darwin area to study problems associated with defence against low level incursions against Tindal RAAF Base. Exercise ‘Northern Explorer’ followed in October of that year when units of the 3Div including A Squadron 8/13 Victorian Mounted Rifles sent patrol groups to get a first taste of environment and conditions. Post-Exercise reports had to include recommendations re: health, equipment and adaptation of Standing Operating Procedures (SOPs) in preparation for the new role deploying to Northern Australia. The first deployment by 8/13 Vistorian Mounted Rifles was in 1988. Deployments continued i following years. In September 1993, 3 Troop (Wangaratta) VMR Squadron 4/19 PWLH commanded by Captain Kelvin Robertson deployed to NT. The training began with airfield defence at Tindal followed by a 1000km recon into Arnhem Land in four Landrovers. The troop reported on the conditions of the roads, airfields, bridges (mainly causeways) resources such as fuel supplies in the towns and infrastructure. Each troop taking different route. 3 Troop had the Northern route through Kakadu National park across the East Alligator River to Oenpelli then to Maningrida and Ramangining and south to the Central Arnhem Road and back to Tindal Air force Base. Kelvin Robertson enlisted on 6 April 1981 at Cobram where Lieutenant Dan Wyborn was the troop leader at 2 Troop A Squadron 8th/13th Victorian Mounted Rifles (2TP A SQN 8/13 VMR). He completed the Initial Employment Training Course (IET) and then an M113A1 driver’s course in March 1982. Course Senior Instructor (SI) was Captain (CAPT) John McLean and wing instructor Warrant Officer Class 2 (WO2) Mick Baxter (ex-Driving & Servicing Wing instructor at the School of Armour). He served with 2TP at Cobram as a trooper Driver/Signaller until June 1982 when he was selected for officer training. He served two years as an Officer Cadet in Course 21 at Officer Cadet Training Unit (OCTU) graduating in June 1984. He returned to 8/13 VMR and completed the 1/85 Army Reserve (ARES) Regimental Officers Basic Course (ROBC Reconnaissance), then was posted immediately as 1 TP LDR for the Hay Booligal Annual Field Exercise (AFX). In 1985 he took command of 2TP at Cobram until Nov 1987 when he transferred to C Squadron First Armoured Regiment (CSQN 1AR). This began six months full time duty in which Lieutenant (LT) Robertson completed the regular army 1/88 (ROBC Tank), and then served as CSQN's first and only ARES Leopard Tank TP LDR until the next ARES LT was trained up as 2TP LDR. He later served as the CSQN Liaison Officer (LO) on the First Brigade (1 Bde) exercise ‘Predators Advance’ and as a staff officer on a Second Division (2Div) exercise. In Jan 1991 he studied at the Reserve Command and Staff College (RCSC). Upon completion of Grade 3 he was promoted to CAPT and transferred back to a reconnaissance troop, 3TP VMR SQN 4th/19th Prince of Wales’s Light Horse (4/19PWLH) at Wangaratta. CAPT Robertson transferred to the Inactive List in 1994, but in 2011 returned to the Active List serving as Operations Captain (OPS CAPT) at Regimental Headquarters (RHQ) 12th/16th Hunter River Lancers (12/16 HRL)and later Second-In-Command (2IC) Tamworth-based Operations Support Squadron (OPSPT SQN), and at 9 day exercises at Singleton range and an exercise at Townville High Range in Protective Mobility Vehicle (PMV) Bushmasters. In 2013 after completing the ARES Grade 3 Staff Officers course in Brisbane he returned home to Jerilderie and served as 2IC A SQN 4/19 PWLH based at Latchford Barracks Bonegilla. He was awarded the Defence Long Service Medal (DLSM) in 2014. Highlights of his career included being Parade Commander for the 75th anniversary Beersheba parade in Canberra on 31 October 1992. The guard, drawn from the VMR SQN 4/19 PWLH represented the 4th Light Horse Regiment, a participant of the Charge. Then twenty years later, 2012, he was invited to speak at the Quirindi Anzac Day ceremony. On this occasion he was serving with 12/16 HRL, so in two ceremonies, 20 years apart, he had represented both the 4th LHR and the 12th LHR, the two lead Regiments that charged Beersheba. CAPT Robertson was placed on the Inactive List again in 2015. Illustrates Reserve training in NT.Colour image of soldier with landscape in background being Captain Kelvin Robertson 3 Troop Leader (Wangaratta) VMR Squadron 4th/19th Prince of Wales’s Light Horse Regiment looking out over the Arafura swamp near the Maningrida to Ramingining road in Arnhem Land during exercise in the Northern Territory, September 1993.tindal, robertson -
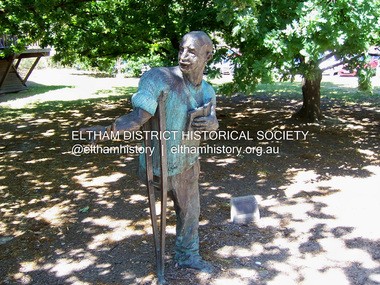 Eltham District Historical Society Inc
Photograph - Digital Photograph, Marguerite Marshall, Alan Marshall by Marcus Skipper (1995) outside Eltham Library, Panther Place, Eltham, 11 October 2006
Sculture in bronze of Alan Marshall by Marcus Skipper, 1995 Alan Marshall, AM., O.B.E., Hon.LL,D. (1902-1984) was born at Noorat, Victoria and became one of Australia's most famous authors. His association with the Eltham area began in 1920 when he started his first job as a junior clerk at the Eltham Shire Offices, Kangaroo Ground. In the 1940's he spent some time living at Research. From 1955 he lived in Eltham for nearly 20 years. Disabilities resulting from polio as a young child did not prevent a wide range of experiences. Alan's occupations have been listed as clerk, night watchman, fortune teller, freelance journalist and author. He has been patron of many disadvantaged Children's Societies. Alan's books are numerous and include novels, short stories, children's books, history and travel. Among the best known are his autobiographies "I Can Jump Puddles" and "This is the Grass". Others include "These are My People", "Ourselves Writ Strange", "People of the Dreamtime"; "The Gay Provider" and "Wild Red Horses". In 1971 he wrote the Centenary History of the Shire of Eltham, "Pioneers and Painters". Covered under National Trust of Australia (Victoria), State significance. Published: Nillumbik Now and Then / Marguerite Marshall 2008; photographs Alan King with Marguerite Marshall.; p159 Outside the Eltham Library a bronze figure of a short one-legged man with a crutch invites people to the world of literature. The bronze statue, by Marcus Skipper, is of author Alan Marshall, who is famed for his autobiography I Can Jump Puddles, about growing up and overcoming the effects of polio. That plucky little boy later lived in the Nillumbik district for more than 50 years, and on his death in 1984, was buried in the Nillumbik Cemetery at Diamond Creek. Although a hugely successful author, his grave is modest with only a tiny boulder and simple bronze plaque on a grassed plot. From 1955 to 1972 Marshall lived in a tiny fibro-cement bungalow at the rear of a house at Park West Road, Eltham, owned by his older sister, Elsie McConnell. It was there that he wrote most of his autobiographical trilogy and his history of the former Eltham Shire, Pioneers and Painters. His long association with Eltham Shire began in 1918 when his family moved to Diamond Creek. Then in 1920 he began work as a junior clerk at the Eltham Shire Offices on Main Road, Kangaroo Ground near the Yarra Glen Road, while boarding at the hotel next door. Marshall later bought a block of land in Research, which had three bark huts. In one of these he wrote his first book These Are My People. He later sold the land but lived in a caravan there and in 1955 wrote I Can Jump Puddles.1 Proud of its citizen, the Eltham Shire named a park after Marshall at the corner of Main Road and Leanne Drive, Eltham. In 1985 the Shire initiated the Alan Marshall Short Story Award. It was Marshall’s early life in the country that taught him to live courageously in spite of his crippling polio, and he inspired many. This informed his writing – full of courage, championing the battler and love of the bush. Alan Marshall was born in 1902 at Noorat in Western Victoria, as the only son of Billy a drover, horse breaker, hawker and then general store owner. At the age of six, Marshall contracted infantile paralysis and was later hospitalised in Colac for 18 months. With his father’s encouragement, Marshall learnt to swim, wrestle and box, ride a bicycle (downhill), ride a horse and drive a car. Marshall won a scholarship to Stott’s Correspondence College to study accountancy. To help him continue his studies and find employment, his family bought 12 acres (4.8ha), in Ryans Road, Diamond Creek, opposite Windmill Court. There they ran cows, some poultry and an orchard. But life with a disability and during the Depression was hard for Marshall, who for 20 years, endured long periods of unemployment and loneliness and was often exploited at work.2 However, life improved in the 1930s, when he published short stories and articles in newspapers and magazines, including a column of advice to the lovelorn, which he wrote for nearly 20 years. At age 42 Marshall published his first book and in the next 30 years he published more than 20. His most successful book was I Can Jump Puddles, which sold more than three million copies internationally. It was made into a film, released in 1971, by Czechoslovakian director Karel Kachyna. Marshall was one of the first Australians to write about Aborigines who called him Gurrawilla - teller of tales - when he lived with them in Arnhem Land for eight months.3 In 1941 Marshall married Olive Dixon, with whom he had two daughters, Catherine and Jennifer. Marshall and Olive divorced in 1957. In 1972 Marshall was awarded an OBE for his work with the handicapped. He was also awarded an Honorary Doctor of Laws by Melbourne University, an Order of Australia for services to literature and the Soviet Order of Friendship of Peoples.This collection of almost 130 photos about places and people within the Shire of Nillumbik, an urban and rural municipality in Melbourne's north, contributes to an understanding of the history of the Shire. Published in 2008 immediately prior to the Black Saturday bushfires of February 7, 2009, it documents sites that were impacted, and in some cases destroyed by the fires. It includes photographs taken especially for the publication, creating a unique time capsule representing the Shire in the early 21st century. It remains the most recent comprehenesive publication devoted to the Shire's history connecting local residents to the past. nillumbik now and then (marshall-king) collection, alan marshall, art in public places, eltham, eltham library, marcus skipper, panther place, public art, sculpture -
 Eltham District Historical Society Inc
Document - Sales Brochure, Dallas Price Homes Pty Ltd, Eltham Hub: A Unique New Entry To Eltham's Town Centre; the facts about this multi purpose development, 1996
Produced by Contour Consultants Australia Pty Ltd on behalf of Dallas Price Homes Pty Ltd as part of the planning process for redevelopment of the former Eltham Shire Office site at 895 Main Road. In 1963 the Shire of Eltham purchased the Shillinglaw property of approximately 2 acres in Main Road, Eltham for the widening of Main Road and as a site for new Council offices. This land, which contained the Shillinglaw Cottage (c1878-80), was the remaining section of the Shillinglaw family holding that originally comprised 30 acres, being Lot 90 of Holloway's 1851 subdivision. Eltham Council intended to demolish this cottage, but through extensive community action it was saved, funds were raised, and it was relocated to the current site adjacent to the Eltham Library. The new Eltham Shire Offices opened in 1965 were designed to ensure retention of the three Italian Cypress trees that were located outside the Shillinglaw Cottage. In 1971 the building was extended at the southern end to provide additional space, including for the Eltham Library and Council's Engineering Department. Renovations were undertaken to the offices during 1987. The Victorian State Government commenced to restructure local government in 1994, which resulted in the establishment of the Shire of Nillumbik and the cessation of the Shire of Eltham. This new Nillumbik Shire Council was headed by government appointed commissioners, who decided in 1995 to put the former Eltham Shire offices on the market. Eventually in June 1996 the property was sold for $1.1 million and the building was subsequently demolished. A planning application for the site was then submitted to Nillumbik Shire Council in September 1996 for construction of a 24-hour service station, convenience store, cafe/takeaway food premises, a retail facility and community facility. There were many objections to this proposed development and in controversial circumstances a planning permit was granted by the Nillumbik Shire Council commissioners. After protracted actions involving a planning panel and a planning advisory committee, established by the Minister for Local Government, the proposal was eventually rejected as not satisfying the requirements of the planning scheme. In December 1997 the purchaser withdrew from the contract of sale, just prior to Council announcing a withdrawal from the contract. While there have been a number of possible development proposals considered by subsequent Nillumbik Shire Councils, this site has remained vacant since July 1996. TIMELINE (Prepared by Jim Connor, Eltham District Historical Society- March 2018- Based on press, council and personal records) June 1996 - Eltham Shire offices sold to Dallas Price Homes for $1.1 million. July 1996 - Shire office building demolished against community's wishes. Council claimed building riddled with asbestos. September 1996 - Planning application submitted to Nillumbik Shire Council to construct on the site a 24 hours Shell service station, convenience store, Hungry Jacks café/takeaway food premises, a retail facility and community facility. 213 objections and petition of over 1400 signatures received. Minister for Planning and Local Government orders an independent investigation into valuation and sale. 9 October 1996 - Permit granted by Nillumbik Shire Council commissioners, in controversial circumstances. A Planning Special Committee consisting of 3 commissioners and 3 community representatives considered 32 community objections. One commissioner declared a potential conflict of interest so only 2 commissioners were able to vote. After hearing all objections, the community representatives moved a foreshadowed motion to refuse a permit. The commissioners then closed the meeting, formerly opened a council meeting (for about a minute) and approved the application. October 1996 - Community members appealed planning decision to Administrative Appeals Tribunal. November 1996 -Minister for Planning and Local Government Robert McClelland calls appeal in and directs MT to refer this 'major policy issue' to the Governor in Council. February 1997 - Planning panel (Dimity Reed and Margaret Pitt) established to consider submissions. March 1997 - New council elected with five councillors. April 1997 - Three of the five new councillors vote to fight Commissioner's decision to grant a permit. April 1997 - Planning panel (Dimity Reed and Margaret Pitt) conducts hearings at Nillumbik Shire offices. June 1997 -Planning panel rejected Dallas Price Homes proposal as being 'totally inappropriate' for the site and recommends the site be rezoned for 'public purposes'. July 1997 - Dallas Price Homes threatened to sue Council and individual councillors. October 1997 - Report released of an Advisory Committee (Paul Jerome) established by the Minister for Planning and Local Government. Committee considered Dallas Price Homes proposal and an alternative concept plan proposal by Council for a gallery, workshop, offices and cinema community-based development. Advisory Committee recommended Dallas Price Homes proposal be rejected as not satisfying the requirements of the planning scheme and recommended further testing of the financial viability of Council's proposal. December 1997 - Dallas Price Homes withdrew from the contract of sale, just prior to Council announcing a withdrawal from the contract, which expired on 28th November and was not renewed by either side, after previously being extended twice pending a decision by the Minister. Council had to pay developer $58,000 for demolition costs. February 1998 - Dallas Price Homes application rejected by Planning and Local Government Minister. October 1998 - Nillumbik Councillors suspended and an Administrator appointed (until March 1999). The demolition of the former Shire of Eltham offices and proposed sale and development driven by the Commissioners for Nillumbik Shire Council brought the community together in substantial protest at the infrigement of ratepayers democratic say in local government and ciommunity assets combined with protests about inappropraite development of Eltham's Gateway. This issue led to the formation of the Eltham Community Action Group which still operates strongly today (2023) on behalf of the community to ensure appropriate development within the community.895 main road, commissioners, dallas price homes, development application, eltham hub, hungry jacks, nillumbik shire council, re-zoning, shell service station, town planning, eltham gateway, eltham gateway action group, eltham shire offices, shillinglaw cottage, shillinglaw farm, shillinglaw trees, jim connor collection -
 Eltham District Historical Society Inc
Newspaper clipping, Romantic, charming . . . ''SUNNYBROOK', Diamond Valley Local, 31 March, 1954, p4, 1954
Romantic, charming . . . ''SUNNYBROOK'' ON the slope of a hill on the East side of Bolton street and overlooking willows that trail gracefully in a creeklet which shows no great haste to blend with Diamond Creek and so to the Yarra, there stands a great old-fashioned home. Outwardly it speaks of past opulence rather than beauty of design, but the velvet green lawns and the formal neatly weeded rose gardens, the well established trees, tennis courts, wisteria covered pergolas and the great curved fronds of old palms produce an atmosphere that cannot be built-up in less than decades. Here is irresistible old-world charm. The jangle of today cannot penetrate ... it is a place to remember ... a place where events to be remembered have a perfect setting ... it is "Sunnybrook." From the neighbouring ‘Beranto Lodge’ Mrs. Lenne can catch glimpses of ‘Sunnybrook,’ but the old home is well hidden from all quarters and only the faultlessly kept lawn can be seen by the curious. Like many other people, Mrs. Lenne was curious. Who can blame her. ‘Sunnybrook’ is a name to conjure with in Eltham. When the elderly men of the township were young bucks ‘Sunnybrook’ stood alone, a proud home that was known and established. Amongst the simple homes of the valley of the Diamond Creek, ‘Sunnybrook’ was Queen. In the roistering days of the Diamond Valley, when Kangaroo Ground was the seat of the Shire and when five pubs dotted the road from Lower Plenty to the civic centre, ‘Sunnybrook’ was off the track of the boisterous and tipsy. ‘Sunnybrook’ is still off the beaten track . . . but only slightly so; it no longer looks over cow pastures, but the neat, newly built houses which dot the length of the Main Road. They are still no closer than half a mile and while these houses have sprung up the fine trees and shrubs have quietly closed in around the boundaries of ‘Sunnybrook' as if to keep the old place to itself. That is how it has become something to whet the curiosity. When the course of events put the place on the market Mrs. Lenne bought it. When a modern house is bought it is pliable in the sense that the owner moulds it according to personality. It can remain severe, utilitarian and with a little neglect soon run to an ugly shabbiness. But with old 'Sunnybrook' it is different. There is in existence a character indelibly written into every line of the place . . . it is a LOVE OF ENGLAND. Upon ‘Sunnybrook’ has been lavished the devoted love of England to such a degree that it must be seen. The gardens and lawns are formal, and though lovely and speaking of the leisure of past years they are not English . . . they are just lovely, with the beauty that only the long established seem to possess. It is inside ‘Sunnybrook’ that the intense love of England is seen. Years ago the home was bought by a Mr. Martin, who was getting on in years, as a home for his much younger wife. The couple spent thousands of pounds as well as endless care and imagination in the complete redecorating of their home. Oak panelling imported from England was built in. Huge fireplaces shed their Colonial appearance to be become the fireplaces of England . . . and they were so in every sense because they were also imported from England. One lovely specimen whose gracious lines are remarked upon by all who see it, is a certified antique of finest English Oak. Care was taken to see what hand made wrought iron light fittings were in keeping. The old place has three lounge, dining or living rooms according to taste and requirements, and all are bigger than the biggest attempted in a “big” modern home. This does not include an outside living space of ample proportions, all fine flywired in and enclosing a fernery. A turn of a tap and spray as fine as mist is released over the rockery. On a scorching summer day when no relief short of a swim could help ordinary people, the resident of ‘Sunnybrook’ found the coolness of a dell in which to sit and enjoy their evening meal. What is more, the temperature of the whole house could be reduced by merely turning on this extensive spray water system. Yes, comfort to luxury standard is built in. And what happens to 'Sunnybrook' now? Mrs Lenne is famous to thousands for her quite fabulous catering. Her home and her "Wanda Inn" at Hepburn Springs have long been a Mecca for those who want the different in catering . . . different in the sense that every client is treated as a friend, not a customer and the hospitality and attention one would give to an honoured friend is accorded. And the food! – ask anyone who has enjoyed the privilege. Ask those who attended the reception given to Mr. Menzies by Eltham Shire Council; ask those members of the Diamond Valley Chamber of Commerce who enjoyed it! [See EDHS_04736-1/2 https://victoriancollections.net.au/items/5d4c2fb521ea6727d892df72] There is only one word anyone ever uses . . . “unbelievable!” it must be seen and eaten to be believed. And ‘Sunnybrook’ will ring to the laughter, and offer its spaciousness for the fun of all who join in the happiest occasion in the life of those just married, whose wedding reception is intended to be “remembered.” Mrs. Lenne is a dynamic ball of energy whose enthusiasm is not to be brooked. She has acquired the home of her dreams. 13 March 2020 Note: Historian Stella M. Barber via the GSV members Forum cites that Clair Samwell and Doris Good ran a nursing home in Balwyn called Penquite (1946-1952). Prior to that the women had run a rest home called Beranto in Eltham. Single newsprint page separated rest of paperberanto lodge, bolton street, houses, mrs. lenne, prime minister, properties, robert gordon menzies, sunnybrook -
 Flagstaff Hill Maritime Museum and Village
Gestetner Machine, c. 1922 - 1929
This Gestetner Cyclostyle duplicating machine was invented and manufactured by David Gestetner. He claimed in 1922, once he had released several models, that if a Gestetner Durotype stencil was used together with his Cyclostyle machine, then 10,000 copies could be made from the one Durotype stencil, an amazing claim for office technology of that era. David Gestetner (1854-1939), was born in Csoma, Hungary. He has been called the “founder of the worldwide office copying and duplicator industry.). He moved to London and in 1879 filed his first copying patent. In 1881 he patented the Cyclostyle stylus (or pen), which was used in conjunction with his Cyclograph device for copying text and images, He established the Gestetner Cyclograph Company in England at this time (1881) to protect his inventions and to produce his products; stencils, stylos (stylus or pen) and ink rollers. HIs inventions included nail-clipper and the ball-point pen (although the latter is more commonly associated with Laszlo Biro). Gestetner’s patented Cyclograph duplicator was used with his Cyclostyle Stylus or pen to write or draw on special thin wax-coated stencil paper (originally used for kite making paper) in the following way; 1. The Cyclostyle stencil was placed on a lower, framed metal plate of the Cyclograph 2. An upper frame was clipped over the top 3. The Cyclostyle pen, with its tip being a small metal-spiked or toothed wheel, was used to write or draw on the stencil, punched small holes into the paper and removed the wax coating in those places 4. The upper frame and stencil was then removed and a piece of blank paper was placed onto the metal plate in the lower frame and the upper frame with stencil was replaced 5. A roller was given an even distribution of Cyclostyle ink and rolled by hand over the stencil in the frame. This forced the ink through the holes in the stencil to and made a copy of the stencil on the paper 6. The upper frame was raised, the printed paper removed and another blank sheet was put into place. The whole process was repeated until enough copies were made. Gestetner’s invention developed further in 1894, with a stencil that could be placed on a screen on a revolving drum. The drum was manually rotated, the stencil then wrapped around another drum and was fed between cloth-covered rollers on which ink was evenly spread. Each revolution of the drum forced ink through the holes in the stencil and transferred the ink onto paper that had been fed between rollers and pressed against the drum. The process was repeated for each page. The paper was still fed and removed manually in this earlier invention but became more automatic in later models. In 1902 Gestetner duplicator model 6 was put onto the market. This model included the improvement of an automatic paper feed that synchronised with the rotation of the stencil. The Gestetner machine was the first office printing machine. It was easily installed and it made exact copies of the sane document quickly, effectively and inexpensively. This changed the way offices operated, making information easily available to many more users. The machines were commonly used in small businesses, schools, churches, clubs and other organisations for the wide distribution of a wide variety of information in the form of worksheets, newsletters and more. In 1906 the Gestetner Works were opened in Tottenham Hale, North London, and thousands of people were employed there up until the 1970’s. Due to the fast growing success of the Gestetner Duplicator machines many international branches for sales and service centres were established. David Gestetner was succeeded by his son Sigmund, followed by his grandson’s David and Jonathan. Further advancement was made by using a manual typewriter with specifically designed stencils. The end product was a printed, typewritten copy similar to the print from newspapers and booklets. In the next few years there were further developments of this revolutionary invention. The Gestetner Cyclostyle duplicator in our Collection is dated c.1922 - 1929 and it uses Gestetner Durotype stencils The 1922 British Industries Fair’s catalogue contained advertising for the Gestetner Rotary Cyclostyle “The World’s Premier Duplicator”, demonstrated at Stand K 86.” A Notice at the foot of the advertisement’s page boasts "Important - D Gestetner's latest invention, the "Durotype" Stencil, enables you to obtain 10,000 copies from one original if desired. It contains no wax of any description, is indestructible, can be stored indefinitely and printed from as required” In 1929 the look of the Gestetner machines changed; American designer Raymond Loewy was invited by Gestetner to improve the look of his duplicators, resulting in a very streamlined appearance. Eventually, around 1960’s, offices replaced their Gestetner with small photocopying machines and printers. Gestetner took over ownership of other office machine companies over time, including Nashua, Rex Rotary, Hanimex and Savin and eventually all came under the holding company name of NRG (Nashuatech, Rex Rotary and Gestetner). In 1996 Ricoh acquired the Gestetner Company, and it was renamed the NRG Group. REFERENCES Cyclostyle, Stencil Duplicating Machines, antique Copying Machines, Early Office Museum, http://www.officemuseum.com/copy_machines.htm Duplicating machines, Wikipedia Duplicator, Collection online, Canada Science and Technology Museums Corporation http://techno-science.ca/en/collection-research/collection-item.php?id=1989.0229.001 Gestetner duplicators, Totterham-Summerhillroad.com http://tottenham-summerhillroad.com/gestetner_duplicators_tottenham.htm Gestetner Duplicator, V&A Museum http://collections.vam.ac.uk/item/O322014/gestetner-duplicator-duplicator-loewy-raymond-fernand/ Gestetner, Grace’s Guide to British Industrial History, http://www.gracesguide.co.uk/Gestetner Duplicating machines such as this one revolutionalised access to copies of printed material, changing the way that educational bodies, offices, small businesses and community clubs and charities operated.Duplicating machine, Gestetner Cyclostyle Durotype, a stencil-method duplicating machine with two rotating drums plus rollers. Hand operated, tabletop office machine. Front has folding Bakelite handle, oil filling hole, calibrating gauge with scale, and copy counting meter. Right side has printed manufacturer’s plate that slides out as a paper output tray. Left side has metal plate with protrusions and perforations, plus another similar plate that is detached. It also has a metal frame attached [that would have been used to hold a paper input board, adjusted for various sizes of paper]. Cover, metal, with folding wooden handle on top, attaches to base with metal clips. Inscriptions printed on machine, mostly in gold-coloured paint. Round metal manufacturing plate is stamped with Serial Number 95759. Made by D. Gestetner, London, c.1922-1929Maker’s plate “MANUFACTURED / BY / D. GESTETNER LTD, / No. 95759 / CYCLOSTYLE WORKS / TOTTENHAM HALE / LONDON, N” Copy counting meter shows “1 4 6 4 8 [space]“ copies. Calibrating gauge has divisions with numbers “0 1 2“, labelled “← [left arrow] “TO PRINT LOWER” and “→ [right arrow], TO PRINT HIGHER”. “The Gestetner”, “Cyclostyle”, “Gestetner” (Trade Mark), Right side print of manufacturing details includes “The / Gestetner / TRADE MARK” And “THE FOLLOWING TRAFE MARKS / - - - OF INK, STENCILS / - - - AND GUARANTEE OF PERFECT / - - - BOTH - - - AND MACHINE” and “CYCLOSTYLE / DUROTYPE / GESTETNER” and “D. Gestetner” flagstaff hill, warrnambool, shipwrecked coast, flagstaff hill maritime museum, maritime museum, shipwreck coast, flagstaff hill maritime village, great ocean road, office machine, copying machine, gestetner machine, duplicating machine, duplicator, stencil machine, gestetner cyclograph company, cyclograph, cyclostyle, d. gestetner ltd, gestetner durotype stencils, gestetner cyclostyle, printing machine, office technology, durotype stencils, david gestetner, raymond loewy, roneo, rotary duplicatorten, mimeo, mimeograph machine, roneograph copier -
 Flagstaff Hill Maritime Museum and Village
Photograph
HISTORY OF THE LOCH ARD The LOCH ARD belonged to the famous Loch Line which sailed many ships from England to Australia. Built in Glasgow by Barclay, Curdle and Co. in 1873, the LOCH ARD was a three-masted square rigged iron sailing ship. The ship measured 262ft 7" (79.87m) in length, 38ft (11.58m) in width, 23ft (7m) in depth and had a gross tonnage of 1693 tons. The LOCH ARD's main mast measured a massive 150ft (45.7m) in height. LOCH ARD made three trips to Australia and one trip to Calcutta before its final voyage. LOCH ARD left England on March 2, 1878, under the command of Captain Gibbs, a newly married, 29 year old. She was bound for Melbourne with a crew of 37, plus 17 passengers and a load of cargo. The general cargo reflected the affluence of Melbourne at the time. On board were straw hats, umbrella, perfumes, clay pipes, pianos, clocks, confectionary, linen and candles, as well as a heavier load of railway irons, cement, lead and copper. There were items included that intended for display in the Melbourne International Exhibition in 1880. The voyage to Port Phillip was long but uneventful. At 3am on June 1, 1878, Captain Gibbs was expecting to see land and the passengers were becoming excited as they prepared to view their new homeland in the early morning. But LOCH ARD was running into a fog which greatly reduced visibility. Captain Gibbs was becoming anxious as there was no sign of land or the Cape Otway lighthouse. At 4am the fog lifted. A man aloft announced that he could see breakers. The sheer cliffs of Victoria's west coast came into view, and Captain Gibbs realised that the ship was much closer to them than expected. He ordered as much sail to be set as time would permit and then attempted to steer the vessel out to sea. On coming head on into the wind, the ship lost momentum, the sails fell limp and LOCH ARD's bow swung back. Gibbs then ordered the anchors to be released in an attempt to hold its position. The anchors sank some 50 fathoms - but did not hold. By this time LOCH ARD was among the breakers and the tall cliffs of Mutton Bird Island rose behind the ship. Just half a mile from the coast, the ship's bow was suddenly pulled around by the anchor. The captain tried to tack out to sea, but the ship struck a reef at the base of Mutton Bird Island, near Port Campbell. Waves broke over the ship and the top deck was loosened from the hull. The masts and rigging came crashing down knocking passengers and crew overboard. When a lifeboat was finally launched, it crashed into the side of LOCH ARD and capsized. Tom Pearce, who had launched the boat, managed to cling to its overturned hull and shelter beneath it. He drifted out to sea and then on the flood tide came into what is now known as LOCH ARD Gorge. He swam to shore, bruised and dazed, and found a cave in which to shelter. Some of the crew stayed below deck to shelter from the falling rigging but drowned when the ship slipped off the reef into deeper water. Eva Carmichael had raced onto deck to find out what was happening only to be confronted by towering cliffs looming above the stricken ship. In all the chaos, Captain Gibbs grabbed Eva and said, "If you are saved Eva, let my dear wife know that I died like a sailor". That was the last Eva Carmichael saw of the captain. She was swept off the ship by a huge wave. Eva saw Tom Pearce on a small rocky beach and yelled to attract his attention. He dived in and swam to the exhausted woman and dragged her to shore. He took her to the cave and broke open case of brandy which had washed up on the beach. He opened a bottle to revive the unconscious woman. A few hours later Tom scaled a cliff in search of help. He followed hoof prints and came by chance upon two men from nearby Glenample Station three and a half miles away. In a state of exhaustion, he told the men of the tragedy. Tom returned to the gorge while the two men rode back to the station to get help. By the time they reached LOCH ARD Gorge, it was cold and dark. The two shipwreck survivors were taken to Glenample Station to recover. Eva stayed at the station for six weeks before returning to Ireland, this time by steamship. In Melbourne, Tom Pearce received a hero's welcome. He was presented with the first gold medal of the Royal Humane Society of Victoria and a £1000 cheque from the Victorian Government. Concerts were performed to honour the young man's bravery and to raise money for those who lost family in the LOCH ARD disaster. Of the 54 crew members and passengers on board, only two survived: the apprentice, Tom Pearce and the young woman passenger, Eva Carmichael, who lost all of her family in the tragedy. Ten days after the LOCH ARD tragedy, salvage rights to the wreck were sold at auction for £2,120. Cargo valued at £3,000 was salvaged and placed on the beach, but most washed back into the sea when another storm developed. The wreck of LOCH ARD still lies at the base of Mutton Bird Island. Much of the cargo has now been salvaged and some was washed up into what is now known as LOCH ARD Gorge. Cargo and artefacts have also been illegally salvaged over many years before protective legislation was introduced. One of the most unlikely pieces of cargo to have survived the shipwreck was a Minton porcelain peacock - one of only nine in the world. The peacock was destined for the Melbourne International Exhibition in 1880. It had been well packed, which gave it adequate protection during the violent storm. Today, the Minton peacock can be seen at the Flagstaff Hill Maritime Museum in Warrnambool. From Australia's most dramatic shipwreck it has now become Australia's most valuable shipwreck artefact and is one of very few 'objects' on the Victorian State Heritage Register. Flagstaff Hill’s collection of artefacts from LOCH ARD is significant for being one of the largest collections of artefacts from this shipwreck in Victoria. It is significant for its association with the shipwreck, which is on the Victorian Heritage Register (VHR S417). The collection is significant because of the relationship between the objects, as together they have a high potential to interpret the story of the LOCH ARD. The LOCH ARD collection is archaeologically significant as the remains of a large international passenger and cargo ship. The LOCH ARD collection is historically significant for representing aspects of Victoria’s shipping history and its potential to interpret sub-theme 1.5 of Victoria’s Framework of Historical Themes (living with natural processes). The collection is also historically significant for its association with the LOCH ARD, which was one of the worst and best known shipwrecks in Victoria’s history. Photograph of Loch Ard Gorge. Photograph taken some distance from the Gorge. Three men in the Gorge and outlines of steps can be seen. Right hand side of the photograph is written "Loch Ard Gorge"flagstaff hill, warrnambool, shipwrecked coast, flagstaff hill maritime museum, maritime museum, shipwreck coast, flagstaff hill maritime village, great ocean road, loch line, loch ard, captain gibbs, eva carmichael, tom pearce, glenample station, mutton bird island, loch ard gorge, photograph of loch ard gorge, photograph -
 Flagstaff Hill Maritime Museum and Village
Painting
HISTORY OF THE LOCH ARD The LOCH ARD belonged to the famous Loch Line which sailed many ships from England to Australia. Built in Glasgow by Barclay, Curdle and Co. in 1873, the LOCH ARD was a three-masted square rigged iron sailing ship. The ship measured 262ft 7" (79.87m) in length, 38ft (11.58m) in width, 23ft (7m) in depth and had a gross tonnage of 1693 tons. The LOCH ARD's main mast measured a massive 150ft (45.7m) in height. LOCH ARD made three trips to Australia and one trip to Calcutta before its final voyage. LOCH ARD left England on March 2, 1878, under the command of Captain Gibbs, a newly married, 29 year old. She was bound for Melbourne with a crew of 37, plus 17 passengers and a load of cargo. The general cargo reflected the affluence of Melbourne at the time. On board were straw hats, umbrella, perfumes, clay pipes, pianos, clocks, confectionary, linen and candles, as well as a heavier load of railway irons, cement, lead and copper. There were items included that intended for display in the Melbourne International Exhibition in 1880. The voyage to Port Phillip was long but uneventful. At 3am on June 1, 1878, Captain Gibbs was expecting to see land and the passengers were becoming excited as they prepared to view their new homeland in the early morning. But LOCH ARD was running into a fog which greatly reduced visibility. Captain Gibbs was becoming anxious as there was no sign of land or the Cape Otway lighthouse. At 4am the fog lifted. A man aloft announced that he could see breakers. The sheer cliffs of Victoria's west coast came into view, and Captain Gibbs realised that the ship was much closer to them than expected. He ordered as much sail to be set as time would permit and then attempted to steer the vessel out to sea. On coming head on into the wind, the ship lost momentum, the sails fell limp and LOCH ARD's bow swung back. Gibbs then ordered the anchors to be released in an attempt to hold its position. The anchors sank some 50 fathoms - but did not hold. By this time LOCH ARD was among the breakers and the tall cliffs of Mutton Bird Island rose behind the ship. Just half a mile from the coast, the ship's bow was suddenly pulled around by the anchor. The captain tried to tack out to sea, but the ship struck a reef at the base of Mutton Bird Island, near Port Campbell. Waves broke over the ship and the top deck was loosened from the hull. The masts and rigging came crashing down knocking passengers and crew overboard. When a lifeboat was finally launched, it crashed into the side of LOCH ARD and capsized. Tom Pearce, who had launched the boat, managed to cling to its overturned hull and shelter beneath it. He drifted out to sea and then on the flood tide came into what is now known as LOCH ARD Gorge. He swam to shore, bruised and dazed, and found a cave in which to shelter. Some of the crew stayed below deck to shelter from the falling rigging but drowned when the ship slipped off the reef into deeper water. Eva Carmichael had raced onto deck to find out what was happening only to be confronted by towering cliffs looming above the stricken ship. In all the chaos, Captain Gibbs grabbed Eva and said, "If you are saved Eva, let my dear wife know that I died like a sailor". That was the last Eva Carmichael saw of the captain. She was swept off the ship by a huge wave. Eva saw Tom Pearce on a small rocky beach and yelled to attract his attention. He dived in and swam to the exhausted woman and dragged her to shore. He took her to the cave and broke open case of brandy which had washed up on the beach. He opened a bottle to revive the unconscious woman. A few hours later Tom scaled a cliff in search of help. He followed hoof prints and came by chance upon two men from nearby Glenample Station three and a half miles away. In a state of exhaustion, he told the men of the tragedy. Tom returned to the gorge while the two men rode back to the station to get help. By the time they reached LOCH ARD Gorge, it was cold and dark. The two shipwreck survivors were taken to Glenample Station to recover. Eva stayed at the station for six weeks before returning to Ireland, this time by steamship. In Melbourne, Tom Pearce received a hero's welcome. He was presented with the first gold medal of the Royal Humane Society of Victoria and a £1000 cheque from the Victorian Government. Concerts were performed to honour the young man's bravery and to raise money for those who lost family in the LOCH ARD disaster. Of the 54 crew members and passengers on board, only two survived: the apprentice, Tom Pearce and the young woman passenger, Eva Carmichael, who lost all of her family in the tragedy. Ten days after the LOCH ARD tragedy, salvage rights to the wreck were sold at auction for £2,120. Cargo valued at £3,000 was salvaged and placed on the beach, but most washed back into the sea when another storm developed. The wreck of LOCH ARD still lies at the base of Mutton Bird Island. Much of the cargo has now been salvaged and some was washed up into what is now known as LOCH ARD Gorge. Cargo and artefacts have also been illegally salvaged over many years before protective legislation was introduced. One of the most unlikely pieces of cargo to have survived the shipwreck was a Minton porcelain peacock - one of only nine in the world. The peacock was destined for the Melbourne International Exhibition in 1880. It had been well packed, which gave it adequate protection during the violent storm. Today, the Minton peacock can be seen at the Flagstaff Hill Maritime Museum in Warrnambool. From Australia's most dramatic shipwreck it has now become Australia's most valuable shipwreck artefact and is one of very few 'objects' on the Victorian State Heritage Register. Flagstaff Hill’s collection of artefacts from LOCH ARD is significant for being one of the largest collections of artefacts from this shipwreck in Victoria. It is significant for its association with the shipwreck, which is on the Victorian Heritage Register (VHR S417). The collection is significant because of the relationship between the objects, as together they have a high potential to interpret the story of the LOCH ARD. The LOCH ARD collection is archaeologically significant as the remains of a large international passenger and cargo ship. The LOCH ARD collection is historically significant for representing aspects of Victoria’s shipping history and its potential to interpret sub-theme 1.5 of Victoria’s Framework of Historical Themes (living with natural processes). The collection is also historically significant for its association with the LOCH ARD, which was one of the worst and best known shipwrecks in Victoria’s history. Painting of The Loch Ard oil on board depicting wreck. It shows stormy sea and coastline in background. Ship appears to be capsized.flagstaff hill, warrnambool, shipwrecked coast, flagstaff hill maritime museum, maritime museum, shipwreck coast, flagstaff hill maritime village, great ocean road, loch line, loch ard, captain gibbs, eva carmichael, tom pearce, glenample station, mutton bird island, loch ard gorge, painting -
 Flagstaff Hill Maritime Museum and Village
Photograph
HISTORY OF THE LOCH ARD The LOCH ARD belonged to the famous Loch Line which sailed many ships from England to Australia. Built in Glasgow by Barclay, Curdle and Co. in 1873, the LOCH ARD was a three-masted square rigged iron sailing ship. The ship measured 262ft 7" (79.87m) in length, 38ft (11.58m) in width, 23ft (7m) in depth and had a gross tonnage of 1693 tons. The LOCH ARD's main mast measured a massive 150ft (45.7m) in height. LOCH ARD made three trips to Australia and one trip to Calcutta before its final voyage. LOCH ARD left England on March 2, 1878, under the command of Captain Gibbs, a newly married, 29 year old. She was bound for Melbourne with a crew of 37, plus 17 passengers and a load of cargo. The general cargo reflected the affluence of Melbourne at the time. On board were straw hats, umbrella, perfumes, clay pipes, pianos, clocks, confectionary, linen and candles, as well as a heavier load of railway irons, cement, lead and copper. There were items included that intended for display in the Melbourne International Exhibition in 1880. The voyage to Port Phillip was long but uneventful. At 3am on June 1, 1878, Captain Gibbs was expecting to see land and the passengers were becoming excited as they prepared to view their new homeland in the early morning. But LOCH ARD was running into a fog which greatly reduced visibility. Captain Gibbs was becoming anxious as there was no sign of land or the Cape Otway lighthouse. At 4am the fog lifted. A man aloft announced that he could see breakers. The sheer cliffs of Victoria's west coast came into view, and Captain Gibbs realised that the ship was much closer to them than expected. He ordered as much sail to be set as time would permit and then attempted to steer the vessel out to sea. On coming head on into the wind, the ship lost momentum, the sails fell limp and LOCH ARD's bow swung back. Gibbs then ordered the anchors to be released in an attempt to hold its position. The anchors sank some 50 fathoms - but did not hold. By this time LOCH ARD was among the breakers and the tall cliffs of Mutton Bird Island rose behind the ship. Just half a mile from the coast, the ship's bow was suddenly pulled around by the anchor. The captain tried to tack out to sea, but the ship struck a reef at the base of Mutton Bird Island, near Port Campbell. Waves broke over the ship and the top deck was loosened from the hull. The masts and rigging came crashing down knocking passengers and crew overboard. When a lifeboat was finally launched, it crashed into the side of LOCH ARD and capsized. Tom Pearce, who had launched the boat, managed to cling to its overturned hull and shelter beneath it. He drifted out to sea and then on the flood tide came into what is now known as LOCH ARD Gorge. He swam to shore, bruised and dazed, and found a cave in which to shelter. Some of the crew stayed below deck to shelter from the falling rigging but drowned when the ship slipped off the reef into deeper water. Eva Carmichael had raced onto deck to find out what was happening only to be confronted by towering cliffs looming above the stricken ship. In all the chaos, Captain Gibbs grabbed Eva and said, "If you are saved Eva, let my dear wife know that I died like a sailor". That was the last Eva Carmichael saw of the captain. She was swept off the ship by a huge wave. Eva saw Tom Pearce on a small rocky beach and yelled to attract his attention. He dived in and swam to the exhausted woman and dragged her to shore. He took her to the cave and broke open case of brandy which had washed up on the beach. He opened a bottle to revive the unconscious woman. A few hours later Tom scaled a cliff in search of help. He followed hoof prints and came by chance upon two men from nearby Glenample Station three and a half miles away. In a state of exhaustion, he told the men of the tragedy. Tom returned to the gorge while the two men rode back to the station to get help. By the time they reached LOCH ARD Gorge, it was cold and dark. The two shipwreck survivors were taken to Glenample Station to recover. Eva stayed at the station for six weeks before returning to Ireland, this time by steamship. In Melbourne, Tom Pearce received a hero's welcome. He was presented with the first gold medal of the Royal Humane Society of Victoria and a £1000 cheque from the Victorian Government. Concerts were performed to honour the young man's bravery and to raise money for those who lost family in the LOCH ARD disaster. Of the 54 crew members and passengers on board, only two survived: the apprentice, Tom Pearce and the young woman passenger, Eva Carmichael, who lost all of her family in the tragedy. Ten days after the LOCH ARD tragedy, salvage rights to the wreck were sold at auction for £2,120. Cargo valued at £3,000 was salvaged and placed on the beach, but most washed back into the sea when another storm developed. The wreck of LOCH ARD still lies at the base of Mutton Bird Island. Much of the cargo has now been salvaged and some was washed up into what is now known as LOCH ARD Gorge. Cargo and artefacts have also been illegally salvaged over many years before protective legislation was introduced. One of the most unlikely pieces of cargo to have survived the shipwreck was a Minton porcelain peacock - one of only nine in the world. The peacock was destined for the Melbourne International Exhibition in 1880. It had been well packed, which gave it adequate protection during the violent storm. Today, the Minton peacock can be seen at the Flagstaff Hill Maritime Museum in Warrnambool. From Australia's most dramatic shipwreck it has now become Australia's most valuable shipwreck artefact and is one of very few 'objects' on the Victorian State Heritage Register. Flagstaff Hill’s collection of artefacts from LOCH ARD is significant for being one of the largest collections of artefacts from this shipwreck in Victoria. It is significant for its association with the shipwreck, which is on the Victorian Heritage Register (VHR S417). The collection is significant because of the relationship between the objects, as together they have a high potential to interpret the story of the LOCH ARD. The LOCH ARD collection is archaeologically significant as the remains of a large international passenger and cargo ship. The LOCH ARD collection is historically significant for representing aspects of Victoria’s shipping history and its potential to interpret sub-theme 1.5 of Victoria’s Framework of Historical Themes (living with natural processes). The collection is also historically significant for its association with the LOCH ARD, which was one of the worst and best known shipwrecks in Victoria’s history. Photograph of Loch Ard Gorge c1900flagstaff hill, warrnambool, shipwrecked coast, flagstaff hill maritime museum, maritime museum, shipwreck coast, flagstaff hill maritime village, great ocean road, loch line, loch ard, captain gibbs, eva carmichael, tom pearce, glenample station, mutton bird island, loch ard gorge, photograph of loch ard gorge, photograph -
 Flagstaff Hill Maritime Museum and Village
Calendar
HISTORY OF THE LOCH ARD The LOCH ARD belonged to the famous Loch Line which sailed many ships from England to Australia. Built in Glasgow by Barclay, Curdle and Co. in 1873, the LOCH ARD was a three-masted square rigged iron sailing ship. The ship measured 262ft 7" (79.87m) in length, 38ft (11.58m) in width, 23ft (7m) in depth and had a gross tonnage of 1693 tons. The LOCH ARD's main mast measured a massive 150ft (45.7m) in height. LOCH ARD made three trips to Australia and one trip to Calcutta before its final voyage. LOCH ARD left England on March 2, 1878, under the command of Captain Gibbs, a newly married, 29 year old. She was bound for Melbourne with a crew of 37, plus 17 passengers and a load of cargo. The general cargo reflected the affluence of Melbourne at the time. On board were straw hats, umbrella, perfumes, clay pipes, pianos, clocks, confectionary, linen and candles, as well as a heavier load of railway irons, cement, lead and copper. There were items included that intended for display in the Melbourne International Exhibition in 1880. The voyage to Port Phillip was long but uneventful. At 3am on June 1, 1878, Captain Gibbs was expecting to see land and the passengers were becoming excited as they prepared to view their new homeland in the early morning. But LOCH ARD was running into a fog which greatly reduced visibility. Captain Gibbs was becoming anxious as there was no sign of land or the Cape Otway lighthouse. At 4am the fog lifted. A man aloft announced that he could see breakers. The sheer cliffs of Victoria's west coast came into view, and Captain Gibbs realised that the ship was much closer to them than expected. He ordered as much sail to be set as time would permit and then attempted to steer the vessel out to sea. On coming head on into the wind, the ship lost momentum, the sails fell limp and LOCH ARD's bow swung back. Gibbs then ordered the anchors to be released in an attempt to hold its position. The anchors sank some 50 fathoms - but did not hold. By this time LOCH ARD was among the breakers and the tall cliffs of Mutton Bird Island rose behind the ship. Just half a mile from the coast, the ship's bow was suddenly pulled around by the anchor. The captain tried to tack out to sea, but the ship struck a reef at the base of Mutton Bird Island, near Port Campbell. Waves broke over the ship and the top deck was loosened from the hull. The masts and rigging came crashing down knocking passengers and crew overboard. When a lifeboat was finally launched, it crashed into the side of LOCH ARD and capsized. Tom Pearce, who had launched the boat, managed to cling to its overturned hull and shelter beneath it. He drifted out to sea and then on the flood tide came into what is now known as LOCH ARD Gorge. He swam to shore, bruised and dazed, and found a cave in which to shelter. Some of the crew stayed below deck to shelter from the falling rigging but drowned when the ship slipped off the reef into deeper water. Eva Carmichael had raced onto deck to find out what was happening only to be confronted by towering cliffs looming above the stricken ship. In all the chaos, Captain Gibbs grabbed Eva and said, "If you are saved Eva, let my dear wife know that I died like a sailor". That was the last Eva Carmichael saw of the captain. She was swept off the ship by a huge wave. Eva saw Tom Pearce on a small rocky beach and yelled to attract his attention. He dived in and swam to the exhausted woman and dragged her to shore. He took her to the cave and broke open case of brandy which had washed up on the beach. He opened a bottle to revive the unconscious woman. A few hours later Tom scaled a cliff in search of help. He followed hoof prints and came by chance upon two men from nearby Glenample Station three and a half miles away. In a state of exhaustion, he told the men of the tragedy. Tom returned to the gorge while the two men rode back to the station to get help. By the time they reached LOCH ARD Gorge, it was cold and dark. The two shipwreck survivors were taken to Glenample Station to recover. Eva stayed at the station for six weeks before returning to Ireland, this time by steamship. In Melbourne, Tom Pearce received a hero's welcome. He was presented with the first gold medal of the Royal Humane Society of Victoria and a £1000 cheque from the Victorian Government. Concerts were performed to honour the young man's bravery and to raise money for those who lost family in the LOCH ARD disaster. Of the 54 crew members and passengers on board, only two survived: the apprentice, Tom Pearce and the young woman passenger, Eva Carmichael, who lost all of her family in the tragedy. Ten days after the LOCH ARD tragedy, salvage rights to the wreck were sold at auction for £2,120. Cargo valued at £3,000 was salvaged and placed on the beach, but most washed back into the sea when another storm developed. The wreck of LOCH ARD still lies at the base of Mutton Bird Island. Much of the cargo has now been salvaged and some was washed up into what is now known as LOCH ARD Gorge. Cargo and artefacts have also been illegally salvaged over many years before protective legislation was introduced. One of the most unlikely pieces of cargo to have survived the shipwreck was a Minton porcelain peacock - one of only nine in the world. The peacock was destined for the Melbourne International Exhibition in 1880. It had been well packed, which gave it adequate protection during the violent storm. Today, the Minton peacock can be seen at the Flagstaff Hill Maritime Museum in Warrnambool. From Australia's most dramatic shipwreck it has now become Australia's most valuable shipwreck artefact and is one of very few 'objects' on the Victorian State Heritage Register. Flagstaff Hill’s collection of artefacts from LOCH ARD is significant for being one of the largest collections of artefacts from this shipwreck in Victoria. It is significant for its association with the shipwreck, which is on the Victorian Heritage Register (VHR S417). The collection is significant because of the relationship between the objects, as together they have a high potential to interpret the story of the LOCH ARD. The LOCH ARD collection is archaeologically significant as the remains of a large international passenger and cargo ship. The LOCH ARD collection is historically significant for representing aspects of Victoria’s shipping history and its potential to interpret sub-theme 1.5 of Victoria’s Framework of Historical Themes (living with natural processes). The collection is also historically significant for its association with the LOCH ARD, which was one of the worst and best known shipwrecks in Victoria’s history. Calendar printed by Terang Express for December 1923 with picture of Loch Ard Gorge and survivors of wreck and also story of the episode. Has some large tears in it.flagstaff hill, warrnambool, shipwrecked coast, flagstaff hill maritime museum, maritime museum, shipwreck coast, flagstaff hill maritime village, great ocean road, loch line, loch ard, captain gibbs, eva carmichael, tom pearce, glenample station, mutton bird island, loch ard gorge, calendar, terang express -
 Flagstaff Hill Maritime Museum and Village
Lid
Ref: LA 2 29 274 HISTORY OF THE LOCH ARD The LOCH ARD belonged to the famous Loch Line which sailed many ships from England to Australia. Built in Glasgow by Barclay, Curdle and Co. in 1873, the LOCH ARD was a three-masted square rigged iron sailing ship. The ship measured 262ft 7" (79.87m) in length, 38ft (11.58m) in width, 23ft (7m) in depth and had a gross tonnage of 1693 tons. The LOCH ARD's main mast measured a massive 150ft (45.7m) in height. LOCH ARD made three trips to Australia and one trip to Calcutta before its final voyage. LOCH ARD left England on March 2, 1878, under the command of Captain Gibbs, a newly married, 29 year old. She was bound for Melbourne with a crew of 37, plus 17 passengers and a load of cargo. The general cargo reflected the affluence of Melbourne at the time. On board were straw hats, umbrella, perfumes, clay pipes, pianos, clocks, confectionary, linen and candles, as well as a heavier load of railway irons, cement, lead and copper. There were items included that intended for display in the Melbourne International Exhibition in 1880. The voyage to Port Phillip was long but uneventful. At 3am on June 1, 1878, Captain Gibbs was expecting to see land and the passengers were becoming excited as they prepared to view their new homeland in the early morning. But LOCH ARD was running into a fog which greatly reduced visibility. Captain Gibbs was becoming anxious as there was no sign of land or the Cape Otway lighthouse. At 4am the fog lifted. A man aloft announced that he could see breakers. The sheer cliffs of Victoria's west coast came into view, and Captain Gibbs realised that the ship was much closer to them than expected. He ordered as much sail to be set as time would permit and then attempted to steer the vessel out to sea. On coming head on into the wind, the ship lost momentum, the sails fell limp and LOCH ARD's bow swung back. Gibbs then ordered the anchors to be released in an attempt to hold its position. The anchors sank some 50 fathoms - but did not hold. By this time LOCH ARD was among the breakers and the tall cliffs of Mutton Bird Island rose behind the ship. Just half a mile from the coast, the ship's bow was suddenly pulled around by the anchor. The captain tried to tack out to sea, but the ship struck a reef at the base of Mutton Bird Island, near Port Campbell. Waves broke over the ship and the top deck was loosened from the hull. The masts and rigging came crashing down knocking passengers and crew overboard. When a lifeboat was finally launched, it crashed into the side of LOCH ARD and capsized. Tom Pearce, who had launched the boat, managed to cling to its overturned hull and shelter beneath it. He drifted out to sea and then on the flood tide came into what is now known as LOCH ARD Gorge. He swam to shore, bruised and dazed, and found a cave in which to shelter. Some of the crew stayed below deck to shelter from the falling rigging but drowned when the ship slipped off the reef into deeper water. Eva Carmichael had raced onto deck to find out what was happening only to be confronted by towering cliffs looming above the stricken ship. In all the chaos, Captain Gibbs grabbed Eva and said, "If you are saved Eva, let my dear wife know that I died like a sailor". That was the last Eva Carmichael saw of the captain. She was swept off the ship by a huge wave. Eva saw Tom Pearce on a small rocky beach and yelled to attract his attention. He dived in and swam to the exhausted woman and dragged her to shore. He took her to the cave and broke open case of brandy which had washed up on the beach. He opened a bottle to revive the unconscious woman. A few hours later Tom scaled a cliff in search of help. He followed hoof prints and came by chance upon two men from nearby Glenample Station three and a half miles away. In a state of exhaustion, he told the men of the tragedy. Tom returned to the gorge while the two men rode back to the station to get help. By the time they reached LOCH ARD Gorge, it was cold and dark. The two shipwreck survivors were taken to Glenample Station to recover. Eva stayed at the station for six weeks before returning to Ireland, this time by steamship. In Melbourne, Tom Pearce received a hero's welcome. He was presented with the first gold medal of the Royal Humane Society of Victoria and a £1000 cheque from the Victorian Government. Concerts were performed to honour the young man's bravery and to raise money for those who lost family in the LOCH ARD disaster. Of the 54 crew members and passengers on board, only two survived: the apprentice, Tom Pearce and the young woman passenger, Eva Carmichael, who lost all of her family in the tragedy. Ten days after the LOCH ARD tragedy, salvage rights to the wreck were sold at auction for £2,120. Cargo valued at £3,000 was salvaged and placed on the beach, but most washed back into the sea when another storm developed. The wreck of LOCH ARD still lies at the base of Mutton Bird Island. Much of the cargo has now been salvaged and some was washed up into what is now known as LOCH ARD Gorge. Cargo and artefacts have also been illegally salvaged over many years before protective legislation was introduced. One of the most unlikely pieces of cargo to have survived the shipwreck was a Minton porcelain peacock - one of only nine in the world. The peacock was destined for the Melbourne International Exhibition in 1880. It had been well packed, which gave it adequate protection during the violent storm. Today, the Minton peacock can be seen at the Flagstaff Hill Maritime Museum in Warrnambool. From Australia's most dramatic shipwreck it has now become Australia's most valuable shipwreck artefact and is one of very few 'objects' on the Victorian State Heritage Register. Flagstaff Hill’s collection of artefacts from LOCH ARD is significant for being one of the largest collections of artefacts from this shipwreck in Victoria. It is significant for its association with the shipwreck, which is on the Victorian Heritage Register (VHR S417). The collection is significant because of the relationship between the objects, as together they have a high potential to interpret the story of the LOCH ARD. The LOCH ARD collection is archaeologically significant as the remains of a large international passenger and cargo ship. The LOCH ARD collection is historically significant for representing aspects of Victoria’s shipping history and its potential to interpret sub-theme 1.5 of Victoria’s Framework of Historical Themes (living with natural processes). The collection is also historically significant for its association with the LOCH ARD, which was one of the worst and best known shipwrecks in Victoria’s history. Lid from child's tea set. Porcelain. Lid has small chip and some slight iron stains. Recovered from the wreck of the Loch Ard. Artefact reg No LA/16.flagstaff hill, warrnambool, shipwrecked-coast, flagstaff-hill, flagstaff-hill-maritime-museum, maritime-museum, shipwreck-coast, flagstaff-hill-maritime-village -
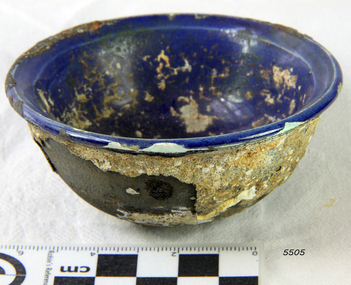 Flagstaff Hill Maritime Museum and Village
Deflector
HISTORY OF THE LOCH ARD The LOCH ARD belonged to the famous Loch Line which sailed many ships from England to Australia. Built in Glasgow by Barclay, Curdle and Co. in 1873, the LOCH ARD was a three-masted square rigged iron sailing ship. The ship measured 262ft 7" (79.87m) in length, 38ft (11.58m) in width, 23ft (7m) in depth and had a gross tonnage of 1693 tons. The LOCH ARD's main mast measured a massive 150ft (45.7m) in height. LOCH ARD made three trips to Australia and one trip to Calcutta before its final voyage. LOCH ARD left England on March 2, 1878, under the command of Captain Gibbs, a newly married, 29 year old. She was bound for Melbourne with a crew of 37, plus 17 passengers and a load of cargo. The general cargo reflected the affluence of Melbourne at the time. On board were straw hats, umbrella, perfumes, clay pipes, pianos, clocks, confectionary, linen and candles, as well as a heavier load of railway irons, cement, lead and copper. There were items included that intended for display in the Melbourne International Exhibition in 1880. The voyage to Port Phillip was long but uneventful. At 3am on June 1, 1878, Captain Gibbs was expecting to see land and the passengers were becoming excited as they prepared to view their new homeland in the early morning. But LOCH ARD was running into a fog which greatly reduced visibility. Captain Gibbs was becoming anxious as there was no sign of land or the Cape Otway lighthouse. At 4am the fog lifted. A man aloft announced that he could see breakers. The sheer cliffs of Victoria's west coast came into view, and Captain Gibbs realised that the ship was much closer to them than expected. He ordered as much sail to be set as time would permit and then attempted to steer the vessel out to sea. On coming head on into the wind, the ship lost momentum, the sails fell limp and LOCH ARD's bow swung back. Gibbs then ordered the anchors to be released in an attempt to hold its position. The anchors sank some 50 fathoms - but did not hold. By this time LOCH ARD was among the breakers and the tall cliffs of Mutton Bird Island rose behind the ship. Just half a mile from the coast, the ship's bow was suddenly pulled around by the anchor. The captain tried to tack out to sea, but the ship struck a reef at the base of Mutton Bird Island, near Port Campbell. Waves broke over the ship and the top deck was loosened from the hull. The masts and rigging came crashing down knocking passengers and crew overboard. When a lifeboat was finally launched, it crashed into the side of LOCH ARD and capsized. Tom Pearce, who had launched the boat, managed to cling to its overturned hull and shelter beneath it. He drifted out to sea and then on the flood tide came into what is now known as LOCH ARD Gorge. He swam to shore, bruised and dazed, and found a cave in which to shelter. Some of the crew stayed below deck to shelter from the falling rigging but drowned when the ship slipped off the reef into deeper water. Eva Carmichael had raced onto deck to find out what was happening only to be confronted by towering cliffs looming above the stricken ship. In all the chaos, Captain Gibbs grabbed Eva and said, "If you are saved Eva, let my dear wife know that I died like a sailor". That was the last Eva Carmichael saw of the captain. She was swept off the ship by a huge wave. Eva saw Tom Pearce on a small rocky beach and yelled to attract his attention. He dived in and swam to the exhausted woman and dragged her to shore. He took her to the cave and broke open case of brandy which had washed up on the beach. He opened a bottle to revive the unconscious woman. A few hours later Tom scaled a cliff in search of help. He followed hoof prints and came by chance upon two men from nearby Glenample Station three and a half miles away. In a state of exhaustion, he told the men of the tragedy. Tom returned to the gorge while the two men rode back to the station to get help. By the time they reached LOCH ARD Gorge, it was cold and dark. The two shipwreck survivors were taken to Glenample Station to recover. Eva stayed at the station for six weeks before returning to Ireland, this time by steamship. In Melbourne, Tom Pearce received a hero's welcome. He was presented with the first gold medal of the Royal Humane Society of Victoria and a £1000 cheque from the Victorian Government. Concerts were performed to honour the young man's bravery and to raise money for those who lost family in the LOCH ARD disaster. Of the 54 crew members and passengers on board, only two survived: the apprentice, Tom Pearce and the young woman passenger, Eva Carmichael, who lost all of her family in the tragedy. Ten days after the LOCH ARD tragedy, salvage rights to the wreck were sold at auction for £2,120. Cargo valued at £3,000 was salvaged and placed on the beach, but most washed back into the sea when another storm developed. The wreck of LOCH ARD still lies at the base of Mutton Bird Island. Much of the cargo has now been salvaged and some was washed up into what is now known as LOCH ARD Gorge. Cargo and artefacts have also been illegally salvaged over many years before protective legislation was introduced. One of the most unlikely pieces of cargo to have survived the shipwreck was a Minton porcelain peacock - one of only nine in the world. The peacock was destined for the Melbourne International Exhibition in 1880. It had been well packed, which gave it adequate protection during the violent storm. Today, the Minton peacock can be seen at the Flagstaff Hill Maritime Museum in Warrnambool. From Australia's most dramatic shipwreck it has now become Australia's most valuable shipwreck artefact and is one of very few 'objects' on the Victorian State Heritage Register. Flagstaff Hill’s collection of artefacts from LOCH ARD is significant for being one of the largest collections of artefacts from this shipwreck in Victoria. It is significant for its association with the shipwreck, which is on the Victorian Heritage Register (VHR S417). The collection is significant because of the relationship between the objects, as together they have a high potential to interpret the story of the LOCH ARD. The LOCH ARD collection is archaeologically significant as the remains of a large international passenger and cargo ship. The LOCH ARD collection is historically significant for representing aspects of Victoria’s shipping history and its potential to interpret sub-theme 1.5 of Victoria’s Framework of Historical Themes (living with natural processes). The collection is also historically significant for its association with the LOCH ARD, which was one of the worst and best known shipwrecks in Victoria’s history. Small Porcelain Heat Deflector from a kero lamp,deflector is blue inside. Outside has some encrustation. Artefact reg no LA/15. Recovered from the wreck of the Loch Ard.flagstaff hill, warrnambool, shipwrecked coast, flagstaff hill maritime museum, maritime museum, shipwreck coast, flagstaff hill maritime village, great ocean road, loch line, loch ard, captain gibbs, eva carmichael, tom pearce, glenample station, mutton bird island, loch ard gorge, porcelain heat deflector, heat deflector -
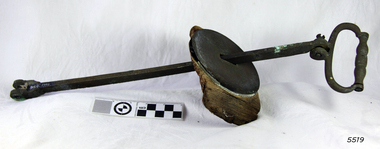 Flagstaff Hill Maritime Museum and Village
Pump
HISTORY OF THE LOCH ARD The LOCH ARD belonged to the famous Loch Line which sailed many ships from England to Australia. Built in Glasgow by Barclay, Curdle and Co. in 1873, the LOCH ARD was a three-masted square rigged iron sailing ship. The ship measured 262ft 7" (79.87m) in length, 38ft (11.58m) in width, 23ft (7m) in depth and had a gross tonnage of 1693 tons. The LOCH ARD's main mast measured a massive 150ft (45.7m) in height. LOCH ARD made three trips to Australia and one trip to Calcutta before its final voyage. LOCH ARD left England on March 2, 1878, under the command of Captain Gibbs, a newly married, 29 year old. She was bound for Melbourne with a crew of 37, plus 17 passengers and a load of cargo. The general cargo reflected the affluence of Melbourne at the time. On board were straw hats, umbrella, perfumes, clay pipes, pianos, clocks, confectionary, linen and candles, as well as a heavier load of railway irons, cement, lead and copper. There were items included that intended for display in the Melbourne International Exhibition in 1880. The voyage to Port Phillip was long but uneventful. At 3am on June 1, 1878, Captain Gibbs was expecting to see land and the passengers were becoming excited as they prepared to view their new homeland in the early morning. But LOCH ARD was running into a fog which greatly reduced visibility. Captain Gibbs was becoming anxious as there was no sign of land or the Cape Otway lighthouse. At 4am the fog lifted. A man aloft announced that he could see breakers. The sheer cliffs of Victoria's west coast came into view, and Captain Gibbs realised that the ship was much closer to them than expected. He ordered as much sail to be set as time would permit and then attempted to steer the vessel out to sea. On coming head on into the wind, the ship lost momentum, the sails fell limp and LOCH ARD's bow swung back. Gibbs then ordered the anchors to be released in an attempt to hold its position. The anchors sank some 50 fathoms - but did not hold. By this time LOCH ARD was among the breakers and the tall cliffs of Mutton Bird Island rose behind the ship. Just half a mile from the coast, the ship's bow was suddenly pulled around by the anchor. The captain tried to tack out to sea, but the ship struck a reef at the base of Mutton Bird Island, near Port Campbell. Waves broke over the ship and the top deck was loosened from the hull. The masts and rigging came crashing down knocking passengers and crew overboard. When a lifeboat was finally launched, it crashed into the side of LOCH ARD and capsized. Tom Pearce, who had launched the boat, managed to cling to its overturned hull and shelter beneath it. He drifted out to sea and then on the flood tide came into what is now known as LOCH ARD Gorge. He swam to shore, bruised and dazed, and found a cave in which to shelter. Some of the crew stayed below deck to shelter from the falling rigging but drowned when the ship slipped off the reef into deeper water. Eva Carmichael had raced onto deck to find out what was happening only to be confronted by towering cliffs looming above the stricken ship. In all the chaos, Captain Gibbs grabbed Eva and said, "If you are saved Eva, let my dear wife know that I died like a sailor". That was the last Eva Carmichael saw of the captain. She was swept off the ship by a huge wave. Eva saw Tom Pearce on a small rocky beach and yelled to attract his attention. He dived in and swam to the exhausted woman and dragged her to shore. He took her to the cave and broke open case of brandy which had washed up on the beach. He opened a bottle to revive the unconscious woman. A few hours later Tom scaled a cliff in search of help. He followed hoof prints and came by chance upon two men from nearby Glenample Station three and a half miles away. In a state of exhaustion, he told the men of the tragedy. Tom returned to the gorge while the two men rode back to the station to get help. By the time they reached LOCH ARD Gorge, it was cold and dark. The two shipwreck survivors were taken to Glenample Station to recover. Eva stayed at the station for six weeks before returning to Ireland, this time by steamship. In Melbourne, Tom Pearce received a hero's welcome. He was presented with the first gold medal of the Royal Humane Society of Victoria and a £1000 cheque from the Victorian Government. Concerts were performed to honour the young man's bravery and to raise money for those who lost family in the LOCH ARD disaster. Of the 54 crew members and passengers on board, only two survived: the apprentice, Tom Pearce and the young woman passenger, Eva Carmichael, who lost all of her family in the tragedy. Ten days after the LOCH ARD tragedy, salvage rights to the wreck were sold at auction for £2,120. Cargo valued at £3,000 was salvaged and placed on the beach, but most washed back into the sea when another storm developed. The wreck of LOCH ARD still lies at the base of Mutton Bird Island. Much of the cargo has now been salvaged and some was washed up into what is now known as LOCH ARD Gorge. Cargo and artefacts have also been illegally salvaged over many years before protective legislation was introduced. One of the most unlikely pieces of cargo to have survived the shipwreck was a Minton porcelain peacock - one of only nine in the world. The peacock was destined for the Melbourne International Exhibition in 1880. It had been well packed, which gave it adequate protection during the violent storm. Today, the Minton peacock can be seen at the Flagstaff Hill Maritime Museum in Warrnambool. From Australia's most dramatic shipwreck it has now become Australia's most valuable shipwreck artefact and is one of very few 'objects' on the Victorian State Heritage Register. Flagstaff Hill’s collection of artefacts from LOCH ARD is significant for being one of the largest collections of artefacts from this shipwreck in Victoria. It is significant for its association with the shipwreck, which is on the Victorian Heritage Register (VHR S417). The collection is significant because of the relationship between the objects, as together they have a high potential to interpret the story of the LOCH ARD. The LOCH ARD collection is archaeologically significant as the remains of a large international passenger and cargo ship. The LOCH ARD collection is historically significant for representing aspects of Victoria’s shipping history and its potential to interpret sub-theme 1.5 of Victoria’s Framework of Historical Themes (living with natural processes). The collection is also historically significant for its association with the LOCH ARD, which was one of the worst and best known shipwrecks in Victoria’s history. Part of a pump system. Has been attached to a piece of wood. Possibly a cistern plunger. From the Loch Ard.flagstaff hill, warrnambool, shipwrecked coast, flagstaff hill maritime museum, maritime museum, shipwreck coast, flagstaff hill maritime village, great ocean road, loch line, loch ard, captain gibbs, eva carmichael, tom pearce, glenample station, mutton bird island, loch ard gorge, pump system, pump -
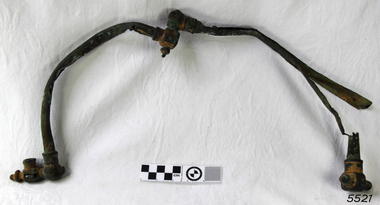 Flagstaff Hill Maritime Museum and Village
Functional object - Gas Fitting
This gas fitting was recovered from the wreck of the Loch Ard circa 1970, at the time of the discovery of the wreck. HISTORY OF THE LOCH ARD: - The LOCH ARD belonged to the famous Loch Line which sailed many ships from England to Australia. Built in Glasgow by Barclay, Curdle and Co. in 1873, the LOCH ARD was a three-masted square rigged iron sailing ship. The ship measured 262ft 7" (79.87m) in length, 38ft (11.58m) in width, 23ft (7m) in depth and had a gross tonnage of 1693 tons. The LOCH ARD's main mast measured a massive 150ft (45.7m) in height. LOCH ARD made three trips to Australia and one trip to Calcutta before its final voyage. LOCH ARD left England on March 2, 1878, under the command of Captain Gibbs, a newly married, 29 year old. She was bound for Melbourne with a crew of 37, plus 17 passengers and a load of cargo. The general cargo reflected the affluence of Melbourne at the time. On board were straw hats, umbrella, perfumes, clay pipes, pianos, clocks, confectionary, linen and candles, as well as a heavier load of railway irons, cement, lead and copper. There were items included that intended for display in the Melbourne International Exhibition in 1880. The voyage to Port Phillip was long but uneventful. At 3am on June 1, 1878, Captain Gibbs was expecting to see land and the passengers were becoming excited as they prepared to view their new homeland in the early morning. But LOCH ARD was running into a fog which greatly reduced visibility. Captain Gibbs was becoming anxious as there was no sign of land or the Cape Otway lighthouse. At 4am the fog lifted. A man aloft announced that he could see breakers. The sheer cliffs of Victoria's west coast came into view, and Captain Gibbs realised that the ship was much closer to them than expected. He ordered as much sail to be set as time would permit and then attempted to steer the vessel out to sea. On coming head on into the wind, the ship lost momentum, the sails fell limp and LOCH ARD's bow swung back. Gibbs then ordered the anchors to be released in an attempt to hold its position. The anchors sank some 50 fathoms - but did not hold. By this time LOCH ARD was among the breakers and the tall cliffs of Mutton Bird Island rose behind the ship. Just half a mile from the coast, the ship's bow was suddenly pulled around by the anchor. The captain tried to tack out to sea, but the ship struck a reef at the base of Mutton Bird Island, near Port Campbell. Waves broke over the ship and the top deck was loosened from the hull. The masts and rigging came crashing down knocking passengers and crew overboard. When a lifeboat was finally launched, it crashed into the side of LOCH ARD and capsized. Tom Pearce, who had launched the boat, managed to cling to its overturned hull and shelter beneath it. He drifted out to sea and then on the flood tide came into what is now known as LOCH ARD Gorge. He swam to shore, bruised and dazed, and found a cave in which to shelter. Some of the crew stayed below deck to shelter from the falling rigging but drowned when the ship slipped off the reef into deeper water. Eva Carmichael had raced onto deck to find out what was happening only to be confronted by towering cliffs looming above the stricken ship. In all the chaos, Captain Gibbs grabbed Eva and said, "If you are saved Eva, let my dear wife know that I died like a sailor". That was the last Eva Carmichael saw of the captain. She was swept off the ship by a huge wave. Eva saw Tom Pearce on a small rocky beach and yelled to attract his attention. He dived in and swam to the exhausted woman and dragged her to shore. He took her to the cave and broke open case of brandy which had washed up on the beach. He opened a bottle to revive the unconscious woman. A few hours later Tom scaled a cliff in search of help. He followed hoof prints and came by chance upon two men from nearby Glenample Station three and a half miles away. In a state of exhaustion, he told the men of the tragedy. Tom returned to the gorge while the two men rode back to the station to get help. By the time they reached LOCH ARD Gorge, it was cold and dark. The two shipwreck survivors were taken to Glenample Station to recover. Eva stayed at the station for six weeks before returning to Ireland, this time by steamship. In Melbourne, Tom Pearce received a hero's welcome. He was presented with the first gold medal of the Royal Humane Society of Victoria and a £1000 cheque from the Victorian Government. Concerts were performed to honour the young man's bravery and to raise money for those who lost family in the LOCH ARD disaster. Of the 54 crew members and passengers on board, only two survived: the apprentice, Tom Pearce and the young woman passenger, Eva Carmichael, who lost all of her family in the tragedy. Ten days after the LOCH ARD tragedy, salvage rights to the wreck were sold at auction for £2,120. Cargo valued at £3,000 was salvaged and placed on the beach, but most washed back into the sea when another storm developed. The wreck of LOCH ARD still lies at the base of Mutton Bird Island. Much of the cargo has now been salvaged and some was washed up into what is now known as LOCH ARD Gorge. Cargo and artefacts have also been illegally salvaged over many years before protective legislation was introduced. One of the most unlikely pieces of cargo to have survived the shipwreck was a Minton porcelain peacock - one of only nine in the world. The peacock was destined for the Melbourne International Exhibition in 1880. It had been well packed, which gave it adequate protection during the violent storm. Today, the Minton peacock can be seen at the Flagstaff Hill Maritime Museum in Warrnambool. From Australia's most dramatic shipwreck it has now become Australia's most valuable shipwreck artefact and is one of very few 'objects' on the Victorian State Heritage Register. Flagstaff Hill’s collection of artefacts from LOCH ARD is significant for being one of the largest collections of artefacts from this shipwreck in Victoria. It is significant for its association with the shipwreck, which is on the Victorian Heritage Register (VHR S417). The collection is significant because of the relationship between the objects, as together they have a high potential to interpret the story of the LOCH ARD. The LOCH ARD collection is archaeologically significant as the remains of a large international passenger and cargo ship. The LOCH ARD collection is historically significant for representing aspects of Victoria’s shipping history and its potential to interpret sub-theme 1.5 of Victoria’s Framework of Historical Themes (living with natural processes). The collection is also historically significant for its association with the LOCH ARD, which was one of the worst and best known shipwrecks in Victoria’s history. Copper gas pipe and fitting. Tow C-shaped pipes with fittings at each end. One end of each pipe is joined to the other pipe, making a U-shape. It was recovered from the 1878 wreck of the ship Loch Ard in the 1970s. flagstaff hill, warrnambool, shipwrecked coast, flagstaff hill maritime museum, maritime museum, shipwreck coast, flagstaff hill maritime village, great ocean road, loch line, loch ard, captain gibbs, eva carmichael, tom pearce, glenample station, mutton bird island, loch ard gorge, copper gas pipe and fitting, copper gas pipe -
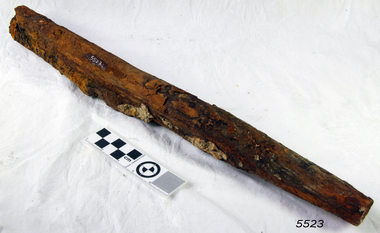 Flagstaff Hill Maritime Museum and Village
Handle
Ref: LA 6 67 311 HISTORY OF THE LOCH ARD The LOCH ARD belonged to the famous Loch Line which sailed many ships from England to Australia. Built in Glasgow by Barclay, Curdle and Co. in 1873, the LOCH ARD was a three-masted square rigged iron sailing ship. The ship measured 262ft 7" (79.87m) in length, 38ft (11.58m) in width, 23ft (7m) in depth and had a gross tonnage of 1693 tons. The LOCH ARD's main mast measured a massive 150ft (45.7m) in height. LOCH ARD made three trips to Australia and one trip to Calcutta before its final voyage. LOCH ARD left England on March 2, 1878, under the command of Captain Gibbs, a newly married, 29 year old. She was bound for Melbourne with a crew of 37, plus 17 passengers and a load of cargo. The general cargo reflected the affluence of Melbourne at the time. On board were straw hats, umbrella, perfumes, clay pipes, pianos, clocks, confectionary, linen and candles, as well as a heavier load of railway irons, cement, lead and copper. There were items included that intended for display in the Melbourne International Exhibition in 1880. The voyage to Port Phillip was long but uneventful. At 3am on June 1, 1878, Captain Gibbs was expecting to see land and the passengers were becoming excited as they prepared to view their new homeland in the early morning. But LOCH ARD was running into a fog which greatly reduced visibility. Captain Gibbs was becoming anxious as there was no sign of land or the Cape Otway lighthouse. At 4am the fog lifted. A man aloft announced that he could see breakers. The sheer cliffs of Victoria's west coast came into view, and Captain Gibbs realised that the ship was much closer to them than expected. He ordered as much sail to be set as time would permit and then attempted to steer the vessel out to sea. On coming head on into the wind, the ship lost momentum, the sails fell limp and LOCH ARD's bow swung back. Gibbs then ordered the anchors to be released in an attempt to hold its position. The anchors sank some 50 fathoms - but did not hold. By this time LOCH ARD was among the breakers and the tall cliffs of Mutton Bird Island rose behind the ship. Just half a mile from the coast, the ship's bow was suddenly pulled around by the anchor. The captain tried to tack out to sea, but the ship struck a reef at the base of Mutton Bird Island, near Port Campbell. Waves broke over the ship and the top deck was loosened from the hull. The masts and rigging came crashing down knocking passengers and crew overboard. When a lifeboat was finally launched, it crashed into the side of LOCH ARD and capsized. Tom Pearce, who had launched the boat, managed to cling to its overturned hull and shelter beneath it. He drifted out to sea and then on the flood tide came into what is now known as LOCH ARD Gorge. He swam to shore, bruised and dazed, and found a cave in which to shelter. Some of the crew stayed below deck to shelter from the falling rigging but drowned when the ship slipped off the reef into deeper water. Eva Carmichael had raced onto deck to find out what was happening only to be confronted by towering cliffs looming above the stricken ship. In all the chaos, Captain Gibbs grabbed Eva and said, "If you are saved Eva, let my dear wife know that I died like a sailor". That was the last Eva Carmichael saw of the captain. She was swept off the ship by a huge wave. Eva saw Tom Pearce on a small rocky beach and yelled to attract his attention. He dived in and swam to the exhausted woman and dragged her to shore. He took her to the cave and broke open case of brandy which had washed up on the beach. He opened a bottle to revive the unconscious woman. A few hours later Tom scaled a cliff in search of help. He followed hoof prints and came by chance upon two men from nearby Glenample Station three and a half miles away. In a state of exhaustion, he told the men of the tragedy. Tom returned to the gorge while the two men rode back to the station to get help. By the time they reached LOCH ARD Gorge, it was cold and dark. The two shipwreck survivors were taken to Glenample Station to recover. Eva stayed at the station for six weeks before returning to Ireland, this time by steamship. In Melbourne, Tom Pearce received a hero's welcome. He was presented with the first gold medal of the Royal Humane Society of Victoria and a £1000 cheque from the Victorian Government. Concerts were performed to honour the young man's bravery and to raise money for those who lost family in the LOCH ARD disaster. Of the 54 crew members and passengers on board, only two survived: the apprentice, Tom Pearce and the young woman passenger, Eva Carmichael, who lost all of her family in the tragedy. Ten days after the LOCH ARD tragedy, salvage rights to the wreck were sold at auction for £2,120. Cargo valued at £3,000 was salvaged and placed on the beach, but most washed back into the sea when another storm developed. The wreck of LOCH ARD still lies at the base of Mutton Bird Island. Much of the cargo has now been salvaged and some was washed up into what is now known as LOCH ARD Gorge. Cargo and artefacts have also been illegally salvaged over many years before protective legislation was introduced. One of the most unlikely pieces of cargo to have survived the shipwreck was a Minton porcelain peacock - one of only nine in the world. The peacock was destined for the Melbourne International Exhibition in 1880. It had been well packed, which gave it adequate protection during the violent storm. Today, the Minton peacock can be seen at the Flagstaff Hill Maritime Museum in Warrnambool. From Australia's most dramatic shipwreck it has now become Australia's most valuable shipwreck artefact and is one of very few 'objects' on the Victorian State Heritage Register. Flagstaff Hill’s collection of artefacts from LOCH ARD is significant for being one of the largest collections of artefacts from this shipwreck in Victoria. It is significant for its association with the shipwreck, which is on the Victorian Heritage Register (VHR S417). The collection is significant because of the relationship between the objects, as together they have a high potential to interpret the story of the LOCH ARD. The LOCH ARD collection is archaeologically significant as the remains of a large international passenger and cargo ship. The LOCH ARD collection is historically significant for representing aspects of Victoria’s shipping history and its potential to interpret sub-theme 1.5 of Victoria’s Framework of Historical Themes (living with natural processes). The collection is also historically significant for its association with Shovel handle. Has pieces of iron and concretion visible. Artefact Reg No LA/42. Recovered from the wreck of the Loch Ard.flagstaff hill, warrnambool, shipwrecked coast, flagstaff hill maritime museum, maritime museum, shipwreck coast, flagstaff hill maritime village, great ocean road, loch line, loch ard, captain gibbs, eva carmichael, tom pearce, glenample station, mutton bird island, loch ard gorge, shovel handle