Showing 10281 items
matching classism
-
 Melbourne Tram Museum
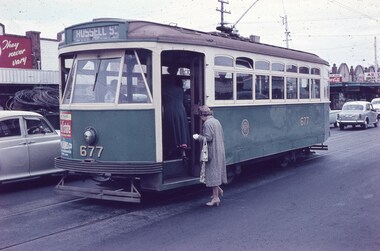
Slide - Set of 7, Keith Caldwell, 10/03/1960 12:00:00 AM
Set of 7 Agfa Colour slide, cardboard mount, by Keith Caldwell of 10 March 1960 - .1 - X2 677 - at the Williamstown Road terminus of the Footscray tram system. Tram photographed in Somerville Road, showing the return destination of Russell St. In the background are a row of shops. .2 - X1 460 turning from Leeds St into Barkly St. Tram has the destination of Ballarat Road. In the background is the bus stop and tram stop and the Trocadero Theatre side wall. See Image i6 for the Theatre. Has a Gant Motors advert. .3 - X1 467 out bound turning into Nicholson St from Irving St. Footscray with the Rockmans Store in the background. This store was later demolished for the Ring Road. Tram has adverts for Gant Motors and Swing Bridge Motors - Holdens. .4 - X1 460 turning from Barkly St into Leeds St, showing the destination of Ballarat Road. Has adverts for Calders watches and Coca Cola - drive safely. In the background is a cafe advertising Oysters, Grey Cigarettes and Vincents Powders. .5 - X1 464 turnings from Nicholson St into Irving St. Footscray with the Rockmans Store in the background. This store was later demolished for the Ring Road. Also is J. Boltons Chemist shop advertising Kodak film and another shop - ? dry cleaners, Footscray Fish Shop and Kings Hotel. Tram has adverts for Gant Motors and Doods Dry cleaning. There is a PMG truck parked outside Rockmans. .6 - X2 677 turning from Barkly St into Leeds St with the Trocadero Theatre in the background. Tram has the destination of Williamstown Road. Tram has an advert for Bridge and Webster. .7 - X1 467 outbound to Williamstown Road, turning from Leeds St into Irving St Footscray. Tram has adverts for Doods dry cleaning and Gant Motors.All hand stamped "10 Mar '60". .1 - marked "Footscray" .2 - "Footscray (NB curves)" .3 - to .7 "Footscray"trams, tramways, footscray, x2 class, russell st, williamstown rd, leeds st, ballarat rd, barkly st, nicholson st, irving st, tram 677, tram 460, tram 467, tram 464 -
 Melbourne Tram Museum
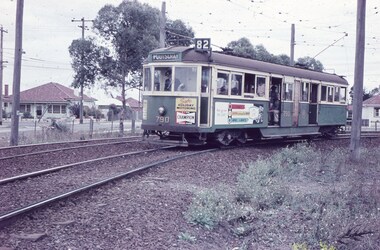
Slide - Set of 2, Keith Caldwell, 10/03/1960 12:00:00 AM
Set of 2 Agfa Colour slide, cardboard mount, by Keith Caldwell of 10 March 1960 - .1 - W5 790, turning on Rosamond Road Maribyrnong into River St, destination of Footscray, Route 82. Tram has the adverts for Champion spark plugs and a recruiting advert for MMTB Conductors. .2 - W5 790 returning, photographed in Rosamond Road, destination Moonee Ponds, Route 82. Has an adverts for Knight? and Tulip? Note the cattle guard on the level crossing and the "Trams No Road Only" and "No Road" signs.All hand stamped "10 Mar '60". .1 - marked "Footscray Connection"trams, tramways, maribyrnong, footscray, rosamond rd, river st, level crossings, w5 class, route 82, moonee ponds, tram 790 -
 Melbourne Tram Museum
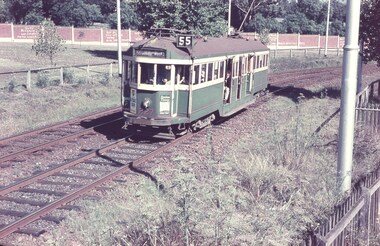
Slide - Set of 7, Keith Caldwell, 12/03/1960 12:00:00 AM
Set of 7 Agfa Colour slide, cardboard mount, by Keith Caldwell of 7 or 12 March 1960 - .1 - W2 227 outbound in Royal Park with the Zoo walls in the background. Destination West Coburg, Route 55. Tram has two adverts which are hard to read. .2 - W2 470 inbound, Domain Road, Route 56 with the Upfield (Fawkner) railway line in the background. Tram has a Remy Martin Brandy advert. .3 - W5 786, as for .2, with an Exide battery advert. .4 - W2 456 as for .2, with an Coca Cola Advert .5 - SW6 965 in bound, showing St Kilda, route 55 with the railway line in the background. Tram has adverts for Band-Aids, Porsche motor cars in Richmond and Singletons? .6 - L 106 - in bound, showing destination of Carnegie, route 4. This would most likely be a Glen Huntly depot doing a late afternoon trip via William St. Has the zoo wall in the background. .7 - W3 655 in bound, showing destination of Carnegie, route 4. This would most likely be a Glen Huntly depot doing a late afternoon trip via William St. Tram has a Remy Martin Brandy advert. Tram running down to the Flemington Road intersection. .1 and .7 have political graffiti or slogans painted onto the zoo walls. examples are" Vote Bryant Out, ?? and the Labor Party? Welfare not warfare out Menzies and Drop Bob today Vote ? Out".1 to .4 - hand stamped "12 Mar '60" .5 to .7 - ditto "& Mar '60" .2 - "W2 Royal Park" .5 - "SW Car Royal Park" .6 - "L Royal Park" .7 - "W3 Royal Park"trams, tramways, royal park, west coburg, route 55, graffiti, domain rd, railways, route 56, w2 class, w5 class, w3 class, l class, st kilda beach, tram 470, tram 227, tram 456, tram 965, tram 655, tram 106, sw6 class, tram 786 -
 Melbourne Tram Museum
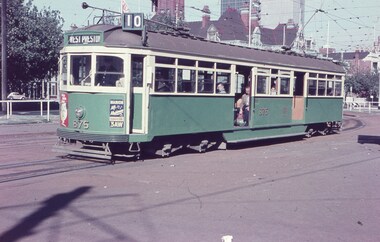
Slide, Keith Caldwell, 12/03/1960 12:00:00 AM
Agfa Colour slide, cardboard mount, by Keith Caldwell of 12 March 1960 - of SW6 875 at junction with Victoria Parade and Brunswick St (now St Vincent's Plaza) wit the Eastern Hill fire station in the background. Tram has adverts for Radio 3AW and ?.1 - hand stamped "12 Mar '60"trams, tramways, st vincent's plaza, victoria parade, west preston, route 10, sw6 class, tram 875 -
 Melbourne Tram Museum
Slide - Set of 3, Keith Caldwell, 11/3/1960
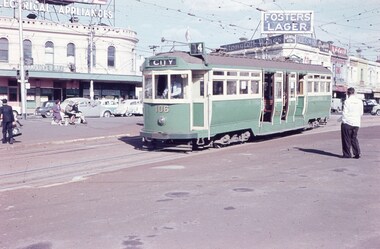
Set of 3 Agfa Colour slide, cardboard mount, by Keith Caldwell of 11 March 1960 of trams at St Kilda Junction. .1 - L 106 arriving at the junction from Wellington St. Tram has the destination of City, route 4. Signals for the trams can been seen on a pole on the left hand side of the photo. .2 - SW6 - as for .1 .3 - W3 668 ditto, from Fitzroy St, showing Moreland, route 15. Has an advert for 3AW. In the background in all photos are adverts for Speedie electrical appliances, Fosters Lager, Stonefell wines, Gilbeys Gin, Penfolds, Stockdale's Bread, Hamburger Max Snack bar, Ardath, Brooks Books.All hand stamped "11 Mar '60"; .1 "L" in ink and .3 "W3" in ink written on.trams, tramways, st kilda junction, signal box, l class, w3 class, tram 106, tram 926, tram 668, sw6 class, wellington st, mmtb, route 4, route 64, route 15 -
 Melbourne Tram Museum
Document - Memorandum, Melbourne & Metropolitan Tramways Board (MMTB), "Victoria House Window Displays", 4/10/1949 12:00:00 AM
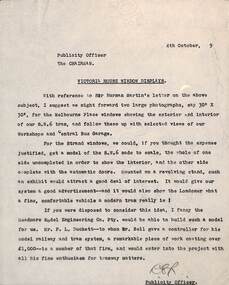
Memos - carbon copy on quarto paper - from the Publicity Officer to the Chairman regarding a window display in Victoria House London, dated 4/10/19?9? (Year only typed as a 9). Refers to a letter from Sir Norman Martin. Suggests two large photos of the SW6 trams exterior and interior, and the possibility of a scale model by Meadmore Engineering where Peter Duckett works and notes that Mr. Bell gave him recently a controller. Has a reference to Mr. Bell. Mr Risson commenced work on 1/10/1949 though in correspondence with Paul Nicholson, he felt that 1949 would be correct.Initialled by Lewis Russell.trams, tramways, sw6 class, london, models -
 Melbourne Tram Museum
Document - Radio Transcript, Melbourne & Metropolitan Tramways Board (MMTB), Wireless talk - "inside information regarding tramcars", Jul. 1926
Radio transcript - 12 foolscap sheets, typed. Although not named, appears to have been prepared for or by Mr. Strickland describing "inside information regarding tramcars". Notes cable trams, conversion, sale of trailers and dummies or grip cars, the variety taken over from the trusts, design of new cars (180 in service at the time of the report), open cars vs closed cars, seating and standing capacity, speed, braking system, step heights, destination signs, lifeguards. Gives a description of Preston Workshops, finishing soon, description of the tramcar construction, roofing, painting, sourcing of materials, timbers, cost per tram of 3250 pounds, depots, breakdowns, overhauls, workshops, collision repairs in 1925, construction of 10 safety cars. Vicsig.net gives that X1 461 entered service in Sept. 1926. Pinned to the file by Robert on the rear of TMSV Raffle ticket is a note "Electrical Engineer 15/7/26 p35 "C. H. Wickham gave recent address broadcast on 3LO"In blue pencil in top left hand corner appears to be "Wickham"trams, tramways, tramcars, preston workshops, new trams, sale of trams, cable trams, destination roll, tram brakes, tramcar equipment, x1 class, w class, depots, radio stations -
 Melbourne Tram Museum
Photograph - Black & White Photograph/s, Dave Macartney, early 1970's
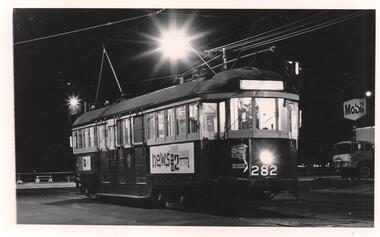
Black and White photograph of W2 282 at the South Melbourne Beach, route 1 terminus, early 1970's, at corner of Victoria Ave and Beaconsfield Parade. Tram has adverts for National batteries, the ABC TV News. In the background is an Mobil Service Station. Photo by Dave Macartney.trams, tramways, south melbourne beach, route 1, w2 class, victoria ave, beaconsfield parade, tram 282 -
 Melbourne Tram Museum
Photograph - Black & White Photograph/s, Dave Macartney, Late 1960's early 1970's
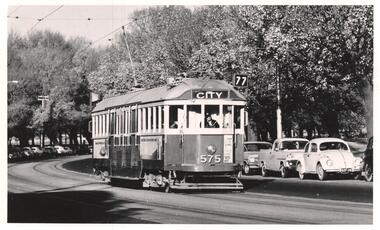
Black and White photograph of W2 575 in bound in Batman Ave, Melbourne, route 77. Has the parks in the background. Late 1960's early 1970's. Photo by Dave Macartney.trams, tramways, batman ave, w2 class, route 77, tram 575 -
 Melbourne Tram Museum
Photograph - Black & White Photograph/s, Alf Gilbert, 1920's?
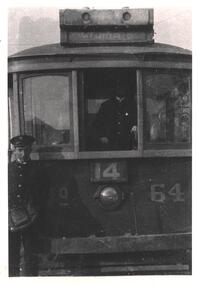
Black and White photograph of former PMTT then MMTB No. 64 with the destination of Victoria St. Has the driver standing in the tram with the window open and the Conductor alongside. Showing route 14. Photo printed by Dave Macartney from an Alf Gilbert photograph.trams, tramways, victoria st, route 14, j-class, crews, tram 64 -
 Melbourne Tram Museum
Photograph - Black & White Photograph/s, 1960's
Black and White photograph of a MMTB No.11 truck as fitted to Y1 610 and 612 One of a series of photographs done by the MMTB to illustrate the various types of bogies / trucks used by the MMTB. Possibly during the 1960's. Two copies held.trams, tramways, mmtb, bogies, trucks, preston workshops, y1 class -
 Melbourne Tram Museum
Photograph - Black & White Photograph/s, Melbourne & Metropolitan Tramways Board (MMTB), MMTB No. 6A Truck, 1960's
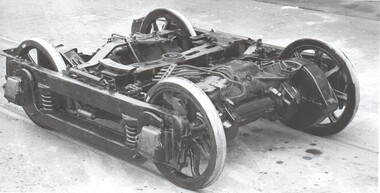
One of a series of photographs done by the MMTB to illustrate the various types of bogies / trucks used by the MMTB. Possibly during the 1960's. Based on item 3461, a No. 6A truck. The chalk markings indicate it is off X2 675, with a MV 102 motor.Yields information about the No. 6A truck used on the X2 class tram.Black and White photograph of an MMTB four-wheel truck or bogie. Has chalk marks "675-1-102" Two copies heldtrams, tramways, mmtb, bogies, trucks, preston workshops, x2 class -
 Melbourne Tram Museum
Photograph - set of 9 Black & White Photograph/s, Melbourne & Metropolitan Tramways Board (MMTB), 1966
Series of 9 black and white photographs of the traffic congestion in the CBD during 1951. .1 - view looking south along Spencer St from Collins St showing the VR Head office, and the railway viaduct with a Berger Paint advertisement, Has one wide body tram with dash canopy lighting and three W2's. Also one small bus. Has "G3" in pencil on rear. .2 - similar view but with a different vehicle mix - W2 317 (Richmond Route 28), an SW6 route 27 and another W2 (route 41). Includes one large truck carrying Land Rover boxes. Typed on rear "Enlargement of No. 72 - Sheet No. 26 (Report P25/1/8) and in ink initials and "For Testing Engs 1/11/51". .3 - View looking north along Swanston St Princes Bridge with a route 6 tram and Princes Bridge Station and St Pauls Cathedral. On rear in pencil "11/2" .4 - Spencer St - trams crossing Spencer St bridge - W5 781 (Route 10) and a W2 649, route 9, South Melbourne Beach. .5 - Queensbridge under bridge - showing many cars jammed and the railway viaduct. .6 - ?? - Collins St - National Mutual and Shaw Savill Line offices - has a Safety Zone stand. .7 - Collins St looking east from Market St - with many trams in the view and many cars. .8 - Collins at Market St with a SW6 with dash canopy lighting - route 45, followed by a route 9A .9 - same location - total chaos. See also Reg 4520 for another 7 photos of the same series.trams, tramways, traffic control, congestion, spencer st, route 27, route 28, route 41, route 6, princes bridge, swanston st, w2 class, sw6 class, route 10, route 9, spencer st bridge, market st, collins st, route 45, route 9a, tram 317, tram 781, tram 649 -
 Melbourne Tram Museum
Photograph - Set of 10 Black & White Photograph/s - Mockup of all electric tram Preston Workshops, Melbourne & Metropolitan Tramways Board (MMTB), c1972
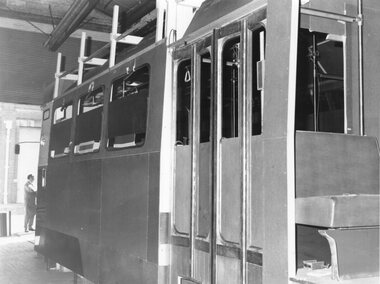
Series of 10 black and white photographs of the construction of the prototype or mock-up model of the prototype for tram 1041 at Preston Workshops c1971. See Reg Item 2502 and 7370 for other photos. .1 - external view shows the centre door and the mock-up construction. .2 - external view showing small entry door - at the back of the tram? .3 - Front entry door. .4 - internal view showing conductors desk and seats .5 - internal view showing conductors desk, ticket machine and microphone. .6 - another view looking along the tram length. .7 - same photo. .8 - Drivers seat showing the mock-up pedals and drivers console. .9 - ditto - different view. .10 - close up of the drivers pedals mock-up box. The photos could have been taken at different stages of the design process and after layout changes had been made.Item 6 has MMTB stamp and "P25/1/1016""trams, tramways, prototype tramcar, tramcar bodies, preston workshops, 1041 mock-up, interiors, tram 1041, pcc class, gibson ticket machines -
 Melbourne Tram Museum
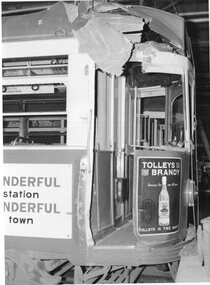
Photograph - Set of 4 Black & White Photograph/s, Melbourne & Metropolitan Tramways Board (MMTB), 1960s
Series of 4 black and white photographs of the accident damage to SW6 926 taken at Preston Workshops. .1 - front of car showing damaged to roof and the drivers door. .2 -The other end showing bumper damage and front panel damage - has a "Not released for work" sign. .3 - as for .1 but different view. .4 - internal view. Has adverts for Tolley's Brandy, Williams Real Estate agency, and internally an advert for Wales savings account - could have a 1/- symbol on advert.trams, tramways, sw6 class, accidents, tram 926 -
 Melbourne Tram Museum
Album - Photo Album, Transit Australia Publishing, "TAP - Part C - W5 to W7 – VR & 980 – sheets C1 to C41 ", 1950's to 1990's
Photo Album - titled " TAP - Part C - W5 to W7 – VR & 980 – sheets C1 to C41 ", from Transit Australia Publishing. Photos used in the Destination City and other publications series. For a detailed list of photographs see htd4602i.pdf. For individual photo images see: \dbtext\hawthtramcoll\photo collections\htd4602-TAP-PartC, images TAP164 to TAP243. TAP164_52_RiverSt_KeithKings_2Apr1960.jpg TAP165_52_RiverSt.jpg TAP166_700_MooneePonds.jpg TAP167_736_HughWaldron.jpg TAP168_820_MooneePondsJunct_2Feb1972_AndrewFoy.jpg TAP169_821_VictoriaPde_Jan1993_RayMarsh.jpg TAP170_796_MaribyrnongRvrBridge_DuckettColln.jpg TAP171_899_VictoriaPde-at-GisborneSt_DuckettColln.jpg TAP172_910_QueensBridge.jpg TAP173_923_RAAF_SwanstonSt_NoellReed_19Jan1953.jpg TAP174_980_VictoriaPde.jpg TAP175_980_RoyalVisit_MalvernDepot_5Mar1954-KeithKings.jpg TAP176_980_VictoriaPde_3Feb1951.jpg TAP177_980_VictoriaPde_3Feb1951.jpg TAP178_980_BourkeSt_26Dec1969_GregKing.jpg TAP179_980_RoyalTram-MMTB.jpg TAP180_980_RoyalTram-StGeorgesRd_KeithKings_1Mar1954.jpg TAP181_980_Preston_HughBallment.jpg T AP182_980_AETA-tour.jpg TAP183_1003_HawthornRd_12April1955_KeithKings_1Mar1954.jpg TAP184_1031-1032_GlenferrieRd_NoelReed_17Feb1956.jpg TAP185_AETA_pre-opening tour_BourkeSt_25Jun1955.jpg TAP186_53_Footscray_18Jan1969_PaulNicholson.jpg TAP187_53_Preston_Feb1973_MMTB.jpg TAP188_684_Caulfield_WJohnWebster.jpg TAP189_685_Esplanade_RayPearson.jpg TAP190_721_Elsternwick_WJohnWebster.jpg TAP191_736_MMTB.jpg TAP192_740_WilliamSt_AndrewFoy_7Feb1972.jpg TAP194_736_VicMarket_RayPearson_13Apr1936.jpg TAP195_760_VicMarket_1986_MichaelMcLeod.jpg TAP196_787_FlemingtonRd_RogerPywell_16May1960.jpg TAP197_801_StKildaRd-trackwork_KSKings_18Mar1951.jpg TAP198_808_Esplanade_RayPearson.jpg TAP199_810_TruganiniRd_NoelReed.jpg TAP200_812_StKildaJunction.jpg TAP201_816_MalvernDepot_WJohnWebster.jpg TAP201_847_BatmanAve_WJohnWebster.jpg TAP202_816_FlindersSt_1986_MichaelMcLeod.jpg TAP203_844_MalvernDepot_AndrewFoy6Jan1973.jpg TAP205_856_BatmanAve_WJohnWebster.jpg TAP206_885_Carnegie_IanCooper.jpg TAP207_836_ElizabethSt_HughBallment.jpg TAP208_887_MalvernDepot_WJohnWebster.jpg TAP209_914_BatmanAve_GeoffGrant.jpg TAP210_914_BatmanAve_LindsayCrowe.jpg TAP211_923_RAAF_VictoriaSt_WJohnWebster.jpg TAP212_915_50thAnnivFederation_Preston_21May1951_KeithKings.jpg TAP213_958_Glenhuntly_AndrewFoy_9Jan1986.jpg TAP214_965_ChapelSt_AndrewFoy_9Jan1986.jpg TAP215_979_HighSt_MMTB.jpg TAP216_988-1003_TestRuns_NicholsonSt_GeoffGrant_19Jun1955.jpg TAP217_988_Nicholson-intoVictoria_GeoffGrant_19Jun1955.jpg TAP218_991_BourkeStOpening_GeoffGrant_24Jun1955.jpg TAP219_993_EastBrighton_DaleBudd_1989.jpg TAP220_993_NicholsonSt_PaulNicholson_10Sep1968.jpg TAP221_994_SmithSt_AndrewFoy_20May1976.jpg TAP222_999_SwanSt_AndrewFoy_19Jan1977.jpg TAP223_980_GlenferrieRd_NoelReed_.jpg TAP224_980_GlenferrieRd_WJohnWebster.jpg TAP225_980_VictoriaPde_AETAtour_KeithKings_3Feb1951.jpg TAP226_980_DandenongRd_MMTB.jpg TAP227_980_Preston_HughBallment.jpg TAP228_1002_SwanstonSt_AndrewFoy_3Jan1989.jpg TAP229_1003_EastPrestonDepot_MMTB.jpg TAP230_1010_HighSt_MMTB.jpg TAP231_1032_MMTB.jpg TAP232_1033_AETAtour_7Apr1956_GeoffGrant.jpg TAP233_1033_EastBrunswick_AETAtour_7Apr1956_GeoffGrant.jpg TAP234_52_DroopSt_JimSeletto.jpg TAP235a_761-961_DomainInterchenge_FrizVanDam_24Oct1988.jpg TAP235_750-759_VictoriaStShunt_FrizVanDam_31Oct1988.jpg TAP236_833-974_CarlisleSt_FrizVanDam_24Oct1988.jpg TAP237_888-999_DandenongRd-at-LansdowneSt_FrizVanDam_22Oct1988.jpg TAP238_940_EastPreston_marker-lights_Jun1970_MMTB.jpg TAP239_891-Kew_pantographtest_RayMarsh_21Nov1989.jpg TAP240_1032-917_VictoriaPde_FrizVanDam_28Oct1988.jpg TAP241_1024_EastBrighton_JimSeletto_1963.jpg TAP242_FrontEntranceSW6-drawing_MMTB_22Aug1955.jpg TAP243_FrontEntranceSW6-drawing_altered-as-1016.jpg Transit Australia Photos - W5 to W7 + VR + 980 sheets C1 to C41.pdf - this item stored in box 01-0 - as Reg Item 4620 foolscap size - larger than folder.trams, tramways, transit australia, destination city, tramcars, depots, w5 class, sw5 class, sw6 class, w7 class, w6 class, vr, tram 52, tram 700, tram 736, tram 820, tram 796, tram 899, tram 910, tram 923, tram 980, tram 1003, tram 1031, tram 1032, tram 53, tram 684, tram 685, tram 721, tram 736, tram 740, tram 746, tram 760, tram 787, tram 801, tram 808, tram 810, tram 812, tram 816, tram 844, tram 847, tram 856, tram 885, tram 836, tram 887, tram 914, tram 923, tram 915, tram 958, tram 965, tram 979, tram 988, tram 1003, tram 991, tram 993, tram 994, tram 999, tram 1002, tram 1003, tram 1010, tram 1032, tram 1033, tram 750, tram 759, tram 761, tram 961, tram 833, tram 974, tram 888, tram 940, tram 891, tram 917, tram 1016 -
 Melbourne Tram Museum
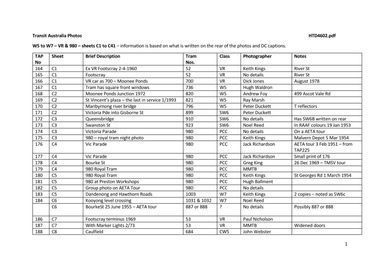
Functional object - Model tram, Preston Workshops, B1, number 2002, c1984
Model tram - B or B1, number 2002 made by The Met for their model tram at the Royal Show Melbourne c1985. Consists of: 1 - 2 x Fibreglass sections - one with a pantograph, painted in The Met colours with number 2002 with destination of "Special". Pantograph made from wire. 2 - small articulated section made from fibre glass and black vinyl, painted yellow and green. 3 - two sets of heavy duty electric motor, geared to two sets of four wheel bogies and one unmotorised bogie with a centre pins, washer and split pin that secured the articulated section of the tram. Each set number on side "MTA No. 7A and 9B" Made from brass, steel, plastic - purpose made. Placed with two sections of O gauge track - each 340mm long.trams, tramways, models, b class, the met, royal show -
 Melbourne Tram Museum
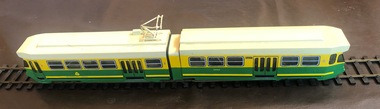
Functional object - Model tram, Preston Workshops, wheel set for an articulated tram made by The Met, c1984
Model tram wheel set for an articulated tram made by The Met for their model tram at the Royal Show Melbourne c1985. Two sets of heavy duty electric motor, geared to two sets of four wheel bogies and one unmotorised bogie with a centre pins, washer and split pin that secured the articulated section of the tram. Each set number on side "MTA No. 9A with motor section given "10" and 7B" Made from brass, steel, plastic - purpose made. Placed with two sections of O gauge track - each 340mm long.trams, tramways, models, b class, the met, royal show -
 Melbourne Tram Museum
Photograph - Set of 4 Black & White Photograph/s, Melbourne & Metropolitan Tramways Board (MMTB), 1923
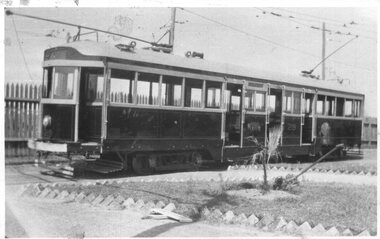
Set of four Black and White Photographs, of W 219 prior to completion at Thornbury Depot - late 1923. .1 - 3/4 view of W2 - incomplete, pending windows, footboards and destination boxes. .2 - side on view showing tramcar number and monogram (not adopted) .3 - Front of tram - shows a white or cream bumper bar. 4 - enlargement of the central section. Official MMTB Photograph?Notes about the tramcar and image numbers. Note "incomplete, pending windows, footboards and destination boxes. Late 1923 Thornbury Depot/"trams, tramways, w class, tramcar construction, thornbury depot, new trams, tram 219 -
 Melbourne Tram Museum
Photograph - Black & White Photograph/s, David Keenan, Oct. 1973
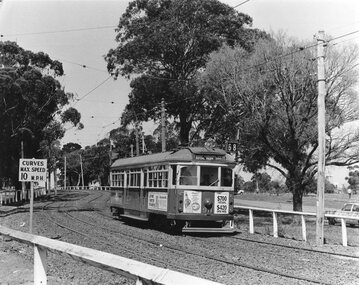
Photographs, Black and White, of SW6 911, in Royal Park with the golf course in the background. Tram has the destination of "West Coburg via Royal Park (Zoo), Route 68. The "Curves Max Speed 10 MPH" board alongside the wooden fence. Tram has advert for BOAC return airfares, Tudor Royal Whiskey. Photo appears on the rear cover of David Keenan's book "Melbourne Tramways in 1974". The author advises that all photos by the author in Oct. 1973, See htd4644doc.pdf for a letter from the Author to Keith Kings advised of the photograph.trams, tramways, royal park, west coburg, route 68, sw6 class, tram 911 -
 Melbourne Tram Museum
Photograph - Black & White Photograph/s, Herald and Weekly Times, 26/06/1967 12:00:00 AM
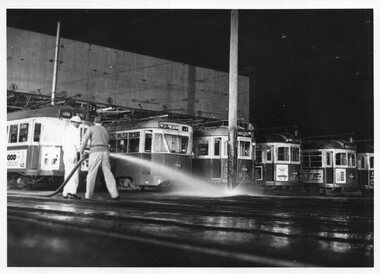
Photographs, Black and White, of: "South Melbourne Depot - re "Our World" TV programme. Hosing the yard to produce a wintry affect. W5 774 at left, then 980, 834, 955, 940. Monday 26/6/67" Herald and Weekly Times photograph with Copyright stamp on rear. The TV programme was the first world wide made through new overseas satellite systems.In ink on the rear: Keith Kings stamp and number S-A-1082 "South Melbourne Depot - re "Our World" TV programme. Hosing the yard to produce a wintry affect. W5 774 at left, then 980, 834, 955, 940. Monday 26/6/67"trams, tramways, south melbourne depot, tv broadcasts, w5 class, sw6 class, tram 774, tram 980, tram 834, tram 955, tram 940, pcc class -
 Melbourne Tram Museum
Photograph - Black & White Photograph/s, Keith Kings, 15/01/1956 12:00:00 AM
Photographs, Black and White, Photo of T modified No. 178 on an all-night service to East Brighton at corner of Swanston and Flinders St, 15/1/1956. Photo by Keith Kings. Photo shows two Austins passing the tram stop with road works signs in position. Would appear that Flinders eastbound has been closed to traffic. In the background is Young & Jackson's, Crofts Store, Coles Store, Nicholas Building, Lyons Cafe,In ink on the rear: Keith Kings stamp and number R(f)(3) "M&MTB - T-178 as "All Night trams, in Swanston St Cnr Flinders City 15/1/56 to East Brighton 7.08am 1/250 f8"trams, tramways, swanston st, flinders st, t class, all night services, road works, tram 178 -
 Melbourne Tram Museum
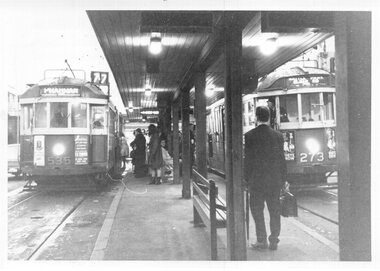
Photograph - Black & White Photograph/s, Keith Kings, 24/06/1968 12:00:00 AM
Photograph, Black and White, Photo of the Batman Ave terminus, passengers loading into trams 5.25 pm 24/6/1968. W2 535 has destination of Prahran, route 77 and W2 273, destination of Wattle Park, Elgar Road along with two White Crow sauce adverts.In ink on the rear: Keith Kings stamp and number 35-36 "M&MTB Batman Ave terminus loading platforms W2 535 and W2 273 5.25pm 24/6/1968" "1/15 @ f3.5 HP4"trams, tramways, batman ave, prahran, wattle park, route 77, w2 class, tram 535, tram 273 -
 Melbourne Tram Museum
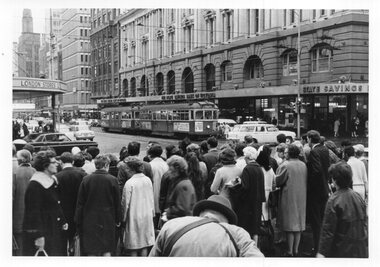
Photograph - Black & White Photograph/s, Keith Kings, 24/10/1968 12:00:00 AM
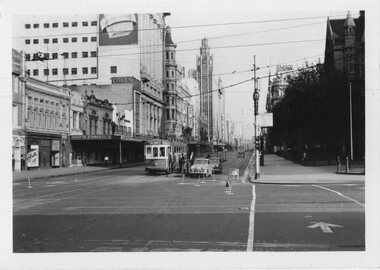
Photograph, Black and White, Photo of the intersection of Bourke and Elizabeth St at evening peak on 24/10/1968, 5.35pm. SW6 872, route 20 to Coburg and W5 740 at the Safety Zone tram stop. Many pedestrians heading towards Flinders St station . In the background is the State Savings Bank and London Stores. The man bending over is possibly a newspaper seller given the leather straps around his back.In ink on the rear: Keith Kings stamp and number 44-23 "M&MTB SW6 872 and W5 740 in Elizabeth St at Corner Bourke St, city 5.35pm 24/10/68" "1/60 @ f8 HP4"trams, tramways, elizabeth st, bourke st, sw6 class, w5 class, route 20, coburg, tram 872, tram 740 -
 Melbourne Tram Museum
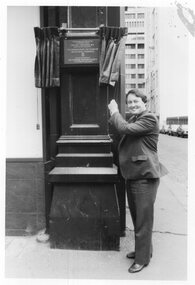
Photograph - Set of 3 Black & White Photograph/s, Keith Kings, 11/11/1985 12:00:00 AM
Set of three Photographs, Black and White, Photo of: .1 - Minister for Transport Tom Roper unveiling a plaque at the City Sq, 11/11/1985? celebrating the centenary of 100 years of Melbourne tramways. See image i1 and i2 for close up of the plaque. .2 - display of cable car 299 and grip car at the city square along with a pseudo railcar. .3 - group of four cars on display in Swanston St with Y469 on the rear.trams, tramways, 100 years of trams, tmsv, swanston st, y class, tram 469 -
 Melbourne Tram Museum
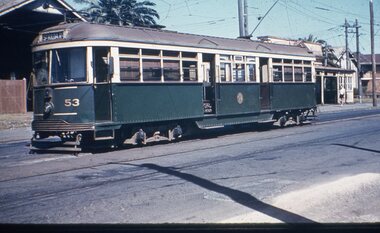
Slide, c1956
Colour slide, 35mm in a white / black Agfachrome plastic mount of VR 53 at the Elwood Depot with the destination of St Kilda Rly. Maybe a duplicate slide made by Keith but retained.Has numbers "33" and "78" stamped on rear.trams, tramways, elwood depot, vr, vr class tramcars, st kilda, st kilda brighton, tram 53 -
 Melbourne Tram Museum
Document - Specification, Melbourne & Metropolitan Tramways Board (MMTB), "Design, Manufacture and delivery of 100 only all-electric trams", Jun. 1965
Specification or Tender Document - titled "Design, Manufacture and delivery of 100 only all-electric trams", and "Background Information and Preliminary Specification", dated June 1965. Bound into a brown foolscap card cover. Details the conditions of tender, conditions of contract, notes, specification, gives background information about Melbourne, dimensions, performance, drivers and conductors, trucks, wheels, brakes, electrical equipment, control panels and drawings. The drawings give a map of the system, typical city route, Glenferrie Road route (grade diagram), concrete track construction, min. radius curves, loading gauge, all-electric tram and mounting details for the trolley base, schedule of prices, tender form, form of contract, schedule of information to be provided by the tenderer. Comprises: 1 - Conditions of Tendering - 1 page 2 - Conditions of Contract - 4 pages 3 - Contents - 3 pages 4 - Notes for prospective tenderers - dated June 1965 5 - General nature of contract - 21 pages 6 - Appendix A - climate data - two sheets 7 - List of 14 appended drawings 8 - O.6887A - cross section of trolley wire 9 - P.13855 - Glenferrie Road, Longitudinal Section 10 - P.13856 - Wattle Park Route 11 - P.13857 - East Preston Route 12 - P13858 - Concrete track construction 13 - P13859 - Open track construction 14 - P.13860 - Paved ballast track construction 15 - P.13887 - Tram Route - locations of substations and section switches 16 - P.13888 - Minimum radius service curves to give minimum clearance between tramcars 17 - P.13889 - Grooved Rail - 102 pounds per yard and tire profile 18 - R10-301 - Loading gauge, proposed electric tramcars 19 - R9706K - Rolling stock data, tramcars 20 - R10306 - Collins Points Shifter - Wiring diagram. 21 - Schedule of data to be supplied by the tenderer 22 - notes on Automatic Points shifters - 2 sheets 23 - Tender prices and delivery periods - 2 sheets. See Reg Item 2266 for the 1972 version and 1583 for the August 1966 version. See Reg Item 4049 for associated newspaper cuttings. See file htd4667i1.pdf for scans of the drawings.In ink in top right hand corner - "Lees"trams, tramways, specification, tenders, z class, mmtb, melbourne -
 Melbourne Tram Museum
Slide - Set of 3, Roy Mitchell, late 1970s
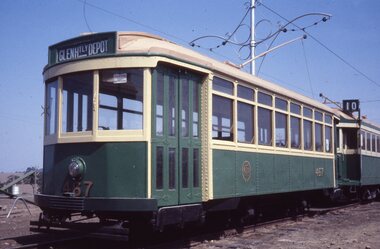
Set of 3 Pakon white plastic mount slides of a visit to the TMSV Bylands, late 1970's, prior to the start of electric tram operations. Photos by Roy Mitchell. .1 - X1 467 on display with a W2 behind. Tram has destination of "Glenhtly Depot" .2 - Horse tram - Zoo - No. 263 with Rebekah standing alongside. .3 - Ballarat 42 on blocks, possibly soon after delivery given its position on the site..1 - "circa 1980's (photo taken) by Roy Mitchell .2 - "1983 tram - unknown adult and Rebekah" .3 - "Tram 1983 by Roy Mitchell"trams, tramways, tmsv, bylands, x1 class, tram 467 -
 Melbourne Tram Museum
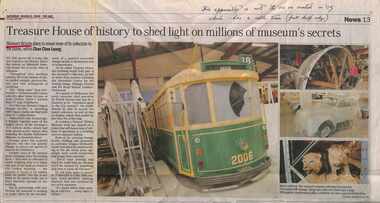
Newspaper, The Age, "Treasure House of history to shed light on millions of museum's secrets", 8/03/2008 12:00:00 AM
Newspaper clipping from The Age, Saturday 8/3/2008, titled "Treasure House of history to shed light on millions of museum's secrets", reporting on the Museum's intention to show more of its exhibits. Features a photo of the Flying Tram - 2006, that was used in the opening of the Commonwealth Games and other objects. Quotes Museum Director, Dr Patrick Greene and Vegan McMasters of the Museum. Item written by Chee Lung with photos by Andrew De La Rue.Keith has written in ink "This opportunity is not the one we visited in '05 which has a cable tram (front half only)".trams, tramways, commonwealth games, museums, events, w class, tram 2006 -
 Melbourne Tram Museum
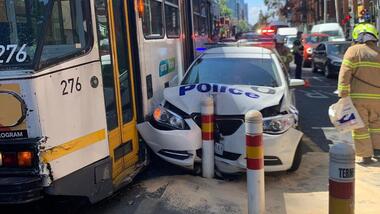
Newspaper, The Age, "Police Car crunched into bollard after colliding with tram in CBD", 16/10/2019 12:00:00 AM
Digital print of page 2 of an on-line article in The Age 16/10/2019, titled "Police Car crunched into bollard after colliding with tram in CBD". Incident at intersection of Flinders and Spencer St on 15/10/2019. Tram Z3 276, on route 70. Shows minor damage to the front of the tram. The bollard won.trams, tramways, accidents, police, spencer st, route 70, flinders st, z3 class, tram 276