Showing 12764 items
matching parade
-
 Ballarat Tramway Museum
Slide - 35mm slide/s, Dave Macartney, Dec. 1968
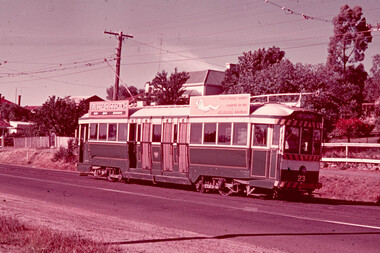
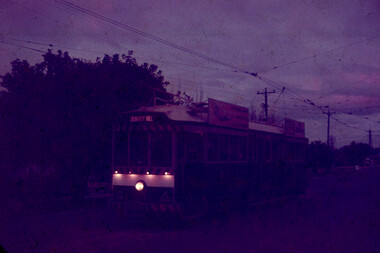
White cardboard mount, 35mm slide, from the Association of Railway Enthusiast's film strip titled "Provincial Tramway Film Strip" of a Bendigo No. 23 passing through Needle Loop, enroute to Eaglehawk. Tram has two SEC Roof advertisements "Electric Cooking" and "Everything's under control in my all electric kitchen" The film strip notes (Reg. Item 2560), provided the following caption details: "Bogie car 23 - freshly painted - negotiates Needles loop on the way to "EAGLEHAWK". - Dec 68 (Dave Macartney)" See image btm2594p.tif for high level scan of image. Stamped on base of slide "11804" and written in ink on top edge "No. 23 Needles Loop Eaglehawk line"tramways, trams, are, film strip, needle loop, eaglehawk, tram 23 -
 Ballarat Tramway Museum
Slide - 35mm slide/s, Graham Evans, Apr. 1972
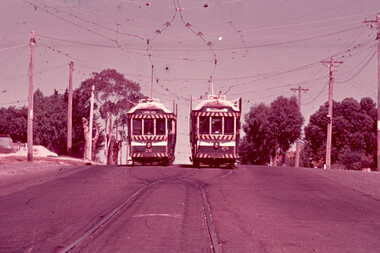
White cardboard mount, 35mm slide, from the Association of Railway Enthusiast's film strip titled "Provincial Tramway Film Strip" of a Bendigo Nos. 26 (Quarry Hill) and 25 (Eaglehawk) at Jobs Gully Loop. The film strip notes (Reg. Item 2560), provided the following caption details: "Bogie cars 26 & 25 meet at Jobs Gully loop about a mile from the terminus. Apr ' 72 (Graham Evans)" See image btm2595p.tif for high level scan of image. Stamped on base of slide "11805" and written in ink on top edge "26 & 25 Jobs Gully Eaglehawk"tramways, trams, are, film strip, jobs gully, eaglehawk, tram 26, tram 25 -
 Ballarat Tramway Museum
Slide - 35mm slide/s, Graham Evans, Apr. 1972
White cardboard mount, 35mm slide, from the Association of Railway Enthusiast's film strip titled "Provincial Tramway Film Strip" of a Bendigo No. 26 descending the Bendigo end of the bridge over the railway near Eaglehawk near Jobs Gully loop. Tram has the destination of Quarry Hill and has four roof advertisements. The film strip notes (Reg. Item 2560), provided the following caption details: "Bogie cars 26 drops down the Bendigo side of the bridge over the Eaglehawk railway, on the long journey to "QUARRY HILL". - Apr ' 72 (Graham Evans)" See image btm2596p.tif for high level scan of image. Stamped on base of slide "11806" and written in ink on top edge "26 Eaglehawk"tramways, trams, are, film strip, jobs gully, eaglehawk, railway bridge, tram 26 -
 Ballarat Tramway Museum
Slide - 35mm slide/s, Harry Jackson, Dec. 1971
White cardboard mount, 35mm slide, from the Association of Railway Enthusiast's film strip titled "Provincial Tramway Film Strip" of a Bendigo No. 3 standing at the Eaglehawk terminus with the Town Hall in the background. Tram reflected in shop windows and shows some of the verandas of High St. Eaglehawk. The film strip notes (Reg. Item 2560), provided the following caption details: "Bogie car No. 3 stands at "EAGLEHAWK" in the hot midday sun. = Dec. '71 (Harry Jackson) See image btm2597p.tif for high level scan of image. Stamped on base of slide "11807" and written in ink on top edge "No. 3 Eaglehawk"tramways, trams, are, film strip, high st, eaglehawk, tram 3 -
 Ballarat Tramway Museum
Slide - 35mm slide/s, Bob Wilson, Dec. 1972
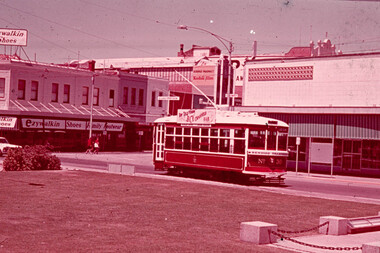
White cardboard mount, 35mm slide, from the Association of Railway Enthusiast's film strip titled "Provincial Tramway Film Strip" of a Bendigo Trust Birney tram, December 1972 at Charing Cross, outbound to the mine. Tram painted in the Bendigo Trust colour scheme and is fitted with a Bendigo Television BCV roof advertisement. "For Television BCV Channel 8 & 11" and underneath the roof advertisement a route sign "Gold Mine - Joss House". Photo has the Ezywalkin store in the background, Fountain Plaza in the foreground. The film strip notes (Reg. Item 2560), provided the following caption details: "The Bendigo Trust operates a tourist service over the former "NORTH BENDIGO" and part of the "GOLDEN SQUARE" lines using severally visually restored cars, such as Birney No. 30 at Charing Cross - Dec ' 72 (Bob Wilson) See image btm2598p.tif for high level scan of image. Stamped on base of slide "11808" and written in ink on top edge "No. 30 Charing Cross"tramways, trams, are, film strip, charing cross, bendigo trust, tram 30 -
 Ballarat Tramway Museum
Slide - 35mm slide/s - set of 5, 1970's
Series of five 35mm slides in a yellow colour "Peter Fox Collins St. Melbourne" cardboard mounts, of view of Bendigo trams. Each slide along the top edge has the details while the bottom edge, has a number in the details area. 2599.1 - No. 9420, No. 24 at Quarry Hill - photo at dusk, poor quality, has surface damage all over slide. 2599.2 - No. 9421, ditto 2599.3 - No. 10132, No. 19 in Bendigo Trust operation colours at intersection of McCrae St & Nolan St, some surface damage around the top and bottom edges. Has Gillies Pies roof advertisement. Tram has destination of North Bendigo. 2599.4 - No. 10133, No. 25, High St, south of Charing Cross - some surface damage around the top and bottom edges. Tram has roof advertisements for "Gas" and "Myers". Has destination of Joss House 2599.5 - No. 10134, No. 19, Pall Mall, some slight surface damage. Tram has destination of Golden Square and has a roof advertisement for Sandhurst Milk and one other company. In blue ink on each slide; number as above in bottom edge. 2599.1 and .2 - "No. 24 Quarry Hill" 2599.3 & .5 - "No. 19 Nth Bendigo" 2599.4 - "No. 25 Nth Bendigo"tramways, trams, bendigo, pall mall, bendigo trust, nolan st, tram 24, tram 19, tram 25 -
 Ballarat Tramway Museum
Photograph - Colour Print/s - set of 9, Warren Doubleday, 27/09/2003 12:00:00 AM
Set of nine colour photographs / prints of No. 27 in service following the completion of the truck overhaul. Taken by Warren Doubleday on 27/9/2003. 2602.1 - No. 27 at Carlton St with John Clowes about to swing the pole. 2602.2 - ditto 2602.3 - picking up passengers at playground stop, Windmill Drive North 2602.4 - ditto 2602.5 - No. 27 at Carlton St 2602.6 - No. 27 with passengers and John Clowes swinging the pole at St Aidans Drive 2602.7 - ditto 2602.8 - No. 27 at St. Aidans with Mt. Warrenheip in the background 2602.9 - ditto Hi res image of i5 added 16-12-15wendouree parade, trackwork, st aidans drive, carlton st, tram 27 -
 Ballarat Tramway Museum
Photograph - Colour Print/s - set of 10, Warren Doubleday, 13/09/2003 12:00:00 AM
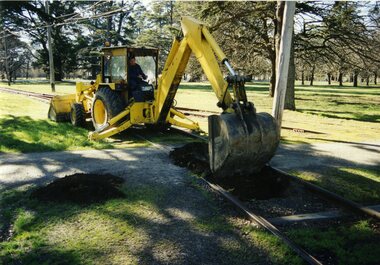
Set of ten colour photographs of the renewal of the sleepers under the level crossing on the main access line, BTM Depot, taken by Warren Doubleday on 13.09.2002. Printed on Agfa Paper. 2603.1 - Commencing excavations - Oedf Byslma on backhoe. 2603.2 - Exposing and pulling out sleepers. 2603.3 - offloading sleepers 2603.4 - inserting sleepers 2603.5 - ditto 2603.6 - Sleepers installed 2603.7 - view along inside rail 2603.8 - view along outside rail 2603.9 - Dog spiking - Alan Snowball, Greg Histen , Danny Smith, Richard Gilbert and Garry Wood, 2603.10 -ditto On rear of each photo in brown felt tip pen, the details of the location and date.btm, access track, trackwork -
 Ballarat Tramway Museum
Photograph - Colour Photograph/s - set of 2, Warren Doubleday, 13/09/2003 12:00:00 AM
Set of two colour photographs of the then new road signs indicating the BTM using the words "Tourist Tramway" in the central median strip of Sturt St. West, or Western Highway at the intersection with Hamilton Ave. Photos taken by Warren Doubleday on 13.09.2002. Printed on Agfa Paper. 2604.1 - Taken from the western side 2604.2 - ditto, but further back. On rear of each photo in brown felt tip pen, the words "New Signage at Highway".btm, hamilton ave, western highway, sturt st west -
 Ballarat Tramway Museum
Photograph - Colour Print/s, Warren Doubleday, 14/09/2003 12:00:00 AM
Colour photograph of Albert St. Sebastopol at the site of the Grey St Loop, looking south. Shows the road layout in 2003. Photo taken by Warren Doubleday on 14/09/2003. Printed on Agfa paper. On rear of each photo in brown felt tip pen, the words "Grey St. Loop site" and "14/9/02".albert st, grey st loop -
 Ballarat Tramway Museum
Slide - 35mm slide/s - set of 2, Travis Jeffrey, 12/1994 or 1/1995
Two Plastic mount (black base, white cover) slides, of No. 671 on No. 4 road of the BTM Depot, being repainted, taken by Travis Jeffrey either Dec. 1994 or Jan. 1995. Painting of the tram in Melbourne MMTB green had commenced, note colour of the destination box. The decision was made soon after to paint the tram in the City of Ballarat Colour.tramways, trams, btm depot, depot, city of ballarat, tram 671 -
 Ballarat Tramway Museum
Slide - 35mm slide/s, Travis Jeffrey, 8/01/1956 12:00:00 AM
Cardboard, Kodachrome slide, white with red band around slide on non viewing side of Geelong No. 18 at East Terminus. Photo shows a crewman boarding the front end of the tram. Possibly taken on the last day of the Chilwell - East West line, 8/1/1956. See Reg. Item 476.5 for a similar photograph taken by Geoff Grant and 2675 for another copy of the slide. Photographer unknown.tramways, trams, geelong, east, tram 18 -
 Ballarat Tramway Museum
Slide - 35mm slide/s, Travis Jeffrey, c1961
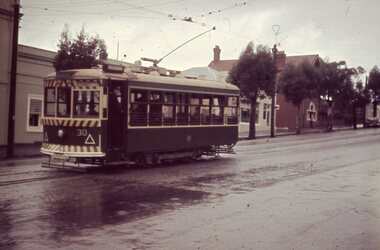
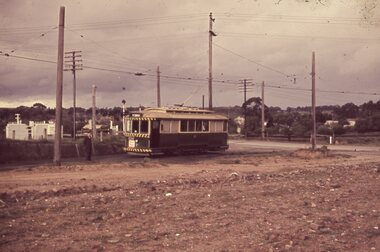
Agfa plastic mount (blue base, white cover) with a photo of Bendigo No. 30 in Mitchell St, just before start of the double track section, c1962. Photo taken during a rainy day. Tram has destination of Eaglehawk. Note SEC crewman standing by door and the passengers looking towards the gutter at the railway station stop. Apparently picking up passengers ex the train on a Sunday. See Other Information regarding a possible date of the slide."BES 1" in penciltramways, trams, bendigo, mitchell st, tram 30 -
 Ballarat Tramway Museum
Slide - 35mm slide/s, Travis Jeffrey, c1962
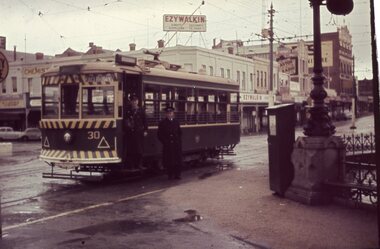
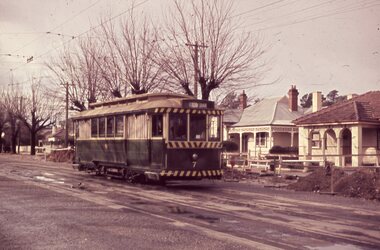
Agfa plastic mount (blue base, white cover) with a photo of Bendigo No. 30 at Charing Cross, in View St., c1962. Photo follows on from Reg Item No. 2612. Photo taken during a rainy day. Tram has destination of Eaglehawk. Note SEC crewman and Inspector standing by door. Has the Ezywalkin building in the background and a billboard advertisement for Astor Radio."BES 2" in penciltramways, trams, bendigo, charing cross, eaglehawk, tram 30 -
 Ballarat Tramway Museum
Slide - 35mm slide/s, Travis Jeffrey, c1962
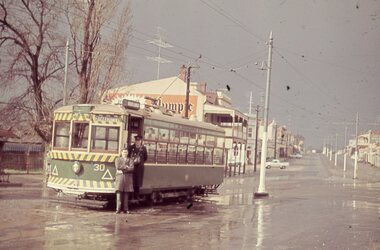
Agfa plastic mount (blue base, white cover) with a photo of Bendigo No. 30 at Eaglehawk terminus, High St. Eaglehawk, c1962. Photo follows on from Reg Item No. 2612. Photo taken during a rainy day. Tram has destination of Eaglehawk. Note SEC crewman and another person standing by door. Has Olympic Tyres ad on a building in the background."BES 3" in penciltramways, trams, bendigo, high st, eaglehawk, tram 30 -
 Ballarat Tramway Museum
Slide - 35mm slide/s, Travis Jeffrey, c1962
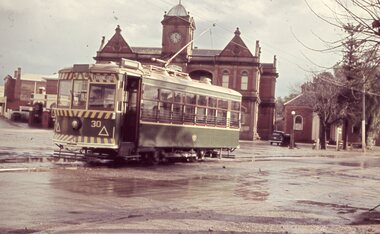
Agfa plastic mount (blue base, white cover) with a photo of Bendigo No. 30 at Eaglehawk terminus, High St. Eaglehawk, c1962 with the Eaglehawk Town Hall in the background. Photo follows on from Reg Item No. 2611 to 2613. Photo taken during a rainy day. Tram has destination of Eaglehawk. Tram has the destination of Charing Cross."BES 4" in penciltramways, trams, bendigo, high st, eaglehawk, tram 30 -
 Ballarat Tramway Museum
Slide - 35mm slide/s, Travis Jeffrey, c1962
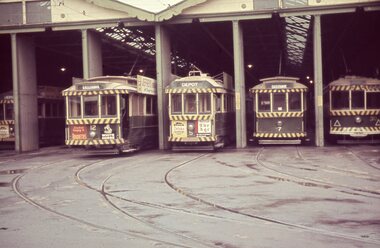
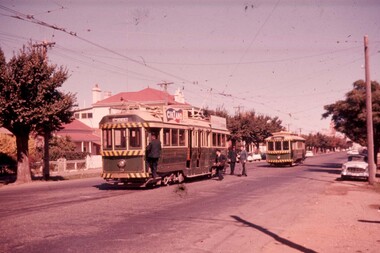
Agfa plastic mount (blue base, white cover) with a photo of four trams standing at the front of Bendigo tram depot. Trams 12, 5, 7 and 30 are featured. Possibly taken on the same day as Reg. item 2611 to 2614, ground in front of depot partly wet and No. 30 showing depot, possibly having run into the depot. Advertisements on the trams feature SEC Briquettes, Whitehorse Whiskey, Cohns Soft Drinks and The Age newspaper. No. 12 has a "Jefferies" road advertisement."BES 5" in penciltramways, trams, bendigo, depot, tram 30, tram 7, tram 5, tram 12 -
 Ballarat Tramway Museum
Slide - 35mm slide/s, Travis Jeffrey, c1962
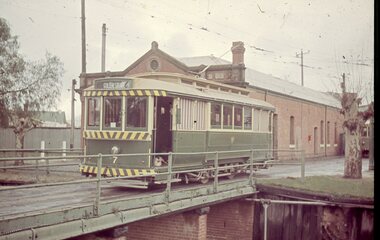
Agfa plastic mount (blue base, white cover) with a photo of Bendigo 7, crossing the bridge outside the Bendigo Tram Depot. Possibly taken on the same day as Reg. item 2611 to 2615. Tram has the destination of Golden Square. Photo taken c1962."BES 6" in penciltramways, trams, bendigo, depot, tram 7 -
 Ballarat Tramway Museum
Slide - 35mm slide/s, Travis Jeffrey, c1962
Agfa plastic mount (blue base, white cover) with a photo of Bendigo 7, in McCrae St, near Arnold St. at the end of the double line track. Note the "End of Section" sign on the pole. Tram has the destination of North Bendigo. Photo taken c1962. Tram has a "The Age" sign on the front cab panel."BES 7" in penciltramways, trams, bendigo, mccrae st, signs, tram 7 -
 Ballarat Tramway Museum
Slide - 35mm slide/s, Travis Jeffrey, c1962
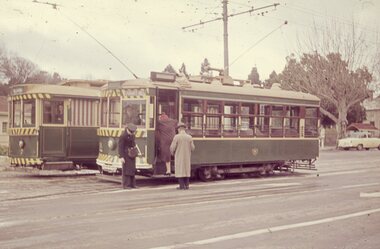
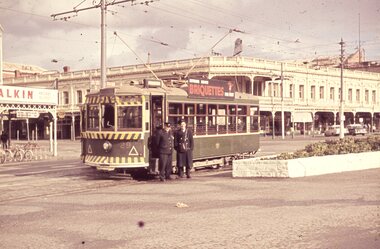
Agfa plastic mount (blue base, white cover) with a photo of Bendigo 7 and possibly No. 29 in Pall Mall Bendigo, with passengers boarding the Birney tram car and the conductor observing them. The Bendigo has the destination of Quarry Hill and No. 7, North Bendigo. Photo taken c1962."BES 8" in penciltramways, trams, bendigo, charing cross, pall mall, tram 7, tram 29 -
 Ballarat Tramway Museum
Slide - 35mm slide/s, Travis Jeffrey, c1962
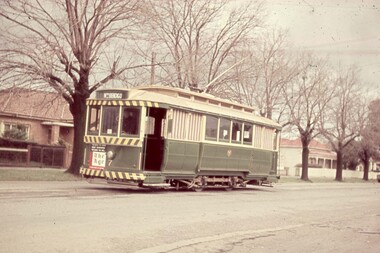
Agfa plastic mount (blue base, white cover) with a photo of Bendigo 7, en route to North Bendigo, McCrae St, about to turn into Nolan St. loop. Tram has the destination of North Bendigo. Photo taken c1962. Tram has a "The Age" sign on the front cab panel. Tram is thought to be outside 260 McCrae St. (8/2004 noted house in background with similar entry at this location."BES 9" in penciltramways, trams, bendigo, north bendigo, mccrae st, tram 7 -
 Ballarat Tramway Museum
Slide - 35mm slide/s, Travis Jeffrey, c1962
Agfa plastic mount (blue base, white cover) with a photo of Bendigo 7,at North Bendigo terminus with the railway level crossing in the background. Tram has the destination of North Bendigo. Photo taken c1962. Tram has a "The Age" sign on the front cab panel."BES 10" in penciltramways, trams, bendigo, north bendigo, tram 7 -
 Ballarat Tramway Museum
Slide - 35mm slide/s, Travis Jeffrey, c1962
Agfa plastic mount (blue base, white cover) with a photo of Bendigo 7, at the north end of the Bridge St. Loop. Photo taken c1962. Note the road works in the background with the kerosene warning lamps and wooden protection barriers. House opposite tram is 122 Bridge St., which is part of a butchers shop (noted during 8/2004 visit)"BES 11" in penciltramways, trams, bendigo, north bendigo, mccrae st, road works, tram 7 -
 Ballarat Tramway Museum
Slide - 35mm slide/s, Travis Jeffrey, c1962
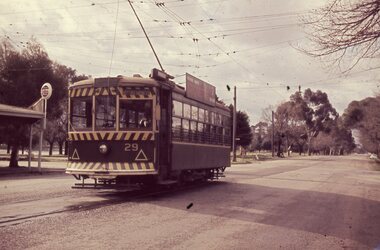
Agfa plastic mount (blue base, white cover) with a photo of Bendigo 29 at Charing Cross, with another single truck car behind it (possibly No. 7). Has two SEC crewman (Driver and Conductor) standing at the front of the tram. In the background is the Ezywalkin Shoe Store and the City Club Hotel in the background. Tram has the destination of North Bendigo and has a SEC Briquettes roof advertisement."BES 12" in penciltramways, trams, bendigo, north bendigo, charing cross, city club hotel, tram 29 -
 Ballarat Tramway Museum
Slide - 35mm slide/s, Travis Jeffrey, c1962
Agfa plastic mount (blue base, white cover) with a photo of Bendigo 29 turning from McCrae St into Nolan St, with Lake Weeroona in the background. Tram has the destination of North Bendigo and has a SEC Briquettes roof advertisement. Note the "Cohns" drink advertisement on the milk bar on the corner."BES 13" in penciltramways, trams, bendigo, north bendigo, nolan st, mccrae st, tram 29 -
 Ballarat Tramway Museum
Slide - 35mm slide/s, Travis Jeffrey, c1962
Agfa plastic mount (blue base, white cover) with a photo of Bendigo 29 at the North Bendigo terminus. Photo taken from the level crossing, looking across to the new housing estate, then under construction. Tram has the destination of Golden Square and has a SEC Briquettes roof advertisement."BES 14" in penciltramways, trams, bendigo, north bendigo, tram 29 -
 Ballarat Tramway Museum
Slide - 35mm slide/s, Travis Jeffrey, c1962
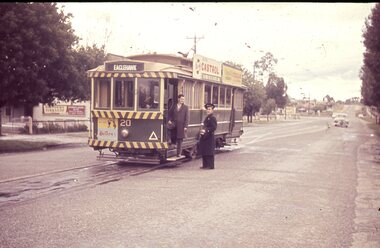
Agfa plastic mount (blue base, white cover) with a photo of Bendigo 20 at the Quarry Hill terminus. Tram has the destination of Eaglehawk and has a Castrol Oil, and another company roof advertisements, with Huttons Ham advertisement on the dash panel. Conductor and another person (enthusiast) outside the tram, driver changing ends on the inside. In the background is the premises for "Northern Terrazzo"."BES 15" in penciltramways, trams, bendigo, quarry hill, tram 20 -
 Ballarat Tramway Museum
Slide - 35mm slide/s, Travis Jeffrey, c1962
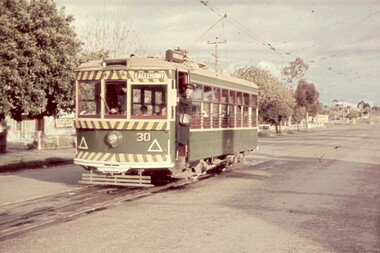
Agfa plastic mount (blue base, white cover) with a photo of Bendigo 30 at the Quarry Hill terminus. Tram has the destination of Eaglehawk . Conductor standing in the doorway for the photographer. In the background is the premises for "Northern Terrazzo"."BES 16" in penciltramways, trams, bendigo, quarry hill, tram 30 -
 Ballarat Tramway Museum
Slide - 35mm slide/s, Travis Jeffrey, c1962
Agfa plastic mount (blue base, white cover) with a photo of Bendigo 30 at Pinder's Loop, Carpenter St. Quarry Hill. Tram has the destination of Eaglehawk ."BES 17" in penciltramways, trams, bendigo, quarry hill, pinders loop, tram 30 -
 Ballarat Tramway Museum
Slide - 35mm slide/s, Travis Jeffrey, c1962
Agfa plastic mount (blue base, white cover) with a photo of Bendigo 5 and No. 20 in McCrae St, Bendigo at the junction with Arnold St, or the junction for the depot. Appears to be changing crews, has driver board, conductor about to board, with two others at the rear of the tram, one in a SEC uniform. Taken c1962, spring or early summer. No. 5 has a Cinzano roof advertisement and destination of North Bendigo."BES 18" in penciltramways, trams, bendigo, mccrae st, depot junction, crews, tram 5, tram 20