Showing 1601 items
matching tram systems
-
 Ballarat Tramway Museum
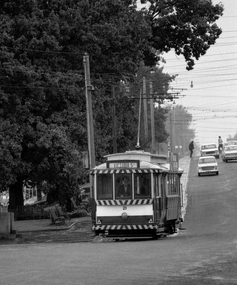
Photograph - Digital image, 1970s
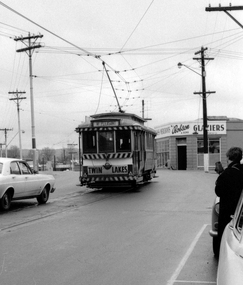
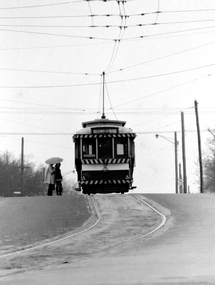
Yields information about the Mt Pleasant route and Main St.Digital image, black and white, of No. 11 in Main St Ballarat, running out to Mt Pleasant. Tram has a Twin Lakes sign. Robson Glaziers shop in the background. Photo taken by Peter Bruce 1970's and 1971, prior to the closure of the Ballarat tramway system. Peter's Title of image: "No. 11 turns out of Barkly St" (not correct location)trams, tramways, mt pleasant, main st, tram 11 -
 Ballarat Tramway Museum
Photograph - Digital image Set of 2, Peter Bruce, No. 11 "Wendouree Parade", 1970s
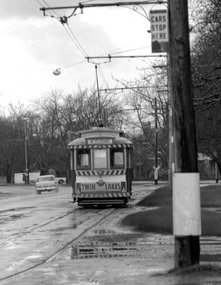
Yields information about Wendouree Parade and the Hamilton Ave area and Sturt St West..Digital image, black and white, of No. 11, with a Twin Lakes sign running a Mt Pleasant service. .1 - In Sturt St west between Hamilton Ave and Russell St loop. .2 - In Wendouree Parade about to turn into Hamilton Ave. Note the Tram timetable on the pole on the right hand side of the photograph. Photo taken by Peter Bruce 1970's and 1971, prior to the closure of the Ballarat tramway system. Peter's Title of images: No. 11 "Wendouree Parade"trams, tramways, wendouree parade, sturt st west, mt pleasant, timetables, hamilton ave, tram 11 -
 Ballarat Tramway Museum
Photograph - Digital image, Peter Bruce, "No. 12 Lydiard St", 1970s
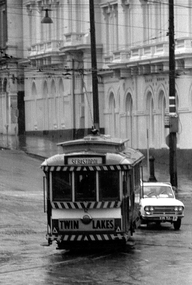
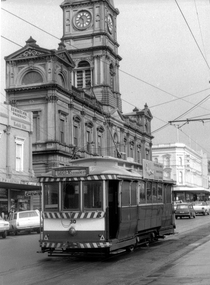
Yields information about the Sturt and Lydiard St intersection.Digital image, black and white, of No. 12 turning from Lydiard St Nth into Sturt St, enroute to Sebastopol, with the Post Office in the background. Tram has a Twin Lakes sign. Photo taken by Peter Bruce 1970's and 1971, prior to the closure of the Ballarat tramway system. Peter's Title of image: "No. 12 Lydiard St"trams, tramways, lydiard st nth, sturt st, post office, tram 12 -
 Ballarat Tramway Museum
Photograph - Digital image Set of 2, 1970s
Yields information about the Lydiard St and Sturt St intersection and some of the signs that were in place at the time.Digital image, black and white, two photos of No. 12 southbound in Lydiard St North, before turning into Sturt St. Note Craigs Royal Hotel street lamp, the fire alarm box, fire plug post and the warning sign behind the Stop sign Photo taken by Peter Bruce 1970's and 1971, prior to the closure of the Ballarat tramway system. Peter's Title of image: "No. 12 and gas lamp" and "No. 12 Lydiard St Sturt 1"trams, tramways, lydiard st nth, craig s hotel, signs, tram 12 -
 Ballarat Tramway Museum
Photograph - Digital image, 1970s
Yields information about the Victoria St route and Bakery Hill.Digital image, black and white, of No. 13 climbing Bakery Hill towards Princess St on the Victoria St route, in Victoria St, with two people waiting for the tram to pass. Photo taken by Peter Bruce 1970's and 1971, prior to the closure of the Ballarat tramway system. Peter's Title of image: "No. 13 Victoria St"trams, tramways, victoria st, bakery hill, tram 13 -
 Ballarat Tramway Museum
Photograph - Digital image, Peter Bruce, "No. 14 Sturt", 1970s
Yields information about Sturt St between Lydiard St and Grenville St, part of the Victoria St route..Digital image, black and white, of No 14 descending the Sturt St hill to Grenville St, enroute to Victoria St. Photo taken by Peter Bruce 1970's and 1971, prior to the closure of the Ballarat tramway system. Peter's Title of image: "No. 14 Sturt"trams, tramways, sturt st, victoria st, tram 14 -
 Ballarat Tramway Museum
Photograph - Digital image, 1970s
Yields information about Sturt St between Grenville St and Lydiard St and the south side of the street.Digital image, black and white, of No. 13 climbing the hill between Grenville St and Lydiard St, past the City Loop with Cooks Private Hotel in the background. Photo taken by Peter Bruce 1970's and 1971, prior to the closure of the Ballarat tramway system. Peter's Title of image: "No. 13 up the hill"trams, tramways, sturt st, grenville st, city loop, tram 14 -
 Ballarat Tramway Museum
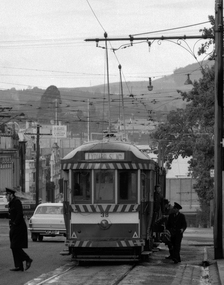
Photograph - Digital image, 1970s
Yields information about Sturt St, Drummond St Jtn and the conductor changing the points.Digital image, black and white, of the conductor on No. 18 standing along side with a point bar, to change the points before the tram goes out along Drummond St Nth. Photo taken by Peter Bruce 1970's and 1971, prior to the closure of the Ballarat tramway system. Peter's Title of image: "No. 18 and Connie"trams, tramways, hospital corner, conductors, points, sturt st, tram 18 -
 Ballarat Tramway Museum
Photograph - Digital image Set of 2, 1970s
Yields information about Sturt St and the intersection with Grenville St.Digital image, black and white, two images of No. 21 at the base of the Sturt St hill before crossing Grenville St, going to Victoria St. Roof advert appears in other photos, but very hard to work out. Photo taken by Peter Bruce 1970's and 1971, prior to the closure of the Ballarat tramway system. Peter's Title of image: "No. 21 bottom Sturt St" and "No. 21 Sturt and Grenville".trams, tramways, sturt st, grenville st, tram 21 -
 Ballarat Tramway Museum
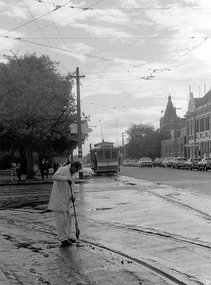
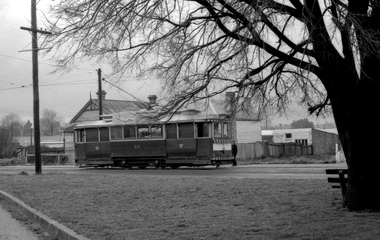
Photograph - Digital image, Peter Bruce, "No. 26 and track cleaner", 1970s
Yields information about track maintenance and the Hospital Junction area.Digital image, black and white, of a track cleaner in white clothing sweeping out the track at Hospital corner with No. 26 approaching along Sturt St. Has the hospital in the background. Photo taken by Peter Bruce 1970's and 1971, prior to the closure of the Ballarat tramway system. Peter's Title of image: "No. 26 and track cleaner"trams, tramways, hospital corner, track, trackwork, tram 26 -
 Ballarat Tramway Museum
Photograph - Digital image, 1970s
Yields information about the Bakery Hill Victoria St and the Caltex Service Station.Digital image, black and white, of No. 26 descending Bakery Hill to Stone's Corner, Victoria and Main St with the Caltex service station in the foreground. Has a lady with slacks walking across the road and a boy wheeling a bike down the footpath. Note the Highway direction signs and service station signage. O'Brien Motors and a book and record shop on the north side Bakery Hill Victoria St. shops. See Reg 4603 for the subsequent photo at this location. Photo taken by Peter Bruce 1970's and 1971, prior to the closure of the Ballarat tramway system. Peter's Title of image: "No. 26 Bridge and Vic1"trams, tramways, victoria st, main st, stones corner, bakery hill, tram 26 -
 Ballarat Tramway Museum
Photograph - Digital image, Peter Bruce, "No. 26 Sturt and Grenville", 1970s
Yields information about the bottom end of Sturt St and the Victoria St route.Digital image, black and white, of No. 26, at the bottom of the Sturt St hill prior to crossing Grenville St, enroute to Victoria St. Note the conductor talking to the driver. Owen Williams, ANZ and Crockers in the view. Photo taken by Peter Bruce 1970's and 1971, prior to the closure of the Ballarat tramway system. Peter's Title of image: "No. 26 Sturt and Grenville"trams, tramways, sturt st, grenville st, victoria st, tram 26 -
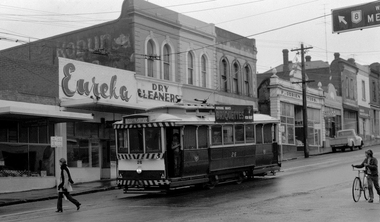 Ballarat Tramway Museum
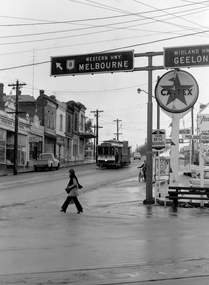
Photograph - Digital image, 1970s
Yields information about the Bakery St Hill on the Victoria St route.Digital image, black and white, of No. 26 at Stones Corner, junction of Bridge, Victoria and Main St, Bakery Hill. No the young girl in slacks walking in front of the tram, the boy wheeling the bike down the street and the young boy standing in the front door of the tram. In the background is Eureka Dry Cleaners, an old Robur tea ad on a building, F. O'Brien Motors. The tram has the destination of Gardens via Sturt St West and a SEC Briquettes Roof advert. Photo taken by Peter Bruce 1970's and 1971, prior to the closure of the Ballarat tramway system. Peter's Title of image: "No. 26 Victoria and Bridge"trams, tramways, stones corner, bakery hill, victoria st, bridge st, tram 26 -
 Ballarat Tramway Museum
Photograph - Digital image, 1970s
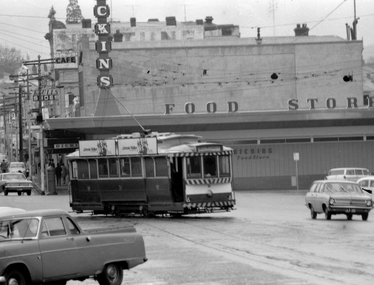
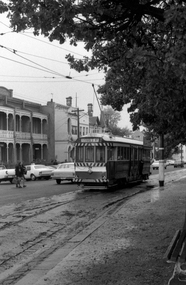
Yields information about the Mt Pleasant route and Main St.Digital image, black and white, of No. 30 outbound to Mt Pleasant in Main St Ballarat, Humffray St. Photo taken by Peter Bruce 1970's and 1971, prior to the closure of the Ballarat tramway system. Peter's Title of image: "No. 30 Bridge and Main"trams, tramways, main st, mt pleasant, tram 30 -
 Ballarat Tramway Museum
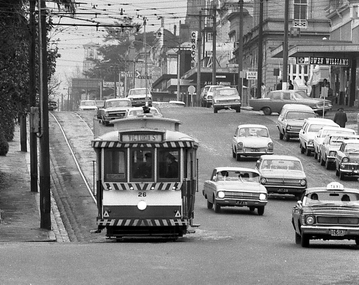
Photograph - Digital image Set of 2, Peter Bruce, "No.30 Bridge and Main", 1970s
Yields information about Bridge St Ballarat and its associated shopping strip.Digital image, black and white, two images, of No. 30 in Bridge St. 4605.1 - at Stones Corner, enroute to Mt Pleasant with Rodda's, Gill & O'Keffe, C.W. Pennan, ANZ Bank and other shops in the background. Note the signal lamps on the right hand side of the photo above the tram stop sign and how the overhead was arranged at this junction. 4605.2 - at Grenville St end, with Faulls Shoes, Suttons HMV and other shops in the background. Photo taken by Peter Bruce 1970's and 1971, prior to the closure of the Ballarat tramway system. Peter's Title of image: "No.30 Bridge and Main" and "No. 30 Bridge St up end".trams, tramways, bridge st, mt pleasant, tram 30 -
 Ballarat Tramway Museum
Photograph - Digital image, Peter Bruce, "No. 30 Main St", 1970s
Yields information about the Main St area.Digital image, black and white, of No. 30 outbound to Mt Pleasant in Main St with a SEC crew member getting off the tram. On the right hand side is a sing for "HUB" and Dennis Swards Upholsterer. Photo taken by Peter Bruce 1970's and 1971, prior to the closure of the Ballarat tramway system. Peter's Title of image: "No. 30 Main St".trams, tramways, main st, mt pleasant, tram 30 -
 Ballarat Tramway Museum
Photograph - Digital image, 1970s
Yields information about the Mt Pleasant Route.Digital image, black and white, of No. 30 in Barkly St, bound for Mt Pleasant, picking up a passenger/s Tram has a SEC Everything's under control in my all electric kitchen" roof advertisement. Photo taken by Peter Bruce 1970's and 1971, prior to the closure of the Ballarat tramway system. Peter's Title of image: "No. 30 makes the stop".trams, tramways, barkly st, mt pleasant, tram 30 -
 Ballarat Tramway Museum
Photograph - Digital image, 1970s
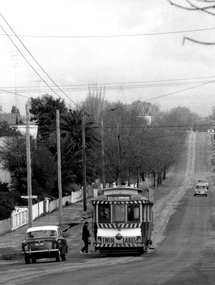
Yields information about the Mt Pleasant route.Digital image, black and white, of No. 30 inbound along Barkly St, Mt Pleasant about to stop to pick up passengers. Tram has the destination of Gardens via Drummond Nth. Photo taken by Peter Bruce 1970's and 1971, prior to the closure of the Ballarat tramway system. Peter's Title of image: "No. 30 Mt Pleasant".trams, tramways, barkly st, mt pleasant, tram 30 -
 Ballarat Tramway Museum
Photograph - Digital image, 1970s
Yields information about the Sturt St city stop with the Town Hall.Digital image, black and white, of No. 30 in Sturt St with the Town Hall in the background, along with Gemmola's Pharmacy and Myers. Advertising Kodak Film. Photo taken by Peter Bruce 1970's and 1971, prior to the closure of the Ballarat tramway system. Peter's Title of image: "No. 30 Sturt St."trams, tramways, sturt st, town hall, tram 30 -
 Ballarat Tramway Museum
Photograph - Digital image, 1970s
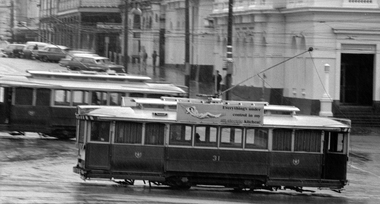
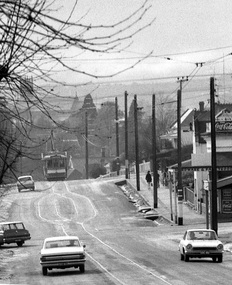
Yields information about the Mt Pleasant route and Barkly St.Digital image, black and white, of No. 30 in bound along Barkly St, Mt Pleasant. Tram has a Twin Lakes sign and destination of Gardens via Drummond Nth. Tram picking up passenger at rear door, while a Vanguard motor car waits. Photo taken by Peter Bruce 1970's and 1971, prior to the closure of the Ballarat tramway system. Peter's Title of image: "No. 31 and Vanguard"trams, tramways, barkly st, mt pleasant, tram 31 -
 Ballarat Tramway Museum
Photograph - Digital image, 1970s
Yields information about the Mt Pleasant route and Barkly St.Digital image, black and white, of No. 31 in Barkly St, Mt Pleasant. Photo taken by Peter Bruce 1970's and 1971, prior to the closure of the Ballarat tramway system. Peter's Title of image: "No. 31 over the hill"trams, tramways, mt pleasant, barkly st, tram 31 -
 Ballarat Tramway Museum
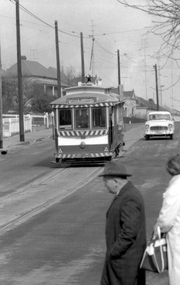
Photograph - Digital image, 1970s
Yields information about the Lydiard St and Sturt St intersection.Digital image, black and white, of No. 31 west bound in Sturt St crossing Lydiard St, while along single trucker goes the other way. No 31 has a "Everything's under control in my all electric kitchen!" roof advertisement. Has the Post Office building in the background. Photo taken by Peter Bruce 1970's and 1971, prior to the closure of the Ballarat tramway system. Peter's Title of image: "No. 31 crossing Lydiard St"trams, tramways, lydiard st, sturt st, tram 31 -
 Ballarat Tramway Museum
Photograph - Digital image, 1970s
Yields information about the Sturt St and Grenville St intersection.Digital image, black and white, of No. 31 entering Sturt St from Bridge St, with S E Dickins Food store in the background. Tram has two Johnnie Walker Whiskey roof advertisements. Photo taken by Peter Bruce 1970's and 1971, prior to the closure of the Ballarat tramway system. Peter's Title of image: "No. 31 Dickins"trams, tramways, sturt st, bridge st, tram 31 -
 Ballarat Tramway Museum
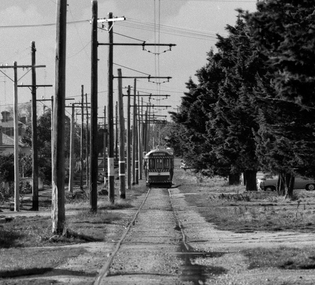
Photograph - Digital image Set of 3, Peter Bruce, Grant St Loop - Mt Pleasant, 1970s
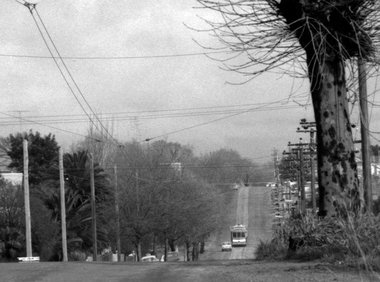
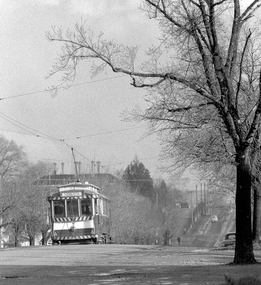
Yields information about the Grant St Loop on the Mt Pleasant line.Digital image, black and white, series of three images of No. 31 entering, travelling through and leaving the Grant St Loop on the Mt Pleasant line. Taken with a telephoto lens at varying lengths. Has a Hardware and Fancy Goods shop on the right hand side. Photo taken by Peter Bruce 1970's and 1971, prior to the closure of the Ballarat tramway system. Peter's Title of image: "No. 31 Approach", "No. 31 into the loop" and "No. 31 leaves the loop"trams, tramways, mt pleasant, grant st, barkly st, tram 31 -
 Ballarat Tramway Museum
Photograph - Digital image Set of 2, Peter Bruce, Lydiard St North, 1970s
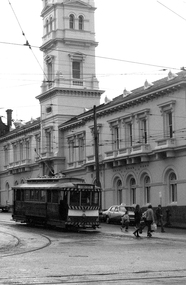
Yields information about the Sturt St and Lydiard St intersection.Digital image, black and white, two images of No. 32 in Lydiard St North. .1 - adjacent to the post office, about to turn into Sturt St, enroute for Sebastopol. .2 - further up Lydiard St North, taken from outside Craigs Royal Hotel (see also Reg Item 4594 for a similar photo) Photo taken by Peter Bruce 1970's and 1971, prior to the closure of the Ballarat tramway system. Peter's Title of image: "No. 32 Lydiard St Nth".trams, tramways, lydiard st, craig s hotel, post office, tram 32 -
 Ballarat Tramway Museum
Photograph - Digital image Set of 3, Peter Bruce, "No. 32 Lydiard St North", 1970s
Yields information about the Lydiard St North Route, and the landscape.Digital image, black and white, set of three images of No. 32 in Lydiard St North, taken with a telephoto lens at various locations. Photo taken by Peter Bruce 1970's and 1971, prior to the closure of the Ballarat tramway system. Peter's Title of image: "No. 32 Lydiard St North"trams, tramways, lydiard st north, tram 32 -
 Ballarat Tramway Museum
Photograph - Digital image Set of 2, Peter Bruce, "No. 34 and schoolgirls", 1970s
Yields information about the Hospital Corner, Drummond and Sturt St intersection area.Digital image, black and white, of No. 34 at Drummond and Sturt intersection, in bound with two school girls walking across the street. The first image is a cropped version of the same photograph. Photo taken by Peter Bruce 1970's and 1971, prior to the closure of the Ballarat tramway system. Peter's Title of image: "No. 34 and schoolgirls"trams, tramways, sturt st, hospital corner, tram 34 -
 Ballarat Tramway Museum
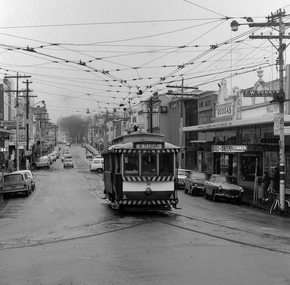
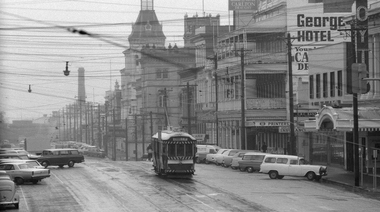
Photograph - Digital image, 1970s
Yields information about Lydiard St between Mair and Sturt Streets.Digital image, black and white, of No. 38 travelling north in Lydiard St North between Sturt and Mair Sts, with many parked cars. Has the George Hotel, the CBC Bank, Hoyts Regent, and other buildings in the view. See also Reg Item 4580 for a later photograph, probably 38 too. Photo taken by Peter Bruce 1970's and 1971, prior to the closure of the Ballarat tramway system. Peter's Title of image: "No. 38 Lydiard St near Mair St."trams, tramways, lydiard st, tram 38 -
 Ballarat Tramway Museum
Photograph - Digital image, Peter Bruce, "No. 38 taken at 1015", 1970s
Yields information about Sturt St City terminus and passengers and crews getting on and off the tram, after changing crews.Digital image, black and white, of No. 38 at the city terminus in Sturt St, with passengers getting off the tram and crews starting to walk across the road, probably after a change over of crews. There is another tram in front of No. 38. No. 38 has the destination of Lydiard St North. Photo taken by Peter Bruce 1970's and 1971, prior to the closure of the Ballarat tramway system. Peter's Title of image: "No. 38 taken at 1015"trams, tramways, crews, sturt st, tram 38 -
 Ballarat Tramway Museum
Photograph - Digital image, Peter Bruce, "No. 39 approaching Sebas", 1970s
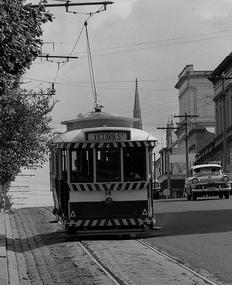
Yields information about the Sebastopol route and area near the terminus.Digital image, black and white, of No. 39 in Albert St Sebastopol, north of the Sebastopol terminus. Shows the condition of the track and the number of poles in the section. Taken with a telephoto lens. Photo taken by Peter Bruce 1970's and 1971, prior to the closure of the Ballarat tramway system. Peter's Title of image: "No. 39 approaching Sebas"trams, tramways, sebastopol, tram 38