Showing 999 items matching "railway sign"
-
 Ringwood and District Historical Society
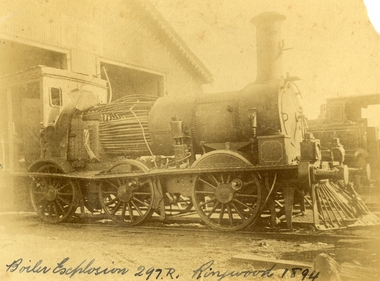
Photograph, Boiler explosion at Ringwood station 20th June 1894 for engine 297R. "Heard in Box Hill"
Black and white photographs - 2 copiesTyped below photograph, "Boiler explosion at Ringwood station 20/6/1894. Heard in Box Hill". Article from newspapers:- Weekly Times (Melbourne, Vic. : 1869 - 1954), Saturday 27 January 1894, page 21 Official enquiry. The Board of Enquiry appointed by the Railway Commissioners to enquire into the causes of the boiler explosion which shattered the locomotive at Ringwood on Saturday night, assembled at the Railway department on Wednesday to commence its deliberations, The board consisted of Mr R. Fulton, engineer, C. W. McLean; engineer to the Marine Board, and Mr Mephan Ferguson, iron-founder. There is some difficulty at the outset about the constitution of the board; It was suggested that the Apt of Parliament contemplated that boards of experts, after the manner of the present one, needed, to have their appointments confirmed by the Governor-in-Council. The point, however, was not considered sufficiently important to prevent the board from proceeding with evidence. Robert Greyford, stationmaster at Ringwood, was the first witness. He said he saw the explosion on Saturday night at about twenty minutes to 8. There was a rush to the engine to see what had happened, and the driver and fireman were both found on the platform of the engine. The driver seemed badly hurt, but the fireman, to all appearances, was not so badly injured. They were both attended to and sent up to Melbourne by the last suburban train. Witness had a look at the engine and found the dome and all the plates round the boiler blown clean, away. The springs were also blown clean away. The Chairman (Mr Fulton) : Did you measure the distance ? Witness: Yes; one of the plates was 209 yards away. A piece from the top of the boiler 15 pounds in weight he found driven into the hard beaten track 410 yards away. Several pieces of boiler plate were found scattered at various distances. The buildings roundabout were injured. The Chairman; Did you notice anything peculiar about either of the driver or the fireman ? — No ; nothing wrong, with either of them. If the engine was blowing off at all, it must have been very light. In your opinion, were they perfectly sober ? — Perfectly. In approaching the station, is there a down or an up grade? — A very slight down grade. How is the road from Healesville ? — Up and down all the way. It is down, grade for about 200 yards coming into Ringwood station. They shut off ; steam about a quarter of a mile away, and come in at a good pace. They generally put on 15 pounds of steam while they are in the station. Mr Ferguson : Had the driver the usual load on ? — Yes ; about the usual load. Witness added that he had known the driver personally for about 10 years, and he had always been a careful, steady, sober man. He did not know the fireman so well. John Palmer, porter at Ringwood station, also saw the explosion. He was attending to the train on its arrival. He was knocked down by the force of the explosion. When he got up he saw the engine driver being carried into the office covered in blood. He noticed nothing peculiar about the driver and fireman, nor about the engine. Mr McLean : How far were you from the engine when you were knocked down ? — From ten to fifteen yards. William Paul, the guard of the train to which the injured locomotive Was attached, said he was looking at the engine at the very moment the explosion occurred. It seemed to come from exactly under the dome. The force of it took him off his feet. He was about 15 yards from the tender. When he rose he tried to reach the engine, but could not do so on account of the steam and coal dust. He called out to know whether any of the passengers were injured, and got no response, so that he concluded they were all right. All the lamps but about half dozen were extinguished by the force of the explosion, although the glass was not broken. He could testify most distinctly that the driver and fireman were both sober. The driver was a man who never drank. The steam started to blow off about a minute and a half before the explosion took place. The last place at which the engine took water was Healesville. The Chairman : Do yon know anything of the quality of the water there ? Is it creek water ? — Yes ; it comes from the Graceburn River. You never heard of its quality ?— No. How long have you known this engine on the road— About 13 months. Hew long have you known the driver on this line ? — About six weeks. I have known the fireman several years. The driver was a strict teetotaller, and I never saw the fireman take anything to drink in his life. Mr T. H, Woodroffe, chief mechanical engineer of the Victorian Railways, produced a report he had written to the secretary, about this explosion. The document gave facts concerning the engine and the explosion. It stated that the rapture seemed to have occurred at the rim of the plates adjoining the fire box. The engine was built at the Phoenix Foundry, Ballarat, in 1883. It was repaired at various times, the last time being in July of last year when it was sent to the Port Melbourne shops, and was then tested to a cold water pressure of 195 and found all right. It was the custom to overhaul all locomotives about every five years. The Chairman : There were no very heavy repairs in July, 1893; were there? — Not to the boilers. The shop manager's report says that the plug and safety tap holes were repaired, five new copper studs put in firebox, ash-pan door repaired, tender cleaned and overhauled, and studs re-rivetted, and boiler tested to pressure of 195, cold water. Mr Woodroffe read the report of the repairs effected to the boiler in December, 1888. That would be the time the plate was put in the boiler. On that occasion three new plates were put in the bottom and the boiler tested up to 195. The Chairman: Do you keep a record of the water used ?— Yes, the water in this case, I think, came from the Maroondah scheme. Mr Woodroffe said boilers were examined front time to time in the running sheds. In his opinion every possible care had been taken to keep the engine in proper care. There might, however, be lessons learnt from this. The Chairman: No doubt. From his examination of the plates [the] witness did not think the state of them could have been detected from the outside. There were no signs of leakage or sweating or anything of that sort. The next witness- was Walter Stinton, workshop manager at Newport and he said that the injured engine had been repeatedly repaired under his charge. He gave a technical account of the repairs effected on various occasions. The testing of locomotives was under his special notice. They had a high pressure pipe running; round the works, and a pump set at 2001b. When the boiler was pumped full of water the pressure when applied up to 1951b. The board appointed by the department to inquire into the Ringwood locomotive boiler explosion sat again at Spencer street on 25th inst. Mr R. Fulton presided and the other members of the board were. Mr Mephan Ferguson and Mr C. W. McLean. Charles Grubb, foreman of the boiler-makers at the Newport workshops, said he had inspected the pieces of plate that had been blown out of the engine, and after examining them, pointed out to the Chief Mechanical Engineer the portion where the plate had started to burst. It was under the lap, on the right hand side of the boiler. The grooving might be accounted for by bad water. During the past twenty years he had examined all the boilers that came into the Williamstown workshops, and while some were hardly marked at all, others were very badly eaten away. The practice was to cut out the defective portions. In this case the boiler was repaired in a similar manner. The Chairman : Can you suggest any other way of repairing so as to prevent accident ? — No, unless by taking out a plate on one side from the joint, and carrying it further up so as to avoid the joints meeting, or by taking out the plate altogether. What would.be the cost .of putting in a new " plate I—Perhaps about double the price; but I wouldn't recommend that course. It would be putting a new plate against plates that have been in use ten years or so and that would not be advisable. I think the present system better. I consider the present system of repairing the best. This is the first we have had so bad like that, to my knowledge. You attributed this to bad water. Is there no other probable cause ? — Well; unless the iron be bad. This was Lowmoor iron. I think this accident was caused by the eating away of plates. This one was the worst I have seen, for the short time it had been running. We use three classes of iron — Lowmoor, Monkbridge and Bowling. By Mr Woodroffe (Chief Mechanical Engineer) ; There are engines still running that were repaired at the same time as this one, in 1888, and. in the same way. These are engines 339 and 333. They have been recently examined and are in splendid order. What in your experience, is the age of a boiler on the Victorian railways? — From 17 to 20 years our earlier boilers stood. The later boilers don't stand so well. How is that? — There is difference in construction, and the material is lighter. The old boilers had thicker plates. Have you been asked in any way to curtail boiler affairs? — No, sir; nor in any way. You have never hesitated to carry out any necessary repairs? — Never. Our orders have been to exercise every care in examining, repairing and renewing boilers. Witness said that his practice was when an engine came into the workshop to find out how long she had been running. If over five years, he informed the workshop manager, and they thought it necessary the tubes were taken nut. If everything was in good order witness reported to the manager. The cost of taking out the tubes and putting them in again was about L20. Mr Woodroffe : Have you ever hesitated to repair a boiler on the score of expense ? — No, never. Mr McLean : Hew do yon ascertain whether a boiler requires repairs?— I keep a record of every boiler examined. From every boiler that comes in I have the dome covers taken off, and when it is practical I get inside. l can almost tell from the top of a boiler what the bottom is like. If there is any doubt about it I have the tubes taken out. If I have suspicion of defective plate I cause to have bored a triangle in the plate at the point where there is the most wear. There is a travelling inspector who visits all the running sheds of the colony except Port Melbourne and tests the boilers. He reports to us and we note what he points out. Alfred Thompson, locomotive inspector of the eastern section, said he knew this engine, 297R. He read a list of her repairs. He heard of the accident on Saturday night and went up to Ringwood. The Chairman : Did you ever notice anything peculiar about the engine? — No, I considered her A1 and would not have hesitated to have put on 140lb pressure owing to the repairs she had undergone. Witness considered that the explosion was caused by the expansion and contraction of the plates ; and, no doubt, the plate had been eaten away through bad water. The other side of the boiler showed: signs of corrosion: By Mr Woodroffe ; Is every care taken with the boilers ? — Yes, every possible care is taken for the safety of boilers, Weekly Times (Melbourne, Vic. : 1869 - 1954), Saturday 27 January 1894, page 7 EXPLOSION OF A LOCOMOTIVE BOILER, NARROW ESACPE FROM FATALITIES. THE DAMAGED ENGINE. [See drawing of loco – saved in “Railways” folder] The explosion of a locomotive boiler at Ringwood on Saturday evening, formed the subject of much discussion in railway circles on Monday. The Minister arrived at the office at an unusually early hour and immediately entered into a consultation with the acting chairman, Mr Kibble, and Mr Commissioner Murray. As the result of the interview it was resolved to ask three gentlemen of acknowledged engineering experience to sib as a board with the . object of inquiring into the cause of the accident and furnishing a report. Mr Richardson and the Commissioners are tally seized of the importance of having a searching investigation into the accident, and, with Mr Murray, the former went to Ringwood to inspect the scene of the disaster. They will he accompanied by Mr Woodroffe. During the morning no official report had come to hand from the driver or fireman of the engine in reference to the accident, but that is thought to be due to the circumstance that they have not sufficiently recovered to be able to give a circumstantial account of what occurred. The engine was one of the old R's, and, Mr Kibble pronounced them to be about the best class of engines used. So far nothing can be said as to the probable cause of the accident, as the broken plating of the engine has not been submitted to the inspection of experts. Weekly Times (Melbourne, Vic. : 1869 - 1954), Saturday 27 January 1894, page 7 STATEMENT BY THE FIREMAN. This morning Thomas Miles, fireman on the engine the boiler of which exploded on Saturday night, is suffering from an injury to the spine, as well as a very severe shaking to the system. He states that he was fireman on the engine attached to the train which left Healesville on Saturday evening, at ten minutes to 8. Everything went all right until Ringwood was reached, when, .just as the train was about to continue its journey, a load explosion took place and Miles remembers nothing more until he was picked np on the platform ; and found himself suffering from a pain in the back, and an injury to his arm. He cannot think of any reason which could have caused the explosion, as there was plenty of water in the boiler, and everything seemed working all right. Mr R. Fulton, consulting engineer, of Queen street; Mr McLean, a member of the Marine Board ; and Mr Mephan Ferguson, engineer, have consented to act as a board to inquire into the cause of the engine boiler explosion at Ringwood on Saturday evening. The board has been appointed under section 117 of Act 1135, which provides that the Governor-in-Council may direct the taking of a such a step. Mr1 Fulton will act as chairman of the board, which met for the first time at the railway offices, Spencer street, this forenoon. Before separating the members of the Board paid a visit to the Prince's Bridge locomotive sheds in company with Mr Woodroffe, the chief mechanical engineer, for the purpose of inspecting the shattered boiler. It has been stated that the explosion is known to have been caused by a flaw in a plate which was put on the boiler about four years ago, but enquiries have tailed to elicit anything in support of that view. The engineers connected with the department are not inclined to say anything on the subject. Weekly Times (Melbourne, Vic. : 1869 - 1954), Saturday 14 April 1894, page 20 The Ringwood Boiler Explosion, The Minister of Railways has received the supplementary report of the board appointed by him to investigate the circumstances connected with the explosion of a locomotive boiler at Ringwood. In their first report the board did not attach blame to anyone. Mr Richardson felt satisfied that the responsibility of having the engines properly inspected and overhauled periodically could be fixed if the inquiry were extended. He therefore referred the matter again to the Board, who took further evidence. In the report now furnished, the Board hold Loco. Inspector Thompson blameable, but point out as a mitigating circumstance that he had not received "written instructions" respecting inspections and overhauls. Weekly Times (Melbourne, Vic. : 1869 - 1954), Saturday 7 July 1894, page 32 The Ringwood Boiler Explosion. The Minister of Railways takes exception to the tone of a paragraph appearing in a morning contemporary respecting the Ringwood boiler explosion. It makes it appear that Mr Richardson has referred the report of the board which considered the facts connected with the explosion to the Crown solicitor simply because he differed from the finding of the board. The Minister explains that when he received the report he found that the responsibility for having boilers properly inspected and overhauled had not been clearly fixed. He personally obtained farther evidence on that point, and arrived at a conclusion, from which the commissioners differed. As he did not like to take upon himself the responsibility of deciding upon the effect of the evidence, he submitted the matter to the Crown Solicitor, but that officer did not furnish him with the information sought. He has, therefore, referred the question to the Attorney-General, together with the draft of a regulation respecting boiler inspections and overhauls in the future. Mr Richardson says that his whole aim is to have the responsibility positively fixed. Weekly Times (Melbourne, Vic. : 1869 - 1954), Saturday 28 April 1894, page 23 The Minister of Railways has completed his consideration of the supplementary report received by him from the Ringwood Boiler Explosion Board. The report, it will be remembered, held Loco-Inspector Thompson blameable for the non-inspection of the boiler, but considered there was extenuating circumstances. There was a certain amount of doubt as to the absolute instructions given for overhauling engines periodically. Mr. Richardson is sending the report on to the Commissioners with instructions that the responsibility respecting inspection of boilers shall be made clear for the future. -
 Melbourne Tram Museum
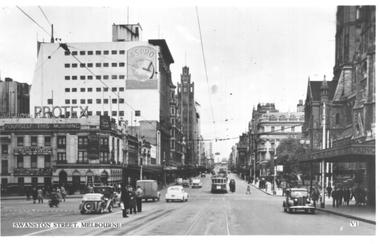
Postcard, Valentine's, "Swanston Street, Melbourne", 1930s
Valentine's postcard titled "Swanston Street, Melbourne", Number V1, looking north from south of Flinders Street. A W2 class tram with dash canopy lighting bound for East Bright on Route 64 is at the Flinders Street tram stop in Swanston Street. There are people standing in the north bound safety zone. Has Young & Jacksons Hotel advertising Protex and shows at the Tivoli Theatre. In the background is a sign for Aspro on the Nicholas Building. To the right is part of the awning leading into the Princes Bridge Railway Station.Yields information about Swanston Street during the 1940s.Postcard - printed, unused, Valentine Seriestrams, tramways, swanston st, princes bridge station, flinders street, flinders st, w2 class, route 64 -
 Melbourne Tram Museum
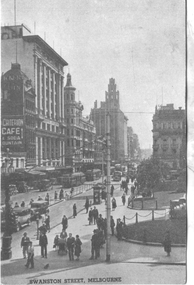
Postcard, "Swanston Street, Melbourne", 1930s
Southern Series No. 30, titled "Swanston Street, Melbourne" looking from the roof of Princes Bridge railway station, north along Swanston Street. Has at least four trams in the view, along with the long Safety Zone Stop handrails for the southbound tram stop. In the background is a sign for the Criterion Cafe & Soda Fountain.Yields information about Swanston Street during the 1930s.Postcard - printed, unused, Southern Series No. 30trams, tramways, swanston st -
 Ballarat Tramway Museum
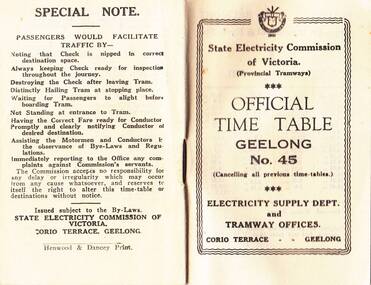
Photograph - Digital image, State Electricity Commission of Victoria (SECV), "Official Timetable Geelong No. 45"
Digital image or copy of the SEC "Official Timetable Geelong No. 45", 16 image files - 32 pages, giving details of the fares, transfers, luggage or parcels, lost property, times of each tram on the Belmont (1), Chilwell (2), East Geelong (3), Eastern Park (4), Newtown (5), North (6), West Geelong (7). Gives details of railway station trams, transfer ticket arrangements, depot workings and the night signs carried out each tram. Based on the 4d max fare, it is a circa 1949 timetable - see reference. See also Reg Item 5629 for Timetable No. 39, c1943 and 8552 for a photocopy of No. 47, March 1953 and 9821 for a photocopy of No. 46. See BTM document, "SEC fare changes - by law references etc.doc, dated 3/9/2006.trams, tramways, geelong, timetables -
 Bendigo Historical Society Inc.
Photograph - BASIL MILLER COLLECTION: TRAM - BENDIGO TRAMWAYS, unknown
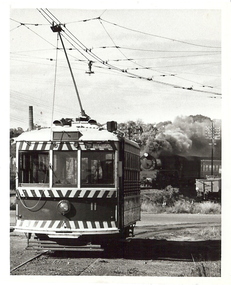
BHS CollectionNo. 11 tram departing North Bendigo terminus, steam train on railway line on right hand side of tram with steam issuing forth, following carriages barely visible. 'Bendigo' destination sign on tram. Mining chimney visible on left hand side behind tram.Claver P. Carroll, 79 Eaglehawk Road, Eaglehawk, Victoria. Tr - 20basil miller, bendigo tramways, north bendigo, steam train, claver carroll -
 Bendigo Historical Society Inc.
Map - MARKS COLLECTION: TRAMWAY OR RAILWAY MAP SANDHURST
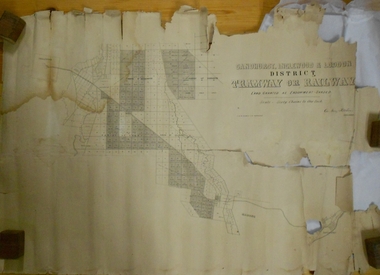
Original map of 'land granted as endowment' for tramway or railway. On top Rh corner of map, in bold print 'Sandhurst, Inglewood & Loddon district Tramway or Railway. Land granted as endowment shaded, scale 60 chains to 1 inch. Lithographed by J & W. Holmes, Lith. Sandhurst'. Signed by Geo Avery Fletcher, Engineer. Map shows Parish of Leichardt, Parish of Yarraberb, Parish of Bridgwater and a section of Marong. On bottom RH corner, is small map of Sandhurst, showing railway reserve. Top LH corner, Inglewood. Map shows route of railway line from Sandhurst to Inglewood.map, marks collection, railway, inglewood -
 Canterbury History Group
Photograph - Bronze Plaque in the ground in Theatre Place noting the original railway station entrance off Maling Road, Canterbury, Jan Pigot, 1994
... Canterbury Maling Road Theatre Place Signs Canterbury ...Coloured photograph of Bronze Plaque in the ground in Theatre Place noting the original railway station entrance off Maling Road, Canterburycanterbury, maling road, theatre place, signs, canterbury railway station -
 Melbourne Tram Museum
Photograph - VR Tram 51 at Black Rock, K McCarthy, 1-1-1951
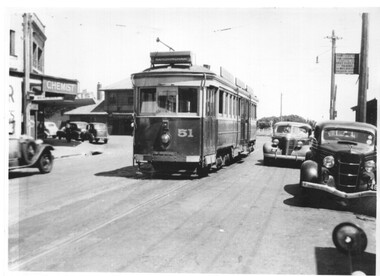
Photo of VR tram No. 51 at the Black Rock terminus of the Victorian Railways operated Sandringham to Black Rock line. In the background is a chemist and on the right hand side, a sign on a pole advertising the tram and the fast electric train service to Melbourne. Photo by Ken McCarthy 1-1-1951Yields information about VR tram No. 51 at Black Rock.Black and white photograph with notes on the rear.Typed "VR 51 Sandringham - Black Rock line 1-1-51, at Black Rock terminus. K McCarthy Photo No. 782"tramcars, tramways, vr, sandringham to black rock, tram 51, black rock -
 Hymettus Cottage & Garden Ballarat
Work on paper - Award Certificate, Victorian Railways Institute award, 1924
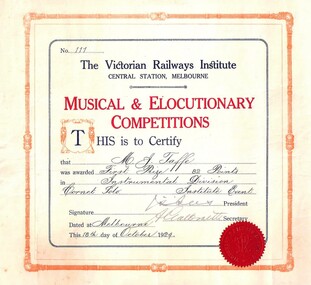
Won by Michael Taffe at the Flinders St station Ballroom in October 1924. Michael Taffe had been the Australian Junior Cornet Solo Champion four years earlier.This certificate is an example of the support the Victorian Railways Institute, and other government and corporate staff organisations gave to their employees in a range of cultural fields from the nineteenth to the late twentieth century. Small certificate with Victorian Railways Institute seal.Details provided in copperplate writing - M. J. Taffe, First Prize 82 Points Instrumental Division Cornet Solo Institute Event , signed by president and secretary and dated Melbourne 18th October 24.victorian railways institute, cornet, taffe, melbourne, central station., railways -
 Flagstaff Hill Maritime Museum and Village
Ceramic - Ceramic Pieces, Minton Potteries, 1877
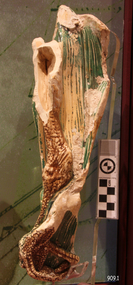
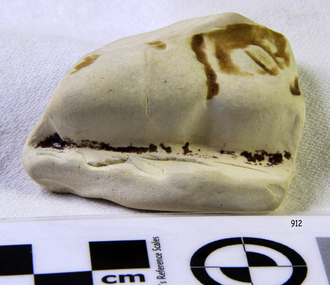
The ceramic pieces are two of five porcelain fragments washed up from the Loch Ard wreck near Port Campbell, Victoria. These fragments resemble the foot and leg of a large bird, and legend has it that another bird had drifted ashore at the same time as the Loch Ard peacock. This figurine is displayed at Flagstaff Hill Maritime Museum and regarded as the most valuable shipwreck relic. It is believed that all five fragments could belong to another peacock or a Minton porcelain stock that had been photographed in a Home Beautiful magazine in 1928. This stork appeared to be missing a leg and foot, and experts have hypothesised that the fragments could belong to this stork, the whereabouts of which are currently unknown. History of the Loch Ard: The Loch Ard got its name from ”Loch Ard”, a loch which lies to the west of Aberfoyle, and to the east of Loch Lomond. It means "high lake" in Scottish Gaelic. The vessel belonged to the famous Loch Line, which sailed many vessels from England to Australia. The Loch Ard was built in Glasgow by Barclay, Curdle and Co. in 1873, the vessel was a three-masted square-rigged iron sailing ship that measured 79.87 meters in length, 11.58 m in width, and 7 m in depth with a gross tonnage of 1693 tons with a mainmast that measured a massive 45.7 m in height. Loch Ard made three trips to Australia and one trip to Calcutta before its fateful voyage. Loch Ard left England on March 2, 1878, under the command of 29-year-old Captain Gibbs, who was newly married. The ship was bound for Melbourne with a crew of 37, plus 17 passengers. The general cargo reflected the affluence of Melbourne at the time. Onboard were straw hats, umbrellas, perfumes, clay pipes, pianos, clocks, confectionery, linen and candles, as well as a heavier load of railway irons, cement, lead and copper. There were other items included that were intended for display in the Melbourne International Exhibition of 1880. The voyage to Port Phillip was long but uneventful. Then at 3 am on June 1, 1878, Captain Gibbs was expecting to see land. But the Loch Ard was running into a fog, which greatly reduced visibility. Captain Gibbs was becoming anxious as there was no sign of land or the Cape Otway lighthouse. At 4 am, the fog lifted, and a lookout aloft announced that he could see breakers. The sheer cliffs of Victoria's west coast came into view, and Captain Gibbs realised that the ship was much closer to them than expected. He ordered as much sail to be set as time would permit and then attempted to steer the vessel out to sea. On coming head-on into the wind, the ship lost momentum, the sails fell limp, and Loch Ard's bow swung back towards land. Gibbs then ordered the anchors to be released in an attempt to hold their position. The anchors sank some 50 fathoms - but did not hold. By this time, the ship was among the breakers, and the tall cliffs of Mutton Bird Island rose behind. Just half a mile from the coast, the ship's bow was suddenly pulled around by the anchor. The captain tried to tack out to sea, but the ship struck a reef at the base of Mutton Bird Island, near Port Campbell. Waves subsequently broke over the ship, and the top deck became loose from the hull. The masts and rigging came crashing down, knocking passengers and crew overboard. When a lifeboat was finally launched, it crashed into the side of Loch Ard and capsized. Tom Pearce, who had launched the boat, managed to cling to its overturned hull and shelter beneath it. He drifted out to sea and then, on the flood tide, came into what is now known as Loch Ard Gorge. He swam to shore, bruised and dazed, and found a cave for shelter. Some of the crew stayed below deck to shelter from the falling rigging, but drowned when the ship slipped off the reef into deeper water. Eva Carmichael, a passenger, had raced onto the deck to find out what was happening, only to be confronted by towering cliffs looming above the stricken ship. In all the chaos, Captain Gibbs grabbed Eva and said, "If you are saved, Eva, let my dear wife know that I died like a sailor". That was the last Eva Carmichael saw of the captain. She was swept off the ship by a huge wave. Eva saw Tom Pearce on a small rocky beach and yelled to attract his attention. He dived in and swam to the exhausted woman and dragged her to shore. He took her to the cave and broke open the case of brandy, which had washed up on the beach. He opened a bottle to revive the unconscious woman. A few hours later, Tom scaled a cliff in search of help. He followed hoof prints and came by chance upon two men from nearby Glenample Station, three and a half miles away. In a complete state of exhaustion, he told the men of the tragedy. Tom then returned to the gorge while the two men rode back to the station to get help. By the time they reached Loch Ard Gorge, it was cold and dark. The two shipwreck survivors were taken to Glenample Station to recover. Eva stayed at the station for six weeks before returning to Ireland by steamship. In Melbourne, Tom Pearce received a hero's welcome. He was presented with the first gold medal of the Royal Humane Society of Victoria and a £1000 cheque from the Victorian Government. Concerts were performed to honour the young man's bravery and to raise money for those who lost family in the disaster. Of the 54 crew members and passengers on board, only two survived: the apprentice, Tom Pearce and the young woman passenger, Eva Carmichael, who lost her family in the tragedy. Ten days after the Loch Ard tragedy, salvage rights to the wreck were sold at auction for £2,120. Cargo valued at £3,000 was salvaged and placed on the beach, but most washed back into the sea when another storm developed. The wreck of Loch Ard still lies at the base of Mutton Bird Island. Much of the cargo has now been salvaged, and some items washed up into Loch Ard Gorge. Cargo and artefacts have also been illegally salvaged over many years before protective legislation was introduced in March 1982. One of the most unlikely pieces of cargo to have survived the shipwreck was a Minton majolica peacock- one of only nine in the world. The peacock was destined for the Melbourne 1880 International Exhibition. It had been well packed, which gave it adequate protection during the violent storm. Today, the Minton peacock can be seen at the Flagstaff Hill Maritime Museum in Warrnambool. From Australia's most dramatic shipwreck, it has now become Australia's most valuable shipwreck artifact and is one of the very few 'objects' on the Victorian State Heritage Register.The shipwreck of the Loch Ard is of significance for Victoria and is registered on the Victorian Heritage Register ( S 417). Flagstaff Hill has a varied collection of artefacts from Loch Ard and its collection is significant for being one of the largest accumulation of artefacts from this notable Victorian shipwreck. The collections object is to also give us a snapshot into history so we can interpret the story of this tragic event. The collection is also archaeologically significant as it represents aspects of Victoria's shipping history that allows us to interpret Victoria's social and historical themes of the time. The collections historically significance is that it is associated unfortunately with the worst and best-known shipwreck in Victoria's history. Glazed ceramic fragments; the two fragments fit together. They appear to be a leg section with foliage.flagstaff hill, flagstaff hill maritime museum and village, warrnambool, maritime museum, maritime village, great ocean road, shipwreck coast, ceramic, porcelain, piece, fragment, ceramic bird, loch ard, shipwreck, salvage, recover, 1877, 1878, minton, shard -
 Flagstaff Hill Maritime Museum and Village
Domestic object - Teapot, 1878
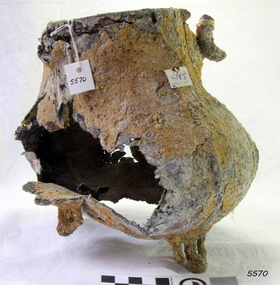
History of the Loch Ard: The Loch Ard got its name from ”Loch Ard” a loch which lies to the west of Aberfoyle, and the east of Loch Lomond. It means "high lake" in Scottish Gaelic. The vessel belonged to the famous Loch Line which sailed many vessels from England to Australia. The Loch Ard was built in Glasgow by Barclay, Curdle and Co. in 1873, the vessel was a three-masted square-rigged iron sailing ship that measured 79.87 meters in length, 11.58 m in width, and 7 m in depth with a gross tonnage of 1693 tons with a mainmast that measured a massive 45.7 m in height. Loch Ard made three trips to Australia and one trip to Calcutta before its fateful voyage. Loch Ard left England on March 2, 1878, under the command of 29-year-old Captain Gibbs, who was newly married. The ship was bound for Melbourne with a crew of 37, plus 17 passengers. The general cargo reflected the affluence of Melbourne at the time. Onboard were straw hats, umbrella, perfumes, clay pipes, pianos, clocks, confectionery, linen and candles, as well as a heavier load of railway irons, cement, lead and copper. There were other items included that were intended for display in the Melbourne International Exhibition of 1880. The voyage to Port Phillip was long but uneventful. Then at 3 am on June 1, 1878, Captain Gibbs was expecting to see land. But the Loch Ard was running into a fog which greatly reduced visibility. Captain Gibbs was becoming anxious as there was no sign of land or the Cape Otway lighthouse. At 4 am the fog lifted and a lookout aloft announced that he could see breakers. The sheer cliffs of Victoria's west coast came into view, and Captain Gibbs realised that the ship was much closer to them than expected. He ordered as much sail to be set as time would permit and then attempted to steer the vessel out to sea. On coming head-on into the wind, the ship lost momentum, the sails fell limp and Loch Ard's bow swung back towards land. Gibbs then ordered the anchors to be released in an attempt to hold its position. The anchors sank some 50 fathoms - but did not hold. By this time the ship was among the breakers and the tall cliffs of Mutton Bird Island rose behind. Just half a mile from the coast, the ship's bow was suddenly pulled around by the anchor. The captain tried to tack out to sea, but the ship struck a reef at the base of Mutton Bird Island, near Port Campbell. Waves subsequently broke over the ship and the top deck became loosened from the hull. The masts and rigging came crashing down knocking passengers and crew overboard. When a lifeboat was finally launched, it crashed into the side of Loch Ard and capsized. Tom Pearce, who had launched the boat, managed to cling to its overturned hull and shelter beneath it. He drifted out to sea and then on the flood tide came into what is now known as Loch Ard Gorge. He swam to shore, bruised and dazed, and found a cave in which to shelter. Some of the crew stayed below deck to shelter from the falling rigging but drowned when the ship slipped off the reef into deeper water. Eva Carmichael a passenger had raced onto the deck to find out what was happening only to be confronted by towering cliffs looming above the stricken ship. In all the chaos, Captain Gibbs grabbed Eva and said, "If you are saved Eva, let my dear wife know that I died like a sailor". That was the last Eva Carmichael saw of the captain. She was swept off the ship by a huge wave. Eva saw Tom Pearce on a small rocky beach and yelled to attract his attention. He dived in and swam to the exhausted woman and dragged her to shore. He took her to the cave and broke the open case of brandy which had washed up on the beach. He opened a bottle to revive the unconscious woman. A few hours later Tom scaled a cliff in search of help. He followed hoof prints and came by chance upon two men from nearby Glenample Station three and a half miles away. In a complete state of exhaustion, he told the men of the tragedy. Tom then returned to the gorge while the two men rode back to the station to get help. By the time they reached Loch Ard Gorge, it was cold and dark. The two shipwreck survivors were taken to Glenample Station to recover. Eva stayed at the station for six weeks before returning to Ireland by steamship. In Melbourne, Tom Pearce received a hero's welcome. He was presented with the first gold medal of the Royal Humane Society of Victoria and a £1000 cheque from the Victorian Government. Concerts were performed to honour the young man's bravery and to raise money for those who lost family in the disaster. Of the 54 crew members and passengers on board, only two survived: the apprentice, Tom Pearce and the young woman passenger, Eva Carmichael, who lost her family in the tragedy. Ten days after the Loch Ard tragedy, salvage rights to the wreck were sold at auction for £2,120. Cargo valued at £3,000 was salvaged and placed on the beach, but most washed back into the sea when another storm developed. The wreck of Loch Ard still lies at the base of Mutton Bird Island. Much of the cargo has now been salvaged and some items were washed up into Loch Ard Gorge. Cargo and artefacts have also been illegally salvaged over many years before protective legislation was introduced in March 1982. One of the most unlikely pieces of cargo to have survived the shipwreck was a Minton majolica peacock- one of only nine in the world. The peacock was destined for the Melbourne 1880 International Exhibition in. It had been well packed, which gave it adequate protection during the violent storm. Today the Minton peacock can be seen at the Flagstaff Hill Maritime Museum in Warrnambool. From Australia's most dramatic shipwreck it has now become Australia's most valuable shipwreck artifact and is one of very few 'objects' on the Victorian State Heritage Register.The shipwreck of the Loch Ard is of significance for Victoria and is registered on the Victorian Heritage Register ( S 417). Flagstaff Hill has a varied collection of artefacts from Loch Ard and its collection is significant for being one of the largest accumulation of artefacts from this notable Victorian shipwreck. The collections object is to also give us a snapshot into history so we can interpret the story of this tragic event. The collection is also archaeologically significant as it represents aspects of Victoria's shipping history that allows us to interpret Victoria's social and historical themes of the time. The collections historically significance is that it is associated unfortunately with the worst and best-known shipwreck in Victoria's history. Pewter teapot, recovered from the wreck of the Loch Ard. It has four legs; one is bent upwards. The metal is sometimes referred to as 'Britannia Metal'. The surface is encrusted, and the metal is broken in places.flagstaff hill, warrnambool, shipwrecked coast, flagstaff hill maritime museum, maritime museum, shipwreck coast, flagstaff hill maritime village, great ocean road, loch line, loch ard, captain gibbs, eva carmichael, tom pearce, glenample station, mutton bird island, loch ard gorge, pewter teapot, britannia metal teapot, teapot -
 Flagstaff Hill Maritime Museum and Village
Ceramic - Ceramic Piece, Minton Potteries, ca. 1877
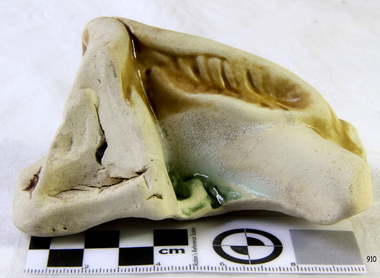
The ceramic piece is one of five porcelain fragments washed up from the Loch Ard wreck near Port Campbell, Victoria. These shards resemble the foot and leg of a large bird, and legend has it that another bird had drifted ashore at the same time as the Loch Ard peacock. This figurine is on display at Flagstaff Hill Maritime Museum and regarded as the most valuable shipwreck relic. It is believed that all five fragments could belong to another peacock or a Minton porcelain stork that had been photographed in a Home Beautiful magazine in 1928. This stork appeared to be missing a leg and foot, and experts have hypothesised that the five fragments could belong to this stork, the whereabouts of which are currently unknown. History of the Loch Ard: The Loch Ard got its name from ”Loch Ard” a loch which lies to the west of Aberfoyle, and the east of Loch Lomond. It means "high lake" in Scottish Gaelic. The vessel belonged to the famous Loch Line which sailed many vessels from England to Australia. The Loch Ard was built in Glasgow by Barclay, Curdle and Co. in 1873, the vessel was a three-masted square-rigged iron sailing ship that measured 79.87 meters in length, 11.58 m in width, and 7 m in depth with a gross tonnage of 1693 tons with a mainmast that measured a massive 45.7 m in height. Loch Ard made three trips to Australia and one trip to Calcutta before its fateful voyage. Loch Ard left England on March 2, 1878, under the command of 29-year-old Captain Gibbs, who was newly married. The ship was bound for Melbourne with a crew of 37, plus 17 passengers. The general cargo reflected the affluence of Melbourne at the time. Onboard were straw hats, umbrella, perfumes, clay pipes, pianos, clocks, confectionery, linen and candles, as well as a heavier load of railway irons, cement, lead and copper. There were other items included that were intended for display in the Melbourne International Exhibition of 1880. The voyage to Port Phillip was long but uneventful. Then at 3 am on June 1, 1878, Captain Gibbs was expecting to see land. But the Loch Ard was running into a fog which greatly reduced visibility. Captain Gibbs was becoming anxious as there was no sign of land or the Cape Otway lighthouse. At 4 am the fog lifted and a lookout aloft announced that he could see breakers. The sheer cliffs of Victoria's west coast came into view, and Captain Gibbs realised that the ship was much closer to them than expected. He ordered as much sail to be set as time would permit and then attempted to steer the vessel out to sea. On coming head-on into the wind, the ship lost momentum, the sails fell limp and Loch Ard's bow swung back towards land. Gibbs then ordered the anchors to be released in an attempt to hold its position. The anchors sank some 50 fathoms - but did not hold. By this time the ship was among the breakers and the tall cliffs of Mutton Bird Island rose behind. Just half a mile from the coast, the ship's bow was suddenly pulled around by the anchor. The captain tried to tack out to sea, but the ship struck a reef at the base of Mutton Bird Island, near Port Campbell. Waves subsequently broke over the ship and the top deck became loosened from the hull. The masts and rigging came crashing down knocking passengers and crew overboard. When a lifeboat was finally launched, it crashed into the side of Loch Ard and capsized. Tom Pearce, who had launched the boat, managed to cling to its overturned hull and shelter beneath it. He drifted out to sea and then on the flood tide came into what is now known as Loch Ard Gorge. He swam to shore, bruised and dazed, and found a cave in which to shelter. Some of the crew stayed below deck to shelter from the falling rigging but drowned when the ship slipped off the reef into deeper water. Eva Carmichael a passenger had raced onto the deck to find out what was happening only to be confronted by towering cliffs looming above the stricken ship. In all the chaos, Captain Gibbs grabbed Eva and said, "If you are saved Eva, let my dear wife know that I died like a sailor". That was the last Eva Carmichael saw of the captain. She was swept off the ship by a huge wave. Eva saw Tom Pearce on a small rocky beach and yelled to attract his attention. He dived in and swam to the exhausted woman and dragged her to shore. He took her to the cave and broke the open case of brandy which had washed up on the beach. He opened a bottle to revive the unconscious woman. A few hours later Tom scaled a cliff in search of help. He followed hoof prints and came by chance upon two men from nearby Glenample Station three and a half miles away. In a complete state of exhaustion, he told the men of the tragedy. Tom then returned to the gorge while the two men rode back to the station to get help. By the time they reached Loch Ard Gorge, it was cold and dark. The two shipwreck survivors were taken to Glenample Station to recover. Eva stayed at the station for six weeks before returning to Ireland by steamship. In Melbourne, Tom Pearce received a hero's welcome. He was presented with the first gold medal of the Royal Humane Society of Victoria and a £1000 cheque from the Victorian Government. Concerts were performed to honour the young man's bravery and to raise money for those who lost family in the disaster. Of the 54 crew members and passengers on board, only two survived: the apprentice, Tom Pearce and the young woman passenger, Eva Carmichael, who lost her family in the tragedy. Ten days after the Loch Ard tragedy, salvage rights to the wreck were sold at auction for £2,120. Cargo valued at £3,000 was salvaged and placed on the beach, but most washed back into the sea when another storm developed. The wreck of Loch Ard still lies at the base of Mutton Bird Island. Much of the cargo has now been salvaged and some items were washed up into Loch Ard Gorge. Cargo and artefacts have also been illegally salvaged over many years before protective legislation was introduced in March 1982. One of the most unlikely pieces of cargo to have survived the shipwreck was a Minton majolica peacock- one of only nine in the world. The peacock was destined for the Melbourne 1880 International Exhibition in. It had been well packed, which gave it adequate protection during the violent storm. Today the Minton peacock can be seen at the Flagstaff Hill Maritime Museum in Warrnambool. From Australia's most dramatic shipwreck it has now become Australia's most valuable shipwreck artefact and is one of very few 'objects' on the Victorian State Heritage Register.The shipwreck of the Loch Ard is of significance for Victoria and is registered on the Victorian Heritage Register ( S 417). Flagstaff Hill has a varied collection of artefacts from Loch Ard and its collection is significant for being one of the largest accumulation of artefacts from this notable Victorian shipwreck. The collections object is to also give us a snapshot into history so we can interpret the story of this tragic event. The collection is also archaeologically significant as it represents aspects of Victoria's shipping history that allows us to interpret Victoria's social and historical themes of the time. The collections historically significance is that it is associated unfortunately with the worst and best-known shipwreck in Victoria's history.Ceramic shard, broken piece of pottery with some diagonally carved features. It is possibly a peacock leg section and green foliage. The ceramic piece has remnants of a coloured glaze.flagstaff hill, flagstaff hill maritime museum and village, warrnambool, maritime museum, maritime village, great ocean road, shipwreck coast, ceramic, porcelain, piece, fragment, ceramic bird, loch ard, shipwreck, salvage, recover, 1877, 1878, minton, shard -
 Flagstaff Hill Maritime Museum and Village
Ceramic - Ceramic Piece, Minton Potteries, ca 1877
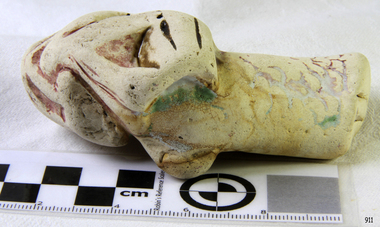
The ceramic piece is one of five porcelain fragments washed up from the Loch Ard wreck near Port Campbell, Victoria. These fragments resemble the foot and leg of a large bird, and legend has it that another bird had drifted ashore at the same time as the Loch Ard peacock. This figurine is on display at Flagstaff Hill Maritime Museum and regarded as the most valuable shipwreck relic. It is believed that all five fragments could belong to another peacock or a Minton porcelain stork that had been photographed in a Home Beautiful magazine in 1928. This stork appeared to be missing a leg and foot, and experts have hypothesised that the five fragments could belong to this stork, the whereabouts of which are currently unknown. A brief history of the Loch Ard (1873-1878): - The sailing ship Loch Ard was one of the famous Loch Line of ships that sailed the long voyage from England to Australia. Barclay, Curdle and Co. built the three-masted iron vessel in Glasgow in 1873. It had sailed three trips to Australia and one trip to Calcutta before its fateful voyage. Loch Ard left England on March 2, 1878, under the command of recently married, 29-year-old Captain Gibbs. It was bound for Melbourne with a crew of 37, plus 17 passengers. The general cargo reflected the affluence of Melbourne at the time. Onboard were straw hats, umbrellas, perfumes, clay pipes, pianos, clocks, confectionery, linen and candles, and a heavier load of railway irons, cement, lead and copper. Other cargo included items intended for display in the Melbourne International Exhibition of 1880. The Loch Ard had been sailing for three months and was close to its destination on June 1, 1878. Captain Gibbs had expected to see land at about 3 am, but the Loch Ard ran into a fog that greatly reduced visibility, and there was no sign of land or the Cape Otway lighthouse. The fog lifted at 4 am, and the sheer cliffs of Victoria's west coast were much closer to them than Captain Gibbs expected. He tried to manage the vessel but failed, and the ship struck a reef at the base of Mutton Bird Island, near Port Campbell. The top deck loosened from the hull, and the masts and rigging crashed down, knocking passengers and crew overboard. The lifeboat was launched by Tom Pearce but crashed into the side of Loch Ard and capsized. He clung onto its overturned hull and sheltered under it. He drifted out to sea, and the tide brought him back to what is now called Loch Ard Gorge. He swam to shore and found a cave for shelter. A passenger, Eva Carmichael, had raced onto the deck to find out what was happening and was confronted by towering cliffs above the ship. She was soon swept off the ship by a huge wave. Eva saw Tom Pearce on a small rocky beach and yelled to attract his attention. He swam out and dragged her to the shelter of the cave. He revived her with a bottle of brandy from a case that had washed up on the beach. Tom scaled a cliff in search of help and followed some horse hoof prints. He came from two men from Glenample Station, three and a half miles away. He told the men of the tragedy and then returned to the gorge while the two men rode back to the station to get help. They reached Loch Ard Gorge and took the two shipwreck survivors to Glenample Station to recover. Eva stayed at the station for six weeks before returning to Ireland by steamship. In Melbourne, Tom Pearce received a hero's welcome and was presented with a medal and some money. Of the 54 crew members and passengers on board, only two survived: the apprentice, Tom Pearce and the young woman passenger, Eva Carmichael, who lost her family in the tragedy. The shipwreck of the Loch Ard is of significance for Victoria and is registered on the Victorian Heritage Register ( S 417). Flagstaff Hill has a varied collection of artefacts from Loch Ard and its collection is significant for being one of the largest accumulation of artefacts from this notable Victorian shipwreck. The collections object is to also give us a snapshot into history so we can interpret the story of this tragic event. The collection is also archaeologically significant as it represents aspects of Victoria's shipping history that allows us to interpret Victoria's social and historical themes of the time. The collections historically significance is that it is associated unfortunately with the worst and best-known shipwreck in Victoria's history.Ceramic piece, broken, with remnants of burgundy, green and yellow glaze. The piece has been shaped. It could be a peacock leg section with green foliage with glaze. Noneflagstaff hill, flagstaff hill maritime museum and village, warrnambool, maritime museum, maritime village, great ocean road, shipwreck coast, ceramic, porcelain, piece, fragment, ceramic bird, loch ard, shipwreck, salvage, recover, 1877, 1878, minton, shard -
 Flagstaff Hill Maritime Museum and Village
Ceramic - Ceramic Piece, Minton Potteries, ca 1877
The ceramic piece is one of five porcelain fragments washed up from the Loch Ard wreck near Port Campbell, Victoria. These fragments resemble the foot and leg of a large bird, and legend has it that another bird had drifted ashore at the same time as the Loch Ard peacock. This figurine is on display at Flagstaff Hill Maritime Museum and regarded as the most valuable shipwreck relic. It is believed that all five fragments could belong to another peacock or a Minton porcelain stork that had been photographed in a Home Beautiful magazine in 1928. This stork appeared to be missing a leg and foot, and experts have hypothesised that the five fragments could belong to this stork, the whereabouts of which are currently unknown. A brief history of the Loch Ard (1873-1878): - The sailing ship Loch Ard was one of the famous Loch Line of ships that sailed the long voyage from England to Australia. Barclay, Curdle and Co. built the three-masted iron vessel in Glasgow in 1873. It had sailed three trips to Australia and one trip to Calcutta before its fateful voyage. Loch Ard left England on March 2, 1878, under the command of recently married, 29-year-old Captain Gibbs. It was bound for Melbourne with a crew of 37, plus 17 passengers. The general cargo reflected the affluence of Melbourne at the time. Onboard were straw hats, umbrellas, perfumes, clay pipes, pianos, clocks, confectionery, linen and candles, and a heavier load of railway irons, cement, lead and copper. Other cargo included items intended for display in the Melbourne International Exhibition of 1880. The Loch Ard had been sailing for three months and was close to its destination on June 1, 1878. Captain Gibbs had expected to see land at about 3 am, but the Loch Ard ran into a fog that greatly reduced visibility, and there was no sign of land or the Cape Otway lighthouse. The fog lifted at 4 am, and the sheer cliffs of Victoria's west coast were much closer to them than Captain Gibbs expected. He tried to manage the vessel but failed, and the ship struck a reef at the base of Mutton Bird Island, near Port Campbell. The top deck loosened from the hull, and the masts and rigging crashed down, knocking passengers and crew overboard. The lifeboat was launched by Tom Pearce but crashed into the side of Loch Ard and capsized. He clung onto its overturned hull and sheltered under it. He drifted out to sea, and the tide brought him back to what is now called Loch Ard Gorge. He swam to shore and found a cave for shelter. A passenger, Eva Carmichael, had raced onto the deck to find out what was happening and was confronted by towering cliffs above the ship. She was soon swept off the ship by a huge wave. Eva saw Tom Pearce on a small rocky beach and yelled to attract his attention. He swam out and dragged her to the shelter of the cave. He revived her with a bottle of brandy from a case that had washed up on the beach. Tom scaled a cliff in search of help and followed some horse hoof prints. He came from two men from Glenample Station, three and a half miles away. He told the men of the tragedy and then returned to the gorge while the two men rode back to the station to get help. They reached Loch Ard Gorge and took the two shipwreck survivors to Glenample Station to recover. Eva stayed at the station for six weeks before returning to Ireland by steamship. In Melbourne, Tom Pearce received a hero's welcome and was presented with a medal and some money. Of the 54 crew members and passengers on board, only two survived: the apprentice, Tom Pearce and the young woman passenger, Eva Carmichael, who lost her family in the tragedy. The shipwreck of the Loch Ard is of significance for Victoria and is registered on the Victorian Heritage Register ( S 417). Flagstaff Hill has a varied collection of artefacts from Loch Ard and its collection is significant for being one of the largest accumulation of artefacts from this notable Victorian shipwreck. The collections object is to also give us a snapshot into history so we can interpret the story of this tragic event. The collection is also archaeologically significant as it represents aspects of Victoria's shipping history that allows us to interpret Victoria's social and historical themes of the time. The collections historically significance is that it is associated unfortunately with the worst and best-known shipwreck in Victoria's history.Ceramic piece, broken with remnants of glaze. It has been shaped. It may be from a peacock leg section.Noneflagstaff hill, flagstaff hill maritime museum and village, warrnambool, maritime museum, maritime village, great ocean road, shipwreck coast, ceramic, porcelain, piece, fragment, ceramic bird, loch ard, shipwreck, salvage, recover, 1877, 1878, minton, shard -
 Flagstaff Hill Maritime Museum and Village
Document - Menu, Bill of Fare ship Schomberg, circa 1855 - May 12 1856
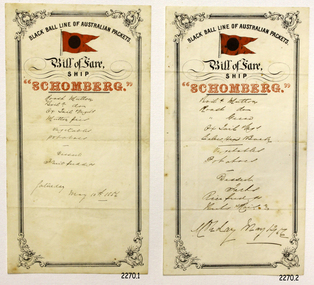
A “Bill of Fare” is a menu or list of food offered for a meal. This Bill of Fare from the sailing ship Schomberg is handwritten in pen in hard-to-read script on the printed pages specifically for the Schomberg ship, of the Black Ball Line of Australian Packets. (‘Packets’ were vessels that had a regular trade run of cargo, passengers and mail; the sailing ship Schomberg was designed for long voyages between England and Australia.) These menus posed a puzzle as they have the handwritten dates of, May 10 and 12, 1856, by which time the Schomberg had sunk (she sunk on December 26, 1855). The donor of these pages of Bill of Fare is a stamp collector from Melbourne. He came across the menus in a package that he bought in 1980 at a stamp auction in Tasmania. He decided to give the menus to Flagstaff Hill this year during his annual family holiday in Warrnambool. A 1981 newspaper article about this donation included an interview with Flagstaff Hill’s curator Mr Peter Ronald, who said that the stationery of these menus is genuine. He went on to say that there would have been much stationery printed for use on the Schomberg although she sank on her maiden voyage. These menus could have been written at a dated late because the surplus Schomberg stationery could have been used for menus on other ships. We will probably never be sure of the answer but none-the-less the pages are still connected to the Schomberg. Below is what we believe the menu consists of although some of the writing is indecipherable - - - - - - - - - - - - - - - - - - - - - - - - - - - - - - - - - - - - - (first menu) Roast Mutton Boiled Mutton? Ox Tail Mulligatawny? Or possibly Ox Tail Vegetables? Mutton Pies? ------------------------------- Vegetables Potatoes ---------------------------------- Dessert Fruit Puddings? Saturday May 10, 1856 - - - - - - - - - - - - - - - - - - - - - - - - - - - - - - - - - - - - AND - - - - - - - - - - - - - - - - - - - - - - - - - - - - - - - - - - - - (second menu) Boiled Mutton Roast Mutton? Roast Geese? Ox Tail?? Calves Head Broth? ------------------------------- Vegetables Potatoes ------------------------------- Dessert Tarts? Rice Pudding? ?...Maids?? Monday May 12, 1856 - - - - - - - - - - - - - - - - - - - - - - - - - - - - - - - - - - - - Background of “SCHOMBERG” When SCHOMBERG was launched in July, 1855, she was considered the “Noblest ship that ever floated on water.” SCHOMBERG’s owners, the Black Ball Line (one of three companies by that name), commissioned the ship for their fleet of passenger liners. She was built by Alexander Hall of Aberdeen, UK at a cost of £43,103. She was constructed with 3 skins: one planked fore and aft, and two diagonally planked, fastened together with screw threaded trunnels (wooden rails). Her first class accommodation was luxurious: velvet pile carpets; large mirrors; rosewood; birds-eye maple; mahogany; soft furnishings of gold satin damask; an oak-lined library; and a piano. Overall she had accommodation for 1000 passengers. SCHOMBERG’s 34 year old master, Captain James ‘Bully’ Forbes, had promised Melbourne in 60 days at the launch, "with or without the help of God." James Nicol Forbes was born in Aberdeen in 1821 and rose to fame with his record-breaking voyages on the famous Black Ball Line ships MARCO POLO and LIGHTNING. In 1852 in the MARCO POLO he made the record passage from London to Melbourne in 68 days. There were 53 deaths on the voyage but the great news was of the record passage by the master. In 1954 Captain Forbes took the clipper LIGHTNING to Melbourne in 76 days and back in 63 days, this was never beaten by a sailing ship. He often drove his crew and ship to breaking point to beat his own records. He cared little for the comfort of the passengers. On this, the SCHOMBERG’s maiden voyage, he was going to break records. SCHOMBERG departed Liverpool on her maiden voyage on 6 October 1855 flying the sign “Sixty Days to Melbourne”. She departed with 430 passengers and 3000 tons cargo including iron rails and equipment intended to build the Melbourne to Geelong Railway as well as a bridge over the Yarra from Melbourne to Hawthorn. She also carried a cow for fresh milk, pens for fowls and pigs, and 90,000 gallons of water for washing and drinking. SCHOMBERG also carried 17,000 letters and 31,800 newspapers. The ship and cargo was insured for $300,000, a fortune for the time. The winds were poor as she sailed across the equator, slowing SCHOMBERG’s journey considerably. Land was first sighted on Christmas Day, at Cape Bridgewater near Portland, and Captain Forbes followed the coastline towards Melbourne. Forbes was said to be playing cards when called by the Third Mate Henry Keen, who reported land about 3 miles off. Due in large part to Forbes regarding a card game as more important than his ship, SCHOMBERG eventually ran aground on a sand spit near Curdie's Inlet (about 56 km west of Cape Otway) on 26 December 1855, 78 days after leaving Liverpool. The sand spit and the currents were not marked on Forbes’s map. Overnight, the crew launched a lifeboat to find a safe place to land the ship’s passengers. The scouting party returned to SCHOMBERG and advised Forbes that it was best to wait until morning because the rough seas could easily overturn the small lifeboats. The ship’s Chief Officer spotted the steamer SS QUEEN at dawn and signalled it. The master of the SS QUEEN approached the stranded vessel and all of SCHOMBERG’s passengers and crew were able to disembark safely. The SCHOMBERG was lost and with her, Forbes’ reputation. The Black Ball Line’s Melbourne agent sent a steamer to retrieve the passengers’ baggage from the SCHOMBERG. Other steamers helped unload her cargo until the weather changed and prevented the salvage teams from accessing the ship. Later one plunderer found a case of Wellington boots, but alas, all were for the left foot! Local merchants Manifold & Bostock bought the wreck and cargo, but did not attempt to salvage the cargo still on board the ship. They eventually sold it on to a Melbourne businessman and two seafarers. In 1864 salvage efforts were abandoned after two men drowned when they tried to reach SCHOMBERG. Parts of the SCHOMBERG were washed ashore on the south island of New Zealand in 1870, nearly 15 years after the wreck. The wreck of the SCHOMBERG lies in almost 9 metres of water. Although the woodwork is mostly disintegrated, the shape of the ship can still be seen due to the remaining railway irons, girders and the ship’s frame. A variety of goods and materials can be seen surrounding the wreck, by divers. Flagstaff Hill holds many items salvaged from the SCHOMBERG including a ciborium (in which a diamond ring was concealed in concretion), communion set, ship fittings and equipment, personal effects, a lithograph, tickets and photograph from the SCHOMBERG. These Bills of Fare are significant due to their connection to Flagstaff Hill’s collection of artefacts from the Schomberg, which is significant for its association with the Victorian Heritage Registered shipwreck S612. The collection is primarily significant because of the relationship between the objects, as together they have a high potential to interpret the story of the Schomberg. The Schomberg collection is archaeologically significant as the remains of an international passenger ship. The shipwreck collection is historically significant for representing aspects of Victoria’s shipping history and its potential to interpret sub-theme 1.5 of Victoria’s Framework of Historical Themes (living with natural processes). The collection is also historically significant for its association with the shipwreck and the ship, which was designed to be fastest and most luxurious of its day. The Schomberg collection meets the following criteria for assessment: Criterion A: Importance to the course, or pattern, of Victoria’s cultural history. Criterion B: Possession of uncommon, rare or endangered aspects of Victoria’s cultural history. Criterion C: Potential to yield information that will contribute to an understanding of Victoria’s cultural history. Menu, or Bill of Fare, on cream coloured stationery from the sailing vessel “Schomberg”. Two rectangular pieces of paper, each bears the printed words “Black Ball Line of Australian Packets, Bill of Fare, Ship, Schomberg”, a printed symbol of the Black Ball line (a black ball on a red flag) and a decorative border. Both pages are handwritten, in similar but different sized writing, with a Bill of Fare and a date, Page (1) dated May 10th 1856 and (2) dated May 12th ’56, (Both dates are AFTER the Schomberg sank in December 26th 1855.) Both pages have three fold lines spaced across their width. To be used for the return voyage.Printed on the pages ““BLACK BALL LINE OF AUSTRALIAN PACKETS.” “Bill of Fare, / SHIP / “SCHOMBERG”.” Handwritten list of food, and on one page “Saturday May 10 1856” and on the other page “Monday May 12” warrnambool, peterborough, shipwrecked coast, shipwreck coast, flagstaff hill maritime museum, flagstaff hill maritime village, maritime museum, great ocean road, flagstaff hill, sailing ship schomberg, shipwreck schomberg, black ball line of australian packets, bill of fare schomberg, menu schomberg 1856, food mid-1800’s, food on ships mid-1800’s, menu, may 10, 1856, may 12, 1856 -
 Flagstaff Hill Maritime Museum and Village
Functional object - Padlock, c. 1855
This padlock has been salvaged from the wrecked sailing ship SCHOMBERG. It is not known whether the padlock was a part of the ship’s equipment or if it was among personal effects or cargo. At some point in time the padlock has been mounted and sealed in resin, perhaps for both display and preservation purposes. ABOUT THE SCHOMBERG When SCHOMBERG was launched in 1855, she was considered the “Noblest ship that ever floated on water.” SCHOMBERG’s owners, the Black Ball Line, commissioned the ship for their fleet of passenger liners. She was built by Alexander Hall of Aberdeen. Overall she had accommodation for 1000 passengers. SCHOMBERG’s 34 year old master, Captain ‘Bully’ Forbes, (James Nicol Forbes) was born in Aberdeen in 1821 and rose to fame with his record-breaking voyages on the famous Black Ball Line ships; MARCO POLO and LIGHTNING. On this, the SCHOMBERG’s maiden voyage, he was going to break records. SCHOMBERG departed Liverpool 6 October 1855 flying the sign “Sixty Days to Melbourne”. She carried 430 passengers and 3000 tons cargo including iron rails and equipment intended to build the Melbourne to Geelong Railway and a bridge over the Yarra from Melbourne to Hawthorn. She also carried a cow for fresh milk, pens for fowls and pigs, 90,000 gallons of water for washing and drinking, 17,000 letters and 31,800 newspapers. The ship and cargo was insured for $300,000, a fortune for the time. The winds were poor as she sailed across the equator, slowing SCHOMBERG’s journey considerably. Land was first sighted on Christmas Day, at Cape Bridgewater near Portland, and Captain Forbes followed the coastline towards Melbourne. Forbes was said to be playing cards when called by the Third Mate Henry Keen, who reported land about 3 miles off, Due in large part to the captain's regarding a card game as more important than his ship, it eventually ran aground on a sand spit near Curdie's Inlet (about 56 km west of Cape Otway) on 26 December 1855, 78 days after leaving Liverpool. The sand spit and the currents were not marked on Forbes’s map. The crew from the scouting party advised Forbes to wait until morning before trying to take the passengers to safety in the lifeboats because the rough seas could easily overturn the small vessels. The ship’s Chief Officer spotted SS QUEEN at dawn and signalled the steamer. The master of the SS QUEEN approached the stranded vessel and all of SCHOMBERG’s passengers and crew were able to disembark safely. The SCHOMBERG was lost and with her, Forbes’ reputation. The Black Ball Line’s Melbourne agent sent a steamer to retrieve the passengers’ baggage from the SCHOMBERG. Other steamers helped unload her cargo until the weather changed and prevented the salvage teams from accessing the ship. Later one plunderer found a case of Wellington boots, but alas, all were for the left foot! Local merchants Manifold & Bostock bought the wreck and cargo, but did not attempt to salvage the cargo that was still on board the ship. They eventually sold it on to a Melbourne businessman and two seafarers. In 1864, after two of the men drowned when they tried to reach SCHOMBERG, salvage efforts were abandoned. Parts of the SCHOMBERG were washed ashore on the south island of New Zealand in 1870, nearly 15 years after the wreck. The wreck now lies in almost 9 metres of water and the shape of the ship can still be seen due to the remaining railway irons, girders and the ship’s frame. A variety of goods and materials can be seen scattered about nearby. Flagstaff Hill holds many items salvaged from the SCHOMBERG including a ciborium (in which a diamond ring was concealed), communion set, ship fittings and equipment, personal effects, a lithograph, tickets, menu and photograph from the SCHOMBERG. This brass padlock is registered as an artefact in the SCHOMBERG collection. The SCHOMBERG collection as a whole is of historical and archaeological significance at a State level, listed on the Victorian Hertage Register VHR S612. Flagstaff Hill’s collection of artefacts from the SCHOMBERG is significant for its association with the Victorian Heritage Registered shipwreck. The collection is primarily significant because of the relationship between the objects, as together they have a high potential to interpret the story of the SCHOMBERG. The SCHOMBERG collection is archaeologically significant as the remains of an international passenger ship. The shipwreck collection is historically significant for representing aspects of Victoria’s shipping history and its potential to interpret sub-theme 1.5 of Victoria’s Framework of Historical Themes (living with natural processes). The collection is also historically significant for its association with the shipwreck and the ship, which was designed to be fastest and most luxurious of its day. The SCHOMBERG collection meets the following criteria for assessment: Criterion A: Importance to the course, or pattern, of Victoria’s cultural history. Criterion B: Possession of uncommon, rare or endangered aspects of Victoria’s cultural history. Criterion C: Potential to yield information that will contribute to an understanding of Victoria’s cultural Brass Padlock lying in a wooden block and encased in resin. The wood encasing the padlock has seven man-made holes in it, perhaps used to hand as a display. There was a paper label with an inscription on the top and bottom of the wood immediately surrounding the padlock. the brass has tarnished. Recovered from the wreck of the Schomberg in 1974.Marked on block - "Recovered 1974 'Schomberg'"flagstaff hill, warrnambool, shipwrecked-coast, flagstaff-hill, flagstaff-hill-maritime-museum, maritime-museum, shipwreck-coast, flagstaff-hill-maritime-village, padlock, schomberg shipwreck, brass padlock circa 1855, object salvaged from shipwreck, captain bully forbes, 19th century security hardware, sjouvenir, security, brass padlock -
 Flagstaff Hill Maritime Museum and Village
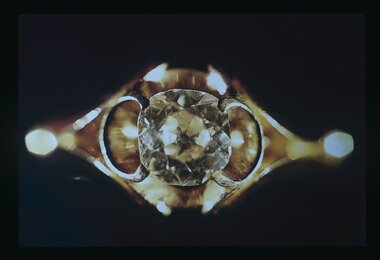
Accessory - Diamond ring, about 1855
In 1975, 120 years after the sailing ship Schomberg was wrecked, Flagstaff Hill divers (Peter Ronald, Colin Goodall and Gary Hayden) found an ornate communion set amongst the wreckage. The set comprised a jug, ciborium, lid, chalice and plate. The items, apart from the lid, were then displayed at Flagstaff Hill Maritime Village. The lid had etchings that did not match the chalice and sat in storage for several years. Then in 1978, while the marine concretion inside the lid was being examined, a surface layer came loose and revealed a glint of gold that was assumed to be a piece of brass. The layers of concretion were carefully removed and a ring-like band emerged. Further treatment exposed a 'large faceted stone in an intricate gold setting. Weeks later a detailed examination estimated the value of the ring, known as the Schomberg Diamond, to be $7000. When the Schomberg was launched in 1855, she was considered the "Noblest” ship that ever floated on the water. Schomberg's owners, the Black Ball Line had commissioned the ship for their fleet of passenger liners. She was built by Alexander Hall of Aberdeen at a cost of £43,103 and constructed with 3 skins. One planked fore and aft and two diagonally planked, fastened together with screw-threaded trunnels (wooden rails). Her First Class accommodation was simply luxurious with velvet pile carpets, large mirrors, rosewood, birds-eye maple and mahogany timbers throughout, soft furnishings of satin damask, an oak-lined library with a piano. Overall she had accommodation for 1000 passengers. At the launch, the Schomberg's 34-year-old master, Captain 'Bully' Forbes, had promised to reach Melbourne in sixty days stating, "with or without the help of God." Captain James Nicol Forbes was born in Aberdeen in 1821 and rose to fame with his record-breaking voyages on the famous Black Ball Line ships; Marco Polo and Lightning. In 1852 in the Marco Polo, he made the record passage from London to Melbourne in 68 days. Unfortunately there were 53 deaths on the voyage, but the great news was off the record passage by Captain Forbes. In 1854 he took the clipper “Lighting” to Melbourne in 76 days and back in 63 days, this record was never beaten by a sailing ship. He often drove his crew and ship to breaking point to beat his previous records. He cared little for the comfort of the passengers. On this, the Schomberg's maiden voyage, he was determined to break existing records. Schomberg departed Liverpool on her maiden voyage on 6th October 1855 flying a sign that read "Sixty Days to Melbourne". She departed with 430 passengers and 3000 tons cargo including iron rails and equipment intended to build the Melbourne to Geelong Railway and a bridge over the Yarra from Melbourne to Hawthorn. She also carried a cow for fresh milk, pens for fowls and pigs, 90,000 gallons of water for washing and drinking. She also carried 17,000 letters and 31,800 newspapers. The ship and cargo were insured for $300,000 a fortune for the time. The winds were poor as she sailed across the equator, slowing Schomberg's journey considerably. Land was first sighted on Christmas Day, at Cape Bridgewater near Portland, Captain Forbes followed the coastline towards Melbourne. Forbes was said to be playing cards when called by the third mate Henry Keen, who reported land about 3 miles off. Due in large part to the captain's regarding a card game as more important than his ship, it eventually ran aground on a sand spit near Curdie's Inlet (about 56 km west of Cape Otway) on 26th December 1855, 78 days after leaving Liverpool. The sand spit and the currents were not marked on Forbes's map. Overnight, the crew launched a lifeboat to find a safe place to land the ship’s passengers. The scouting party returned to Schomberg and advised Forbes that it was best to wait until morning because the rough seas could easily overturn the small lifeboats. The ship’s Chief Officer spotted the SS Queen at dawn and signaled the steamer. The master of the Queen approached the stranded vessel and all of Schomberg’s passengers and crew disembarked safely. The Black Ball Line's Melbourne agent sent a steamer to retrieve the passengers' baggage from the Schomberg. Other steamers helped unload her cargo until the weather changed and prevented the salvage teams from accessing the ship. Later one plunderer found a case of Wellington boots, but alas, all were for the left foot. Local merchants Manifold & Bostock bought the wreck and cargo but did not attempt to salvage the cargo still on board the ship. They eventually sold it on to a Melbourne businessman and two seafarers. In 1864 after two of the men drowned when they tried to reach Schomberg, salvage efforts were abandoned. In 1870, nearly 15 years after the wreck parts of the Schomberg had washed ashore on the south island of New Zealand. The wreck now lies in almost 9 meters of water and although the woodwork is mostly disintegrated the shape of the ship can still be determined due to the remaining railway irons, girders and the ship’s frame. A variety of goods and materials can be seen scattered about nearby. The actual lid in which the ring was found has not yet been completely identified and could belong to a coffee pot, sugar bowl or maybe a jug or something similar. Although all survived the wreck no-one came forward to claim the valuable diamond. The Schomberg Diamond is currently on display in the Great Circle Gallery. Flagstaff Hill Maritime Village along with the rest of the communion set. Other artefacts salvaged from the wreck include ship fittings and equipment, personal effects, a lithograph, tickets and photographs from the Schomberg. One of the Schomberg bells is in the Warrnambool Library.The Schomberg Diamond is particularly significant in that it played a crucial part in having the legislation changed to protect shipwrecks, with far tighter control over the salvaging of items from wreck sites. This ring is registered as Artefact S/105 in the Schomberg collection, the Schomberg collection as a whole is of historical and archaeological significance at a State level. Flagstaff Hill’s collection of artefacts from the Schomberg is also significant for its association with the Victorian Heritage Registered shipwreck (VHR S 612). The collection is of prime significant because of the relationship between the objects salvaged, as together they help us to interpret the story of the Schomberg. The collection as a whole is historically significant for representing aspects of Victoria's maritime history and its potential to interpret social and historical themes. A mid-Victorian gentleman's solitaire diamond dress ring with a Brazilian cut diamond (cushion cut), one and one-third carat set within an 18 carat yellow gold ring consisting of four claws within an open scroll setting and a divided scroll shank. Colour is classified as 'J', clarity SII. The setting is handmade. warrnambool, shipwrecked-coast, flagstaff-hill, flagstaff-hill-maritime-museum, maritime-museum, shipwreck-coast, flagstaff-hill-maritime-village, schomberg, shipwrecked-artefact, clipper ship, black ball line, 1855 shipwreck, aberdeen clipper ship, captain forbes, peterborough shipwreck, ss queen, ciborium, ring, schomberg-diamond, schomberg-ring, gentleman's ring, dress ring -
 Flagstaff Hill Maritime Museum and Village
Weapon - Cannon, Alexander Hall and Son, c. 1855
The Schomberg Cannon was recovered from the 1855 wreck of the SCHOMBERG in 1974 by Flagstaff Hill divers Peter Ronald, Colin Goodall and Gary Hayden. The wreck site was discovered in August 1973 by Stan McPhee and John Laidlaw. ABOUT THE SCHOMBERG When SCHOMBERG was launched in 1855, she was considered the “Noblest ship that ever floated on water.” SCHOMBERG’s owners, the Black Ball Line, commissioned the ship for their fleet of passenger liners. The ship was built by Alexander Hall of Aberdeen at a cost of £43,103. It was constructed with three skins: one planked fore and aft and two diagonally planked, fastened together with screw-threaded trunnels (wooden rails). Its first-class accommodation was simply luxurious; velvet pile carpets, large mirrors, rosewood, birds-eye maple, mahogany, soft furnishings of satin damask; an oak-lined library and a piano. Overall she had accommodation for 1000 passengers. At the launch, the SCHOMBERG’s 34-year-old master, Captain ‘Bully’ Forbes, had promised Melbourne in 60 days, "with or without the help of God." James Nicol Forbes was born in Aberdeen in 1821 and rose to fame with his record-breaking voyages on the famous Black Ball Line ships; MARCO POLO and LIGHTNING. In 1852 in the MARCO POLO he made the record passage from London to Melbourne in 68 days. There were 53 deaths on the voyage but the great news was of the record passage by the master. In 1954 Captain Forbes took the clipper LIGHTNING to Melbourne in 76 days and back in 63 days, this was never beaten by a sailing ship. He often drove his crew and ship to breaking point to beat his own records. He cared little for the comfort of the passengers. On this, the SCHOMBERG’s maiden voyage, he was going to break records. SCHOMBERG departed Liverpool on her maiden voyage on 6 October 1855 flying the sign “Sixty Days to Melbourne”. The ship departed with 430 passengers and 3000 tons of cargo including iron rails and equipment intended to build the Melbourne to Geelong Railway and a bridge over the Yarra from Melbourne to Hawthorn. She also carried a cow for fresh milk, pens for fowls and pigs, and 90,000 gallons of water for washing and drinking. It also carried 17,000 letters and 31,800 newspapers. The ship and the cargo was insured for $300,000, a fortune in those times. The winds were poor as she sailed across the equator, slowing SCHOMBERG’s journey considerably. Land was first sighted on Christmas Day, at Cape Bridgewater near Portland, and Captain Forbes followed the coastline towards Melbourne. Forbes was said to be playing cards when called by the Third Mate Henry Keen, who reported land about 3 miles off, Due in large part to the captain's regarding a card game as more important than his ship, it eventually ran aground on a sand spit near Curdie's Inlet (about 56 km west of Cape Otway) on 26 December 1855, 78 days after leaving Liverpool. The sand spit and the currents were not marked on Forbes’s map. Overnight, the crew launched a lifeboat to find a safe place to land the ship’s passengers. The scouting party returned to SCHOMBERG and advised Forbes that it was best to wait until morning because the rough seas could easily overturn the small lifeboats. The ship’s Chief Officer spotted SS QUEEN at dawn and signalled the steamer. The master of the SS QUEEN approached the stranded vessel and all of SCHOMBERG’s passengers and crew were able to disembark safely. The SCHOMBERG was lost and with her, Forbes’ reputation. The Black Ball Line’s Melbourne agent sent a steamer to retrieve the passengers’ baggage from the SCHOMBERG. Other steamers helped unload her cargo until the weather changed and prevented the salvage teams from accessing the ship. Later one plunderer found a case of Wellington boots, but alas, all were for the left foot! Local merchants Manifold & Bostock bought the wreck and cargo, but did not attempt to salvage the cargo still on board the ship. They eventually sold it on to a Melbourne businessman and two seafarers. In 1864 after two of the men drowned when they tried to reach SCHOMBERG, salvage efforts were abandoned. Parts of the SCHOMBERG were washed ashore on the south island of New Zealand in 1870, nearly 15 years after the wreck. The wreck now lies in almost 9 metres of water. Although the woodwork is mostly disintegrated the shape of the ship can still be seen due to the remaining railway irons, girders and the ship’s frame. A variety of goods and materials can be seen scattered about nearby. Flagstaff Hill holds many items salvaged from the SCHOMBERG including a ciborium (in which a diamond ring was concealed), communion set, ship fittings and equipment, personal effects, a lithograph, tickets and a photograph from the SCHOMBERG. One of the SCHOMBERG bells was in the old Warrnambool Library. The Schomberg cannon is currently on loan to the Port Campbell Visitor Information Centre.The SCHOMBERG collection is of historical and archaeological significance at a State level, listed on the Victorian Heritage Register VHR S612. Flagstaff Hill’s collection of artefacts from the SCHOMBERG is significant for its association with the Victorian Heritage Registered shipwreck. The collection is primarily significant because of the relationship between the objects, as together they have a high potential to interpret the story of the SCHOMBERG. The SCHOMBERG collection is archaeologically significant as the remains of an international passenger ship. The shipwreck collection is historically significant for representing aspects of Victoria’s shipping history and its potential to interpret sub-theme 1.5 of Victoria’s Framework of Historical Themes (living with natural processes). The collection is also historically significant for its association with the shipwreck and the ship, which was designed to be the fastest and most luxurious of its day. The SCHOMBERG collection meets the following criteria for assessment: Criterion A: Importance to the course, or pattern, of Victoria’s cultural history. Criterion B: Possession of uncommon, rare or endangered aspects of Victoria’s cultural history. Criterion C: Potential to yield information that will contribute to an understanding of Victoria’s cultural history.Cannon; 6-POUNDER (6pdr) smooth bore cannon, mounted on a wooden frame. The cannon has a metal lug on each side. It is commonly known as the Schomberg cannon. It was recovered from the wreck of the Schomberg in 1974.warrnambool, flagstaff-hill, flagstaff-hill-maritime-museum, maritime-museum, shipwreck-coast, flagstaff-hill-maritime-village, schomberg, shipwrecked-artefact, clipper ship, black ball line, 1855 shipwreck, aberdeen clipper ship, captain forbes, peterborough shipwreck, ss queen, cannon, the schomberg cannon, schomberg cannon, peterborough, 1855, sailing ship -
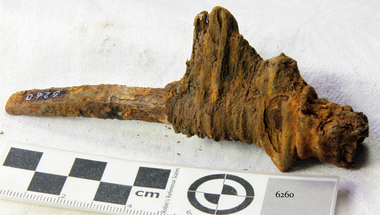 Flagstaff Hill Maritime Museum and Village
Nail, 1855
The artefact is the lower portion of a rectangular shanked ‘planking nail’ with a straight-edged ‘flat point’. The distinctive ‘point’ of a planking/skirting nail was designed to be driven into timber across the grain in order to prevent the wood from splitting. This relic is from the shipwreck of the SCHOMBERG, which ran aground near Peterborough in 1855. It was retrieved in 1875 from a large section of the ship’s bow which had been carried by ocean currents to the western coast of New Zealand’s South Island. The nail is still fixed in a fragment of the original timber that it secured in the SCHOMBERG. The top portion, or ‘head’ of the nail, has corroded away but the pronounced rectangular shank and its flat point indicate its likely purpose and position on the vessel. Most fastenings used in sailing ship construction were either wooden treenails or copper bolts, which were relatively resistant to seawater corrosion. In addition, the preferred hull-frame timber of British Oak has a high content of gallic acid which rapidly corrodes unprotected iron work. The ferrous composition of this planking nail suggests it came from an internal and upper portion of the ship’s bow (protected from exposure to the sea or oak). According to an 1855 edition of the Aberdeen Journal, the five outer layers, or ‘skins’, of the SCHOMBERG’s pine hull were “combined by means of patent screw treenails”. However the “beams of her two upper decks” were of “malleable iron”, and “part of the forecastle” was “fitted for the accommodation of the crew”. It is therefore possible that iron nails of this description were used by the ship’s builders to secure floor and wall planks in enclosed areas of the crew’s quarters. (The same reasoning would apply to officer and passenger accommodation amidships and at the stern of the vessel, but it was the bow that floated to New.Zealand.) The SCHOMBERG was a 2,000 ton clipper ship, specifically designed for the Australian immigration trade (back-loading wool for Britain’s mills), and constructed in Hall’s shipyard in Aberdeen, Scotland. She was owned by the Black Ball Line and launched in 1855. Alexander Hall & Son were renowned builders of sleek and fast 1,000 ton clippers for the China trade (opium in, tea out) and were keen to show they could also outclass the big North American ships built by Donald Mackay. Consequently the SCHOMBERG was ‘overbuilt’. Her hull featured five ‘skins’ of Scotch Larch and Pitch Pine overlaying each other in a diagonal pattern against a stout frame of British Oak. Oak has been favoured by builders of wooden ships for centuries. Its close, dense grain made it harder to work, but also gave it great strength and durability. In addition, the lateral spread of its branches supplied a natural curvature for the ribs of a vessel’s hull, as well as providing the small corner or curved pieces (‘knees’ and ‘elbows’) that fit them together. At the launch the SCHOMBERG’s 34 year old master, Captain ‘Bully’ Forbes, had promised Melbourne in 60 days, "with or without the help of God." James Nicol Forbes was born in Aberdeen in 1821 and rose to fame with his record-breaking voyages on the famous Black Ball Line ships; MARCO POLO and LIGHTNING. In 1852 in the MARCO POLO he made the record passage from London to Melbourne in 68 days. There were 53 deaths on the voyage but the great news was of the record passage by the master. In 1954 Captain Forbes took the clipper LIGHTNING to Melbourne in 76 days and back in 63 days, this was never beaten by a sailing ship. He often drove his crew and ship to breaking point to beat his own records. He cared little for the comfort of the passengers. On this, the SCHOMBERG’s maiden voyage, he was going to break records. SCHOMBERG departed Liverpool on her maiden voyage on 6 October 1855 flying the sign “Sixty Days to Melbourne”. She departed with 430 passengers and 3000 tons cargo including iron rails and equipment intended to build the Melbourne to Geelong Railway and a bridge over the Yarra from Melbourne to Hawthorn. She also carried a cow for fresh milk, pens for fowls and pigs, 90,000 gallons of water for washing and drinking. It also carried 17,000 letters and 31,800 newspapers. The ship and cargo was insured for $300,000, a fortune for the time. The winds were poor as she sailed across the equator, slowing SCHOMBERG’s journey considerably. Land was first sighted on Christmas Day, at Cape Bridgewater near Portland, and Captain Forbes followed the coastline towards Melbourne. Forbes was said to be playing cards when called by the Third Mate Henry Keen, who reported land about 3 miles off, Due in large part to the captain's regarding a card game as more important than his ship, it eventually ran aground on a sand spit near Curdie's Inlet (about 56 km west of Cape Otway) on 26 December 1855, 78 days after leaving Liverpool. The sand spit and the currents were not marked on Forbes’s map. Overnight, the crew launched a lifeboat to find a safe place to land the ship’s passengers. The scouting party returned to SCHOMBERG and advised Forbes that it was best to wait until morning because the rough seas could easily overturn the small lifeboats. The ship’s Chief Officer spotted SS QUEEN at dawn and signalled the steamer. The master of the SS QUEEN approached the stranded vessel and all of SCHOMBERG’s passengers and crew were able to disembark safely. The SCHOMBERG was lost and with her, Forbes’ reputation. The Black Ball Line’s Melbourne agent sent a steamer to retrieve the passengers’ baggage from the SCHOMBERG. Other steamers helped unload her cargo until the weather changed and prevented the salvage teams from accessing the ship. Later one plunderer found a case of Wellington boots, but alas, all were for the left foot! Local merchants Manifold & Bostock bought the wreck and cargo, but did not attempt to salvage the cargo still on board the ship. They eventually sold it on to a Melbourne businessman and two seafarers. In 1864 after two of the men drowned when they tried to reach SCHOMBERG, salvage efforts were abandoned. Parts of the SCHOMBERG were washed ashore on the south island of New Zealand in 1870, nearly 15 years after the wreck. The wreck now lies in almost 9 metres of water. Although the woodwork is mostly disintegrated the shape of the ship can still be seen due to the remaining railway irons, girders and the ship’s frame. A variety of goods and materials can be seen scattered about nearby. Flagstaff Hill holds many items salvaged from the SCHOMBERG including a ciborium (in which a diamond ring was concealed), communion set, ship fittings and equipment, personal effects, a lithograph, tickets and photograph from the SCHOMBERG. One of the SCHOMBERG bells is in the Warrnambool Library. This nail is a registered artefact from the wreck of the SCHOMBERG, Artefact Reg No S/35 and is significant because of its association with the SCHOMBERG. The SCHOMBERG collection as a whole is of historical and archaeological significance at a State level, listed on the Victorian Heritage Register VHR S612. Flagstaff Hill’s collection of artefacts from the SCHOMBERG is significant for its association with the Victorian Heritage Registered shipwreck. The collection is primarily significant because of the relationship between the objects, as together they have a high potential to interpret the story of the SCHOMBERG. The SCHOMBERG collection is archaeologically significant as the remains of an international passenger ship. The shipwreck collection is historically significant for representing aspects of Victoria’s shipping history and its potential to interpret sub-theme 1.5 of Victoria’s Framework of Historical Themes (living with natural processes). The collection is also historically significant for its association with the shipwreck and the ship, which was designed to be fastest and most luxurious of its day. The SCHOMBERG collection meets the following criteria for assessment: Criterion A: Importance to the course, or pattern, of Victoria’s cultural history. Criterion B: Possession of uncommon, rare or endangered aspects of Victoria’s cultural history. Criterion C: Potential to yield information that will contribute to an understanding of Victoria’s cultural history. The object is the bottom end of a slightly curved iron planking nail with remnant of timber still attached, recovered from the wreck of the SCHOMBERG (1855). The shank of the nail is rectangular and it narrows to a flat (chisel like) ‘point’. The ‘head’ is missing although there is a quantity of dark red corrosion within the top of the surrounding wood, suggesting where it might have been. The artefact is from the wreck of the SCHOMBERG (1855) and was retrieved from part of the ship’s bow which was carried by sea currents to the South Island of New Zealand. flagstaff hill, warrnambool, shipwrecked-coast, flagstaff-hill-maritime-museum, maritime-museum, shipwreck-coast, flagstaff-hill-maritime-village, schomberg, planking nail, rectangular ship’s nail, cast iron nail -
 Flagstaff Hill Maritime Museum and Village
Wood encrustation, 1855
The object is a mass of small shipwreck debris that has been concreted together by sediment and marine growth. It was retrieved from the wreck-site of the SCHOMBERG, which ran aground near the mouth of the Curdies River near Peterborough in 1855. The conglomerate of preserved wood impressions, rusted metal pieces, a small square of copper alloy, and black glass-like stones, presents too disjointed a collection to provide information on their purpose or function on the ship. The natural and gradual process of limestone accretion is a significant feature of the wreck-site, which was rediscovered by fishermen and skindivers in 1973. In his book “Exploring Shipwrecks of Western Victoria”, experienced diver and former director at Flagstaff Hill, Peter Ronald writes that the SCHOMBERG’s “triple layered wooden hull has disintegrated almost without trace…The turbulent shallow waters have promoted particularly heavy marine growth which tend to disguise the wreckage…the most prominent feature being a corroded mass of railway iron…Close inspection reveals small artefacts firmly embedded in the marine concretion which…is quite literally as hard as iron”. The huge oblong mass of concretion that now distinguishes the site covers the remains of this heavy cargo. A contemporary account of the SCHOMBERG’s fate (told by two of her passengers to the Melbourne Argus) alleges the ship “was overloaded, drawing over 25 feet when she left, and the cargo was chiefly iron and plant for the Geelong Railway”. The SCHOMBERG was a 2,000 ton clipper ship, specifically designed for the Australian immigration trade (back-loading wool for Britain’s mills), and constructed in Hall’s shipyard in Aberdeen, Scotland. She was owned by the Black Ball Line and launched in 1855. Alexander Hall & Son were renowned builders of sleek and fast 1,000 ton clippers for the China trade (opium in, tea out) and were keen to show they could also outclass the big North American ships built by Donald Mackay. Consequently the SCHOMBERG was ‘overbuilt’. Her hull featured five ‘skins’ of Scotch Larch and Pitch Pine overlaying each other in a diagonal pattern against a stout frame of British Oak. Oak has been favoured by builders of wooden ships for centuries. Its close, dense grain made it harder to work, but also gave it great strength and durability. In addition, the lateral spread of its branches supplied a natural curvature for the ribs of a vessel’s hull, as well as providing the small corner or curved pieces (‘knees’ and ‘elbows’) that fit them together. The shape and texture of this wood sample suggests a dense hardwood like Oak. The timber has been cut off at one end since its recovery from the sea, exposing a smooth and almost shiny surface. Seasoned English Oak has a similar light brown colour and tight grained finish. At the launch the SCHOMBERG’s 34 year old master, Captain ‘Bully’ Forbes, had promised Melbourne in 60 days, "with or without the help of God." James Nicol Forbes was born in Aberdeen in 1821 and rose to fame with his record-breaking voyages on the famous Black Ball Line ships; MARCO POLO and LIGHTNING. In 1852 in the MARCO POLO he made the record passage from London to Melbourne in 68 days. There were 53 deaths on the voyage but the great news was of the record passage by the master. In 1954 Captain Forbes took the clipper LIGHTNING to Melbourne in 76 days and back in 63 days, this was never beaten by a sailing ship. He often drove his crew and ship to breaking point to beat his own records. He cared little for the comfort of the passengers. On this, the SCHOMBERG’s maiden voyage, he was going to break records. SCHOMBERG departed Liverpool on her maiden voyage on 6 October 1855 flying the sign “Sixty Days to Melbourne”. She departed with 430 passengers and 3000 tons cargo including iron rails and equipment intended to build the Melbourne to Geelong Railway and a bridge over the Yarra from Melbourne to Hawthorn. She also carried a cow for fresh milk, pens for fowls and pigs, 90,000 gallons of water for washing and drinking. It also carried 17,000 letters and 31,800 newspapers. The ship and cargo was insured for $300,000, a fortune for the time. The winds were poor as she sailed across the equator, slowing SCHOMBERG’s journey considerably. Land was first sighted on Christmas Day, at Cape Bridgewater near Portland, and Captain Forbes followed the coastline towards Melbourne. Forbes was said to be playing cards when called by the Third Mate Henry Keen, who reported land about 3 miles off, Due in large part to the captain's regarding a card game as more important than his ship, it eventually ran aground on a sand spit near Curdie's Inlet (about 56 km west of Cape Otway) on 26 December 1855, 78 days after leaving Liverpool. The sand spit and the currents were not marked on Forbes’s map. Overnight, the crew launched a lifeboat to find a safe place to land the ship’s passengers. The scouting party returned to SCHOMBERG and advised Forbes that it was best to wait until morning because the rough seas could easily overturn the small lifeboats. The ship’s Chief Officer spotted SS QUEEN at dawn and signalled the steamer. The master of the SS QUEEN approached the stranded vessel and all of SCHOMBERG’s passengers and crew were able to disembark safely. The SCHOMBERG was lost and with her, Forbes’ reputation. The Black Ball Line’s Melbourne agent sent a steamer to retrieve the passengers’ baggage from the SCHOMBERG. Other steamers helped unload her cargo until the weather changed and prevented the salvage teams from accessing the ship. Later one plunderer found a case of Wellington boots, but alas, all were for the left foot! Local merchants Manifold & Bostock bought the wreck and cargo, but did not attempt to salvage the cargo still on board the ship. They eventually sold it on to a Melbourne businessman and two seafarers. In 1864 after two of the men drowned when they tried to reach SCHOMBERG, salvage efforts were abandoned. Parts of the SCHOMBERG were washed ashore on the south island of New Zealand in 1870, nearly 15 years after the wreck. The wreck now lies in almost 9 metres of water. Although the woodwork is mostly disintegrated the shape of the ship can still be seen due to the remaining railway irons, girders and the ship’s frame. A variety of goods and materials can be seen scattered about nearby. Flagstaff Hill holds many items salvaged from the SCHOMBERG including a ciborium (in which a diamond ring was concealed), communion set, ship fittings and equipment, personal effects, a lithograph, tickets and photograph from the SCHOMBERG. One of the SCHOMBERG bells is in the Warrnambool Library. This object is listed on the Shipwreck Artefact Register, No S/49, and is significant because of its association with the ship SCHOMBERG. The SCHOMBERG collection as a whole is of historical and archaeological significance at a State level, listed on the Victorian Heritage Register VHR S612. Flagstaff Hill’s collection of artefacts from the SCHOMBERG is significant for its association with the Victorian Heritage Registered shipwreck. The collection is primarily significant because of the relationship between the objects, as together they have a high potential to interpret the story of the SCHOMBERG. The SCHOMBERG collection is archaeologically significant as the remains of an international passenger ship. The shipwreck collection is historically significant for representing aspects of Victoria’s shipping history and its potential to interpret sub-theme 1.5 of Victoria’s Framework of Historical Themes (living with natural processes). The collection is also historically significant for its association with the shipwreck and the ship, which was designed to be fastest and most luxurious of its day. The SCHOMBERG collection meets the following criteria for assessment: Criterion A: Importance to the course, or pattern, of Victoria’s cultural history. Criterion B: Possession of uncommon, rare or endangered aspects of Victoria’s cultural history. Criterion C: Potential to yield information that will contribute to an understanding of Victoria’s cultural history. The object is an aggregate of limestone sediment that formed at the wreck-site of the SCHOMBERG (1855). It is an irregularly shaped conglomerate of sand, shell-grit and marine worm casings from the ocean floor, but also incorporates an assortment of manufactured metal pieces and pipe fittings (corroded with red rust), a small rectangular piece of copper sheet, some ‘petrified’ wood remains (hardened and a soft brown colour), and pieces of black shiny stone (roughly cube shaped and possibly glass or porcelain remnants). There is an impression left in the stone of a joist or plank end but the original timber that the sediment formed around has since been dispersed by the sea.flagstaff hill, warrnambool, shipwrecked-coast, flagstaff-hill, flagstaff-hill-maritime-museum, maritime-museum, shipwreck-coast, flagstaff-hill-maritime-village, schomberg, shipwreck timber, alexander hall and son, shipwreck debris, black ball line, 1855 shipwreck, aberdeen clipper ship, captain forbes, peterborough shipwreck, ss queen -
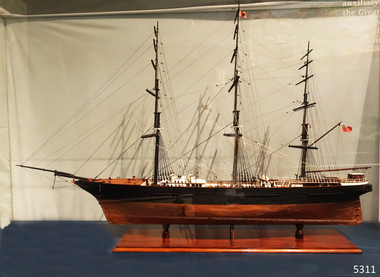 Flagstaff Hill Maritime Museum and Village
Craft - Ship Model, S.S. Schomberg, 1988
This model of the clipper ship SS Schomberg was researched and constructed to a scale of 1:64 by David Lumsden in 1988. When the Schomberg was launched in 1855, she was considered the "Noblest” ship that ever floated on the water. Schomberg's owners, the Black Ball Line had commissioned the ship for their fleet of passenger liners. She was built by Alexander Hall of Aberdeen for £43,103 and constructed with 3 skins. One planked fore and aft and two diagonally planked, fastened together with screw-threaded trunnels (wooden rails). Her First Class accommodation was simply luxurious with velvet pile carpets, large mirrors, rosewood, birds-eye maple and mahogany timbers throughout, soft furnishings of satin damask, and oak-lined library with a piano. Overall she had accommodation for 1000 passengers. At the launch, the Schomberg's 34-year-old master, Captain 'Bully' Forbes, had promised to reach Melbourne in sixty days stating, "with or without the help of God." Captain James Nicol Forbes was born in Aberdeen in 1821 and rose to fame with his record-breaking voyages on the famous Black Ball Line ships; Marco Polo and Lightning. In 1852 in the Marco Polo, he made the record passage from London to Melbourne in 68 days. Unfortunately, there were 53 deaths on the voyage, but the great news was off the record passage by Captain Forbes. In 1854 he took the clipper “Lighting” to Melbourne in 76 days and back in 63 days, this record was never beaten by a sailing ship. He often drove his crew and ship to breaking point to beat his previous records. He cared little for the comfort of the passengers. On this, the Schomberg's maiden voyage, he was determined to break existing records. Schomberg departed Liverpool on her maiden voyage on 6th October 1855 flying a sign that read "Sixty Days to Melbourne". She departed with 430 passengers and 3000 tons cargo including iron rails and equipment intended to build the Melbourne to Geelong Railway and a bridge over the Yarra from Melbourne to Hawthorn. She also carried a cow for fresh milk, pens for fowls and pigs, 90,000 gallons of water for washing and drinking. She also carried 17,000 letters and 31,800 newspapers. The ship and cargo were insured for $300,000 a fortune for the time. The winds were poor as she sailed across the equator, slowing Schomberg's journey considerably. The land was first sighted on Christmas Day, at Cape Bridgewater near Portland, Captain Forbes followed the coastline towards Melbourne. Forbes was said to be playing cards when called by the third mate Henry Keen, who reported land about 3 miles off. Due in large part to the captain's regarding a card game as more important than his ship, it eventually ran aground on a sand spit near Curdie's Inlet (about 56 km west of Cape Otway) on 26th December 1855, 78 days after leaving Liverpool. The sand spit and the currents were not marked on Forbes's map. Overnight, the crew launched a lifeboat to find a safe place to land the ship’s passengers. The scouting party returned to Schomberg and advised Forbes that it was best to wait until morning because the rough seas could easily overturn the small lifeboats. The ship’s Chief Officer spotted the SS Queen at dawn and signaled the steamer. The master of the Queen approached the stranded vessel and all of Schomberg’s passengers and crew disembarked safely. The Black Ball Line's Melbourne agent sent a steamer to retrieve the passengers' baggage from the Schomberg. Other steamers helped unload her cargo until the weather changed and prevented the salvage teams from accessing the ship. Later one plunderer found a case of Wellington boots, but alas, all were for the left foot. Local merchants Manifold & Bostock bought the wreck and cargo but did not attempt to salvage the cargo still on board the ship. They eventually sold it on to a Melbourne businessman and two seafarers. In 1864 after two of the men drowned when they tried to reach Schomberg, salvage efforts were abandoned. In 1870, nearly 15 years after the wreck parts of the Schomberg had washed ashore on the south island of New Zealand. The wreck now lies in almost 9 metres of water and although the woodwork is mostly disintegrated the shape of the ship can still be determined due to the remaining railway irons, girders and the ship’s frame. A variety of goods and materials can be seen scattered about nearby. There have been many other artefacts salvaged from the wreck include ship fittings and equipment, personal effects, a lithograph, tickets and photographs from the Schomberg. This item was retrieved from the shipwreck site during early salvage efforts on the vessel. And was donated to the Flagstaff Hill collection of Schomberg shipwreck artefacts.This artifact is particularly significant in that along with other items salvaged from the wreck have helped in part to having legislation changed to protect shipwrecks, with far tighter controls being employed to oversee the salvaging of wreck sites. This item forms part of the Schomberg collection at Flagstaff Hill maritime museum. The collection as a whole is of historical and archaeological significance at a State level. Flagstaff Hill’s collection of artefacts from the Schomberg is also significant for its association with the Victorian Heritage Registered Schomberg shipwreck (VHR S 612). The collection is of additional significance because of the relationship between the objects salvaged, as together they help us to interpret the story of the Schomberg. The collection as a whole is historically significant for representing aspects of Victoria's maritime history and its potential to interpret social and historical themes from society at the time of the wreck.Wooden model of the clipper ship SS Schomberg. The three masts are rigged with lines but have no sails. The model is mounted on pedestals on a timber board, exhibited in a glass case. The scale of this model is 1:64.Noneflagstaff hill, warrnambool, shipwrecked-coast, flagstaff-hill, flagstaff-hill-maritime-museum, maritime-museum, shipwreck-coast, flagstaff-hill-maritime-village, ship model, schomberg ship model, 1855, david lumsden, ship model maker, clipper ship, black ball line, 1855 shipwreck, aberdeen clipper ship, captain forbes, peterborough shipwreck, ss queen -
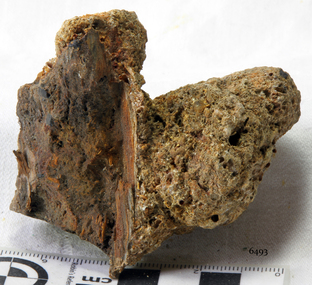 Flagstaff Hill Maritime Museum and Village
Wood sample, 1855
The artefact is a piece of ship’s timber from the wreck-site of the SCHOMBERG, a vessel which collided with the Peterborough reef on her maiden voyage in December 1855. This small wooden remnant of the disaster has been concreted on one side by the accrual of marine sediment while submerged. The build-up of sediment over the remains of the vessel is typical of the site as a whole. This artefact illustrates the reclaiming power of the ocean and the gradual disappearance of timber constructed vessels that have come to grief along this coastline (for example, the THISTLE in 1837, and the CHILDREN in 1838). The SCHOMBERG was a 2,000 ton clipper ship, specifically designed for the Australian immigration trade (back-loading wool for Britain’s mills), and constructed in Hall’s shipyard in Aberdeen, Scotland. She was owned by the Black Ball Line and launched in 1855. Alexander Hall & Son were renowned builders of sleek and fast 1,000 ton clippers for the China trade (opium in, tea out) and were keen to show they could also outclass the big North American ships built by Donald Mackay. Consequently the SCHOMBERG was ‘overbuilt’. Her hull featured five ‘skins’ of Scotch Larch and Pitch Pine overlaying each other in a diagonal pattern against a stout frame of British Oak. Oak has been favoured by builders of wooden ships for centuries. Its close, dense grain made it harder to work, but also gave it great strength and durability. In addition, the lateral spread of its branches supplied a natural curvature for the ribs of a vessel’s hull, as well as providing the small corner or curved pieces (‘knees’ and ‘elbows’) that fit them together. The shape and texture of this wood sample suggests a dense hardwood like Oak. The timber has been cut off at one end since its recovery from the sea, exposing a smooth and almost shiny surface. Seasoned English Oak has a similar light brown colour and tight grained finish. At the launch the SCHOMBERG’s 34 year old master, Captain ‘Bully’ Forbes, had promised Melbourne in 60 days, "with or without the help of God." James Nicol Forbes was born in Aberdeen in 1821 and rose to fame with his record-breaking voyages on the famous Black Ball Line ships; MARCO POLO and LIGHTNING. In 1852 in the MARCO POLO he made the record passage from London to Melbourne in 68 days. There were 53 deaths on the voyage but the great news was of the record passage by the master. In 1954 Captain Forbes took the clipper LIGHTNING to Melbourne in 76 days and back in 63 days, this was never beaten by a sailing ship. He often drove his crew and ship to breaking point to beat his own records. He cared little for the comfort of the passengers. On this, the SCHOMBERG’s maiden voyage, he was going to break records. SCHOMBERG departed Liverpool on her maiden voyage on 6 October 1855 flying the sign “Sixty Days to Melbourne”. She departed with 430 passengers and 3000 tons cargo including iron rails and equipment intended to build the Melbourne to Geelong Railway and a bridge over the Yarra from Melbourne to Hawthorn. She also carried a cow for fresh milk, pens for fowls and pigs, 90,000 gallons of water for washing and drinking. It also carried 17,000 letters and 31,800 newspapers. The ship and cargo was insured for $300,000, a fortune for the time. The winds were poor as she sailed across the equator, slowing SCHOMBERG’s journey considerably. Land was first sighted on Christmas Day, at Cape Bridgewater near Portland, and Captain Forbes followed the coastline towards Melbourne. Forbes was said to be playing cards when called by the Third Mate Henry Keen, who reported land about 3 miles off, Due in large part to the captain's regarding a card game as more important than his ship, it eventually ran aground on a sand spit near Curdie's Inlet (about 56 km west of Cape Otway) on 26 December 1855, 78 days after leaving Liverpool. The sand spit and the currents were not marked on Forbes’s map. Overnight, the crew launched a lifeboat to find a safe place to land the ship’s passengers. The scouting party returned to SCHOMBERG and advised Forbes that it was best to wait until morning because the rough seas could easily overturn the small lifeboats. The ship’s Chief Officer spotted SS QUEEN at dawn and signalled the steamer. The master of the SS QUEEN approached the stranded vessel and all of SCHOMBERG’s passengers and crew were able to disembark safely. The SCHOMBERG was lost and with her, Forbes’ reputation. The Black Ball Line’s Melbourne agent sent a steamer to retrieve the passengers’ baggage from the SCHOMBERG. Other steamers helped unload her cargo until the weather changed and prevented the salvage teams from accessing the ship. Later one plunderer found a case of Wellington boots, but alas, all were for the left foot! Local merchants Manifold & Bostock bought the wreck and cargo, but did not attempt to salvage the cargo still on board the ship. They eventually sold it on to a Melbourne businessman and two seafarers. In 1864 after two of the men drowned when they tried to reach SCHOMBERG, salvage efforts were abandoned. Parts of the SCHOMBERG were washed ashore on the south island of New Zealand in 1870, nearly 15 years after the wreck. The wreck now lies in almost 9 metres of water. Although the woodwork is mostly disintegrated the shape of the ship can still be seen due to the remaining railway irons, girders and the ship’s frame. A variety of goods and materials can be seen scattered about nearby. Flagstaff Hill holds many items salvaged from the SCHOMBERG including a ciborium (in which a diamond ring was concealed), communion set, ship fittings and equipment, personal effects, a lithograph, tickets and photograph from the SCHOMBERG. One of the SCHOMBERG bells is in the Warrnambool Library. The SCHOMBERG collection as a whole is of historical and archaeological significance at a State level, listed on the Victorian Heritage Register VHR S612. Flagstaff Hill’s collection of artefacts from the SCHOMBERG is significant for its association with the Victorian Heritage Registered shipwreck. The collection is primarily significant because of the relationship between the objects, as together they have a high potential to interpret the story of the SCHOMBERG. The SCHOMBERG collection is archaeologically significant as the remains of an international passenger ship. The shipwreck collection is historically significant for representing aspects of Victoria’s shipping history and its potential to interpret sub-theme 1.5 of Victoria’s Framework of Historical Themes (living with natural processes). The collection is also historically significant for its association with the shipwreck and the ship, which was designed to be fastest and most luxurious of its day. The SCHOMBERG collection meets the following criteria for assessment: Criterion A: Importance to the course, or pattern, of Victoria’s cultural history. Criterion B: Possession of uncommon, rare or endangered aspects of Victoria’s cultural history. Criterion C: Potential to yield information that will contribute to an understanding of Victoria’s cultural history. A piece of wood, concreted in sediment, from the wreck of the SCHOMBERG (1855). The limestone accretion includes sand, shell grit and marine worm casings. The exposed surface of the wood is broken and worn smooth along the grain. One end of the timber has been cut or sawn off across the grain, presenting a smooth and shiny surface.flagstaff hill, warrnambool, shipwrecked-coast, flagstaff-hill, flagstaff-hill-maritime-museum, maritime-museum, shipwreck-coast, flagstaff-hill-maritime-village, wood segment, schomberg, shipwreck timber, alexander hall and son, limestone concretion, oak-framed hull -
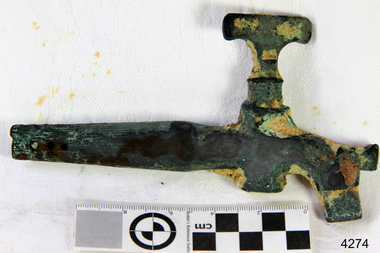 Flagstaff Hill Maritime Museum and Village
Functional object - Keg Spigot/Tap, Circa 1855
When the Schomberg was launched in 1855, she was considered the "Noblest” ship that ever floated on the water. Schomberg's owners, the Black Ball Line had commissioned the ship for their fleet of passenger liners. She was built by Alexander Hall of Aberdeen for £43,103 and constructed with 3 skins. One planked fore and aft and two diagonally planked, fastened together with screw-threaded trunnels (wooden rails). Her First Class accommodation was simply luxurious with velvet pile carpets, large mirrors, rosewood, birds-eye maple and mahogany timbers throughout, soft furnishings of satin damask, and oak-lined library with a piano. Overall she had accommodation for 1000 passengers. At the launch, the Schomberg's 34-year-old master, Captain 'Bully' Forbes, had promised to reach Melbourne in sixty days stating, "with or without the help of God." Captain James Nicol Forbes was born in Aberdeen in 1821 and rose to fame with his record-breaking voyages on the famous Black Ball Line ships; Marco Polo and Lightning. In 1852 in the Marco Polo, he made the record passage from London to Melbourne in 68 days. Unfortunately, there were 53 deaths on the voyage, but the great news was off the record passage by Captain Forbes. In 1854 he took the clipper “Lighting” to Melbourne in 76 days and back in 63 days, this record was never beaten by a sailing ship. He often drove his crew and ship to breaking point to beat his previous records. He cared little for the comfort of the passengers. On this, the Schomberg's maiden voyage, he was determined to break existing records. Schomberg departed Liverpool on her maiden voyage on 6th October 1855 flying a sign that read "Sixty Days to Melbourne". She departed with 430 passengers and 3000 tons cargo including iron rails and equipment intended to build the Melbourne to Geelong Railway and a bridge over the Yarra from Melbourne to Hawthorn. She also carried a cow for fresh milk, pens for fowls and pigs, 90,000 gallons of water for washing and drinking. She also carried 17,000 letters and 31,800 newspapers. The ship and cargo were insured for $300,000 a fortune for the time. The winds were poor as she sailed across the equator, slowing Schomberg's journey considerably. The land was first sighted on Christmas Day, at Cape Bridgewater near Portland, Captain Forbes followed the coastline towards Melbourne. Forbes was said to be playing cards when called by the third mate Henry Keen, who reported land about 3 miles off. Due in large part to the captain's regarding a card game as more important than his ship, it eventually ran aground on a sand spit near Curdie's Inlet (about 56 km west of Cape Otway) on 26th December 1855, 78 days after leaving Liverpool. The sand spit and the currents were not marked on Forbes's map. Overnight, the crew launched a lifeboat to find a safe place to land the ship’s passengers. The scouting party returned to Schomberg and advised Forbes that it was best to wait until morning because the rough seas could easily overturn the small lifeboats. The ship’s Chief Officer spotted the SS Queen at dawn and signalled the steamer. The master of the Queen approached the stranded vessel and all of Schomberg’s passengers and crew disembarked safely. The Black Ball Line's Melbourne agent sent a steamer to retrieve the passengers' baggage from the Schomberg. Other steamers helped unload her cargo until the weather changed and prevented the salvage teams from accessing the ship. Later one plunderer found a case of Wellington boots, but alas, all were for the left foot. Local merchants Manifold & Bostock bought the wreck and cargo but did not attempt to salvage the cargo still on board the ship. They eventually sold it on to a Melbourne businessman and two seafarers. In 1864 after two of the men drowned when they tried to reach Schomberg, salvage efforts were abandoned. In 1870, nearly 15 years after the wreck parts of the Schomberg had washed ashore on the south island of New Zealand. The wreck now lies in almost 9 metres of water and although the woodwork is mostly disintegrated the shape of the ship can still be determined due to the remaining railway irons, girders and the ship’s frame. A variety of goods and materials can be seen scattered about nearby. There have been many other artefacts salvaged from the wreck include ship fittings and equipment, personal effects, a lithograph, tickets and photographs from the Schomberg. This item was retrieved from the shipwreck site during early salvage efforts on the vessel. And was donated to the Flagstaff Hill collection of Schomberg shipwreck artefacts.This artifact is particularly significant in that along with other items salvaged from the wreck have helped in part to having legislation changed to protect shipwrecks, with far tighter controls being employed to oversee the salvaging of wreck sites. This item forms part of the Schomberg collection at Flagstaff Hill maritime museum. The collection as a whole is of historical and archaeological significance at a State level. Flagstaff Hill’s collection of artefacts from the Schomberg is also significant for its association with the Victorian Heritage Registered Schomberg shipwreck (VHR S 612). The collection is of additional significance because of the relationship between the objects salvaged, as together they help us to interpret the story of the Schomberg. The collection as a whole is historically significant for representing aspects of Victoria's maritime history and its potential to interpret social and historical themes from society at the time of the wreck. Brass keg spigot valve/tap, Schomberg Artifact Reg No S/94.Nonewarrnambool, flagstaff-hill, flagstaff-hill-maritime-museum, maritime-museum, shipwreck-coast, flagstaff-hill-maritime-village, schomberg, shipwrecked-artefact, clipper ship, black ball line, 1855 shipwreck, aberdeen clipper ship, captain forbes, peterborough shipwreck, ss queen, keg tap, brass keg tap -
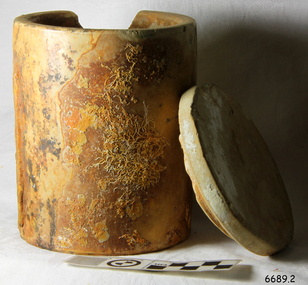 Flagstaff Hill Maritime Museum and Village
Ceramic - Container
When the Schomberg was launched in 1855, she was considered the "Noblest” ship that ever floated on the water. Schomberg's owners, the Black Ball Line had commissioned the ship for their fleet of passenger liners. She was built by Alexander Hall of Aberdeen for £43,103 and constructed with 3 skins. One planked fore and aft and two diagonally planked, fastened together with screw-threaded trunnels (wooden rails). Her First Class accommodation was simply luxurious with velvet pile carpets, large mirrors, rosewood, birds-eye maple and mahogany timbers throughout, soft furnishings of satin damask, and oak-lined library with a piano. Overall she had accommodation for 1000 passengers. At the launch, the Schomberg's 34-year-old master, Captain 'Bully' Forbes, had promised to reach Melbourne in sixty days stating, "with or without the help of God." Captain James Nicol Forbes was born in Aberdeen in 1821 and rose to fame with his record-breaking voyages on the famous Black Ball Line ships; Marco Polo and Lightning. In 1852 in the Marco Polo, he made the record passage from London to Melbourne in 68 days. Unfortunately, there were 53 deaths on the voyage, but the great news was off the record passage by Captain Forbes. In 1854 he took the clipper “Lighting” to Melbourne in 76 days and back in 63 days, this record was never beaten by a sailing ship. He often drove his crew and ship to breaking point to beat his previous records. He cared little for the comfort of the passengers. On this, the Schomberg's maiden voyage, he was determined to break existing records. Schomberg departed Liverpool on her maiden voyage on 6th October 1855 flying a sign that read "Sixty Days to Melbourne". She departed with 430 passengers and 3000 tons cargo including iron rails and equipment intended to build the Melbourne to Geelong Railway and a bridge over the Yarra from Melbourne to Hawthorn. She also carried a cow for fresh milk, pens for fowls and pigs, 90,000 gallons of water for washing and drinking. She also carried 17,000 letters and 31,800 newspapers. The ship and cargo were insured for $300,000 a fortune for the time. The winds were poor as she sailed across the equator, slowing Schomberg's journey considerably. The land was first sighted on Christmas Day, at Cape Bridgewater near Portland, Captain Forbes followed the coastline towards Melbourne. Forbes was said to be playing cards when called by the third mate Henry Keen, who reported land about 3 miles off. Due in large part to the captain's regarding a card game as more important than his ship, it eventually ran aground on a sand spit near Curdie's Inlet (about 56 km west of Cape Otway) on 26th December 1855, 78 days after leaving Liverpool. The sand spit and the currents were not marked on Forbes's map. Overnight, the crew launched a lifeboat to find a safe place to land the ship’s passengers. The scouting party returned to Schomberg and advised Forbes that it was best to wait until morning because the rough seas could easily overturn the small lifeboats. The ship’s Chief Officer spotted the SS Queen at dawn and signalled the steamer. The master of the Queen approached the stranded vessel and all of Schomberg’s passengers and crew disembarked safely. The Black Ball Line's Melbourne agent sent a steamer to retrieve the passengers' baggage from the Schomberg. Other steamers helped unload her cargo until the weather changed and prevented the salvage teams from accessing the ship. Later one plunderer found a case of Wellington boots, but alas, all were for the left foot. Local merchants Manifold & Bostock bought the wreck and cargo but did not attempt to salvage the cargo still on board the ship. They eventually sold it on to a Melbourne businessman and two seafarers. In 1864 after two of the men drowned when they tried to reach Schomberg, salvage efforts were abandoned. In 1870, nearly 15 years after the wreck parts of the Schomberg had washed ashore on the south island of New Zealand. The wreck now lies in almost 9metres of water and although the woodwork is mostly disintegrated the shape of the ship can still be determined due to the remaining railway irons, girders and the ship’s frame. A variety of goods and materials can be seen scattered about nearby. There have been many other artefacts salvaged from the wreck include ship fittings and equipment, personal effects, a lithograph, tickets and photographs from the Schomberg. This ceramic container was retrieved from the shipwreck site during early salvage efforts on the vessel. And was donated to the Flagstaff Hill collection of Schomberg shipwreck artefacts.The ceramic container is particularly significant in that along with other items from the wreck have helped in part to having legislation changed to protect shipwrecks, with far tighter controls being employed to oversee the salvaging of wreck sites. This item forms part of the Schomberg collection at Flagstaff Hill maritime museum. The collection as a whole is of historical and archaeological significance at a State level. Flagstaff Hill’s collection of artefacts from the Schomberg is also significant for its association with the Victorian Heritage Registered Schomberg shipwreck (VHR S 612). The collection is of additional significance because of the relationship between the objects salvaged, as together they help us to interpret the story of the Schomberg. The collection as a whole is historically significant for representing aspects of Victoria's maritime history and its potential to interpret social and historical themes from society at the time of the wreck.Stoneware Container with lid, white in colour,Noneflagstaff hill, warrnambool, shipwrecked-coast, flagstaff-hill, flagstaff-hill-maritime-museum, maritime-museum, shipwreck-coast, flagstaff-hill-maritime-village, container, shipwrecked-artefact, schomberg, clipper ship, black ball line, 1855 shipwreck, aberdeen clipper ship, captain forbes, peterborough shipwreck, ss queen -
Port Melbourne Historical & Preservation Society
Book, Jill Barnard et al, "Welcome & Farewell - The Story of Station Pier", Aug 2004
Donated to the PMH&PS by the authors, at the launch on Station Pier (occasion of 150th birthday of Railway Pier), 12th September 2004. (Ref 1948.01 for picture of authors at launch)."Welcome & Farewell - The Story of Station Pier" - a large, lavishly illustrated history of early Sandridge Railway and Station Piers. Copper coloured cover and dust cover, hardback, 206 pp. Index, Bibliography, Chronology and extensive references. Signed by co-authors and Station Pier ManagerSigned by co-authors Jill Barnard and Sonia Jennings, and Station Pier Manager Evda Marangospiers and wharves - railway pier, piers and wharves - station pier, transport - shipping, transport - railways, immigration, jill barnard, sonia jennings -
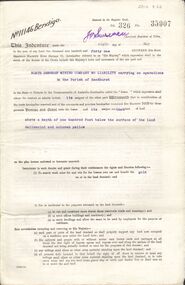 Bendigo Historical Society Inc.
Document - MCCOLL, RANKIN AND STANISTREET COLLECTION: GOLD MINING LEASE NORTH DEBORAH MINING COMPANY, 6th May, 1941
6 page indenture document plus plan, between King George VI and North Deborah Mining company, no liability, Parish of Sandhurst, dated 6th May 1941. Lease number 11146 Bendigo. ' all that piece of land above a depth of one hundred feet below the surface of the land delineated and coloured yellow' Signed by J. Stanistreet, manager. Plan shows excised area in pink. Excised below 100ft shown in yellow ( lease 11146 ) On top of plan ' Mining district of Bendigo, County of Bendigo, Parish of Sandhurst. Area section has been amended to show 1 rood, 14 perches. Leases on plan : No. 9988, 11013, 11062, 11033, 11146, 10753, 11020. Streets: Sullivan Street, Hargreaves Street, Violet Street, Queen Street, King Street. Railway line shown. Scale 8 chains to 1 inch.bendigo, mining, north deborah mining company, north deborah mine, j stanistreet, sullivan heargreaves, queen, king streets. -
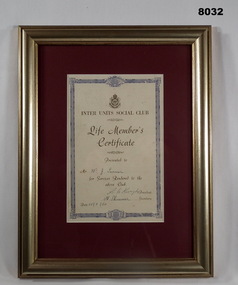 Bendigo Military Museum
Certificate - LIFE MEMBERSHIP 1960, RSL Inter Units Social Club, 28.3.1960
The Life Membership relates to William John Turner Bendigo RSL Sub Branch. Refer Cat No 8029 for details of his work and fund raising for the Sub Branch. Refer Cat No 8030 for details re his Committee involvement with Bendigo Sub Branch and his WW1 service history. The Unit Social Clubs listed in an RSL Bendigo Annual report 1946 appear to be 6th, 38th, 57th Bn Associations, Railways Sub Section, Catholic War Veterans Association, POW Association (new member 1947).Framed certificate, frame is timber gold colour, backing for the certificate is maroon colour, certificate has ornate blue edging, RSL logo at the top followed by the details of the certificate, all print in black, signed and dated.Main points; “Inter Units Social Club - Life Members Certificate - Presented to Mr W.J. Turner for services rendered to the above club” “R C. Kuryke President” “H Skinner Secretary” Dated 28.3.1960”brsl, smirsl, certificate. -
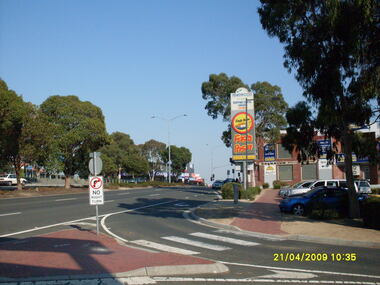 Ringwood and District Historical Society
Photograph, Looking along Maroondah Highway towards the south-east, on 21 April 2009. Showing entrance to Ringwood Railway Station, Carter Real Estate and Fasta Pasta sign
Ron Brons photographic study of Ringwood. -
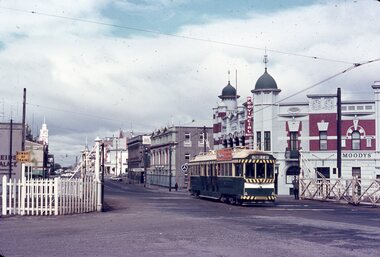 Ballarat Tramway Museum
Slide - SECV Ballarat tram 36 at the Railway Station, Graeme Cleak, 5-4-1969
The photo shows SECV Ballarat No. 36 northbound in Lydiard St North crossing the railway level crossing. Taken during the AETA Easter tour to Ballarat - see reference. In the background are Reid's Coffee Palace, Union Trustees, a Mercedes-Benz sign, and the Provincial Hotel. The tram has a SEC Electric Cooking roof advert.Yields information about the AETA 1969 Ballarat tour and tram 36.Colour slide - AGFA Cardboard mount with handwritten notes.In ink "No. 36 Rly Stn 5-4-69, EK13"tramways, tramcars, aeta tours, lydiard st nth, level crossing, tram 36 -
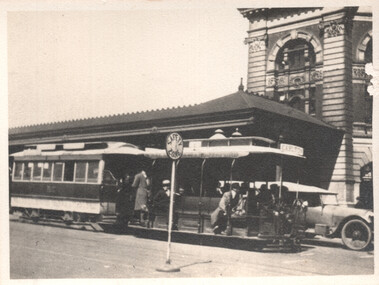 Melbourne Tram Museum
Photograph - Cable tram No. 32 Swanston St, 1920s
Photograph shows a cable tram set in Swanston Street at Flinders Street bound for Carlton with Flinders Street railway station in the background. Has a Safety zone sign in the foreground. Photo early to mid 1920s, the line was converted to electric trams in 1926.Yields information about cable trams in Swanston Street in 1920'sBlack and white photograph with notes on the rear.On rear in pencil "Swanston St at Flinders St" Has the number "21" in pencil in top right-hand corner. tramways, cable trams, swanston st, flinders street station, tram 32, flinders st, trams