Showing 10283 items
matching classism
-
 Melbourne Tram Museum
Slide, John Webster, 5/04/1960 12:00:00 AM
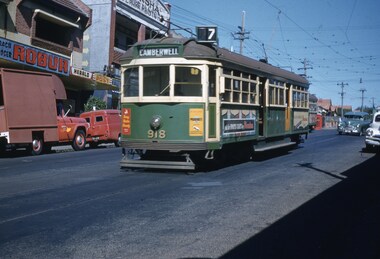
Colour slide, Kodak, white cardboard of tram SW6 918, in Burke Road, Gardiner after turning from Malvern Road, route 7, Camberwell. In the background are the shops since removed advertising Robur tea and the Herald and the Australasian Post. Slide dated 5-4-60.Hand writing on rear in ink "5-4-60 tram 918 Burke Road Gardiner Victoria"trams, tramways, sw6 class, camberwell, burke rd, route 7, gardiner, tram 918 -
 Melbourne Tram Museum
Slide - Set of 2, John Webster, 14/06/1960 12:00:00 AM
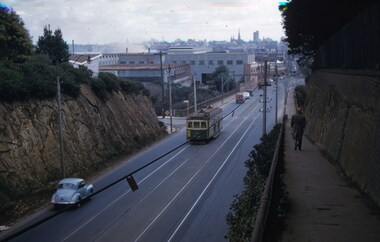
Set of two Colour slides Kodak, white cardboard of trams: .1 - an SW6 (route 42) car descending the Barkers Road hill through the cutting towards Victoria Bridge over the Yarra river, Has the Vickers Ruwolt factor in the background and the city skyline. .2 - SW6 893 (City Route 42), crossing the Victoria Bridge after leaving the Barkers Road cutting. Shows the overhead support structure on the bridge. Slide datedHand writing on rear in ink "14-6-60 - Retrieving a trolley pole Church St Hawthorn."trams, tramways, route 42, barkers road, sw6 class, bridges, victoria bridge, tram 893 -
 Melbourne Tram Museum
Slide, John Webster, 14/06/1960 12:00:00 AM
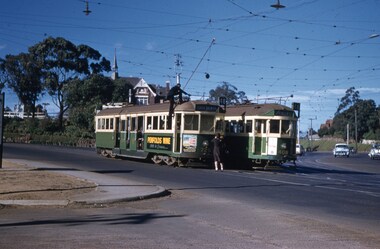
Colour slide, Kodak, white cardboard of trams W5 725 (North Balwyn) and W2 408 (Spencer St), both route 48 at the intersection of Church St, Burwood Road and Bridge Road Hawthorn with the driver? of 725 getting on the roof to retrieve a trolley pole (with wheel) that cant be positioned because of the overhead span wire. Note the street light behind the tram. 725 has an advert for Penfolds Wine. Slide dated 14-6-60. See Reg Items 4361 for the Chairman Robert Risson on the roof of a tram and 3973 for a related newspaper cutting following the death of a driver.Hand writing on rear in ink "14-6-60 - Retrieving a trolley pole Church St Hawthorn."trams, tramways, route 48, north balwyn, trolley poles, church st, burwood rd, w2 class, w5 class, tram 725, tram 408 -
 Melbourne Tram Museum
Slide - Set of 4, John Webster, 16/11/1959 12:00:00 AM
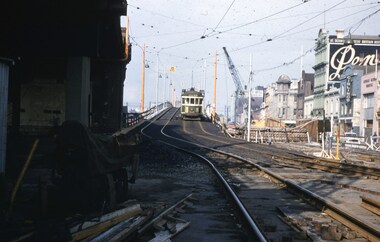
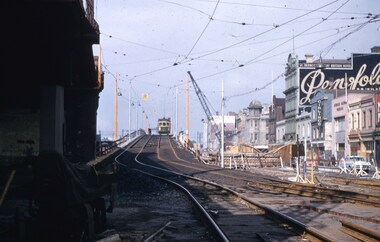
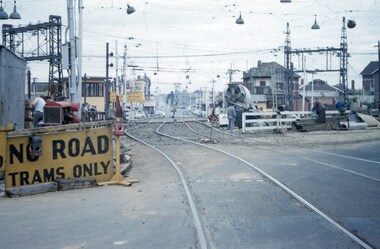
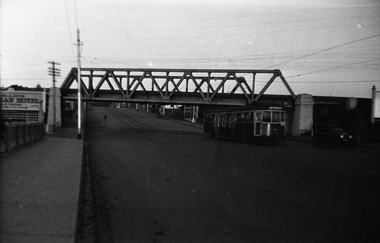
Set of four Colour slides, Kodak, white cardboard of trams using the Flinders St overpass of King St, 16-11-59. .1 - W2 538 descending the temporary track over King St as part of the first stage of construction. Tram has the destination of East Kew Route 40. .2 - ditto at the base of the bridge. Tram has adverts for Uncle Toby's Oats, .3 - W5 725 entering the temporary track near Queen St. Tram has destination of Spencer St, route 48 and adverts for 3AW, Pimms No. 1 and Penfolds Wine. On the far right is a MMTB Mk III bus to Kew - Earl St. .4 - ditto with the Yarra Family Hotel in the background. Note the tram stop sign. .In the background are adverts for Penfolds Wines, Bushels, the Flinders St viaduct, Nestles Milk, Girlings Store and the Cafe / Milk bar that was under the viaduct.Hand writing on rear in ink; .1 - 16-11-59 - Melbourne Vic. .2 - ditto ..3 and .4 - 16-11-59 Tram 725 entering temporary track in Flinders St Melbourne Vic.trams, tramways, trackwork, flinders st, king st, track construction, bridges, w2 class, east kew, route 40, w5 class, route 48, tram stops, tram 538, tram 725 -
 Melbourne Tram Museum
Slide - Set of 4, John Webster, 14/12/1959 12:00:00 AM
Set of four Colour slides, Kodak, white cardboard, .4 brown cardboard of trams using the Flinders St overpass of King St, 14-12-1959 .1 - SW6 854 at the top of the new bridge. .2 - SW6 854 at the bottom of the new bridge, has destination of Hawthorn route 27, and adverts for Biro pens, Lindeman's sherry, Knights Jewellery and KSP ? .3 - SW6 854 trailing photo with William St, nearing the intersection with William St. with the Yarra Family Hotel and a shop selling Oysters and Crayfish. .4 - Photo showing a W2 and W5? climbing the bridge. Note the overhead has been set up for a junction. In the background are adverts for Penfolds Wines, Bushels, the Flinders St viaduct, Nestles Milk, Girlings, Barrow Bros, Store.Hand writing on rear in ink; .1 - 14-12-59 - KFL2 - Flinders St flyover, Melbourne Vic. .2 - 14-12-59 - KFL2a - Trams coming over the Flinders St flyover, Melbourne Vic. .3 - 14-12-59 - KFL3 - temporary track during building of the Flinders St flyover, Melbourne. .4 - 14-12-59 - KFL3a - Flinders St flyover, Melbourne Vic.trams, tramways, trackwork, flinders st, king st, track construction, bridges, sw6 class, hawthorn, route 27, tram 854 -
 Melbourne Tram Museum
Slide - Set of 2, John Webster, 21/07/1959 12:00:00 AM
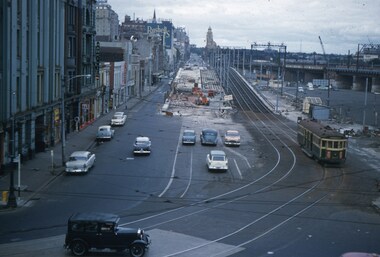
Set of two Colour slides, Kodak, white cardboard of trams of the construction of the Flinders St overpass over King St from the railway viaduct over Spencer St, looking east. Shows the temporary track on the south side of the bridge and the large car park under construction from the former cool stores on this site. Also shows the former track into Spencer St. Note the cross over at the base of the bridge. .1 - possibly 357 running a route 27 to Spencer St. Has the Great Southern Hotel on the left side. .2 - similar photo taken from the viaduct, further along - has the Bushels and Penfolds Wines signs in the background.Hand writing on rear in ink; .1 and .2 - "2-4-60 - Tracks - Flinders St Melbourne" Both slides have the speed and the f reading on the left hand side.trams, tramways, trackwork, flinders st, king st, track construction, bridges, w2 class, route 27, tram 357? -
 Melbourne Tram Museum
Slide - Set of 5, John Webster, 17/10/1959 12:00:00 AM
Set of five Colour slides, Kodak, brown cardboard of the removal of the Elsternwick Level crossing on 17-10-1959 .1 - looking east along Glenhuntly Road, showing the level crossing, concrete truck and road protection signs and the temporary track. .2 - W2 287 traversing the temporary track over the level crossing. Tram has the destination of route 4B, Sth Caulfield via Glenhuntly Road. Also has adverts for APEX and Fitwear socks. .3 - ditto on the crossing. .4 - ditto past the crossing. .5 - W2 551 (Carnegie Route 4) and L 103 (City route 4B) on the level crossing. 551 has adverts for Castle Vintage Sherry and Apex. 103 has adverts for Remy Martin Brandy, Alongside is a Victorian Railways sign advertising trains to the city.Hand writing on rear in ink; .1 - 17-10-59 - KFH1 .2 - KFH 1a .3 - KFH 1b .4 - KFH 1c .5 - KFH 1etrams, tramways, elsternwick, level crossings, railway squares, w2 class, l class, carnegie, south caulfield, glenhuntly rd, tram 287, tram 551, tram 103 -
 Melbourne Tram Museum
Slide - Set of 7, John Webster, 17/10/1959 12:00:00 AM
Set of seven Colour slides, Kodak, brown cardboard of the removal of the Elsternwick Level crossing on 28-5-1960 .1 - looking down into he cutting through the old goods yard - has the platform being installed. .2 - X2 675 crossing the new bridge with the level crossing in the background. .3 - L103, to the city, route 4, with the conductor watching the trolley pole. Has an advert for white horse whiskey. .4 - W2 269, route 4 to Carnegie, on the level crossing. Has a building in the background, advertising Esquire car sales. .5 - A Tait train on the crossing no gates in operation. .6 - ditto, to Sandringham .7 - W6 965, route 4 to the City on the crossing. Has two railway hoardings in the background advertising BP Benzol petrol and Saunders Pure Malt extract and part of a sign for Penfolds. The tram has an advert for Porsche cars. Note the tram stop sign on the small post alongside the tram.Hand writing on rear in ink; .1 - 28-5-60 - Railway cutting for underpass at Elsternwick Vic. .2 - ditto, tram 675 on temporary tracks in Glenhuntly Road, Elsternwick Vic. .3 - tram 103 on temporary tracks in Glenhuntly Road, Elsternwick Vic. .4 - tram 269 on temporary tracks in Glenhuntly Road, Elsternwick Vic. .5 - Elsternwick station new crossing .6 - Temporary track Elsternwick Vic .7 - Tram 965 at temporary stop at Elsternwick Vic.trams, tramways, elsternwick, level crossings, railway squares, w2 class, l class, carnegie, south caulfield, glenhuntly rd, w6 class, vr -
 Melbourne Tram Museum
Document - Report, Track and Signal, "How they meet a cost conscious market - How Alstom designed, manufactured and marketed the CITADIS", Mar. 2002
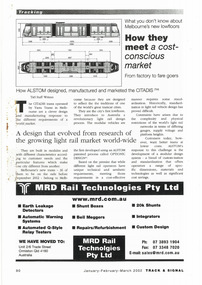
Digital image of a report in the Jan - March 2002 issue of Track & Signal, pages 90 and 91 titled - "How they meet a cost conscious market - How Alstom designed, manufactured and marketed the CITADIS". Written by Staff Writers. Gives information about the design, body testing, specifications and construction. Has a drawing of the tramcar.trams, tramways, c class, alstom, citadis, new tramcars, tramcar construction -
 Melbourne Tram Museum
Photograph - Black & White Photograph/s, c1956
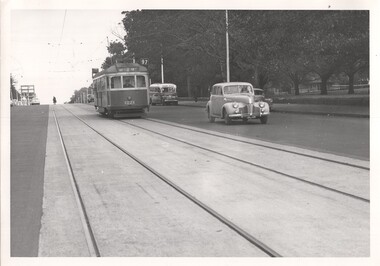
Black and White photograph of W7 1021 in Nicholson St Carlton, route 97, mid 1950's. Tram has the destination of North Fitzroy Park St. In the background are a number of vehicles including a bus - see image htd4436ib.jpg for a close up.trams, tramways, nicholson st, w7 class, buses, route 97, tram 1021 -
 Melbourne Tram Museum
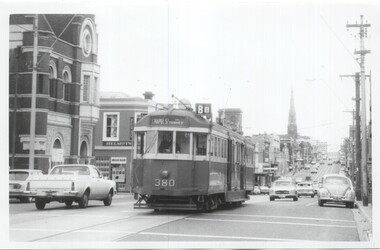
Photograph - Set of 4 Black & White Photograph/s, Clive Gibson?, c1975
Set of four Black and White photographs of W2 380. Photos not dated, c1975. .1 - Toorak Road, just past Osborne St, South Yarra, with the South Yarra Post Office in the view. Also Helmuts Milk Bar? Tram has the destination of Chapel St, route 8B. .2 - Turning from Park St South Yarra into Toorak Road. Tram has the destination of Toorak, route 8. Note the Bundy clock on the left hand pole. .3 - In St Kilda Road, at the Arts Centre, with destination of Elsternwick, Route 4E. .4 - turning from Toorak Road into Park St, route 8. See image i5 for envelope which has the names of Clive Gibson, Dave Menzies and date 1975 which could be the date the photos were sent to Dave Menzies for some reason.trams, tramways, w2 class, bundy clock, route 8b, toorak road, south yarra, park st, route 8, st kilda rd, route 4e, elsternwick, tram 380 -
 Melbourne Tram Museum
Photograph - Black & White Photograph/s, Dec. 1959
Black and White photograph of W2 340 at Preston Workshops, showing Special, and the route number 01, possibly indicating the completion of an O1 overhaul. Record cards extracted by Geoff Warburton give the last 01 date of 12/1959.trams, tramways, preston workshops, w2 class, overhauls, tram 340 -
 Melbourne Tram Museum
Photograph - Black & White Photograph/s, Apr. 1971
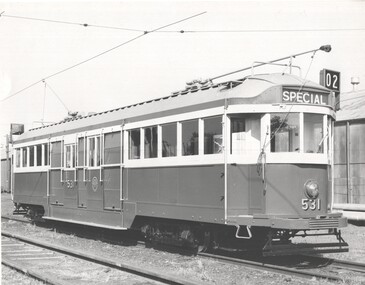
Black and White photograph of W2 531 at Preston Workshops, showing Special, and the route number 02, possibly indicating the completion of an O2 overhaul. Record card date 4/1971 2nd copy - stamped TMSV sales on rear and MMTB.trams, tramways, preston workshops, w2 class, overhauls, tram 531 -
 Melbourne Tram Museum
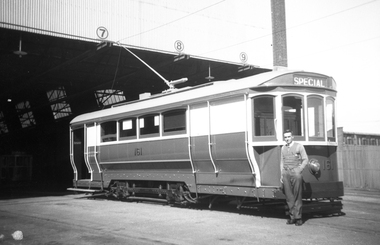
Negative, Wal Jack, 19/01/1941 12:00:00 AM
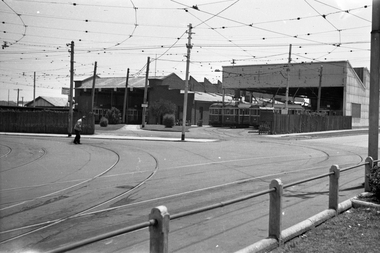
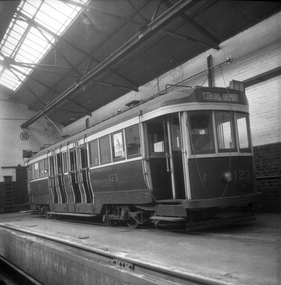
Black and white negative by Wal Jack of the then Preston Depot, Thornbury Depot from St Georges Road, 19-1-1941. A man in a white jacket is sweeping the curve track. Inside the new shed, trams W2 477? (showing City Route 9D), 644 (Thornbury Route 9) and 444 (Thornbury Route 9D)trams, tramways, preston depot, thornbury depot, st georges road, w2 class, route 9, route 9d, tram 477?, tram 644, 444 -
 Melbourne Tram Museum
Negative, Wal Jack, 1940's
Black and white negative by Wal Jack of S 161 at the South Melbourne or Hanna St depot. Photo mid 1940's?trams, tramways, hanna st, south melbourne depot, s class, tram 161 -
 Melbourne Tram Museum
Negative, Wal Jack, 1940's
Black and white negative by Wal Jack of X2 675 at the Point Ormond terminus. Photo mid 1940's?trams, tramways, x2 class, point ormond, tram 675 -
 Melbourne Tram Museum
Negative, Wal Jack, 1940's
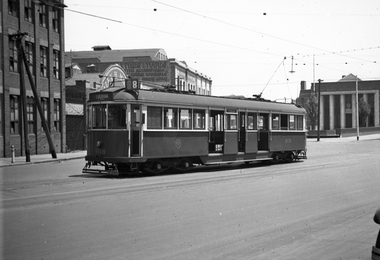
Black and white negative by Wal Jack of W5 808 (Toorak Route 8) in Victoria St, shunting. Has the Army Recruiting centre in the background and a building advertising Goodyear tyres and tubes. Photo undated, c1940.trams, tramways, victoria st, route 8, shunting, w5 class, tram 808 -
 Melbourne Tram Museum
Negative, Wal Jack collection, 1940's
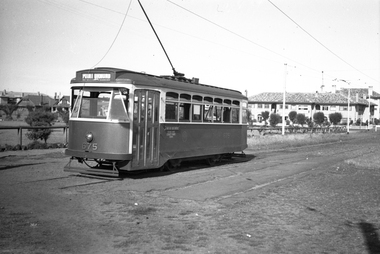
Black and white negative by Wal Jack of W5 741 outbound in the reservation, Mount Alexander Road, North Essendon. Tram number identified on print in album. Has the destination of Essendon, Route 51 Photo undated, c1940.trams, tramways, mount alexander road, w5 class, route 51, tram 741 -
 Melbourne Tram Museum
Negative, Wal Jack collection, 1940's
Black and white negative by Wal Jack of W4 670 (Maribyrnong River, route 54), passing under the rail over bridge for the Coburg railway line in Racecourse Road, Flemington. Tram about to cross the Moonee Ponds Creek bridge. Tram number identified on print in album. Photo undated, c1940.trams, tramways, racecourse road, w4 class, route 54, tram 670 -
 Melbourne Tram Museum
Negative, Wal Jack collection, Sep. 1941
Black and white negative by Wal Jack? of N 123 at Coburg Tram Depot, with the destination of Coburg Depot. Photo dated, 9/1941 in the Wal Jack album.trams, tramways, coburg depot, n class, tram 123 -
 Melbourne Tram Museum
Negative, Wal Jack collection, 1925
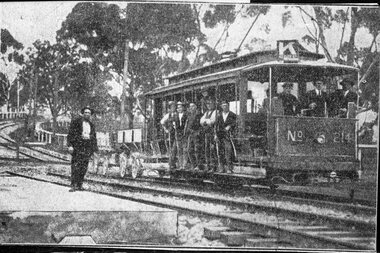
Black and white copy negative obtained by Wal Jack of V 214, towing two trailers, undertaking ballasting operations on the Royal Park tram line, 1925.trams, tramways, v class, royal park, ballast, trailers, tram 214 -
 Melbourne Tram Museum
Negative, Wal Jack, Sep. 1941
Black and white negative by Wal Jack of S160, fitted with a head light mask at the St Georges Road terminus of the Holden St line in Barkly St North Fitzroy. Note the tram stop signs on the adjacent pole. Photo dated, 1/9/1941 in the Wal Jack album.trams, tramways, s class, barkly st, holden st, st georges road, headlight mask, tram 160 -
 Melbourne Tram Museum
Negative, Wal Jack collection, 1/09/1941 12:00:00 AM
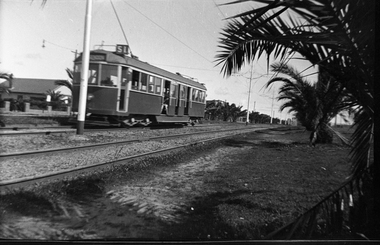
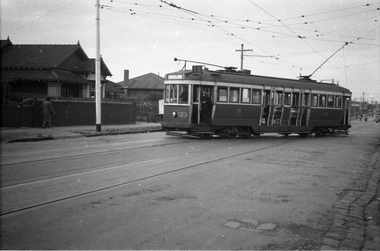
Black and white negative by Wal Jack of Maximum Traction CW5 684 at the intersection of Warragul Road and Riversdale Road with Wattle Park in the background. Tram has the destination of City, Route 71. A RAAF poster can be seen in one of the windows. Above the tram on a pole is a tram signal for the single line operation between Warragul Road and the Wattle Park terminus. See also item 6771 for a photo of the pole itself. Photo dated, 1/9/1941 in the Wal Jack album. See also Reg Itemtrams, tramways, cw5 class, warragul road, riversdale road, route 71, maximum traction, wattle park, tram 684 -
 Melbourne Tram Museum
Negative, Wal Jack collection, 24/11/1941 12:00:00 AM
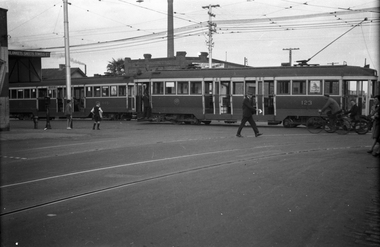
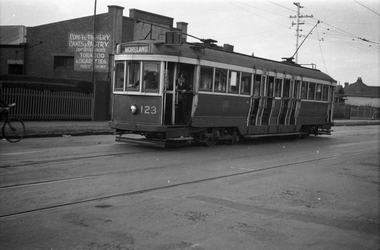
Black and white negative by Wal Jack of Maximum Traction N 123 leaving the Coburg Depot in Nicholson St Coburg with the destination of Moreland. Photo dated, 24/11/1941 in the Wal Jack album. See also Reg Item 5329 to 5332 for other photos featuring this tram.trams, tramways, n class, coburg depot, coburg, moreland, nicholson st, tram 123 -
 Melbourne Tram Museum
Negative, Wal Jack collection, 24/11/1941 12:00:00 AM
Black and white negative by Wal Jack of Maximum Traction N 123 northbound in Nicholson St at the intersection with Holmes Road and Moreland Road. W2 445 has the destination of Darling Road. The tracks into Moreland Road are in the foreground. A RAAF poster can be seen in one of the windows of both cars. Note the fire alarm pillar, the paper boy, conductor on the step of the N 123. A premise selling blankets, sheets and towels etc can be seen. See also Reg Item 5328 to 5332 for other photos featuring this tram. Photo not in the album, based on the date of others featuring N123, 24/11/1941.trams, tramways, n class, w2 class, coburg, moreland rd, nicholson st, tram 123, tram 445 -
 Melbourne Tram Museum
Negative, Wal Jack collection, 24/11/1941 12:00:00 AM
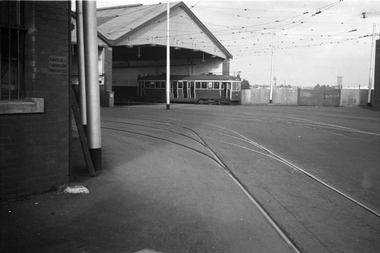
Black and white negative by Wal Jack of Maximum Traction N 123 at the Coburg Tram Depot. Note the sign on the wall "Hawking Canvassing Prohibited" Photo dated, 24/11/1941 in the Wal Jack album. See also Reg Item 5329 to 5332 for other photos featuring this tram.trams, tramways, n class, coburg depot, coburg, tram 123 -
 Melbourne Tram Museum
Negative, Wal Jack collection, 24/11/1941 12:00:00 AM
Black and white negative by Wal Jack of Maximum Traction N 123 (Moreland) in Nicholson St after running out of the Coburg Tram Depot. The shop in the background selling Confectionery etc is the Pause Cafe (Google Earth - 20-10-2020) Photo dated, 24/11/1941 in the Wal Jack album. See also Reg Item 5329 to 5332 for other photos featuring this tram.trams, tramways, n class, coburg depot, coburg, moreland, nicholson st, tram 123 -
 Melbourne Tram Museum
Negative, Wal Jack collection, 24/11/1941 12:00:00 AM
Black and white negative by Wal Jack of Maximum Traction N 123 (Moreland) in Nicholson St after running out of the Coburg Tram Depot with W4 672 (Route 1 South Melb & St Kilda Beach) alongside. N 123 waiting for the tram to pass before using the cross over in front of the tram. The shop in the background selling Confectionery etc is now the Pause Cafe (Google Earth - 20-10-2020) Photo dated, 24/11/1941 in the Wal Jack album. See also Reg Item 5329 to 5332 for other photos featuring this tram.trams, tramways, n class, w4 class, coburg depot, coburg, moreland, nicholson st, tram 123, tram 672, route 1 -
 Melbourne Tram Museum
Negative, Wal Jack, c1941
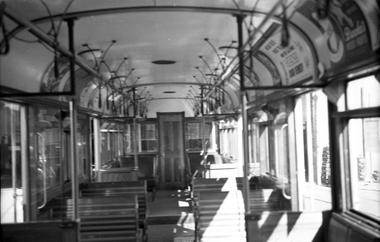
Black and white negative, by Wal Jack, of an interior view of SW6 844. Photo undated, in the Wal Jack album but given as the car number. c1941.trams, tramways, sw6 class, interiors, tram 844 -
 Melbourne Tram Museum
Negative, Wal Jack, 1/09/1941 12:00:00 AM
Black and white negative, by Wal Jack, of S 160 (Lygon St) and Q 191 (No destination) turning from Holden St into Lygon St. Brunswick. Photo dated 1-9-1941, in the Wal Jack album.trams, tramways, s class, q class, holden st, lygon st, brunswick, tram 160, tram 191