Showing 12725 items
matching parade
-
 Ballarat Tramway Museum
Film - Microfiche, Nova Micrographics, "ESCo Tramway Employee Register", Jun. 1994
Yields information about the ESCo employees register that was donated to the Museum, c1990. Microfiche of this register., Yields information about the ESCo employees register that was donated to the Museum, c1990. Microfiche of this register.Set of 3 microfiche, each in a plastic envelope of the ESCo Employee Register (Reg Item 100), made by Nova Micrographics, North Carlton, early 1994. 10 Copies made, one to Alan Bradley and one to Ballarat Genealogical society 10/1994. Each Microfiche has the heading "Ballarat Tramway Preservation Society, "ESCo Tramway Employee Register" and Fiche No on the right hand edge. Each set of fiche contained within a separate plastic envelope. One set of fiche transferred to Melbourne and held in the negative file - Ntrams, tramways, esco, employees, crews, personnel -
 Ballarat Tramway Museum
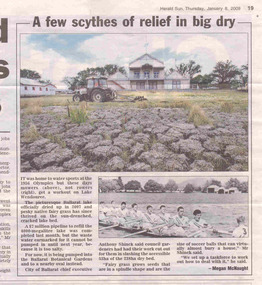
Newspaper, Herald Sun, "A few scythes of relief in big dry", 8/01/2009 12:00:00 AM
Newspaper clipping from the Herald Sun, Thursday 8/1/2009, titled "A few scythes of relief in big dry", with a photograph of the dry and cracked lake bed of Lake Wendouree and a photograph of it being used as a rowing course. Has some of the rowing sheds in the background and a track mowing the surface. Provides details of the pipeline that will be used to fill the lake when suitable.lake wendouree, drought -
 Ballarat Tramway Museum
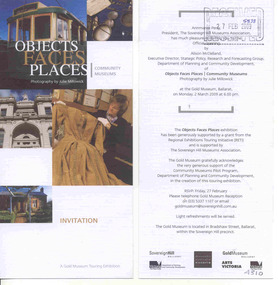
ephemera - Invitation, Gold Museum, "Objects Faces Places", 2009
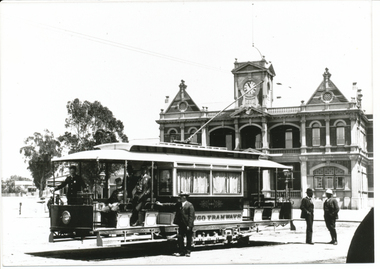
Invitation to the opening of the exhibition at the Gold Museum "Objects Faces Places", photograph by Julie Millowick at the Gold Museum 2/3/2009. Has a photo of No. 27 on the top of the invitation card and details of the exhibition on the rear. The BTM provided a number of objects to the exhibition.Date stamped by BTM and letter number "5838"trams, tramways, exhibitions, gold museum -
 Ballarat Tramway Museum
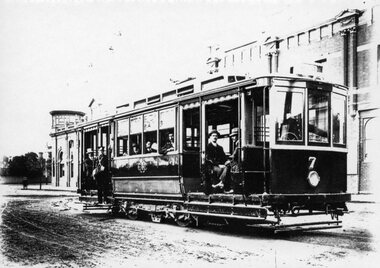
Photograph - Black & White Photograph/s, 1912
Yields information about the form and style of the early Geelong trams.Black and white photograph, printed onto card (inkjet printer?) of Geelong No. 7, at the depot, then Corio Terrace, now Brougham Street Geelong 1912. Has a number of men on board the tram - depot workers for the photograph? Shows as built details of the tramcar. Two copies held. Dave O'Neil advised 20/7/2009 - test tram prior to formal opening.Copy 1 on rear "Emerging from Depot 1912", "W.F. Scott Collection", "Geelong Historical Society" in Bill Scot's handwriting and in bottom right hand corner "William F. Scott" address label. and "14" in top left hand corner. Copy 2 - "Geelong Hist Soc / William F Scott Collection / Car outside the depot in Corio Tce (now called Brougham Street)"tramways, trams, geelong, depot, brougham st, tram 7 -
 Ballarat Tramway Museum
Photograph - Black & White Photograph/s, 1915
Yields information about the form and style of the early Geelong trams and in particular one of the cross bench trams.Black and white photograph, printed onto card (inkjet printer?) of the front of the Geelong depot soon after the opening of the tramway, four roads - 1915. Has trams 2, 8, 4 and 1 on front of the track and alongside is a small motor bus and a motorcycles. Each tram has a person vehicle in the front. Shows depot arrangements. Two copies held. Dave O'Neil advised 20/7/2009 - agree with date.Copy 1 - " Depot view about 1915 - Geelong Hist Soc / W F S Collection." Copy 2 on rear "Depot view about 1915. Note bus in right road. Buses were housed there until 1922" in Bill Scot's handwriting and in bottom right hand corner "William F. Scott" address label. and "20" in top left hand corner. Also "Geelong Trys" "C1915" and "W.F. Scott Collection." trams, tramways, geelong, depot, buses, tram 1, tram 2, tram 8, tram 4 -
 Ballarat Tramway Museum
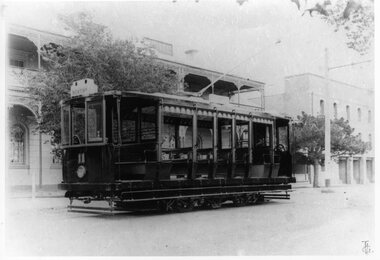
Photograph - Black & White Photograph/s - set of 2, c1912
Yields information about the form and style of the early Geelong trams.Black and white photograph, printed onto card (inkjet printer?) of Geelong Cross bench tram No. 11 in Corio Tce, now Brougham St outside Marks Hotel. Tram has the destination of Newtown. Two copies held. 4316.2 - same photograph printed on photographic paper - supplied by Peter Duckett - two copies held. Photograph used in Destination City, page 46.4316.1 Copy 1 - " Corio Tce, now Brougham St, outside Mark's Hotel, car travelling toward the Depot nearby - Geelong Hist Soc / W F S Collection." Copy 2 on rear "William F. Scott Collection / Geelong Hist Soc / W F S Collection" 4316.2 Copy 1 - On rear, stamped in black ink "Photo supplied from P.W. Duckett Collection, All Rights Reserved, 69 Howitt Rd. Nth Caulfield 3161." Copy 2 - On rear, stamped in black ink "Photo supplied from P.W. Duckett Collection, All Rights Reserved, 69 Howitt Rd. Nth Caulfield 3161." In the bottom right hand corner, a "William F Scott" address label in the bottom left hand corner.trams, tramways, geelong, depot, brougham st, tram 11 -
 Ballarat Tramway Museum
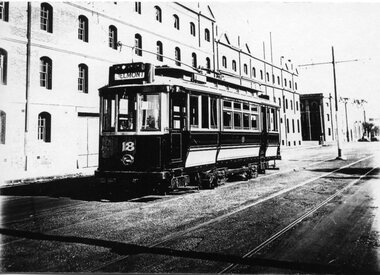
Photograph - Black & White Photograph/s, Late 1930's
Yields information about the form and style of the early Geelong trams.Black and white photograph, printed onto card (inkjet printer?) of Geelong Cross bench tram No. 18 in Corio Tce, now Brougham St outside the wood stores. Tram has the destination of Belmont. Taken after SEC take over with the sides of tram panelled in. Late 1930's. See Reg item 4318 for a different view. Dave O'Neil advised 20/7/2009 - following conversion for one man trams. Given the condition of the tram, assume just after conversion." Corio Tce, now Brougham St / Geelong Hist Soc / W F S Collection."trams, tramways, geelong, depot, brougham st, tram 18 -
 Ballarat Tramway Museum
Photograph - Black & White Photograph/s, late 1930's
Yields information about the form and style of the early Geelong trams and assistance given to the Red Cross during the first world war.Black and white photograph, printed onto card (inkjet printer?) of Geelong Cross bench tram No. 18 in Corio Tce, now Brougham St outside the wood stores. Tram has the destination of Belmont. Taken after SEC take over with the sides of tram panelled in. Late 1930's. See Reg item 4317 for a different view. Two copies held. Dave O'Neil advised 20/7/2009 - following conversion for one man trams. Given the condition of the tram, assume just after conversion. Copy 1 - "Geelong Hist Soc / William Scott Collection." in ink. Copy 2 - " Corio Tce, now Brougham St / Moorabool Street crossing in background / Geelong Hist Soc / W F S Collection." in ink.trams, tramways, geelong, depot, brougham st, tram 18 -
 Ballarat Tramway Museum
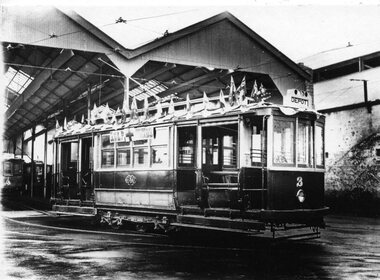
Photograph - Black & White Photograph/s, c1918
Yields information about the form and style of the early Geelong trams and how they were used with trailers for football matches.Black and white photograph, printed onto card (inkjet printer?) of Geelong Cross bench tram No. 3, in the Geelong Depot yard, decorated with Australian flags and a "Help + Funds" = Red Cross during First World War. C1918?"Geelong Hist Soc / William Scott Collection." in ink.trams, tramways, geelong, depot, red cross, world war 1, tram 3 -
 Ballarat Tramway Museum
Photograph - Geelong football trams, c1920's
Photograph of Geelong No. 12 towing a trailer with other trams in the background, following a football match, Corio football ground, Ryrie St East, with the Garden St junction in the background. See btm9211 for another print, Dave O'Neil advised 20/7/2009 - Geelong High School to the left and other photos in the series. Laminated A3 size print added 3-08-2014 - to be used for display purposes.Yields information about the form and style of the Geelong tram depot during the Second World War era.Black and white photograph, printed onto card (inkjet printer?) "21 / Geelong Trmys" "Ryrie Street East / Garden Street Jtn in background, / Spectators returning from a Victoria Football League football match, played at Corio Oval, early 1920's" and a "William F Scott" address labels in the bottom right hand corner.trams, tramways, geelong, football, ryrie st, tram 12 -
 Ballarat Tramway Museum
Photograph - Black & White Photograph/s, c1942
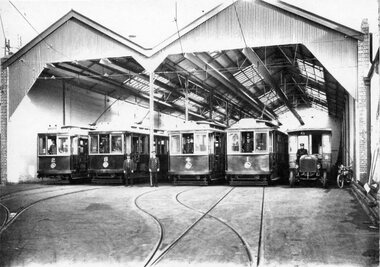
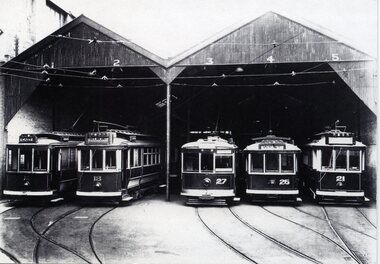
Yields information about the appearance of Bendigo Birney trams mid 1950's.Black and white photograph, printed onto card (inkjet printer?) of the Geelong depot with five trams parked - Nos. 2, 13, 27, 26 and 21 in the front. Roads marked 1 to 5. c1942"28 / Geelong publicity view taken about 1929 (crossed out), 1936 (crossed out) 1942? with WFS Collection in bottom left hand corner and "William Scott" address label in bottom right hand corner.trams, tramways, geelong, depot, tram 2, tram 13, tram 27, tram 26, tram 21 -
 Ballarat Tramway Museum
Photograph - Black & White Photograph/s, William. F. Scott, 3/04/1983 12:00:00 AM
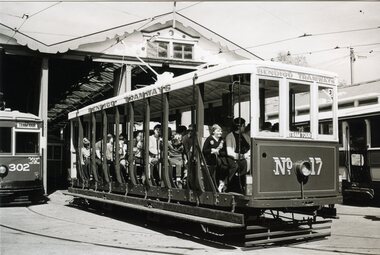
Yields information about the appearance of Bendigo Birney trams at the time of the opening of the tram services and Eaglehawk Town Hall.Black and white photograph, of Toastrack, Bendigo 17, with passengers outside the Bendigo Depot, photo by William F Scott 3/4/1983."22" in pencil in top left hand corner, and along bottom edge in ink "Bendigo Trust, car on tour 3/4/1983, William F. Scott photo".trams, tramways, bendigo, depot, tram 17 -
 Ballarat Tramway Museum
Photograph - Colour Photograph/s, William. F. Scott, Easter 1991
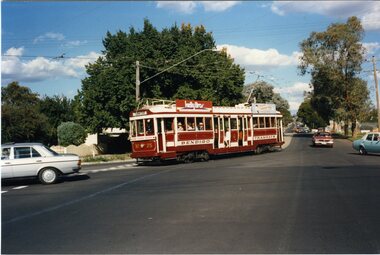
Colour photograph, of W2, 470, painted in Bendigo tram tour colours, advertising the Bendigo Bank, Tramways Ave Bendigo, before turning into McCrae St, Bendigo, Easter 1991. Photograph by William F Scott."79" in blue ink in top left hand corner, and a "Bendigo Trust / Car 470 in Tramways Ave, heading for McCrae, William F. Scott photo". and in bottom right hand corner "Easter 91 / WFS".trams, tramways, bendigo, depot, tramways ave, mccrae st, tram 470 -
 Ballarat Tramway Museum
Photograph - Colour Photograph/s, William. F. Scott, Easter 1991
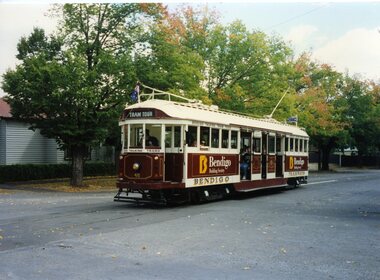
Colour photograph, of Bendigo 25, advertising Kelly Bros and Gillies Pies, turning a corner on the North Bendigo Route, Easter 1991. Photograph by William F Scott.In the bottom right hand corner in ink "Bendigo Trust / Easter 1991 / William F. Scott photo".trams, tramways, bendigo, north bendigo, tram 25 -
 Ballarat Tramway Museum
Photograph - Black & White Photograph/s, mid 1900's
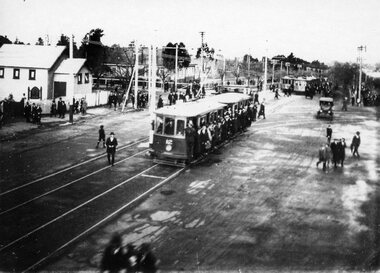
Yields information about the appearance of Bendigo trams early 1970's and the Charing Cross area.Black and white photograph of an ESCo combination tramcar at the Eaglehawk terminus, with the Eaglehawk Town Hall in the background. Driver at the controls, with a number of men standing alongside and the conductor (2 No.) in the front portion of the tramcar. Note the curtains in the tramcar, taken during a summers day. Photo taken early mid 1900's. Creative Images Photographic Collection. High Resolution image added 31/8/2012In pencil, top left hand corner, "Eaglehawk early 1900's and in the bottom right hand corner / Bendigo / Creative Image Photographic Collection".trams, tramways, bendigo, eaglehawk, esco -
 Ballarat Tramway Museum
Photograph - Black & White Photograph/s, Keith Kings, 30/01/2956 12:00:00 AM
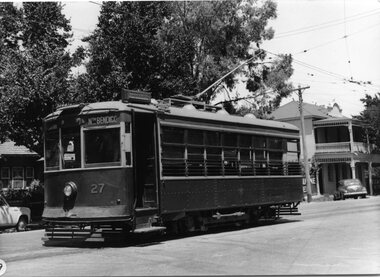
Black and White Photograph of SEC Bendigo Birney 27 in McCrae St and Arnold St, 30/1/1956. Has destination of North Bendigo, and the hotel in the background. Photo Keith Kings, number R(q)(8) Stamp in top right hand corner and handwritten number with "K.S. Kings No. R(q)(8) Copyright reserved". In black ink "Bendigo / Birney 27 in McCrae St and Arnold St, (Now Tramways Avenue) 30/1/1956. On front of photograph in bottom left hand corner, white dot with number "19"trams, tramways, bendigo, birney, mccrae st, tram 27 -
 Ballarat Tramway Museum
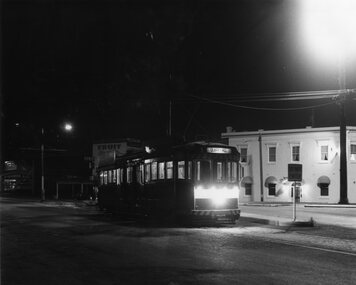
Photograph - Black & White Photograph/s, Chris Wurr, early 1970's
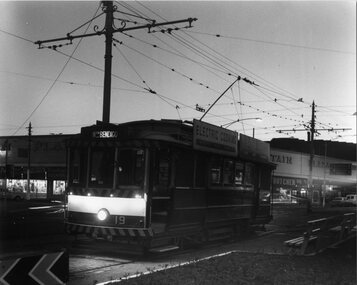
Yields information about the appearance of Bendigo Birney trams early 1970's and the North Bendigo area.Black and White Photograph of SEC Bendigo 19, late evening photograph, at Charing Cross with the Fountain Plaza building in the background. Tram has the destination of Nth Bendigo and SEC Electric Cooking roof advertisements. Photo Chris Wurr, early 1970's. "Photo by Chris Wurr" stamped on the rear.trams, tramways, bendigo, charing cross, night photo, tram 19 -
 Ballarat Tramway Museum
Photograph - Black & White Photograph/s, Chris Wurr, early 1970's
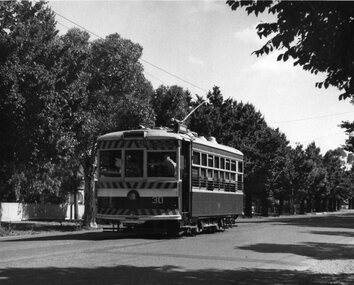
Yields information about the appearance of Bendigo Birney trams early 1970's en route to North Bendigo and its tree lined streets.Black and White Photograph of SEC Bendigo 30, Birney at North Bendigo terminus with the driver turning the trolley pole. Tram has the destination of Golden Square. Photo shows the fitting in the overhead to help locate the trolley pole on the inbound wire. Photo Chris Wurr, early 1970's. "Photo by Chris Wurr" stamped on the rear.trams, tramways, bendigo, north bendigo, overhead, birney, tram 30 -
 Ballarat Tramway Museum
Photograph - Black & White Photograph/s, Chris Wurr, early 1970's
Yields information about the appearance of Bendigo trams early 1970's and the Charing Cross area.Black and White Photograph of SEC Bendigo 30, Birney en route to North Bendigo , possibly in McCrae St. Tram has the destination of North Bendigo. Note conductor at the front of the tram, talking to the driver. Photo Chris Wurr, early 1970's. "Photo by Chris Wurr" stamped on the rear.trams, tramways, bendigo, north bendigo, mccrae st, birney, tram 30 -
 Ballarat Tramway Museum
Photograph - Black & White Photograph/s, Chris Wurr, early 1970's
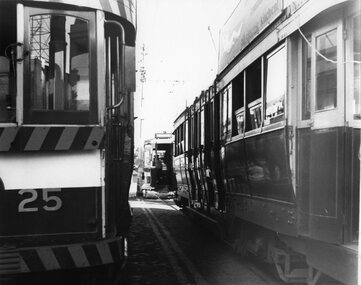
Yields information about the appearance of Bendigo trams early 1970's and the Charing Cross area.Black and White Photograph of three trams at Charing Cross. Photo taken between two bogie cars (25 and one other) on the Eaglehawk line while a Birney crosses in front of them. Possibly No. 29. Photo Chris Wurr, early 1970's. "Photo by Chris Wurr" stamped on the rear.trams, tramways, bendigo, charing cross, tram 25, tram 29 -
 Ballarat Tramway Museum
Photograph - Black & White Photograph/s, Chris Wurr, early 1970's
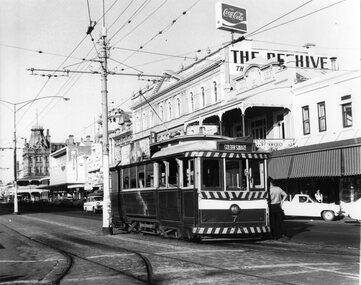
Yields information about the appearance of Bendigo Birney trams early 1970's and the McCrae St area.Black and White Photograph of Bendigo No. 7, in Pall Mall, at Charing Cross, with the destination of Golden Square. An inspector is leaning against the front door of the tram. Has in the background, The Beehive building, Coca Cola advertisement, Myers store and Stoneman's Shamrock Hotel. Photo Chris Wurr, early 1970's. "Photo by Chris Wurr" stamped on the rear.trams, tramways, bendigo, charing cross, pall mall, tram 7 -
 Ballarat Tramway Museum
Photograph - Black & White Photograph/s, Chris Wurr, early 1970's
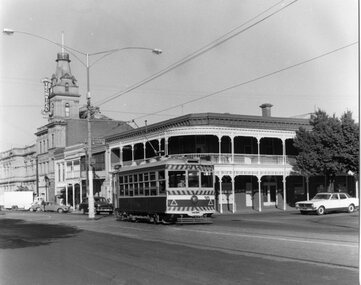
Yields information about the appearance of Bendigo Birney tram No. 11, stored at the depot, following an accident. Was not returned to service until after the SEC closed the tram system.Black and White Photograph of Bendigo No. 30, Birney, inbound to Charing Cross, McRae St, Bendigo, at Baxter St intersection? with the Bendigo Technical College in the background. Note the direction sign for "Heathcote". Tram has the destination of Golden Square. Photo Chris Wurr, early 1970's. "Photo by Chris Wurr" stamped on the rear.trams, tramways, bendigo, mccrae st, tram 30 -
 Ballarat Tramway Museum
Photograph - Black & White Photograph/s, Chris Wurr, early 1970's
Yields information about the appearance of Bendigo Birney trams early 1970's and the Charing Cross area.Black and White Photograph of Bendigo No. 11, Birney, stored in the Bendigo tram depot, early 1970's following an accident. See Bendigo Tramways excerpt re this tram, ex their web site 9/6/2009. Has another, possibly stored tram along side. Photo shows the damaged end panel removed, distorted bumper bar and broken life guard tray. Photo Chris Wurr, early 1970's. "In 1968, the SECV assessed damage to the tram after an accident with an automobile. Upon inspection, it was found that the side bearers of the tram body had spread, and the centre bearers had been severely distorted because of the impact. Repairs of this nature required costly engineering work and with the closure of the tramway being imminent, it was decided to place Car 11 in storage on 6 road until the cessation of SECV services in 1972. Work commenced on the restoration of this tram in 1975 and it returned to service in 1986, being painted in the SECV livery of the 1950s." See Bendigo Tramway web site, accessed 9/6/2009 for notes re accident damage."Photo by Chris Wurr" stamped on the rear. On rear in pencil "B'go 11"trams, tramways, bendigo, depot, tram 11 -
 Ballarat Tramway Museum
Photograph - Black & White Photograph/s, Chris Wurr, Jan. 1971
Black and White Photograph of Bendigo No. 2 at the Eagle Hawk terminus, Jan. 1971, night photograph. Tram has the destination of Quarry Hill. In the background is the Foodland Store, a Milk bar. The tram has arrived at the terminus, the trolley pole has been turned, but the headlights and dash canopy lights have yet to be turned. Tram has the destination of Quarry Hill. Photo Chris Wurr, early 1970's. "Photo by Chris Wurr" stamped on the rear. In top left hand corner, in ink "71)" and "Bendigo (SEC) Tramways / 1.1971 / Eaglehawk Terminus"trams, tramways, bendigo, eaglehawk, night photo, tram 2 -
 Ballarat Tramway Museum
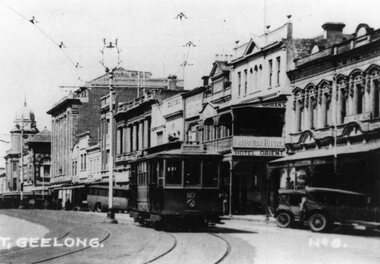
Photograph - Black & White Photograph/s - set of 2, late 1920's, early 1930's
Yields information about the appearance of Geelong's Birney trams during the 1940's.Black and White Photograph of Geelong No. 10, Malop St, travelling north west to the railway station, during the late 1920s, between Gheringhap and Moorabool St. Tram has the destination of "Station", with the National Mutual, Moran's Hotel Orient in the background. Melbourne Bitter advertisement on the hotel. A number of soft top cars parked in the street. Photo probably from a postcard, has the words "T. Geelong. No. 8" along part of the bottom edge. Photo from the Peter Duckett Collection. For a close up of the tram itself see Reg Item 5822. 4335.1 - Black and White print contained within the Wal Jack Bendigo and Geelong Album, see Reg Item 5003 for more details. Added 7/8/2013. This item is the larger image of the two.On rear, stamped in black ink "Photo supplied from P.W. Duckett Collection, All Rights Reserved, 69 Howitt Rd. Nth Caulfield 3161." In hand writing on the rear "47)" in top left hand corner. In the body of the photograph "Malop St travelling NW to Station, between Gheringhap and Moorabool Sts." 4335.1 - in ink on rear. "Geelong No. 10 Original Condition, photo about 1930" and "Please Return"trams, tramways, geelong, malop st, mesco, tram 10 -
 Ballarat Tramway Museum
Photograph - Black & White Photograph/s, Chris Wurr, Jan. 1971
Yields information about the closure of the Ballarat tramway system in 1971, people at the depot and the "last tram".Black and White Photograph of Ballarat No. Ballarat 42, inbound in Albert St Sebastopol , January 1971. Tram has the destination of Lydiard St North. Photo by Chris Wurr, Jan. 1971.On rear, stamped in black ink "Photo by / Chris Wurr / 12 Truscott Street / Ararat 3377 / (053) 52 3403." and in ink "Ballarat Tramways (SEC) / Bogie car 42, heads north in Albert St, Jan 1971 / purchased 5.93."trams, tramways, ballarat, albert st, sebastopol, tram 42 -
 Ballarat Tramway Museum
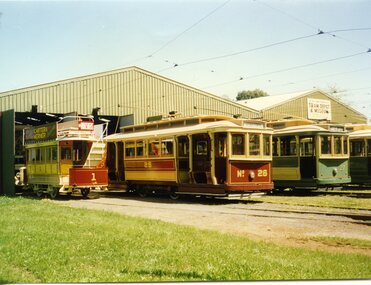
Photograph - Colour Photograph/s, Earl Ewers, Nov. 1992
Yields information about the appearance of three Ballarat trams, owned by the BTM in front of the depot 1992.Colour photograph of the BTM depot from the south east perspective with horse tram on No. 7 road, 26, 27 and a SEC tram, 11.1992, photograph by Earl Ewers. Printed on Agfa paper. On rear in pencil in bottom left hand corner. "Earl R. Ewers / 11.1992 Ballarat"trams, tramways, depot, horse tram, tram 1, tram 26, tram 27 -
 Ballarat Tramway Museum
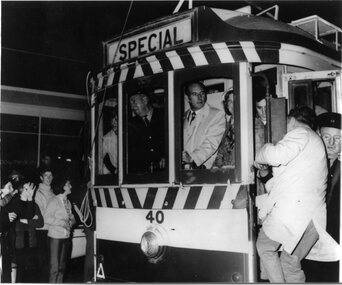
Photograph - Black & White Photograph/s, 19.9.1971
Yields information about the closure of the Ballarat tramway system in 1971, people at the depot and the "last tram".Black and white photograph of people getting on and off No. 40 at the depot, on the day of the closure of the system 19/9/1971. Photo used in ???????? People to be identified from other pics held Newspaper photograph?????On rear in ink "last car, the SEC tramways at Ballarat 9.1971" "90.786" In bottom right hand corner, "WFS Collection"trams, tramways, closure, last tram, depot, tram 40 -
 Ballarat Tramway Museum
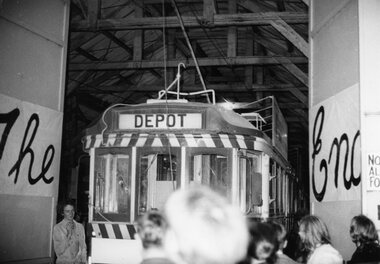
Photograph - Black & White Photograph/s, Andrew C Ward, 19.9.1971
Yields information about the appearance of Ballarat tram No. 27 following is repainting to the 1930's colour scheme mid 1980's.Black and white photograph of the scene after No. 40 had run the last tram and was running into the depot, prior to the doors closing, saying "The End", with a number of people around the rear of the tram. Taken Sun 19.9.1971, Andrew C Ward. On rear in ink "47)", "Sun 19.9.71", "Ballarat Tramways (SEC) . Last car into depot" / "Andrew C Ward" and in bottom left hand corner, "William F Scott" address label.trams, tramways, closure, last tram, depot, tram 40 -
 Ballarat Tramway Museum
Postcard, Color Offset Marketing Pty Ltd, five Birney trams lined up in Tramways Ave, 1987
Colour printed postcard of five Birney trams lined up in Tramways Ave, lead by No. 11. Postcard has title "Bendigo Vic" in the bottom right hand corner. Other trams in sequence are 15, 30, 302 (ex 29) and 28. Produced by Color Offset Marketing Pty Ltd, has placed for Stamp and Address box. Photo by Earl Ewers Dec. 1986.Has label on front left hand bottom of card with "1" inked on it.trams, tramways, bendigo, birney