Showing 1358 items matching " tramcars of ballarat"
-
 Ballarat Tramway Museum
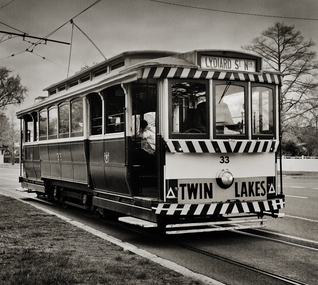
Photograph - Ballarat 33 - BTM, Greg Naylor, 2022
Photo of Ballarat Tramway Museum's tram 33 at the Carlton St stop with a Twin Lakes advertisement. See reference for the history of this tram. Photographed during 2022 on a Mamiya RB67 large format film camera.Yields information about BTM tram 33.Black and White photo of Ballarat 33 - BTM at Carlton Stbtm, trams, tramcars, tram 33, carlton st, twin lakes -
 Ballarat Tramway Museum
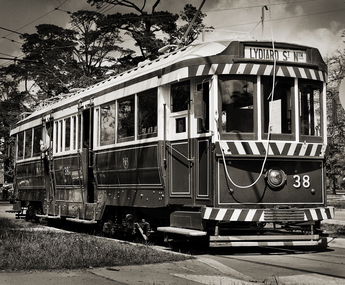
Photograph - Ballarat 38 - BTM, Greg Naylor, 2022
Black and White photo of Ballarat 38 - BTM on depot access track. See reference for the history of this tram. Photographed during 2022 on a Mamiya RB67 large format film camera.Yields information about BTM tram 38.Black and White photo of Ballarat 38 - BTM on depot access track.btm, trams, tramcars, tram 38 -
 Ballarat Tramway Museum
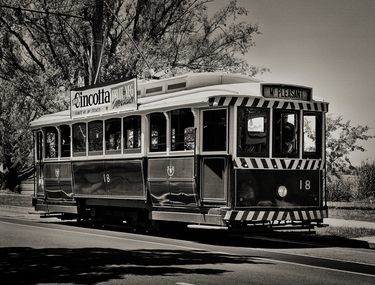
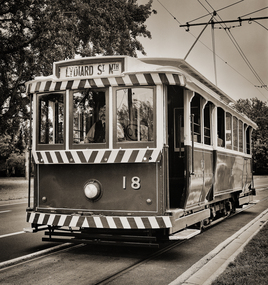
Photograph - Ballarat 18 - BTM, Greg Naylor, 2022
Black and white photo of Ballarat BTM 18, Wendouree Parade. Has an advert for Cincotta Fruit and Vegetable store. See reference for the history of this tram. Photographed during 2022 on a Mamiya RB67 large format film camera.Yields information about BTM tram 18.Black and white photo of Ballarat BTM 18, Wendouree Parade.btm, trams, tramcars, tram 18, cincotta -
 Ballarat Tramway Museum
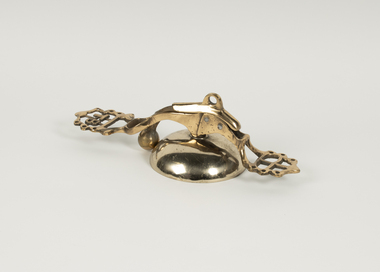
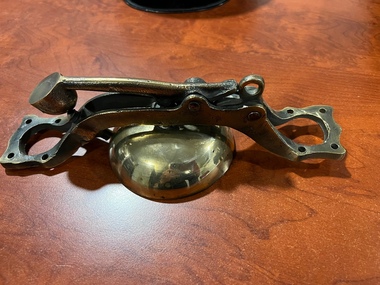
Functional object - Tramcar Conductors Bell
Recovered by the donor from Geelong tram No. 2 and polished for donation to the Museum. One of four bells that would have been fitted to the tram.Demonstrates a conductors communication bell made for use on tramcars. Brass Conductor Communication Bell, consisting of cast frame, bell, striker, bell pull part, one nut to secure the bell to the frame and two rivets securing for the bell pull part. Has the initials "TB" cast in both ends that were used to secure the bell to the roof - possibly indicating the "Tramway Board" manufacture. Has the number "2" on the underside of the bell in green paint.conductor, bell, trams, tramways, geelong, tram 2 -
 Ballarat Tramway Museum
Document - Manuscript, Peter J Barry, "Signalling and Operations on the Tramway System in Bendigo", April 1990
Draft of an article with notes/additions by Keith Kiings on the signalling system and tramcar operations in Bendigo. Looks at the basic services, crossing loops, signalling, following movements (Bendigo used a white disc on the tram to indicate a following tram, Ballarat did not use this system), short workings, reversals, observations of actual workings. Includes a map drawn by Keith Kings in 1972. Published in the September 1990 issue of Somersault, by the Signalling Record Society of Victoria.Yields information about the operation of the Bendigo tramway system using the Forest City Signalling system.Six A4 pages of a draft of an article by Peter Barry and correspondence to Keith Kings re "Signalling and Operations on the Tramway System in Bendigo, April 1990.tramways, trams, bendigo, signalling, forest city, operations, crossing loops, srsv -
 Ballarat Tramway Museum
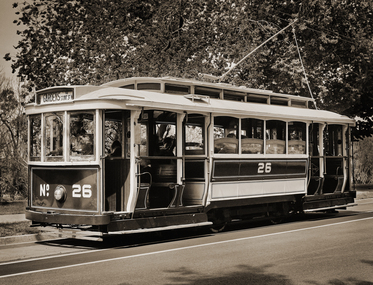
Photograph - Set of two digital images of BTM Tram 26, Greg Naylor, 21/1/2023
Set of 2 Black and white photos of Ballarat BTM 26, Wendouree Parade. Photographed 21/1/2023 on a Mamiya RB67 large format film camera.Yields information about BTM tram 26.Black and white photo of Ballarat BTM 26, Wendouree Parade - set of two.btm, trams, tramcars, tram 26 -
 Ballarat Tramway Museum
Photograph - Digital images of BTM - Geelong tram No. 2, Greg Naylor, 21/1/2023
Digital images of BTM - Geelong tram No. 2 in the New Museum section of the depot. Photographed 21/1/2023 on a Mamiya RB67 large format film camera.Yields information about BTM tram 2.Black and white photo of - Digital images of BTM - Geelong tram No. 2btm, trams, tramcars, geelong, tram 2 -
 Ballarat Tramway Museum
Photograph - Digital image of BTM Tram 18, Greg Naylor, 21/1/2023
Black and white photo of Ballarat BTM 18, Wendouree Parade. Photographed 21/1/2023 on a Mamiya RB67 large format film camera.Yields information about BTM tram 18.Black and white photo - Digital image of BTM Tram 18btm, trams, tramcars, tram 18 -
 Ballarat Tramway Museum
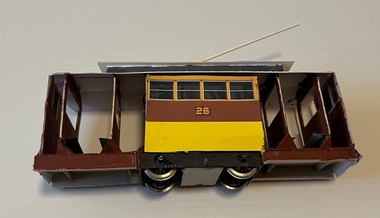
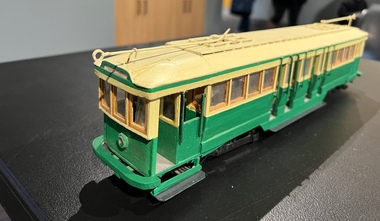
Model - Model - cardboard - of Ballarat tram 26, David Hawksworth, c2021
... . models tramcars Ballarat David Hawksworth Model of Ballarat 26 ...Constructed by David Hawksworth of the UK, based on photographs and sketches of a Ballarat tram. Demonstrates model making using cardboard and model parts.Model of Ballarat 26 made from cardboard painted or colour photocopied onto cardboard and glued. Has two operable axles, each with a wheel - 30mm gauge. Trolley pole made from a plastic tube.models, tramcars, ballarat, david hawksworth -
 Ballarat Tramway Museum
Model - Model - cardboard - of Melbourne City Circle car SW6 957, David Hawksworth, c2021
Constructed by David Hawksworth of the UK, based on photographs, drawings and sketches of a Melbourne city circle tramcar.Demonstrates model making using cardboard and model parts.Model of Melbourne City circle tram 957 made from cardboard painted or colour photocopied onto cardboard and glued. Has two operable bogies - 30mm gauge. Trolley poles made from a piece of cane.models, tramcars, david hawksworth, city circle, tram 957, melbourne -
 Ballarat Tramway Museum
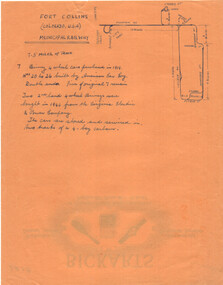
Archive - Notes on Fort Collins Municipal Railway, Wal Jack, c1950
Wal Jack kept extensive notes on railways and tramways around the world, provided by his correspondents and research. This sheet gives details of the Fort Collins Municipal Railway in Colorado USA. The 7.5mile system operated a small fleet of Birney type tramcars. Includes a map of the system. Bickarts were Ballarat Watchmakers and Jewellers.Yields information about type of work undertaken by Wal Jack.Orange colour quarto sheet on the rear of Bickarts' letterhead providing Notes on Fort Collins Municipal Railwayletters, wal jack, archive, usa, records, bickarts, fort collins, birney tramcars -
 Ballarat Tramway Museum
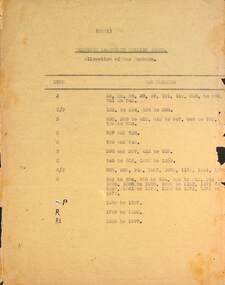
Document - List of Sydney tramcars, allocation of numbers, c1950
Wal Jack maintained lists of Australian tramcars, often provided by his correspondents. This list, c1950, provides a list of Sydney tramcars up to R1 1987 in passenger service by class with their allocated numbers - prior to the construction of the last 100 R1 class cars. Not known who prepared the list.Yields information about Wal Jack's records.Carbon copy, typed on fawn coloured paper - List of Sydney tramcar numbers and class.letters, wal jack, trams, sydney, lists -
 Ballarat Tramway Museum
Document, Tramways of Plymouth & District UK, c1950
Wal Jack maintained lists of Australian tramcars and information on tramways, often provided by his correspondents. This document provides a short history of the Plymouth and District tramways which had closed by 1945 along with a list of routes, and tramcars.Yields information about Wal Jack's records.Typed document - foolscap sheet, quarto and part of a cut foolscap sheet about the Tramways of Plymouth & District UKletters, wal jack, trams, lists, plymouth uk -
 Ballarat Tramway Museum
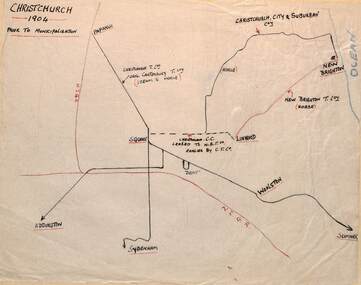
Drawing - Christchurh NZ - Plan and Notes, Wal Jack, 1947
Wal Jack had an extensive range of correspondents throughout Australia and the world who often provided him with detailed drawings and notes on various tramway systems. This set of notes on the Christchurch tramway system, provides details of the tram system prior to being taken over by the City and afterwards. Plan dated 30-6-1947. The hand written sheets provide details of the routes and the rolling stock. Based on the handwriting, prepared by Wal Jack himself. Yields information about Wal Jack's extensive recording and research work.Set of two drawings - black, red and blue ink on quarto size paper and three sheets of notes on the Christchurch tramway system 1947tramways, christchurch nz, wal jack, drawings, maps, tramcars -
 Ballarat Tramway Museum
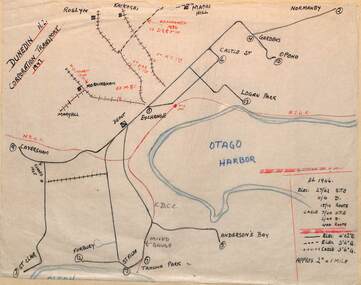
Drawing - Dunedin NZ - Plan and Notes, Wal Jack, 1946
Wal Jack had an extensive range of correspondents throughout Australia and the world who often provided him with detailed drawings and notes on various tramway systems. This set of notes on the Dunedin tramway system, provides details of the tram system during 1946 and the rolling stock. Based on the handwriting, prepared by Wal Jack himself. Yields information about Wal Jack's extensive recording and research work.Drawing - black, red and blue ink or colour pencil on quarto size paper and one sheet of notes on the Dunedin NZ tramway system 1946.tramways, wal jack, drawings, maps, tramcars, dunedin nz -
 Ballarat Tramway Museum
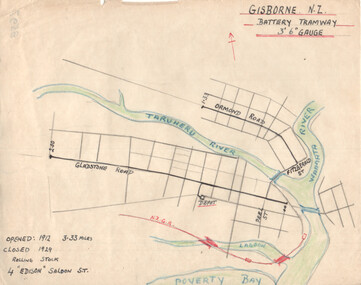
Drawing - Gisborne NZ - Battery Tramway - plan, Wal Jack, c1946
Wal Jack had an extensive range of correspondents throughout Australia and the world who often provided him with detailed drawings and notes on various tramway systems. This drawing shows the small battery-powered (four) tramcar system in Gisborne NZ. Shows the NZ rail line, rivers and the length of each route, and the dates of operation. Based on the handwriting, prepared by Wal Jack himself. Yields information about Wal Jack's extensive recording and research work.Drawing - black, red and blue ink or colour pencil on quarto size paper of the Gisborne NZ tramway system.tramways, wal jack, drawings, maps, tramcars, gisborne nz -
 Ballarat Tramway Museum
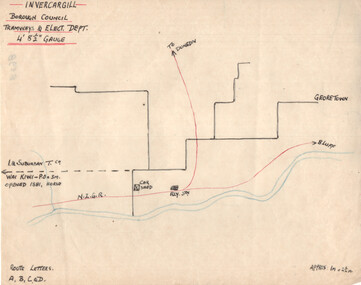
Drawing - Invercargill NZ - Plan and Notes, Wal Jack, 1947
Wal Jack had an extensive range of correspondents throughout Australia and the world who often provided him with detailed drawings and notes on various tramway systems. This set of notes on the Invercargill tramway system, provides details of the tram system and a list of the rolling stock and track length. Based on the handwriting, prepared by Wal Jack himself. Yields information about Wal Jack's extensive recording and research work.Drawing - black, red and blue ink or colour pencil and a second sheet, both on quarto paper providing details of the Invercargill NZ tramway system.tramways, wal jack, drawings, maps, tramcars, invercargill -
 Ballarat Tramway Museum
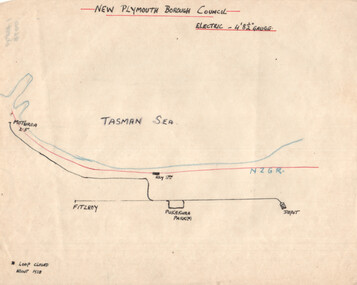
Drawing - New Plymouth NZ - Plan and Notes, Wal Jack, c1947
Wal Jack had an extensive range of correspondents throughout Australia and the world who often provided him with detailed drawings and notes on various tramway systems. This set of notes on the New Plymouth NZ tramway system provides details of the tram system and a list of the rolling stock. Based on the handwriting, prepared by Wal Jack himself. Yields information about Wal Jack's extensive recording and research work.Drawing - black, red and blue ink or colour pencil and a second sheet, both on quarto paper providing details of the New Plymouth NZ tramway system.tramways, wal jack, drawings, maps, tramcars, new plymouth nz -
 Ballarat Tramway Museum
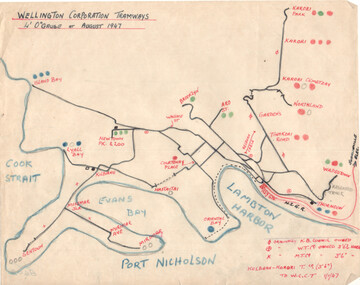
Drawing - Wellington NZ - Plan and Notes, Wal Jack, August 1947
Wal Jack had an extensive range of correspondents throughout Australia and the world who often provided him with detailed drawings and notes on various tramway systems. This set of notes on the Wellington NZ tram system provides a list of tramcars, track layout and general notes. Dated August 1947. Based on the handwriting, prepared by Wal Jack himself. Yields information about Wal Jack's extensive recording and research work.Drawing - black, red and blue ink or colour pencil and two quarto sheets hand made.tramways, wal jack, drawings, maps, tramcars, wellington nz -
 Ballarat Tramway Museum
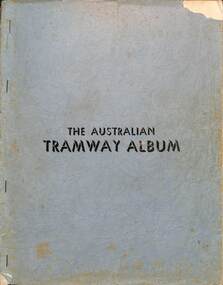
Book, Jack Richardson, The Australian Tramway Album, 1946/47
One of the first books published about Australian Tramway systems. Compiled by Jack Richardson as Editor who went on to publish the Destination series of tramway books. Provides information about the tramcars of each Australian tramway system and some photos and information on USA systems.Demonstrates publishing of magazines and books after the second world war and the work of Jack Richardson.Book - 56 pages, multiple sections with grey covers, stapled and re-stapled, black and white photos.Many corrections, notes marked in blue ink on various pages.books, destinations, jack richardson, traction publications, australia, tramways, ballarat, bendigo, geelong -
 Ballarat Tramway Museum
Photograph - Framed - Geelong tram depot, late 1920s
Shows trams 6, 19, 1, 25 and 18 at the front of the Geelong tram depot - late 1920's. Each tram has the MESCo destination lights on the roof. Printed by the donor from a negative from Lindsay Crow.Shows Geelong tram depot and some of the trams operated by the Melbourne Electric Supply Co. Metal framed photograph with card backing, glazed and hanging cord. See image i4 for a large size file provided by the donor.geelong, trams, tramways, tramcars, tram 6, tram 19, tram 1, tram 25, tram 18, mesco -
 Ballarat Tramway Museum
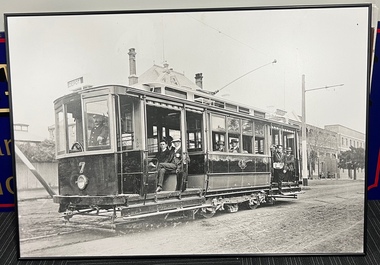
Photograph - Geelong No. 7, 1912
The photograph shows Geelong 7 as built, understood to be a test tram prior to the opening of the system. Photo taken in the then Corio Terrace, now Brougham Street Geelong 1912. Has a number of men on board the tram - depot workers for the photograph? See Item 4314 for another photo looking the other way. Printed by the donor from a negative held by the Museum of Victoria, Science Works. Shows Geelong tram No. 7 as built.Metal framed photograph with card backing, and hanging cord.geelong, trams, tramways, tramcars, tram 7, corio terrace, opening -
 Ballarat Tramway Museum
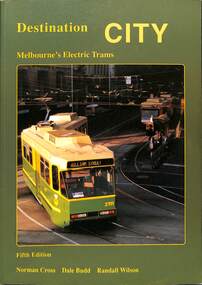
Book, Traction Publications, "Destination City" fifth edition, 1993
Includes brief description of each type, photographs and a summary history, including the Victorian Railway's trams. Has many photographs of the various tramcars associated with relevant text. On front cover is a photo of Z3 at the Burwood terminus. Written by Norm Cross, Dale Budd and Randall Wilson as editors, published by Transit Australia Publishing. Has two maps, north and south of Melbourne, printed on the inside card covers. Published 1993. Yields information up to 1993 about Melbourne's tramcars.Book - "Destination City" with subtitle "Melbourne's Electric Trams" - 128 A4 pages + card card, printed on gloss paper - 7 sections, perfect bound, describes Melbourne's tram car fleet. mmtb, tramways, tramcars, melbourne, vr trams, destination city -
 Ballarat Tramway Museum
Document - Errata, "Destination City" fifth edition, 1993c
Provides an errata, page by page to Destination City fifth edition - corrections and further information. Yields information up to 1993 about Melbourne's tramcars and provides additional information and corrections.Six A4 page photocopied document.mmtb, tramways, tramcars, melbourne, vr trams, destination city, errata -
 Ballarat Tramway Museum
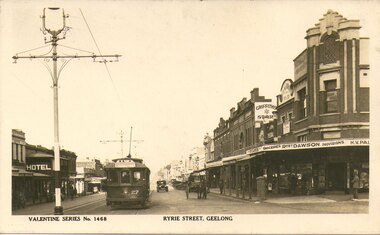
Photograph - Digital Image - Geelong 27 Ryrie St, Valentine & Sons Publishing Co
Photograph shows Geelong 27 at the corner of Gheringhap and Ryrie Streets, possibly late 1920s. The tram has the destination of Chilwell. In the view is the Robert Dawson Groceries Store. Shows a scene in Ryrie St Geelong possibly late 1920s.Digital image of Valentine Series postcard No. 1468geelong, tramcars, tramways, tram 27, gheringhap st, ryrie st -
 Ballarat Tramway Museum
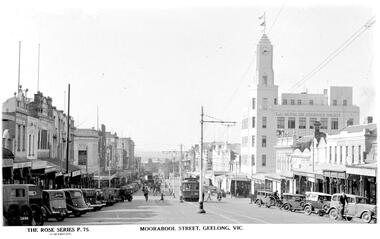
Photograph - Digital Image - Geelong 30 in Moorabool St, Rose Stereograph Co
Photograph shows Moorabool Street looking north with the T&G building Mutual Life Assurance Society in the view. Tram 30, (Belmont) later Ballarat 13 in 1936. Photo early 1930s. Shows a scene in Moorabool St Geelong, early 1930s.Digital image of Rose Series Postcard No. P75geelong, tramcars, tramways, moorabool st, tram 30, t&g building -
 Ballarat Tramway Museum
Photograph - Bendigo Birneys 28 & 30 Charing Cross, Robert Wallace Studios
Photograph shows Bendigo SEC Birney trams 28 and 30 at Charing Cross in Pall Mall, prior to the closure of the SEC operated system in April 1972. Photograph by Robert Wallace Studios. Has The Behive buildiing in the background. No. 28 has a SEC Briquettes roof advertisement.Yields information about the operation of SEC Birney's in Bendigo prior to closure.Photograph - Black and White mounted onto heavy card.Photographer's studio stamp on rear - Robert Wallace Studiosbendigo, tramways, trams, birney tramcars, tram 28, tram 30, charing cross, pall mall -
 Ballarat Tramway Museum
Functional object - Conductor's (Signal) Bell - MMTB Pattern, Melbourne and Metropolitan Tramways Board (MMTB)
Bell used by the conductor or passengers to signal to the driver - stop, proceed or an emergency stop. MMTB Drawing R1241 Details of Signal Bell refers. Tram 502 entered service 4/1928. Demonstrates a conductors communication or signal bell made for use on tramcars. Brass Conductor Communication Bell, or signal bell, consisting of cast frame, bell, striker, bell pull part, three nuts to secure the bell to the frame and two rivets securing for the bell pull part. Has at both ends, four screw holes that were used to secure the bell to the roof. Has been stamped at one end on the underside "502" "1", indicating it was made or used on W2 502, No. 1 end. trams, tramways, conductors, bells, mmtb, w2 class, tram 502 -
 Ballarat Tramway Museum
photograph - Wendouree Parade early 1960s special tour
Photograph of SEC Ballarat of a line up of about 9 trams, lead by No. 41 in Wendouree Parade, Gardens area, early 1960's for a special tour. See item 3341 for a colour photograph of the event. Photographer unknown. Yields information about a large tour group of trams in Wendouree Parade.Black and white photographbendigo, tramcars, wendouree parade, tours, gardens -
 Ballarat Tramway Museum
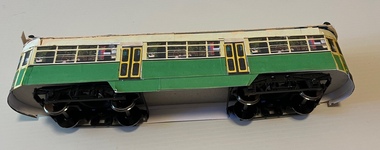
Model - Model of Bendigo tram No. 23
Model of Bendigo bogie, ex Hawthorn Tramways Trust, four centre doorways, tram, No. 23 in a SEC colour scheme with the destination of Quarry Hill. The Modeller has detailed the seats throughout the tram and the controls. Balsa wheels had broken off, repaired with 'O' gauge wheels along with other parts by the Museum's model builder.Demonstrates model tram building. One of a series of Ballarat and Bendigo tram models. Not known who built them.Model tram - made from Balsa wood, cardboard, paint, metal, styrene, wire.models, trams, bendigo, bogie tramcars, tram 23