Showing 1647 items
matching g. white
-
 Ballarat Tramway Museum
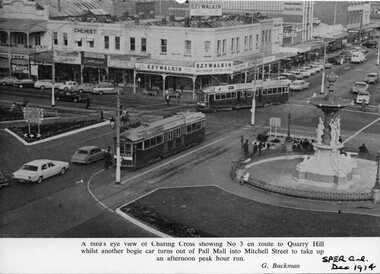
Photograph - Illustration/s, Bendigo Charing Cross
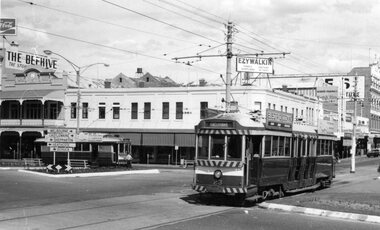
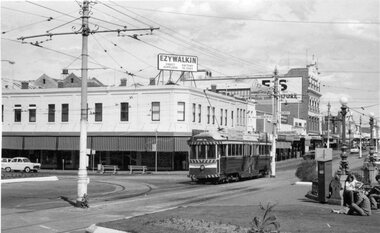
Black and white illustration from the South Pacific Electric Railway Co-op (Sydney Tramway Museum) - Dec.. 1974 calendar of Charing Cross Bendigo from an elevated viewpoint. Overlooks intersection has tram 3 waiting to proceed to Quarry Hill while another bogie tram turns from Pall Mall into Mitchell St. Photo undated, but most likely during the early 1970's. Photo by G. Buckman Has the EZYWALKIN store and other stores in the background.On bottom right hand corner "SPER Calendar Dec. 1974"trams, tramways, bendigo, charing cross, pall mall, mitchell st. -
 Ballarat Tramway Museum
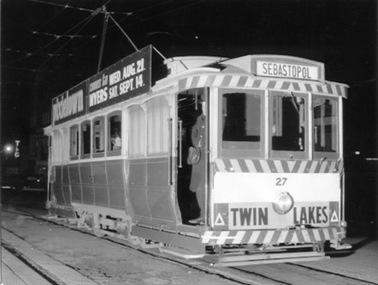
Photograph - Black & White Photograph/s, R.G. Vanselow, 30/08/1968 12:00:00 AM
Black and white photograph of SEC No. 27 with destination of Sebastopol waiting at the City terminus on Friday 30 August 1968. Has driver standing in doorway, looking very cold and one passenger in saloon looking at photographer. Tram has a "Twin Lakes" advertisement on the drivers cab panel and "Pixietown" and "comes to Myers Wed. August 21 - Sat. Sept. 14" roof advertisements. Illuminated T&G sign in the background. Copy 1 - Colour photocopy, laminated, of this photograph on display 5/2000 at 02-02-06 Copy 2 - made by enlarging photo to an approx. A4 print by colour photocopying and laminated for display purposes. Made July 2000 for the Trams at Night exhibition in the depot. Made by W.Doubleday. Has four Velcro dots on rear. Overall size 210H x 275W. Stored in same box at rear of large photos area in an A4 plastic folder.On rear in pencil "Approx. 11.05pm, Fri 30 August 1968 / City Centre, Sturt St, / Ballarat" and in bottom right hand corner, in ink "With Compliments / R.G." and stamped in black ink "Vanselow".trams, tramways, city centre, sturt st, night photo, tram 27 -
 Ballarat Tramway Museum
Book, G. McEldowney, "100 years of Melbourne's Trams", Nov. 1985
Thirty Two page book, A4 landscape format, saddle stapled, titled "100 years of Melbourne's Trams", published by the Metropolitan Transit Authority and the Australian Tramway and Motor Omnibus Employees Association in 1985. Colour cover featuring drawings of Melbourne trams from cable trams to articulated electric trams. Has foreword by Tom Roper, Minister for Transport. Book published to celebrate the centenary of the opening of the first cable tram in Melbourne, 11/11/1885. Reviews the history of trams in Melbourne, cable trams, horse trams, Clapp, municipal tramways, electric trams, MMTB, buses, Preston Workshops, Wattle Park and the Metropolitan Transit Authority. Notes the MTA winning the tender to building the Kowloon - Canton Light Rail system and Melbourne's Automatic Vehicle Monitoring System. Has colour photos and sepia toned (black and white) photos throughout.trams, tramways, melbourne, mmtb, cable trams, mta, horse trams -
 Ballarat Tramway Museum
Photograph - Black and White photograph/s - mounted, John Phillips, late 1960's or early 1970's
Yields information about the vicinity of the Sturt St city loop and the buildings on the south side of Sturt St.Black and White photograph mounted on heavy cardboard backing. Photo of Ballarat No. 12 with destination of Victoria St., westbound in Sturt St, passing the City Loop. No. 12 has a "Twin Lakes" sign on the back of the tram. In the background is the T&G Assurance Society building, the Vegas cinema and other buildings on the south side of St. St. Has many Velcro dots on rear and left overs of mounting devices have been removed on the rear. Note image scanned in two runs through a scanner, resulting in the shading in the image file.trams, tramways, sturt st, city loop, town hall, tram 12 -
 Ballarat Tramway Museum
Photograph - Black & White Photograph/s - set of 3, Geoff Grant, 8/01/1956 12:00:00 AM
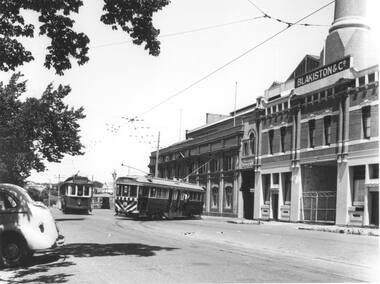
Yields information about the appearance of Geelong's trams in particular ex Melbourne J class trams after receipt in Geelong. This tram later became Ballarat No. 11.Black and white print from a Geoff Grant negative of a Geelong bogie tram entering Corio Terrace from the Geelong depot on 8/1/1956, while Pengelley 19 waits in the siding. The bogie tram (37) has destination of "Special", 19 - "Chilwell". Has the Geelong SEC depot/powerhouse building in the background with part of the Blakistons' sign visible. Photo used in Trolley Wire, Feb. 1999, page 11, article on Geelong tramways. Pencil marks on the rear of the photo indicate proposed used of the photo in the article. 2472.2 - As above but with the rear of the motor vehicle edited from the photograph. Produced by William Scott for his book, 2008. Two copies. Added 21/7/2009. 2472.3 - large format print from Lloyd Rogers collection via Robert Green 2/2014. Added 4-4-20192472 - On rear in red ink "Geelong Depot 8-1-56" in top left hand corner and in bottom left hand corner "G.A. Grant" 2472.1 - on rear of copy 1 in ink in top left hand corner "40) Geelong 8.1.1956 / G. Grant pic / modified image (background only). Last day of Chilwell Route in 1st closures. Single truck car being changed over about mid afternoon for a bogie car to cater for increased traffic / Cars 19 and 37." copy 2 - "Geelong 8.1.1956 / G. Grant pic / cars 19 & 37." copy 3 - "Geelong tram depot / 8th Jan 1956"trams, tramways, geelong, geelong depot, corio terrace, chilwell, tram 19, tram 37 -
 Ballarat Tramway Museum
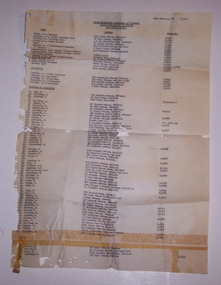
Document - List, State Electricity Commission of Victoria (SECV), SEC Ballarat Tramways staff, late 1960's
Yields information about the Ballarat tramway staff, in addition to the crews. Gives address and telephone details of the time and the list of names who were employed in undertaking the tramway service. Does not list depot or track crews or revenue clerks.Carbon copy of a typed list of SEC Ballarat Tramways staff, mid to late 1960's, giving Name, position, Address and Phone number. Dated 10th Feb. 19??, the last two digits having been torn off when tape removed. Consists of one large sheet of paper with a small sheet containing 4 names taped to the bottom of the main sheet. Has been attacked by silver fish on the left hand side. .1 - Original sheet .2 - Photocopy of top half .3 - Photocopy of lower half All sheets have been folded. Names on List: White F Denmead L Trusler W Irwin D Dennis W Calnin T Maxwell A Wellard L Dunstan T Satchell G Kellett D May H Van Rooy H Harding C Newell W Williams T Nancarrow W Chambers D Reynolds H Bassett G Mason J McGregor D Bolton J Edmonds F Mercer A Reed A Mann? B Blackman M Hunt N Knight H Mannion B McMahon L Domaschenz D Davies S Turnbull A Everett D Allan N Smerdon H Gill V O'Brien J Segrave W van Oorschot H Retallick W Kellett D O'Leary D Lake E Maher J Bird L Hall N Haes W Butler K Billman J Malins A Cahill M Hamilton N Tierney I Morris R Jeffreys A Cameron E Walker L Ward W Williams R Knight R Morris A Thompson D Davies W Wallis I Robe N Courtney R sec, ballarat, staff, inspectors, personnel -
 Ballarat Tramway Museum
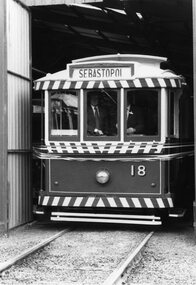
Photograph - Black & White Photograph/s, The Courier Ballarat, 23/03/1985 12:00:00 AM
Yields information about the launch of No. 18 by the Sebastopol Mayor following its recovery/repaint from storage in Sebastopol.Black and White copy photograph of a newspaper photograph taken by The Courier of No. 18 is re-commissioned by Sebastopol Mayor Cr G Collins. Photo taken 23/3/1985, published 25/3/1985. See Reg Item 3438 for the newspaper clipping the photograph was used in and further details.. Collected by Alan Bradley from the Ballarat Courier early 1980's. See Excel file "Record of Ballarat Courier Photos BTM era" (Archive Documents) for source of details.On rear stamped "Copyright, The Ballarat Courier Proprietary Limited." and a label with "Photo page 18, 3.25" x 5" Reduce" and trim markings and mark in black pen "80%".tramways, trams, btps, borough of sebastopol, launch, tram 18 -
 Ballarat Tramway Museum
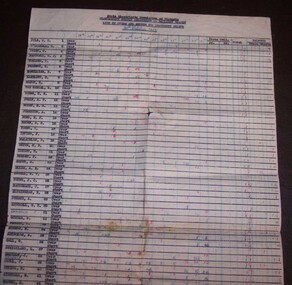
Document - List, State Electricity Commission of Victoria (SECV), "List of Overs and Shorts for Fortnight Ending 30 October 1943", 3/11/1943 12:00:00 AM
Typed carbon copy headed State Electricity Commission of Victoria, Electricity Supply Department - Ballarat Branch "List of Overs and Shorts for Fortnight Ending 30 October 1943". Typed with employee names, number, Over, Short, Fares Collected, Total and Balance of Over/Unders. Ruled in black and blue lines. Gives overs and unders for each day for each person and a total for each person and day and blue and red ink. Initialled in pencil and dated 3/11/43. Photocopies of sheet made - A3 and left hand side scanned image stitched together - see i3 (left hand half only) List of names: List of Employees– Overs and Unders return – 30/10/1943 SEC Ballarat Branch 1 Pyle NT 2 O’Donnell T 3 Prisk J 4 McDonald GJ 5 Furlong P 6 Preston H 7 McWilliam N 8 Bartlett C 9 Mason R 10 Van Berkel S 11 Young CE 12 Jolly At 13 Bodey HG 14 Johnston A 15 Ford EJ 16 Brown GC 17 Young T 18 Irving J 19 McLachlan D 20 White CF 21 Knight H 22 Bowden F 23 Scott S 24 Ellis AE 25 Sewell RW 26 Young JC 27 McCormack J 28 Eltringham E 29 Purdue A 30 Satchell GH 31 Smerdon J 32 Scruse F 33 McGann V 34 Morrow R 35 Reynolds S 36 Hall G 37 Strickland L 38 Skurrie 39 Paull J 40 Atikins B 41 Mitchell S 42 Browne M 43 Cheney J 44 Lawrence A 45 Doncaster T 46 Hudson T 47 Ritchie ME 48 Harrison J 49 Horbury T 50 Moss H 51 Tonkin P 52 Tucker V (Verna May Tucker - email of 23-9-2020 - 1914-2001 from [email protected]) 53 Denmead KI 54 Etty CC 55 Spielvogel J 56 Wightwick J 57 Jakobi EA 58 Egan V 59 Dixon DA 60 Cole M 61 Chibnall L 62 Grundell HP 63 Duke F Fox A (no number alongside)In pencil "Miss Gullock" ?? crossed out and "Mr. Munro"tickets, fares, employees, conductors, motormen, conductresses, uniforms -
 Ballarat Tramway Museum
Slide - 35mm slide/s, Eldon Hogan, Sep. 1971
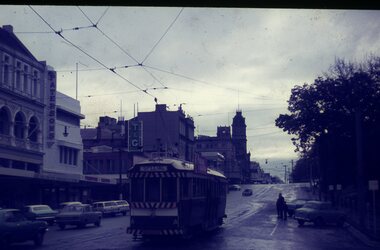
35mm Agfa colour blue and white plastic mount slide - photo of Ballarat No. 37 parked in the City loop, Sturt St, showing "Special". Photo taken Sept. 1971?. Has the T&G and Paterson's buildings in the background. Photos Eldon Hogan. tramways, trams, city loop, sturt st, tram 37 -
 Ballarat Tramway Museum
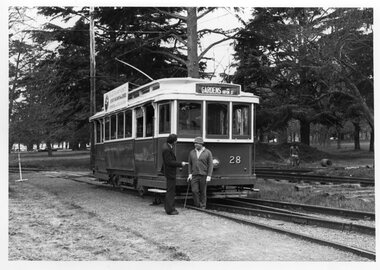
Photograph - Black & White Photograph/s, John Phillips, 1980
Black and White photograph of Gavin Young and Carry Davey in front of No. 28 on No. 2 road at the BTPS depot 1980. Photo used in the 1979 - 1980 Annual Report. Photo by John Phillips. Note the construction of No. 40 road in the background and the remains of No. 3 road extension or the ski jump. On the rear of the photo "BC Bottom", "Gavin Young chats to Driver Gary Davey in front of No. 28, resplendent in its 1950's colour scheme." (G) S/S all in pencil.tramways, trams, btps, depot, track construction, tram 27 -
 Ballarat Tramway Museum
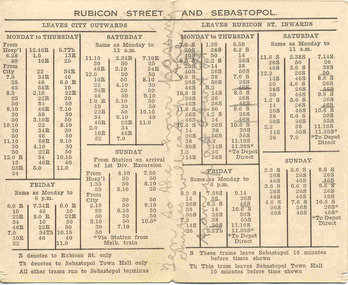
Ephemera - Timetable/s, Electric Supply Co. of Vic (ESCo), "Ballarat Tramways Rubicon Street and Sebastopol Time Table.", 1920's
Demonstrates aspects of the Ballarat Tramways in providing information to the travelling public about their tram services, times and how organised in relation to the time of the day. An ESCo era timetable. Two local businesses have advertised as well.Folded printed card, off white, titled "Ballarat Tramways Rubicon Street and Sebastopol Time Table." Gives details of trams from the City for Rubicon St and Sebastopol for the various days and inbound trams from Rubicon, indicating that trams ex Sebastopol ran 10 minutes earlier. Has various notes on the timetable. On Front of card, has advertisements for R. Hutchinson - 29 Armstrong St Ballarat, auto electrician and Suttons Ltd - Musical instruments - Corner Sturt and Dawson Streets. An ESCo produced timetable - 1920's, as the SECV used "Grey St" instead of Rubicon St. (Email from Alan Bradley 8/2006). Copy of email with worksheet.Pencil marks on the cover - about tram services etc. g "Ten to the hour Aunties will catch the tram up at Sturt St"timetables, sebastopol, rubicon st, r. hutchinson, suttons, esco -
 Ballarat Tramway Museum
Photograph - Black & White Photograph/s, George Bishop, 1969
... or pencil "No. 39 / Ballarat tram operated by SEC 1969 / Photo G ...Black and white photograph of Ballarat No. 39 Lydiard St Nth Level crossing, heading north. Tram has destination of Lydiard St Nth, and a "Everything is under control in my all electric kitchen" roof advertisement. In the back is the Moody's Provincial Hotel, and the railway signal box. Photo by George Bishop 1969. Five copies of the photograph held.In ink or pencil "No. 39 / Ballarat tram operated by SEC 1969 / Photo G. Bishop"tramways, trams, lydiard st nth, level crossings, provincial hotel, railway crossing, tram 39 -
 Ballarat Tramway Museum
Photograph - Black & White Photograph/s - set of 2, George Bishop, Dec. 1971
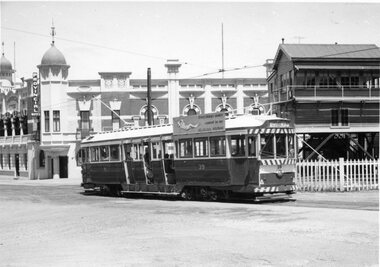
Black and white photographs of Bendigo No. 7 at Charing Cross 12/1971. Photos by George Bishop. .1 - No. 7 arriving at Charing Cross, with Pall Mall buildings, including the Beehive in the background. .2 - ditto - side on view, with the Plaza building in the background. No. 7 has two SEC roof advertisements for electric cooking. Photo dated from label on rear of btm3605.3On the back photo in ink No. 7, Near Charing Cross (Bendigo) / G. Bishop photo"tramways, trams, bendigo, charing cross, pall mall, tram 7 -
 Ballarat Tramway Museum
Photograph - Black & White Photograph/s - set of 3, George Bishop, Dec. 1971
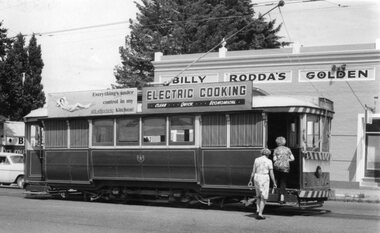
Black and white photographs of Bendigo No. 7 at Golden Square terminus 12/1971. Photos by George Bishop. .1 - Tram at terminus, with two ladies boarding the tram .2 - ditto without ladies .3 - view rear number of the tram and Billy Rodda's Golden Square Hotel. No. 7 has two SEC roof advertisements for electric cooking.On the back of two of the photos in ink No. 7, Golden Square/ G. Bishop photo" On the rear of .3 is a label "No. 7 at Golden Square Bendigo, December 1971"tramways, trams, bendigo, golden square, tram 7 -
 Ballarat Tramway Museum
Photograph - Black & White Photograph/s - set of 2, George Bishop, Dec. 1971
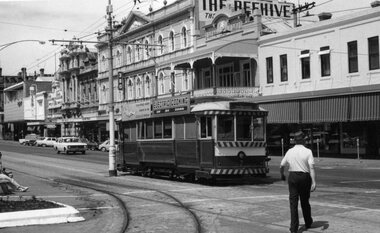
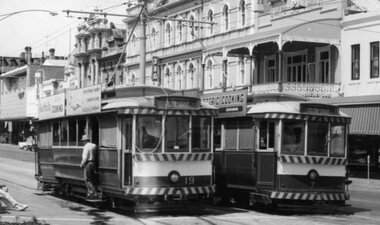
Black and white photographs of Bendigo No. 7 and 19 at Charing Cross 12/1971. Photos by George Bishop. .1 - 19 and 7 at the Charing Cross stop, with a man getting off the tram. Has a over exposure line across part of No. 19. 3BO sign on the Beehive buildings in the background. .2 - Close up of the ends of the both trams - note both have destinations of "Golden Square". Both trams have two SEC roof advertisements for electric cooking.On the back of two of the photos in ink No. 7 and 19, at Charing Cross Bendigo Dec. 1971 / G. Bishop photo"tramways, trams, bendigo, charing cross, pall mall, tram 7, tram 19 -
 Ballarat Tramway Museum
Photograph - Black & White Photograph/s, George Bishop, Dec. 1971
Black and white photographs of Bendigo No. 23 and 19 at Charing Cross 12/1971. No. 23 has destination of Eaglehawk. The Beehive and Ezywalkin buildings in the background. No. 19 in the distance. Both trams have SEC Electric Cooking Roof Advertisements. Photos by George Bishop. .On the back of the photo in ink "SEC trams No. 19 and 23 (Bendigo System) at Charing Cross. / G. Bishop photo."tramways, trams, bendigo, charing cross, pall mall, tram 19, tram 23 -
 Ballarat Tramway Museum
Photograph - Black & White Photograph/s - set of 2, George Bishop, Dec. 1971
Two Black and White photograph of a in-bound bogie tram No. 3, 12/1971 descending Mitchell St Bendigo, just after the start of the double track near the railway station. Photo has Glendon House on the left hand side. Photo by George Bishop. Tram has the destination "Eaglehawk"On the back of the photos in ink "Outside Glendon House Bendigo / G. Bishop photo" and in pencil on 3609.2 "No. 3 near Rly Station Bendigo, Dec 1971, Destination Eaglehawk: and "George Bishop Photo"tramways, trams, bendigo, mitchell st, railway station, tram 3 -
 Ballarat Tramway Museum
Photograph - Black & White Photograph/s, George Bishop, c1980
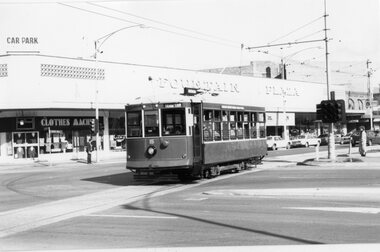
Black and White photograph of Birney No. 15 at Charing Cross, northbound, c1980.s Tram operating a Bendigo Tramways talking tram tour. Has the Fountain Plaza in the background. Photo by George Bishop.On the back of the photos in ink "Tram Tour, Charing Cross Car 15 / G. Bishop photo"tramways, trams, bendigo, charing cross, tram 15 -
 Ballarat Tramway Museum
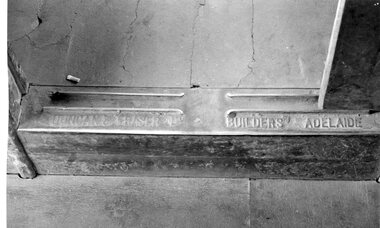
Photograph - Black & White Photograph/s, George Bishop, Dec. 1971
Black and White photograph of a interior saloon step plate of a Bendigo single trucker, advising that it was built by Duncan and Fraser of Adelaide. Photo by George Bishop 12/1971.On the back of the photos in ink on a label "Step plate indicating tram builder Duncan and Fraser Adelaide SA. Photographed December 1971, Bendigo Victoria" and "Photo G. Bishop" in penciltramways, trams, bendigo, duncan fraser, tramcar component -
 Ballarat Tramway Museum
Photograph - Black & White Photograph/s, George Bishop, Dec. 1971
Black and White photograph of a interior sign or notice in a Bendigo tram - advising passengers that it is the Conductors duty to issue a check for every fare received and that it must be produced on demand. Photo by George Bishop 12/1971.On the back of the photos in ink "presumably Bendigo December 1971 SEC trams" and "Photo G. Bishop" in penciltramways, trams, bendigo, signs, tickets, tramcar component -
 Ballarat Tramway Museum
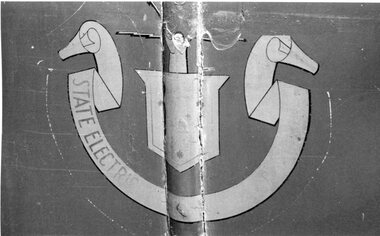
Photograph - Black & White Photograph/s, George Bishop, Dec. 1971
Black and White photograph of a very faded and damaged SEC emblem / logo / coat of arms on the side of a Bendigo tram. Photo by George Bishop 12/1971.On the back of the photos in ink on a label "State Electricity Commission of Victoria coat of arms photographed December 1971 Bendigo" and "Photo G. Bishop" in pencil.tramways, trams, bendigo, signs, secv, logos, tramcar component -
 Ballarat Tramway Museum
Photograph - Black & White Photograph/s - set of 2, George Bishop, Dec. 1971
Set of two Black and white photographs of Bendigo No. 3 leaving Charing Cross for Quarry Hill 12/1971. Photos by George Bishop. Both have the Ezywalkin sign and building in the background and people sitting on the ground by the fountain.On the back of two of the photos in ink or pencil "No. 3, Charing Cross December/ G. Bishop photo" On the rear of .2 is a label "No. 3 at Charing Cross Bendigo, December 1971"tramways, trams, bendigo, charing cross, tram 3 -
 Ballarat Tramway Museum
Photograph - Black & White Photograph/s, Leon Marshall-Wood?, early 1950's
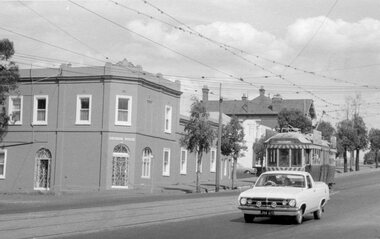
Yields information about the appearance of Geelong trams early 1950's with information about Ryrie St Geelong and its buildings.Black and white photograph of Geelong No. 36 in Ryrie St at Moorabool St, mid 1960's with T& G Mutual Life Building and Belchers Corner building, with No. 17 in background and safety zone signs. Tram showing 'West' as destination. No. 17 had the destination of Chilwell. Shows people boarding No. 17 and the crossover under No. 36, with the driver's window open. Photographer not shown, but based on the stamp and the writing on the rear of Reg Item 4194, which has the initials "L M-W" possibly "Leon Marshall Wood", but not his stamp as shown on Reg Item 4167.On rear in ink with in a red stamp "Traction" "5512 (1). Pencil cropping marks on rear.tramways, trams, geelong, ryrie st, west, tram 36, tram 17 -
 Ballarat Tramway Museum
Photograph - Black & White Photograph/s, Late 1940's
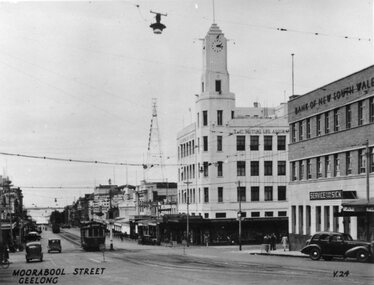
Yields information about the appearance of Moorabool Street Geelong and its buildings and vehicles.Black and white photograph of Moorabool Street Geelong at the intersection with Ryrie St, with the T&G Mutual Life Assurance, Bank of New South Wales and other buildings in the background. Shows a number of motor vehicles (late 1940's) and one tram. Has The title "Moorabool Street Geelong" in the bottom left hand corner and "V.24" in the bottom right hand corner. A commercial produced photograph - printer/publisher unknown.tramways, trams, geelong, moorabool st -
 Ballarat Tramway Museum
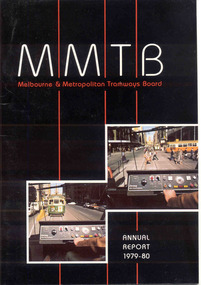
Document - Report, Melbourne and Metropolitan Tramways Board (MMTB), MMTB Reports 1979 to 1981, 1980 to 1982
Three copies of the Annual report of the MMTB for the years end 1980, 1981 and 1982 3953.1 - "Annual Report 1979-80" - white gloss paper with colour card covers with 36 pages, gloss, on inside giving details of the MMTB Board, Officers, Operations report, schedule of debenture, investments, Auditors reports, record of Annual traffic receipts, passengers, miles etc, tram and bus routes operated, statistical information, graphs and photographs. Photos include; Z 117 in Bourke St, Z 31 Burwood terminus, new safety tower wagon, Z118 in Bourke St, W2 528 High St Kew, reconstruction of High St Kew, Z3 120, cable and electric trams at Flemington Bridge, Z3 117, fitting trams to bogies at Preston workshops, Queens Bridge roundabout, MAN bus, Burwood substation, Z111 in Bourke St and Z's enter Elizabeth St service and Z3 129 on rear cover at night. 3953.2 - "Annual Report 1980-81" - white gloss paper with colour card covers with 36 pages, on inside giving details of the MMTB Board, Officers, Operations report, schedule of debenture, investments, Auditors reports, record of Annual traffic receipts, passengers, miles etc, tram and bus routes operated, statistical information, graphs and photographs. Photos include; image of Park St, Domain Road Jtn before changes, Museum station entrance, Flinders and Swanston St, CDB City Ring bus service, Swanston St, Westgate bus route, Park St, new substation, Swanston and Flinders St, Flinders land, and give way to buses pulling out of stops. 3953.2 - "Annual Report 1981-82" - white gloss paper with colour card covers with 36 pages, on inside giving details of the MMTB Board, Officers, Operations report, schedule of debenture, investments, Auditors reports, record of Annual traffic receipts, passengers, miles etc, tram and bus routes operated, statistical information, graphs and photographs. Photos include images of a z class crossing the Maribyrnong bridge, Footscray bus workshops, track renewals, a wedding at Wattle Park, a W2 arriving at Museum Station, Clifton Hill interchange, buses, Z class in Elizabeth St (Nos 158 and 43), Z89 in Mt Alexander Road North Essendon and a W2 loaded on a truck for New Zealand.3951.1 - has Graeme Breydon's address stamp on front cover., 3951.2 - ditto, 3951.3 - ditto and on inside of front cover., 3951.6 - "G. Breydon" in pencil on front cover and pencil comments on balance sheet., 3951.7 - dittotrams, tramways, mmtb, melbourne, annual reports, operations, trackwork -
 Ballarat Tramway Museum
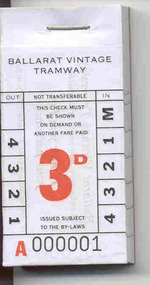
Ephemera - Ticket/s, Ballarat Tramway Museum (BTM), BTM 3d, Dec. 2007
Block of 100 tickets, 3d, Ballarat Vintage Tramway, A00001 to A000100. Printed on white paper, black ink with the "3d" and A prefix in red ink. Issued commencing 1 January 2008, to replace the 80c child single journey ticket. Stapled with a heavy staple at the top of the ticket onto a heavy brown cardboard sheet. With worksheet is a "Notice to Traffic Staff", issued by the Operations Manager, 26/10/2007. On the rear is a note regarding the BTM and contact details. 4028.1 - Block A7001 to A7100 - different style of printing the ticket number - provided to Archives by G. Young 3/2009.trams, tramways, tickets, btm -
 Ballarat Tramway Museum
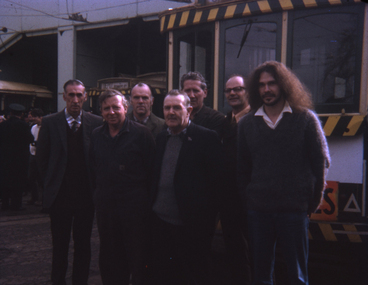
Slide - 35mm slide/s, Theo Dunstan, Aug. 1971
35mm slide, square format mounted in a "Kodak " cardboard slide mount with Kodak logos and printing of the SEC shed staff in front of the depot shortly before the closure of the tramway system. Underexposed photo. Standing in front of No. 33. From matching names and faces on Reg. Item 1861 Back row from left - S. Lakey, W. Trusler, N.Lorensini, A.Donaschenz Front row from left - G. Gray, B. Peart, W. Kell. See also Reg Item 1861 for a black and white photo and 1862 for the listing. Taken 23/8/1971 - the last Sunday of full operations? Has date of "Sep 71" and "11" stamped onto the slide.tramways, trams, crews, ballarat, sec crews, personnel, staff photo -
 Ballarat Tramway Museum
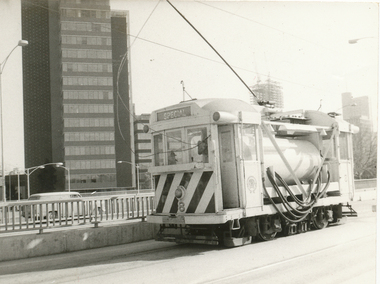
Photograph - Black & White Photograph/s - set of 3, Ellen Butland, early 1970's?
Set of three black and white prints of MMTB Scrubber No. 8 early 1970's. .1 - Arts Centre area, St Kilda Road .2 - Dandenong Road, about to use the crossover just to the west of Glenferrie Road .3 - using the crossing. Has the Hoyts picture theatre on the corner of Glenferrie and Dandenong Roads in the background. On Agfa paper. Photo by E. G. Butland - Ron Scholten - provided a written note re Ellen Butland - in with worksheet - 5th women driver in Melbourne, worked from Kew, now lives in NZ and drove buses in Auckland. See Donated by Ron Scholten to BTM 11/2005 See Destination City - renumbering of No. 8 to 8W took place during 1975.1 - "E.G. Butland" stamped in black ink on rear. .2 - as above, "Wattletree Road" stamped in public in three places, along with address blacked out and the words "please return to" in pencil and in the top left hand corner "No.8 Victoria Pde" in pencil. .3 - "E.G. Butland" stamped in black ink on rear., "D. Menzies / 237 Wattletree Road, Malvern Vic. 3144."tramways, trams, scrubber tram, dandenong road, st kilda road, tram 8, tram 8w -
 Ballarat Tramway Museum
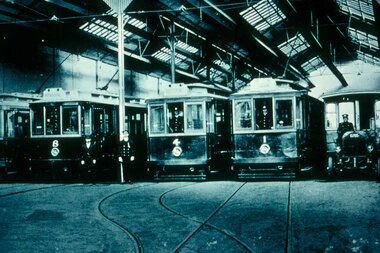
Slide - 35mm slide/s, prior 1924
Agfachrome Professional plastic mount (blue base, white cover) reproduction slide of a black and white photograph of Geelong Nos 8, 4, 1 and another 4 wheel tramcar and a open cab motor bus photographed within the interior of Geelong depot, prior to 1924. From notes provided by David O'Neil, 12/2003, advises that bus driver is either Bill Hamaling or Charles Stafford. Gentlemen next to No. 8 could be Vic Phipps. Hawthorn Tram Museum Reg Item 3558 shows the tram on the left hand side - Geelong 2."G 1" and "1 -1" in pencil.tramways, trams, geelong, depot, motor buses, tram 8, tram 4, tram 1 -
 Ballarat Tramway Museum
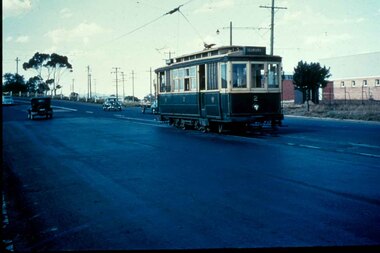
Slide - 35mm slide/s, c1955
Agfachrome Professional plastic mount (blue base, white cover) reproduction slide of a colour slide of Geelong No. 2 at North terminus. Tram has the destination of Belmont. Photo taken mid 1950's. "G 3" and "1 -3" in pencil.tramways, trams, geelong, north, tram 2