Showing 1061 items
matching photo folder
-
 Bendigo Historical Society Inc.
Newspaper - JENNY FOLEY COLLECTION: FOOTY
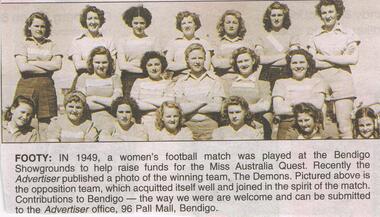
BHS CollectionBendigo Advertiser ''The way we were'' from Tuesday, November 23, 2004. Footy: in 1949, a women's football match was played at the Bendigo Showgrounds to help raise funds for the Miss Australia Quest. Recently the Advertiser published a photo of the winning team , The Demons. Pictured above is the opposition team, which acquitted itself well and joined in the spirit of the match. The clip is in a folder.newspaper, bendigo advertiser, the way we were -
 Melbourne Tram Museum
Document - Folder with papers, Urban Land corporation, "Hawthorn Tram Depot - Expressions of Interest Documentation", late 1998
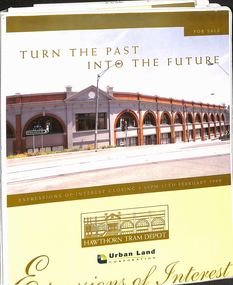
White two spring clip folder with papers, titled "Hawthorn Tram Depot - Expressions of Interest Documentation", sub-titled "Turn the Past into the Future" Has a photo of Hawthorn Tram depot and an image on the front cover. Closing date 17/2/1999, prepared by the Urban Land Corporation with the assistance of VicTrack. Approx 110 pages with supplementary papers in the end covers. Contains a table of contents, checklist, EOI Process, Development Brief, Site conditions. Gives details of the heritage registration, site plans, building plans, property title and detailed room condition and use of the ground floor. Supplementary papers include the marketing brochure, letters and a detail feature and level survey by Bosco Johnson surveyors, 30-9-1998.trams, tramways, htt, hawthorn tram depot, sale of land, property -
 Melbourne Tram Museum
Photograph - Compact Diskette with photographs, Peter Wynd, "Eric Wynde Photos", 2016
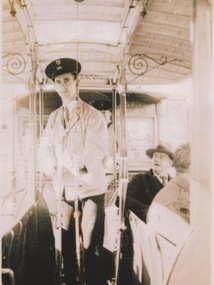
... Compact Diskette within green plastic circular folder... Compact Diskette within green plastic circular folder containing ...Compact Diskette within green plastic circular folder containing a photo of Eric Wynd at the controls of a cable car and MMTB certificate of service. image 1 - Photo of Eric at the cable tram controls with a light coloured summer uniform jacket and MMTB peaked cap. See history of object for further details and the htd3058doc.pdf file for further details of Eric and the donor. image 2 - image of MMTB certificate of service - 38 years, dated 6-4-1978, signed by the Chairman D. Snell, Deputy Chairman, Board Member and Secretary Mr. Aird. image 3 - of the CD container.trams, tramways, mmtb, cable trams, drivers, certificates, uniforms -
 Melbourne Tram Museum
Book, Melbourne & Metropolitan Tramways Board (MMTB), "MMTB Electric Tramways and Motor Omnibuses Traffic Information Book" (Sections and Fares), Mar. 1981
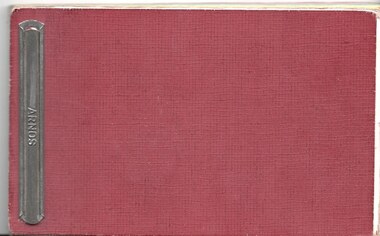
Red card covers book, with sections for general information, tram fares, bus fares and passes printed on white, yellow, green or pink paper, secured with an Arnos binder metal clip on the left hand side, titled "MMTB Electric Tramways and Motor Omnibuses Traffic Information Book", dated March 1981. Details the various section and fares for each tram and bus route, General instructions, concession fares and has photos or drawings of the various special tickets, eg passes or prepaid tickets. 2nd copy added 19/12/2019 from the Collection of Bob Prentice, donated by Barry Brooks. Full pdf scan added. See item 5625 for an extract in a grey folder for the yellow pages only.On inside of front cover has L. Rickard" written in ink, and J. Nugent crossed out. First page has the various contact phone numbers updated. In the second copy, many of the pages with ticket information have been stamped "Cancelled"trams, tramways, mmtb, tickets, fares, sections, passes -
 Melbourne Tram Museum
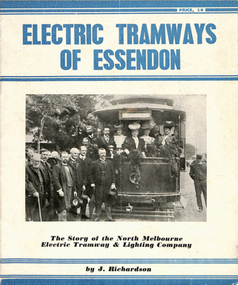
Book, Jack Richardson, "Electric Tramways of Essendon", "The Essendon Tramways", 1963
Book - 16 pages including card covers on semi gloss paper titled "The Essendon Tramways" written by Jack Richardson, published by Traction Publications, Historical Series No. 3 in 1956. The story of the North Melbourne and Electric Tramway and Lighting Company. Foreword on page 2 gives the background to the book and the persons who assisted with it. Details the historical background, a map of the tramway in 1906, relationship with the Victorian Railways, construction, rolling stock, carbarn, (depot) power station, overhead, takeover by the MMTB, connection to the City, 1956 map, expansion under the MMTB, services at the time of publication, Rolling Stock Roster, notes on some of the personnel of the tramway, junction details and dates of the various extensions etc. Includes a number of photographs, a list of railway and tramway books published by Traction Publications on the rear cover a short biography on the author. 2nd copy - from the H. S. McComb collection - stored in the original box - Items 2027 to 2030 and 1309 copy 2 contained within box 72.3 in a brown folder marked "Historical Data regarding Essendon Tramways and their services to the City" PDF copy of 1309.1 - the 1956 version added 25-2-2021 PDF copy of 1309.2 - the 1963 version added 16-3-2017. 1309.2 - 2nd edition, 1963, Historical Series No. 153, with a photo of J. Richardson on rear cover. Has notes on the edition and publisher notes. Revised to pick up errors and other photographs. Added 16-3--2017.1309.2 - has "L. W. Rogers" in ink on the top right hand corner of page 3.trams, tramways, essendon, nmetl, tramcars, depots, moonee ponds, north melbourne -
 Melbourne Tram Museum
Negative, Travis Jeffrey, c1963
Negative of tram 219 at a tram stop. Tram has destination City and Route No 7. Photo looks staged as a school child in uniform leaning at door, driver and passenger in front window are all staring at the photographer. Note the tram has a trolley wheel fitted, the stop is a compulsory stop and that there is a light fitting above the tram with a tinted glass shield that indicated the type of stops at night. Possibly in Burke Road, between Leura Grove and Toorak Road.Paper folder that contained the negative had "NR99A" in red ink, "M5" in pencil, 58A in green ink, date stamp "1 Jan 1963" on front, and date stamp on rear "26 Sep 1962".trams, tramways, w2 class, route 7, tram stops, burke rd, tram 219 -
 Melbourne Tram Museum
Negative, Travis Jeffrey, c1963
Negative of tram 372 in Toorak Rd at Burwood terminus. Tram has destination City and Route No 74. Photo shows a person wearing what appears to be a Brisbane tramway cap tying down trolley pole for return trip to City. Comment from Tony Smith of the MTPA, that it could be Travis Jeffery. Email from Len Millar - 7-2-2019 - "As best as I can decipher by enlarging the image, it does look like a young Travis. The long-ish face was my guide. Brisbane hat – and tying a pole down on a service car in busy Toorak Road? That would be Travis!"Paper folder that contained the negative had "NR100A" in red ink, "12A" in blue ink, date stamp "1 Jan 1963" on front, and date stamp "26 Sep 1962" on rear.trams, tramways, w2 class, route 74, burwood, toorak rd, tram 372 -
 Melbourne Tram Museum
Negative, Travis Jeffrey, c1961
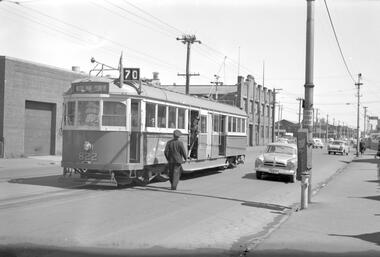
Negative of tram 482 at Camberwell Tram Depot. Tram has destination City and Route No 70. Photo shows driver handing something from cab to man standing near depot shelter.Paper folder that contained the negative had "NR13A" in red ink, "M2" in pencil, "12A" in blue ink, "P ORMD" in purple ink, and date stamp "1 Dec 1959" on front, and date stamps "26 Sep 1962" on rear.trams, tramways, w2 class, route 70, camberwell depot, shelters, tram 482 -
 Melbourne Tram Museum
Negative - Set of 2, Travis Jeffrey, 10/06/1962 12:00:00 AM
Colour negative of tram 514 in Dandenong Road. Tram has destination Malvern - Burke Rd and Route No 5. Photo shows tram shunting. Note the newspaper box on the left hand side of the photograph. , Colour negative of tram 514 in Wattletree Road at Burke Rd terminus. Tram has destination City and Route No 5. Note thePaper folder that contained the negative had "NR77B" and date written as 10 Jun 62 in red ink., Paper folder that contained the negative had "NR76B" and date written as 10 Jun 62 in red ink.trams, tramways, w2 class, route 5, dandenong rd, wattle tree rd, malvern burke rd, tram 514 -
 Melbourne Tram Museum
Negative, Travis Jeffrey, 10/06/1962 12:00:00 AM
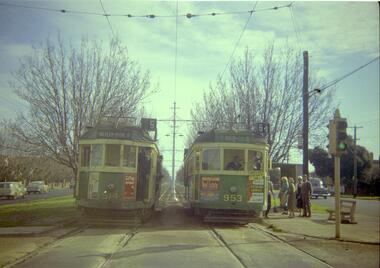
Colour negative of trams 514 and 953 in Dandenong Road. Tram 514 has destination Malvern - Burke Rd and Route No 5. Photo shows tram on the left track (city-bound), although facing towards its destination (Malvern). Driver standing in door of cab and conductor standing in doorway to tram. Tram 953 has destination East Brighton via Caulfield and Route No 64. Sign on front states: "Connect with Malvern-Burke Rd tram".Paper folder that contained the negative had "NR75B" and date written as 10 Jun 62 in red ink.trams, tramways, w2 class, route 5, route 64, dandenong rd, wattle tree rd, malvern burke rd, tram 514, tram 953 -
 Melbourne Tram Museum
Negative, Travis Jeffrey, 30/09/1961 12:00:00 AM
Negative of trams 557 and 849 at Batman Avenue tram terminus. Tram 557 in foreground has destination Wattle Park - Elgar Rd and Route No 70. Photo shows tram on the right track (outwards from city), with driver and conductor standing in front of tram, posing for the camera. Tram 849 in background has destination Prahran (route not visible).Paper folder that contained the negative had "NR58A" written in red ink, "M3" written in pencil, "48A" written in blue ink, and date stamped/written as 30 Sep 1961.trams, tramways, w2 class, sw5 class, route 70, batman ave, wattle park, prahran, crews, conductors, tram 557, tram 849 -
 Melbourne Tram Museum
Negative, Travis Jeffrey, 28/09/1961 12:00:00 AM
Negative of tram W3 666 in Collins St at Elizabeth St. Tram has destination City - Spencer St and Route No 9A. Photo shows tram at Elizabeth St stop heading west towards Spencer St.Paper folder that contained the negative had "NR55A" written in red ink, "M6" written in pencil, "45A" written in blue ink, and date stamped/written as 28 Sep 1961.trams, tramways, w3 class, route 9a, collins st, elizabeth st, tram 666 -
 Melbourne Tram Museum
Negative, Travis Jeffrey, 1/12/1959 12:00:00 AM
Negative of tram 822 in Swan St Richmond, at Bendigo St. Tram has destination Wattle Park - Elgar Rd and Route No 70. Photo shows driver on road talking to conductor who is leaning out of doorway. Tram stop has a bundy clock. On the side of the bundy clock could be a point bar clipped to the clock case.Paper folder that contained the negative had "NR14A" written in red ink, "M14" written in pencil, "14A" written in blue ink, "P Ormond" written in purple ink and date stamped as 1 Dec 1959.trams, tramways, w5 class, swan st, crews, bundy clock, tram 822 -
 Melbourne Tram Museum
Negative, Travis Jeffrey, c1962
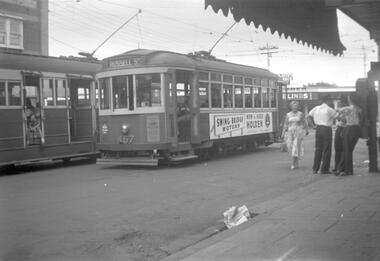
B&W negative of tram 467 in St, Footscray Tram has destination Russell St. 2nd unidentified tram in photo. Drivers and conductors chatting and leaning on Bundy Clock.Paper folder that contained the negative had "NR110A" written in red ink, "F7". On rear and dated stamped as 26 Sep 1962.trams, tramways, w2 class, footscray, russell st, leeds st, bundy clock, tram 467 -
 Melbourne Tram Museum
Document - Folder with papers, Alstom Australia, "Alstom", Jul, 1987
Set of some 10 items issued by Alstom around the time they became responsible for the operation or the facilities manager of Preston Workshops and other corporate materials. .1 - Letter dated 3-7-2002 to all employees as the Preston Workshop and Press Release advising that Alstom was the successful bidder for the Facilities Management of the workshops. .2 - document - 4 sheets - titled "Alstom Citadis Tram Presentation - Preston Workshop August 7, 2001" - PowerPoint slides by Dan Davies introducing the C class tram. .3 - Large foldout folder or pamphlet titled "Citadis the spirit of your city" introducing the tram. .4 - DL four fold pamphlet - "Citadis at your fingertips, the spirit of your city" with information about the various types of trams. .5 - Folder with company name printed on a label, containing four sheets: Citadis for Yarra Trams Ballarat Railway Service Centre Alstom Melbourne Transport Limited - asset management for Connex Alstom's New Preston Service Centre Launched - 27-8-2002 .6 - Book - Alstom Australia and New Zealand Capabilities and Profile 2001 - 36 pages + card cover with high gloss photos. .7 - Plastic bag with company name, logo and website.trams, tramways, alstom, preston workshops -
 Melbourne Tram Museum
Album - Photo Album, Transit Australia Publishing, "TAP - Part C - W5 to W7 – VR & 980 – sheets C1 to C41 ", 1950's to 1990's
Photo Album - titled " TAP - Part C - W5 to W7 – VR & 980 – sheets C1 to C41 ", from Transit Australia Publishing. Photos used in the Destination City and other publications series. For a detailed list of photographs see htd4602i.pdf. For individual photo images see: \dbtext\hawthtramcoll\photo collections\htd4602-TAP-PartC, images TAP164 to TAP243. TAP164_52_RiverSt_KeithKings_2Apr1960.jpg TAP165_52_RiverSt.jpg TAP166_700_MooneePonds.jpg TAP167_736_HughWaldron.jpg TAP168_820_MooneePondsJunct_2Feb1972_AndrewFoy.jpg TAP169_821_VictoriaPde_Jan1993_RayMarsh.jpg TAP170_796_MaribyrnongRvrBridge_DuckettColln.jpg TAP171_899_VictoriaPde-at-GisborneSt_DuckettColln.jpg TAP172_910_QueensBridge.jpg TAP173_923_RAAF_SwanstonSt_NoellReed_19Jan1953.jpg TAP174_980_VictoriaPde.jpg TAP175_980_RoyalVisit_MalvernDepot_5Mar1954-KeithKings.jpg TAP176_980_VictoriaPde_3Feb1951.jpg TAP177_980_VictoriaPde_3Feb1951.jpg TAP178_980_BourkeSt_26Dec1969_GregKing.jpg TAP179_980_RoyalTram-MMTB.jpg TAP180_980_RoyalTram-StGeorgesRd_KeithKings_1Mar1954.jpg TAP181_980_Preston_HughBallment.jpg T AP182_980_AETA-tour.jpg TAP183_1003_HawthornRd_12April1955_KeithKings_1Mar1954.jpg TAP184_1031-1032_GlenferrieRd_NoelReed_17Feb1956.jpg TAP185_AETA_pre-opening tour_BourkeSt_25Jun1955.jpg TAP186_53_Footscray_18Jan1969_PaulNicholson.jpg TAP187_53_Preston_Feb1973_MMTB.jpg TAP188_684_Caulfield_WJohnWebster.jpg TAP189_685_Esplanade_RayPearson.jpg TAP190_721_Elsternwick_WJohnWebster.jpg TAP191_736_MMTB.jpg TAP192_740_WilliamSt_AndrewFoy_7Feb1972.jpg TAP194_736_VicMarket_RayPearson_13Apr1936.jpg TAP195_760_VicMarket_1986_MichaelMcLeod.jpg TAP196_787_FlemingtonRd_RogerPywell_16May1960.jpg TAP197_801_StKildaRd-trackwork_KSKings_18Mar1951.jpg TAP198_808_Esplanade_RayPearson.jpg TAP199_810_TruganiniRd_NoelReed.jpg TAP200_812_StKildaJunction.jpg TAP201_816_MalvernDepot_WJohnWebster.jpg TAP201_847_BatmanAve_WJohnWebster.jpg TAP202_816_FlindersSt_1986_MichaelMcLeod.jpg TAP203_844_MalvernDepot_AndrewFoy6Jan1973.jpg TAP205_856_BatmanAve_WJohnWebster.jpg TAP206_885_Carnegie_IanCooper.jpg TAP207_836_ElizabethSt_HughBallment.jpg TAP208_887_MalvernDepot_WJohnWebster.jpg TAP209_914_BatmanAve_GeoffGrant.jpg TAP210_914_BatmanAve_LindsayCrowe.jpg TAP211_923_RAAF_VictoriaSt_WJohnWebster.jpg TAP212_915_50thAnnivFederation_Preston_21May1951_KeithKings.jpg TAP213_958_Glenhuntly_AndrewFoy_9Jan1986.jpg TAP214_965_ChapelSt_AndrewFoy_9Jan1986.jpg TAP215_979_HighSt_MMTB.jpg TAP216_988-1003_TestRuns_NicholsonSt_GeoffGrant_19Jun1955.jpg TAP217_988_Nicholson-intoVictoria_GeoffGrant_19Jun1955.jpg TAP218_991_BourkeStOpening_GeoffGrant_24Jun1955.jpg TAP219_993_EastBrighton_DaleBudd_1989.jpg TAP220_993_NicholsonSt_PaulNicholson_10Sep1968.jpg TAP221_994_SmithSt_AndrewFoy_20May1976.jpg TAP222_999_SwanSt_AndrewFoy_19Jan1977.jpg TAP223_980_GlenferrieRd_NoelReed_.jpg TAP224_980_GlenferrieRd_WJohnWebster.jpg TAP225_980_VictoriaPde_AETAtour_KeithKings_3Feb1951.jpg TAP226_980_DandenongRd_MMTB.jpg TAP227_980_Preston_HughBallment.jpg TAP228_1002_SwanstonSt_AndrewFoy_3Jan1989.jpg TAP229_1003_EastPrestonDepot_MMTB.jpg TAP230_1010_HighSt_MMTB.jpg TAP231_1032_MMTB.jpg TAP232_1033_AETAtour_7Apr1956_GeoffGrant.jpg TAP233_1033_EastBrunswick_AETAtour_7Apr1956_GeoffGrant.jpg TAP234_52_DroopSt_JimSeletto.jpg TAP235a_761-961_DomainInterchenge_FrizVanDam_24Oct1988.jpg TAP235_750-759_VictoriaStShunt_FrizVanDam_31Oct1988.jpg TAP236_833-974_CarlisleSt_FrizVanDam_24Oct1988.jpg TAP237_888-999_DandenongRd-at-LansdowneSt_FrizVanDam_22Oct1988.jpg TAP238_940_EastPreston_marker-lights_Jun1970_MMTB.jpg TAP239_891-Kew_pantographtest_RayMarsh_21Nov1989.jpg TAP240_1032-917_VictoriaPde_FrizVanDam_28Oct1988.jpg TAP241_1024_EastBrighton_JimSeletto_1963.jpg TAP242_FrontEntranceSW6-drawing_MMTB_22Aug1955.jpg TAP243_FrontEntranceSW6-drawing_altered-as-1016.jpg Transit Australia Photos - W5 to W7 + VR + 980 sheets C1 to C41.pdf - this item stored in box 01-0 - as Reg Item 4620 foolscap size - larger than folder.trams, tramways, transit australia, destination city, tramcars, depots, w5 class, sw5 class, sw6 class, w7 class, w6 class, vr, tram 52, tram 700, tram 736, tram 820, tram 796, tram 899, tram 910, tram 923, tram 980, tram 1003, tram 1031, tram 1032, tram 53, tram 684, tram 685, tram 721, tram 736, tram 740, tram 746, tram 760, tram 787, tram 801, tram 808, tram 810, tram 812, tram 816, tram 844, tram 847, tram 856, tram 885, tram 836, tram 887, tram 914, tram 923, tram 915, tram 958, tram 965, tram 979, tram 988, tram 1003, tram 991, tram 993, tram 994, tram 999, tram 1002, tram 1003, tram 1010, tram 1032, tram 1033, tram 750, tram 759, tram 761, tram 961, tram 833, tram 974, tram 888, tram 940, tram 891, tram 917, tram 1016 -
 Melbourne Tram Museum
Album - Photo Album, Transit Australia Publishing, "TAP - Part E - VR Trams – Sheets E1 to E24 ", 1950's to 1990's
Photo Album - titled "TAP - Part E - VR Trams – Sheets E1 to E24 ", from Transit Australia Publishing. Photos used in the Destination City and other publications series. For a detailed list of photographs see htd4604i.pdf. For individual photo images see: \dbtext\hawthtramcoll\photo collections\TAP-Part D, images TAP269 to TAP315. TAP269_1-scrubber-OrmondRd_c1943_LeonMarcshallWood.jpg (Bob Lilburn notes in a letter to Keith Kings, photo dated 10/1942 - see 4064.1 in the same folder) TAP270_7_BrightonBeach_1954_HughBallment.jpg TAP271_17_ex-Sydney_LeonMarshallWoodCollection.jpg TAP272_23_ElwoodDepotTurntable.jpg TAP273_26_SandringhamDepot_LGPooleColln.jpg TAP274_40_BrightonBeach_1954_HughBallment.jpg TAP275_43_Sandringham_1943_LeonMarshallWood.jpg TAP276_43_ElwoodDepot_HughBallment.jpg TAP277_48_BlackRock_1954_HughBallment.jpg TAP278_51_ElwoodDepot_25Jan1957_LeonMarshallWood.jpg TAP279_ElwoodDepot_1918.jpg TAP280_6-ElwoodDepot.jpg TAP281_8-9trailer_LeonMarshallWoodCollection.jpg TAP282_3_ElwoodDepot_HughBallment.jpg TAP283_6_ElwoodDepot.jpg TAP284_6_ElwoodDepot_RayPearsonColln.jpg TAP285_trailer_ElwoodDepot_PTC.jpg TAP286_23_Sandringham_RayPearson.jpg TAP287_28-32_ElwoodDepot_PTC.jpg TAP288_32_StKilda_HughBallment.jpg TAP289_34_OrrmondRd_TMSV.jpg TAP291_37_ElwoodDepot_LindsayCrowe.jpg TAP292_36-39_VautierSt_JimSeletto.jpg TAP292_36-52_ElwoodDepot_1959_JimSeletto.jpg TAP293_40-33_ElwoodDepot_HughBallment.jpg TAP294_41_StKildaStation_1959_JimSeletto.jpg TAP295_43_StKildaStation_HughBallment.jpg TAP296_48_BlackRock_1954_HughBallment.jpg TAP297_51_Sandringham_LindsayCrowe.jpg TAP298_51_leaving-Sandringham_HughBallment.jpg TAP299_51_Sandringham_RayPearson.jpg TAP300_50_Sandringham_1955_GeoffGrant.jpg TAP301_LuxuryCar_Elwood_VictorianRailways.jpg TAP302_52_leaving-StKilda_HughBallment.jpg TAP303_53_ElwoodDepot_HughBallment.jpg TAP304_53-40_StKilda_NoelReed_19Jan1954.jpg TAP305_54_ElwoodDepot_NoelReed.jpg TAP306_Esplanade_MiddleBrighton_TMSV.jpg TAP307_BrightonBeach_TMSV.jpg TAP308_SandringhamStation_TMSV.jpg TAP309_34_ElwoodDepot_JimSeletto.jpg TAP310_34_Yarrambat_JimSeletto.jpg TAP312_34_Elwood_VictorianRailways.jpg TAP313_43_StKildaStation_HughBallment.jpg TAP314_43-894_StKildaStation.jpg TAP315_53_VautierSt_JimSeletto.jpgtrams, tramways, transit australia, destination city, tramcars, depots, vr, victorian railways, st kilda brighton, sandringham, tram 1, tram 7, tram 17, tram 23, tram 26, tram 40, tram 43, tram 46, tram 51, tram 6, tram 3, tram 13, tram 23, tram 28, tram 32, tram 34, tram 36, tram 39, tram 37, tram 52, tram 40, tram 43, tram 41, tram 48, tram 51, tram 50, tram 53, tram 4, tram 54, tram 42 -
 Melbourne Tram Museum
Document - Personal Papers, The Age, Keith Kings, Herald Sun, Australian Home Beautiful, recovery of tram bodies 12 Kilara Road Mentone, 1982
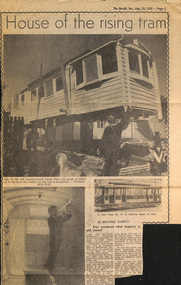
Collection of Personal Papers regarding the sale and recovery of tram bodies 12 Kilara Road Mentone in 1982. Comprises: 1 - letter to the TMSV dated 28/4/1982, to the TMSV from Duncan & Weller for auction on 29/5/1982. 2 - Newspaper from The Age, 12/5/1982 regarding the forthcoming article 3 - Photocopy of an article from March 1, 1930 The Australian Home Beautiful titled "A House Built from tram cars, by W. A. Somerset 4 - Set of five photographs and negative of the above article, possibly by the State Library. In an orange folder addressed to Mr. Kings. 5 - Newspaper item the Herald, Sat 28/8/1982, "House of the rising tram" reporting on the removal of the tram bodies from this house by the TMSV. Has a photo of the TMSV Chairman, Hamish Haugh removing a shower fitting. Item folded.trams, tramways, mmtb, pmtt, mentone, tramcars, melbourne, houses, sale of land -
 Melbourne Tram Museum
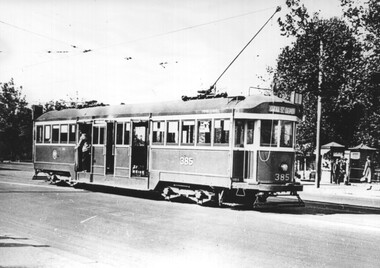
Photograph - Black & White Photograph/s, J D Nowell, 1938
Black and white print of W2 class 385 fitted with MMTB No. 13 trucks. in St Kilda Road late 1938. Tram has the destination of Hanna St Depot in St Kilda Road late 1938. With the item is extensive correspondence and notes prepared by Keith and Roger Greenwood about the photograph and the trucks, 2007 and the families work. Photo by J. D Nowell supplied by CC Nowell - see notes re publication. Photo filed with paperwork within a A4 folder.trams, tramways, trucks, bogies, st kilda rd, w2 class, tram 385 -
 Melbourne Tram Museum
Album - Photo Album, Michael Schrader, General tramway photos, 1995 - 1997
Album - comprising 23 plastic photo holders in a interleaved pack glued to a heavy plastic sheet covered folder. Matching image and sheet numbers .1 - overhead issue at intersection of Riversdale and Glenferrie Road with parked trams. .2 - University terminus under construction (Dec. 1995) showing track layout and Bendigo tram 808 on City Circle outside Spencer St station and Bourke St. - 1995. .3 - New Exhibition Centre (Jeff's Shed) and trams 852 and A292 in Clarendon St. - Feb. 1996 .3a - Y469 on Zoo Tourist tram - 2/1995 and at the zoo. .4 - Y469 and Z3 200 at the zoo cross over and 469 using the cross over. .5 - Y469 crew photo and overhead work following trackwork in Domain Road at Domain Junction. .6 - Short shunts and bus replacements for Domain Junction works - Z69 and buses. .7 - Volvo bus 89 in Swanston St (replacement) an a view of the Burke Road overpass of the Freeway at Gardiner nearing completion. .8 - ditto showing the new widened level crossing at Gardiner and trams in the distance. Opened Dec. 1995. .9 - Photos showing widening of the freeway at Gardiner and relocation of the creek. .10 - Photos showing the construction of the turnout into the new Southbank Depot - cFeb. 1997. .11 - Photos of four trams and others at South Melbourne depot (closed 8/2/1997) including 981, 954, 923 and 1005 prior to fan trip to move the trams to Malvern Depot. .12 - Photo of one of the trams leaving the depot and two on Queensway Prahran. .13 - Trams 843 and 920 at South Melbourne and 843 and others at Whiteman St shunt. .14 - Tram 843 at Southbank depot entrance on the Port Melbourne Line. .15 - Restaurant trams 442, 937 and 939 at Southbank and tram 114 in Swanston St at Batman Ave. .16 - Z8 leads a fleet of Z class trams in Swanston St and Batman Ave and a large number of buses lined up in Spencer St - Grand Prix tram strike - 1997 .17 - buses buses - Latrobe St and Swanston St. .18 - ditto .19 - Relaying Hawthorn Bridge and relaying Dandenong Road .20 - Track relay Dandenong Road - centre median reserved track with rail wagons .22 - ditto .23 - lifting track into place. Two loose photos - Bundoora terminus, Grand Prix services and Grand Prix information booth.trams, tramways, mmtb, overhead, riversdale rd, glenferrie rd, university, spencer st, city circle, clarendon st, y class, z3 class, a class, trackwork, domain junction, swanston st, burke rd, gardiner, southbank, south melbourne depot, queensway, restaurant tram, dandenong rd, grand prix, bundoora, tram 808, tram 892, tram 292, tram 920, tram 200, tram 69, tram 981, tram 954, tram 923, tram 1005, tram 843, tram 442, tram 937, tram 939, tram 114 -
 Melbourne Tram Museum
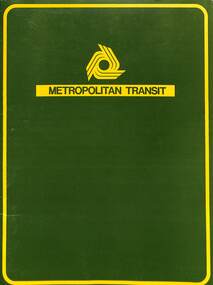
Document - Folder with papers, The Met, "Metropolitan Transit Authority", 10/07/1983 12:00:00 AM
Folder - folded card sheet, green with yellow outlines and the Metropolitan Transit logo containing A4 sized papers at the time of the launch of the "Metropolitan Transit Authority". Contains the following documents: .1 - cover .2 - sheet advising of the formation of the "Metropolitan Transit Authority" .3 - sheet discussing the logo or symbol and its meaning .4 - heavy politicised sheet with the logo or symbol and name .5 - Two sheets - detailing the new colours and technical aspects of why the colours were selected. .6 - Two sheets - showing the uniforms in front of a bus and tram and the specification of the uniforms and what would be issued. .7 - Two sheets - Press Release or news release dated 10/7/1983 about the MTA - issued by the Minister of Transport Mr. S Crabb. Note the first sheet has been printed on longer paper - folded to fit. .8 - single sheet titled "Super trains" giving the specification of Comeng Trains and a photo.trams, tramways, the met, mta, uniforms, logos, colour schemes, railways, comeng, minister for transport -
 Melbourne Tram Museum
Document - Folder, William Pollock, "The Melbourne Cable Tramway System", c1940
Folder - heavy red covers with two screw sets containing a photocopy of a report by William Pollock, prepared after the closure of the cable tram system titled ""The Melbourne Cable Tramway System". Image numbers listed: Folder – htd4715i1 Inside of folder – htd4715i2.jpg Report –Photocopy of a 14 foolscap sheets, paper titled “The Melbourne Cable Tramway System” by William Pollock, describing the system in detail, listing 26 appendices. Has notes on each Power Station, including a table of opening, closing, power produced and cables, fuel, permanent way (track), cables, underground gear, tunnels, flooding and the grip. Image – htd4714i3.pdf Appendix 1 – Handwritten table “Cost the Melbourne Tramway System” – photocopied special size sheet folded. See image htd4715i4.jpg 2 – Drawing – Typical Power House layout - image htd4715i5.jpg 3 – Drawing – Head of Cable Driver – htd4715i6.jpg 4 – Drawing – Rope Drive – htd4715i7.jpg 5 – Photocopy of a Fuel and Water test sheet for the Esplanade Power House – two sheets – 14/5/1918 – htd4715i8.jpg and htd4715i9.jpg 6 – Section of Cable Tram track – htd4715i10.jpg 7 – Tar Burner used by MTOC 1893 – 1900 - htd4715i11.jpg 8 – Yoke Bracket for line drums – A1 Pulley – htd4715i12.jpg 9 – Tunnel Yoke – htd4715i13.jpg 10 – Elevating Wheel or Pulley with shield plate – htd4715i14.jpg 11 – Curve Pulleys, curve drum and rubbing bar – 2 sheets – htd4715i15.jpg and htd4715i16.jpg 12 – Curve or Conical drum – htd4715i17.jpg 13 – Cable Separating pulley or cone line drum – htd4715i18.jpg 14 – Yoke Pulley or General Pulley – htd4715i19.jpg 15 – Yoke Bracket for Drums – htd4715i20.jpg 16 – Automatic Switch Gear – htd4715i21.jpg 17 – Hand operated switch gear – htd4715i22.jpg 18 – Hand pickup – htd4715i23.jpg 19 & 20 – Photo of bunched strands and damaged cable – htd4715i24 21 – Diagram of Rope – Clarendon St Rope No. 41 – htd4715i25.jpg 22 – Strand Alarm – htd4715i26.jpg 23 – Rope History – two sheets – htd4715i27 and htd4715i28.jpg 24 – Rope Splice – htd4715i29.jpg 25 – Cable Grip – htd4715i30.jpg 26 – Crown Pulley – two sheets – htd4715i30 and htd4715i31trams, tramways, drawings, tramcars, cable trams, trackwork, mto co, reports -
 Melbourne Tram Museum
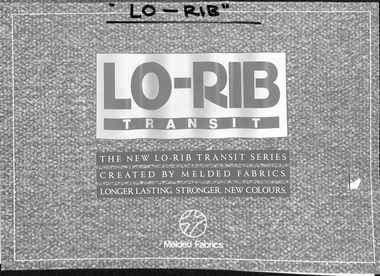
Functional object - Seat Fabric Samples, Melded Fabrics, "Lo-Rib Transit", Aug. 1986
Seat Fabric Samples in a cardboard folder - by Lo-Rib Transit for public transport and other uses. Has a photo of the interior of a bus. Has 9 different colours, with detailed specifications on the rear. Printed August 1986. Manufactured by Melded Fabrics of Dandenong, a unit of Nylex. Has contact details.trams, tramways, public transport, equipment, seats, fabric -
 Melbourne Tram Museum
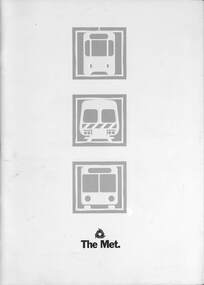
Document - Informaion booklet / folder, The Met, "The Met", late 1980s
Information document about The Met, its services, forward plans, trams, trains, buses. Includes maps showing where upgrades were planned, including roads, and electrification of rail lines. Has a forward by Kevin Shea the Managing Director of The Met. Undated, late 1980s, based on the text with some dates. Has a photo of B2 class tram No. 2005. Notes the completion of the Hong Kong project in 1988.Provides infomation about the forward planning of The Met in late 1980s.Document - 16 pages including folded out sheet + card covers.melbourne, tramways, trams, the met, mta, railways, buses, planning -
 Melbourne Tram Museum
Document - Event Materials, Colonial Tramcar Restaurant Co, "The Colonial Tramcar Restaurant", c2005
... ". Comprises: 1 - full colour printed folder with a photo of tram 442... - full colour printed folder with a photo of tram 442 ...Folder possibly produced for a tourism promotional conference or event for the - "The Colonial Tramcar Restaurant". Comprises: 1 - full colour printed folder with a photo of tram 442 with the Arts Centre in the rear and a fireworks display - includes a card for Craig Opie - Managing Director. On the rear lists the awards received up to 2002. 2 - two 2-page printed A4 document titled - "A tram ride to indulgence" - describes the trip 3 - five course dinner menu - two different ones 4 - postcard 5 - single A4 full colour sheet with a photo of W2 442 in Collins St and Spring St 6 - three fold DL Demonstrates Event materials for the "The Colonial Tramcar Restaurant"Full colour folder containing promotional materials and items.trams, tram 442, restaurant tram, travel promotion, colonial tramcar restaurant -
 Melbourne Tram Museum
Album - Robert Thomson Slide Collection - box 16, 1980
Photo - see pdf file for further information. Number Date Brief Description Box 16 RT372 23-1-1980 W2 271, High St Kew reconstruction trackwork – route 48 RT373 23-1-1980 W2 504 Burwood Road RT374 23-1-1980 Z7 East Burwood terminus RT375 23-1-1980 Z26 Burwood Highway, route 75 RT376 23-1-1980 W2 255 North Balwyn terminus, route 48 RT377 24-1-1980 W5 at North Coburg terminus – route 19 RT378 24-1-1980 Z37 (route 19) and a W route 20 at North Coburg terminus RT379 24-1-1980 W2 378? Park St St Kilda terminus, route 12 RT380 24-1-1980 Z121 route 88 at Bourke St terminus with Spencer St station in background RT381 25-1-1980 Z1 118 and another Z81? At East Preston terminus – both route 88 RT382 26-1-1980 SW5 812 route 67 at Carnegie terminus RT383 28-1-1980 MMTB Austerity bus No. 301 RT384 26-1-1980 SW5 818? And SW6 965 at Carnegie Glen Huntly Road at start of the single line Truganini Road – note the single track signs. Both route 67. RT385 26-1-1980 W2 504 at East Malvern Darling Road – route 3 RT386 26-1-1980 SW5 787 route 52, Mathews Ave. RT387 26-1-1980 SW5 684? Airport West terminus, route 52, RT388 26-1-1980 High St Kew track reconstruction, W6 986, route 48 RT389 26-1-1980 SW6 965 route 67, Glen Huntly Road level crossing RT390 27-1-1980 SW6 962 Collins St route 42 Spencer St terminus RT391 27-1-1980 Z3 121, route 88 Bourke St Mal with parked cars. RT392 27-1-1980 Z3 188? Bourke St route 96 RT393 27-1-1980 3MP tram Camberwell Route 72 at Gardiner level crossing RT394 28-1-1980 MMTB Bus 370, Leyland OPS1 on display RT395 28-1-1980 MAN Bus 103, on display showing Doncaster Depot Demonstrates the work of Robert Thomson in photography, collection and/or production of slidesAssembled album in a black presentation folder of 24 colour slides, collected or produced by Robert Thomson. A list of all photographs with details has been compiled. All rights reserved for all photos., melbourne, tramways, trams, tram 271, high st kew, trackworks, route 48, tram 504, tram 7, east burwood, tram 26, tram 255, north coburg, route 19, tram 37, park st st kilda, tram 121, bourke st, spencer st, tram 118, east preston, route 88, route 12, route 67, carnegie, tram 812, tram 67, buses, tram 965, truganini road, route 3, route 52, tram 787, tram 986, level crossings, glen huntly rd, matthews ave, tram 962, collins st, route 42, tram 188, route 72, gardiner -
 Melbourne Tram Museum
Album - Robert Thomson Slide Collection - box 17, 1999 to 2001
Photo - see pdf file for further information. Number Date Brief Description Box 17 RT396 Nov. 99 A 239 arriving Batman Ave Route 70 RT397 Nov 99 W7 1012 running Special, Clarendon St RT398 Nov 99 A 300, Port Melbourne, Mont Albert route 109 RT399 Nov 99 A 286 Port Melbourne line, route 109 RT400 Nov 99 Z3 223 Carlisle St St Kilda, route 69 – with destination set for return Kew Cotham Road RT401 Nov 99 W7 1005 Swanston St route 8 with Christmas decorations – route 8 RT402 Nov 99 Z3 140 Swanston St route 8 with Christmas decorations – route 11 RT403 Nov 99 Z3 144 Swanston and Bourke with “Give way to passengers ”sign – route 1 RT404 Nov 99 Z3s 144 and 196 Swanston St – with sign “Tram stop ahead” RT405 Nov 99 W6 977 Swanston St – route 8 and Z1 72 RT406 Nov 99 11W and City Circle SW5 723 – Spencer and Collins Sts RT407 Nov 99 SW6 960 University terminus, route 16 RT408 Nov 99 SW6 960 University terminus with Z2 108 and other trams RT409 Nov. 99 A 234 Wattle Park terminus, route 70 RT410 Nov 99 New track docklands with old shipping shed in the view. RT411 Nov 99 Flinders St extension Docklands new track RT412 Nov 99 A 255 route 109 Port Melbourne terminus with former station building RT413 Nov 99 SW6 954 Route 16, Ackland St terminus with a Z3 behind. RT414 Nov 99 Restraurant tram 442, Esplanade. RT 415 Nov 2000 Z27 and Z1 Balaclava Junction RT416 Nov 2000 A 278 route 109 Port Melbourne terminus with former station building RT417 Nov 2001 B2 2010 in Yarra livery, Bourke St at Spencer St RT418 Nov 2001 B2 2108 turning from Bourke into Spencer St (route 96) followed by another B2 2048? RT 419 Nov 2001 Z 80 and another two Zs in Swanston St RT420 Nov 2001 Z137 and other Z’s in Swanston St RT421 Nov 2001 Z82 Swanston st RT422 Nov 2001 Z3 169 Wests Road, West Maribyrnong terminus with another Z arriving. Route 57 RT423 Nov 2001 West Maribyrnong terminus board with Swanston Trams signage RT424 Nov 2001 Z3 172 route 82, Wests Road RT425 Nov 2001 A class Flinders St extension route 48 in Yarra Trams livery RT426 Nov 2001 11W Bourke St with MTOCco building in the background. Demonstrates the work of Robert Thomson in photography, collection and/or production of slidesAssembled album in a black presentation folder of 31 colour slides, collected or produced by Robert Thomson. A list of all photographs with details has been compiled. All rights reserved for all photos., melbourne, tramways, trams, tram 239, route 70, batman ave, tram 1012, clarendon st, tram 300, port melbourne, route 109, tram 223, tram 69, tram 1005, route 8, swanston st, tram 140, tram 144, tram 196, tram 977, tram 72, tram 11w, tram 723, city circle, tram 960, tram 108, tram 234, wattle park, docklands, trackwork, flinders st, tram 255, tram 954, tram 442, tram 27, tram 1, tram 278, tram 2010, tram 2108, tram 80, tram 137, tram 82, tram 169, wests road, west maribyrnong, swanston trams, tram 172, route 82, route 48, bourke st, mtoco -
 Melbourne Tram Museum
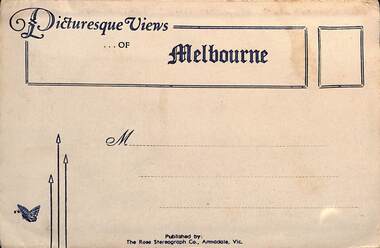
Postcard - Folder, Rose Stereograph Co, "Picturesque Views of Melbourne", mid 1930s
... Paper envelope folder with 6 photos on each side... and new attractions mid 1930s. Melbourne Photo folders Postcards ...Comprises 12 photos of Melbourne, mid to late 1930s. Produced by Rose Stereograph of Armadale. 1 - Botanical Gardens and Government House Melbourne. - 2 - The MacRobertson Fountain Melbourne - Both the Fountain and the Shrine of Remembrance were completed in 1934. Government House tower features in the background. Also note the absence of any mature trees. See reference - completed 1934. 3 - Flinders Street Railway Station with a "W" class tram in Flinders Street and "Y" class tram in Swanston Street in the view 4 - St Kilda Road Melbourne - Looking south with the Queen Victoria Gardens in the left of the photo. 5 - Collins Street Melbourne - Showing the Regent Theatre, Manchester Unity Building and the Town Hall. 6 - Princes Bridge and city Skyline Melbourne - Shows; Princes Bridge, Yarra River, Excursion Ferry, Princes Walk, Flinders Street Railway Station, the Nicholas and Manchester Unity Buildings in Swanston Street and the Sargood Gardner building in Flinders Street. 7 - The Conservatory, Fitzroy Gardens Melbourne - 8 - The Cathedral Corner Melbourne - shows; Young & Jacksons Hotel, St Paul's Cathedral, The Gas & Fuel building, Ball & Walsh Department store and The State Theatre plus several "w" class trams in Swanston Street. 9 - St Kilda Road Melbourne - Looking south from Nolan Street. Note trees still present at the entrance area to the Shrine of Remembrance. 10 - Looking across Princes Bridge to St Kilda Road Melbourne - Looking south from the roof of the Nicolas Building showing; Princes Bridge, St. Kilda Road, The Shrine of Remembrance and the Victoria Barracks in the distance. 11 - Parliament House Melbourne - in Spring Street 12 - Captain Cook's Cottage, Fitzroy Gardens Melbourne - Erected in the gardens in 1934. Yields information about Melbourne city views and new attractions mid 1930s. Paper envelope folder with 6 photos on each side of a foldout section titled "Picturesque Views of Melbourne" melbourne, photo folders, postcards -
 Bendigo Historical Society Inc.
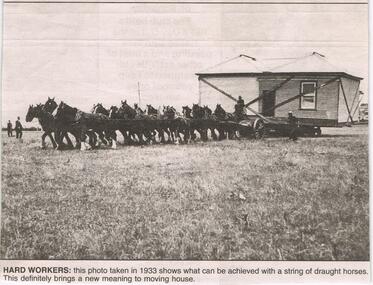
Newspaper - JENNY FOLEY COLLECTION: HARD WORKERS
BHS CollectionBendigo Advertiser ''The way we were'' from Monday, February 24, 2003. Hard workers: this photo taken in 1933 shows what can be achieved with a string of draught horses. This definitely brings a new meaning to moving house. The clip is in a folder.newspaper, bendigo advertiser, the way we were -
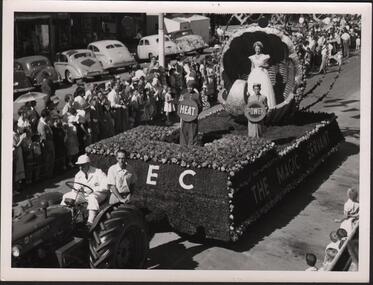 Bendigo Historical Society Inc.
Photograph - HANRO COLLECTION: A COLLECTION OF STREET EASTER PARADE PHOTOGRAPHS
BHS CollectionA Collection of Street Parade Photographs: Three photos all black and white. The first is of the S.E.C. float with *The Magic Servant* being pulled by a tractor with two men aboard. The float is of grass and flowers. Three children are on the float holding signs of Heat, Power, ?. A girl stands in a decorative shell. The street scene is lined with many people and cars of the day are parked at the road edge. The second is of the White Christmas Golden Square Mothers Club. A truck is decorated with a large Christmas tree with children dressed for winter. At the right is a sign*Bendigo Olympic Pool Fun is now open* on the balcony with a crowd of people. The streets are lined with spectators with flags flying above the parade. The Third is a float carrying a train with VR in flowers on the side and a floral display on the float. A crown of flowers at the front and the train on rails is featured. The train is No: B60 and is named the *Harold W. Clapp* All photos are of Bendigo's streetscape. All three photo's have two holes 7.4cm apart for housing in a folder. Box 116Aphotograph, streetscape, bendigo, bendigo. parade. golden square mothers club.