Showing 999 items matching "railway sign"
-
 Bendigo Historical Society Inc.
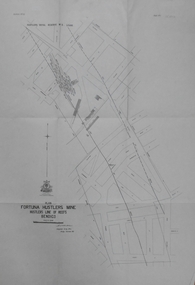
Map - FORTUNA HUSTLER'S MINE - PLAN OF FORTUNA HUSTLER'S MINE
Map and plan of the Fortuna Hustler's Mine on the Hustler's Line of Reefs. Bulletin No 33, Plate No 1. Plan gives depth of the different levels. Bendigo Railway Station is on the map and also a number of the streets. Carpenter Street is called Cemetery Road. Also on the Hustler's Line of Reef is the Summer Hill Shaft. Shown is the Hustler's Royal Reserve No 2 Lease. Map has the Geological Survey of Victoria crest. It is signed by H Whit ? an Underground Survey Office Bendigo, September 1913. map, fortuna hustler's mine, hustler's royal reserve no 2 lease, summer hill shaft, hustler's line of reef -
 Ringwood and District Historical Society
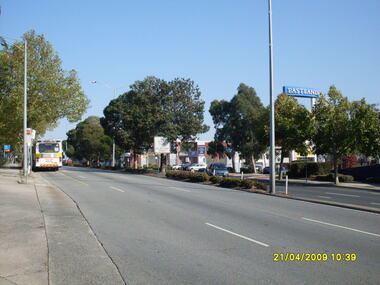
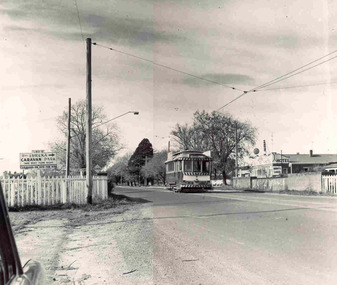
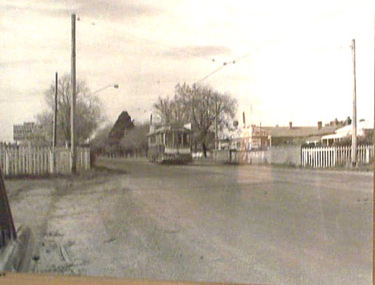
Photograph, West along Maroondah Highway, on 21 April 2009, showing Eastland sign and shops opposite the railway station
Ron Brons photographic study of Ringwood. -
 Melbourne Tram Museum
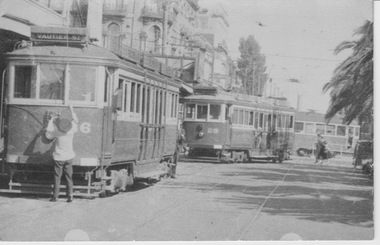
Photograph - VR tram 36, 29 at St Kilda Station, 12 January 1954
The photograph shows VR tram 36 at St Kilda Railway Station with the driver in summer jacket raising the rear trolley pole. The tram displays destination Vautier St, an intermediate terminus about three kms from the station. VR tram 29 is also arriving at the terminus with weather blinds and saloon sunshades raised to shunt over tram 36. Its destination sign is indistinct but appears to be Middle Brighton or Brighton Beach. This movement of multiple shunting was common in the afternoon peak. Up to three trams would depart simultaneously following the arrival of a busy electric train from the city. The first tram would travel limited express to Brighton Beach; the second tram also ran limited express to the intermediate terminus at Middle Brighton; the last tram stopped all stops to Vaitier St, then return to repeat the same run. Also in the photograph is a M&MTB W2 tram in Fitzroy St crossing the VR tracks bound for its Acland St, St Kilda Beach terminus.Yields information about St Kilda Railway Station VR 36, Vr 29, and tram operationsSepia photograph with note on the rear.In ink on the rear " 36,29, &a W2 at M&MTB/VR crossing St Kilda Stn 12-1-54 1035"vr tram, st kilda railway station, weather blinds, middle brighton, tram 36, tram 29, brighton beach, vautier st, limited express, intermediate terminus, m&mtb, w2, fitzroy st, acland st -
 Melbourne Tram Museum
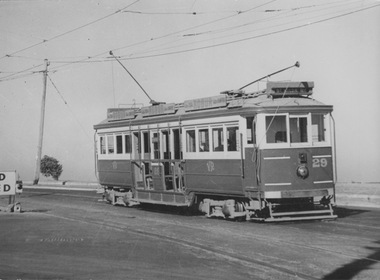
Photograph - VR tram 29 at Brighton Beach Baths terminus
Photograph shows bogie car VR tram 29 waiting on UP track with trolley pole raised, destination 'St Kilda Rly', driver's cab vacant, all windows closed and all off-side weather blinds open. Port Philip Bay is in the background and a partially obscured Road Closed sign is at the left of the photo. Yields information of Railways tramcar 34 and St Kilda Railway Station Black and white photograph with note on rear.In red biro: 'VR "Ricketty Kate" 29 Brighton Beach Baths Terminus Jan 58 D Print'victorian railways, vr tram 34, st kilda railway station, fitzroy st, m&mtb -
 Ballarat Tramway Museum
Photograph - Ballarat tram 31, Victoria St, Buninyong Railway bridge, John Phillips, 1968
Photo of Ballarat No. 31, just after leaving Victoria St. terminus, late 1960's or early 1970s crossing over the Eureka siding railway bridge. Taken by John Phillips. Tram has destination of Gardens via Sturt St. West, Twin Lakes advertisement on the front. In the background is Meagher's Hotel with Abbots Lager and Victoria Bitter sign. On the bridge is graffiti "Smash US Imperialism". On the Ballarat side of the bridge is a sign directing travellers to the "Eureka Caravan Park". Yields information about the vicinity of the Victoria St terminus and the bridge over the Buninyong Railway line.Black and White photograph mounted on heavy cardboard backing. Has 6 Velcro dots on the rear and marks where mounting devices have been removed on the rear. Note: image scanned in two runs through a scanner, resulting in the shading in the image file. .1 - Second copy with 4 black Velcro squares and 4 dots on rear - wider view on the right-hand side with an additional pole - not scanned.trams, tramways, victoria st, eureka, twin lakes, tram 31 -
 Ballarat Tramway Museum
Photograph - Ballarat tram 31, Victoria St, Buninyong Railway bridge, John Phillips, 1968
Black and white photo of No. 31, inbound from Victoria St. crossing the Buninyong railway overbridge. Meaghers Hotel in the background and an ad for Eureka Caravan Park. No cars on the road. 'Smash Imperialism' graffiti on bridge beam. Tram fitted with lights, a small number over the headlight, and a long Twin Lakes sign under the headlight. See item 2015 for another print.Yields information about the vicinity of the Victoria St terminus and the bridge over the Buninyong Railway line.Black and white photograph - laminated.trams, tramways, ballarat, victoria st -
 Ballarat Tramway Museum
Photograph - Digital Image - View from Town Hall - Sturt and Lydiard Sts, Victorian Railways (VR), 11/1947
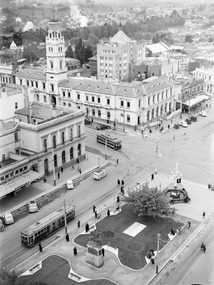
Photograph from the Town Hall clock tower overlooking the intersection of Sturt St and Lydiard St Nth with tram 35 at the City tram stop and most likely tram 19, turning from Sturt into Lydiard St Nth. From a Victorian Railways photograph dated November 1947. In the view are - Edwards Beauty Salon, Racey's cafe, the Bank of Australasia, the mining exchange advertising Plume and Buick motor cars, the Post Office, the Police building, Johnson's shoes & boots, and E White. Also in the view are signs for Paterson, Lang & Bruce Wharehouse men, and The Mail and The Echo newspapers.Yields information about the intersection of Sturt and Lydiard Sts in Nov. 1947.Digital image of a Victorian Railways photograph held by the State Library of Victoria.vr photos, ballarat, sturt st, lydiard st, tram 35, tram 19 -
 Flagstaff Hill Maritime Museum and Village
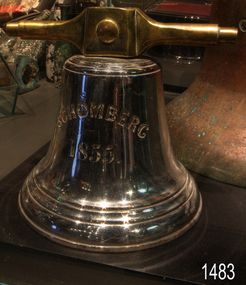
Functional object - Bell, Schomberg 1855, Before 1855
This bell was the smaller of the two bells rescued by the crew of the Schomberg when it was wrecked in 1855. All of the crew from the Schomberg wreck survived. They carried the two ship’s bells with them as they made their way along the coast, eventually arriving at the home of settler John Manning, who lived at Hopkins Point near Warrnambool. Manning acquired the Schomberg bells, presenting them to two Warrnambool churches: the smaller one to St Joseph’s Catholic Church and the larger bell to St John’s Presbyterian church. The small bell at St Joseph’s developed a crack after about a year and could no longer be used. Thomas Manifold imported a new bell for that church, and the cracked bell was stored at his farm. The property was sold years later to John Logan, who donated the discarded bell to the Warrnambool Museum when it first opened in 1886. The Curator, Joseph Archibald, displayed the bell in the entry. In 1975, the bell was transferred from the Warrnambool Art Gallery to Flagstaff Hill. THE SAILING SHIP, SCHOMBERG: - When the Schomberg was launched in 1855, she was considered the "Noblest” ship that ever floated on the water. Schomberg's owners, the Black Ball Line, had commissioned the ship for their fleet of passenger liners. She was built by Alexander Hall of Aberdeen for £43,103 and constructed with 3 skins. One planked fore and aft and two diagonally planked, fastened together with screw-threaded trunnels (wooden rails). Her First Class accommodation was simply luxurious with velvet pile carpets, large mirrors, rosewood, birds-eye maple and mahogany timbers throughout, soft furnishings of satin damask, and an oak-lined library with a piano. Overall, she had accommodation for 1000 passengers. At the launch, the Schomberg's 34-year-old master, Captain 'Bully' Forbes, had promised to reach Melbourne in sixty days, stating, "with or without the help of God." Captain James Nicol Forbes was born in Aberdeen in 1821 and rose to fame with his record-breaking voyages on the famous Black Ball Line ships, Marco Polo and Lightning. In 1852, on the ship Marco Polo, he made the record passage from London to Melbourne in 68 days. Unfortunately, there were 53 deaths on the voyage, but the great news was of the record passage by Captain Forbes. In 1854, he took the clipper “Lightning” to Melbourne in 76 days and back in 63 days; this record was never beaten by a sailing ship. He often drove his crew and ship to breaking point to beat his previous records. He cared little for the comfort of the passengers. On this, Schomberg's maiden voyage, he was determined to break existing records. Schomberg departed Liverpool on her maiden voyage on 6th October 1855, flying a sign that read "Sixty Days to Melbourne". She departed with 430 passengers and 3000 tons of cargo, including iron rails and equipment intended to build the Melbourne to Geelong Railway and a bridge over the Yarra from Melbourne to Hawthorn. She also carried a cow for fresh milk, pens for fowls and pigs, and 90,000 gallons of water for washing and drinking. She also carried 17,000 letters and 31,800 newspapers. The ship and cargo were insured for $300,000, a fortune for the time. The winds were poor as she sailed across the equator, slowing Schomberg's journey considerably. The land was first sighted on Christmas Day, at Cape Bridgewater near Portland. Captain Forbes followed the coastline towards Melbourne. Forbes was said to be playing cards when called by the third mate, Henry Keen, who reported land about 3 miles off. Due in large part to the captain's regarding a card game as more important than his ship, it eventually ran aground on a sand spit near Curdie's Inlet (about 56 km west of Cape Otway) on 26th December 1855, 78 days after leaving Liverpool. The sand spit and the currents were not marked on Forbes's map. Overnight, the crew launched a lifeboat to find a safe place to land the ship’s passengers. The scouting party returned to Schomberg and advised Forbes that it was best to wait until morning because the rough seas could easily overturn the small lifeboats. The ship’s Chief Officer spotted the SS Queen at dawn and signalled the steamer. The master of the Queen approached the stranded vessel and all of Schomberg’s passengers and crew disembarked safely. The Black Ball Line's Melbourne agent sent a steamer to retrieve the passengers' baggage from the Schomberg. Other steamers helped unload her cargo until the weather changed and prevented the salvage teams from accessing the ship. Later, one plunderer found a case of Wellington boots, but alas, all were for the left foot. Local merchants Manifold & Bostock bought the wreck and cargo but did not attempt to salvage the cargo still on board the ship. They eventually sold it on to a Melbourne businessman and two seafarers. In 186,4, after two of the men drowned when they tried to reach Schomberg, salvage efforts were abandoned. In 1870, nearly 15 years after the wreck, parts of the Schomberg had washed ashore on the south island of New Zealand. The wreck now lies in almost 9 meters of water, and although the woodwork is mostly disintegrated, the shape of the ship can still be determined due to the remaining railway irons, girders and the ship’s frame. A variety of goods and materials can be seen scattered about nearby.The bell is particularly significant in that along with other items from the wreck helped in part to having the legislation changed to protect shipwrecks, with far tighter controls being employed to oversee the salvaging of wreck sites. This bell forms part of the Schomberg collection at Flagstaff Hill maritime museum. The collection as a whole is of historical and archaeological significance at a State level. Flagstaff Hill’s collection of artefacts from the Schomberg is also significant for its association with the Victorian Heritage Registered Schomberg shipwreck (VHR S 612). The collection is of additional significance because of the relationship between the objects salvaged, as together they help us to interpret the story of the Schomberg. The collection as a whole is historically significant for representing aspects of Victoria's maritime history and its potential to interpret social and historical themes from society at the time of the wreck. A small ship’s bell. The bell bears the ship’s name and year of construction on one side and the name and address of the ship’s builders on the other. These details are deeply engraved into the metal and formed in bold, upper-case lettering. The bell has two bell stands, a left and a right side. Both stands have an Iron pipe made into an inverted ‘Y’ shape with a hole made in the single length and feet attached to a rectangular metal plate at the other two ends. Feet are bolted into a timber base that has a hole drilled through the centre for mounting. Bell's front; “SCHOMBERG” with “1855” below. Bell's back “HALL & SONS (crack splits letter “N”) / BUILDERS (in italics) / ABERDEEN” (crack splits letter “B”).flagstaff hill, flagstaff hill maritime museum and village, warrnambool, maritime museum, maritime village, great ocean road, shipwreck coast, schomberg, silver plated bell, mess bell, bell stands, captain ‘bully’ forbes, alexander hall and son, james baines and company, liverpool’s black ball line, bell, schomberg bell, ship's bell, small bell, st joseph's church, briggs marine, john manning, john logan, warrnambool museum -
 Flagstaff Hill Maritime Museum and Village
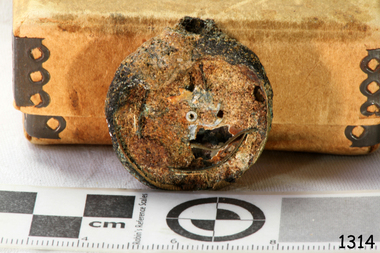
Instrument - Fob Watch, ca 1878
This lady's dainty pocket watch or fob watch was found at Loch Ard Gorge, where the Loch Ard was wrecked in 1878, and is said to be from the Loch Ard. The watch is recognisable by its bump on the edge, which would have been the winder. The watch face has broken away, revealing the spring workings inside. It is coated with encrustations and is in poor, fragile condition, but was likely to originally be a gold watch. Two documents and a newspaper clipping about the story of the Loch Ard were donated with the watch. They are all in a strong cardboard box with reinforced corners on the base and lid. HISTORY OF THE LOCH ARD: - The Loch Ard belonged to the famous Loch Line, which sailed many ships from England to Australia. Built in Glasgow by Barclay, Curdle and Co. in 1873, the Loch Ard was a three-masted square-rigged iron sailing ship. It measured 262ft 7" (79.87m) in length, 38ft (11.58m) in width, 23ft (7m) in depth and had a gross tonnage of 1693 tons. The Loch Ard's main mast measured a massive 150ft (45.7m) in height. The Loch Ard had previously made three trips to Australia and one trip to Calcutta before its final voyage. The ship left England on March 2, 1878, under the command of Captain Gibbs, a newly married, 29-year-old. It was bound for Melbourne with a crew of 37, plus 17 passengers and a load of cargo. The general cargo reflected the affluence of Melbourne at the time. On board were straw hats, umbrellas, perfumes, clay pipes, pianos, clocks, confectionery, linen and candles, as well as a heavier load of railway irons, cement, lead and copper. There were items included that were intended for display in the Melbourne International Exhibition in 1880. The voyage to Port Phillip was long but uneventful. At 3 am on June 1, 1878, Captain Gibbs was expecting to see land, and the passengers were becoming excited as they prepared to view their new homeland in the early morning. But the Loch Ard was running into a fog which greatly reduced visibility. Captain Gibbs was becoming anxious as there was no sign of land or the Cape Otway lighthouse. At 4 am, the fog lifted. A man aloft announced that he could see breakers. The sheer cliffs of Victoria's west coast came into view, and Captain Gibbs realised that the ship was much closer to them than expected. He ordered as much sail to be set as time would permit and then attempted to steer the vessel out to sea. On coming head-on into the wind, the ship lost momentum, the sails fell limp and the Loch Ard's bow swung back. Gibbs then ordered the anchors to be released in an attempt to hold their position. The anchors sank some 50 fathoms but did not hold. By this time, the Loch Ard was among the breakers, and the tall cliffs of Mutton Bird Island rose behind the ship. Just half a mile from the coast, the ship's bow was suddenly pulled around by the anchor. The captain tried to tack out to sea, but the ship struck a reef at the base of Mutton Bird Island, near Port Campbell. Waves broke over the ship and the top deck was loosened from the hull. The masts and rigging came crashing down knocking passengers and crew overboard. When a lifeboat was finally launched, it crashed into the side of the Loch Ard and capsized. Tom Pearce, who had launched the boat, managed to cling to its overturned hull and shelter beneath it. He drifted out to sea and then, on the flood tide, came into what is now known as Loch Ard Gorge. He swam to shore, bruised and dazed, and found a cave in which to shelter. Some of the crew stayed below deck to shelter from the falling rigging but drowned when the ship slipped off the reef into deeper water. Eva Carmichael had raced onto the deck to find out what was happening, only to be confronted by towering cliffs looming above the stricken ship. In all the chaos, Captain Gibbs grabbed Eva and said, "If you are saved, Eva, let my dear wife know that I died like a sailor". That was the last Eva Carmichael saw of the captain. She was swept off the ship by a huge wave. Eva saw Tom Pearce on a small rocky beach and yelled to attract his attention. He dived in and swam to the exhausted woman and dragged her to shore. He took her to the cave and used a bottle from a case of brandy that had washed up on the beach to revive the unconscious woman. A few hours later, Tom scaled a cliff in search of help. He followed hoof prints and came by chance upon two men from nearby Glenample Station, three and a half miles away. In a state of exhaustion, he told the men of the tragedy. Tom returned to the gorge while the two men rode back to the station to get help. By the time they reached Loch Ard Gorge, it was cold and dark. The two shipwreck survivors were taken to Glenample Station to recover. Eva stayed at the station for six weeks before returning to Ireland, this time by steamship. In Melbourne, Tom Pearce received a hero's welcome. He was presented with the first gold medal of the Royal Humane Society of Victoria and a £1000 cheque from the Victorian Government. Concerts were performed to honour the young man's bravery and to raise money for those who lost family in the Loch Ard disaster. Of the 54 crew members and passengers on board, only two survived: the apprentice, Tom Pearce and the young woman passenger, Eva Carmichael, who lost all of her family in the tragedy. Ten days after the Loch Ard tragedy, salvage rights to the wreck were sold at auction for £2,120. Cargo valued at £3,000 was salvaged and placed on the beach, but most washed back into the sea when another storm developed. The wreck of the Loch Ard still lies at the base of Mutton Bird Island. Much of the cargo has now been salvaged, and some was washed up into what is now known as Loch Ard Gorge. Cargo and artefacts have been illegally salvaged over many years before protective legislation was introduced. One of the most unlikely pieces of cargo to have survived the shipwreck was a Minton porcelain peacock, one of only nine in the world. The peacock was destined for the Melbourne International Exhibition in 1880. It had been well packed, which gave it adequate protection during the violent storm. Today, the Minton peacock can be seen at the Flagstaff Hill Maritime Museum in Warrnambool. From Australia's most dramatic shipwreck, it has now become Australia's most valuable shipwreck artefact and is one of the very few 'objects' on the Victorian State Heritage Register.This little fob watch is significant in its own right as an example of a timepiece from the 1870s. It is also significant for its association with the historical, tragic wreck of the Loch Ard and with Flagstaff Hill’s collection of artefacts from the Loch Ard, one of the largest collections of artefacts from this shipwreck in Victoria. It is significant for its association with the shipwreck, which is on the Victorian Heritage Register (VHR S417). The collection is significant because of the relationship between the objects, as together they have a high potential to interpret the story of the Loch Ard. The Loch Ard collection is archaeologically significant as the remains of a large international passenger and cargo ship. The Loch Ard collection is historically significant for representing aspects of Victoria’s shipping history and its potential to interpret sub-theme 1.5 of Victoria’s Framework of Historical Themes (living with natural processes). Ladies' fob watch, thought to be of gold but is now covered in encrustation. A bump on the edge would be the winding mechanism for the watch. A small section has broken away on the reverse, and an engraved surface can be seen. Face and hands are missing, revealing the spring workings inside. Donated with the watch were two documents and a newspaper cutting about the story of the shipwreck of the Loch Ard. They are all in a strong cardboard box with reinforced corners on the base and lid. Found at Loch Ard Gorge and said to have been from the Loch Ard.flagstaff hill, warrnambool, shipwrecked coast, flagstaff hill maritime museum, maritime museum, shipwreck coast, flagstaff hill maritime village, great ocean road, loch line, loch ard, captain gibbs, eva carmichael, tom pearce, glenample station, mutton bird island, loch ard gorge, ladies fob watch, gold watch, fob watch, pocket watch, horology, accessory, time keeping, scientific instrument, ladies' watch, ladies' pocket watch