Showing 1483 items matching "terminus"
-
 Ballarat Tramway Museum
Photograph - Black & White Photograph/s, Wal Jack, 10/04/1950 12:00:00 AM
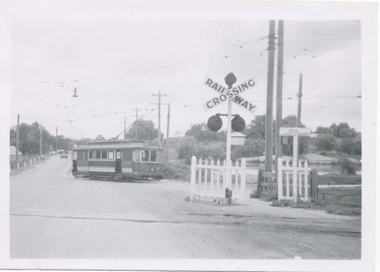
Black and White print contained within the Wal Jack Bendigo and Geelong Album, see Reg Item 5003 for more details. Photo of No. 21 departing from the North Bendigo terminus, 10-4-1950, turning in to Thunder St. Has the level crossing flashing lights in the foreground. i1 - scan of print in the album i2 - rear of image i3 - scan of negative at 3200dpi added 6/6/2020. On rear in ink "No. 21 at North Bendigo, Thunder St, level crossing 10-4-50" and in bottom right hand corner "W. Jack".trams, tramways, bendigo, north bendigo, thunder st, level crossings, tram 21 -
 Ballarat Tramway Museum
Newspaper, The Courier Ballarat, "A long way from home", 24/09/1971 12:00:00 AM
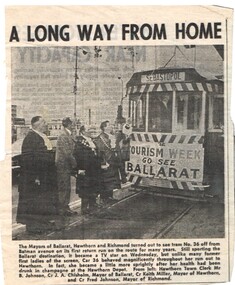
Yields information about the visit of Ballarat Tram 36 to Melbourne after the closure of the Ballarat SEC system and its use for a celebration and visit to Hawthorn Depot.Newspaper cutting from The Courier, possibly the Sat Sept. 24, 1971, with the title "A long way from home", with a photo of Ballarat No. 36 at the Batman Ave terminus. The cutting refers to its operation and TV start on the previous Wednesday. Photo has the tram with Hawthorn Town Clerk Mr. B. Johnson, Cr. Chisholm, Cr Keith Miller Mayor of Hawthorn and Cr. Fred Johnson, Mayor of Richmond. Tramcar No. 36hawthorn, tourism, batman ave -
 Ballarat Tramway Museum
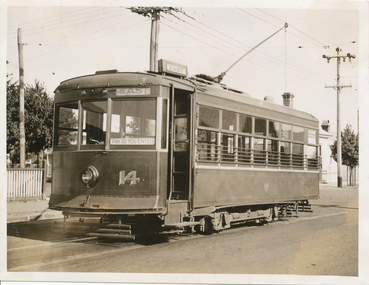
Photograph - Black & White Photograph/s, late 1930's or early 1940's
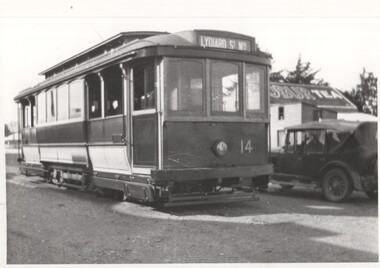
Yields information about the appearance of tram No. 14, during the late 1930's or early 1940's at the Sebastopol tram terminus and the buildings in the background.Black and white photograph of Ballarat trams 14 at the Sebastopol tram terminus, during the late 1930's or early 1940's. The tram has the destination of Lydiard St North. A motor car with a soft roof is parked alongside the tram. In the background is a building with a Robur Tea roof advertisement. Note the tram step is folded up, pay as you enter sign and the tram has a lower cream painted panel. On rear has an Ian Barkla Collection stamp, giving location as Ballarat, Neg. No.1650, SEC Tram No. 14 written in black felt pen.trams, tramways, lydiard st nth, tram 14 -
 Ballarat Tramway Museum
Photograph - Black & White Photograph/s, 1948?
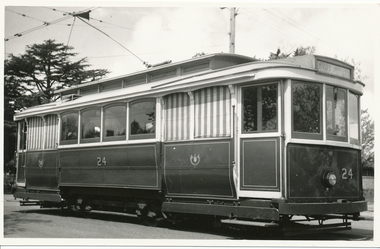
Yields information about the appearance of SEC tram No. 24 in late 1940's - the best photograph so far of this tram.Black and white photograph of the Ballarat 24 - 3/4 front on view, late 1948? Appears to have been photographed at Victoria St terminus. Tram has the destination of Gardens via Sturt St. Note the pan in the overhead to assist the trolley pole positioning at night. Negative of photograph held. Printed on Agfa Bravira paper. Negative scanned at hi res 4/6/2020 and image updated added as i4.In pencil, "Ballarat late 1940's (late 1940's crossed out) and 1948? written in and in bottom left hand corner "ex M?"trams, tramways, victoria st, overhead, tram 24 -
 Ballarat Tramway Museum
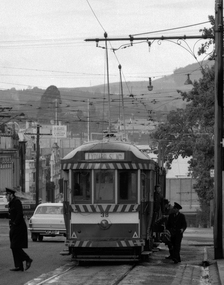
Photograph - Digital image, Peter Bruce, "No. 38 taken at 1015", 1970s
Yields information about Sturt St City terminus and passengers and crews getting on and off the tram, after changing crews.Digital image, black and white, of No. 38 at the city terminus in Sturt St, with passengers getting off the tram and crews starting to walk across the road, probably after a change over of crews. There is another tram in front of No. 38. No. 38 has the destination of Lydiard St North. Photo taken by Peter Bruce 1970's and 1971, prior to the closure of the Ballarat tramway system. Peter's Title of image: "No. 38 taken at 1015"trams, tramways, crews, sturt st, tram 38 -
 Ballarat Tramway Museum
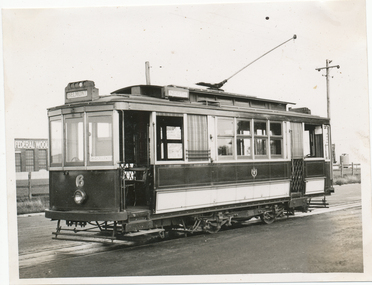
Photograph - Black & White Photograph/s, Wal Jack, 1940
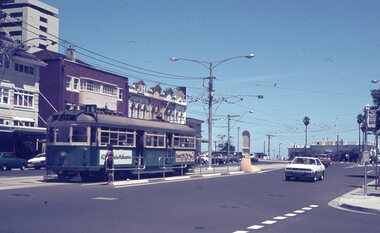
Black and White print contained within the Wal Jack Bendigo and Geelong Album, see Reg Item 5003 for more details. Photo of Geelong No. 6 at the North terminus. The tram has the destination of Belmont. In the background are the Federal Wool stores. Wal's album notes provides the date of 1940. i1 - scan of print in the album i2 - rear of image i3 - scan of negative at 3200dpi added 6/6/2020. trams, tramways, geelong, north, tram 6 -
 City of Greater Bendigo - Civic Collection
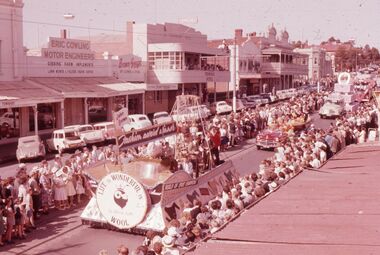
Slide - Series of 16 slides taken at the 1962 Bendigo Easter Parade, Sandner Family, Easter Float 1962, 1962
The first Bendigo Easter Fair was held on April 10th and 11th 1871 and remains one of Australia’s longest running annual community events taking place over the Easter long weekend. The Bendigo Easter Fair features events throughout the City of Greater Bendigo and celebrations culminate in a parade through the streets on Easter Sunday. The parade features a variety of commercial and community groups. In 1892, large processional dragons became an integral part of the annual parade. The three principal golden dragons are Loong (1892–1970), Sun Loong (1970–2019) and Dai Gum Loong (2019–present), housed at the Golden Dragon Museum in Bendigo. The Bendigo Easter Fair Society is custodian of the Bendigo Easter Fair and continues to support the City of Greater Bendigo’s largest festival. Series of 16 colour 35mm Ektachrome slide transparency of parade floats and community groups as they pass along Mitchel Street. Images have been taken from a second story vantage point, diagonally opposite the Terminus Hotel which stood at 126 Mitchell Street Bendigo. Floats include S.E.C., Post Master Generals Office, Greyhound Racing, YMCA, the wool industry and Bendigo ALP Women's Association. sandner collection, mayor sandner, city of greater bendigo easter fair, city of greater bendigo tourism, city of greater bendigo events -
 Melbourne Tram Museum
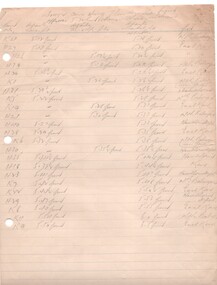
Document - Personal Papers, Charles Craig, "Town cars along Flinders St from Approx 5.20 pm, c1960
Handwritten in pencil notes titled "Town cars along Flinders St from Approx 5.20 pm" - no date. Gives run number, time ex Lonsdale St, Spencer and Flinders St and Market St. Not dated. Gives schedule times and destination. C1960, shows Hawthorn Depot as a terminus. Second sheet appears to be draft sheet. Prepared on ruled foolscap sheet with four punch holes on the right hand side.trams, tramways, flinders st, schedules, timetables, hawthorn depot -
 Melbourne Tram Museum
Negative, Wal Jack collection, Dec. 1939
Negative of a photograph of 558 and grip at the Nicholson St terminus, December 1939. Has the outside the Palace Theatre 790 Nicholson St Fitzroy in the view and the Railway Hotel 800 Nicholson St Fitzroy. Tram has the destination of Spencer St. and an advert for Apollo Theatre on the side of the grip car. The Theatre has "Rose of Washington Square" showing that night. The associated sho9p is selling Nestles Mil, Swallows Ice cream.trams, tramways, cable trams, nicholson st, fitzroy, hotels, theatres, tram 558 -
 Melbourne Tram Museum
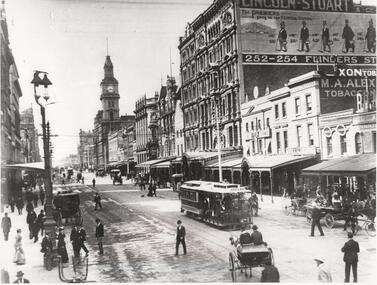
Photograph - Black and White photograph, c1900
Black and white photograph of Elizabeth St from Flinders St, looking north. Has a cable set arriving at the terminus. Has the Post Office tower in the view along with the M. A. Alexander Tobacconist. Has a large advert to Lincoln Stuart at 252-254 Flinders St. who were clothing manufacturers. Has an advert for various styles of clothes, advertising various styles suitable for "The Premiers going to the Federal Capital"in ink in the corner "Latrobe"trams, tramways, cable trams, elizabeth st, post office -
 Melbourne Tram Museum
Negative, Wal Jack, 24/07/1944 12:00:00 AM
Black and white negative, by Wal Jack, of W2 638 (Route 42) in Whitehorse Road crossing Burke Road, Camberwell, with SW6 883 (City Route 7) at the terminus. Note the curves in front of the tram which allowed for cars to turn from Whitehorse Road Westbound into Burke Road. Note the conductor standing in the doorway. Photo dated 24-7-1944 in the Wal Jack album along with details of the location and the tramcar.trams, tramways, balwyn, whitehorse road, burke road, w2 class, sw6 class, tram 638, tram 883 -
 Melbourne Tram Museum
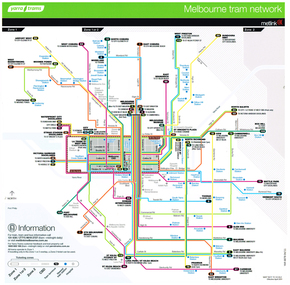
Poster, Yarra Trams, "Melbourne Tram Network", Apr. 2011
Full colour poster printed on a vinyl plasticized based sheet titled "Melbourne Tram Network. Shows a diagrammatic layout of the Melbourne tram system, shows zones, CBD, tram terminuses, train station and hospitals. Has the Yarra Trams and Metlink logos. Provides contact information including a website. Dated Effective April 2011. See also Reg item 721 for Jan. 2014 version. 2 copies held.trams, tramways, yarra trams, metlink, maps -
 Ballarat Tramway Museum
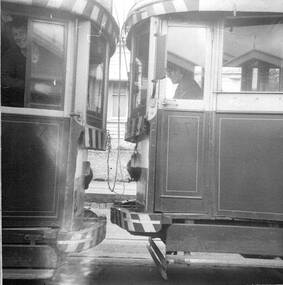
Photograph - Series of 6 black and white photographs of Ballarat Trams, Ellen Butland, 1970 and 1971
.1 - Close up photo of a single trucker and a bogie tram showing difference in bumper heights. .2 - Photo showing the front of a single trucker (No. 26?) with the motorman leaning out the small window with a cigarette in hand. Photo dated 1970. .3 - No. 34 parked on "0" road. Photo dated 1971. .4 - Similar to .2, driver looking at photographer. .5 - Bogie tram parked on "0" road, photo dated 1970. .6 - No. 27 at Lydiard St North terminus - photo dated 1970. Has a strong association with a Melbourne tram driver who assembled the scrap book and series of photos of Ballarat trams at the time of closure. Yields information about the tram operations.Set of six black and white photographs contained with Reg item 5988, a Stamford Kiwi School Scrap Book - card covers, 23 sheets, spiral bound, titled "Ballarat", prepared by Ellen Butland of Auckland following the closure of the SEC Ballarat Tramway system.closure, trams, tramways, ballarat, lydiard st nth, tram 34, tram 27, depot, crews, motormen -
 Melbourne Tram Museum
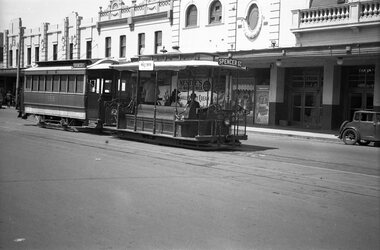
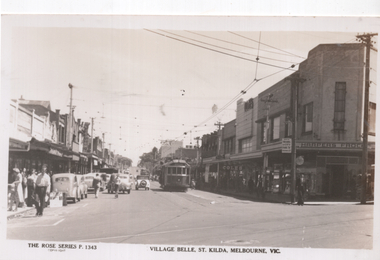
Postcard, Rose Stereograph Co, "Village Belle, St Kilda, Melbourne Vic", early 1950s
Rose Series postcard No. P 1343, titled "Village Belle, St Kilda, Melbourne Vic" showing W2 568 (Moreland Route 15) at the St Kilda Beach terminus in Ackland St. Another W2 is further behind. A uniformed tramway employee is walking across the road, underneath a MMTB sign advising of Trams to the City and a Fare of 5d and child fares of 2d. In the background is the Coles store and Harpers Frocks. In the foreground are tram tracks for the Victorian Railways St. Kilda to Brighton Beach line in Buckly Street.Yields information about Ackland St, St Kilda early 1950s.Postcard - printed real photograph with Rose Stereograph Co. name on the rear.trams, tramways, village belle, ackland st, route 15, st kilda, w2 class, tram 568 -
 Ballarat Tramway Museum
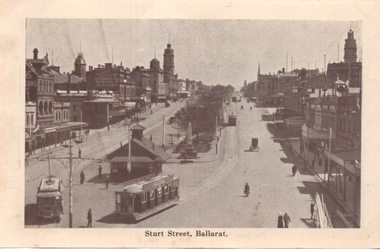
Photograph - Illustration, Rose Stereograph Co, "Sturt Street, Ballarat", c1913
Illustration or photograph looking at the Grenville St tram terminus. One of the trams is a Sebastopol-type tram No 22. Has the large shelter in the background and another tram in the view. Taken c1913, following the introduction of the Sebastopol-type tram. From a Rose Series postcard - Rose Number 1710. Note the Mechanics Institute advertising sign on their building advertising the institute rather than a company. The 8-hour monument at the end of the central median can be seen. On the rear is an illustration of Shoppee's Square in the median strip. See item 4083 for a postcard.Yields information about the operation of ESCo trams in Sturt St and in particular the Sebastopol type.Black and white Illustration cut from a journaltramways, trams, sturt st, esco, grenville st, sebastopol type, tram 22, shoppee's square -
 Ballarat Tramway Museum
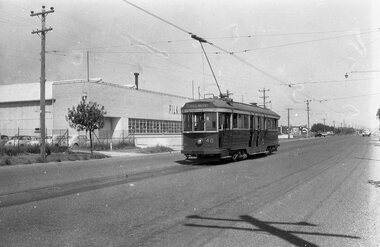
Negative - Tram 40 at the North terminus, Laurie Gallop, early 1956
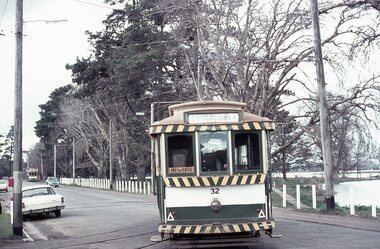
Photo shows Geelong tram 40 at the North Terminus, with the Pilkington glass factory behind. The tram has the destination of Belmont. One of a set of photos was taken between 15/2/1956 and 3/3/1956 when services operated only between Belmont and North before the final closure of the Belmont route on 25/31956 and that bogie tram 31 is not shown on the board, having gone to Ballarat on 15/2/1956 - see item 5554. See item 8213 for an article on the Geelong system by Keith Kings. Yields information about the Geelong operations toward the closure of the tram system and the North terminus.Black and white Negative - 120 sizetramways, geelong, geelong depot, tram 40, north -
 Melbourne Tram Museum
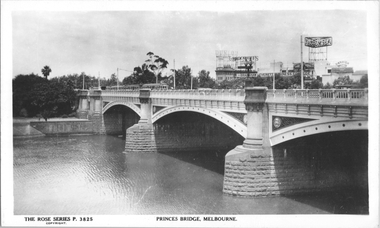
Postcard, Rose Stereograph Co, Princes Bridge Melbourne", mid to late 1930s
Rose Series postcard No. P 3825, titled Princes Bridge Melbourne", showing at least four trams, including some W2 class cars on the bridge. The YMCA building with the "Dunlop Weftless Cord Tyre" sign on top. The "Aspro" sign on top of the Aspro Buildings in City Road. The "Garrick Theatre" sign on the roof of the theater in Aikman Street plus, advertisements for: "Brockhoff Biscuits", "Berger Paints" and "Bradshaw & Everett Business College". The photo is taken from Batman Avenue tram terminus looking southwest.Yields information about Princes Bridge, in the middle to late 1930sPostcard - printed real photograph with Rose Stereograph Co. name on the rear.trams, princes bridge, st kilda road, tramways, advertisements, w2 class, yarra river -
 Ballarat Tramway Museum
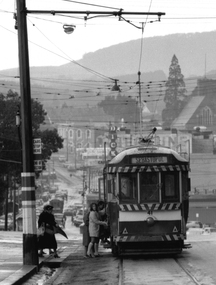
Slide - 35mm slide/s - set of 20, Noel Simons, 21/05/1971 12:00:00 AM
Set of 20 transparencies taken on 21/5/1971 on Kodak mounts. 1197.1 - Bendigo No. 5 en route to Eaglehawk at Creeth St Long Gully. Tram has a SEC roof ad and Cinzano roof ad. 1197.2 - No 5 approaching Needle Loop between Long Gully and California Gully. On left hand side is the City of Bendigo sign, indicating city boundary. 1197.3 - As for 1197.2 but actually entering loop. Photo taken after tram has passed photographer. 1197.4 - No. 26 bound for Eaglehawk descending the railway bridge near Eaglehawk, at Jobs Gully. 1197.5 - as for 1197.4, but after crossing bridge, now ascending a hill. Photo taken after tram has passed photographer. 1197.6 - No. 26 climbing High St. hill Eaglehawk, nearing end of Double track, bound for Quarry Hill. Shows centre of the road poles. 1197.7 - As for 1197.6, with tram entering single track section. Photo taken after tram has passed photographer. Has a BP service station in the background. 1197.8 - No. 26 (bound for Quarry Hill) crossing No. 17 (Eaglehawk) at Job's Gully Loop. 1197.9 - No. 17 climbing railway bridge at Job's Gully, en route to Eaglehawk. Photo taken after tram has passed photographer. 1197.10 - No.26 bound for Quarry Hill, leaving Long Gully Loop? Has the Creeth St. church in l197.l in the far background. Photo taken after tram has passed photographer. 1197.11 - Tramway Point work at the northern end of Long Gully Loop. 1197.12 - No. 17 en route for Quarry Hill turning into View St. from Bamard St. Tram has SEC roof ads "Everything fine in my all electric Kitchen' and 'Electric Cooking is Matchless'. 1197.13 - as for 1197.12, but tram has turned into View St and about to enter the double line track. Photo taken after tram has passed photographer. 1197.14 - No. 21 enters Nolan St after turning from MacRae St. en route to Bendigo. Note sign on its own post noting tram turns "Beware Tram Turns" and stop sign on adjacent pole "Trams stop on Request". No. 21 has two SEC roof ads. 1197.15 - No. 21 in Nolan St. after turning from Bridge St. (White Hills Road). Note signal light for Bridge St. loop on pole corner of street. Photo taken after tram has passed photographer. 1197.16 - No. 2 bound for Eaglehawk at unknown location. 1197.17 - Tram stop sign on a pole "CARS STOP BY REQUEST" 1197.18 - No. 5 in Carpenter St.? en route to Quarry Hill. 1197.19 - No. 28 has just arrive at Golden Square terminus, passengers are disembarking and the trolley pole is being turned. Golden Square Hotel in the background. 1197.20 - No. 28 at Golden Square terminus. Has a "Nothing beats Briquettes for hear roof ad. Information written on in black ink and date stamped on purple ink. 1197.1 - "No. 5 at Creeth St. Long Gully" 1197.2 - "No. 5 approaching Needle Loop between Long Gully and California Gully" 1197.3 - "No. 5 at Needle Loop between Long Gully and California Gully" 1197.4 - "No. 26 crossing railway bridge at Job's Gully near Eaglehawk" 1197.5 - "No. 26 just after crossing railway bridge at Job's Gully near Eaglehawk/ 1197.6 - "No. 26 in High St. Eaglehawk" 1197.7 - "No. 26 at end of double track in High St. Eaglehawk" 1197.8 - "Nos. 26 and 17 crossing at Job's Gully Loop" 1197.9 - "No. 17 crossing railway bridge at Job's Gully near Eaglehawk". 1197.10 - "No. 26 at Long Gully" 1197.11 - 'Northern end of points at Long Gully Loop". 1197.12 - "No. 17 turning into View St. from Bamard St. Bendigo". 1197.13 -'No. 17 at beginning of double track in View St. after leaving Bamard St. Bendigo. 1197.14 - "No. 21 enters Nolan St. from MacRae St. Bendigo." 1197.15 - "No. 21 in Nolan St. Bendigo just after leaving White Hills Road." 1197.16 - "No. 2" 1197.18 - "No. 5" 1197.19 - "Birney car No. 28 at Golden Square Terminus" 1197.20 "Birney car No. 28 at Golden Square Terminus" tramways, trams, bendigo, long gully, railway bridge, jobs gully, trackwork, nolan st, quarry hill, tram stops, golden square, tram 2, tram 5, tram 17, tram 21, tram 26, tram 28 -
 Melbourne Tram Museum
Album - Robert Thomson Slide Collection, "January 1980 Box 2 - COTMA 1982"
Photo - see pdf file for further information. Number Brief Description RT315 Fitzroy St St Kilda 27-1-80 - tram 900 - "City" - route 16 RT316 Mont Albert Terminus 27-1-80 - tram 937 - "City" - route 42 RT317 Footscray Terminus 26-1-80 - tram 700 - route 82? RT318 Hawthorn Depot 27-1-80 - tram V214 & tram 56 - "Wattle Park - Elgar Rd" - route 70 RT319 Hawthorn Depot 27-1-80 - tram V214 RT320 Swan St Burnley 27-1-80 - tram V214 RT321 Batman Avenue 27-1-80 - tram V214 RT322 Sth Melbourne Beach Terminus 27-1-80 - tram 757 - "East Coburg Moreland" - route 1 RT323 Mitcham Station 24-1-80 - bus 794 -"Doncaster Jun" - route 281 RT324 COTMA 1982 Sth Melb Depot RT325 COTMA 1982 Sth Melb Depot - tram 8W - "Special" RT326 COTMA 1982 Sth Melb Depot - tram 587 RT327 COTMA 1982 Sth Melb Depot - tram 587 RT328 COTMA 1982 Sth Melb Depot - Tramways Emergency Truck RT329 COTMA 1982 Sth Melb Depot - track stockpile RT330 COTMA 1982 Sth Melb Depot - emergency trucks and lifts RT331 1982 West Coburg Dawson St Relay - tram 764 - "Domain Rd" - route 56 RT332 1982 Hawthorn Depot - tram 610 - "Special" & tram 469 - "Special" RT333 1982 Preston Workshops - tram 201 RT334 1982 Preston Workshops - tram 202 and tram 46 - note this car repainted into the Z3 Deep Yellow livery. RT335 1982 Victoria Pde - tram 729 -"Mont Albert" - route 42 Demonstrates the work of Robert Thomson in photography, collection and/or production of slidesAssembled album in a black presentation folder of 21 colour slides, collected or produced by Robert Thomson. A list of all photographs with details has been compiled. melbourne, tramways, trams, z3 class, z1 class, v class, w5 class, w2 class, y1 class, y class, south melbourne depot, vr class, tram 700, tram 214, tram 900, route 16, sw6 class, fitzroy st, mont albert, route 42, tram 937, footscray, hawthorn depot, z1, tram 46, route 70, swan st, batman avenue, south melbourne beach, tram 757, mitcham station, aec, mkv1 class, bus 794, route 281, tram 8w, tram 587, tram 56, international, route 56, tram 764, dawson st, tram 610, tram 469, preston workshops, tram 201, tram 202, tram 729, victoria parade -
 Ballarat Tramway Museum
Photograph - Digital image Set of 10, Stuart Lodington, 1971
Set of 10 digital images of Ballarat trams prior to closure, scanned from original slides by Stuart Lodington, 1971 prior to closure of the system. .1 - No. 32 entering the depot from Wendouree Parade, with the Lake in the background. Shows the depot fire alarm on an adjacent pole. .2 - No. 26 at Sebastopol, before turning the pole. Has a bus stop sign on a pole already. .3 - No. 27 and 26? crossing at the Bell St loop in Skipton St. No. 27 has a Twin Lakes sign. .4 - No. 32 outbound to the Gardens in Hamilton Ave about to enter Wendouree Parade with Loreto convent and Olympic monument the background. .5 - No. 26, Albert St Sebastopol, approaching the Sebastopol terminus, with Sebastopol Food Stores building on the left of the photo. .6 - No. 12 leaving the Parker St. Loop, Sturt St West after crossing a tram. No. 12 has destination of Victoria St. .7 - No. 12 inward bound in Lydiard St North with Fine Art Gallery in the background, 3BA. No. 12 has destination of Sebastopol and has a Twin Lakes sign. .8 - No. 12 inward bound, Sturt St West, No. 12 has destination of Victoria St and has a Twin Lakes sign. .9 - No. 26 at Sebastopol terminus, outside the Royal Mail Hotel, has a bus stop sign on a pole. Tram pole yet to be turned, but destination adjusted to Lydiard St. North. .10 - No. 12 at Sebastopol terminus, outside the Royal Mail Hotel. No. 12 has destination of Lydiard St Nth and has a Twin Lakes sign.trams, tramways, ballarat, sturt st west, sebastopol, skipton st, wendouree parade, hamilton ave, depot, depot junction, parker st loop, bell st, lydiard st nth, tram 32, tram 26, tram 27, tram 12 -
 Ballarat Tramway Museum
Photograph - Set of 8 colour 35mm slides of Ballarat Trams May 1971, Noel J Simons, 24/5/1971
Shows a sample of photographs taken about 3 months before the Ballarat Tramway system commenced to close.Yields information about various Ballarat Trams and the streetscape at the time prior to closure in August and September 1971Set of 8 Kodachrome transparencies taken on 24/5/1971 1172.1 - Tram 27 in Wendouree Parade, near Barrett Ave., with destination of Victoria St., passing a tram stop, with a seat and "Warning Oncoming Trams" sign mounted on the pole. Tram has a Twin Lakes advertisement on the front dash and a unknown roof advertisement. See also Reg. Item No. 1174.3 for a later photograph. 1172.2 - No. 32 entering Bridge St. from Sturt St. Photo taken after tram has passed photographer. Has Woolworths and Dickins stores in the background, and many motor vehicles. Tram has destination of Mt Pleasant 1172.3 - No. 13 in bound along Sturt St. West, near Alfred St. looking west along Sturt St. West. Has destination of Mt. Pleasant. 1172.4 - as for 1172.3, but closer up. 1172.5 - No. 17 west bound along Sturt St. passing the Town Hall, with Myers and Queen Victoria's statue in the background. Taken from the north side of Sturt St. through the median strip. 1172.6 - No. 13 at the City terminus, on the south side of Sturt St. with the National Mutual and other buildings up to the Town Hall in the background, including the fountain and the city terminus shelter. 1172.7 - Bogie tram at the city terminus, on the south side of Sturt St. looking from the central median strip, westwards. Has Town Hall in background along with other buildings. 1172. 8 - as above but with Scrubber car behind a bogie tram. Shows fountain and ESCo control box by a pole.wendouree parade, •tram stops, •bridge st, •sturt st. west, •murray st., •sturt st, •town hall, •scrubber tram, tram 27, tram 32, tran 13, tram 17, ballarat, tramways, trams -
 Ballarat Tramway Museum
Photograph - Black & White Photograph/s, Leon Marshall-Wood, 29/03/1948 12:00:00 AM
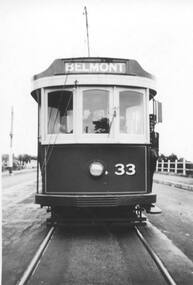
Yields information about Geelong trams in the late 1940's and the bogie trams.Black and white print of Geelong 33, rear end photo showing the conductor leaning from the tram slightly. In the background is a SEC Tramway signal - Forest City. Tram has the destination of Belmont. Photo could have been taken at the Belmont terminus. Photo dated 29/3/1948. Based on the handwriting on btm5869i, the photo is by Leon Marshal-Wood. Negative scanned at 3200dpi 9/6/2020 9/6/2020.On the rear in pencil "29/3/1948, Geelong"trams, tramways, geelong, north, belmont, signals, conductors, tram 33 -
 Ballarat Tramway Museum
Photograph - Black & White Photograph/s, David Endacott, 14/08/1971 12:00:00 AM
Black and white photograph and negative of the timetable board and CARS STOP HERE" sign on the pole at the Sebastopol terminus, with the Royal Hotel and Fosters Lager sign in the background. See item No. 29 for the sign itself. Assumed photo taken 14 August 1971. Duplicate print (1268A) by John Phillips 12/1999. Large copy print added 5/2001. Original neg scanned at hi res and updated 11/5/2020.trams, tramways, sebastopol, royal hotel, signs -
 Ballarat Tramway Museum
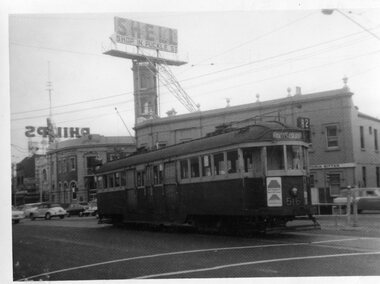
Photograph - Black & White Photograph/s, Ian Barkla, 12/02/1966 12:00:00 AM
Black and white photo of W2 516 at the Moonee Ponds terminus of route 82, Moonee Ponds to Footscray. Tram has destination "Footscray", all blinds drawn and a Ramset? ad on the drivers cab dash panel. In background are the buildings at the intersection of Puckle St and Mt Alexander Road, Moonee Ponds. The hotel on the SE corner has a large ad for "SHELL" and a message underneath "Shop in Puckle St." and also in background a large ad for "Phillips".On rear in blue biro "W2 516 / 12/2/66 / Moonee Ponds Junc."trams, tramways, melbourne, moonee ponds , tram 516 -
 Ballarat Tramway Museum
Ephemera - Place Mat, Sebastopol Bowling Club, 100 years of Electric trams, 23/09/2005 12:00:00 AM
Place Mat used at the celebratory dinner of the BTM at the Sebastopol Bowling Club - 24 September 2005. Produced by the Bowling Club. Has words "Tram Museum / 100 years / On behalf of Sebastopol Bowling Club Inc we hope you have a wonderful day!", with Bowling club logo. Features photos of No. 31 at Victoria St. terminus and No. 26 c 1960 at intersection of Sturt and Lydiard St. North". Two copies held.trams, tramways, btm, 100 years of electric trams, sebastopol -
 Ballarat Tramway Museum
Photograph - Black & White Photograph/s, Keith Kings, 26/03/1956 12:00:00 AM
Photograph of some of the last trams of Geelong - night photograph in the city area.Black and White Photograph of a closure scene of the Geelong tramway system Sunday 26/3/1956, taken by Keith Kings, photograph from the Geelong Heritage Centre, copied and reproduced on ink jet paper. See worksheet 4398 for supplementary information. 31 and 38 and 4 as last trams at Belmont terminus. Keith Kings photograph T(G)(4) See also Reg Item 5999i4 for the same photograph in the Wal Jack Album.In hand writing on the rear " (48) " In bottom left hand corner - 26.3.1956 Geelong Keith Kings, last night of the tramways. Geelong Heritage Centre.trams, tramways, geelong, belmont, closure, last tram, tram 31, tram 38, tram 4 -
 Ballarat Tramway Museum
Photograph - Digital image, 1938
Yields information about the appearance and the use of ESCo tram 24 and other single truckers late 1930's and the appearance of the north side of Sturt St near Lydiard St north.Digital Copy of a photograph sourced by Roger Greenwood as part of his work on the production of a Video Tape on Ballarat's trams. Photographer and source details not provided by Roger. See btm6302doc.pdf Image of No. 24 and two other single truckers at the City terminus, 1938. Tram has the destination of Lydiard St North. Shows the appearance of the trams at the time. Has a number of passengers on board. In the background is the ANZ building, Post Office and Whitesides Tailors and Mercers.trams, tramways, sturt st, lydiard st nth, city, tram 24 -
 Ballarat Tramway Museum
Photograph - Digital image, 1970s
Yields information about the Sebastopol tram terminus.Digital image of No. 38 at the Sebastopol terminus, with the Royal Mail Hotel in the background. Shows the stop arrangements. Hotel has Melbourne Bitter and Fosters Lager signs. The tram has the destination of Lydiard St North and a SEC "Everything is fine in my electric kitchen" roof advertisement. Photo taken by Peter Bruce 1970's and 1971, prior to the closure of the Ballarat tramway system. Peter's Title of image: "No 38 at Royal Mail Sebastopol"trams, tramways, sebastopol, hotels, tram 38 -
 Ballarat Tramway Museum
Photograph - Digital image, Peter Bruce, "No. 41 Loading for Sebas", 1970s
Yields information about the stop in the City on the south side of Sturt St and loading passengers.Digital image, black and white, of No. 41 loading passengers for Sebastopol at the city terminus. A number of passengers, including one carrying an umbrella are boarding. Shows the signage at the city stop. In the background is Bridge St, looking along to Victoria St and Mt Warrenheip. Another tram is in Bridge St. Photo taken by Peter Bruce 1970's and 1971, prior to the closure of the Ballarat tramway system. Peter's Title of image: "No. 41 Loading for Sebas"trams, tramways, city, sturt st, bridge st, sebastopol, tram 41 -
 Ballarat Tramway Museum
Photograph - Black & White Photograph/s, Wal Jack, 1940
Black and White print contained within the Wal Jack Bendigo and Geelong Album, see Reg Item 5003 for more details. Photo of Geelong Birney 14 at the Chilwell terminus, 1940. Wal notes it is No. 11 on the Bendigo system. The tram has the destination of East and has a "Pay as you Enter" sign on the door. i1 - scan of print in the album i2 - rear of image i3 - scan of negative at 3200dpi added 18/6/2020.On the rear in ink "Geelong Tramways No. 14 Birney Car, bought new 1924"trams, tramways, geelong, chilwell, birney, tram 14