Showing 1647 items
matching g. white
-
 Ballarat Tramway Museum
Slide - 35mm slide/s, c1955
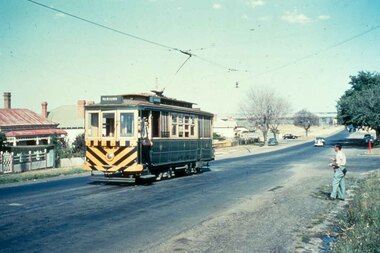
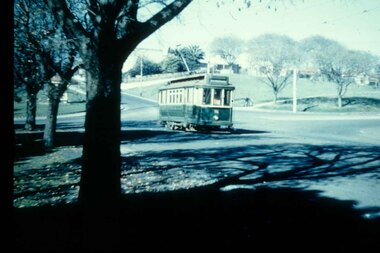
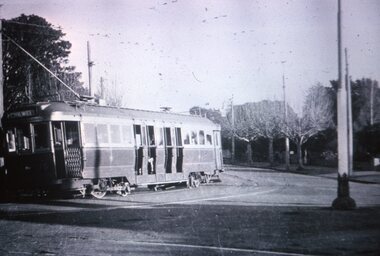
Agfachrome Professional plastic mount (blue base, white cover) reproduction slide of a colour slide of Geelong No. 4 at Eastern Park Terminus. Tram has the destination of Newtown. Photo taken after 1953. Photo has the driver/conductor in the doorway. "G 6" and "1 -6" in pencil.tramways, trams, geelong, eastern park, tram 4 -
 Ballarat Tramway Museum
Slide - 35mm slide/s, Keith Kings, 25/03/1956 12:00:00 AM
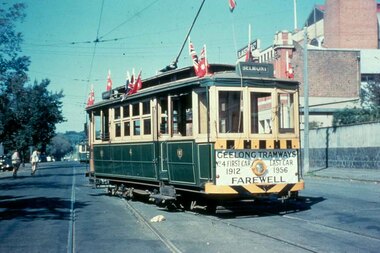
Yields information about the closure of Geelong tramway system - slide of Geelong No. 4 decorated for the last tram in Geelong.Agfachrome Professional plastic mount (blue base, white cover) reproduction slide of a colour slide of Geelong No. 4 decorated for the last day of service, outside the depot in Corio Tce. Tram has the destination of Belmont. Sign on the end of the tram, notes that the tram was the first car in 1912 and was to be the last car in 1956. Photo taken on 25/3/1956. See also Reg Item 4388 for a print of this photograph. See btm2667doc.pdf for a scan of a letter and the rear of the photograph identifying that Keith Kings took the photo. Photo added to collection - "G 7" and "1 -7" in pencil.tramways, trams, geelong, depot, last tram, corio tce, closure, tram 4 -
 Ballarat Tramway Museum
Slide - 35mm slide/s, c1955
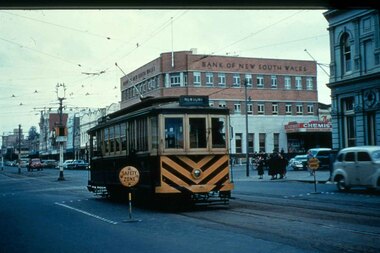
Agfachrome Professional plastic mount (blue base, white cover) reproduction slide of a colour slide of Geelong No. 5, at the corner of Moorabool and Ryrie St. Geelong. Has the Bank of New South Wales building in the background. Also a set of "Bar traffic lights" and signs indicating the safety zone at the tram stops on either side of the road are shown in the photo. The signs could be taken away from the stops when necessary. The tram has the destination of Newtown Photo taken after 1953. Dave O'Neil's notes that the tram has terminated in the city instead of through routing to Eastern Park and was about to reverse to run to Newtown - an unusual working. "G 8" and "1 -8" in pencil.tramways, trams, geelong, moorabool st, ryrie st, traffic lights, safety zones, tram 5 -
 Ballarat Tramway Museum
Slide - 35mm slide/s, mid 1950's
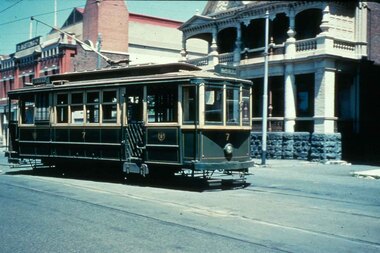
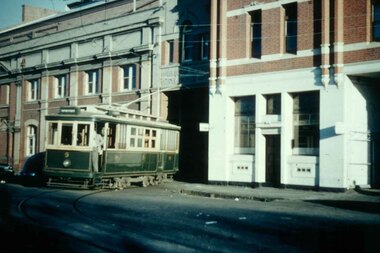
Agfachrome Professional plastic mount (blue base, white cover) reproduction slide of a colour slide of Geelong No. 7 outside the depot, turning onto the double track in Corio Tce. The tram has the destination of East. Photo taken mid 1950's. "G 9" and "1 -9" in pencil.tramways, trams, geelong, depot, corio st, tram 7 -
 Ballarat Tramway Museum
Slide - 35mm slide/s, mid 1950's
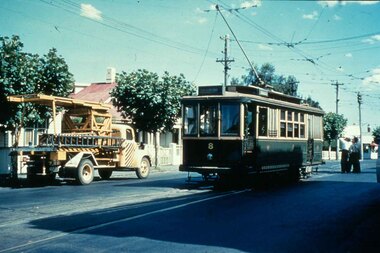
Agfachrome Professional plastic mount (blue base, white cover) reproduction slide of a colour slide of Geelong No. 8 at intersection Pakington and Aphrasia St - Newtown to the right. Photo taken mid 1950's. Photo shows Geelong overhead service truck on the right side of the photograph and a group of workers (tram crew and overhead crew) looking up at the overhead itself. "G 10" and "1 -10" in pencil.tramways, trams, geelong, pakington st, overhead, tram 8 -
 Ballarat Tramway Museum
Slide - 35mm slide/s, mid 1950's
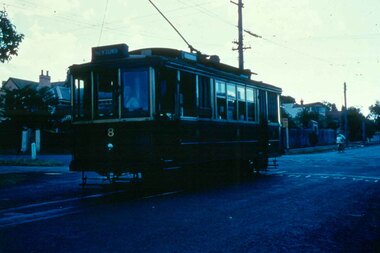
Agfachrome Professional plastic mount (blue base, white cover) reproduction slide of a colour slide of Geelong No. 8 at Newtown terminus, just after arrival. Tram has the destination of Newtown. Dave O'Neil notes remark about the sign on the left hand side of the road, partly obscured by the tram. Sign says way to Queens Park - was taken down during 2002. "G 11" in pencil.tramways, trams, geelong, newtown, tram 8 -
 Ballarat Tramway Museum
Slide - 35mm slide/s, mid 1950's
Agfachrome Professional plastic mount (blue base, white cover) reproduction slide of a colour slide of Geelong No. 9 running out of the depot building into Corio Tce. Photo taken mid 1950's. "G 12" and "1 -12" in pencil.tramways, trams, geelong, depot, corio st, tram 9 -
 Ballarat Tramway Museum
Slide - 35mm slide/s, mid 1950's
Agfachrome Professional plastic mount (blue base, white cover) reproduction slide of a colour slide of Geelong Pengelley No. 16 at the Beach terminus - Bellarine St and Corio Tce (now Brougham St). Photo taken after 1951. Dave O'Neil notes remark that the corner is virtually unchanged, except for traffic lights. "G 14" and "1 -14" in pencil.tramways, trams, geelong, beach, corio tce, tram 16 -
 Ballarat Tramway Museum
Slide - 35mm slide/s, mid 1950's
Agfachrome Professional plastic mount (blue base, white cover) reproduction slide of a colour slide of Geelong Pengelley No. 18 at East Terminus. Photo shows a crewman boarding the front end of the tram. Possibly taken on the last day of the Chilwell - East West line, 8/1/1956. See Reg. Item 476.5 for a similar photograph taken by Geoff Grant and 2610 for another copy of the slide. Photographer unknown. "G 15" and "1 -15" in pencil.tramways, trams, geelong, east, tram 18 -
 Ballarat Tramway Museum
Slide - 35mm slide/s, mid 1950's
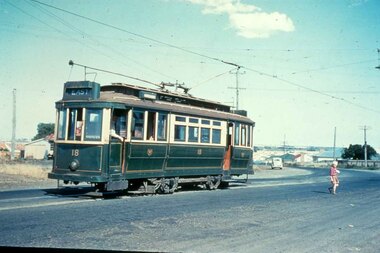
Yields information about the Geelong tramway system and one of the terminus and the appearance at the time.Agfachrome Professional plastic mount (blue base, white cover) reproduction slide of a colour slide of Geelong Pengelley No. 18 at East Terminus Ormond and Boundary Roads. Photo shows a child walking away from the tram. Tram has the destination of East. Photographer unknown. Taken on the last day of the first closures, 8/1/1956. See also Reg Item 4389 for a print of this slide. "G 16" and "1 -16" in pencil.tramways, trams, geelong, east, closure, last day, tram 18 -
 Ballarat Tramway Museum
Slide - 35mm slide/s, mid 1950's
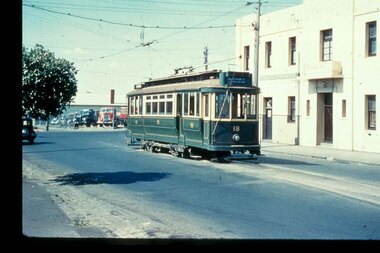
Agfachrome Professional plastic mount (blue base, white cover) reproduction slide of a colour slide of Geelong Pengelley No. 18 at West Terminus. Tram destination part way between "East" and "West". Photographer unknown. Taken after 1951, probably near time of closure. "G 17" and "1 -17" in pencil.tramways, trams, geelong, west, tram 18 -
 Ballarat Tramway Museum
Slide - 35mm slide/s, mid 1950's
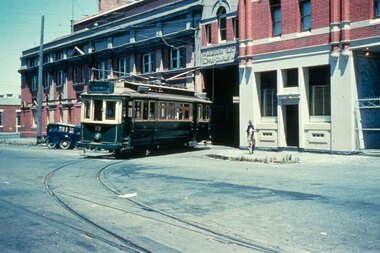
Agfachrome Professional plastic mount (blue base, white cover) reproduction slide of a colour slide of Geelong Pengelley No. 19 running out of the depot / power house building into Corio Tce mid 1950's. Tram has the destination of Chilwell. Photographer unknown. Taken after 1951, probably near time of closure. "G 18" and "1 -18" in pencil.tramways, trams, geelong, depot, corio st, tram 19 -
 Ballarat Tramway Museum
Slide - 35mm slide/s, mid 1950's
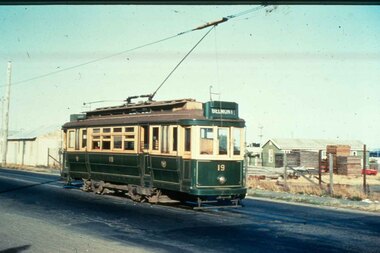
Agfachrome Professional plastic mount (blue base, white cover) reproduction slide of a colour slide of Geelong Pengelley No. 19 at Belmont terminus mid 1950's. Tram has the destination of Belmont. Photographer unknown. "G 19" and "1 -19" in pencil.tramways, trams, geelong, belmont, tram 19 -
 Ballarat Tramway Museum
Slide - 35mm slide/s, mid 1950's
Agfachrome Professional plastic mount (blue base, white cover) reproduction slide of a black and white photo of Geelong No. 35, at Pakington and Aberdeen St turning towards Chilwell. Photo taken early 1950's. Photographer unknown. Tram has the destination of Chilwell. Tramcar number can just be seen in the image - appears to be No. 35 - which fits the tram type. See also Reg item 4212 for the same photo - of Wal Jack. "G 20" and "1 -20" in pencil.tramways, trams, geelong, chilwell, pakington st, tram 35 -
 Ballarat Tramway Museum
Photograph - Black & White Photograph/s, Keith Kings, 26/03/1956 12:00:00 AM
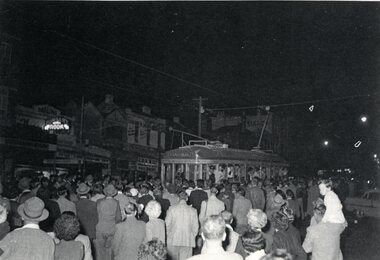
Photograph of some of the last trams of Geelong - night photograph in the city area.Black and White Photograph of a closure scene of the Geelong tramway system Sunday 26/3/1956, taken by Keith Kings, photograph from the Geelong Heritage Centre, copied and reproduced on ink jet paper. See worksheet 4398 for supplementary information. 31 and 38 and 4 as last trams at Belmont terminus. Keith Kings photograph T(G)(4) See also Reg Item 5999i4 for the same photograph in the Wal Jack Album.In hand writing on the rear " (48) " In bottom left hand corner - 26.3.1956 Geelong Keith Kings, last night of the tramways. Geelong Heritage Centre.trams, tramways, geelong, belmont, closure, last tram, tram 31, tram 38, tram 4 -
 Ballarat Tramway Museum
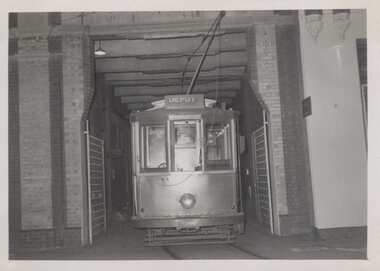
Photograph - Black & White Photograph/s, Keith Kings, 26/03/1956 12:00:00 AM
Yields information about the construction of the tramcars for the Geelong tramway system and the way they were assembled in the depot.Black and White Photograph of a closure scene of the Geelong tramway system Sunday 26/3/1956, taken by Keith Kings, photograph from the Geelong Heritage Centre, copied and reproduced on ink jet paper. See worksheet 4398 for supplementary information. 33 as the fourth "last" tram at intersection with Ryrie St, car in Moorabool St at the safety zone. Destination blind altered to Football, instead of Depot, seemingly by passengers. Keith Kings photograph T(G)(5) See also Reg Item 5999i2 for the same photograph in the Wal Jack Album.In hand writing on the rear " (49) " In bottom left hand corner - 26.3.1956 Geelong Keith Kings, last night of the tramways. Geelong Heritage Centre.trams, tramways, geelong, moorabool st, ryrie st, closure, last tram, tram 33 -
 Ballarat Tramway Museum
Photograph - Colour Photograph/s, Candy Footwear, 1948
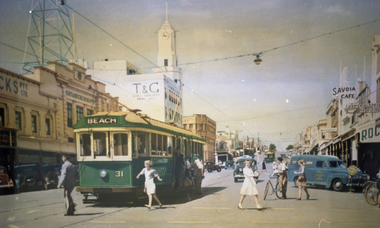
Yields information about Moorabool Street Geelong, colour publicity photograph, summer clothing and the street scape during the early 1950's. Has a strong association with a commercial collection - Candy footwear.Colour print of a colour photograph held by the Candy Footwear collection (two slightly different prints) and a black and white version, of No. 31 in Moorabool Street, with the destination of BEACH, at the corner of Malop St, 1948. Has a number of people joining and leaving the tram, and walking across to the footpath. Also a number of bicycles in the photograph. People are wearing summer clothes. Printed on Agfa paper. In the background is the T&G building, Rockman's, Savoia Cafe, and Hitchcocks (?) Pty Ltd building. In an envelope that contained the photographs (now with the worksheet) is "pics and negatives for Geelong 31 / copy Candy Footwear framed illustration." Two strips of three negatives in the negatives folder - page 58.In hand writing on the rear " (6) " Car in Moorabool St at the cnr with Malop St en-route to Beach." Along the bottom edge "William Scott" address label and "Candy Footwear Collection 1950s". Copy 2 and the black & White photograph, as above, but 1948 written instead of 1950. trams, tramways, geelong, moorabool st, malop st, clothing, tram 31 -
 Ballarat Tramway Museum
Photograph - Black & White Photograph/s, Wal Jack, Easter Saturday, 1941
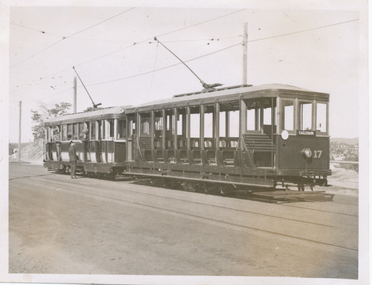
Black and White print contained within the Wal Jack Bendigo and Geelong Album, see Reg Item 5003 for more details. No. 17 and No. 22 at Mt Korong Road loop - Garden Gully Loop. Photo taken Easter Saturday, 1941. Negative No. T191. No. 17 has the destination of "Eaglehawk" and is carrying a white disk at the front of the tram. i1 - scan of print in the album i2 - rear of image i3 - scan of negative at 3200dpi added 6/6/2020. On rear in ink "T191 State Electricity Commission Bendigo tramways / No. 17 summer car and "No. 22 Ex MMTB G Class standing at Passing Loop in Mt Korong Road, Easter Saturday 1941." In bottom right hand corner "W. Jack Photo".trams, tramways, bendigo, mt korong road, garden gully loop, tram 17, tram 22 -
 Ballarat Tramway Museum
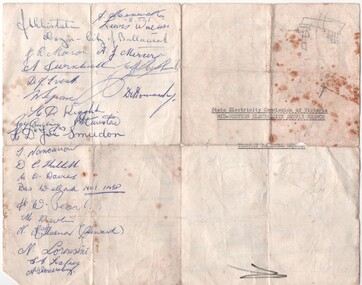
Ephemera - Menu, State Electricity Commission of Victoria (SECV), "Tramway Farewell Dinner", Sept. 1971
Yields information about the fare dinner for the SEC Ballarat tramway employees and has a strong association with those who took part and autograph the dinner menu or programme sheet., Yields information about the fare dinner for the SEC Ballarat tramway employees and has a strong association with those who took part and autograph the dinner menu or programme sheet.Menu or Programme - Quarto sheet, Gestener duplicated printed, titled "Tramway Farewell Dinner", provided by the State Electricity Commission of Victoria - Mid-Western Supply Branch. Provides a detail programme for the dinner, speakers and a space for autographs which has been extensively filled in by participants. Speakers Mr. I. Pellas (SEC Ballarat Manager), N. R. White - Chairman and General Manager of the SEC), Cr. J. A. Chisholm (Mayor of Ballarat), Cr. N. F. Donald - Mayor of the Borough of Sebastopol with the Harmony provided by Mr. R. G. Lemke and response by Mr. R. Courtney. Do not remove from the sheet holder due to very weak nature of the sheet along the folds.Extensive autographs on both sides of the sheets as well pen marks.trams, tramways, sec, closure, dinner, menu, ballarat -
 Ballarat Tramway Museum
Photograph - Black & White Photograph/s, Ellen Butland, c1973
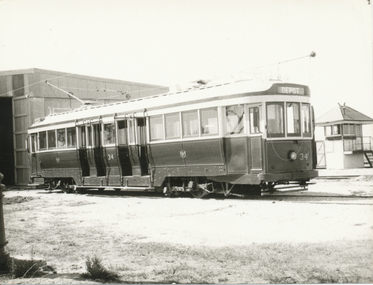
Yields information about Ballarat's bogie trams after the disposal from Ballarat and the work of the AETM St Kilda Tramway MuseumBlack and white photograph of No. 34 outside the depot of the St Kilda Tramway Museum, AETM, c1973, following its repainting. Has the signal box in the background. Photo by Ellen Butland, c1973.On rear in ink "Ballarat" and "E. G. Butland" stamp.trams, tramways, aetm, st kilda museum, tram 34 -
 Ballarat Tramway Museum
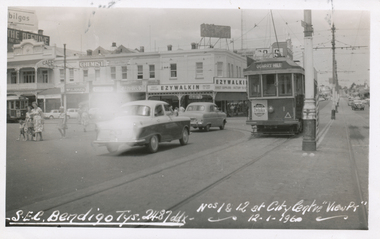
Photograph - Black & White Photograph/s, Bendigo tram 21 in Pell Mall, late 1950's
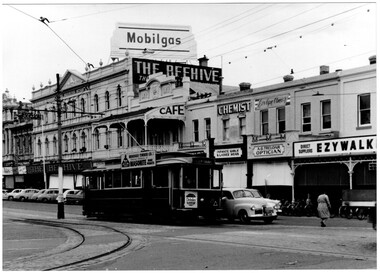
Black and White photograph, of Bendigo 21 with the destination of Golden Square, in the Pall Mall, approaching Charing Cross, during the mid to late 1950's. Tram has a roof advert for Bendigo Timber Co. Masonite and a Cohn's Drink ad on the front of the tram. In the background are roof advert for Mobilgas on the Beehive Building, Ezywalkin building, A. G. Treloar Optician and Evlyn Amer? shop for Infants Girls and Ladies Wear. There is a large number of Holden motor cars in the photos along with bicycles parked by the Ezywalkin shop. Printed on Fujichrome paper. Two copies held."TMSV Sales" stamp on rear. On rear of in ink "MMTB 188, Bendigo 21"trams, tramways, bendigo, charing cross, pall mall, tram 21 -
 Ballarat Tramway Museum
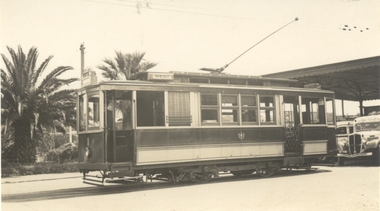
Photograph - Black & White Photograph/s, William G. A. Lewis, 25/11/1939 12:00:00 AM
... Railway Station tram 1 On rear in ink and stamped "William G ...Black and white photograph of Geelong No. 1 at the Geelong railway station, with the destination of West. Has a bus in the background. Photo William G. A. Lewis, 25 Nov. 1939. Two copies held.On rear in ink and stamped "William G. A. Lewis Photo No. 451 25 Nov 1939 and SEC Car No. 1 Geelong system, Geelong Railway Station". trams, tramways, geelong, railway station, tram 1 -
 Ballarat Tramway Museum
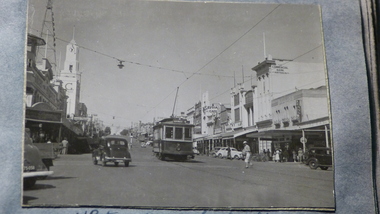
Photograph - Black & White Photograph/s, 12/01/1960 12:00:00 AM
Black and White print contained within the Wal Jack Bendigo and Geelong Album, see Reg Item 5003 for more details. Photo, commercially produced?, of Bogie tram No. 1 and single trucker No. 12 at Charing Cross 12-1-1960, with the details of the photo written onto the negative and printed. Tram 1 has the destination of Quarry Hill and has a Cohn's drink advertisement on the rear panel. In the background are: The Beehive, Ezywalkin, Wm Jones Chemist, A. G. Relearn Optician, .Mobilgas. Note the advertisement Plume? over the Ezywalkin store has been blanked out. trams, tramways, bendigo, charing cross, secv, pall mall, tram 1, tram 12 -
 Ballarat Tramway Museum
Photograph - Black & White Photograph/s, late 1940s?
Black and White print contained within the Wal Jack Bendigo and Geelong Album, see Reg Item 5003 for more details. Photo of Geelong No. 5 in Moorabool St, late 1940's. No details of photographer. Has the T&G building, Savoia Cafe, The Commercial Bank of Australia in the background. Photo has been glued onto the album sheet.trams, tramways, geelong, moorabool st, tram 5 -
 Ballarat Tramway Museum
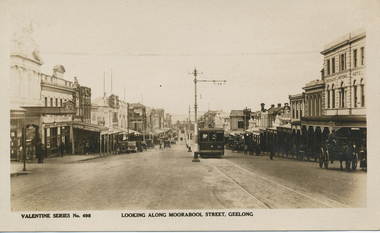
Postcard, Moorabool St, Geelong with Birney No. 14
Postcard contained within the Wal Jack Bendigo and Geelong Album, see Reg Item 5003 for more details. Valentine Series Postcard, No. 498 looking north along Moorabool St, Geelong with Birney No. 14 approaching the camera on the single line section. The tram has the destination of South (prior to extension from the Barwon River to Belmont in 1927) and is fitted with two trolley poles. There are two other trams in the photograph along with many motor vehicles and horse drawn vehicles - mid 1920's. Moorabool St has centre poles. In the photo are Sully's National Hotel, White Hart Hotel, Leitch Cycles and sports goods and a T&G building (prior to the new one being built?). Published by Valentines Publishing Co of Queen St Melbourne. See related documents for a email from Richard Gilbert providing further documents.trams, tramways, south, belmont, geelong, moorabool, tram 37, tram 36 -
 Ballarat Tramway Museum
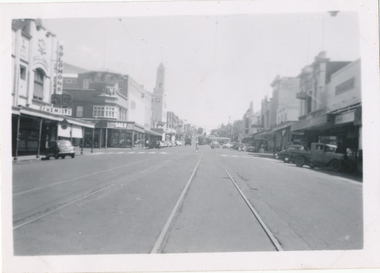
Photograph - Black & White Photograph/s, 8/01/1956 12:00:00 AM
Black and White print contained within the Wal Jack Bendigo and Geelong Album, see Reg Item 5003 for more details. Photo of Moorabool Street looking south from Malop St, last day of operations 8-1-1956. Photographer unknown - same as 5854. Has two trams turning at Ryrie St. In the background is the T&G building, a Chemist and Solomons. Has written in ink on the rear "Looking south along Moorabool St from Malop St."trams, tramways, geelong, moorabool st -
 Ballarat Tramway Museum
Photograph - Black & White Photograph/s, Wal Jack, c1940
Black and White print contained within the Wal Jack Bendigo and Geelong Album, see Reg Item 5003 for more details. Photo of 26 in Moorabool St, Geelong. Tram has the destination of North. Printed on Kodak Velox paper. No date given, but c1940. In the background is building for W. T. Wiggs Pty Ltd sports store, F. G. H Ritchie Queensland Insurance and Berger's Paints On rear in ink "Geelong Tramways No. 26, Ex M&MTB made into 1 man car, 3 in service 24, 25, 26"trams, tramways, geelong, moorabool st, tram 26 -
 Ballarat Tramway Museum
Photograph - Black & White Photograph/s, Wal Jack, 1/01/1956 12:00:00 AM
Black and White print contained within the Wal Jack Bendigo and Geelong Album, see Reg Item 5003 for more details. Photo of Geelong No 39 in Ryrie St, 1-1-1956. Photo by Wal Jack. Tram has the destination of West. In the background is the T&G building, Belchers Corner store, Miss Vic? Art Florist store. i1 - scan of print in the album i2 - rear of image i3 - scan of negative at 3200dpi added 27/6/2020. On rear in ink SEC Geelong, No. 39 (now Ballarat's 41) from East to West, Ryrie St Geelong 1-1-56". Has the Wal Jack copyright stamp in the top right hand corner with the number T1297 written in.trams, tramways, geelong, ryrie st, tram 39 -
 Ballarat Tramway Museum
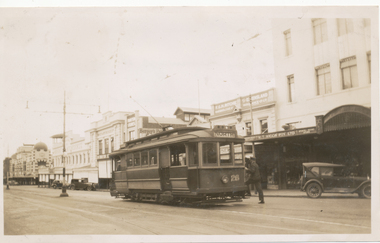
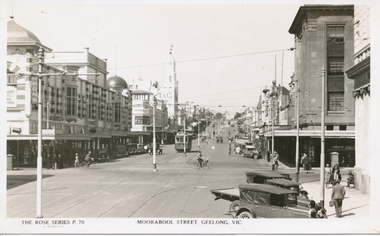
Photograph - Black & White Photograph/s, Rose Stereograph Co, Moorabool Street Geelong Vic, c1930
Photo of Geelong No 4 in Moorabool St, from a Rose Series Postcard, No. P 70, looking south along Moorabool Street at the intersection with Ryrie St. Geelong. Has the Solomon's store, T& G in the background. Photo c1930? Has a Birney tram on the hill. Printed by the Rose Stereograph Co. Original postcard held - see image 2 for pencil notes on the rear about the trams and their routes.Yields information about Moorabool St Geelong in the 1930s.Black and White print of a postcard contained within the Wal Jack Bendigo and Geelong Album, see Reg Item 5003 for more details.On rear in ink "SEC Geelong No. 4 with Birney tram on Moorabool St hill"trams, tramways, geelong, moorabool st, ryrie st, tram 4 -
 Ballarat Tramway Museum
Photograph - Black & White Photograph/s - set of 4, Keith Kings, 8/01/1956 12:00:00 AM
... at Belmont terminus, Sun 26/3/1956" - T(g)(4) Black and White print ...Black and White print contained within the Wal Jack Bendigo and Geelong Album, see Reg Item 5003 for more details. Set of four black and white photographs from Keith Kings of the staged closures of the Geelong tramways. Note some of these photographs are very similar to those of Geoff Grant - See Reg Item 476i8. Also see Reg item 4398 and 4399 for same images of Keith Kings collected by Bill Scott. .1 - No. 1 - last tram ex Chilwell back at Depot - Sun 8/1/56 - KSK Photo Q(x)(8). .2 - Scene for the last tram in Ryrie St, Sun 26/3/56, many people in photograph, with tram in background, has destination of Belmont. KSK Photo T(g)(7) .3 - ditto, for 31 and 38 as the third and second "last" trams, back at Ryrie St, Sun 26/3/56 - KSK Photo T(g)(6) .4 - Nos. 31 and 38 as the last trams at Belmont terminus, Sun 26/3/1956 - KSK Photo T(g)(4)On the rear in ink and with the Keith Kings Copyright stamp: .1 - "Geelong - 1 - last tram ex Chilwell back at Depot - Sun 8/1/56" - Q(x)(8) .2 - "Geelong - 4 - last tram back at Ryrie St, Sun 26/3/56" - T(g)(7) .3 - "Geelong - 31 & 38 - as third and second "last" trams, back at Ryrie St, Sun 26/3/56" - T(g)(6) .4 - "Geelong - 31 and 38 as last trams at Belmont terminus, Sun 26/3/1956" - T(g)(4)trams, tramways, geelong, closure, chilwell, ryrie st, belmont, last tram, tram 1, tram 4, tram 31, tram 38