Showing 1979 items matching "signal"
-
 Ballarat Tramway Museum
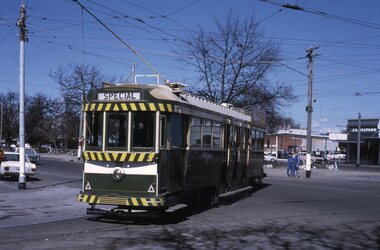
Film - Movie Film & Box, Kodak, 1960 to 1971
Yields information in movie film format of Ballarat trams in 1960 through to 1971, how the system operated and was used by people, including special trams., Yields information in movie film format of Ballarat trams in 1960 through to 1971, how the system operated and was used by people, including special trams.Movie film - 8mm, approx. 15 mins, without leader strip on a plastic reel, within a clear plastic case - Standard 8, titled "Ballarat Trams". See Reg Item 4957 for DVD and Mini DVD. Has been transferred to DVD - see Reg item 4957 Made by Arthur Hill. Also transferred to DVD by Rod Cook Oct. 2015, via Roger Greenwood for use in his DVD, "The City of Ballarat Trams, Gardens & Gold" of 2016. See Reg Item 6883. In Arthur's letter - on file - Made between 1960 and August 1971. Synopsis: based on time. Between 1960 and 1968 0:00 Trams Ahead sign before the Victoria St terminus with 20 at terminus 0.14 - No. 20 leaving Victoria St terminus and being followed along Victoria St by car and then passengers jointing the tram at a tram stop. 00.40 - No. 12 (c1960) in bound along Lydiard St North and arriving in the Gregory St loop. 00.56 - No. 12 and 14 crossing at Gregory St. 01.20 - No. 33 and a bogie car crossing at depot loop. 01.31 - No. 18 travelling along Wendouree Parade with the Lake in the background. 01.42 - No 41 at depot junction and running into the depot No. 2 road with a short sequence of a tramway signal. 02.17 - SEC Sign at the depot gate, shot of 41 in No. 2 road, with the lights other way around, Caution beware of trams sign and a red signal. 02.31- Timetable sign at Gardens Loop 02.36 - No. 30 arriving at Loop and view of a signal with no lights showing. 02.48 - Destination roll being changed through a number of destinations. 03.26 - No. 20 arriving at Carlton St loop with the Olympic monument in the background and the red signal light going out. 03.31 - a lady standing at the front of No. 20, with an ice cream in hand, and No. 17 arriving at the Carlton St loop with a short sped up sequence and No. 20 departing from the loop, followed by No. 17 leaving the loop, heading into the city. 03.41 - No. 13 inbound from Sebastopol crossing Albert St and heading into the city. 04.12 - view of signal and contactor, the light going green and the tram passing underneath. 04.24 - No. 12 at the Sebastopol terminus and departing. 04.51 - No. 12 crossing Albert St Sebastopol. 05.16 - Following No. 12 along Albert St, with Borough Offices in background initially. 05.28 - No. 12 arriving at the Grey St loop with No. 14 arriving at the loop from the city and both trams departing. March 1971 05.58 - No. 30 being followed along Barkly St, Mt Pleasant and the pole being turned at the terminus 06.32 - No. 30 picking up a lady passenger. 06.38 - view from the front of a tram, with the drivers hand and a cigarette, view from the back of the tram, along the Mt Pleasant route and running through the loop and then turning into Main St - has the Ballarat (East) fire station in one sequence, and finally running along Main St. 07.35 - view from tram, with car turning into Bridge St. and then running into Sturt St passed the Parking Loop, and along Sturt St. 08.32 - Points at Drummond St North being changed, doors changed over and the tram running along Drummond St. North, through the Mill St loop and into Macarthur St and in Wendouree Parade, with the Lake Wendouree in view and crossing No. 12 at the Depot Loop, with crews chatting, past the depot, a lady passenger getting off the tram near Forest St., and arriving at Gardens Loop with the same lady passenger who got on in Barkly St, getting off the tram. 11.09 - view of No. 30 at Gardens Loop, departing the loop. August 1971 11.30 - R761 crossing Melton (Exford Wier) on the special train to Ballarat and then the bridge between Ballan and Gordon Stations. 12.16 - View from the front of a tram, following No. 26 along Lydiard St North, crossing at Gregory St and returning to the City. 12.39 - No. 14 and one other tram running along Albert St to Sebastopol, crossing No. 21 at Grey St and then to Sebastopol terminus, crossing Albert St and return and running along Albert St. 13.36 - No. 26, 39 crossing 13 at Gardens Loop. 14.00 - view looking across Lake Wendouree. 14.07 - 26 arriving at Victoria St, running part of Destination roll, passengers getting off with hotel in the background, trolley pole being turned and then with 39 following tram along Victoria St, crossing at the King St Loop. 15.07 - view of a trolley pole tracking through the overhead at curve 15.10 - end. Written labels giving title information on reel.trams, tramways, ballarat, sebastopol, lydiard st north, victoria st, mt pleasant, lake wendouree, depot, tram 12, tram 13, tram 14, tram 17, tram 18, tram 21, tram 26, tram 33, tram 39, tram 41 -
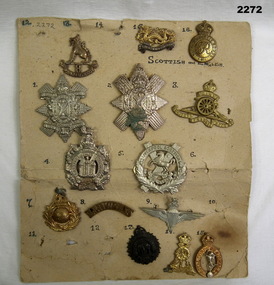 Bendigo Military Museum
Badge - BADGE COLLECTION MOUNTED, C.WW2
Items in the collection re Ian McLeod RWAFF, refer Cat No 2262.2 for service details.Badges, metal, mounted on cardboard, 14 in total. List from top down left to right across cardboard. 1 "Punjab Regt" animal with "8" 2 "China" 1st Puntam Regiment Dragon 3 "Nires AOQVIRIT EUNDO" Crown over circle 4 "The Glasgow Highlanders" crown, cross, person 5 "Nemo me impune acessit" crown, cross 6 "Ubique quo fas bt gloria ducunt", Artillery. 7 "The kings own Scottish Borderers, crown, castle..8) "The kings Liverpool Scottish, horse, wreath. 8 Crown, globe and wreath 10 "Red Cross" letters only 11 Crown over Wings, parachute. 12 "Punjab Regiment" Crown, Elephant. 13 "Abor Omnia Vincit" Crown, crossed rifles. 14 "Royal Corps of Signals", crown, Mercury badges, collection -
 4th/19th Prince of Wales's Light Horse Regiment Unit History Room
Christmas Card, 1917
A small, coloured Christmas card showing the rising sun badge, a sketch of purple pansies and the words" To greet you and wish you a Merry Christmas" on the front. There is a green woven cord down the spine holding the internal sheet on which is written "Christmas, 1917. Did you hear a whispered "Coo-ee". Did you feel a clasping hand, When the Christmas bells were ringing, In Australias Golden Land? For in my thoughts I send them you, From the shatter'd fields of war, That we might meet, greet as in dear days of yore; And O how low distant distant seem those times, When you and I were near, Oh would the Southern Cross and you were shining on me here. From 2987 Sapper C A Roney 1st Aust Divn Signal Coy AIF France"As describedchristmas card, ww1, france -
 Ballarat Tramway Museum
Photograph - Black & White Photograph/s - set of 6, Charles Craig, 1950s
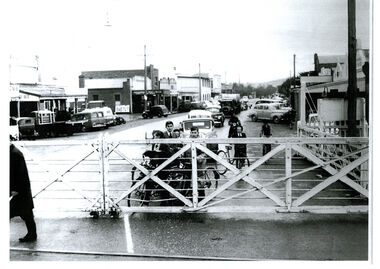
Yields information about the appearance and use of the Ballarat Railway Station level crossing by trams prior to closure.Set of six black and white photographs of trams at the railway level crossing, Ballarat, Lydiard St North featuring the railway station, gates and signals, Reeds Coffee Palace and the Provincial Hotel. .1 - 28 heading south, with an R class and a K class locomotive in the view. .2 - 11, heading north - taken during the 1950's. .3 - 17 parked right up to the gates while K184 shunts at the station. .4 - single trucker (number obscured) - most likely 17 giving the passengers in the previous photo. .5 - Photo with two single truckers in the view and the gates being closed after the tram has passed. .6 - 11, at the gates with a bogie tram behind. No. 11 has a Briquettes roof advert and a Twin Lakes sign. Photo by Charles Craig - during 1971, except for .2, taken during the 1950's. trams, tramways, lydiard st north, railway station, signals, level crossings, tram 28, tram 11, tram 17 -
 Ballarat Tramway Museum
Negative - Set of 3, Wal Jack, c1948
Yields information about staff or safeworking system in use at Ballarat up to the time of the introduction of the signal system. No information known at the time of cataloguing of the person in the photographs.Set of three Negative and Digital images of an unknown person: .1 - showing the hook and the section staff at the Ripon St - Sturt St corner. Alongside is an ESCo Electrical connection box or pillar. In the background is the shelter at this location. .2 - the same person handing the staff to a well loaded No. 22 (c1946) at Ripon St. Tram has a Regatta Auxiliary board. Has the Western Hotel in the background. .3 - the same person holding the Sturt St to Lake View Loop. .4 - close up of the staff. Note: The Ripon St - Lake View Loop - View Point section of track was not fitted with coloured light signals. Tram 22 (Reg Item 5533) entered service - 1945; post 1947, as side numbers (which can just be seen in image i2) were painted Oct. 1947 and was renumbered to 37, in Sept. 1952.trams, tramways, signals, staff, ripon st, view point, lake view, tram 22 -
 Ballarat Tramway Museum
Photograph - B&W print of donated negative, Ron E. Fluck, 23/04/1950 12:00:00 AM
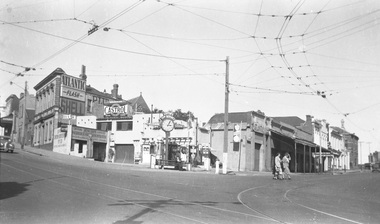
Black and white print of a donated negative. Print made 8/1998. Photo of the Lister's Junction Service Station, overhead and tram track at the intersection of Bridge St, Main St and Victoria St. (Stones Corner). Shows the style of overhead construction, signal contactors, the service station, its clock and associated advertising. Three ladies are crossing the road. Photo taken on 23.4.1950 at 3.05pm. Advertising on service station has Atlantic, Shell, and Castrol. Has multiple petrol dispensing bowsers. Clocks has directional arrows for Melbourne and Geelong. Tram tracks visible. Copy made Oct. 2001 for the "gold, Gold GOLD" temporary exhibition - colour laser print onto card, with Velcro dots on rear. Stored in box D1 (Display Box) 02/2003. high res scan of the negatives added 18/1/2019.tramways, trams, bridge st, stones corner, ballarat, main st -
 Ballarat Tramway Museum
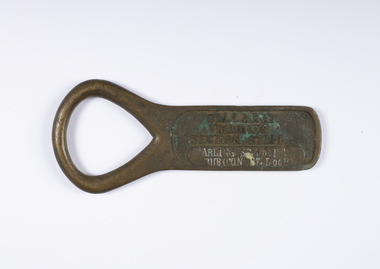
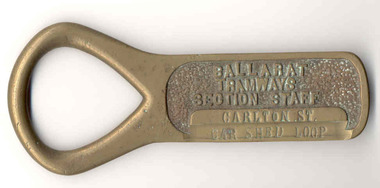
Functional Object - Section Staff, Electric Supply Co. of Vic (ESCo), "Victoria Park Loop / Carlton St Loop"
Demonstrates aspects of Safeworking on the Ballarat Tramway system from 1960 to c1936 when replaced by electric signs. Yields Information about the operation of Ballarat's trams and safeworking procedures.Cast brass item with a flat part recessed section with the words "BALLARAT TRAMWAYS SECTION STAFF" cast into the surface and a flat section underneath, flush with the outside edges in which the words "VICTORIA PARK LOOP / CARLTON ST LOOP" stamped in. Has an open rounded end which forms a handle or a point where it could be hung on a peg. The top line of words has a reddish paint inlay. Used as a means of authorising a tramcar to have sole use of the track between the named points to avoid head on collisions. Safeworking object - known as a section staff. Not known when made, but in use until the introduction of the electric signalling in the mid 1930's by the SEC. See also Reg Items 934 and 988 for details of use and other examples are at 1851, to 53, 2473 and 4444 to 4448 and Reg item 934 and 988 for articles on the safeworking systems.trams, tramways, staff, safeworking, tramway staffs, sec, signals -
 Ballarat Tramway Museum
Functional Object - Section Staff, Electric Supply Co. of Vic (ESCo), "Car Shed Loop / Macarthur St Loop"
Demonstrates aspects of Safeworking on the Ballarat Tramway system from 1960 to c1936 when replaced by electric signs. Yields Information about the operation of Ballarat's trams and safeworking procedures.Cast brass item with a flat part recessed section with the words "BALLARAT TRAMWAYS SECTION STAFF" cast into the surface and a flat section underneath, flush with the outside edges in which the words "CAR SHED LOOP / MACARTHUR ST LOOP" stamped in. Has an open rounded end which forms a handle or a point where it could be hung on a peg. The stamped area appears to have been polished compared to the others. Used as a means of authorising a tramcar to have sole use of the track between the named points to avoid head on collisions. Safeworking object - known as a section staff. Not known when made, but in use until the introduction of the electric signalling in the mid 1930's by the SEC. See also Reg Items 934 and 988 for details of use and other examples are at 1851, to 53, 2473 and 4444 to 4448, 4496 and Reg item 934 and 988 for articles on the safeworking systems.trams, tramways, staff, safeworking, tramway staffs, sec, signals -
 Ballarat Tramway Museum
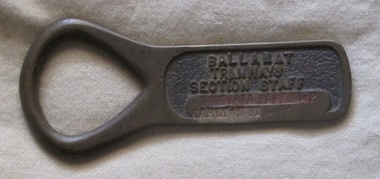
Functional Object - Section Staff, Electric Supply Co. of Vic (ESCo), "Darling St Loop to Rubicon St Loop"
Demonstrates aspects of Safeworking on the Ballarat Tramway system from 1960 to c1936 when replaced by electric signs. Yields Information about the operation of Ballarat's trams and safeworking procedures.Cast brass item with a flat part recessed section with the words "BALLARAT TRAMWAYS SECTION STAFF" cast into the surface and a flat section underneath, flush with the outside edges in which the words "DARLING ST LOOP RUBICON ST LOOP " stamped in. Has an open rounded end which forms a handle or a point where it could be hung on a peg. Used as a means of authorising a tramcar to have sole use of the track between the named points to avoid head on collisions. Safeworking object - known as a section staff. Not known when made, but in use until the introduction of the electric signalling in the mid 1930's by the SEC. See also Reg Items 934 and 988 for details of use and other examples are at 1851, to 53, 2473 and 4444 to 4448, , 4996 and 4497 and Reg item 934 and 988 for articles on the safeworking systems.Ballarat Tramways Section Staff Darling St Loop Rubicon St Looptrams, tramways, staff, safeworking, tramway staffs, sec, signals -
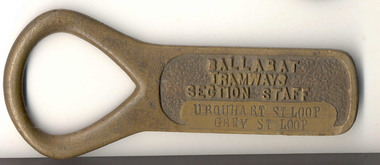 Ballarat Tramway Museum
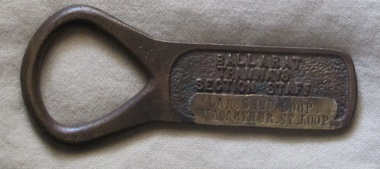
Functional Object - Section Staff, Electric Supply Co. of Vic (ESCo), "Urquhart St Loop to Grey St Loop"
Demonstrates aspects of Safeworking on the Ballarat Tramway system from 1960 to c1936 when replaced by electric signs. Yields Information about the operation of Ballarat's trams and safeworking procedures.Cast brass item with a flat part recessed section with the words "BALLARAT TRAMWAYS SECTION STAFF" cast into the surface and a flat section underneath, flush with the outside edges in which the words "URQUHART ST LOOP TO GREY ST LOOP " stamped in. Has an open rounded end which forms a handle or a point where it could be hung on a peg. Used as a means of authorising a tramcar to have sole use of the track between the named points to avoid head on collisions. Safeworking object - known as a section staff. Not known when made, but in use until the introduction of the electric signalling in the mid 1930's by the SEC. See also Reg Items 934 and 988 for details of use and other examples are at 1851, to 53, 2473 and 4444 to 4448, , 4996 and 4497 and Reg item 934 and 988 for articles on the safeworking systems.trams, tramways, staff, safeworking, tramway staffs, sec, signals -
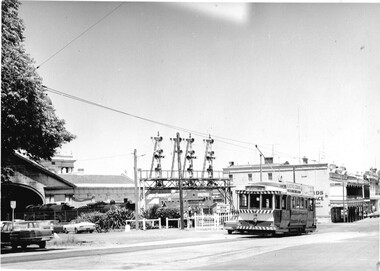
 Ballarat Tramway Museum
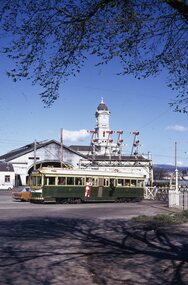
Slide - 35mm slide/s - set of 6, Campbell Duncan, 19/09/1971 12:00:00 AM
Yields information about the operations of the Ballarat Tramway system on the last day of SEC tramway operations in Ballarat.Set of 6 Kodak - Kodachrome slides - cardboard mounts - all taken on 19/9/1971, last day of operations prior to closure of the SEC operated tramway. .1 - Tram 40, waits at the level crossing gates - the gates are being opened. In the background is the station building and the signal gantry. Tram has the destination of Sebastopol. .2 - No. 42, with destination of Lydiard St north, northbound in Lydiard St, with railway station buildings and VRI in the background. .3 - No. 35 on inbound, Lydiard St North. .4 - No. 35, on inbound service, leaving Skipton St loop with another bogie in the background. .5 - No. 39 on inbound service, Albert St Sebastopol with the Sebastopol boundary sign and Binks Ford in the background. Tram has an everything under control in my all electric kitchen roof advert. .6 - No. 42, with destination of Sebastopol, Albert St Sebastopol.In ink on slide: .1 - Sun 19 Sept 71 - up Lydiard St Nth waits for gates to be opened after fast goods. .2 - Sun 19 Sept 1971, down Lydiard St Nth near VRI. .3 - Sun 19 Sept 1971, Up Lydiard St Nth .4 - Sun 19 Sept 1971, Up Sebastopol (supplementary service) has just crossed down in Skipton St near Drummond St. .5 - Sun 19 Sept 1971, Up Sebas at Ballarat / Sebastopol boundary. .6 - Sun 19 Sept 1971, c5.30pm down Sebas in Sebas shire.tramways, trams, lydiard st nth, railway station, level crossings, skipton st, albert st, sebastopol, closure, last day, tram 40, tram 42, tram 35, tram 39 -
 Melbourne Tram Museum
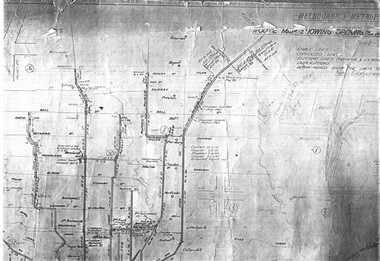
Drawing, Melbourne & Metropolitan Tramways Board (MMTB), "Plan of Tramway System - showing route mileage of electric tramways", Late 1960's
Set of 9 A3 photocopy of a drawing - of a dyeline print that had been mounted onto a cloth backing and had been kept up to date with regard to extensions and closures or opening and closing - titled - "Plan of Tramway System - showing route mileage of electric tramways" - Principal Junctions and intersections shown diagrammatically. Map of system shown at 40 chains to the inch. Copy of Drawing No. P6050. Shows crossovers, signal cabins, automatic points, closed cable tram lines in the city area, Port Melbourne, roads, railways and stations. Has extensions to Mill Park up to April 1987. Shows the Port Melbourne, North Melbourne (Spencer and Abbotsford Sts) and Collingwood cable lines, the Footscray system lines and the Point Ormond lines. See also Reg Item 1561 for a late 1960's print and 3642 for a 1941 version.trams, tramways, mmtb, trackwork, tramways, junction, map -
 Ballarat Tramway Museum
Photograph - Colour Photograph/s - set of 15', Austin Brehaut, 1/04/2000 12:00:00 AM
Yields information about various locations in Ballarat in March 2000 for comparison with previous photographs.Set of 15 colour photographs taken by Austin Brehaut in April 2000 showing various locations that Ballarat trams once ran in, for use in a BTM presentation, named "Ballarat Past and Present" at the COTMA 2000 Ballarat Conference. All on Fujicolour Crystal Archive Paper. On rear in blue ink is the date, location and where relevant a reference number to photo locations that the author of the presentation had requested. Letter from Austin, filed with this worksheet. 1772.1 - Sebastopol terminus, 4/4/2000 .2 - Albert St. Sebastopol near "crossover" - 4/4/2000 .3 - Old depot site, 5/4/2000 .4 - From depot site at Depot junction - 5/4/2000 .5 - Albert St. Sebastopol, looking south above loop site - 5/4/2000 .6 - Mt. Pleasant line, in Barkly St. towards terminus - 5/4/2000 .7 - Mt. Pleasant terminus, Cobden Cnr. - 5/4/2000 .8 - Wendouree Parade at Macarthur St. - 5/4/2000 .9 - Site of old Power Station Cnr Ripon St. Wendouree Parade .10 - Sturt St. at Dawson St (site of crossover) towards former Golden City Hotel - 6/4/2000 .11 - From Grenville St - up Sturt St. hill - 6/4/2000 .12 - Lower Sturt St. toward Grenville St - 6/4/2000 .13 - Railway Station from Signal box - 27/4/2000 .14 - Lower Sturt St. toward Grenville St - 6/4/2000 .15 - Railway Station from Signal box - 27/4/2000 For 2010 comparisons see 4645 and 4646. See Aboveballarat, sebastopol, albert st, sec depot, railway station, mt pleasant, dawson st, sturt st -
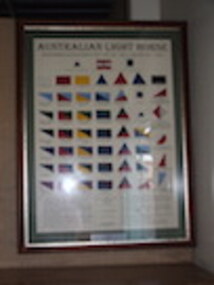 4th/19th Prince of Wales's Light Horse Regiment Unit History Room
Colour Patch Display, Frontier Military History Services, Australian Light Horse Colour Patches of the 1st AIF 1915-1920 & AMF/CMF 1921-1940's, 24/07/2010
Display board of replica cloth colour patches, mounted in glass fronted wooden frame. Colour patches displayed are those of : 1st Cavalry Division HQ (CMF) Desert Mounted Corps HQ 2nd Cavalry Division HQ (CMF) HQ 1st Light Horse Brigade (AIF & CMF) HQ 2nd Light Horse Brigade (AIF & CMF) HQ 3rd Light Horse Brigade (AIF & CMF) HQ 4th Light Horse Brigade (AIF) HQ 5th Light Horse Brigade (AIF & CMF) HQ 4th Light Horse Brigade (CMF) HQ 6th Light Horse Brigade (CMF) 1st Light Horse Regiment / 1st Royal NSW Lancers 5th Light Horse Regiment / 5th Wide Bay & Burnett Light Horse 8th Light Horse Regiment / 8th Indi Light Horse Regiment 4th Light Horse Regiment / 4th Corangamite Light Horse Regiment 14th Light Horse Regiment / 14th West Moreton Light Horse Regiment 18th Adelaide Lancers 4th Light Horse Regiment / 1st Aust Div Mounted Regiment / 2nd ANZAC Mounted Regiment / 22nd Corps Mounted Regiment. 2nd Light Horse Regiment / 2nd Moreton Light Horse Regiment 6th Light Horse Regiment / 6th NSW Mounted Rifles 9th Light Horse Regiment / 9th Flinders Light Horse Regiment 11th Light Horse Regiment / 11th Darling Downs Light Horse Regiment 15th Light Horse Regiment / 15th Northern River Lancers 21st Riverina Light Horse 13th Light Horse Regiment / 2nd Aust Div Mounted Regiment / 1st ANZAC Mounted Regiment / Aust Corps Mounted Regiment / 13th Gippsland Light Horse Regiment 3rd Light Horse Regiment / 3rd South Australian Mounted Rifles 7th Light Horse Regiment / 7th Australian Horse 10th Light Horse Regiment / 10th Western Australian Mounted Infantry 12th Light Horse Regiment / 12th New England Light Horse Regiment 17th Prince of Wales Light Horse Regiment 22nd Tasmanian Mounted Infantry 11th Light Horse Regiment / 4th Aust Div Mounted Regiment / 24th Gwydir Light Horse Regiment 1st Machine Gun Squadron / 25th Light Horse (MG) 2nd Machine Gun Squadron / 16th Hunter River Lancers 3rd Machine Gun Squadron / 20th Victorian Mounted Rifles 4th Machine Gun Squadron / 26th Light Horse (MG) 5th Machine Gun Squadron / 19th Yarrowee Light Horse 23rd Barossa Light Horse Regiment 12th Light Horse Regiment / 5th Aust Div Mounted Regiment 1st Light Horse Field Ambulance 2nd Light Horse Field Ambulance 3rd Light Horse Field Ambulance 4th Light Horse Field Ambulance 5th Light Horse Field Ambulance 4th Signal Troop / 4th Light Horse brigade 6th Mobile Veterinary Section /1st Light Horse Brigade 7th Mobile Veterinary Section / 2nd Light Horse Brigade 8th Mobile Veterinary Section / 3rd Light Horse Brigade 9th Mobile Veterinary Section / 4th Light Horse brigade 10th Mobile Veterinary Section / 5th Light Horse Brigade 5th Signal Troop / 5th Light Horse Brigade 1st Signal Squadron / NZ & Aust Mounted Div Signal SquadronColour Patch Display No 39. Includes detailed notes about history, usage and design of colour patchesworld war one, ww1, army, aif, insignia, heraldry, light horse, militia, badges, colour patches, cmf -
 Robin Boyd Foundation
Document - Manuscript, Robin Boyd, Imported Archi…
Boyd argues that Australia needs confidence in creative thinking so our products can cut through established formulas to contribute to our growth as a nation. He outlines four stages of architectural development in every community, and describes Canada in these terms. He posits that Australia overall is only at stage two (imported sophisticated), Brisbane/Hobart/Adelaide at stage one. Boyd argues the Australian dream of individual identity is impossible now, to move to stage 3 Australia needs to be encouraged to have confidence in Australian artists of all kinds, allowing creative people to flourish, be themselves. He indicates that Canberra is close to third stage, with architecture designed by international figures in 1960s but now Australian John Andrews brought out to do an architecturally creative office complex in Belconnen - Canberra, signalling growth of a national identity.Typewritten (c copy), pencil edits and additions, quarto, 7 pages - p12-18confidence in creative thinking, australian national identity, four stages in architectural development, canberra architecture, john andrews, robin boyd, manuscript -
 Melbourne Legacy
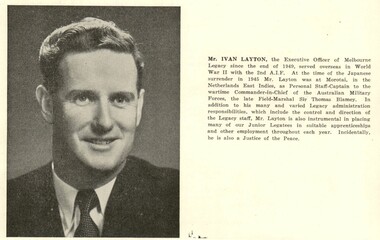
Article, VALE Ivan Layton, 2002
Two page summary of the life of Ivan Layton. During World War 2 he served in the South West Pacific area as a signaller in the Australia Corps of Signals, 2nd AIF. He became personal Staff Captain for General Blamey. After the war he was the CEO of Legacy for 30 years. His secretary for 14 years was Wendy Faulkner who related that he loved theatre and was a great friend of Gracie Fields. Among his friends were Nurse Vivian Bullwinkle and Weary Dunlop. He retired from Legacy in June 1979 after serving for 30 years, and was nominated to become a member of Legacy. He passed away on 15 September 1979. Another source of information on Ivan Layton is when he was a 'Guest of Honour' at a Legacy function. His introduction and speech are recounted in the Bulletin of 22/5/1979.A record of the appreciation of long serving staff.Black and white printed A4 page from the Bulletin about Ivan Layton.ivan layton, vale -
 Ballarat Tramway Museum
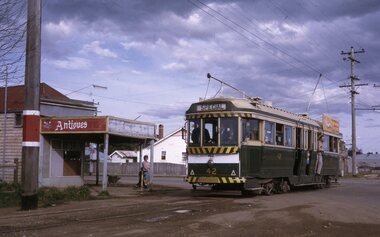
Slide - Set of 7, Warren Doubleday, Ballarat - last Saturday of full operations, 21/8/1971
Photos taken on the last Saturday of full operations by the SECV in Ballarat prior to the first closure of the Victoria St line on 22/8/1971. 1 - Tram 42 running a special inbound in Albert St Sebastopol with a closed Antiques shop in the background. 2 - Trams 26 and 30 Grant St loop on the Mt Pleasant line. 3 - Tram 39 using the Dawson St cross over with tram 26 behind. 4 - Tram 26 on Dawson St cross over 5 - Tram 31 or 32? in Lydiard St north crossing over the level crossing with Reids Coffee Palace, the Provincial Hotel and the signal gantry in the view. 6 - Running through the Gardens with the McDonald Gates and a wedding. 7 - Tram 30 turning from Macarthur St into Wendouree Parade View Point with the tram stop shelter and Swans in the view.Yields information about the last full Saturday of SEC Tramway operations in Ballarat and has a strong association with the archivist. Set of 7 Kodachrome colour slides - cardboard mountsHave the photographer's slide numbers written on them.trams, tramways, closure, tram 26, wendouree parade, barkly st, tram 42, tram 30, level crossing, lydiard st nth, railway, ballarat station, view point, macarthur st -
 Ballarat Tramway Museum
Slide - Set of 6, Warren Doubleday, Ballarat - last day of the Lydiard St Nth to Sebastopol line, 19/9/1971
Photos taken on the last day of the SECV operated tram services in Ballarat 19/9/1971 1 - Tram 39 running out as Special at corner of Sturt and Drummond St North. Has the Mobil Service station and J A Malpass shop in the background. 2 - Tram 40 waiting at the railway gates. Has the Kennedy Murray Pty Ltd General Carrier office in the background and the railway goods shed. Photo taken from the signal box. 3 - Tram 42 in Lydiard St North with Reids Coffee Palace and the Provincial Hotel in the background. The street is very quiet. 4 - Tram 39 at the Lydiard St North terminus. 5 - Tram 40 at the Lydiard St North terminus. Note the shelter and the tram stop pole. 6 - Tram 40 using the Dawson St Crossover with St Patricks Cathedral behind.Yields information about the last day of SEC public operations in Ballarat.Set of 6 Kodachrome colour slides - cardboard mounts. Sixth one in a green card mount.Have the photographer's slide numbers written on them.trams, tramways, closure, tram 35, tram 34, tram 42, tram 40, lydiard st north, level crossing, dawson st -
 Warrnambool and District Historical Society Inc.
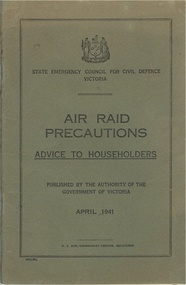
Booklet, Air Raid Precautions, 1941
This booklet was published on the recommendation of the Commonwealth government as part of a plan to offer protection to the people in the event of air strikes. Local councils and individuals were called to help to protect themselves in taking precautions,. The booklet itself sets out action to be taken in the event of an air raid happening, lighting restrictions fire prevention, refuge rooms and garden shelters and risks from air raids. It contains the relevant siren signals which denote different types of events and explains in detail various aspects of preparing for possible attack. There was discussion about issues such as evacuation of children should such an event occur with the focus primarily on the larger centres such as Geelong and Melbourne. From 1942 the number of air attacks increased mainly from Japan on the northern and western parts of Australia including over 60 on Darwin. Attacks continued into 1943 and it wasn’t until later in that year that the Prime Minister, John Curtin announced that the threat of invasion had passed.While the link to Warrnambool’s history is tenuous, it was a government publication to all persons in the state of Victoria in 1941.This item relates to a significant period in Australia’s history. All Australians were affected by the war. It has historical and scientific or research interest as it gives a number of diagrams and possible plans and the effectiveness of same. Olive green soft card cover with black text. 36 pages, with 2 extra pages depicting plans for shelters pasted inside back cover. Victorian coat of arms at top of cover.April 1941. H. E. Daw, Government printer. Forward by Sir John Harris KBE MLC Minister of Public Instruction and Public Healthhistory of warrnambool, air raid precautions 1941 -
 Warrnambool and District Historical Society Inc.
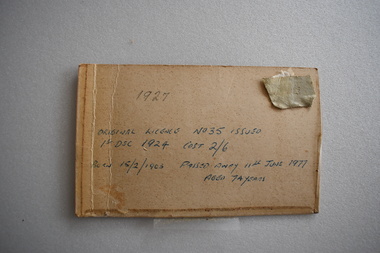
Amateur Radio Card, A 3AJ, 1920's
The Wireless Institute of Victoria was established in 1910 and amateur radio operators (called hams) in Victoria were issued with licences by this institute. Cards such as this one were exchanged by operators to confirm a contact between two amateur radio operators anywhere in the world (called QSL cards). The cards contained information regarding the radio contact made, the strength of the signal, the type of transmitter etc and the words, codes and abbreviations used were known internationally. This card, which is an unused one, belonged to Ted Salamy who had the call sign A 3AJ. This licence was issued in 1924 and was the 35th amateur radio licence issued in Victoria. It is believed that this was the first amateur radio station established in Warrnambool. Ted Salamy (1903-1977) was the son of Michael Salamy who established jewellery shops in Timor Street and in Liebig Street in Warrnambool in the 20th century. Ted Salamy was later the proprietor of these stores up to the 1960s when he retiredThis card has considerable local significance as an early Warrnambool amateur radio card and as one belonging to a prominent 20th century Warrnambool businessman, Ted Salamy. This is a card with a buff-coloured background and black and red printing on one side of the card and handwritten information in blue ink on the other side. The remains of adhesive tape applied to the edges of the card are still visible. ‘Timor Street Warrnambool Vic. Australia A 3AJ, E. Salamy Op.’ amateur (ham) radio, victoria, ted salamy -
Glen Eira Historical Society
Article - Golden Days Radio (operating from Caulfield Racecourse)
This file contains 4 items: 1/A brief history of ‘Golden Days Radio’ updated by Jackie Pelhon, April 2000. It includes description of programming & polices, and details of first meetings. 2/The official newsletter of Golden Days Radio, ‘The Golden Broadcaster’ – volume 4, no. 2, dated August 2009. It includes photographs of the station members receiving service certificates and events. Also a message from President Larry James, and former president Alex Hehr, including their aims relicence, internet streaming and digital radio. 3/A leaflet for Golden Days Radio Station. Includes details on membership, broadcasting times, strength of broadcast signal, list of music genres played and contact details. Author and date unknown. 4/A leaflet for Golden Days Radio Station. Includes the station’s objective as a community service, subjects covered in the programming, contact details and the signatures of John Amor and Don Iacono. Date unknown, prior to 1997.clark nobby, clark neil, james larry, glen huntly, simmons loretta, reidy chris, neville lisa mp, hehr alex, golden days radio, wolff peter, bastow julie, mcbrien bruce, hird peter, iacono don, whittier grandstand, pelhon jackie, amor john, williams cb, caulfield east, caulfield racecourse, lockie maurie, golden days raido for senior citizens, rupert clark stand, voluntary workers, radio stations, radio broadcasting, communication establishments, senior citizens centres, aged people, the ‘fred cross collection’, golden days music library, committee of the vatc, plaques, bentleigh rsl, grandstands, vatc, newsletters, goldsmith brian, bassanetti sandra, norman peter, bendigo bank, music -
Glen Eira Historical Society
Article - ELSTERNWICK RAILWAY STATION AND LINE
Contains 5 downloaded photographs: 1/Photocopy of postcard of ‘Elsternwick Express Disaster at Richmond Railway Station, 18/07/1910’ with photograph of the train wreck, from the State Library of Victoria (dated 24/05/2012). 2/Photocopy of postcard of ‘Elsternwick Express Disaster, at Richmond Railway Station, 18/07/1910’ (a different photograph from the previous) from State Library of Victoria (dated 24/05/2012). 3/Photocopy of photographic print titled ‘A Revolving Signal, Elsternwick Crossing (Vic)’, from State Library of Victoria (dated 06/03/2012). 4/Photocopy of a gelatin silver photograph of ‘Elsternwick (train) derailment, 21/04/1926’ from State Library of Victoria (dated 24/05/2012). 5/Photocopy of postcard of ‘Elsternwick Railway Station’ (no date given perhaps c.1910), from State Library of Vitoria (dated 24/05/2012).railways, stations, transport, tramways, accidents, elsternwick, richmond, caulfield -
 Parliament of Victoria
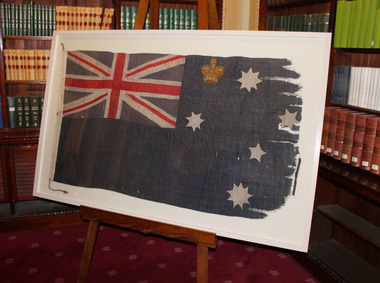
Victorian Ensign, c.1870
An ensign is a national flag used within a naval or military context. A naval ensign is usually required to be flown when entering and leaving harbour, when sailing through foreign waters, and when a ship is signalled to do so by a warship. They are also flown during battles and when the ensign is lowered, the ship is said to have surrendered. This Victorian Naval Ensign was used by the Victorian Naval Contingent in the Boxer Rebellion in China in 1900. The contingent was led by Captain Frederick Tickell who had commanded the Victorian Naval Forces since 1897. In around 1901, Captain Tickell presented the ensign to Frederick Thomas Sargood [1834-1903] who had been Minister of Defence and Education for the Colony of Victoria and was a Senator in Federal Parliament. In September 1986 the ensign was stolen from Parliament House. The suspect was described as a young man wearing 'a beret and bow tie' ("The Age" 26 September 1986). Fortunately the ensign was recovered a week later. Victorian Ensign wool flag with Union Jack, Southern Cross and crown emblem. Hand written ink inscription on white linen sleeve. Rope attached. Framed.Handwritten black ink on flag header: "This Victorian Ensign (the first on active service) was used by the Victorian Contingent during service in 1900 in China. It was presented to Senator Sir F.T. Sargood K.C.M.G. by Captain Tickell C.M.B. Lieut. Col."colony of victoria, boxer rebellion, victorian navy -
 Wodonga & District Historical Society Inc
Photograph - High Street, Wodonga Level Crossing, 1954
This image is representative of many photographs illustrating the level crossing in the centre of Wodonga. Since its opening in 1873 the railway line had crossed High Street, originally called Sydney Road. It bisected the city with level crossing gates frequently stopping the flow of traffic and pedestrians as trains passed through. Signal Box B stood on the eastern side of the High Street level crossing and a big wheel closed and opened the gates. On 17th September, 1961, it was replaced by boom gates and flashing lights. The railway crossing was removed from High Street as part of the Wodonga Rail Bypass project. This involved a 5.5 kilometres bypass, the elimination of 11 level crossings and the relocation of the Wodonga station. It was moved from its original central location to a position on a new line on the northern edge of the town. The old station closed on 8 November 2008 and the new station opened on 25 June 2011.This image has local and statewide significance as it captures the former crossing in a major railway system. The railways played a critical role in opening up Victoria and connecting Australia for trade, business, social communication and transport.A black and white photo of the railway level crossing in High Street, Wodonga with gates closed. The Melbourne to Sydney railway line went through the centre of Wodonga and trains frequently held up internal vehicular and pedestrian traffic in the main street. railways wodonga, wodonga railway relocation, high st wodonga rail crossing -
 Trafalgar Holden Museum
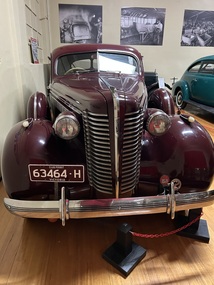
Vehicle - Buick Sedan, 1938
The Special Sport Sedan is a rear wheel drive saloon (sedan) motor car with a front located engine, manufactured by Buick. The Special Sport Sedan is part of Buick's Series 40 family of cars. It is powered by a naturally aspirated engine of 4.1 litre capacity. This unit features overhead valve valve gear, in line 8 cylinder layout, and 2 valves per cylinder. It has an output of 107 bhp (108 PS/80 kW) of power at 3400 rpm, and maximum torque of 275 N·m (203 lb·ft/28 kgm) at 2000 rpm. A 3 speed manual transmission transmits the power. Buick scored another first in 1939 when it became the first company to introduce turn signals, which did not appear on other car brands until almost a decade later.[ All 1939 models also had a steering column mounted shift lever1938 Buick Sedan . Bodied in Australia by GMHBurgundy 4 door rear wheel drive sedan, white wheels. Spare wheel holder both sides, side lights. Steel front and back bumper bars, steel strip around car Buick badge on front grille. Bonnet vent with "SPECIAL' badge. Two Buick badges behind front bumper, Buick badge on boot.automobile, bodied, car, buick -
 Bendigo Military Museum
Award - MEDAL SET WW2, Post 1945
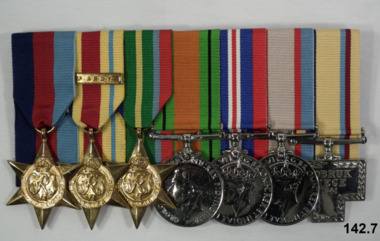
Frederick Lloyd CARLETON enlisted on 24.10.1939 No VX1555 age 33 Years. He was posted to 2/6th Div Signals but was discharged Medically unfit on 20.1.1940. He then re enlisted on 1.7.1940 No VX33476, posted to 2/23rd Bn 20.8.1940, promoted L/Cpl 14.9.1940, embarked for the Middle East 16.11.1940, promoted to Cpl 18.12.1940, Sgt 14.12.1941, embarked for Australia 31.4.1943 and disembarked Melb 25.2.1943. In the Middle East he was one of 10 to receive a Commander in Chiefs Commendation during Sept 1941. Served in the Tobruk Seige , Lebanon and El Alamein. He met and married a British Army Nursing sister in Palestine 1942. Hospitalised in Seymour Vic with Furuncles. Embarked for Milne Bay from Cairns and disembarked 4.8.1943, embarked 31.1.1944 (unclear) and disembarked 7.2.1944 (unclear), hospital with Malaria 2.6.1944. On discharge being medically unfit 12.9.44 he held the rank of Sergeant. Service abroad was 1023 days.Medal set, court mounted, group of (7) re F.L.Carleton. 1. 1939-45 Star. 2. Africa Star with clasp 8th Army. 3. Pacific Star. 4. Defence Medal 5.War medal 1939-45. 6. Australian Service Medal 1939 - 45. 7. Tobruk commemorative medal "T" shaped."VX33476 F.L.Carleton"numismatics, medals, metalcraft, military -
 Ballarat Tramway Museum
Slide - 27 mm sq slide/s - set of 8 - tram tracks - Victoria St, Lilian Butler, Aug. 1971
Yields information about the streetscapes of Ballarat on the Gardens to Victoria St route and in particular buildings and people that crewed the trams.Set of eight Colour 27 x 27 mm slide in a Kodachrome cardboard mount. .1 - view of the Sturt and Lydiard St intersection from the front of the tram car with the Robbie Burns statue in the view and the Big W store. .2 - ditto at the corner of Sturt and Grenville St with the tramway shelter and the Dickins store. .3 - setting the signals for the Bridge St route. .4 - View looking east along Bridge St with Big W store and Faull's shoe shop. .5 - At intersection with Main Road, looking up the hill towards Victoria St. On the right is the advert for Viscount Ambassador Caravans. .6 - Looking along Victoria St, towards the East at E St, with the biscuit factory on the left. .7 - tram shelter at Queen St. .8 - View of the terminus looking east, showing the median strip Slide mount date August 1971. Photo from the collection of Lilian Butler.ballarat, tramways, trams, sturt st, grenville st, shelters, bridge st, signals, victoria st -
 Ballarat Tramway Museum
Functional Object - Section Staff, Electric Supply Co. of Vic (ESCo), "Carlton St - Car Shed Loop"
Demonstrates aspects of Safeworking on the Ballarat Tramway system from 1960 to c1936 when replaced by electric signs. Yields Information about the operation of Ballarat's trams and safeworking procedures.Cast brass item with a flat part recessed section with the words "BALLARAT TRAMWAYS SECTION STAFF" cast into the surface and a flat section underneath, flush with the outside edges in which the words "CARLTON ST. CAR SHED LOOP." stamped in. Has an open rounded end which forms a handle or a point where it could be hung on a peg. The part with the words "CAR SHED LOOP" appears to have been ground down and a previous location name taken out and replaced. Used a means of authorising a tramcar to have sole use of the track between the named points to avoid head on collisions. Safeworking object - known as a section staff. Not known when made, but in use until the introduction of the electric signalling in the mid 1930's by the SEC. See also Reg Items 934 and 988 for details of use and other examples are at 1851, to 53, 2473 and 4444 to 4448, , 4996 and 4497 and Reg item 934 and 988 for articles on the safeworking systems.trams, tramways, staff, safeworking, tramway staffs, sec, signals -
 Ballarat Tramway Museum
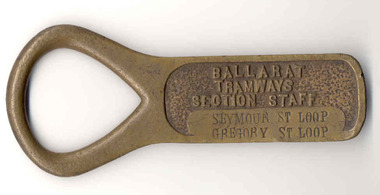
Functional Object - Section Staff, Electric Supply Co. of Vic (ESCo), "Seymour St. Loop. Gregory St. Loop"
Demonstrates aspects of Safeworking on the Ballarat Tramway system from 1960 to c1936 when replaced by electric signs. Yields Information about the operation of Ballarat's trams and safeworking procedures.Cast brass item with a flat part recessed section with the words "BALLARAT TRAMWAYS SECTION STAFF" cast into the surface and a flat section underneath with the words "SEYMOUR ST LOOP GREGORY ST LOOP." stamped in. Has an open rounded end which forms a handle or a point where it could be hung on a peg. The part with the words giving the two locations appears to have been ground down and a previous location names taken out and replaced. Used a means of authorising a tramcar to have sole use of the track between the named points to avoid head on collisions. Safeworking object - known as a section staff. Not known when made, but in use until the introduction of the electric signalling in the mid 1930's by the SEC. See also Reg Items 934 and 988 for details of use and other examples are at 1851, to 53, 2473 and 4444 to 4448, , 4996 and 4497 and Reg item 934 and 988 for articles on the safeworking systems.trams, tramways, staff, safeworking, tramway staffs, sec, signals -
 Ballarat Tramway Museum
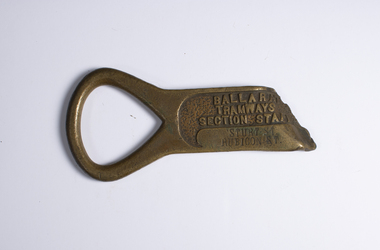
Functional Object - Section Staff, Electric Supply Co. of Vic (ESCo), "Sturt St Loop to Rubicon St Loop"
Demonstrates aspects of Safeworking on the Ballarat Tramway system from 1960 to c1936 when replaced by electric signs. Yields Information about the operation of Ballarat's trams and safeworking procedures. Demonstrates what can happen in use - has been run over by a tram - possibly being exchanged on the move or some other story.Cast brass item with a flat part recessed section with the words "BALLARAT TRAMWAYS SECTION STAFF" cast into the surface and a flat section underneath, flush with the outside edges in which the words "STURT ST RUBICON ST " stamped in. Has an open rounded end which forms a handle or a point where it could be hung on a peg. The staff has been run over by a tram and had the last part of the object cut off. Used as a means of authorising a tramcar to have sole use of the track between the named points to avoid head on collisions. Safeworking object - known as a section staff. Not known when made, but in use until the introduction of the electric signalling in the mid 1930's by the SEC. See also Reg Items 934 and 988 for details of use and other examples are at 1851, to 53, 2473 and 4444 to 4448, , 4996 and 4497 and Reg item 934 and 988 for articles on the safeworking systems.Ballarat Tramways Section Staff Sturt St Rubicon Sttrams, tramways, staff, safeworking, tramway staffs, sec, signals