Showing 1423 items matching " bridge st "
-
 Old School House Museum
Photograph
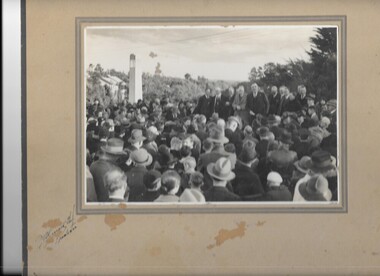
Opening of Mile Bridge Frankston, large group of people, photo on grey cardboard -
 Numurkah & District Historical Society
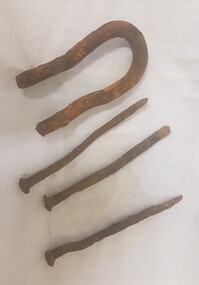
Equipment - Handmade nails (3) and shackle
Found by metal detector at the site of an old bridge in Numurkah district 3 x Handmade metal nails / 1 x Handmade metal u-shaped shacklehandmade nails, shackle, metal detector, numurkah bridge site -
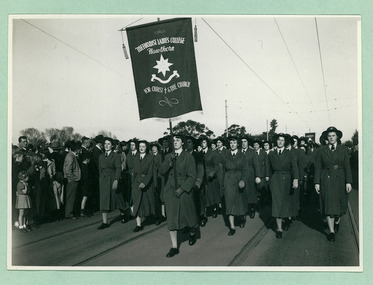 Department of Health and Human Services
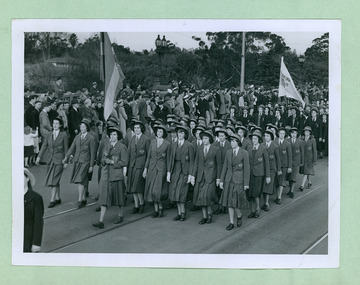
The Methodist Ladies College (MLC) crossing Princes Bridge and marching towards the Melbourne Town Hall on Swanston Street, Melbourne CBD Australia, from the War Memorial - Department of Health – National Fitness Office (Sports & Recreation) – Historical Press Release Photo Collection
Department of Health – National Fitness Office (Sports & Recreation) – Historical Press Release Photo - Empire Youth Day & Royals on Tour CollectionDepartment of Health – National Fitness Office (Sports & Recreation) – Historical Press Release Photo - Empire Youth Day & Royals on Tour Collection -
 Department of Health and Human Services
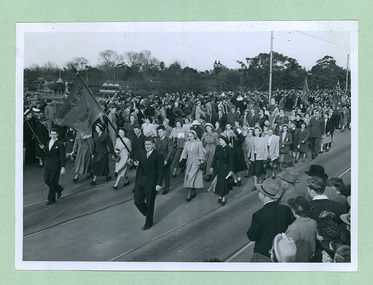
A group of school flag bearers crossing the Princes Bridge marching towards to the Melbourne Town Hall on Swanston Street, Melbourne CBD Australia - 1948, from the War Memorial - Department of Health – National Fitness Office (Sports & Recreation) – Historical Press Release Photo Collection
Department of Health – National Fitness Office (Sports & Recreation) – Historical Press Release Photo - Empire Youth Day & Royals on Tour CollectionDepartment of Health – National Fitness Office (Sports & Recreation) – Historical Press Release Photo - Empire Youth Day & Royals on Tour Collection -
 Department of Health and Human Services
A group of Catholic College groups crossing the Princes Bridge marching towards to the Melbourne Town Hall on Swanston Street, Melbourne CBD Australia - 1948, from the War Memorial - Department of Health – National Fitness Office (Sports & Recreation) – Historical Press Release Photo Collection
Department of Health – National Fitness Office (Sports & Recreation) – Historical Press Release Photo - Empire Youth Day & Royals on Tour CollectionDepartment of Health – National Fitness Office (Sports & Recreation) – Historical Press Release Photo - Empire Youth Day & Royals on Tour Collection -
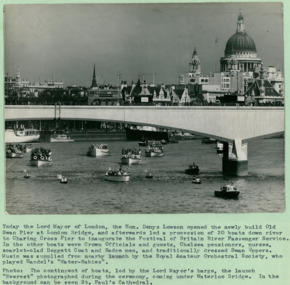 Department of Health and Human Services
Opening of the Old Swan Pier at London Bridge, with procession of boats seen underneath - Department of Health – National Fitness Office (Sports & Recreation) – Historical Press Release Photo Collection
Department of Health – National Fitness Office (Sports & Recreation) – Historical Press Release Photo - Empire Youth Day & Royals on Tour CollectionDepartment of Health – National Fitness Office (Sports & Recreation) – Historical Press Release Photo - Empire Youth Day & Royals on Tour Collection -
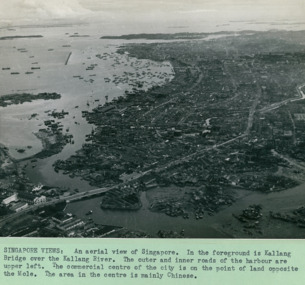 Department of Health and Human Services
An aerial view of with the Kallang Bridge over the Kallang River in the foreground left Singapore - 3 of 3 photos - Department of Health – National Fitness Office (Sports & Recreation) – Historical Press Release Photo Collection
Department of Health – National Fitness Office (Sports & Recreation) – Historical Press Release Photo - Empire Youth Day & Royals on Tour CollectionDepartment of Health – National Fitness Office (Sports & Recreation) – Historical Press Release Photo - Empire Youth Day & Royals on Tour Collection -
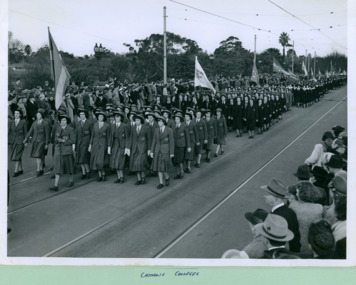
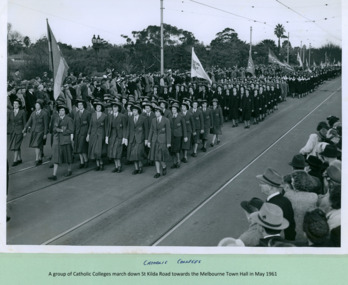 Department of Health and Human Services
Catholic Colleges march over Princes Bridge towards Swanston Street and the Melbourne Town Hall, Melbourne CBD Australia, from the War Memorial on May 1961 - Department of Health – National Fitness Office (Sports & Recreation) – Historical Press Release Photo Collection
Department of Health – National Fitness Office (Sports & Recreation) – Historical Press Release Photo - Empire Youth Day & Royals on Tour CollectionDepartment of Health – National Fitness Office (Sports & Recreation) – Historical Press Release Photo - Empire Youth Day & Royals on Tour Collection -
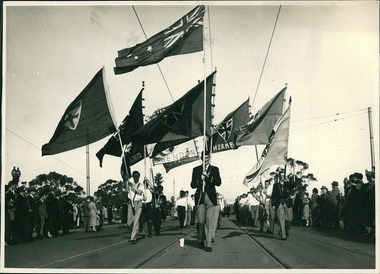
 Department of Health and Human Services
Different College groups marching over Princes Bridge towards Flinders Street Station and the salute base in front of the Melbourne Town Hall on Swanston Street, Melbourne CBD Australia, from the War Memorial - Department of Health – National Fitness Office (Sports & Recreation) – Historical Press Release Photo Collection
Department of Health – National Fitness Office (Sports & Recreation) – Historical Press Release Photo - Empire Youth Day & Royals on Tour CollectionDepartment of Health – National Fitness Office (Sports & Recreation) – Historical Press Release Photo - Empire Youth Day & Royals on Tour Collection -
 Department of Health and Human Services
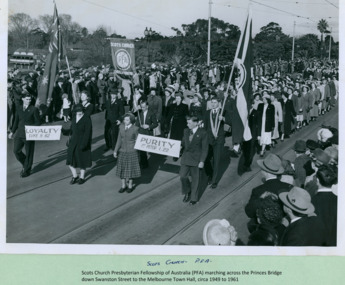
Scots Church & The Presbyterian Fellowship of Australia ( PFA ) crossing Princes Bridge marching towards the Melbourne Town Hall on Swanston Street, Melbourne CBD Australia, from the War Memorial - Department of Health – National Fitness Office (Sports & Recreation) – Historical Press Release Photo Collection
Department of Health – National Fitness Office (Sports & Recreation) – Historical Press Release Photo - Empire Youth Day & Royals on Tour CollectionDepartment of Health – National Fitness Office (Sports & Recreation) – Historical Press Release Photo - Empire Youth Day & Royals on Tour Collection -
 Department of Health and Human Services
Churches of Christ group crossing Princes Bridge marching towards the Melbourne Town Hall on Swanston Street, Melbourne CBD Australia, from the War Memorial - Department of Health – National Fitness Office (Sports & Recreation) – Historical Press Release Photo Collection
Department of Health – National Fitness Office (Sports & Recreation) – Historical Press Release Photo - Empire Youth Day & Royals on Tour CollectionDepartment of Health – National Fitness Office (Sports & Recreation) – Historical Press Release Photo - Empire Youth Day & Royals on Tour Collection -
 Department of Health and Human Services
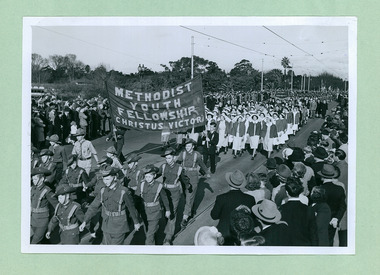
Army Cadets, Nurses, and Methodist Youth Fellowship & Council crossing Princes Bridge marching towards the Melbourne Town Hall on Swanston Street, Melbourne CBD Australia, from the War Memorial - Department of Health – National Fitness Office (Sports & Recreation) – Historical Press Release Photo Collection
Department of Health – National Fitness Office (Sports & Recreation) – Historical Press Release Photo - Empire Youth Day & Royals on Tour CollectionDepartment of Health – National Fitness Office (Sports & Recreation) – Historical Press Release Photo - Empire Youth Day & Royals on Tour Collection -
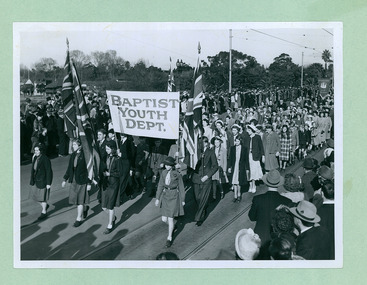 Department of Health and Human Services
Baptist Youth Department group crossing Princes Bridge marching towards the Melbourne Town Hall on Swanston Street, Melbourne CBD Australia, from the War Memorial - Department of Health – National Fitness Office (Sports & Recreation) – Historical Press Release Photo Collection
Department of Health – National Fitness Office (Sports & Recreation) – Historical Press Release Photo - Empire Youth Day & Royals on Tour CollectionDepartment of Health – National Fitness Office (Sports & Recreation) – Historical Press Release Photo - Empire Youth Day & Royals on Tour Collection -
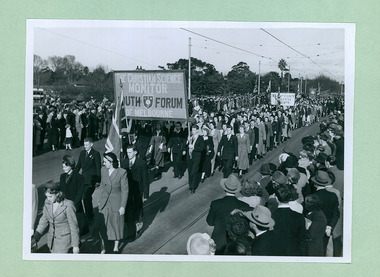 Department of Health and Human Services
The Christian Science Monitor Youth Forum ( CSMYF ) group crossing Princes Bridge marching towards the Melbourne Town Hall on Swanston Street, Melbourne CBD Australia, from the War Memorial - Department of Health – National Fitness Office (Sports & Recreation) – Historical Press Release Photo Collection
Department of Health – National Fitness Office (Sports & Recreation) – Historical Press Release Photo - Empire Youth Day & Royals on Tour CollectionDepartment of Health – National Fitness Office (Sports & Recreation) – Historical Press Release Photo - Empire Youth Day & Royals on Tour Collection -
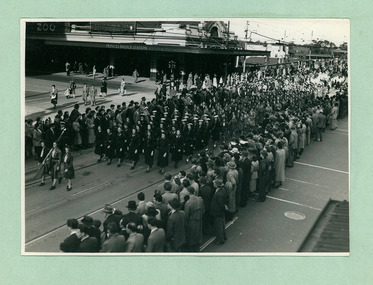 Department of Health and Human Services
Girl Guides crossing Flinders Street next to Princes Bridge Station marching towards the Melbourne Town Hall on Swanston Street, Melbourne CBD Australia, from the War Memorial - Department of Health – National Fitness Office (Sports & Recreation) – Historical Press Release Photo Collection
Department of Health – National Fitness Office (Sports & Recreation) – Historical Press Release Photo - Empire Youth Day & Royals on Tour CollectionDepartment of Health – National Fitness Office (Sports & Recreation) – Historical Press Release Photo - Empire Youth Day & Royals on Tour Collection -
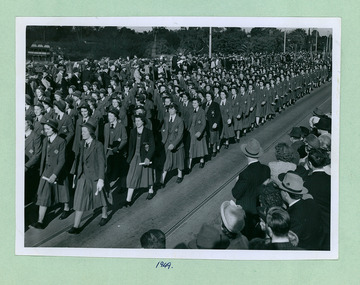 Department of Health and Human Services
A College group crossing Princes Bridge marching towards the Melbourne Town Hall on Swanston Street, Melbourne CBD Australia, from the War Memorial 1949 - Department of Health – National Fitness Office (Sports & Recreation) – Historical Press Release Photo Collection
Department of Health – National Fitness Office (Sports & Recreation) – Historical Press Release Photo - Empire Youth Day & Royals on Tour CollectionDepartment of Health – National Fitness Office (Sports & Recreation) – Historical Press Release Photo - Empire Youth Day & Royals on Tour Collection -
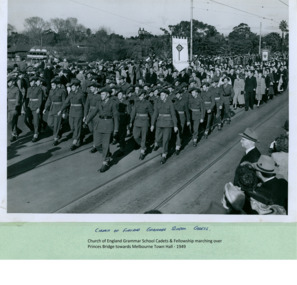 Department of Health and Human Services
Church of England Grammar School Cadets marching over Princes Bridge towards the Melbourne Town Hall on Swanston Street, Melbourne CBD Australia, from the War Memorial 1949 - Department of Health – National Fitness Office (Sports & Recreation) – Historical Press Release Photo Collection
Department of Health – National Fitness Office (Sports & Recreation) – Historical Press Release Photo - Empire Youth Day & Royals on Tour CollectionDepartment of Health – National Fitness Office (Sports & Recreation) – Historical Press Release Photo - Empire Youth Day & Royals on Tour Collection -
 Department of Health and Human Services
Christian groups from Coburg, East Brunswick, Williamstown and South Melbourne marching over Princes Bridge towards the Melbourne Town Hall on Swanston Street, Melbourne CBD Australia, from the War Memorial - Department of Health – National Fitness Office (Sports & Recreation) – Historical Press Release Photo Collection
Department of Health – National Fitness Office (Sports & Recreation) – Historical Press Release Photo - Empire Youth Day & Royals on Tour CollectionDepartment of Health – National Fitness Office (Sports & Recreation) – Historical Press Release Photo - Empire Youth Day & Royals on Tour Collection -
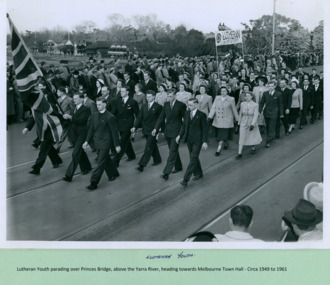 Department of Health and Human Services
Lutheran Youth marching over Princes Bridge towards the Melbourne Town Hall on Swanston Street, Melbourne CBD Australia, from the War Memorial - Department of Health – National Fitness Office (Sports & Recreation) – Historical Press Release Photo Collection
Department of Health – National Fitness Office (Sports & Recreation) – Historical Press Release Photo - Empire Youth Day & Royals on Tour CollectionDepartment of Health – National Fitness Office (Sports & Recreation) – Historical Press Release Photo - Empire Youth Day & Royals on Tour Collection -
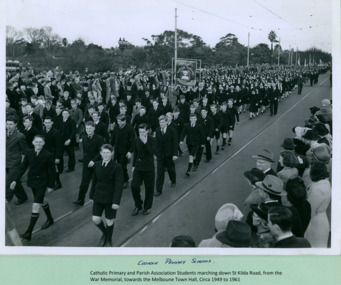 Department of Health and Human Services
Catholic Primary Schools and Parish association Students marching over Princes Bridge towards the Melbourne Town Hall on Swanston Street, Melbourne CBD Australia, from the War Memorial - Department of Health – National Fitness Office (Sports & Recreation) – Historical Press Release Photo Collection
Department of Health – National Fitness Office (Sports & Recreation) – Historical Press Release Photo - Empire Youth Day & Royals on Tour CollectionDepartment of Health – National Fitness Office (Sports & Recreation) – Historical Press Release Photo - Empire Youth Day & Royals on Tour Collection -
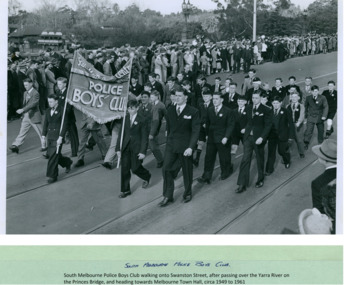 Department of Health and Human Services
South Melbourne Police Boys' Club marching over Princes Bridge heading towards the Melbourne Town Hall on Swanston Street, Melbourne CBD Australia, from the War Memorial - Department of Health – National Fitness Office (Sports & Recreation) – Historical Press Release Photo Collection
Department of Health – National Fitness Office (Sports & Recreation) – Historical Press Release Photo - Empire Youth Day & Royals on Tour CollectionDepartment of Health – National Fitness Office (Sports & Recreation) – Historical Press Release Photo - Empire Youth Day & Royals on Tour Collection -
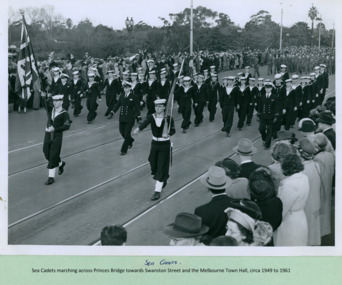 Department of Health and Human Services
Sea Cadets crossing Princes Bridge marching towards the Melbourne Town Hall on Swanston Street, Melbourne CBD Australia, from the War Memorial - Department of Health – National Fitness Office (Sports & Recreation) – Historical Press Release Photo Collection
Department of Health – National Fitness Office (Sports & Recreation) – Historical Press Release Photo - Empire Youth Day & Royals on Tour CollectionDepartment of Health – National Fitness Office (Sports & Recreation) – Historical Press Release Photo - Empire Youth Day & Royals on Tour Collection -
 Department of Health and Human Services
Army Cadets crossing Princes Bridge marching towards the Melbourne Town Hall on Swanston Street, Melbourne CBD Australia, from the War Memorial - Department of Health – National Fitness Office (Sports & Recreation) – Historical Press Release Photo Collection
Department of Health – National Fitness Office (Sports & Recreation) – Historical Press Release Photo - Empire Youth Day & Royals on Tour CollectionDepartment of Health – National Fitness Office (Sports & Recreation) – Historical Press Release Photo - Empire Youth Day & Royals on Tour Collection -
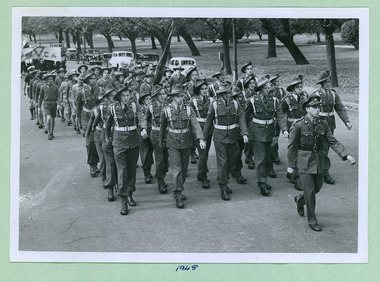 Department of Health and Human Services
Army Cadets marching towards Princes Bridge and then on to the Melbourne Town Hall on Swanston Street, Melbourne CBD Australia, from the War Memorial - Department of Health – National Fitness Office (Sports & Recreation) – Historical Press Release Photo Collection
Department of Health – National Fitness Office (Sports & Recreation) – Historical Press Release Photo - Empire Youth Day & Royals on Tour CollectionDepartment of Health – National Fitness Office (Sports & Recreation) – Historical Press Release Photo - Empire Youth Day & Royals on Tour Collection -
 Department of Health and Human Services
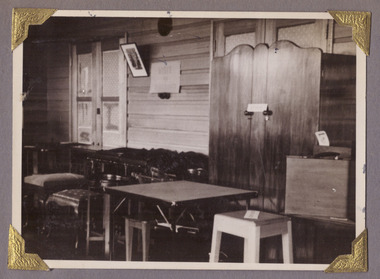
Photograph, A photo of furniture, including chairs, wardrobe, and a bridge table made by patients at Gresswell Sanitorium, Mont Park
-
 Ballarat Tramway Museum
Photograph - Black and White - tram 11 Victoria St, A T Miles, 26/11/1969
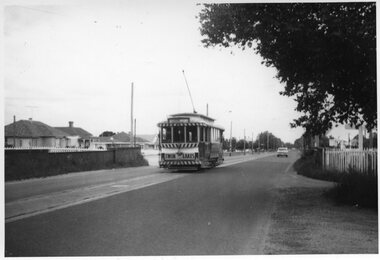
... in Victoria St crossing over the Eureka line bridge - former Buninyong ...Black and White - tram 11 in Victoria St crossing over the Eureka line bridge - former Buninyong railway line. Taken by A T Miles 26/11/1969. The tram has a Twin Lakes advert on the front. The destination has been changed for the return trip to the Gardens via Sturt St West.Yields information about services to Victoria St.Photograph - black and white print with notes on rear. A T Miles stamp and location and date notes.tramways, trams, tram 11, victoria st, eureka line, bridge, buninyong -
 Ballarat Tramway Museum
Photograph - Digital image, The Courier Ballarat, 1/10/1949 12:00:00 AM
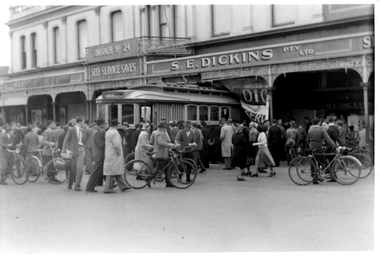
... and S.E. Dickins Store, Bridge St Ballarat. Trams tramways ...Yields information about Ballarat 17 in an accident with a bus used a doughnut kitchen and S.E. Dickins Store, Bridge St Ballarat.Set of four images of photographs (two each same, different exposure) of Black and white photographs of SEC Tram 17 and a former bus used a food vendors stand, that have finished up in the front of S.E. Dickins Pty Ltd. (Grocers) store c1949. The tram derailed at the intersection of Sturt and Grenville St. collided with the bus and pushed it into the front of the store. Many people standing around the incident, including two trammies in front of the tram. See Reg Item 5587 for newspaper reports and 1020 for other photographs.trams, tramways, grenville st, accidents, s.e. dickins, tram 17 -
 Ballarat Tramway Museum
Slide - 35mm slide/s - set of 11, Noel Simons, 23/10/1965 12:00:00 AM
Set of 11 Kodachrome transparencies taken on 23/10/1965 in Melbourne. 1178.1 - W7 1020 (on route 9A, Northcote via St Georges Road) with a W2 536 (Deepdene) behind at the corner of Victoria Parade and Brunswick St. East Melbourne or Fitzroy. Has Eastern Hill fire station and ICI building in background. 1020 has front dash panel ads for Queens Bridge Motors and Bridgestone tyres. 1178.2 - W5 759 (route 19, North Coburg) and W5 807 in Elizabeth St. Melbourne at the intersection of Bourke St. with the State Savings Bank building in the background. 759 has side ads, one of which is for CASTROL. 1178.3 -SW6 903 crossing Brunswick St. in Victoria Parade, Fitzroy bound for Deepdene, route 45. Photo taken after tram has passed photographer. 1178.4 - W7 1019 (route 96, East Brunswick Blyth St.) and W7 1010 (route 88 East Preston) in Nicholson St at intersection with Victoria Parade. A Herald newspaper truck is alongside 1019. 1178.5 - W7 1040 (route 96, East Brunswick Blyth St.) in Nicholson St at intersection with Albert St. Has Princess Theatre in the background. (High res scan added 26/10/2008 - copy to FOHTD) .1178.6 - W6 974 (route 89 East Preston Bell St.) in Bourke St. about to turn into Spring St. Has buildings on the south side of Bourke St in background, including Southern Cross Hotel. Note trees in tubs and red phone box by Windsor Hotel. 1178.7 - as for same location as 1178.6 - SW6 967 (route 96) and W6 971 (inbound - route 90 - City Spencer St.) 967 has Lucas ad on front dash. 1178.8 - W7 1013 (route 88 East Preston) photographed from W6 991 in Bourke St at corner of Russell St. Has Normans corner store, Treadways and Foys in background. 1178.9 - W2 553 (route 1 East Coburg) at the corner of Elizabeth St and Bourke St. Has the Leviathan, Roger David and Ezywalkin shops in the background. 1178.10 - W6 991 (route 88) and W7 (route 96) in Bourke St. at corner with Elizabeth St. Photo taken from the GPO steps. 991 has ads for BIC pens and CASTROL. In background are the State Savings Bank, Halls Books and McEwans shops. 1178.11 - Line up of north bound trams (3 +) lead by W2 449and southbound in Elizabeth St at corner of Collins St. Has Flinders St. station building in the background. Hi -res image of .10 added 22-12-2018All have date stamp of "23 Oct 1965" in purple ink. All black ink unless otherwise noted. 1178.1 - "W7 1020 turning into Brunswick St. from Victoria parade, East Melbourne (followed by W2 536) 1178.2 - "W5 799 and 807 in Elizabeth St. Melbourne at cnr. of Bourke St." 1178.3 - "SW6 903 entering reserved track in Victoria Parade, East Melbourne" 1178.4 - "W7 1019 and 1010 in Nicholson St. East Melbourne at Victoria Pde intersection" 1178.5 - "W7 1040 Melbourne's last tram (to date) in Nicholson St. at Albert St. intersection." 1178.6 - "W6 974 in Bourke St. Melbourne, about to turn into Spring St." 1178.7 - "W6 971 entering Bourke St. from Spring St. Melbourne, passes SW6 967 outward bound for East Brunswick" 1178.8 - "W7 1013 (seen from W6 991) in Bourke St. Melbourne crossing Russell St." 1178. 9 -"W2 553 in Elizabeth St. Melbourne at cnr of Bourke St." 1178.10 - "W6 991 and W7 1005 in Bourke St. Melbourne at cnr of Elizabeth St." 1178.11 - "W2 449 leads a line of Peak hour cars along Elizabeth St. Melbourne (at Collins St. corner)"tramways, trams, melbourne, victoria parade, nicholson st., brunswick st., bourke st, elizabeth st, tram 1020, tram 536, tram 799, tram 807, tram 903, tram 1019, tram 1010, tram 1040, tram 974, tram 967, tram 971, tram 1013, tram 553, tram 991, tram 1005, tram 449 -
 Ballarat Tramway Museum
Slide - 35mm slide/s, Noel Simons, 21/11/1962 12:00:00 AM
Set of 17 transparencies taken on 21/11/1962 on Kodak mounts. 1188.1 - Bendigo No. 11 at Depot Junction McCrae and Arnold St. with driver/conductor changing points. 1188.2 - Bendigo No. 4 at Charing Cross, side on photo, with City Club Hotel and Alexandra Fountain in the background. Tram has Castrol and SEC 'Electric Cooking' ads. 1188.3 - Bendigo No. 4 climbing View St. after tram has passed photographer. Tram has Streets Ice Cream and Cohns Soft Drinks ad on rear dash panel. In the background are the buildings in View St., including the Princess Theatre. Tram has destination of Eaglehawk. 1188.4 - Trams 2 and 4 crossing at the California Gully or Thorpe St Loop. 1188.5 - Bendigo 4 in Mt Korong Road. Tram inbound with destination of Quarry Hill, just leaving Garden Gully Loop. 1188.6 - Bendigo 4 and 17 crossing at the Hayes St. or Iron Bark Gully Loop. No. 17 bound for Eaglehawk, No. 4, Quarry Hill. 17 has two SEC roof ads and a white horse whiskey ad. 1188.7 - No. 17 bound for Eaglehawk, soon after leaving California Gully. Has large mullock heap in background. 1188.8 - Bendigo 2 and 17 crossing at the Thorpe St. or California Gully Loop. Has butchers shop in background. 1188.9 - Bendigo 17 at the Eaglehawk terminus. Has destination of Quarry Hill. In background is the hotel and shops at the terminus, showing ads for "Melbourne Bitter". Tram has two SEC 'Electric Cooking' ads. Driver and conductor about to assist two lady passengers with a pram and baby. 1188.10 - No. 17 at Eaglehawk terminus, awaiting departure. Has Eaglehawk Town Hall and Post Office in background. Tram has a Whitehorse Whiskey ad on the front dash panel. 1188.11 - No. 3 in High St. Eaglehawk, with destination of Eaglehawk. Has the shops on the south side of High St. in the background, including the Eaglehawk fish shop. Tram has two roof ads, one an SEC roof ad, and Cohns Drinks and Streets Ice cream ads on front dash panel. 1188.12 - as above, but after tram has passed photographer. Note the centre of the road poles. 1188.13 - No. 2 outbound for Eaglehawk at the intersection of Mt. Korong Road and the Calder Highway. Photo taken after the tram has passed the photographer. Has an Ampol service station in the background. 1188.14 - No. 11 leaving the Bendigo depot, crossing the bridge, with the Scrubber car in the background. 1188.15 - No. 21 at the North Bendigo terminus. Tram has destination of Golden Square and Cohns drink ad on front dash and two roof ads on side. 1188.16 - No. 11 on Golden Square route, in High St. at intersection with Old High St. 1188.17 - No. 11 at the Golden Square terminus, conductor turning the pole. Hotel on the left side of the photo. Note the road works barrier and red flag behind the tram. Slide has an end of roll mark on the right hand side of the image.Information written on in black ink and date stamped on purple ink. 1188.1 - "Birney car No. 11 in McCrae St. at Cnr of Arnold about to run into depot, Bendigo" 1188.2 - "No. 4 at Alexandra Fountain, Charing Cross Bendigo" 1188.3 - "No. 4 climbing the View St. Hill from Charing Cross, Bendigo (Eaglehawk Route)" 1188.4 - "No. 4 and 2 at Thorpe St. Loop, California Gully" 1188.5 - "No. 4 in Mt Korong Rd., Long Gully, Near Havilah Rd. (Bendigo) (Eaglehawk Route)" 1188.6 - "Nos. 17 and 4 crossing on Hayes St. Loop, Ironbark, Bendigo" 1188.7 - "No. 17 soon after leaving California Gully (Eaglehawk Route)" 1188.8 - "No.2 and 17 crossing on Thorpe St. Loop, California Gully (Eaglehawk Route)" 1188.9 - "No. 17 at Eaglehawk terminus" 1188.10 - "No. 17 at Eaglehawk terminus" 1188.11 - "No. 3 in High St. Eaglehawk" 1188.12 - "No. 3 nearing Eaglehawk terminus" 1188.13 - "No. 2 in Mt. Korong Rd., Ironbark. Calder highway on left (Eaglehawk route) 1188.14 - "Birney car No. 11 leaving Bendigo depot. Scrubber car at rear" 1188.15 - "No. 21 at North Bendigo Terminus" 1188.16 - "Birney car No. 11 in High St. Bendigo at intersection with Old High Street (Golden Square Route)" 1188.17 - "Birney Car No. 11 at Golden Square terminus, High St., Bendigo". tramways, trams, bendigo, depot junction, charing cross, view st., eaglehawk, north bendigo, golden square, tram 2, tram 3, tram 4, tram 11, tram 17, tram 21, tram scrubber -
 Ballarat Tramway Museum
Slide - 35mm slide/s, Noel Simons, 21/11/1962 12:00:00 AM
... - "No. 17 in Mitchell St., Bendigo approaching bridge over Railway... - "No. 17 in Mitchell St., Bendigo approaching bridge over Railway ...Set of 6 transparencies taken on 21/11/1962 on Kodak mounts. 1189.1 - Bendigo No.11 at Quarry Hill terminus. Photo taken looking in along the route. Tram has destination of North Bendigo. 1189.2 - No. 21 in Pall Mall bound for North Bendigo. Tram has roof ads for Mamouney's furniture and SEC. In the background are the National Bank building, Dad and Dave's Cafe and the Beehive Buildings and the London Pharmacy. 1189.3 - No. 2 in Mitchell St, just after crossing over railway bridge. Photo taken after tram has passed photographer. Has what appears to be an SEC road works crew in the background. Has destination of Quarry Hill. 1189.4 - No. 17 climbing Mitchell St. on the start of the single track section, just before crossing the railway bridge. Has destination of Quarry Hill and the large Maples building sign in the background. 1189.5 - as for 1189.4 but after tram has passed photographer. Has an Ilford film roof ad and an SEC roof ad. Railway bridge in the background. 1189.6 - No. 21 at Charing Cross with passengers boarding. Tram has destination of North Bendigo and roof ads for SEC 'Electric Cooking' and Sandhurst Milk. In background are the buildings on the south side of High St. Also has a SEC worker in white overalls sweeping the track.Information written on in black ink and date stamped on purple ink. 1189.1 - "Birney car No. 11 in High St. Bendigo at Golden Square terminus" 1189.2 - "No. 21 in Pall Mall Bendigo near Charing Cross" 1189.3 - "No. 2 in Mitchell St. Bendigo, just after crossing bridge over railway line (Quarry Hill route)" 1189.4 - "No. 17 in Mitchell St. Bendigo, climbing the hill the bridge over the railway line. (Quarry Hill route)" 1189.5 - "No. 17 in Mitchell St., Bendigo approaching bridge over Railway line (Quarry Hill route)" 1189.6 - "No. 21 at Charing Cross, Bendigo"tramways, trams, bendigo, golden square, pall mall, mitchell st., quarry hill, tram 2, tram 11, tram 17, tram 21