Showing 1983 items
matching railway museum
-
 Ballarat Tramway Museum
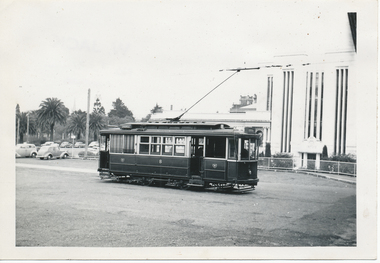
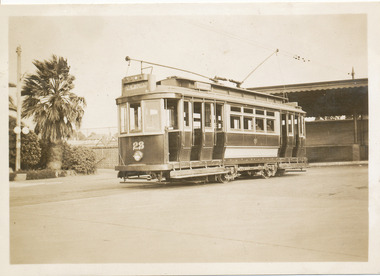
Photograph - Digital image, Wal Jack, 2/03/1958 12:00:00 AM
Yields information about the arrangements made to transport trams from Melbourne to Ballarat by Yellow express vehicle.Digital image from the Wal Jack Ballarat Album of a photograph of Queens Mothers visit in 1958. Sunday 2/3/1958, outside the Railway Station in Lydiard St North. Sunday 11AM. Trams waiting special trains. No. 14, 13, 28, 40 34 up line, 26, 39, 27 down line. See image i2 for rear of photograph. See image i3 for hi res scan of print. See image i4 for hi res scan of negative Two negatives held.Royal visit day - SEC 2/3/58, Ballarat, Lydiard St North, Sunday 11AM. Trams waiting special trains. No. 14, 13, 28, 40 34 up line, 26, 39, 27 down line. In top right hand corner is Wal Jack stamp with number T245 written in.trams, tramways, royal visit, lydiard st north, railway station, tram 14 -
 Ballarat Tramway Museum
Photograph - Digital image, Wal Jack, 14/03/1960 12:00:00 AM
Yields information about the appearance of railway level crossing and Ballarat station in 1960.Digital image from the Wal Jack Ballarat Album of a photograph of No. 21 at the gates at Ballarat Railway station while R734 shunts onto the 1.40pm Horsham Passenger train, 14-3-1960. Photo Wal Jack. See image i2 for rear of photograph.On rear of photograph in ink "VR , SEC, Ballarat No. 21 tram newly painted waiting at rail gates Ballarat Rly Station. R734 4-6-4 backing on 1.40pm Horsham Passenger Train 14-3-60" and in top right hand corner, Wal Jack stamp with "2899" written in.trams, tramways, lydiard st, railway station, level crossings, tram 21 -
 Ballarat Tramway Museum
Photograph - Black & White Photograph/s, E. A. Downs, Sept. 1943
Black and white photograph of Ballarat No. 29 passing over the level crossing at the Ballarat Railway Station, with the station building in the background. The conductor is on the footboards of the tram. Sept. 1943, Photograph E. Downs. Lydiard St North.On rear in ink "Ballarat Railway Station - from Down end Sept. 1943 Photo E. Downs.trams, tramways, ballarat station, railway crossing, lydiard st north, tram 29 -
 Ballarat Tramway Museum
Photograph - Black & White Photograph/s, William G. A. Lewis, 25/11/1939 12:00:00 AM
Black and white photograph of Geelong No. 1 at the Geelong railway station, with the destination of West. Has a bus in the background. Photo William G. A. Lewis, 25 Nov. 1939. Two copies held.On rear in ink and stamped "William G. A. Lewis Photo No. 451 25 Nov 1939 and SEC Car No. 1 Geelong system, Geelong Railway Station". trams, tramways, geelong, railway station, tram 1 -
 Ballarat Tramway Museum
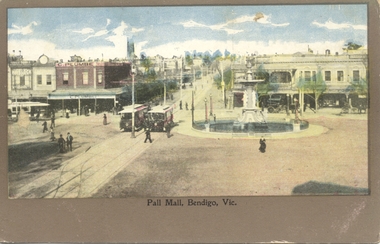
Postcard, Pall Mall Bendigo, early 1900's
Postcard, coloured, Pall Mall Bendigo, looking east towards the Railway Station. Has three trams in the view, along with the fountain. Has C. Plumbe store on the north east corner of the intersection. Title "Pall Mall, Bendigo Vic." Note the small space for a message under the image. On rear, undivided back, with "Post card", "Address to be written on this side" and position for stamp. In the top left hand corner, has "Ian Barkla's" hand stamp. Ian Barkla stamptrams, tramways, bendigo, pall mall -
 Ballarat Tramway Museum
Photograph - Digital image, Wal Jack, 7/04/1962 12:00:00 AM
Yields information about the trams used and how they were arranged at the railway station for a major tour group visit in 1962.Digital image from the Wal Jack Ballarat Album of a photograph of the ten trams to be used for the ARHS visit to Ballarat 7-4-62. Ten trams used as listed in the inscriptions below. No. 20 the lead tram, has an SEC roof Advertisements, Ilford Film and The Age advert on the back dash panel. See image i2 for rear of photograph. See image i3 for hi res scan of print. See image i4 for hi res scan of negativeOn rear of photograph in ink "SEC, Ballarat ARHS Specials to Gardens (10 trams) No. 20, 31, 31, 38 in order, others 14, 28, 33, 35, 36,37 from Railway level crossing Lydiard St Nth 7-4-62" and Wal Jack stamp in top right hand corner with number "T1265" written in.trams, tramways, arhs, tours, lydiard st nth, railway station, tram 20 -
 Ballarat Tramway Museum
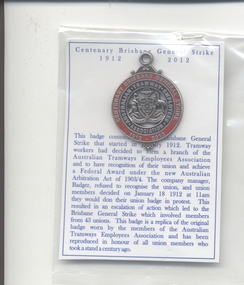
Badge - Centenary of the Brisbane General Strike, 2012
Replica Australian Tramway Employees Association (Tramways Union) badge. Badge made on a steel/ silver backing with words "Australian Tramway Employees Association" on inner edge of badge with a black background. In centre of badge has the Australian coat of arms with a railway type spoke wheel above the logo and underneath the coat of arms the words "Federated Australia" in a banner. Has a steel ring through a hole in the top of the badge. On the outer edge with red background "Centenary Brisbane General Strike 1912-2012". Badge has a metal clip on the rear. Contained within a plastic envelope, "Centenary Brisbane General Strike" and details of the even printed on a piece of light card. Printed in Association with the book "One American Too Many" - see One American Too Many, Boss Badger and the Brisbane Trams, David Burke, Published Queensland Museum 2012.tramways, trams, unions, badges, atea, employees, brisbane -
 Ballarat Tramway Museum
Slide - 35mm slide/s - set of 20, Eldon Hogan, 22/05/1971 12:00:00 AM
Set of 20 35mm Agfa colour blue and white plastic mount slide - featuring photos taken during an Association of Railway Enthusiasts Tour by Eldon Hogan. Folder had the date "22/5/1971" on it. Scanned on the Canon scanner at the depot 15/12/2005 at the time of the installation of the scanner. .1 - No. 25 in Nolan St with Lake Weeroona in the background. .2 - Three Birneys at the Depot junction, 30 and 29 with Conoles Hotel, McCrae St in the background. .3 - No. 5 in front of the Shamrock Hotel, Pall Mall .4 - No. 29 in front of the Shamrock Hotel with Stonemasons sign in the background. .5 - No. 18 ditto .6 - No. 30 and another Birney at the Quarry Hill terminus .7 - No. 24 southbound High St at the Violet St intersection with a "Mine Open" sign in the foreground and the Cathedral in the background. .8 - No. 19 at the Golden Square terminus, with the Golden Square Hotel in the background. .9 - No. 29 - side on view, North Bendigo line? Thunder St? .10 - No. 30 crossing the railway overbridge, inbound from Eaglehawk with a number of photographers in the foreground. .11 - No. 29? ditto .12 - No. 5 outbound - side on view, Thunder St, North Bendigo line? .13 - No. 29 and 30 at the intersection of High St and Brazier St with Church or School hall in the background. .14 - ditto .15 - ditto .16 - No. 25 and the two Birneys at the Eaglehawk terminus. .17 - No. 29 and two other trams at ditto .18 - No. 30 and 19 adjacent to the Lake View Hotel, McCrae St .19 - No. 5 and 25 crossing on the Eaglehawk Line, Ironbark? .20 - No. 29 at Quarry Hilltramways, trams, bendigo, lake weeroona, pall mall, golden square, eaglehawk, quarry hill, tram 25, tram 30, tram 29, tram 5, tram 18, tram 19, tram 24, tram 25 -
 Ballarat Tramway Museum
Slide - 35mm slide/s - set of 7, Eldon Hogan, Aug. 1964
Set of seven Kodak cardboard mounted slides - featuring photos taken during a visit to Bendigo by Eldon Hogan. Slides have slide number (26 to 32) and date "Aug 64" stamped onto them. Possibly a Xavier College Cadets tour - Eldon was involved with them at the time, given slide No. 27. Scanned on the Canon scanner at the depot 15/12/1971 at the time of the installation of the scanner. .1 - No 11 and a bogie car at the Railway Station .2 - ditto - note uniformed person boarding (Xavier College Cadet?) .3 - No. 11 at Charing Cross, showing "special" .4 - No. 11 bound for Eaglehawk at a Crossing loop .5 - No. 20 in bound for Quarry Hill - at the above crossing loop? .6 - No. 11 crossing the Eaglehawk / Swan Hill railway line at the overbridge. .7 - No. 11, High St Eaglehawk.tramways, trams, bendigo, railway station, eaglehawk, charing cross, birney, tram 11, tram 20 -
 Ballarat Tramway Museum
Album - Photo Album, c1970
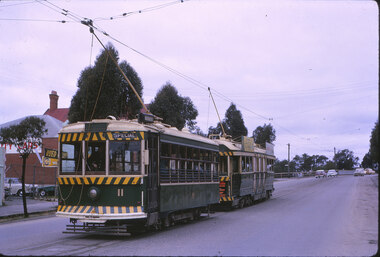
Set of 16 photos of Ballarat tram system taken 1970c on a tour by an unknown Qld based person.Photo album containing 16 colour prints. Photo album has heavy card covers, covered in black textured plastic containing 12 clear plastic photo sleeves held with a white comb binder. Photos of Ballarat prior to closure, c1970. Photographer unknown. Donated by Peter Hyde of Brisbane Tramway Museum to BTM 3/2/2010, from a deceased estate. Photos apparently taken on a tram tour. .1 - No. 42 and a single trucker inbound in Sturt St. .2 - taken from tram ascending Bakery St hill in Victoria St. .3 - End of No. 42, with the destination "Haddon St via Drummond Nth" .4 - No. 11 and 42 in Lydiard St Nth, near the railway station. No. 11 showing special. .5 - photo of three people on the tour. .6 - Trams reversing at the Victoria St terminus .7 - ditto .8 - 11, 42 and 12? in Lydiard St North by railway station. .9 - Three trams at Sebastopol terminus. .10 - View in Albert St Sebastopol looking north along the track on the side of the road. .11 - View of the tram crossing in Albert St. .12 - 27 and 42 crossing Albert St Sebastopol. .13 - View of Albert St from the tram, north of the crossing looking at the reserved track 14. - Lydiard St North looking south .15 - 42 at the railway level crossing. .16 - View south of the railway level crossing, three trams, with passengers alighting.trams, tramways, ballarat, albert st, sebastopol, victoria st, sturt st, lydiard st nth, railway crossing -
 Ballarat Tramway Museum
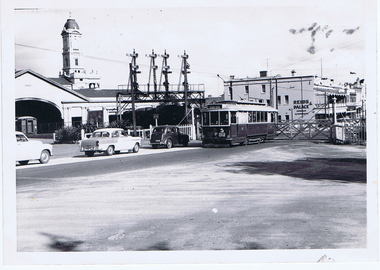
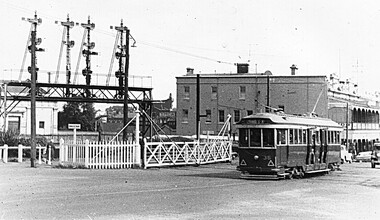
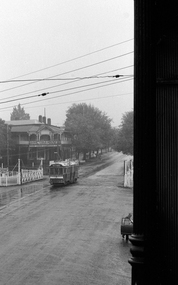
Photograph - Digital image, Late 1950's
Yields information the appearance and details about SEC Tram No. 36 in the late 1950's and the railway level crossing at Ballarat station.Digital scan from the Ben Parle collection of SEC No. 36 crossing the level crossing at the Ballarat Railway station with the signalling mast and Reid's Coffee Palace in the background. Photo 1950's or early 1960 prior to introduction of dash canopy lighting. Photo received with the Ben Parle slides 09/2004. trams, tramways, lydiard st nth, railway, level crossings, tram 36 -
 Ballarat Tramway Museum
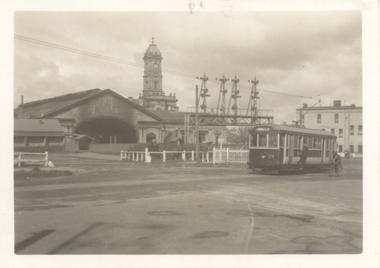
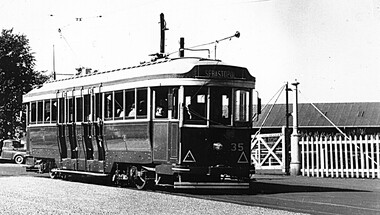
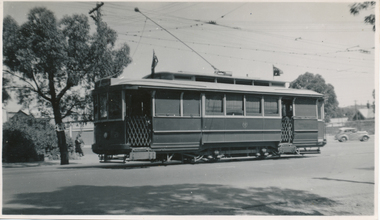
Photograph - Digital image, Late 1950's
Yields information the appearance and details about No. 35 crossing the railway level crossing.Digital scan from the Ben Parle collection of SEC 35 crossing the railway level crossing, south bound with the destination of Sebastopol . Photo 1950's or early 1960 prior to introduction of dash canopy lighting. Photo received with the Ben Parle slides 09/2004. trams, tramways, lydiard st nth, level crossings, tram 35 -
 Ballarat Tramway Museum
Photograph - Digital image, 1970s
Yields information about the railway level crossing.Digital image, black and white, of No. 41 north bound in Lydiard St North, crossing the railway lines with Victoria House in the background, at the level crossing. A wet day. Photo taken by Peter Bruce 1970's and 1971, prior to the closure of the Ballarat tramway system. Peter's Title of image: "No. 41 at the Railway"trams, tramways, level crossings, railway station, lydiard st nth, tram 41 -
 Ballarat Tramway Museum
Photograph - Black & White Photograph/s, John Alfred, 1960
Yields information about the appearance of BTM tram No. 661 in 1960, W2 349 and how the Carnegie line section of single track was worked.Black and white photograph of trams W3 661 (Route 4 Carnegie) and X2 675 (Point Ormond), Glenhuntly Road, Elsternwick Station, during the lowering of the railway line, 1960. Photo by John Alfred. Two copies held. See also Reg Item 5163 for an Ian Brady photograph prior to the work commencing.trams, tramways, mmtb, elsternwick, point ormond, w class trams, level crossings, tram 661, tram 675 -
 Ballarat Tramway Museum
Photograph - Black & White Photograph/s, Wal Jack, 7/03/1954 12:00:00 AM
Black and White print contained within the Wal Jack Bendigo and Geelong Album, see Reg Item 5003 for more details. Photo of No. 21 in Mitchell St, near the Railway Station, 7-3-1954. Photo by Wal Jack. Printed on Ilford paper. See image i2 for rear of photograph. See image i3 for hi res scan of negative On the rear in blue ink "SEC Bendigo No 21 in Mitchell St near Rly Stn Sunday morning 7-3-54" with Wal Jack copyright stamp in the top right hand corner and the number "T67PC" written in.trams, tramways, bendigo, mitchell st, tram 21 -
 Ballarat Tramway Museum
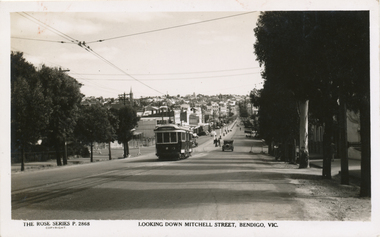
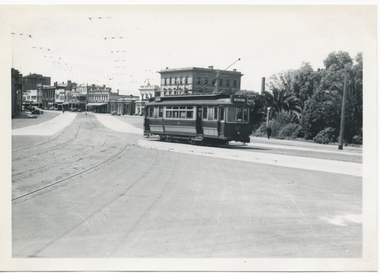
Postcard, Rose Stereograph Co, "Looking down Mitchel St Bendigo Vic"
Postcard contained within the Wal Jack Bendigo and Geelong Album, see Reg Item 5003 for more details. Rose Series Postcard No. 2868, titled "Looking down Mitchel St Bendigo Vic", from the railway overbridge. Has bogie tram No. 23 descending the hill, with the destination of Eaglehawk. Would appear the railway station entrance has been barriered off. Published by the Rose Stereograph Co. Armadale Vic, has the rose logo on the rear and a statement "A real photograph produced in Australia". No space for the stamp or address line. On rear in ink "Bogie 23" and in pencil "WJ"trams, tramways, bendigo, rose postcards, mitchell st, tram 28 -
 Ballarat Tramway Museum
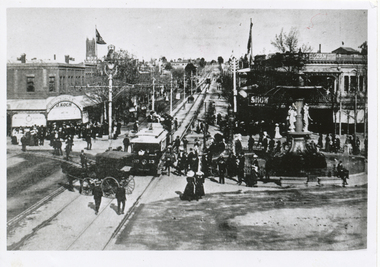
Photograph - Black & White Photograph/s, The Bendigonian, Sep. 2005
Black and White copy print contained within the Wal Jack Bendigo and Geelong Album, see Reg Item 5003 for more details. Photo of looking east along Mitchell St towards the Railway Station with tram No. 13 and a double deck trailer - has the centre poles along Mitchell St. in the photograph. In the background is a J. Koch and the Bendigo Supply Stores. Has fountain in photograph. Copied by Keith Kings from The Bendigonian 19/9/1905. On rear in ink " SA782, Bendigo, No. 13 - 3 window saloon Charing Cross. Note:- Crossover in Mitchell St.". Copied ex "The Bendigonian 19/9/1905."trams, tramways, bendigo, charing cross, horse trams, mitchell st -
 Ballarat Tramway Museum
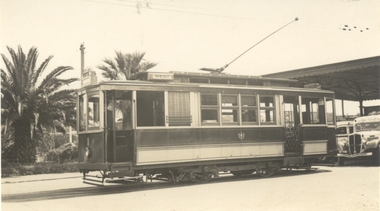
Photograph - Black & White Photograph/s, Wal Jack, 27/06/1955 12:00:00 AM
Black and White print contained within the Wal Jack Bendigo and Geelong Album, see Reg Item 5003 for more details. Photo of Geelong No. 8 at the Railway Station with the Gordon Institute buildings in the background. The tram has the destination of Chilwell. Photo by Wal Jack 27/6/1955. Printed on Ilford paper. i1 - scan of print in the album i2 - rear of image i3 - scan of negative at 3200dpi added 27/6/2020. On rear in ink "SEC Geelong No. 8 to Chilwell at Geelong Station". Has the Wal Jack copyright stamp in the top right hand corner with the number "T331" written in and the date "27 Jun 1955" stamped with a purple ink hand date stamp.trams, tramways, geelong, railway station, tram 8 -
 Ballarat Tramway Museum
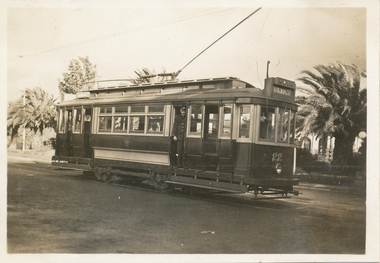
Photograph - Black & White Photograph/s, Wal Jack, Jun. 1939
Black and White print contained within the Wal Jack Bendigo and Geelong Album, see Reg Item 5003 for more details. Photo of No. 22 at the Geelong Railway Station. Photographer unknown - possibly Wal Jack - see date on Reg Item 5861. Wal's album notes dates the photo as June 1939. Printed on Kodak Velox paper. The tram has two trolley poles, the destination of Newtown. A conductor is standing in one of the doorways. i1 - scan of print in the album i2 - rear of image i3 - scan of negative at 3200dpi added 6/6/2020. trams, tramways, geelong, railway station, tram 22 -
 Ballarat Tramway Museum
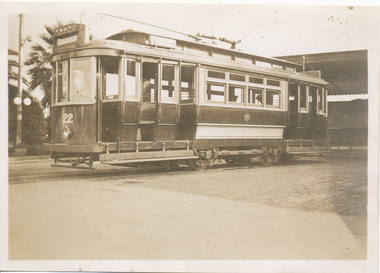
Photograph - Black & White Photograph/s, Wal Jack, Jun. 1939
Black and White print contained within the Wal Jack Bendigo and Geelong Album, see Reg Item 5003 for more details. Photo of No. 22 at the Geelong Railway Station. Photographer unknown same as 5859 - possibly Wal Jack - see date on Reg Item 5861. Wal's album notes dates the photo as June 1939. Printed on Kodak Velox paper. The tram has two trolley poles. i1 - scan of print in the album i2 - rear of image i3 - scan of negative at 3200dpi added 6/6/2020. trams, tramways, geelong, railway station, tram 22 -
 Ballarat Tramway Museum
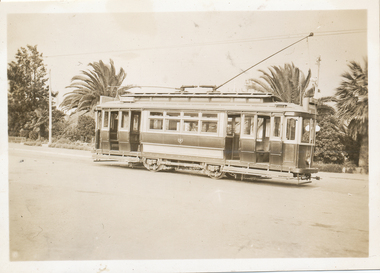
Photograph - Black & White Photograph/s - Geelong 23 at Railway Station, Wal Jack, Jun. 1939
Black and white photo from the Wal Jack album (item 5003) of Geelong tram 23 leaving the railway station with Johnstone park in the background. i1 - scan of print in the album i2 - rear of image i3 - scan of negative at 3200dpi - not exactly the same location given the position of the trees behind. i4 - scan of a print from the Ken Magor collection i5 - scan of rear of print with date 21-6-1939 and Ken Magor number 1805. Yields information about Geelong tram 23Photo of No. 23 at the Geelong Railway Station. Has the Wal Jack copyright stamp on the back.trams, tramways, geelong, railway station, tram 23 -
 Ballarat Tramway Museum
Photograph - Black & White Photograph/s, Wal Jack, Jun. 1939
Black and White print contained within the Wal Jack Bendigo and Geelong Album, see Reg Item 5003 for more details. Photo of No. 23 at the Geelong Railway Station with the station buildings in the background. Photographer unknown - handwriting is the same as other photos such as Reg item 5850.. Wal's album notes dates the photo as June 1939. Printed on Kodak Velox paper. The tram has two trolley poles and the destination of Newtown. i1 - scan of print in the album i2 - rear of image i3 - scan of negative at 3200dpi added 6/6/2020. Has the rear in ink "Geelong Tramways, No. 23 "Two man trams", built by A. Pengelley South Australia"trams, tramways, geelong, railway station, tram 23 -
 Ballarat Tramway Museum
Photograph - Black & White Photograph/s, Wal Jack, 3/01/1945 12:00:00 AM
Black and White print contained within the Wal Jack Bendigo and Geelong Album, see Reg Item 5003 for more details. Photo of No. 17 from the Railway Station turning out of Railway Terrace into Mercer St. 3-1-1945. Printed on Ilford Paper. Tram has the destination of West. i1 - scan of print in the album i2 - rear of image i3 - scan of negative at 3200dpi added 30/6/2020.Has the rear in ink "SEC Geelong No. 17 from the Railway Station turning out of Railway Terrace into Mercer St. 3rd January 1945". Has the Wal Jack copyright stamp on the rear with the number T319 written in.trams, tramways, geelong, mercer st, railway station, tram 17 -
 Ballarat Tramway Museum
Photograph - Black & White Photograph/s, 8/01/1956 12:00:00 AM
Black and White print contained within the Wal Jack Bendigo and Geelong Album, see Reg Item 5003 for more details. Photo of Geelong No 31 bound for North Geelong at Railway station junction, Malop and Mercer Streets 8/1/1956. General view of junction in the area with a Olympic tyre / service station No details on photographer. On rear in ink "No.31 bound for North Geelong at Railway Stn Junc Malop and Mercer Streets 8/1/56"trams, tramways, geelong, north, railway station, malop st, mercer st, tram 31 -
 Ballarat Tramway Museum
Photograph - Black & White Photograph/s, 11/07/1950 12:00:00 AM
Black and White print contained within the Wal Jack Bendigo and Geelong Album, see Reg Item 5003 for more details. Photo of an illuminated street sign, lamp, near Geelong Railway Station, at Mercer St corner, 11-7-1950. Photographer not known. Photo is glued into album. Sign has the words "Geelong Electric Tramways / Board tram at Curve" with a hand and finger pointing the direction to walk in.trams, tramways, geelong, signs, railway station -
 Ballarat Tramway Museum
Newsletter, Ballarat Tramway Preservation Society (BTPS), "Fares Please!", 1979
Yields information about the operations of the BTPS in 1979 and has a strong association with those involved., Yields information about the operations of the BTPS in 1979 and has a strong association with those involved.Set of 6 "Fares Please!" and other documents printed for distribution to BTPS members as news. All printed by the Gestetner duplication process. Consolidated from other items or holdings from donations into a single year set of newsletters. All produced during 1979 .1 - Fares Please! March 1979 .2 - ditto May 1979 .3 - Appeal sheet .4 - Fares Please! August 1979 .5 - ditto October 1979 .6 - Sales Sheet .7 - Fares Please - November / December 1979 .8 - Two pages sheet with various tramway and railway news cuttings. All documents scanned as pdf images. museums btps, publicity, sales, appeals -
 Running Rabbits Military Museum operated by the Upwey Belgrave RSL Sub Branch
Photo
Chart of camps along the Burma-Siamese Railwayphoto, ww2, army -
 Bendigo Historical Society Inc.
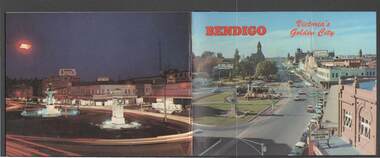
Book - BENDIGO: VICTORIA'S GOLDEN CITY
Coloured booklet of various scenes and buildings in and around Bendigo, titled Bendigo Victoria's Golden City. The front cover has a scene of Charing Cross looking towards Pall Mall. Inside the front cover is a very brief history and some Historical Buildings are mentioned. They are: Fortuna, Shamrock Hotel, Gold Mines Hotel, City Hall, Post Office, Law Courts, the Home for the Aged, Sacred Heart Cathedral, St. Paul's, Specimen Cottage, Log Lock-up and the Chinese Joss House. The coloured pictures inside are: The Central Deborah Gold Mine, Fortuna, Miner's Cottage, The Gold Mines Hotel, Victoria Hill, Bendigo Law Courts, Eaglehawk Log Lock-up, Look-out Tower Rosalind Park, Alexandra Fountain - Charing Cross, Conservatory Gardens with Law Courts in background, Inside the Conservatory, Bendigo Home & Hospital for the Aged - Victoria's 'White House', Sacred Heart Cathedral, Chinese Joss House, Chinese Joss House - Interior of the Main Temple, Bendigo Pottery - Potter at work, Bendigo Municipal Offices, Bendigo Institute of Technology at Flora Hill, Mt. Alvernia Hospital, Cobb & Co Coach, R Class Locomotive, Bendigo Tramcar, Lake Weeroona and Lake Eppalock Pumping Station. Some more attractions are mentioned inside the back cover. On the back cover is the Cenotaph - the only scale replica of the Whitehall Cenotaph - and Alexandra Fountain by night.Nucolorvue Productions Pty Ltdbendigo, tourism, photographs of bendigo icons, bendigo - victoria's golden city, fortuna, shamrock hotel, gold mines hotel, city hall, post office, law courts, home for the aged, victoria's 'white house', sacred heart cathedral, st paul's, specimen cottage, log lock-up, chinese joss house, charing cross, cenotaph, alexandra fountain, centra deborah gold mine, army cartographic unit, miner's cottage, harvey town, victoria hill, look-out tower rosalind park, conservatory gardens, conservatory, bendigo pottery, bendigo municipal offices, bendigo institute of technology, mt alvernia hospital, cobb & co coach, r class locomotive, bendigo railway station, bendigo tramcar, lake weeroona, lake eppalock pumping station, art gallery, historical museum eaglehawk, melville's caves, whitehall cenotaph, nucolorvue productins pty ltd, national library of australia -
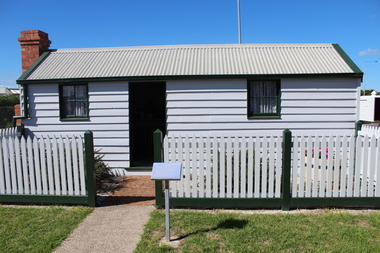 Queenscliffe Maritime Museum
Functional object - Fishermans Cottage, Built in 1870/1880 for Thomas and Anna Ikin
This low-lying northern-most tip of Queenscliff saw its physical origins in 1863 with allotments let to a burgeoning fishing community previously accommodated on the site of the current railway station and whose construction in 1879 necessitated eviction. Among this community, Chinese fishermen are thought to be of the first international settlers. The success of the fishermen’s settlement was due in part to commercial trading prospects the railway afforded and the size of catch available to those fishing in Bass Strait. Salmon, snapper and particularly barracouta led to the success of the local industry.Original Fishermans Cottage previously located at Swan Bay end of Bridge Street Queenscliff. Timber - Weatherboardfishermen's cottage, fishermen's flat, queenscliff -
 Ballarat Tramway Museum
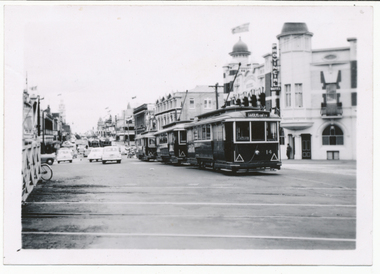
Photograph - Tram 38 decorated for Royal Visit, Ken Magor, 1954
The photo, shows tram 38 decorated for the 1954 Royal Visit, crossing the railway tracks at Ballarat Station in Lydiard St North. The tram has the destination of Sebastopol. In the background is the railway signal gantry, Reids Coffee Palace and the Post Office. Many of the buildings are flying flags.Yields information about the 1954 Royal Tram.Photograph, black and white - plain black with Ken Magor stamp and negative number written on the rear.Ken Magor Negative Number - "3427" tramways, trams, royal visit, decorated trams, tram 38, lydiard st nth, level crossings