Showing 2282 items
matching ballarat east
-
 Ballarat Tramway Museum
Ephemera - Timetable/s, Melbourne and Metropolitan Tramways Board (MMTB), Set of 14 MMTB Melbourne bus timetables, 1969
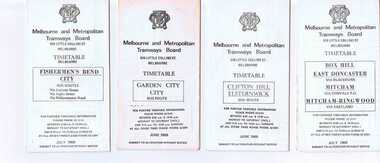
Set of 14 MMTB timetables for various bus routes, dated July 1969. Generally includes Sat and Suns, Good Friday and Christmas day as well as weekdays, unless noted otherwise. Also includes a map of the route, detailed time points, sections, connecting services, fares, and organisation address - 616 Little Collins St. Melbourne. Have been folded into eight or ten portions. All on white paper unless noted otherwise. Items shown with an # - have a sticker modifying timetable information details on the front page. Items shown with a % are larger size sheets of paper, folded into 10. 1155.1 - Clifton Hill - Elsternwick # .2 - Garden City - City # .3 - Fishermen's Bend - City .4 - Box Hill - East Doncaster via Blackburn, Mitcham via Donvale PO and Mitcham - Ringwood via Eastland .5 - Warrandyte via Templestowe, via East Doncaster, Donvale PO - City % .6 - Warrandyte, Park Orchards Ringwood .7 - Williamstown Rd., Footscray Railway Station, Ballarat Rd # .8 - Latrobe University, Northland, West Heidelberg - City # % .9 - Deer Park, Sunshine Park, Sunshine, Footscray - City # .10 - as above, but for Saturdays and Sundays on pink paper # .11 - Box Hill, Heidelberg, Templestowe .12 - Box Hill, North Blackburn .13 - East Kew, Box Hill, Doncaster .14 - Bullen, North Kew - City # % Images of a sample of documents added 16-11-2013. mmtb, timetables, melbourne -
 Ballarat Tramway Museum
Slide - 35mm slide/s - set of 14, Noel Simons, 23/11/1962 12:00:00 AM
Set of 14 Kodachrome transparencies taken on 23/11/1962. 1162.1 - tram 38 turning into Lydiard St. North from Sturt St. with tram 20 in background. Many motor vehicles in photo. 1162.2 - as above, but a minute of so later. Has Mutual Life building in background as well as Town Hall. 1162.3 - No. 40 entering Albert St. from Skipton St. outbound to Sebastopol. 1162.4 - No. 40 near start of side of the road running in Albert St. heading to Sebastopol. 1162.5 - No. 40 at the City terminus, on the South side of Sturt St. Has Town Hall and other buildings along the south side of Sturt St. in the background. 1162.6 - No. 40 at Sebastopol terminus - shows arrangement of the signs at the terminus. 1162.7 - No. 40 and No. 38 crossing at loop between Sayle and Grey St. No. 40 inbound. 1162.8 - No. 40 turning from Drummond St. South to Sturt St. at Hospital Corner with Southern Cross Hotel in background. 1162.9 - No. 18 in Wendouree Parade near Forest St. heading east with destination of "Victoria St." 1162.10 - Nos 41 and 39 at Depot Junction. Both trams have SEC ads. 1162.11 - No. 39 turning into the depot from Wendouree Parade - showing destination of "Gardens via Drummond Nth" 1162.12- No. 17 at Lydiard St. North terminus, showing destination of "Grey St. Sebas". Has a Twin Lakes sign 1162.13 - ditto, but with trolley pole turned around. Has SEC Briquettes roof ad and Whitehorse whiskey ad on rear dash panel. 1162.14 - No. 40 outbound to Sebastopol crossing Albert St. 1162.1 -"Nos. 38 and 20 in Sturt St. Ballarat at corner of Lydiard St." 1162.2 - "No. 38 turns into Lydiard St. as No. 20 waits at stop in Sturt St. Ballarat" 1162.3 - "No. 40 entering Albert St. from Skipton St. Redan on Sebastopol route." 1162.4 - "No 40 at beginning of reserved track on Sebastopol route, Albert St. Redan." 1162.5 - "No. 40 in Sturt St. Ballarat near cnr. of Armstrong St." 1162.6 - "No. 40 at Sebastopol terminus" 1162.7 - "No. 38 and 40 crossing at Sayle St. Loop on Albert St. reserved track, Sebastopol route" 1162.8 - "No. 40 turning into Sturt St. from Drummond St." 1162.9 - "No. 18 in Wendouree Pde. Ballarat near tramway depot" 1162.10 - "No. 41 and 39 outside Ballarat tramway depot, Lake Wendouree in background" 1162.11 - "No. 39 entering tramway depot from Wendouree Parade, Ballarat" 1162.12 - "No 17 at Lydiard St. North terminus, Ballarat North" 1162.13 - "No 17 at Lydiard St. North terminus, Ballarat North" 1162.14 - "No. 40 crossing Albert St. Sebastopol as reserved track switches from left to right of road" All have date stamp of "23 Nov. 1962" in purple ink. All black ink unless otherwise noted.tramways, trams, ballarat, albert st., sturt st., sebastopol, grey st., hospital corner, wendouree parade, depot junction, lydiard st. north, tram 17, tram 18, tram 20, tram 38, tram 39, tram 40, tram 41 -
 Ballarat Tramway Museum
Slide - 35mm slide/s - set of 14, Noel Simons, 22/05/1971 12:00:00 AM
Set of 14 transparencies taken on 22/5/1971. 1170.1 - No. 31 outbound in Sturt St. West near Murray St. - has "To read pack Tilt Train" roof advert. 1170.2 - No. 31 ditto, near Russel St. loop. 1170.3 - No. 14 in Wendouree Parade at what is now BTM Depot Junction, near Toilet block. 1170.4 - No. 31 in Wendouree Parade at the North Gardens, approaching St. Aidans Drive 1170.5 - Scrubber car on "O " road with tennis court alongside. 1170.6 - Scrubber, 43 and 3 8 on 0 road at depot. 1170.7 - 3 8 and 43 on 0 road at depot 1170.8 - 38 on 0 road at depot, showing sharpness of 0 road curves. 1170.9 - 39 and 40 inside depot. 40 has "To read pack, tilt tram" roof advertisement. 1170. 10 - Tram 27 passes the depot gates, east bound with Lake Wendouree in the background. 1170.11 - SEC Depot, from Wendouree Parade, with No. 38 on "O" road. 1170.12 - trams 14 and 30 at depot loop, Wendouree Parade 1170.13 - ditto 1170.14 - "Cars take following line" sign on tram stop pole at Wendouree Parade Loop. All have date stamp of "28 Apr 1971" in purple ink on base. All blue ink unless otherwise noted. 1170.1 - "No. 31 in Sturt St. West between Murray and Wonliss Sts." 1170.2 - "No. 31 approaching Russell St. Loop in Sturt St. West Ballarat" 1170.3 - "No. 14 Gardens" 1170.4 - "No. 3 1 North Gardens 1170.5 - "Track cleaner car (formerly No. 23) at Wendouree Depot" 1170.6 - "Track cleaner, No. 43 and No. 38 at Wendouree Depot" 1170.7 - "No. 43 and No. 38 at Wendouree Depot" 1170.8 - "No. 38 gazes across Lake Wendouree from depot" 1170.9 - "Nos 3 9 and 40 in Wendouree Depot" 1170.10 - "No. 27 passing Wendouree Depot" 1170.11 - "Wendouree Depot with No. 38 on road No. "O" on left. 1170.12 - "Depot Loop" 1170.13 - "Depot Loop" 1170.14 - "Depot" tramways, trams, sturt st. west, wendouree parade, o road, depot, depot loop, signs, bliss bombs, tram 14, tram 27, tram 30, tram 31, tram 38, tram 39, tram 40, tram 43, tram scrubber -
 Ballarat Tramway Museum
Slide - 35mm slide/s, Noel Simons, Aug. 1971
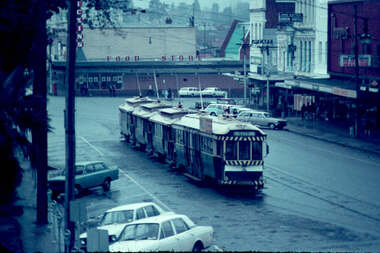
Plain white cardboard transparency slide of Ballarat No. bogie tram (No. 34) and three single truckers in the City Loop on a wet Ballarat day. Taken from central median strip, looking south east. Has Dickins Food store and shops along the south side of Sturt St. near Grenville St. in the background, including Thomas Jewellers and the Jack Gaffin? Union Hotel"City Loop" and "Aug 1971" in blue ink.tramways, trams, city loop, sturt st, tram 34 -
 Ballarat Tramway Museum
Slide - 35mm slide/s - set of 11, Noel Simons, 23/10/1965 12:00:00 AM
Set of 11 Kodachrome transparencies taken on 23/10/1965 in Melbourne. 1178.1 - W7 1020 (on route 9A, Northcote via St Georges Road) with a W2 536 (Deepdene) behind at the corner of Victoria Parade and Brunswick St. East Melbourne or Fitzroy. Has Eastern Hill fire station and ICI building in background. 1020 has front dash panel ads for Queens Bridge Motors and Bridgestone tyres. 1178.2 - W5 759 (route 19, North Coburg) and W5 807 in Elizabeth St. Melbourne at the intersection of Bourke St. with the State Savings Bank building in the background. 759 has side ads, one of which is for CASTROL. 1178.3 -SW6 903 crossing Brunswick St. in Victoria Parade, Fitzroy bound for Deepdene, route 45. Photo taken after tram has passed photographer. 1178.4 - W7 1019 (route 96, East Brunswick Blyth St.) and W7 1010 (route 88 East Preston) in Nicholson St at intersection with Victoria Parade. A Herald newspaper truck is alongside 1019. 1178.5 - W7 1040 (route 96, East Brunswick Blyth St.) in Nicholson St at intersection with Albert St. Has Princess Theatre in the background. (High res scan added 26/10/2008 - copy to FOHTD) .1178.6 - W6 974 (route 89 East Preston Bell St.) in Bourke St. about to turn into Spring St. Has buildings on the south side of Bourke St in background, including Southern Cross Hotel. Note trees in tubs and red phone box by Windsor Hotel. 1178.7 - as for same location as 1178.6 - SW6 967 (route 96) and W6 971 (inbound - route 90 - City Spencer St.) 967 has Lucas ad on front dash. 1178.8 - W7 1013 (route 88 East Preston) photographed from W6 991 in Bourke St at corner of Russell St. Has Normans corner store, Treadways and Foys in background. 1178.9 - W2 553 (route 1 East Coburg) at the corner of Elizabeth St and Bourke St. Has the Leviathan, Roger David and Ezywalkin shops in the background. 1178.10 - W6 991 (route 88) and W7 (route 96) in Bourke St. at corner with Elizabeth St. Photo taken from the GPO steps. 991 has ads for BIC pens and CASTROL. In background are the State Savings Bank, Halls Books and McEwans shops. 1178.11 - Line up of north bound trams (3 +) lead by W2 449and southbound in Elizabeth St at corner of Collins St. Has Flinders St. station building in the background. Hi -res image of .10 added 22-12-2018All have date stamp of "23 Oct 1965" in purple ink. All black ink unless otherwise noted. 1178.1 - "W7 1020 turning into Brunswick St. from Victoria parade, East Melbourne (followed by W2 536) 1178.2 - "W5 799 and 807 in Elizabeth St. Melbourne at cnr. of Bourke St." 1178.3 - "SW6 903 entering reserved track in Victoria Parade, East Melbourne" 1178.4 - "W7 1019 and 1010 in Nicholson St. East Melbourne at Victoria Pde intersection" 1178.5 - "W7 1040 Melbourne's last tram (to date) in Nicholson St. at Albert St. intersection." 1178.6 - "W6 974 in Bourke St. Melbourne, about to turn into Spring St." 1178.7 - "W6 971 entering Bourke St. from Spring St. Melbourne, passes SW6 967 outward bound for East Brunswick" 1178.8 - "W7 1013 (seen from W6 991) in Bourke St. Melbourne crossing Russell St." 1178. 9 -"W2 553 in Elizabeth St. Melbourne at cnr of Bourke St." 1178.10 - "W6 991 and W7 1005 in Bourke St. Melbourne at cnr of Elizabeth St." 1178.11 - "W2 449 leads a line of Peak hour cars along Elizabeth St. Melbourne (at Collins St. corner)"tramways, trams, melbourne, victoria parade, nicholson st., brunswick st., bourke st, elizabeth st, tram 1020, tram 536, tram 799, tram 807, tram 903, tram 1019, tram 1010, tram 1040, tram 974, tram 967, tram 971, tram 1013, tram 553, tram 991, tram 1005, tram 449 -
 Ballarat Tramway Museum
Slide - 35mm slide/s - set of 24, Noel Simons, 20/05/1971 12:00:00 AM
Set of 24 transparencies taken on 20/5/1971 on Kodak mounts. 1195.1 - Bendigo 19 arriving at Charing Cross en route to North Bendigo with Fountain Plaza and the City Family Hotel in the background. No. 19 has two roof ads for the SEC. -'Electricity better for cooking' and 'Everything's under control in my all electric kitchen' 1195.2 - as above, but standing at the Charing cross stop, with the Beehive Stores and other buildings along the east side of Pall Mall in the background. 1195.3 - No 21 ex Golden Square crossing View St. trackwork in front of No. 25 waiting to depart for Quarry Hill. No.21 has two roof ads (as for No.19 in 1195.1) and No.25 has one SEC roof ad and another. Ezywalkin sign in the background, and Fountain Plaza. 1195.4 - as for 1195.3, but after 21 has arrived and 25 left for Quarry Hill. Has Ezywalkin store and the Beehive store in the background. 1195.5 - No. 5 at the Eaglehawk terminus. Photo taken with a cannon in foreground looking along High St. Eaglehawk. Has shops on the west side of High St. in the background. 1195.6 - No. 5 at the Eaglehawk terminus, close up of the rear of the tram - note tow bar arrangement. Has destination of Quarry Hill. 1195.7-Nos.25 and 5 crossing at the Thorpe St. Loop, California Gully. No. 25 bound for Eaglehawk (has SEC Briquette and electric cooking roof ads) and 5 en route for Quarry Hill with a SEC and Cinzano roof ad. 1195.8 - as for 1195.7, but after trams have passed each other. Has Borough Auto Service building in the background. 1195.9 - No. 5 in Mt Korong Road, towards Bamard Street, photo taken after tram has passed photographer. 1195.10 - No. 30 at the Golden Square terminus with the Milk Bar on the right hand side of the photograph. 1195.11 - No. 30 inbound at Fire Station Loop, High St. Golden Square. Has old fire station in the background. Passengers are boarding the tramcar. 1195.12 - No. 30 in High St, bound for North Bendigo between Vine and Wattle Streets. 1195.13 - No. 5 bound for Eaglehawk waits at Iron Bark Gully Loop, at Hayes St. 1195.14 - No. 5 and No. 2 crossing at Iron Bark Gully Loop. 1195.15 - No. 5 bound for Eaglehawk leaving the Manchester Loop, Long gully. 1195.16 - No. 5 passing William Street, Long Gully en route to Eaglehawk. 1195.17 - No. 5 just before the California Gully Crossing Loop. 1195.18 - Nos. 5 and 26 crossing at California Gully crossing Loop. No. 5 heading to Eaglehawk, 26, Quarry Hill. 1195.19 - No. 5 in High St. Eaglehawk with Bob Moyle's Victoria Hotel and the TAB in the background. 1195.20 - No. 5 in High St. Eaglehawk approaching the terminus. Photo taken after the tram has passed the photographer. Has Foodland store and J. Best Fruit supply in the background, along with Eaglehawk Town Hall. 1195.21 - No. 5 at the Eaglehawk terminus, photo taken along seldom used track along High St. 1195.22 - as for 1195.22 - but at the very end of the track. 1195.23 - No. 5 en route for Quarry Hill climbs High St. Eaglehawk with the Victoria Hotel and Eaglehawk Town Hall in the background. 1195.24 - No. 5 and 25 crossing at Jobs Gully Loop. Note 25 has a black on white destination roll, while No. 5 has a white on black destination roll. Information written on in black ink and date stamped on purple ink. 1195.1 - "No. 19 arrives at Charing Cross Bendigo from Golden Square" 1195.2 - "No. 19 about to leave Charing Cross for North Bendigo" 1195.3 - "No. 25 awaiting departure for Quarry Hill, watches No. 21 arrive at Charring Cross from Golden Square" 1195.4 - "No. 21 on North Bendigo service and No. 25 on Quarry Hill run await departure at Charing Cross" 1195.5 - "No. 5 at Eaglehawk terminus" 1195.6 - "No. 5 at Eaglehawk terminus" 1195.7 - "Nos. 5 and 25 crossing at Thorpe St. Loop, California". 1195.8 - "Nos. 25 and 5 crossing Thorpe St. Loop, California Gully". 1195.9 - "No. 5 descending Mt Korong Rd. towards Bamard St." 1195.10 - "Birney car No. 30 at Golden Square terminus" 1195.11 - "Birney car No. 30 in High Street near Thistle Street (Fire Station Loop)" 1195.12 - "No. 30 in High St. between vine and Wattle Streets" 1195.13 - "No. 25 at Hayes Street Loop Iron Bark". 1195.14 - "Nos. 2 and 5 crossing at Hayes Street Loop Iron Bark" 1195.15 - "No. 5 at Manchester Loop opposite Havilah Road, Long Gully" 1195.16 - "No. 5 passing William Street, Long Gully". 1195.17 - "No. 5 at California Gully" 1195,18 - "Nos. 26 and 5 at Thorpe St. Loop, California Gully". 1195.19 - "No. 5 in High St. Eaglehawk". 1195.20 - "No. 5 approaching Eaglehawk terminus" 1195.21 - "No. 5 at Eaglehawk terminus" 1195.22 - "No. 5 at Eaglehawk terminus" 1195.23 - "No. 5 in High St. Eaglehawk" tramways, trams, bendigo, charing cross, eaglehawk, california gully, golden square, iron bark gully, jobs gully, tram 2, tram 5, tram 19, tram 21, tram 25, tram 26, tram 30 -
 Ballarat Tramway Museum
Slide - 35mm slide/s - set of 19, Noel Simons, 26/02/1972 12:00:00 AM
Set of 18 transparencies taken on 26/2/1972 on Kodak mounts. 1203.1 - Bendigo 5 at Eaglehawk terminus - with new traffic works. 1203.2 - No. 5 climbing the High St. hill Eaglehawk with the buildings on the east side in the photo. 1203.3 - No 2 descending the road over rail bridge at Job's Gully, heading for Quarry Hill. 1203.4 - as for 1202.3, but more side on. Tram has two SEC roof ads. 1203.5 - as for 1202.4 1203.6 - No. 26 entering Garden Gully Loop, Mt. Korong Road, Ironbark. Tram en route to Eaglehawk. Water column on right hand side of photograph. 1203.7 - No. 2 on the Eaglehawk route, Iron Bark area?, bound for Quarry Hill. 1203.8 - as for 1202.7, but photo taken after tram has past photographer. 1203.9 - No. 5 at Eaglehawk terminus, night photo. Tram has arrived at terminus, showing Quarry Hill, pole turned, but the tram lights have yet to be turned around. 1203.10 - as for 1202.9, but lights have been turned around. 1203.11 - No. 26 climbing the View St. Hill near the Commodore Hotel. Has Campbells Electrical Services building in the background. Photo taken after the tram has passed the photographer. 1203.12 - No. 7 end on photograph, at Golden Square, destination showing Golden Square - night photo. 1203.13 - number not used. 1203.14 - as for 1202.12, but partially side on, has a passenger looking out the tram. 1203.15 - as for 1202.12, but with hotel in the background. 1203.16 - No. 26 and 2 at Charing Cross, night photo. Tram 26 en route to Quarry Hill, 2 to Eaglehawk. 1203.17 - Interior photo of No. 26, at night. 1203.18 - No. 26 at the Quarry Hill terminus as night. 1203.19 - as for 1202.18, but central portion of the tramcar.Information written on in blue ink and date stamped on purple ink. 1203.1 - "No. 5 at Eaglehawk terminus" 1203.1 - "No. 5 in High St. Eaglehawk" 1203.3 - "No. 2" 1203.4 - "No. 2" 1203.5 - "No. 2" 1203.6 - "No. 26 at Garden Gully Loop Mt Korong Rd., Ironbark" 1203.7 - "No. 2" 1203.8 - "No. 2" 1203.9 - "No. 5 at Eaglehawk terminus" 1203.10 - "No. 5 at Eaglehawk terminus" 1203.11 - "No. 26 in View St. Near the Commodore Motel" 1203.12 - "No. 7 at Golden Square Terminus" 1203.14 - "No. 7 at Golden Square Terminus" 1203.15 - "No. 7 at Golden Square Terminus" 1203.16 - "Nos. 26 and 2 at Charing Cross" 1203.17 - "Interior of No. 26" 1203.18 - "No. 26 at the Quarry Hill terminus" 1203.19 - "No. 26 at the Quarry Hill terminus "tramways, trams, bendigo, eaglehawk, bridges, iron bark gully, night photo, quarry hill, golden square, tram 2, tram 5, tram 7, tram 26 -
 Ballarat Tramway Museum
Slide - 35mm slide/s set of 7, Noel Simons, 1972
Set of 7 transparencies undated on PAKON mounts - appear to be early 1970's. 1212.1 - No. 18 about to enter the Long Gully loop with ESSO service station on the right hand side. 1212.2 - No. 6 in Mitchell Street bound for Charing Cross. Tram has destination of "Rly Station". Has buildings on the east side of Mitchell St. in the background. 1212.3 - No. 7 (North Bendigo) and 29 (Golden Square) crossing. Actual location? 1212.4 - "No 6 showing 'SPECIAL' at Eaglehawk terminus. Has the Foodland store and Fruit shop in the background. 1212.5 - No. 19 at Eaglehawk terminus, on the extension to the normal Eaglehawk terminus. Tram has showing 'Eaglehawk'. Tram has two SEC roof ads. 1212.6 - No. 25 and another Bogie car at Quarry Hill terminus on last day. 1212.7 - No. 18 and 29 at Quarry Hill terminus. No.. 18 showing 'Quarry Hill' - has two SEC roof ads 'Electric Cooking - Matchless' and 'Everything's fine in my all electric kitchen' and No. 29 has a briquettes roof ad.Information typed onto a white label stuck on the slide. 1212.1 - "No. 18 at Long Gully" 1212.2 - "No. 6 in Mitchell Street." 1212.3 - "7 and 29 Lake View Hotel" 1212.4 - "No. 6 at Eaglehawk" 1212.5 - "No. 19 at Eaglehawk Term." 1212.6 - "Last cars Quarry Hill." 1212.7 - "18 & 29 Quarry Hill"tramways, trams, bendigo, long gully, mitchell st., eaglehawk, quarry hill, last tram, tram 6, tram 7, tram 18, tram 19, tram 25, tram 29 -
 Ballarat Tramway Museum
Photograph - Colour Photograph/s, David Endacott, 1971
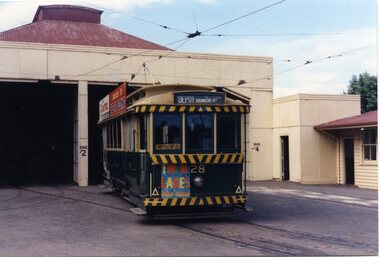
Colour print of a Ballarat No. 30 in Lydiard St. North opposite the concrete retaining wall on the east side of Lydiard St. North, just before Macarthur St, the cutting was between Clarendon St and Macarthur St. Tram has destination of Lydiard St. Nth. Has homes and the city of Ballarat in the background. Original film image scanned at 3200dpi 12/5/2020.On rear in blue ink "Lydiard St. Nth" and in the top left hand corner "1971".ballarat, lydiard st. nth, retaining wall, tram 30 -
 Ballarat Tramway Museum
Photograph - Colour Photograph/s, 23/11/1962 12:00:00 AM
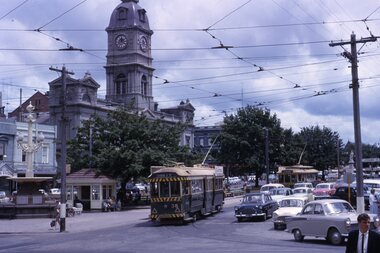
Colour postcard size print of SEC Ballarat trams 13, 26 and bogie car in the City Loop. Photo dated 23.11.1962. Printed on AGFA paper. In background is Morseheads building and another single trucker heading onto Bridge St. Tram 13 has "Twin Lakes" sign in multiple colours on front panel, 26 has briquette ad and the bogie car has an SEC Ad as well. Bogie car has front or east trolley pole up, as if to run back to Bridge St. All trams fitted with dash canopy lighting, but not the large white strip on the front panel. Tram 13 has the destination of "CITY"On rear top left hand corner "23.11.62" in very wavy handwriting typical of an aged person.city loop, sturt st., ballarat, tram 13, tram 26 -
 Ballarat Tramway Museum
Photograph - Colour Photograph/s, 23/11/1962 12:00:00 AM
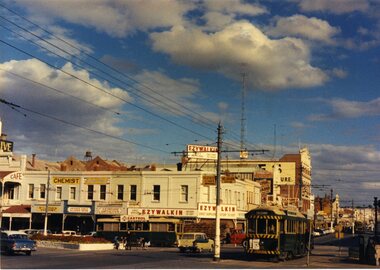
Colour postcard size print of SEC Bendigo trams 26 and a single trucker at Charing Cross with Mitchell St. in the background. Photo dated 21.11.1962. Printed on AGFA paper. Both trams fitted with dash canopy lighting, but no large white strip under the driver's windows. 26 showing destination of "Eaglehawk" with two SEC ads and another ad on the front dash panel. Single trucker has a Castrol ad on the roof. In the background are various buildings along the east side of Pall Mall and along Mitchell St. Pole by the front of 26 has directional signs "Melbourne" and "Heathcote / Echuca". On rear top left hand corner "21.11.62" in very wavy handwriting typical of an aged person.bendigo, pall mall, charing cross, tram 26 -
 Ballarat Tramway Museum
Photograph - Colour Photograph/s, 1960's
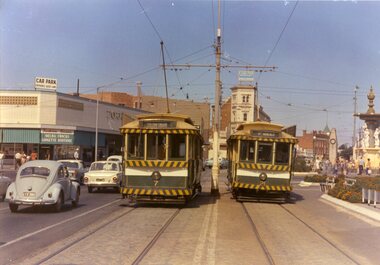
Colour postcard size print of an SEC Bendigo trams 7 and 21 at Charing Cross. Printed on AGFA paper. Photo taken during last years of Bendigo. Trams have dash canopy lighting and large white strip under the driver's windows. Tram 21 showing "North Bendigo" and 7 showing "Golden Square" destinations. Photo has Cenotaph, fountain and buildings on the south east corner of Mitchell St and Pall Mall in background.bendigo, pall mall, charing cross, tram 7, tram 21 -
 Ballarat Tramway Museum
Slide - 35mm slide/s, Aug. 1984
Colour slide - white / yellow cardboard mount, Kodacolor (Kodachrome) slide, of Z3's 208 (Route 95, showing Exhibition) and 225 showing (Route 96, East Brunswick), at the Bourke St. terminus with the Spencer St. Railway station building in the background and the Greyhound building on the right side. 225 has been painted green, while 208 is in the original orange colour scheme. Date on cardboard mount by Kodak is August 1984. Has an Australia Post van by the side of 225.tramways, trams, bourke st, melbourne, spencer st., tram 225, tram 208 -
 Ballarat Tramway Museum
Document - Letter/s, Lloyd Jenkins, Apr. 1999
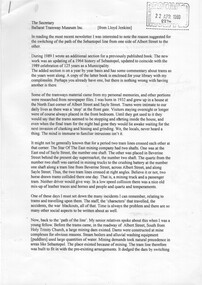
Copy of letter to the Secretary (Original with Secretary and copy to Alan Bradley) from Lloyd Jenkins accompanying the donation of history of the Borough of Sebastopol (see Reg. Item 1090), along with notes discussing the reason for the tram track to Sebastopol crossing from one side of Albert St. to the other near Trinity Church and other stories of the tramway. The water supply dam for the Star of the East dam was in the way. Also comments regarding Fares Please! Has date received stamp in top right hand corner. Part of letter in May 1999 Fares Please! See May 1999 Fares Please!In top right hand corner, btm date received stamp and correspondence number.trams, tramways, sebastopol, albert st, star of the east, stories -
 Ballarat Tramway Museum
Photograph - Colour Photograph/s, Austin Brehaut, Mar. 1999
Set of 23 photographs taken by Austin Brehaut during March and April 1999 of power poles along the former tram routes that still have signs of the former tram stops. An accompanying note (scanned) written by Austin Brehaut is reproduced below in Other Information - see related documents. 1096.1 - Sturt St at Doveton St., south (down) side. .2 - Drummond St. Sth (east side) outside St. Patrick's School between Dana and Eyre St. .3 - Drummond St. Sth, cnr Urquhart St. (east side) .4 - Drummond St. Sth, cnr South St. (east side) .5 - Drummond St. Sth, cnr Sebastopol St. (east side) .6 - Drummond St. Sth, cnr Latrobe St. (east side) .7 - Drummond St. Sth, cnr Darling St. .8 - Sturt St. cnr Ripon St. (North East side) .9 - Ripon St. Nth, cnr Sussex St. .10 - Ripon St. Nth, cnr Mair St. (South West Corner) .11 - Ripon St. Nth, cnr Mair St. (North East Corner) .12 - Macarthur St. cnr Burbank St. (up side) .13 - Lydiard St. Nth, cnr Clarendon St. (east side) .14 - Lydiard St. Nth, cnr Howard St. (west side) .15 - Lydiard St. Nth, cnr Gregory St. (west side) .16 - Lydiard St. Nth, cnr Howitt St. (west side) .17 - Lydiard St. Nth, near Walker St., (east side) .18 - Lydiard St. Nth, cnr Landsborough St. (east side) .19 - Barkly St. cnr Main Road (up side) .20 - Barkly St. near Haymes Cres (down side) .21 - Barkly St., near Young St. (down side) .22 - Barkly St, Cameron St (up side) .23 - Barkly St., at Cobden St. terminus (west side) .1 - April 99, .2 > .10, 9/3/99, .11 > .18 - March 1999, .19 > .23 - April 1999. See also Reg. Item 768.1 > 768.6 for another group of tram stop photos in Drummond St. in 1997. On Fujifilm paper.On rear of each photo in blue ink is location at date at the top of the photo and in the bottom right hand corner - initials "APB"tram stops, power poles, barkly st., lydiard st. nth, ripon st., sturt st., drummond st. sth -
 Ballarat Tramway Museum
Newspaper, The Courier Ballarat, "On the trams", 19/09/1992 12:00:00 AM
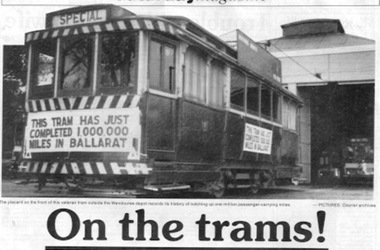
Newspaper cutting from The Courier, Ballarat, Saturday 19/9/1992, page 27, written by Seaton Ashton about the history of trams in Ballarat on the 20th anniversary of their closure. Notes horse trams, ESCo, opening of lines, tram car builders, their rehabilitation in the 1930's, the involvement of the BTPS, trams 1 and 12. Has two photos, one of tram 27 sitting outside the SEC depot carrying the "This tram has just completed 1,000,000 miles in Ballarat" and one of tram 31, east bound in Bridge St. bound for Victoria St. dropping off a passenger at a stop. Both picture from the Courier Archives. Item in the Courier's "Saturday Magazine". Occupies a full page of the newspaper. 2nd copy added 11/8/2001 - folded.trams, tramways, ballarat, esco, btps, horse trams, sec -
 Ballarat Tramway Museum
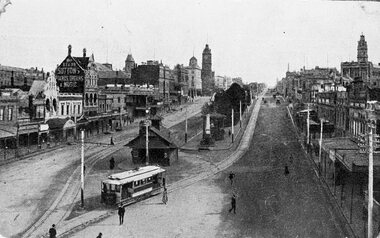
Postcard, ESCo tram at the east end of Sturt St
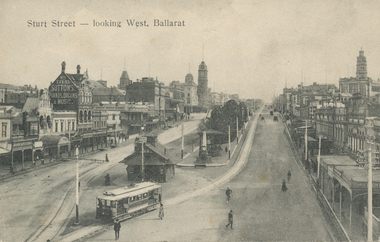
B&W postcard of an ESCo tram at the east end of Sturt St. Ballarat, with the Grenville St. shelter in the background. Shows buildings along both sides of Sturt St. Has a few pedestrians in the photo and some horse drawn vehicles in the background. Tram in style with destination box/lights at back of drivers canopy. Has title "Sturt Street - looking West, Ballarat" in top left hand corner. On rear "H.J. Summerscales, next Post Office, Ballarat - Printed in Germany" on left hand edge vertically. Post card dated 29/12/10 (1910), from E.H. Colson? at 49 Webster St. wishing the recipient a happy new year. Recipient - Mr. A. Steer, Glen Eira Rd. Elsternwick. Has a Ballarat Post office and stamp and Victorian 1d stamp (red). As well in pencil, a price "$15". See also scanned image file and prints from negative at Reg. Item 833. Image cropping is slightly different at the bottom to that of Reg. Item 833. Used in postcard display 2017-2018trams, tramways, esco, sturt st, postcards -
 Ballarat Tramway Museum
Photograph - Illustration/s, Sydney and Melbourne trams
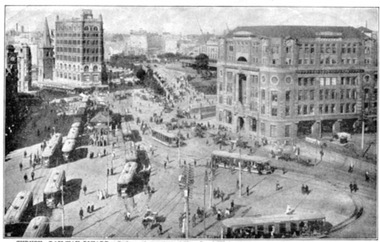
Tear out of a magazine - approx. quarto size of two sepia toned illustrations: Top: Railway Square Sydney - approx. 20 trams and horse drawn vehicles. Lower: Collins St. Melbourne, east, looking west from about Exhibition St. - has two cable trams and horse drawn vehicles. C1900? On rear has series of 5 ink drawings of Australian explorers, Sturt, Leichardt, Mitchell, Eyre and Burke - titled "Australian Explorers"trams, tramways, sydney railway sq., melbourne, cable trams -
 Ballarat Tramway Museum
Photograph - Illustration/s, W.J.Wyse - photos, Colour Illustration of Hamburg, The Hague
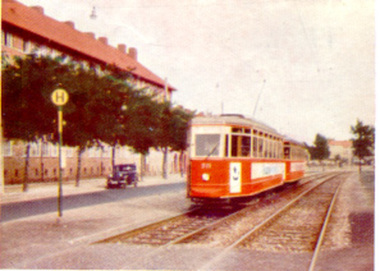
Sheet with colour reproductions (each 7.8W X 5.8H ) of trams in Hamburg (V6 325 & trailer), The Hague (coupled PCC cars at Trekweg) & London (Ex East Ham car at Eltham). "Agfacolour Photos by W.J.Wyse"trams, tramways, trams, london, the hague, hamburg -
 Ballarat Tramway Museum
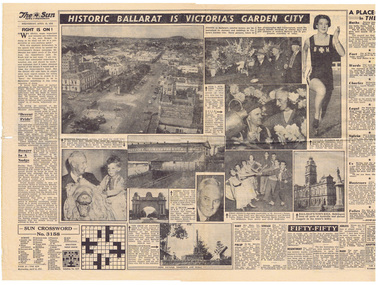
Newspaper, Herald Sun, Historic Ballarat is Victoria's Garden City, Apr. 1953
Yields information and demonstrates Ballarat's development from a Melbourne newspaper viewpoint in 1953 and what it's view on the city was.Centre page of Melbourne Sun, pp15-18, 15/4/1953, photos of Sturt St. from Town Hall, looking east, Town Hall, Arch of Victory, Alfred Hall, Eureka Stockade and Begonias. Record updated and image added 21/9/2013.trams, tramways, ballarat, street views, alfred hall, eureka -
 Ballarat Tramway Museum
Book, Hadfield's, "Points, Crossings and Special Track Work for Tramways & Railways, c1910
160 page book with heavy covers, with title "Points, Crossings and Special Track Work for Tramways & Railways / Hadfield's Steel Foundry Co. Ltd., Sheffield England" giving details with many photographs of the company and their work in producing cast steel points and castings for Railways and Tramways. Shows many photos of the layout of complex junctions in their Sheffield works at East Hecla. Has many fine detailed engravings. Images added 24-12-2016"Ballarat Tramway Preservation Society Catalogue No. 4" on page 1.trams, tramways, trackwork, hadfield's, special work, cast steel -
 Ballarat Tramway Museum
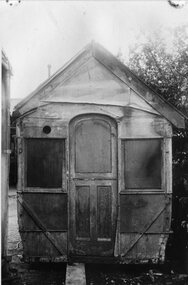
Photograph - Black & White Photograph/s - set of 3, 13/12/1985 12:00:00 AM
Black and white photograph of the recovery of the body of Horse Tram No. 1 at the Anderson St. Ballarat home of J. Leviston on Friday 13 December 1985. See also Ref. No. 734 and 751. Body yet to be loaded on the trailer. Photos of end views of the tram body. 788.1 - Garry Wood working to slide tram body along a piece of timber east end. 788.2 - end view of body - note piece of timber under frame to enable movement - west end..trams, tramways, horse tram no. 1, btps, tramcars, tram recovery -
 Ballarat Tramway Museum
Postcard, John Phillips, Sturt St. Ballarat
B&W print and scanned images of a black and white postcard lent to the BTM by Mr. Norm DePomeroy, Dec. 1997. Image is an ESCo tram at the east end of Sturt St. Ballarat, with the Grenville St. shelter in the background. Shows buildings along both sides of Sturt St. Has a few pedestrians in the photo and some horse drawn vehicles in the background. Tram in style with destination box/lights at back of drivers canopy. 2 copies held at 8/98. See also Reg. Item 1988 for postcard with the same photo but different details.See 833i3trams, tramways, esco, sturt st, postcards -
 Ballarat Tramway Museum
Postcard, John Phillips, Sturt St. Ballarat, - horse tram trailer
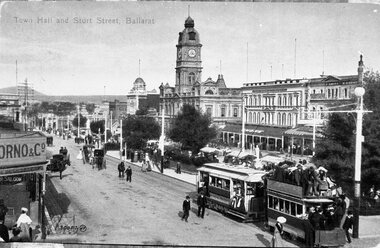
B&W print and scanned images of a coloured postcard lent to the BTM by Mr. Norm DePomeroy, Dec. 1997. Image is an ESCo tram just past the intersection of Doveton St. and Sturt St. travelling east along the north side of Sturt. Steet towing a heavily laden horse tram as a trailer. Photo appears to be taken soon after opening of the electric trams, as the tram does not have any destination box above the driver. Possibly summer 1905/1906. Numerous people in the street, some horse drawn vehicles in the photograph. Shows buildings along the south side of Sturt St. and part of the verandah of the building at the NE corner of Doveton St. 1 copy held at 8/98. For a list and description of the same base image see Archives file - "Notes on ESCo Tram towing a heavily loaded trailer" See Reg item 4275 for other black and white prints of this photograph and 162 for the coloured postcard. See 835i3. In top of image are the words "Town Hall and Sturt Street, Ballarat"trams, tramways, esco, horse trams, postcards, doveton st, sturt st -
 Ballarat Tramway Museum
Slide - 35mm slide/s, Peter Moses, Jan. 1966
Photo of a bogie tram east bound in Sturt St. after leaving Hospital corner (corner of Sturt and Drummond Streets). Has curve from Drummond North into Sturt St. in the foreground. Note scanning error in the image. Kodak cardboard mount slide, taken by Peter Moses January 1966.On back of slide in blue ink in the bottom right hand corner "P. Moses".tramways, trams, hospital corner, sturt st. -
 Ballarat Tramway Museum
Slide - 35mm slide/s, Peter Moses, Jan. 1966
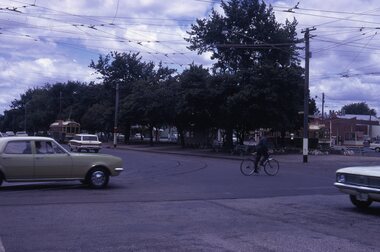
Photo of SEC Ballarat Tram No. 30 at Victoria St. terminus, looking east along Victoria St. Shows terminal arrangements with regard to the roadway and pan in the overhead to assist placement of the trolley pole. Tram has destination of "Gardens via Sturt St. W". Kodak cardboard mount slide, taken by Peter Moses January 1966.On back of slide in blue ink "Jan. 1966 Victoria St. Terminus" and in bottom right hand corner "P. Moses".tramways, trams, victoria st, terminus, tram 30 -
 Ballarat Tramway Museum
Slide - 35mm slide/s, Peter Moses, Aug. 1971
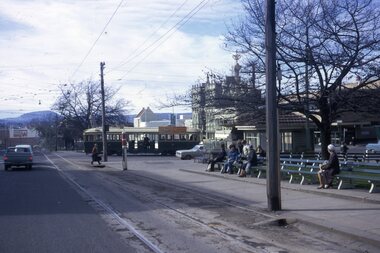
Colour slide - Photo of SEC Ballarat Tram No. 35 crossing Sturt St. from Lydiard St. North. Photo taken from the north side of Sturt St. Photo shows the tram stop arrangements for east bound trams in Sturt St. with passengers waiting on the seats. Tram has "Everything's under control in my all electric kitchen" SEC roof advertisement panel. Kodak cardboard mount slide, taken by Peter Moses August 1971.On back of slide in red ink "Ballarat / into Sturt St from Lydiard St." and in top left hand corner in black ink "P. Moses".tramways, trams, sturt st, lydiard st north, tram stops, tram 35 -
 Ballarat Tramway Museum
Slide - 35mm slide/s, Peter Moses, Aug. 1971
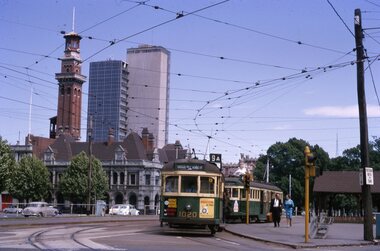
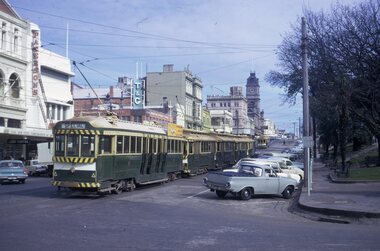
Photo of SEC Ballarat Trams No. 37 and four others (4 single truckers) in City Loop at the east end of Sturt St. Ballarat. and Sturt St stop. Tram 37 has destination of "Special". In the photograph are the buildings on the south side of Sturt St., including Patersons, the Town Hall, T&G building. Kodak cardboard mount slide, taken by Peter Moses August 1971.On back of slide in blue ink "Ballarat, Siding Sturt St. " and in top left hand corner in black ink "P. Moses". On other side of the slide is the word "Siding" in blue ink.tramways, trams, sturt st, city loop, tram 37 -
 Ballarat Tramway Museum
Slide - 35mm slide/s, Peter Moses, Aug. 1971
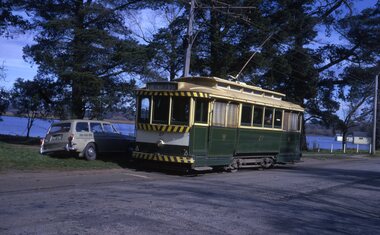
Photo of SEC Ballarat Tram No. 27 in Wendouree Parade, east bound, near the Junction for the SEC Depot. Tram has the destination of "Victoria St.". Has Lake Wendouree in the background. Kodak cardboard mount slide, taken by Peter Moses August 1971.On back of slide in light black ink "N27 Ballarat / Wendouree Pde. " and in bottom right hand corner in black ink "P. Moses" on the other side of the slide.tramways, trams, wendouree parade, sec depot, tram 27 -
 Ballarat Tramway Museum
Slide - 35mm slide/s, Peter Moses, Aug. 1971
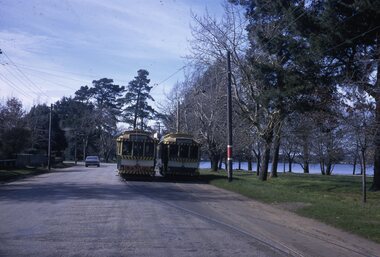
Photo of SEC Ballarat Tram No. 27 and 32 crossing at Depot Loop (Barrett Ave) in Wendouree Parade, east bound, near the Junction for the SEC Depot. Tram 27 has the destination of "Victoria St.". Has Lake Wendouree in the background. Shows the arrangement of the loop within Wendouree Parade Kodak cardboard mount slide, taken by Peter Moses August 1971.On back of slide in red ink "Ballarat / Passing Loop Wendouree Pde" and in bottom right hand corner in black ink "P. Moses" on the other side of the slide.tramways, trams, wendouree parade, depot, crossing loop, barrett ave, depot loop, tram 27, tram 32