Showing 3173 items
matching destinations
-
 Melbourne Tram Museum
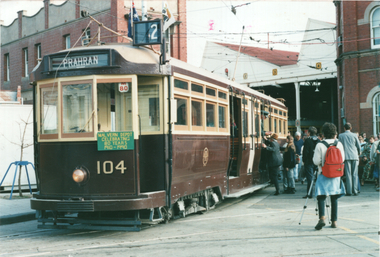
Photograph - L104 80th Anniversary of PMTT, May 1990
Colour print showing L class 104 on the depot fan at the time of a tour to celebrate 80 years of the Prahran and Malvern Tramways Trust. Has a "Malvern Depot Celebrating 80 years 1910-1990", auxilary board, a destination of "Prahran" and a run number in the driver's window "M80". Photographer unknown.Yields information about a celebration of the 80th anniversary of the commencement of operations by the PMTT.Colour print on plain paper."Page 18" in ink on rear.pmtt, tram 104, l class, trams, tramways, tours -
 Melbourne Tram Museum
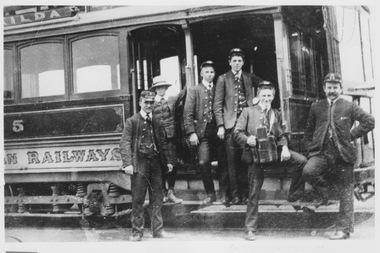
Photograph - VR tram 5 second fleet
Photograph shows partial side view of VR single truck tram 5 second fleet showing destination St Kilda. Five uniformed crew and one young male stand at side step. Glass driver windscreen is visible.Below photo is embossed letter B from a previous display.Yields information of Railways tramcar 5 and crew Black and white photograph with stamp and notes on rear TMSV stamp, black biro writing 'Print from RH Prentice negative - August 1980 (Original from L Marshall Wood collection)'victorian railways, single truck, second fleet, st kilda, vr tram 5 -
 Melbourne Tram Museum
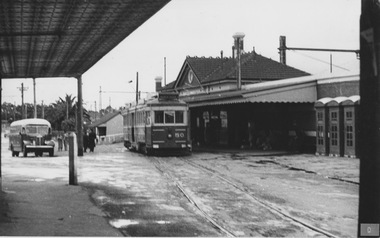
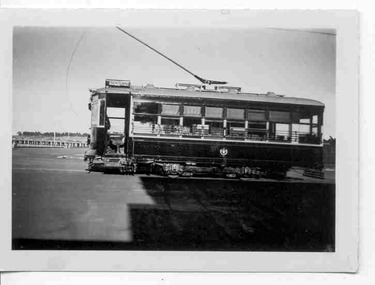
Photograph - VR tram 50 at Sandringham Railway Station
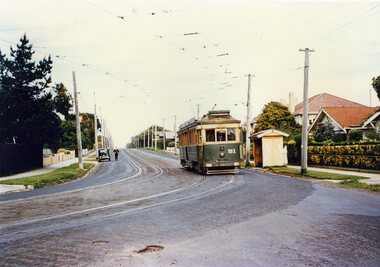
Photograph shows bogie tram VR 50 waiting at Sandringham Railway Station with destination 'Black Rock'. A local bus also waits not far from the tramcar. The tram crew and a few by-standers are wearing overcoats, the sky appears overcast and the ground is wet. Three telephone boxes are at the right of the photo.Yields information about VR tram 3 and Elwood Depot Black and white photograph with letter D at lower right and blue stamp and biro date on rearStamp reads: 'W E L T Collection, A G Culpeffer-Cooke, Victoria, Australia Ref 8B Date 1956'victorian railways, sandringham station, black rock, vr tram 50, local bus -
 Melbourne Tram Museum
Functional object - Tramcar component, Boselli Italy, Luminator Texas, Set of six destination indicator equipment that was fitted to Z, Z3 and B class trams, c1975 - 1990's?
Set of six destination indicator equipment that was fitted to Z, Z3 and B class trams. .1 - dot matrix type destination sign fitted to the side of a B class tram - set at Preston Depot - serial number 232636 - Luminator type, back cover loose, 180H x 1300W x 100D. See images 3704i1a to e. .2 - dot matrix type route number fitted to the front of a tram, type fitted to B2 class tram, set at 86D, serial number 273644 - Luminator type, marked "163 No", 240H x 350W x 135D. See images 3704i2a to d. .3 - flipper type, side destination type, marked "ex 53" (Z class tram), made in Italy by Boselli has yellow label 37/702S, serial number 40A1603, set to St Kilda Beach and stamped 136 on one flange. 120H x 330W x 165D. See images 3704i3a to c .4 - flipper type, destination box, with markings "B'Wick Flaps", with labels "New" "Universal A flaps" made in Italy by Boselli, serial number 40A6623, set to St Kilda Junc". 210H x 1000W x 1900. See images 3704i4a to d. .5 - flap from an above type box, half of "Richmond" and "South Melb Depot", 970W x 80H. See images 3704i5a to b .6 - controller box, marked "No. 105" on rear, serial number 202311 Luminator, numeric pad, illuminated display and five control buttons made by gulton Luminator division fitted to a B2 tram. See images 3704i6a to b .7 - dot matrix destination sign fitted to the front of a B2 class tram, set to "Not in Service", Serial number 502626 Luminator, 220H x 1300W x 165D, See images 3704i7a to e. Source of items 3 and 4 name based on drawings held by the Museum for the destination signs fitted to Z class trams. Refer to drawing R11-982 as an example. Luminator made by Luminator Technology Group Texas - see https://www.ltgglobal.com/ access 12/7/2019. Imagetrams, tramways, destination indicators, z3 class, transport equipment, z class, b class -
 Marysville & District Historical Society
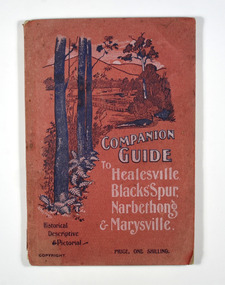
Book, The Atlas Press, Companion Guide to Healesville, Blacks' Spur, Narbethong & Marysville, 1904
A companion guide to Healesville, Blacks' Spur, Narbethong & Marysville. With photographs, information and a pull-out map.Paperback. Front cover has a drawing of a countryside outlook. The book contains 65 photographs and information relating to the locations listed on the front cover. There is a pull-out map located on the inside of the back cover. Back cover has details of the rail and coach services available to travel to the destinations mentioned in the book. non-fictionA companion guide to Healesville, Blacks' Spur, Narbethong & Marysville. With photographs, information and a pull-out map.healesville, black spur, narbethong, marysville, victoria, history -
 Bendigo Historical Society Inc.
Photograph - BASIL MILLER COLLECTION: TRAMS
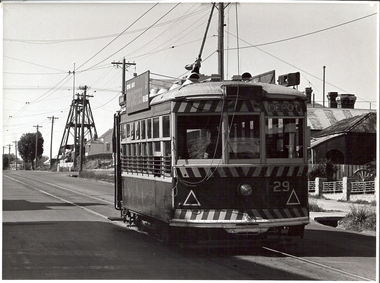
Black and white photograph of 'Birney Car' Number 29 indicating 'Depot' in destination indicator. Heading uphill towards the poppet head of the 'Iron Bark Mine' in Long Gully. Inscription on reverse: Photo by A. Doney Bendigo stamped in blue. Birney car climbs the hill past the the Iron Bark Mine.person, individual, basil miller -
 Bendigo Historical Society Inc.
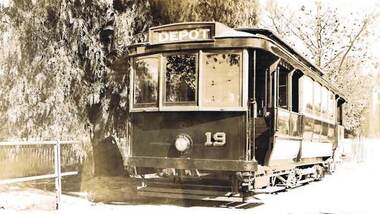
Photograph - BENDIGO TRAM NO 19, 1935
Black and White Photo of Tram No 19, No 19 Tram parked by a Peppercorn Tree, Destination Plate at top of tram reads 'Depot', Markings on back of Photo read 'Bendigo Electric Tramways 1935', '1935 One man- two man cars', 'S.E.C. Colours', stamped with 'Printed by Olivers Bendigo'photograph, tram, no. 19, bendigo tram, bendigo trams, bendigo tramways, trams, bendigo electric tramways -
 Bendigo Historical Society Inc.
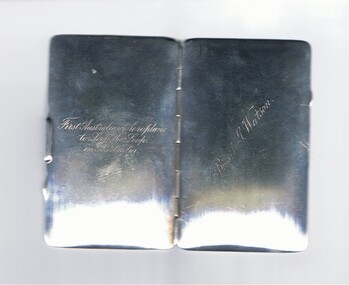
Memorabilia - BASIL WATSON COLLECTION: STERLING SILVER CARD CASE, 1917
Sterling silver card case (B Watson) - hinged with single brass leaf insider engraved with details of Watson's flights and achievements in Australia - destinations,distance, time, date inscribed on inside of case.. On front ''Basil G. Watson''; on back ''First Australian to Loop the Loop in Australia'' (engraved inscriptions)person, individual, basil watson -
 Ballarat Tramway Museum
Negative, Wal Jack, mid to late 1940's
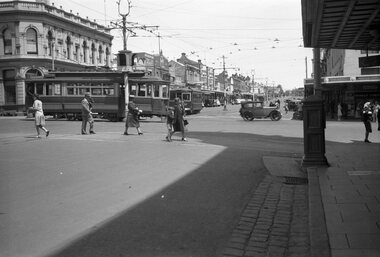
Negative and Digital images of the Wal Jack Geelong Negative file of two trams including No. 27 at the intersection of Ryrie and Moorabool streets, with shoppers and cars. No. 27 has the destination of West. In the background is Donald Chemist. Note the set of bar traffic lights at this location. Photo mid to late 1940's. trams, tramways, geelong, ryrie st, moorabool st, traffic lights, tram 27 -
 Ballarat Tramway Museum
Photograph - Black & White Photograph/s, Charles Craig, mid 1950's
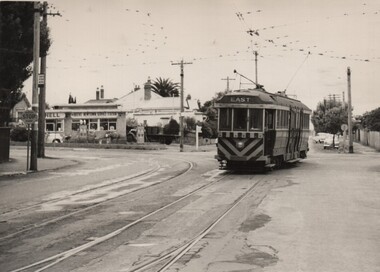
Photograph of the intersection of a bogie tram with destination of East and hazard stripes and dash canopy lighting turning from Pakington St (from West) into Aberdeen St at Pakington St junction. In the background is the Shell service station. Note the metal tram stop sign on the left. Two copies of the print held. trams, tramways, geelong, aberdeen st, east, west, tram stops -
 Ballarat Tramway Museum
Photograph - Black & White Photograph/s set of 2, Charles Craig, Aug. 1971
Yields information about the intersection of Sturt St and Hamilton Ave by trams prior to the closure of the SEC operated system.Black and White photograph of Nos 13 and 14 turning from Hamilton Ave into Sturt St west. Both tram have the destination of City. No. 13 has a Twin Lakes sign. Photo by Charles Craig possibly August 1971, prior to closure as the new bus stops signs are in view. trams, tramways, sturt st west, closure, hamilton ave, tram 13, tram 14 -
 Ballarat Tramway Museum
Slide - 35mm slide/s, Keith Caldwell, 8/03/1960 12:00:00 AM
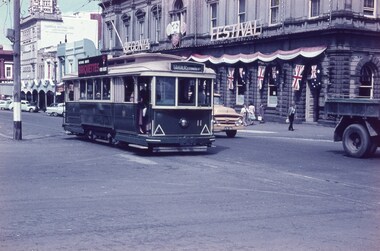
Yields information about the Sturt St, tram 11 and the Town Hall decorated for the Begonia Festival.Agfa colour slide, white cardboard mount, photo by Keith Caldwell on 8/3/1960 of: Tram 11 passing the Town Hall which is decorated for the Begonia Festival with both Australian and British flags. The tram has a Briquettes roof advertisement, with the destination of Gardens via Drummond St North.Stamped on bottom of slide "8 Mar 60". tramways, trams, sturt st, armstrong st, town hall, tram 11 -
 Ballarat Tramway Museum
Slide - 35mm slide/s, Keith Caldwell, 8/03/1960 12:00:00 AM
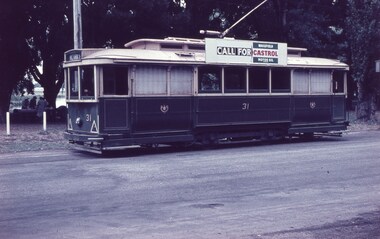
Yields information about tram 31 and Gardens Loop area.Agfa colour slide, white cardboard mount, photo by Keith Caldwell on 8/3/1960 of: Tram 31 running in Wendouree Parade on the north side of Gardens Loop. Tram has the destination of Victoria St and has a Castrol Oil roof advertisement. Note the ladies possibly having a picnic.Stamped on bottom of slide "8 Mar 60". tramways, trams, wendouree parade, lake wendouree, tram 31 -
 Ballarat Tramway Museum
Slide - 35mm slide/s, Keith Caldwell, 8/03/1960 12:00:00 AM
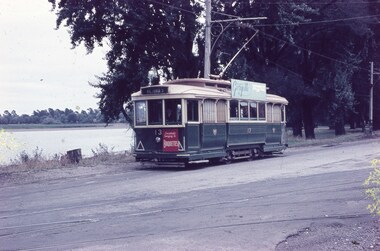
Yields information about tram 13 and Wendouree Parade near Lake Wendouree.Agfa colour slide, white cardboard mount, photo by Keith Caldwell on 8/3/1960 of: Tram 13 running in Wendouree Parade opposite the depot with Lake Wendouree in the background. Tram has the destination of Victoria St, has a Briquettes advert on the front dash panel and a roof advertisement for Georgette.Stamped on bottom of slide "8 Mar 60". In ink "Ballarat"tramways, trams, wendouree parade, lake wendouree, depot junction, tram 13 -
 Ballarat Tramway Museum
Slide - 35mm slide/s, Keith Caldwell, 12/03/1962 12:00:00 AM
Yields information about the nature of tram services and the Titanic bandstand in Sturt St.Agfa colour slide, white cardboard mount, photo by Keith Caldwell on 12/3/1962 of: Tram 18 descending the Sturt St hill to Grenville St, passing the Titanic bandstand. The tram has the destination of Mt Pleasant and roof advertisements for Whites Flower shop and a SEC Electric cooking.In ink "Ballarat 12.3.62"tramways, trams, sturt st, tram 18 -
 Ballarat Tramway Museum
Slide - 35mm slide/s, Keith Caldwell, 16/03/1963 12:00:00 AM
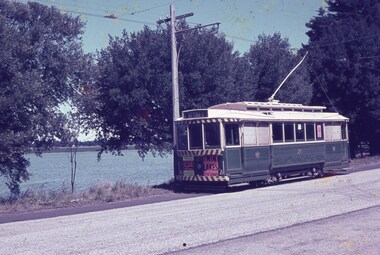
Yields information about tram 21 and Wendouree Parade and the nearby Lake Wendouree.Agfa colour slide, white cardboard mount, photo by Keith Caldwell on 16/3/1963 of: Tram 21 in Wendouree Parade, approaching the tram depot. Tram has the destination of Mt Pleasant, a Dancing at Civic Hall and a Twin Lakes dash panel advert. Has Lake Wendouree in the background.In ink "16.3.63"tramways, trams, wendouree parade, sec depot, lake wendouree, tram 21 -
 Ballarat Tramway Museum
Slide - 35mm slide/s, Keith Caldwell, 16/03/1963 12:00:00 AM
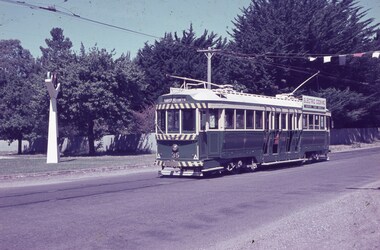
Yields information about tram 35 and Wendouree Parade, the Olympic Monument and the nearby Lake Wendouree.Agfa colour slide, white cardboard mount, photo by Keith Caldwell on 16/3/1963 of: Tram 35 in Wendouree Parade / Hamilton Ave nearing the Carlton St Loop. Has the Olympic Monument in the background and Lake Wendouree. Tram has the destination of Gardens via Sturt St West.In ink "Olympic Memorial L Wendouree 16.3.63"tramways, trams, wendouree parade, olympics, hamilton ave, tram 35 -
 Ballarat Tramway Museum
Slide - 35mm slide/s, Robert Thomson, c1966
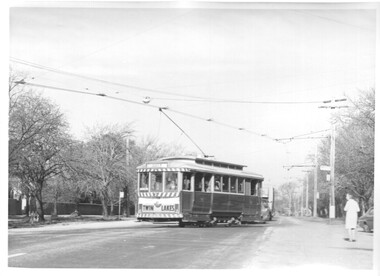
Yields information about Ballarat's trams during 1966c, the Mt Pleasant terminus.AGFA blue / white plastic mount, colour slide of No. 33 at the Mt Pleasant terminus, c1966 - still has the white on black destination roll. In the background are the shops advertising Robur Tea, Women's Weekly, The Age, and Coca Cola. The tram has Eureka Roofing and Electric Cooking roof adverts.tramways, trams, mt pleasant, barkly st, tram 33 -
 Ballarat Tramway Museum
Slide - 35mm slide/s, Mark Plummer, Sep. 1971
Photo of Ballarat trams 13 and 14 at the City Terminus, Sturt St, with the Ballaarat Town Hall in the Background. Note the FE Holden with an almost matching green colour scheme. Tram 13 has a destination of "Mt. Pleasant" Kodak cardboard mount slide, taken Mark Plummer, September 1971tramways, trams, sturt st, city terminus, town hall, tram 13, tram 14 -
 Ballarat Tramway Museum
Slide - 35mm slide/s, Peter Moses, 21/08/1971 12:00:00 AM
Photo of SEC Ballarat No. 42 after turning from Main St into Bridge St while running on the ARHS/TMSV special trams prior to closure. Tram 42 showing destination of "Special". No. 11 in the background. Kodak cardboard mount slide, taken by Peter Moses 21 August 1971.On the rear of the slides in blue ink "N42 Ballarat / Bridge St near Main St." and "P. Moses" in the bottom left hand corner in black ink on the other side of the slide.tramways, trams, bridge st, main st, special trams, tram 42 -
 Ballarat Tramway Museum
Photograph - Colour Print, Geoff Grant, Dec. 1955
Colour print, possibly from a Geoff Grant negative or slide, of VR tram No. 51 on the Sandringham tram route, tram has the destination of "Sandringham". Photo taken 12/1955. Printed on Fujicolour paper. See also Reg Item 478.1 for the black and white image taken slightly later.vr, sandringham, tram 51 -
 Ballarat Tramway Museum
Photograph - Black & White Photograph/s, 1950s
Yields information about the appearance of one of Ballarat tramcars No. 25 during the mid 1950's and Gardens Loop.Black and white photograph of Ballarat No. 25 north bound in Wendouree Parade, Gardens Loop, 1950's with all the blinds drawn and destination of Victoria St. Shows the signage at the time at Gardens loop. No details of photographer. Original negative scanned at hi res and image updated 1/6/2020.tramways, trams, wendouree parade, gardens loop, tram 25 -
 Ballarat Tramway Museum
Photograph - Black & White Photograph/s, Wal Jack, 26/03/1939 12:00:00 AM
Black and white photograph of Geelong 27 at the old Moorabool St Wharf terminus Photographed by Wal Jack on 26/3/1939. Tram has the destination of Newtown. .1 same print in the Wal Jack photo album, Reg Item 5003. Note handwriting on rear is different to the other print.On rear in ink "SEC Geelong Birney No. 27 ex (MTT 303) at old Moorabool St Wharf terminus 26th March '39" and in top right hand corner, stamped in purple ink "W. Jack No. Copyright" with Number T265 in ink. 4214.1 - Geelong Tramways, Birney Steel Safety No. 27, J. C. Brill, Philadelphia USE in Adelaide 303. i1 - scan of print in the album i2 - rear of image i3 - scan of negative at 3200dpi added 6/6/2020. tramways, trams, geelong, birney, moorabool st, tram 27 -
 Ballarat Tramway Museum
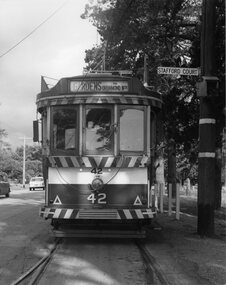
Photograph - Black & White Photograph/s, Chris Wurr, 1971
Yields information about the stop arrangements at depot junction and the details of one end of a bogie tram.Black and White photograph of No. 42 at the depot junction points. Tram has the Destination 'Gardens via Drummond St Nth'. The points are set for the depot. On the pole adjacent is the tram stop and the street sign for Stafford Court. Shows the detail of the one of the ends of No. 42 and how the trolley rope was positioned by the crews. Stamped on rear in black ink "Donated to BTPS by and Photo By" / "Chris Wurr 12 Truscott Street, Ararat 3377 (053) 52 3403.tramways, trams, depot junction, bogie trams, trolley poles, tram 42 -
 Ballarat Tramway Museum
Photograph - Black & White Photograph/s, Chris Wurr, Jan. 1971
Yields information about one of Ballarat's bogie trams at Dawson St and in particular one of the roof advertisements that were well written to catch attention.Black and White photograph of No. 40 using the crossover at Dawson St. The tram has the destination of Lydiard St Nth and has a Eureka Roof Tiles and Bliss Bombs (To read pack: Tilt Tram") roof advertisement. 2nd copy added 13/4/2009, ex Bill Scott Donation.Stamped on rear in black ink "Donated to BTPS by and Photo By" / "Chris Wurr 12 Truscott Street, Ararat 3377 (053) 52 3403. Copy 2 - Stamped on rear "Photo by Chris Wurr 12 Truscott Street, Ararat 3377 (053) 52 3403", a "William F Scott" address label in the bottom right hand corner and in ink "Ballarat Trmys (SEC) / No. 40 negotiates the Dawson St shunt to head back to Lydiard St North/ Jan 1971" and "purchased 5.93"tramways, trams, sturt st, dawson st, bliss bombs, tram 42 -
 Ballarat Tramway Museum
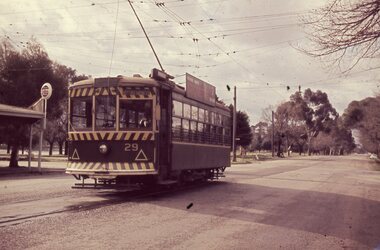
Slide - 35mm slide/s, Travis Jeffrey, c1962
Agfa plastic mount (blue base, white cover) with a photo of Bendigo 29 turning from McCrae St into Nolan St, with Lake Weeroona in the background. Tram has the destination of North Bendigo and has a SEC Briquettes roof advertisement. Note the "Cohns" drink advertisement on the milk bar on the corner."BES 13" in penciltramways, trams, bendigo, north bendigo, nolan st, mccrae st, tram 29 -
 Ballarat Tramway Museum
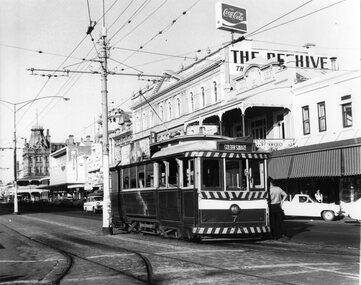
Photograph - Black & White Photograph/s, Chris Wurr, early 1970's
Yields information about the appearance of Bendigo Birney trams early 1970's and the McCrae St area.Black and White Photograph of Bendigo No. 7, in Pall Mall, at Charing Cross, with the destination of Golden Square. An inspector is leaning against the front door of the tram. Has in the background, The Beehive building, Coca Cola advertisement, Myers store and Stoneman's Shamrock Hotel. Photo Chris Wurr, early 1970's. "Photo by Chris Wurr" stamped on the rear.trams, tramways, bendigo, charing cross, pall mall, tram 7 -
 Ballarat Tramway Museum
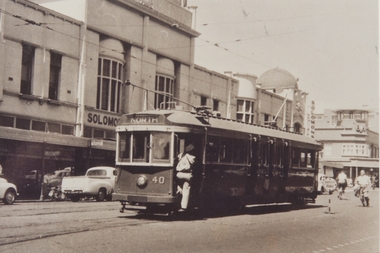
Photograph - Black & White Photograph/s, mid 1950's
Black and white print of Geelong No. 40, in Moorabool St, just south of Malop St. with the destination of North. Appears the driver is board the tram. Has the Solomons building in the background and a small safety zone stop portable sign alongside the tram. Photo mid 1950's. Printed on AGFA paper.On rear in ink PMTT=MMTB E40 = Geelong 40 = Ball 43"trams, tramways, geelong, moorabool st, tram 40 -
 Ballarat Tramway Museum
Slide - 35mm slide/s - set of 2, Dave Simpson, late 1960's early 1970's
Yields information about the intersection of Main Road and Barkly St Mt PleasantSet of two 35mm slides - Anscochrome white plastic mounts of No. 13 turning from Main Road into Barkly St with the destination of Mt Pleasant. .2 - the tram has a Twin Lakes on the rear of the tram with a Morris motor car at the rear of the tram. In the background are roadside advertisements for HBA and Taubman's paints.tramways, trams, barkly st, main road, mt pleasant, tram 13 -
 Ballarat Tramway Museum
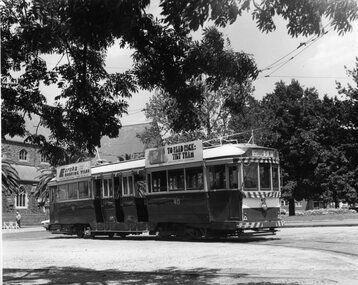
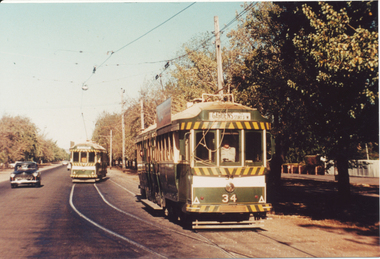
Postcard, SEC Ballarat trams 34
Yields information about the use of trams in Ballarat and tram operation in the Sturt St west as the loops, in particular the Parker St. Loop.Colour photograph, printed on a postcard back format of SEC Ballarat trams 34 and another bogie tram crossing at the Parker St loop in Sturt St West. Tram 34 has the destination of "Gardens via Sturt St West". Photo late 1960's or early 1970's.trams, tramways, sturt st west, parker st loop, tram 34