Showing 13727 items
matching no 7
-
 Flagstaff Hill Maritime Museum and Village
Decorative object - Fork
This fork is from the wreck of the Loch Ard that sailed from Gravesend London. The manifest listed an array of manufactured goods being exported to the Colony of Victoria. Included in the cargo manifest was a large number of hardware & cutlery items. This fork is representative of similar items of silver electro-plated cutlery salvaged from the Loch Ard wreck site, comprising nickel silver electroplated spoons and forks of various sizes but all sharing the same general shape and design. Some of the pieces display their makers’ mark of William Page & Co Birmingham UK. Within the Flagstaff Hills cutlery collection donated from the Loch Ard, maker’s marks are often obscured by sedimentary accretion or verdigris after a century of submersion in the ocean. However sufficient detail has survived to indicate that the collection of samples of electroplated cutlery probably originated from the same cargo consignment from the Loch Ard and were made by William Page & Co. William Page was born in 1811 and died in 1885. He was active as a manufacturer of cutlery from 1829 with premises at 74 Belmont Rd, Dales End as a "close plater" (someone who works sheet metal), and he began electroplating in 1855. William Page & Co was also active from 1880 at Cranemore St, Cattle’s Grove also 55 Albion St, Birmingham, in 1936 the firm became Ltd. The firm used the trademarks "Asrista, Bolivian Silver, Silverite, Roman Silver, Roumanian Silver and Trevor Plate. In 1938 William Page was a supplier to the British Government, marking it's products with the broad arrow symbol and was also present at Sheffield. History of the Loch Ard: The Loch Ard got its name from ”Loch Ard” a loch which lies to the west of Aberfoyle, and the east of Loch Lomond. It means "high lake" in Scottish Gaelic. The vessel belonged to the famous Loch Line which sailed many vessels from England to Australia. The Loch Ard was built in Glasgow by Barclay, Curdle and Co. in 1873, the vessel was a three-masted square-rigged iron sailing ship that measured 79.87 meters in length, 11.58 m in width, and 7 m in depth with a gross tonnage of 1693 tons with a mainmast that measured a massive 45.7 m in height. Loch Ard made three trips to Australia and one trip to Calcutta before its fateful voyage. Loch Ard left England on March 2, 1878, under the command of 29-year-old Captain Gibbs, who was newly married. The ship was bound for Melbourne with a crew of 37, plus 17 passengers. The general cargo reflected the affluence of Melbourne at the time. On board were straw hats, umbrella, perfumes, clay pipes, pianos, clocks, confectionery, linen and candles, as well as a heavier load of railway irons, cement, lead and copper. There were other items included that were intended for display in the Melbourne International Exhibition of 1880. The voyage to Port Phillip was long but uneventful. Then at 3 am on June 1, 1878, Captain Gibbs was expecting to see land. But the Loch Ard was running into a fog which greatly reduced visibility. Captain Gibbs was becoming anxious as there was no sign of land or the Cape Otway lighthouse. At 4 am the fog lifted and a lookout aloft announced that he could see breakers. The sheer cliffs of Victoria's west coast came into view, and Captain Gibbs realised that the ship was much closer to them than expected. He ordered as much sail to be set as time would permit and then attempted to steer the vessel out to sea. On coming head-on into the wind, the ship lost momentum, the sails fell limp and Loch Ard's bow swung back towards land. Gibbs then ordered the anchors to be released in an attempt to hold its position. The anchors sank some 50 fathoms - but did not hold. By this time the ship was among the breakers and the tall cliffs of Mutton Bird Island rose behind. Just half a mile from the coast, the ship's bow was suddenly pulled around by the anchor. The captain tried to tack out to sea, but the ship struck a reef at the base of Mutton Bird Island, near Port Campbell. Waves subsequently broke over the ship and the top deck became loosened from the hull. The masts and rigging came crashing down knocking passengers and crew overboard. When a lifeboat was finally launched, it crashed into the side of Loch Ard and capsized. Tom Pearce, who had launched the boat, managed to cling to its overturned hull and shelter beneath it. He drifted out to sea and then on the flood tide came into what is now known as Loch Ard Gorge. He swam to shore, bruised and dazed, and found a cave in which to shelter. Some of the crew stayed below deck to shelter from the falling rigging but drowned when the ship slipped off the reef into deeper water. Eva Carmichael a passenger had raced onto the deck to find out what was happening only to be confronted by towering cliffs looming above the stricken ship. In all the chaos, Captain Gibbs grabbed Eva and said, "If you are saved Eva, let my dear wife know that I died like a sailor". That was the last Eva Carmichael saw of the captain. She was swept off the ship by a huge wave. Eva saw Tom Pearce on a small rocky beach and yelled to attract his attention. He dived in and swam to the exhausted woman and dragged her to shore. He took her to the cave and broke the open case of brandy which had washed up on the beach. He opened a bottle to revive the unconscious woman. A few hours later Tom scaled a cliff in search of help. He followed hoof prints and came by chance upon two men from nearby Glenample Station three and a half miles away. In a complete state of exhaustion, he told the men of the tragedy. Tom then returned to the gorge while the two men rode back to the station to get help. By the time they reached Loch Ard Gorge, it was cold and dark. The two shipwreck survivors were taken to Glenample Station to recover. Eva stayed at the station for six weeks before returning to Ireland by steamship. In Melbourne, Tom Pearce received a hero's welcome. He was presented with the first gold medal of the Royal Humane Society of Victoria and a £1000 cheque from the Victorian Government. Concerts were performed to honour the young man's bravery and to raise money for those who lost family in the disaster. Of the 54 crew members and passengers on board, only two survived: the apprentice, Tom Pearce and the young woman passenger, Eva Carmichael, who lost her family in the tragedy. Ten days after the Loch Ard tragedy, salvage rights to the wreck were sold at auction for £2,120. Cargo valued at £3,000 was salvaged and placed on the beach, but most washed back into the sea when another storm developed. The wreck of Loch Ard still lies at the base of Mutton Bird Island. Much of the cargo has now been salvaged and some items were washed up into Loch Ard Gorge. Cargo and artefacts have also been illegally salvaged over many years before protective legislation was introduced in March 1982. The shipwreck of the Loch Ard is of significance for Victoria and is registered on the Victorian Heritage Register ( S 417). Flagstaff Hill has a varied collection of artefacts from Loch Ard and its collection is significant for being one of the largest accumulation of artefacts from this notable Victorian shipwreck. The collections object is to also give us a snapshot into history so we can interpret the story of this tragic event. The collection is also archaeologically significant as it represents aspects of Victoria's shipping history that allows us to interpret Victoria's social and historical themes of the time. The collections historically significance is that it is associated unfortunately with the worst and best-known shipwreck in Victoria's history. Silver plated copper alloy table fork from the wreck of the Loch Ard. William Pageflagstaff hill, warrnambool, shipwrecked coast, flagstaff hill maritime museum, maritime museum, shipwreck coast, flagstaff hill maritime village, great ocean road, loch line, loch ard, captain gibbs, eva carmichael, tom pearce, glenample station, mutton bird island, loch ard gorge, electroplated cutlery, fork -
Flagstaff Hill Maritime Museum and Village
Domestic object - Fork, c.1878
This fork is from the wreck of the Loch Ard, that sailed from Gravesend, London. The manifest listed an array of manufactured goods being exported to the Colony of Victoria. Included in the cargo manifest was a large number of hardware & cutlery items. This fork is representative of similar items of silver electro-plated cutlery salvaged from the Loch Ard wreck site, comprising nickel silver electroplated spoons and forks of various sizes but all sharing the same general shape and design. Some of the pieces display their makers’ mark of William Page & Co Birmingham UK. Within the Flagstaff Hills cutlery collection donated from the Loch Ard, maker’s marks are often obscured by sedimentary accretion or verdigris after a century of submersion in the ocean. However sufficient detail has survived to indicate that the collection of samples of electroplated cutlery probably originated from the same cargo consignment from the Loch Ard and were made by William Page & Co. William Page was born in 1811 and died in 1885. He was active as a manufacturer of cutlery from 1829 with premises at 74 Belmont Rd, Dales End as a "close plater" (someone who works sheet metal), and he began electroplating in 1855. William Page & Co was also active from 1880 at Cranemore St, Cattle’s Grove also 55 Albion St, Birmingham, in 1936 the firm became Ltd. The firm used the trademarks "Asrista, Bolivian Silver, Silverite, Roman Silver, Roumanian Silver and Trevor Plate. In 1938 William Page was a supplier to the British Government, marking it's products with the broad arrow symbol and was also present at Sheffield. History of the Loch Ard: The Loch Ard got its name from ”Loch Ard” a loch which lies to the west of Aberfoyle, and the east of Loch Lomond. It means "high lake" in Scottish Gaelic. The vessel belonged to the famous Loch Line which sailed many vessels from England to Australia. The Loch Ard was built in Glasgow by Barclay, Curdle and Co. in 1873, the vessel was a three-masted square-rigged iron sailing ship that measured 79.87 meters in length, 11.58 m in width, and 7 m in depth with a gross tonnage of 1693 tons with a mainmast that measured a massive 45.7 m in height. Loch Ard made three trips to Australia and one trip to Calcutta before its fateful voyage. Loch Ard left England on March 2, 1878, under the command of 29-year-old Captain Gibbs, who was newly married. The ship was bound for Melbourne with a crew of 37, plus 17 passengers. The general cargo reflected the affluence of Melbourne at the time. Onboard were straw hats, umbrella, perfumes, clay pipes, pianos, clocks, confectionery, linen and candles, as well as a heavier load of railway irons, cement, lead and copper. There were other items included that were intended for display in the Melbourne International Exhibition of 1880. The voyage to Port Phillip was long but uneventful. Then at 3 am on June 1, 1878, Captain Gibbs was expecting to see land. But the Loch Ard was running into a fog which greatly reduced visibility. Captain Gibbs was becoming anxious as there was no sign of land or the Cape Otway lighthouse. At 4 am the fog lifted and a lookout aloft announced that he could see breakers. The sheer cliffs of Victoria's west coast came into view, and Captain Gibbs realised that the ship was much closer to them than expected. He ordered as much sail to be set as time would permit and then attempted to steer the vessel out to sea. On coming head-on into the wind, the ship lost momentum, the sails fell limp and Loch Ard's bow swung back towards land. Gibbs then ordered the anchors to be released in an attempt to hold its position. The anchors sank some 50 fathoms - but did not hold. By this time the ship was among the breakers and the tall cliffs of Mutton Bird Island rose behind. Just half a mile from the coast, the ship's bow was suddenly pulled around by the anchor. The captain tried to tack out to sea, but the ship struck a reef at the base of Mutton Bird Island, near Port Campbell. Waves subsequently broke over the ship and the top deck became loosened from the hull. The masts and rigging came crashing down knocking passengers and crew overboard. When a lifeboat was finally launched, it crashed into the side of Loch Ard and capsized. Tom Pearce, who had launched the boat, managed to cling to its overturned hull and shelter beneath it. He drifted out to sea and then on the flood tide came into what is now known as Loch Ard Gorge. He swam to shore, bruised and dazed, and found a cave in which to shelter. Some of the crew stayed below deck to shelter from the falling rigging but drowned when the ship slipped off the reef into deeper water. Eva Carmichael a passenger had raced onto the deck to find out what was happening only to be confronted by towering cliffs looming above the stricken ship. In all the chaos, Captain Gibbs grabbed Eva and said, "If you are saved Eva, let my dear wife know that I died like a sailor". That was the last Eva Carmichael saw of the captain. She was swept off the ship by a huge wave. Eva saw Tom Pearce on a small rocky beach and yelled to attract his attention. He dived in and swam to the exhausted woman and dragged her to shore. He took her to the cave and broke the open case of brandy which had washed up on the beach. He opened a bottle to revive the unconscious woman. A few hours later Tom scaled a cliff in search of help. He followed hoof prints and came by chance upon two men from nearby Glenample Station three and a half miles away. In a complete state of exhaustion, he told the men of the tragedy. Tom then returned to the gorge while the two men rode back to the station to get help. By the time they reached Loch Ard Gorge, it was cold and dark. The two shipwreck survivors were taken to Glenample Station to recover. Eva stayed at the station for six weeks before returning to Ireland by steamship. In Melbourne, Tom Pearce received a hero's welcome. He was presented with the first gold medal of the Royal Humane Society of Victoria and a £1000 cheque from the Victorian Government. Concerts were performed to honour the young man's bravery and to raise money for those who lost family in the disaster. Of the 54 crew members and passengers on board, only two survived: the apprentice, Tom Pearce and the young woman passenger, Eva Carmichael, who lost her family in the tragedy. Ten days after the Loch Ard tragedy, salvage rights to the wreck were sold at auction for £2,120. Cargo valued at £3,000 was salvaged and placed on the beach, but most washed back into the sea when another storm developed. The wreck of Loch Ard still lies at the base of Mutton Bird Island. Much of the cargo has now been salvaged and some items were washed up into Loch Ard Gorge. Cargo and artefacts have also been illegally salvaged over many years before protective legislation was introduced in March 1982. The shipwreck of the Loch Ard is of significance for Victoria and is registered on the Victorian Heritage Register ( S 417). Flagstaff Hill has a varied collection of artefacts from Loch Ard and its collection is significant for being one of the largest accumulation of artefacts from this notable Victorian shipwreck. The collections object is to also give us a snapshot into history so we can interpret the story of this tragic event. The collection is also archaeologically significant as it represents aspects of Victoria's shipping history that allows us to interpret Victoria's social and historical themes of the time. The collections historically significance is that it is associated unfortunately with the worst and best-known shipwreck in Victoria's history. Silver plated copper alloy table fork from the wreck of the Loch Ard. William Pageflagstaff hill, warrnambool, shipwrecked coast, flagstaff hill maritime museum, maritime museum, shipwreck coast, flagstaff hill maritime village, great ocean road, loch line, loch ard, captain gibbs, eva carmichael, tom pearce, glenample station, mutton bird island, loch ard gorge, electroplated cutlery, fork -
Flagstaff Hill Maritime Museum and Village
Domestic object - Fork, 1878
This fork is from the wreck of the Loch Ard that sailed from Gravesend London. The manifest listed an array of manufactured goods being exported to the Colony of Victoria. Included in the cargo manifest was a large number of hardware & cutlery items. This fork is representative of similar items of silver electro-plated cutlery salvaged from the Loch Ard wreck site, comprising nickel silver electroplated spoons and forks of various sizes but all sharing the same general shape and design. Some of the pieces display their makers’ mark of William Page & Co Birmingham UK. Within the Flagstaff Hills cutlery collection donated from the Loch Ard, maker’s marks are often obscured by sedimentary accretion or verdigris after a century of submersion in the ocean. However sufficient detail has survived to indicate that the collection of samples of electroplated cutlery probably originated from the same cargo consignment from the Loch Ard and were made by William Page & Co. William Page was born in 1811 and died in 1885. He was active as a manufacturer of cutlery from 1829 with premises at 74 Belmont Rd, Dales End as a "close plater" (someone who works sheet metal), and he began electroplating in 1855. William Page & Co was also active from 1880 at Cranemore St, Cattle’s Grove also 55 Albion St, Birmingham, in 1936 the firm became Ltd. The firm used the trademarks "Asrista, Bolivian Silver, Silverite, Roman Silver, Roumanian Silver and Trevor Plate. In 1938 William Page was a supplier to the British Government, marking it's products with the broad arrow symbol and was also present at Sheffield. History of the Loch Ard: The Loch Ard got its name from ”Loch Ard” a loch which lies to the west of Aberfoyle, and the east of Loch Lomond. It means "high lake" in Scottish Gaelic. The vessel belonged to the famous Loch Line which sailed many vessels from England to Australia. The Loch Ard was built in Glasgow by Barclay, Curdle and Co. in 1873, the vessel was a three-masted square-rigged iron sailing ship that measured 79.87 meters in length, 11.58 m in width, and 7 m in depth with a gross tonnage of 1693 tons with a mainmast that measured a massive 45.7 m in height. Loch Ard made three trips to Australia and one trip to Calcutta before its fateful voyage. Loch Ard left England on March 2, 1878, under the command of 29-year-old Captain Gibbs, who was newly married. The ship was bound for Melbourne with a crew of 37, plus 17 passengers. The general cargo reflected the affluence of Melbourne at the time. On board were straw hats, umbrella, perfumes, clay pipes, pianos, clocks, confectionery, linen and candles, as well as a heavier load of railway irons, cement, lead and copper. There were other items included that were intended for display in the Melbourne International Exhibition of 1880. The voyage to Port Phillip was long but uneventful. Then at 3 am on June 1, 1878, Captain Gibbs was expecting to see land. But the Loch Ard was running into a fog which greatly reduced visibility. Captain Gibbs was becoming anxious as there was no sign of land or the Cape Otway lighthouse. At 4 am the fog lifted and a lookout aloft announced that he could see breakers. The sheer cliffs of Victoria's west coast came into view, and Captain Gibbs realised that the ship was much closer to them than expected. He ordered as much sail to be set as time would permit and then attempted to steer the vessel out to sea. On coming head-on into the wind, the ship lost momentum, the sails fell limp and Loch Ard's bow swung back towards land. Gibbs then ordered the anchors to be released in an attempt to hold its position. The anchors sank some 50 fathoms - but did not hold. By this time the ship was among the breakers and the tall cliffs of Mutton Bird Island rose behind. Just half a mile from the coast, the ship's bow was suddenly pulled around by the anchor. The captain tried to tack out to sea, but the ship struck a reef at the base of Mutton Bird Island, near Port Campbell. Waves subsequently broke over the ship and the top deck became loosened from the hull. The masts and rigging came crashing down knocking passengers and crew overboard. When a lifeboat was finally launched, it crashed into the side of Loch Ard and capsized. Tom Pearce, who had launched the boat, managed to cling to its overturned hull and shelter beneath it. He drifted out to sea and then on the flood tide came into what is now known as Loch Ard Gorge. He swam to shore, bruised and dazed, and found a cave in which to shelter. Some of the crew stayed below deck to shelter from the falling rigging but drowned when the ship slipped off the reef into deeper water. Eva Carmichael a passenger had raced onto the deck to find out what was happening only to be confronted by towering cliffs looming above the stricken ship. In all the chaos, Captain Gibbs grabbed Eva and said, "If you are saved Eva, let my dear wife know that I died like a sailor". That was the last Eva Carmichael saw of the captain. She was swept off the ship by a huge wave. Eva saw Tom Pearce on a small rocky beach and yelled to attract his attention. He dived in and swam to the exhausted woman and dragged her to shore. He took her to the cave and broke the open case of brandy which had washed up on the beach. He opened a bottle to revive the unconscious woman. A few hours later Tom scaled a cliff in search of help. He followed hoof prints and came by chance upon two men from nearby Glenample Station three and a half miles away. In a complete state of exhaustion, he told the men of the tragedy. Tom then returned to the gorge while the two men rode back to the station to get help. By the time they reached Loch Ard Gorge, it was cold and dark. The two shipwreck survivors were taken to Glenample Station to recover. Eva stayed at the station for six weeks before returning to Ireland by steamship. In Melbourne, Tom Pearce received a hero's welcome. He was presented with the first gold medal of the Royal Humane Society of Victoria and a £1000 cheque from the Victorian Government. Concerts were performed to honour the young man's bravery and to raise money for those who lost family in the disaster. Of the 54 crew members and passengers on board, only two survived: the apprentice, Tom Pearce and the young woman passenger, Eva Carmichael, who lost her family in the tragedy. Ten days after the Loch Ard tragedy, salvage rights to the wreck were sold at auction for £2,120. Cargo valued at £3,000 was salvaged and placed on the beach, but most washed back into the sea when another storm developed. The wreck of Loch Ard still lies at the base of Mutton Bird Island. Much of the cargo has now been salvaged and some items were washed up into Loch Ard Gorge. Cargo and artefacts have also been illegally salvaged over many years before protective legislation was introduced in March 1982. The shipwreck of the Loch Ard is of significance for Victoria and is registered on the Victorian Heritage Register ( S 417). Flagstaff Hill has a varied collection of artefacts from Loch Ard and its collection is significant for being one of the largest accumulation of artefacts from this notable Victorian shipwreck. The collections object is to also give us a snapshot into history so we can interpret the story of this tragic event. The collection is also archaeologically significant as it represents aspects of Victoria's shipping history that allows us to interpret Victoria's social and historical themes of the time. The collections historically significance is that it is associated unfortunately with the worst and best-known shipwreck in Victoria's history. Silver plated copper alloy table fork from the wreck of the Loch Ard. William Pageflagstaff hill, warrnambool, shipwrecked coast, flagstaff hill maritime museum, maritime museum, shipwreck coast, flagstaff hill maritime village, great ocean road, loch line, loch ard, captain gibbs, eva carmichael, tom pearce, glenample station, mutton bird island, loch ard gorge, electroplated cutlery, fork -
Flagstaff Hill Maritime Museum and Village
Domestic object - Fork, c.1878
This fork is from the wreck of the Loch Ard, that sailed from Gravesend, London. The manifest listed an array of manufactured goods being exported to the Colony of Victoria. Included in the cargo manifest was a large number of hardware & cutlery items. This fork is representative of similar items of silver electro-plated cutlery salvaged from the Loch Ard wreck site, comprising nickel silver electroplated spoons and forks of various sizes but all sharing the same general shape and design. Some of the pieces display their makers’ mark of William Page & Co Birmingham UK. Within the Flagstaff Hills cutlery collection donated from the Loch Ard, maker’s marks are often obscured by sedimentary accretion or verdigris after a century of submersion in the ocean. However sufficient detail has survived to indicate that the collection of samples of electroplated cutlery probably originated from the same cargo consignment from the Loch Ard and were made by William Page & Co. William Page was born in 1811 and died in 1885. He was active as a manufacturer of cutlery from 1829 with premises at 74 Belmont Rd, Dales End as a "close plater" (someone who works sheet metal), and he began electroplating in 1855. William Page & Co was also active from 1880 at Cranemore St, Cattle’s Grove also 55 Albion St, Birmingham, in 1936 the firm became Ltd. The firm used the trademarks "Asrista, Bolivian Silver, Silverite, Roman Silver, Roumanian Silver and Trevor Plate. In 1938 William Page was a supplier to the British Government, marking it's products with the broad arrow symbol and was also present at Sheffield. History of the Loch Ard: The Loch Ard got its name from ”Loch Ard” a loch which lies to the west of Aberfoyle, and the east of Loch Lomond. It means "high lake" in Scottish Gaelic. The vessel belonged to the famous Loch Line which sailed many vessels from England to Australia. The Loch Ard was built in Glasgow by Barclay, Curdle and Co. in 1873, the vessel was a three-masted square-rigged iron sailing ship that measured 79.87 meters in length, 11.58 m in width, and 7 m in depth with a gross tonnage of 1693 tons with a mainmast that measured a massive 45.7 m in height. Loch Ard made three trips to Australia and one trip to Calcutta before its fateful voyage. Loch Ard left England on March 2, 1878, under the command of 29-year-old Captain Gibbs, who was newly married. The ship was bound for Melbourne with a crew of 37, plus 17 passengers. The general cargo reflected the affluence of Melbourne at the time. Onboard were straw hats, umbrella, perfumes, clay pipes, pianos, clocks, confectionery, linen and candles, as well as a heavier load of railway irons, cement, lead and copper. There were other items included that were intended for display in the Melbourne International Exhibition of 1880. The voyage to Port Phillip was long but uneventful. Then at 3 am on June 1, 1878, Captain Gibbs was expecting to see land. But the Loch Ard was running into a fog which greatly reduced visibility. Captain Gibbs was becoming anxious as there was no sign of land or the Cape Otway lighthouse. At 4 am the fog lifted and a lookout aloft announced that he could see breakers. The sheer cliffs of Victoria's west coast came into view, and Captain Gibbs realised that the ship was much closer to them than expected. He ordered as much sail to be set as time would permit and then attempted to steer the vessel out to sea. On coming head-on into the wind, the ship lost momentum, the sails fell limp and Loch Ard's bow swung back towards land. Gibbs then ordered the anchors to be released in an attempt to hold its position. The anchors sank some 50 fathoms - but did not hold. By this time the ship was among the breakers and the tall cliffs of Mutton Bird Island rose behind. Just half a mile from the coast, the ship's bow was suddenly pulled around by the anchor. The captain tried to tack out to sea, but the ship struck a reef at the base of Mutton Bird Island, near Port Campbell. Waves subsequently broke over the ship and the top deck became loosened from the hull. The masts and rigging came crashing down knocking passengers and crew overboard. When a lifeboat was finally launched, it crashed into the side of Loch Ard and capsized. Tom Pearce, who had launched the boat, managed to cling to its overturned hull and shelter beneath it. He drifted out to sea and then on the flood tide came into what is now known as Loch Ard Gorge. He swam to shore, bruised and dazed, and found a cave in which to shelter. Some of the crew stayed below deck to shelter from the falling rigging but drowned when the ship slipped off the reef into deeper water. Eva Carmichael a passenger had raced onto the deck to find out what was happening only to be confronted by towering cliffs looming above the stricken ship. In all the chaos, Captain Gibbs grabbed Eva and said, "If you are saved Eva, let my dear wife know that I died like a sailor". That was the last Eva Carmichael saw of the captain. She was swept off the ship by a huge wave. Eva saw Tom Pearce on a small rocky beach and yelled to attract his attention. He dived in and swam to the exhausted woman and dragged her to shore. He took her to the cave and broke the open case of brandy which had washed up on the beach. He opened a bottle to revive the unconscious woman. A few hours later Tom scaled a cliff in search of help. He followed hoof prints and came by chance upon two men from nearby Glenample Station three and a half miles away. In a complete state of exhaustion, he told the men of the tragedy. Tom then returned to the gorge while the two men rode back to the station to get help. By the time they reached Loch Ard Gorge, it was cold and dark. The two shipwreck survivors were taken to Glenample Station to recover. Eva stayed at the station for six weeks before returning to Ireland by steamship. In Melbourne, Tom Pearce received a hero's welcome. He was presented with the first gold medal of the Royal Humane Society of Victoria and a £1000 cheque from the Victorian Government. Concerts were performed to honour the young man's bravery and to raise money for those who lost family in the disaster. Of the 54 crew members and passengers on board, only two survived: the apprentice, Tom Pearce and the young woman passenger, Eva Carmichael, who lost her family in the tragedy. Ten days after the Loch Ard tragedy, salvage rights to the wreck were sold at auction for £2,120. Cargo valued at £3,000 was salvaged and placed on the beach, but most washed back into the sea when another storm developed. The wreck of Loch Ard still lies at the base of Mutton Bird Island. Much of the cargo has now been salvaged and some items were washed up into Loch Ard Gorge. Cargo and artefacts have also been illegally salvaged over many years before protective legislation was introduced in March 1982. The shipwreck of the Loch Ard is of significance for Victoria and is registered on the Victorian Heritage Register ( S 417). Flagstaff Hill has a varied collection of artefacts from Loch Ard and its collection is significant for being one of the largest accumulation of artefacts from this notable Victorian shipwreck. The collections object is to also give us a snapshot into history so we can interpret the story of this tragic event. The collection is also archaeologically significant as it represents aspects of Victoria's shipping history that allows us to interpret Victoria's social and historical themes of the time. The collections historically significance is that it is associated unfortunately with the worst and best-known shipwreck in Victoria's history. Silver plated copper alloy table fork from the wreck of the Loch Ard. William Pageflagstaff hill, warrnambool, shipwrecked coast, flagstaff hill maritime museum, maritime museum, shipwreck coast, flagstaff hill maritime village, great ocean road, loch line, loch ard, captain gibbs, eva carmichael, tom pearce, glenample station, mutton bird island, loch ard gorge, electroplated cutlery, fork -
Flagstaff Hill Maritime Museum and Village
Domestic object - Fork, c.1878
This fork is from the wreck of the Loch Ard that sailed from Gravesend London. The manifest listed an array of manufactured goods being exported to the Colony of Victoria. Included in the cargo manifest was a large number of hardware & cutlery items. This fork is representative of similar items of silver electro-plated cutlery salvaged from the Loch Ard wreck site, comprising nickel silver electroplated spoons and forks of various sizes but all sharing the same general shape and design. Some of the pieces display their makers’ mark of William Page & Co Birmingham UK. Within the Flagstaff Hills cutlery collection donated from the Loch Ard, maker’s marks are often obscured by sedimentary accretion or verdigris after a century of submersion in the ocean. However sufficient detail has survived to indicate that the collection of samples of electroplated cutlery probably originated from the same cargo consignment from the Loch Ard and were made by William Page & Co. William Page was born in 1811 and died in 1885. He was active as a manufacturer of cutlery from 1829 with premises at 74 Belmont Rd, Dales End as a "close plater" (someone who works sheet metal), and he began electroplating in 1855. William Page & Co was also active from 1880 at Cranemore St, Cattle’s Grove also 55 Albion St, Birmingham, in 1936 the firm became Ltd. The firm used the trademarks "Asrista, Bolivian Silver, Silverite, Roman Silver, Roumanian Silver and Trevor Plate. In 1938 William Page was a supplier to the British Government, marking it's products with the broad arrow symbol and was also present at Sheffield. History of the Loch Ard: The Loch Ard got its name from ”Loch Ard” a loch which lies to the west of Aberfoyle, and the east of Loch Lomond. It means "high lake" in Scottish Gaelic. The vessel belonged to the famous Loch Line which sailed many vessels from England to Australia. The Loch Ard was built in Glasgow by Barclay, Curdle and Co. in 1873, the vessel was a three-masted square-rigged iron sailing ship that measured 79.87 meters in length, 11.58 m in width, and 7 m in depth with a gross tonnage of 1693 tons with a mainmast that measured a massive 45.7 m in height. Loch Ard made three trips to Australia and one trip to Calcutta before its fateful voyage. Loch Ard left England on March 2, 1878, under the command of 29-year-old Captain Gibbs, who was newly married. The ship was bound for Melbourne with a crew of 37, plus 17 passengers. The general cargo reflected the affluence of Melbourne at the time. On board were straw hats, umbrella, perfumes, clay pipes, pianos, clocks, confectionery, linen and candles, as well as a heavier load of railway irons, cement, lead and copper. There were other items included that were intended for display in the Melbourne International Exhibition of 1880. The voyage to Port Phillip was long but uneventful. Then at 3 am on June 1, 1878, Captain Gibbs was expecting to see land. But the Loch Ard was running into a fog which greatly reduced visibility. Captain Gibbs was becoming anxious as there was no sign of land or the Cape Otway lighthouse. At 4 am the fog lifted and a lookout aloft announced that he could see breakers. The sheer cliffs of Victoria's west coast came into view, and Captain Gibbs realised that the ship was much closer to them than expected. He ordered as much sail to be set as time would permit and then attempted to steer the vessel out to sea. On coming head-on into the wind, the ship lost momentum, the sails fell limp and Loch Ard's bow swung back towards land. Gibbs then ordered the anchors to be released in an attempt to hold its position. The anchors sank some 50 fathoms - but did not hold. By this time the ship was among the breakers and the tall cliffs of Mutton Bird Island rose behind. Just half a mile from the coast, the ship's bow was suddenly pulled around by the anchor. The captain tried to tack out to sea, but the ship struck a reef at the base of Mutton Bird Island, near Port Campbell. Waves subsequently broke over the ship and the top deck became loosened from the hull. The masts and rigging came crashing down knocking passengers and crew overboard. When a lifeboat was finally launched, it crashed into the side of Loch Ard and capsized. Tom Pearce, who had launched the boat, managed to cling to its overturned hull and shelter beneath it. He drifted out to sea and then on the flood tide came into what is now known as Loch Ard Gorge. He swam to shore, bruised and dazed, and found a cave in which to shelter. Some of the crew stayed below deck to shelter from the falling rigging but drowned when the ship slipped off the reef into deeper water. Eva Carmichael a passenger had raced onto the deck to find out what was happening only to be confronted by towering cliffs looming above the stricken ship. In all the chaos, Captain Gibbs grabbed Eva and said, "If you are saved Eva, let my dear wife know that I died like a sailor". That was the last Eva Carmichael saw of the captain. She was swept off the ship by a huge wave. Eva saw Tom Pearce on a small rocky beach and yelled to attract his attention. He dived in and swam to the exhausted woman and dragged her to shore. He took her to the cave and broke the open case of brandy which had washed up on the beach. He opened a bottle to revive the unconscious woman. A few hours later Tom scaled a cliff in search of help. He followed hoof prints and came by chance upon two men from nearby Glenample Station three and a half miles away. In a complete state of exhaustion, he told the men of the tragedy. Tom then returned to the gorge while the two men rode back to the station to get help. By the time they reached Loch Ard Gorge, it was cold and dark. The two shipwreck survivors were taken to Glenample Station to recover. Eva stayed at the station for six weeks before returning to Ireland by steamship. In Melbourne, Tom Pearce received a hero's welcome. He was presented with the first gold medal of the Royal Humane Society of Victoria and a £1000 cheque from the Victorian Government. Concerts were performed to honour the young man's bravery and to raise money for those who lost family in the disaster. Of the 54 crew members and passengers on board, only two survived: the apprentice, Tom Pearce and the young woman passenger, Eva Carmichael, who lost her family in the tragedy. Ten days after the Loch Ard tragedy, salvage rights to the wreck were sold at auction for £2,120. Cargo valued at £3,000 was salvaged and placed on the beach, but most washed back into the sea when another storm developed. The wreck of Loch Ard still lies at the base of Mutton Bird Island. Much of the cargo has now been salvaged and some items were washed up into Loch Ard Gorge. Cargo and artefacts have also been illegally salvaged over many years before protective legislation was introduced in March 1982. The shipwreck of the Loch Ard is of significance for Victoria and is registered on the Victorian Heritage Register ( S 417). Flagstaff Hill has a varied collection of artefacts from Loch Ard and its collection is significant for being one of the largest accumulation of artefacts from this notable Victorian shipwreck. The collections object is to also give us a snapshot into history so we can interpret the story of this tragic event. The collection is also archaeologically significant as it represents aspects of Victoria's shipping history that allows us to interpret Victoria's social and historical themes of the time. The collections historically significance is that it is associated unfortunately with the worst and best-known shipwreck in Victoria's history. Silver plated copper alloy table fork from the wreck of the Loch Ard. William Pageflagstaff hill, warrnambool, shipwrecked coast, flagstaff hill maritime museum, maritime museum, shipwreck coast, flagstaff hill maritime village, great ocean road, loch line, loch ard, captain gibbs, eva carmichael, tom pearce, glenample station, mutton bird island, loch ard gorge, electroplated cutlery, fork -
Flagstaff Hill Maritime Museum and Village
Domestic object - Fork, c.1878
This fork is from the wreck of the Loch Ard that sailed from Gravesend London. The manifest listed an array of manufactured goods being exported to the Colony of Victoria. Included in the cargo manifest was a large number of hardware & cutlery items. This fork is representative of similar items of silver electro-plated cutlery salvaged from the Loch Ard wreck site, comprising nickel silver electroplated spoons and forks of various sizes but all sharing the same general shape and design. Some of the pieces display their makers’ mark of William Page & Co Birmingham UK. Within the Flagstaff Hills cutlery collection donated from the Loch Ard, maker’s marks are often obscured by sedimentary accretion or verdigris after a century of submersion in the ocean. However sufficient detail has survived to indicate that the collection of samples of electroplated cutlery probably originated from the same cargo consignment from the Loch Ard and were made by William Page & Co. William Page was born in 1811 and died in 1885. He was active as a manufacturer of cutlery from 1829 with premises at 74 Belmont Rd, Dales End as a "close plater" (someone who works sheet metal), and he began electroplating in 1855. William Page & Co was also active from 1880 at Cranemore St, Cattle’s Grove also 55 Albion St, Birmingham, in 1936 the firm became Ltd. The firm used the trademarks "Asrista, Bolivian Silver, Silverite, Roman Silver, Roumanian Silver and Trevor Plate. In 1938 William Page was a supplier to the British Government, marking it's products with the broad arrow symbol and was also present at Sheffield. History of the Loch Ard: The Loch Ard got its name from ”Loch Ard” a loch which lies to the west of Aberfoyle, and the east of Loch Lomond. It means "high lake" in Scottish Gaelic. The vessel belonged to the famous Loch Line which sailed many vessels from England to Australia. The Loch Ard was built in Glasgow by Barclay, Curdle and Co. in 1873, the vessel was a three-masted square-rigged iron sailing ship that measured 79.87 meters in length, 11.58 m in width, and 7 m in depth with a gross tonnage of 1693 tons with a mainmast that measured a massive 45.7 m in height. Loch Ard made three trips to Australia and one trip to Calcutta before its fateful voyage. Loch Ard left England on March 2, 1878, under the command of 29-year-old Captain Gibbs, who was newly married. The ship was bound for Melbourne with a crew of 37, plus 17 passengers. The general cargo reflected the affluence of Melbourne at the time. On board were straw hats, umbrella, perfumes, clay pipes, pianos, clocks, confectionery, linen and candles, as well as a heavier load of railway irons, cement, lead and copper. There were other items included that were intended for display in the Melbourne International Exhibition of 1880. The voyage to Port Phillip was long but uneventful. Then at 3 am on June 1, 1878, Captain Gibbs was expecting to see land. But the Loch Ard was running into a fog which greatly reduced visibility. Captain Gibbs was becoming anxious as there was no sign of land or the Cape Otway lighthouse. At 4 am the fog lifted and a lookout aloft announced that he could see breakers. The sheer cliffs of Victoria's west coast came into view, and Captain Gibbs realised that the ship was much closer to them than expected. He ordered as much sail to be set as time would permit and then attempted to steer the vessel out to sea. On coming head-on into the wind, the ship lost momentum, the sails fell limp and Loch Ard's bow swung back towards land. Gibbs then ordered the anchors to be released in an attempt to hold its position. The anchors sank some 50 fathoms - but did not hold. By this time the ship was among the breakers and the tall cliffs of Mutton Bird Island rose behind. Just half a mile from the coast, the ship's bow was suddenly pulled around by the anchor. The captain tried to tack out to sea, but the ship struck a reef at the base of Mutton Bird Island, near Port Campbell. Waves subsequently broke over the ship and the top deck became loosened from the hull. The masts and rigging came crashing down knocking passengers and crew overboard. When a lifeboat was finally launched, it crashed into the side of Loch Ard and capsized. Tom Pearce, who had launched the boat, managed to cling to its overturned hull and shelter beneath it. He drifted out to sea and then on the flood tide came into what is now known as Loch Ard Gorge. He swam to shore, bruised and dazed, and found a cave in which to shelter. Some of the crew stayed below deck to shelter from the falling rigging but drowned when the ship slipped off the reef into deeper water. Eva Carmichael a passenger had raced onto the deck to find out what was happening only to be confronted by towering cliffs looming above the stricken ship. In all the chaos, Captain Gibbs grabbed Eva and said, "If you are saved Eva, let my dear wife know that I died like a sailor". That was the last Eva Carmichael saw of the captain. She was swept off the ship by a huge wave. Eva saw Tom Pearce on a small rocky beach and yelled to attract his attention. He dived in and swam to the exhausted woman and dragged her to shore. He took her to the cave and broke the open case of brandy which had washed up on the beach. He opened a bottle to revive the unconscious woman. A few hours later Tom scaled a cliff in search of help. He followed hoof prints and came by chance upon two men from nearby Glenample Station three and a half miles away. In a complete state of exhaustion, he told the men of the tragedy. Tom then returned to the gorge while the two men rode back to the station to get help. By the time they reached Loch Ard Gorge, it was cold and dark. The two shipwreck survivors were taken to Glenample Station to recover. Eva stayed at the station for six weeks before returning to Ireland by steamship. In Melbourne, Tom Pearce received a hero's welcome. He was presented with the first gold medal of the Royal Humane Society of Victoria and a £1000 cheque from the Victorian Government. Concerts were performed to honour the young man's bravery and to raise money for those who lost family in the disaster. Of the 54 crew members and passengers on board, only two survived: the apprentice, Tom Pearce and the young woman passenger, Eva Carmichael, who lost her family in the tragedy. Ten days after the Loch Ard tragedy, salvage rights to the wreck were sold at auction for £2,120. Cargo valued at £3,000 was salvaged and placed on the beach, but most washed back into the sea when another storm developed. The wreck of Loch Ard still lies at the base of Mutton Bird Island. Much of the cargo has now been salvaged and some items were washed up into Loch Ard Gorge. Cargo and artefacts have also been illegally salvaged over many years before protective legislation was introduced in March 1982. The shipwreck of the Loch Ard is of significance for Victoria and is registered on the Victorian Heritage Register ( S 417). Flagstaff Hill has a varied collection of artefacts from Loch Ard and its collection is significant for being one of the largest accumulation of artefacts from this notable Victorian shipwreck. The collection's object is to also give us a snapshot into history so we can interpret the story of this tragic event. The collection is also archaeologically significant as it represents aspects of Victoria's shipping history that allows us to interpret Victoria's social and historical themes of the time. The collection's historical significance is that it is associated unfortunately with the worst and best-known shipwreck in Victoria's history. Silver plated copper alloy table fork from the wreck of the Loch Ard. William Pageflagstaff hill, warrnambool, shipwrecked coast, flagstaff hill maritime museum, maritime museum, shipwreck coast, flagstaff hill maritime village, great ocean road, loch line, loch ard, captain gibbs, eva carmichael, tom pearce, glenample station, mutton bird island, loch ard gorge, electroplated cutlery, fork -
Flagstaff Hill Maritime Museum and Village
Domestic object - Fork, c.1878
This fork is from the wreck of the Loch Ard, that sailed from Gravesend, London. The manifest listed an array of manufactured goods being exported to the Colony of Victoria. Included in the cargo manifest was a large number of hardware & cutlery items. This fork is representative of similar items of silver electro-plated cutlery salvaged from the Loch Ard wreck site, comprising nickel silver electroplated spoons and forks of various sizes but all sharing the same general shape and design. Some of the pieces display their makers’ mark of William Page & Co Birmingham UK. Within the Flagstaff Hills cutlery collection donated from the Loch Ard, maker’s marks are often obscured by sedimentary accretion or verdigris after a century of submersion in the ocean. However sufficient detail has survived to indicate that the collection of samples of electroplated cutlery probably originated from the same cargo consignment from the Loch Ard and were made by William Page & Co. William Page was born in 1811 and died in 1885. He was active as a manufacturer of cutlery from 1829 with premises at 74 Belmont Rd, Dales End as a "close plater" (someone who works sheet metal), and he began electroplating in 1855. William Page & Co was also active from 1880 at Cranemore St, Cattle’s Grove also 55 Albion St, Birmingham, in 1936 the firm became Ltd. The firm used the trademarks "Asrista, Bolivian Silver, Silverite, Roman Silver, Roumanian Silver and Trevor Plate. In 1938 William Page was a supplier to the British Government, marking it's products with the broad arrow symbol and was also present at Sheffield. History of the Loch Ard: The Loch Ard got its name from ”Loch Ard” a loch which lies to the west of Aberfoyle, and the east of Loch Lomond. It means "high lake" in Scottish Gaelic. The vessel belonged to the famous Loch Line which sailed many vessels from England to Australia. The Loch Ard was built in Glasgow by Barclay, Curdle and Co. in 1873, the vessel was a three-masted square-rigged iron sailing ship that measured 79.87 meters in length, 11.58 m in width, and 7 m in depth with a gross tonnage of 1693 tons with a mainmast that measured a massive 45.7 m in height. Loch Ard made three trips to Australia and one trip to Calcutta before its fateful voyage. Loch Ard left England on March 2, 1878, under the command of 29-year-old Captain Gibbs, who was newly married. The ship was bound for Melbourne with a crew of 37, plus 17 passengers. The general cargo reflected the affluence of Melbourne at the time. Onboard were straw hats, umbrella, perfumes, clay pipes, pianos, clocks, confectionery, linen and candles, as well as a heavier load of railway irons, cement, lead and copper. There were other items included that were intended for display in the Melbourne International Exhibition of 1880. The voyage to Port Phillip was long but uneventful. Then at 3 am on June 1, 1878, Captain Gibbs was expecting to see land. But the Loch Ard was running into a fog which greatly reduced visibility. Captain Gibbs was becoming anxious as there was no sign of land or the Cape Otway lighthouse. At 4 am the fog lifted and a lookout aloft announced that he could see breakers. The sheer cliffs of Victoria's west coast came into view, and Captain Gibbs realised that the ship was much closer to them than expected. He ordered as much sail to be set as time would permit and then attempted to steer the vessel out to sea. On coming head-on into the wind, the ship lost momentum, the sails fell limp and Loch Ard's bow swung back towards land. Gibbs then ordered the anchors to be released in an attempt to hold its position. The anchors sank some 50 fathoms - but did not hold. By this time the ship was among the breakers and the tall cliffs of Mutton Bird Island rose behind. Just half a mile from the coast, the ship's bow was suddenly pulled around by the anchor. The captain tried to tack out to sea, but the ship struck a reef at the base of Mutton Bird Island, near Port Campbell. Waves subsequently broke over the ship and the top deck became loosened from the hull. The masts and rigging came crashing down knocking passengers and crew overboard. When a lifeboat was finally launched, it crashed into the side of Loch Ard and capsized. Tom Pearce, who had launched the boat, managed to cling to its overturned hull and shelter beneath it. He drifted out to sea and then on the flood tide came into what is now known as Loch Ard Gorge. He swam to shore, bruised and dazed, and found a cave in which to shelter. Some of the crew stayed below deck to shelter from the falling rigging but drowned when the ship slipped off the reef into deeper water. Eva Carmichael a passenger had raced onto the deck to find out what was happening only to be confronted by towering cliffs looming above the stricken ship. In all the chaos, Captain Gibbs grabbed Eva and said, "If you are saved Eva, let my dear wife know that I died like a sailor". That was the last Eva Carmichael saw of the captain. She was swept off the ship by a huge wave. Eva saw Tom Pearce on a small rocky beach and yelled to attract his attention. He dived in and swam to the exhausted woman and dragged her to shore. He took her to the cave and broke the open case of brandy which had washed up on the beach. He opened a bottle to revive the unconscious woman. A few hours later Tom scaled a cliff in search of help. He followed hoof prints and came by chance upon two men from nearby Glenample Station three and a half miles away. In a complete state of exhaustion, he told the men of the tragedy. Tom then returned to the gorge while the two men rode back to the station to get help. By the time they reached Loch Ard Gorge, it was cold and dark. The two shipwreck survivors were taken to Glenample Station to recover. Eva stayed at the station for six weeks before returning to Ireland by steamship. In Melbourne, Tom Pearce received a hero's welcome. He was presented with the first gold medal of the Royal Humane Society of Victoria and a £1000 cheque from the Victorian Government. Concerts were performed to honour the young man's bravery and to raise money for those who lost family in the disaster. Of the 54 crew members and passengers on board, only two survived: the apprentice, Tom Pearce and the young woman passenger, Eva Carmichael, who lost her family in the tragedy. Ten days after the Loch Ard tragedy, salvage rights to the wreck were sold at auction for £2,120. Cargo valued at £3,000 was salvaged and placed on the beach, but most washed back into the sea when another storm developed. The wreck of Loch Ard still lies at the base of Mutton Bird Island. Much of the cargo has now been salvaged and some items were washed up into Loch Ard Gorge. Cargo and artefacts have also been illegally salvaged over many years before protective legislation was introduced in March 1982. The shipwreck of the Loch Ard is of significance for Victoria and is registered on the Victorian Heritage Register ( S 417). Flagstaff Hill has a varied collection of artefacts from Loch Ard and its collection is significant for being one of the largest accumulation of artefacts from this notable Victorian shipwreck. The collections object is to also give us a snapshot into history so we can interpret the story of this tragic event. The collection is also archaeologically significant as it represents aspects of Victoria's shipping history that allows us to interpret Victoria's social and historical themes of the time. The collections historically significance is that it is associated unfortunately with the worst and best-known shipwreck in Victoria's history. Silver plated copper alloy table fork from the wreck of the Loch Ard. William Pageflagstaff hill, warrnambool, shipwrecked coast, flagstaff hill maritime museum, maritime museum, shipwreck coast, flagstaff hill maritime village, great ocean road, loch line, loch ard, captain gibbs, eva carmichael, tom pearce, glenample station, mutton bird island, loch ard gorge, electroplated cutlery, fork -
Flagstaff Hill Maritime Museum and Village
Domestic object - Fork, c.1878
This fork is from the wreck of the Loch Ard that sailed from Gravesend London. The manifest listed an array of manufactured goods being exported to the Colony of Victoria. Included in the cargo manifest was a large number of hardware & cutlery items. This fork is representative of similar items of silver electro-plated cutlery salvaged from the Loch Ard wreck site, comprising nickel silver electroplated spoons and forks of various sizes but all sharing the same general shape and design. Some of the pieces display their makers’ mark of William Page & Co Birmingham UK. Within the Flagstaff Hills cutlery collection donated from the Loch Ard, maker’s marks are often obscured by sedimentary accretion or verdigris after a century of submersion in the ocean. However sufficient detail has survived to indicate that the collection of samples of electroplated cutlery probably originated from the same cargo consignment from the Loch Ard and were made by William Page & Co. William Page was born in 1811 and died in 1885. He was active as a manufacturer of cutlery from 1829 with premises at 74 Belmont Rd, Dales End as a "close plater" (someone who works sheet metal), and he began electroplating in 1855. William Page & Co was also active from 1880 at Cranemore St, Cattle’s Grove also 55 Albion St, Birmingham, in 1936 the firm became Ltd. The firm used the trademarks "Asrista, Bolivian Silver, Silverite, Roman Silver, Roumanian Silver and Trevor Plate. In 1938 William Page was a supplier to the British Government, marking it's products with the broad arrow symbol and was also present at Sheffield. History of the Loch Ard: The Loch Ard got its name from ”Loch Ard” a loch which lies to the west of Aberfoyle, and the east of Loch Lomond. It means "high lake" in Scottish Gaelic. The vessel belonged to the famous Loch Line which sailed many vessels from England to Australia. The Loch Ard was built in Glasgow by Barclay, Curdle and Co. in 1873, the vessel was a three-masted square-rigged iron sailing ship that measured 79.87 meters in length, 11.58 m in width, and 7 m in depth with a gross tonnage of 1693 tons with a mainmast that measured a massive 45.7 m in height. Loch Ard made three trips to Australia and one trip to Calcutta before its fateful voyage. Loch Ard left England on March 2, 1878, under the command of 29-year-old Captain Gibbs, who was newly married. The ship was bound for Melbourne with a crew of 37, plus 17 passengers. The general cargo reflected the affluence of Melbourne at the time. On board were straw hats, umbrella, perfumes, clay pipes, pianos, clocks, confectionery, linen and candles, as well as a heavier load of railway irons, cement, lead and copper. There were other items included that were intended for display in the Melbourne International Exhibition of 1880. The voyage to Port Phillip was long but uneventful. Then at 3 am on June 1, 1878, Captain Gibbs was expecting to see land. But the Loch Ard was running into a fog which greatly reduced visibility. Captain Gibbs was becoming anxious as there was no sign of land or the Cape Otway lighthouse. At 4 am the fog lifted and a lookout aloft announced that he could see breakers. The sheer cliffs of Victoria's west coast came into view, and Captain Gibbs realised that the ship was much closer to them than expected. He ordered as much sail to be set as time would permit and then attempted to steer the vessel out to sea. On coming head-on into the wind, the ship lost momentum, the sails fell limp and Loch Ard's bow swung back towards land. Gibbs then ordered the anchors to be released in an attempt to hold its position. The anchors sank some 50 fathoms - but did not hold. By this time the ship was among the breakers and the tall cliffs of Mutton Bird Island rose behind. Just half a mile from the coast, the ship's bow was suddenly pulled around by the anchor. The captain tried to tack out to sea, but the ship struck a reef at the base of Mutton Bird Island, near Port Campbell. Waves subsequently broke over the ship and the top deck became loosened from the hull. The masts and rigging came crashing down knocking passengers and crew overboard. When a lifeboat was finally launched, it crashed into the side of Loch Ard and capsized. Tom Pearce, who had launched the boat, managed to cling to its overturned hull and shelter beneath it. He drifted out to sea and then on the flood tide came into what is now known as Loch Ard Gorge. He swam to shore, bruised and dazed, and found a cave in which to shelter. Some of the crew stayed below deck to shelter from the falling rigging but drowned when the ship slipped off the reef into deeper water. Eva Carmichael a passenger had raced onto the deck to find out what was happening only to be confronted by towering cliffs looming above the stricken ship. In all the chaos, Captain Gibbs grabbed Eva and said, "If you are saved Eva, let my dear wife know that I died like a sailor". That was the last Eva Carmichael saw of the captain. She was swept off the ship by a huge wave. Eva saw Tom Pearce on a small rocky beach and yelled to attract his attention. He dived in and swam to the exhausted woman and dragged her to shore. He took her to the cave and broke the open case of brandy which had washed up on the beach. He opened a bottle to revive the unconscious woman. A few hours later Tom scaled a cliff in search of help. He followed hoof prints and came by chance upon two men from nearby Glenample Station three and a half miles away. In a complete state of exhaustion, he told the men of the tragedy. Tom then returned to the gorge while the two men rode back to the station to get help. By the time they reached Loch Ard Gorge, it was cold and dark. The two shipwreck survivors were taken to Glenample Station to recover. Eva stayed at the station for six weeks before returning to Ireland by steamship. In Melbourne, Tom Pearce received a hero's welcome. He was presented with the first gold medal of the Royal Humane Society of Victoria and a £1000 cheque from the Victorian Government. Concerts were performed to honour the young man's bravery and to raise money for those who lost family in the disaster. Of the 54 crew members and passengers on board, only two survived: the apprentice, Tom Pearce and the young woman passenger, Eva Carmichael, who lost her family in the tragedy. Ten days after the Loch Ard tragedy, salvage rights to the wreck were sold at auction for £2,120. Cargo valued at £3,000 was salvaged and placed on the beach, but most washed back into the sea when another storm developed. The wreck of Loch Ard still lies at the base of Mutton Bird Island. Much of the cargo has now been salvaged and some items were washed up into Loch Ard Gorge. Cargo and artefacts have also been illegally salvaged over many years before protective legislation was introduced in March 1982. The shipwreck of the Loch Ard is of significance for Victoria and is registered on the Victorian Heritage Register ( S 417). Flagstaff Hill has a varied collection of artefacts from Loch Ard and its collection is significant for being one of the largest accumulation of artefacts from this notable Victorian shipwreck. The collections object is to also give us a snapshot into history so we can interpret the story of this tragic event. The collection is also archaeologically significant as it represents aspects of Victoria's shipping history that allows us to interpret Victoria's social and historical themes of the time. The collections historically significance is that it is associated unfortunately with the worst and best-known shipwreck in Victoria's history. Silver plated copper alloy table fork from the wreck of the Loch Ard. Some verdigris.William Pageflagstaff hill, warrnambool, shipwrecked coast, flagstaff hill maritime museum, maritime museum, shipwreck coast, flagstaff hill maritime village, great ocean road, loch line, loch ard, captain gibbs, eva carmichael, tom pearce, glenample station, mutton bird island, loch ard gorge, electroplated cutlery, fork -
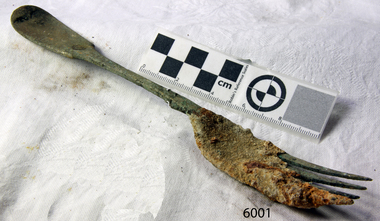 Flagstaff Hill Maritime Museum and Village
Domestic object - Fork, circa 1878
This fork is from the wreck of the Loch Ard, that sailed from Gravesend, London. The manifest listed an array of manufactured goods being exported to the Colony of Victoria. Included in the cargo manifest was a large number of hardware & cutlery items. This fork is representative of similar items of silver electro-plated cutlery salvaged from the Loch Ard wreck site, comprising nickel silver electroplated spoons and forks of various sizes but all sharing the same general shape and design. Some of the pieces display their makers’ mark of William Page & Co Birmingham UK. Within the Flagstaff Hills cutlery collection donated from the Loch Ard, maker’s marks are often obscured by sedimentary accretion or verdigris after a century of submersion in the ocean. However sufficient detail has survived to indicate that the collection of samples of electroplated cutlery probably originated from the same cargo consignment from the Loch Ard and were made by William Page & Co. William Page was born in 1811 and died in 1885. He was active as a manufacturer of cutlery from 1829 with premises at 74 Belmont Rd, Dales End as a "close plater" (someone who works sheet metal), and he began electroplating in 1855. William Page & Co was also active from 1880 at Cranemore St, Cattle’s Grove also 55 Albion St, Birmingham, in 1936 the firm became Ltd. The firm used the trademarks "Asrista, Bolivian Silver, Silverite, Roman Silver, Roumanian Silver and Trevor Plate. In 1938 William Page was a supplier to the British Government, marking it's products with the broad arrow symbol and was also present at Sheffield. History of the Loch Ard: The Loch Ard got its name from ”Loch Ard” a loch which lies to the west of Aberfoyle, and the east of Loch Lomond. It means "high lake" in Scottish Gaelic. The vessel belonged to the famous Loch Line which sailed many vessels from England to Australia. The Loch Ard was built in Glasgow by Barclay, Curdle and Co. in 1873, the vessel was a three-masted square-rigged iron sailing ship that measured 79.87 meters in length, 11.58 m in width, and 7 m in depth with a gross tonnage of 1693 tons with a mainmast that measured a massive 45.7 m in height. Loch Ard made three trips to Australia and one trip to Calcutta before its fateful voyage. Loch Ard left England on March 2, 1878, under the command of 29-year-old Captain Gibbs, who was newly married. The ship was bound for Melbourne with a crew of 37, plus 17 passengers. The general cargo reflected the affluence of Melbourne at the time. Onboard were straw hats, umbrella, perfumes, clay pipes, pianos, clocks, confectionery, linen and candles, as well as a heavier load of railway irons, cement, lead and copper. There were other items included that were intended for display in the Melbourne International Exhibition of 1880. The voyage to Port Phillip was long but uneventful. Then at 3 am on June 1, 1878, Captain Gibbs was expecting to see land. But the Loch Ard was running into a fog which greatly reduced visibility. Captain Gibbs was becoming anxious as there was no sign of land or the Cape Otway lighthouse. At 4 am the fog lifted and a lookout aloft announced that he could see breakers. The sheer cliffs of Victoria's west coast came into view, and Captain Gibbs realised that the ship was much closer to them than expected. He ordered as much sail to be set as time would permit and then attempted to steer the vessel out to sea. On coming head-on into the wind, the ship lost momentum, the sails fell limp and Loch Ard's bow swung back towards land. Gibbs then ordered the anchors to be released in an attempt to hold its position. The anchors sank some 50 fathoms - but did not hold. By this time the ship was among the breakers and the tall cliffs of Mutton Bird Island rose behind. Just half a mile from the coast, the ship's bow was suddenly pulled around by the anchor. The captain tried to tack out to sea, but the ship struck a reef at the base of Mutton Bird Island, near Port Campbell. Waves subsequently broke over the ship and the top deck became loosened from the hull. The masts and rigging came crashing down knocking passengers and crew overboard. When a lifeboat was finally launched, it crashed into the side of Loch Ard and capsized. Tom Pearce, who had launched the boat, managed to cling to its overturned hull and shelter beneath it. He drifted out to sea and then on the flood tide came into what is now known as Loch Ard Gorge. He swam to shore, bruised and dazed, and found a cave in which to shelter. Some of the crew stayed below deck to shelter from the falling rigging but drowned when the ship slipped off the reef into deeper water. Eva Carmichael a passenger had raced onto the deck to find out what was happening only to be confronted by towering cliffs looming above the stricken ship. In all the chaos, Captain Gibbs grabbed Eva and said, "If you are saved Eva, let my dear wife know that I died like a sailor". That was the last Eva Carmichael saw of the captain. She was swept off the ship by a huge wave. Eva saw Tom Pearce on a small rocky beach and yelled to attract his attention. He dived in and swam to the exhausted woman and dragged her to shore. He took her to the cave and broke the open case of brandy which had washed up on the beach. He opened a bottle to revive the unconscious woman. A few hours later Tom scaled a cliff in search of help. He followed hoof prints and came by chance upon two men from nearby Glenample Station three and a half miles away. In a complete state of exhaustion, he told the men of the tragedy. Tom then returned to the gorge while the two men rode back to the station to get help. By the time they reached Loch Ard Gorge, it was cold and dark. The two shipwreck survivors were taken to Glenample Station to recover. Eva stayed at the station for six weeks before returning to Ireland by steamship. In Melbourne, Tom Pearce received a hero's welcome. He was presented with the first gold medal of the Royal Humane Society of Victoria and a £1000 cheque from the Victorian Government. Concerts were performed to honour the young man's bravery and to raise money for those who lost family in the disaster. Of the 54 crew members and passengers on board, only two survived: the apprentice, Tom Pearce and the young woman passenger, Eva Carmichael, who lost her family in the tragedy. Ten days after the Loch Ard tragedy, salvage rights to the wreck were sold at auction for £2,120. Cargo valued at £3,000 was salvaged and placed on the beach, but most washed back into the sea when another storm developed. The wreck of Loch Ard still lies at the base of Mutton Bird Island. Much of the cargo has now been salvaged and some items were washed up into Loch Ard Gorge. Cargo and artefacts have also been illegally salvaged over many years before protective legislation was introduced in March 1982. The shipwreck of the Loch Ard is of significance for Victoria and is registered on the Victorian Heritage Register ( S 417). Flagstaff Hill has a varied collection of artefacts from Loch Ard and its collection is significant for being one of the largest accumulation of artefacts from this notable Victorian shipwreck. The collections object is to also give us a snapshot into history so we can interpret the story of this tragic event. The collection is also archaeologically significant as it represents aspects of Victoria's shipping history that allows us to interpret Victoria's social and historical themes of the time. The collections historically significance is that it is associated unfortunately with the worst and best-known shipwreck in Victoria's history. Large Nickel Silver plated dinner fork, fiddle-back design handle, narrow stem with flared collar and elongated forks.makers’ mark “W” & “P” placed within a raised diamond outline, which is in turn contained within a sunken crown shape identifying the manufacturer as William Page & Co of Birmingham.flagstaff hill, warrnambool, shipwrecked coast, flagstaff hill maritime museum, maritime museum, shipwreck coast, flagstaff hill maritime village, great ocean road, loch line, loch ard, captain gibbs, eva carmichael, tom pearce, glenample station, mutton bird island, loch ard gorge, electroplated cutlery, fork -
Flagstaff Hill Maritime Museum and Village
Domestic object - Fork, c.1878
This fork is from the wreck of the Loch Ard, that sailed from Gravesend, London. The manifest listed an array of manufactured goods being exported to the Colony of Victoria. Included in the cargo manifest was a large number of hardware & cutlery items. This fork is representative of similar items of silver electro-plated cutlery salvaged from the Loch Ard wreck site, comprising nickel silver electroplated spoons and forks of various sizes but all sharing the same general shape and design. Some of the pieces display their makers’ mark of William Page & Co Birmingham UK. Within the Flagstaff Hills cutlery collection donated from the Loch Ard, maker’s marks are often obscured by sedimentary accretion or verdigris after a century of submersion in the ocean. However sufficient detail has survived to indicate that the collection of samples of electroplated cutlery probably originated from the same cargo consignment from the Loch Ard and were made by William Page & Co. William Page was born in 1811 and died in 1885. He was active as a manufacturer of cutlery from 1829 with premises at 74 Belmont Rd, Dales End as a "close plater" (someone who works sheet metal), and he began electroplating in 1855. William Page & Co was also active from 1880 at Cranemore St, Cattle’s Grove also 55 Albion St, Birmingham, in 1936 the firm became Ltd. The firm used the trademarks "Asrista, Bolivian Silver, Silverite, Roman Silver, Roumanian Silver and Trevor Plate. In 1938 William Page was a supplier to the British Government, marking it's products with the broad arrow symbol and was also present at Sheffield. History of the Loch Ard: The Loch Ard got its name from ”Loch Ard” a loch which lies to the west of Aberfoyle, and the east of Loch Lomond. It means "high lake" in Scottish Gaelic. The vessel belonged to the famous Loch Line which sailed many vessels from England to Australia. The Loch Ard was built in Glasgow by Barclay, Curdle and Co. in 1873, the vessel was a three-masted square-rigged iron sailing ship that measured 79.87 meters in length, 11.58 m in width, and 7 m in depth with a gross tonnage of 1693 tons with a mainmast that measured a massive 45.7 m in height. Loch Ard made three trips to Australia and one trip to Calcutta before its fateful voyage. Loch Ard left England on March 2, 1878, under the command of 29-year-old Captain Gibbs, who was newly married. The ship was bound for Melbourne with a crew of 37, plus 17 passengers. The general cargo reflected the affluence of Melbourne at the time. Onboard were straw hats, umbrella, perfumes, clay pipes, pianos, clocks, confectionery, linen and candles, as well as a heavier load of railway irons, cement, lead and copper. There were other items included that were intended for display in the Melbourne International Exhibition of 1880. The voyage to Port Phillip was long but uneventful. Then at 3 am on June 1, 1878, Captain Gibbs was expecting to see land. But the Loch Ard was running into a fog which greatly reduced visibility. Captain Gibbs was becoming anxious as there was no sign of land or the Cape Otway lighthouse. At 4 am the fog lifted and a lookout aloft announced that he could see breakers. The sheer cliffs of Victoria's west coast came into view, and Captain Gibbs realised that the ship was much closer to them than expected. He ordered as much sail to be set as time would permit and then attempted to steer the vessel out to sea. On coming head-on into the wind, the ship lost momentum, the sails fell limp and Loch Ard's bow swung back towards land. Gibbs then ordered the anchors to be released in an attempt to hold its position. The anchors sank some 50 fathoms - but did not hold. By this time the ship was among the breakers and the tall cliffs of Mutton Bird Island rose behind. Just half a mile from the coast, the ship's bow was suddenly pulled around by the anchor. The captain tried to tack out to sea, but the ship struck a reef at the base of Mutton Bird Island, near Port Campbell. Waves subsequently broke over the ship and the top deck became loosened from the hull. The masts and rigging came crashing down knocking passengers and crew overboard. When a lifeboat was finally launched, it crashed into the side of Loch Ard and capsized. Tom Pearce, who had launched the boat, managed to cling to its overturned hull and shelter beneath it. He drifted out to sea and then on the flood tide came into what is now known as Loch Ard Gorge. He swam to shore, bruised and dazed, and found a cave in which to shelter. Some of the crew stayed below deck to shelter from the falling rigging but drowned when the ship slipped off the reef into deeper water. Eva Carmichael a passenger had raced onto the deck to find out what was happening only to be confronted by towering cliffs looming above the stricken ship. In all the chaos, Captain Gibbs grabbed Eva and said, "If you are saved Eva, let my dear wife know that I died like a sailor". That was the last Eva Carmichael saw of the captain. She was swept off the ship by a huge wave. Eva saw Tom Pearce on a small rocky beach and yelled to attract his attention. He dived in and swam to the exhausted woman and dragged her to shore. He took her to the cave and broke the open case of brandy which had washed up on the beach. He opened a bottle to revive the unconscious woman. A few hours later Tom scaled a cliff in search of help. He followed hoof prints and came by chance upon two men from nearby Glenample Station three and a half miles away. In a complete state of exhaustion, he told the men of the tragedy. Tom then returned to the gorge while the two men rode back to the station to get help. By the time they reached Loch Ard Gorge, it was cold and dark. The two shipwreck survivors were taken to Glenample Station to recover. Eva stayed at the station for six weeks before returning to Ireland by steamship. In Melbourne, Tom Pearce received a hero's welcome. He was presented with the first gold medal of the Royal Humane Society of Victoria and a £1000 cheque from the Victorian Government. Concerts were performed to honour the young man's bravery and to raise money for those who lost family in the disaster. Of the 54 crew members and passengers on board, only two survived: the apprentice, Tom Pearce and the young woman passenger, Eva Carmichael, who lost her family in the tragedy. Ten days after the Loch Ard tragedy, salvage rights to the wreck were sold at auction for £2,120. Cargo valued at £3,000 was salvaged and placed on the beach, but most washed back into the sea when another storm developed. The wreck of Loch Ard still lies at the base of Mutton Bird Island. Much of the cargo has now been salvaged and some items were washed up into Loch Ard Gorge. Cargo and artefacts have also been illegally salvaged over many years before protective legislation was introduced in March 1982. The shipwreck of the Loch Ard is of significance for Victoria and is registered on the Victorian Heritage Register ( S 417). Flagstaff Hill has a varied collection of artefacts from Loch Ard and its collection is significant for being one of the largest accumulation of artefacts from this notable Victorian shipwreck. The collections object is to also give us a snapshot into history so we can interpret the story of this tragic event. The collection is also archaeologically significant as it represents aspects of Victoria's shipping history that allows us to interpret Victoria's social and historical themes of the time. The collections historically significance is that it is associated unfortunately with the worst and best-known shipwreck in Victoria's history. Silver plated copper alloy table forks entree from the wreck of the Loch Ard. William Pageflagstaff hill, warrnambool, shipwrecked coast, flagstaff hill maritime museum, maritime museum, shipwreck coast, flagstaff hill maritime village, great ocean road, loch line, loch ard, captain gibbs, eva carmichael, tom pearce, glenample station, mutton bird island, loch ard gorge, electroplated cutlery, fork -
Flagstaff Hill Maritime Museum and Village
Domestic object - Forks, c.1878
This fork is from the wreck of the Loch Ard, that sailed from Gravesend, London. The manifest listed an array of manufactured goods being exported to the Colony of Victoria. Included in the cargo manifest was a large number of hardware & cutlery items. This fork is representative of similar items of silver electro-plated cutlery salvaged from the Loch Ard wreck site, comprising nickel silver electroplated spoons and forks of various sizes but all sharing the same general shape and design. Some of the pieces display their makers’ mark of William Page & Co Birmingham UK. Within the Flagstaff Hills cutlery collection donated from the Loch Ard, maker’s marks are often obscured by sedimentary accretion or verdigris after a century of submersion in the ocean. However sufficient detail has survived to indicate that the collection of samples of electroplated cutlery probably originated from the same cargo consignment from the Loch Ard and were made by William Page & Co. William Page was born in 1811 and died in 1885. He was active as a manufacturer of cutlery from 1829 with premises at 74 Belmont Rd, Dales End as a "close plater" (someone who works sheet metal), and he began electroplating in 1855. William Page & Co was also active from 1880 at Cranemore St, Cattle’s Grove also 55 Albion St, Birmingham, in 1936 the firm became Ltd. The firm used the trademarks "Asrista, Bolivian Silver, Silverite, Roman Silver, Roumanian Silver and Trevor Plate. In 1938 William Page was a supplier to the British Government, marking it's products with the broad arrow symbol and was also present at Sheffield. History of the Loch Ard: The Loch Ard got its name from ”Loch Ard” a loch which lies to the west of Aberfoyle, and the east of Loch Lomond. It means "high lake" in Scottish Gaelic. The vessel belonged to the famous Loch Line which sailed many vessels from England to Australia. The Loch Ard was built in Glasgow by Barclay, Curdle and Co. in 1873, the vessel was a three-masted square-rigged iron sailing ship that measured 79.87 meters in length, 11.58 m in width, and 7 m in depth with a gross tonnage of 1693 tons with a mainmast that measured a massive 45.7 m in height. Loch Ard made three trips to Australia and one trip to Calcutta before its fateful voyage. Loch Ard left England on March 2, 1878, under the command of 29-year-old Captain Gibbs, who was newly married. The ship was bound for Melbourne with a crew of 37, plus 17 passengers. The general cargo reflected the affluence of Melbourne at the time. Onboard were straw hats, umbrella, perfumes, clay pipes, pianos, clocks, confectionery, linen and candles, as well as a heavier load of railway irons, cement, lead and copper. There were other items included that were intended for display in the Melbourne International Exhibition of 1880. The voyage to Port Phillip was long but uneventful. Then at 3 am on June 1, 1878, Captain Gibbs was expecting to see land. But the Loch Ard was running into a fog which greatly reduced visibility. Captain Gibbs was becoming anxious as there was no sign of land or the Cape Otway lighthouse. At 4 am the fog lifted and a lookout aloft announced that he could see breakers. The sheer cliffs of Victoria's west coast came into view, and Captain Gibbs realised that the ship was much closer to them than expected. He ordered as much sail to be set as time would permit and then attempted to steer the vessel out to sea. On coming head-on into the wind, the ship lost momentum, the sails fell limp and Loch Ard's bow swung back towards land. Gibbs then ordered the anchors to be released in an attempt to hold its position. The anchors sank some 50 fathoms - but did not hold. By this time the ship was among the breakers and the tall cliffs of Mutton Bird Island rose behind. Just half a mile from the coast, the ship's bow was suddenly pulled around by the anchor. The captain tried to tack out to sea, but the ship struck a reef at the base of Mutton Bird Island, near Port Campbell. Waves subsequently broke over the ship and the top deck became loosened from the hull. The masts and rigging came crashing down knocking passengers and crew overboard. When a lifeboat was finally launched, it crashed into the side of Loch Ard and capsized. Tom Pearce, who had launched the boat, managed to cling to its overturned hull and shelter beneath it. He drifted out to sea and then on the flood tide came into what is now known as Loch Ard Gorge. He swam to shore, bruised and dazed, and found a cave in which to shelter. Some of the crew stayed below deck to shelter from the falling rigging but drowned when the ship slipped off the reef into deeper water. Eva Carmichael a passenger had raced onto the deck to find out what was happening only to be confronted by towering cliffs looming above the stricken ship. In all the chaos, Captain Gibbs grabbed Eva and said, "If you are saved Eva, let my dear wife know that I died like a sailor". That was the last Eva Carmichael saw of the captain. She was swept off the ship by a huge wave. Eva saw Tom Pearce on a small rocky beach and yelled to attract his attention. He dived in and swam to the exhausted woman and dragged her to shore. He took her to the cave and broke the open case of brandy which had washed up on the beach. He opened a bottle to revive the unconscious woman. A few hours later Tom scaled a cliff in search of help. He followed hoof prints and came by chance upon two men from nearby Glenample Station three and a half miles away. In a complete state of exhaustion, he told the men of the tragedy. Tom then returned to the gorge while the two men rode back to the station to get help. By the time they reached Loch Ard Gorge, it was cold and dark. The two shipwreck survivors were taken to Glenample Station to recover. Eva stayed at the station for six weeks before returning to Ireland by steamship. In Melbourne, Tom Pearce received a hero's welcome. He was presented with the first gold medal of the Royal Humane Society of Victoria and a £1000 cheque from the Victorian Government. Concerts were performed to honour the young man's bravery and to raise money for those who lost family in the disaster. Of the 54 crew members and passengers on board, only two survived: the apprentice, Tom Pearce and the young woman passenger, Eva Carmichael, who lost her family in the tragedy. Ten days after the Loch Ard tragedy, salvage rights to the wreck were sold at auction for £2,120. Cargo valued at £3,000 was salvaged and placed on the beach, but most washed back into the sea when another storm developed. The wreck of Loch Ard still lies at the base of Mutton Bird Island. Much of the cargo has now been salvaged and some items were washed up into Loch Ard Gorge. Cargo and artefacts have also been illegally salvaged over many years before protective legislation was introduced in March 1982. The shipwreck of the Loch Ard is of significance for Victoria and is registered on the Victorian Heritage Register ( S 417). Flagstaff Hill has a varied collection of artefacts from Loch Ard and its collection is significant for being one of the largest accumulation of artefacts from this notable Victorian shipwreck. The collections object is to also give us a snapshot into history so we can interpret the story of this tragic event. The collection is also archaeologically significant as it represents aspects of Victoria's shipping history that allows us to interpret Victoria's social and historical themes of the time. The collections historically significance is that it is associated unfortunately with the worst and best-known shipwreck in Victoria's history. Silver plated copper alloy table forks entree from the wreck of the Loch Ard. William Pageflagstaff hill, warrnambool, shipwrecked coast, flagstaff hill maritime museum, maritime museum, shipwreck coast, flagstaff hill maritime village, great ocean road, loch line, loch ard, captain gibbs, eva carmichael, tom pearce, glenample station, mutton bird island, loch ard gorge, electroplated cutlery, fork -
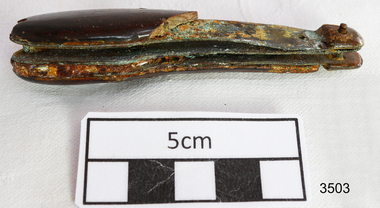 Flagstaff Hill Maritime Museum and Village
Pocket Knife, before 1878
Found on board the "Loch Ard" . 'Loch Ard" left Gravesend, England on 2nd March 1878, under the command of Captain Gibb, bound for Melbourne loaded with passengers and cargo. On June 1st 1878, almost at the end of her journey, she ran into a rocky reef at the base of Mutton Bird Island, near Port Campbell. Of the 54 crew members and passengers on board, only two survived: an apprentice, Tom Pearce and a young woman passenger, Eva Carmichael, who lost all of her family in the tragedy. The wreck of Loch Ard still lies at the base of Mutton Bird Island and much of the cargo has been salvaged. Some was washed up into what is now known as Loch Ard Gorge following the shipwreck. Amongst artefacts salvaged from the Loch Ard is the now famous Minton Peacock Statue which was destined for the Melbourne International Exhibition to be held in 1880 HISTORY OF THE LOCH ARD The LOCH ARD belonged to the famous Loch Line which sailed many ships from England to Australia. Built in Glasgow by Barclay, Curdle and Co. in 1873, the LOCH ARD was a three-masted square rigged iron sailing ship. The ship measured 262ft 7" (79.87m) in length, 38ft (11.58m) in width, 23ft (7m) in depth and had a gross tonnage of 1693 tons. The LOCH ARD's main mast measured a massive 150ft (45.7m) in height. LOCH ARD made three trips to Australia and one trip to Calcutta before its final voyage. LOCH ARD left England on March 2, 1878, under the command of Captain Gibbs, a newly married, 29 year old. She was bound for Melbourne with a crew of 37, plus 17 passengers and a load of cargo. The general cargo reflected the affluence of Melbourne at the time. On board were straw hats, umbrella, perfumes, clay pipes, pianos, clocks, confectionary, linen and candles, as well as a heavier load of railway irons, cement, lead and copper. There were items included that intended for display in the Melbourne International Exhibition in 1880. The voyage to Port Phillip was long but uneventful. At 3am on June 1, 1878, Captain Gibbs was expecting to see land and the passengers were becoming excited as they prepared to view their new homeland in the early morning. But LOCH ARD was running into a fog which greatly reduced visibility. Captain Gibbs was becoming anxious as there was no sign of land or the Cape Otway lighthouse. At 4am the fog lifted. A man aloft announced that he could see breakers. The sheer cliffs of Victoria's west coast came into view, and Captain Gibbs realised that the ship was much closer to them than expected. He ordered as much sail to be set as time would permit and then attempted to steer the vessel out to sea. On coming head on into the wind, the ship lost momentum, the sails fell limp and LOCH ARD's bow swung back. Gibbs then ordered the anchors to be released in an attempt to hold its position. The anchors sank some 50 fathoms - but did not hold. By this time LOCH ARD was among the breakers and the tall cliffs of Mutton Bird Island rose behind the ship. Just half a mile from the coast, the ship's bow was suddenly pulled around by the anchor. The captain tried to tack out to sea, but the ship struck a reef at the base of Mutton Bird Island, near Port Campbell. Waves broke over the ship and the top deck was loosened from the hull. The masts and rigging came crashing down knocking passengers and crew overboard. When a lifeboat was finally launched, it crashed into the side of LOCH ARD and capsized. Tom Pearce, who had launched the boat, managed to cling to its overturned hull and shelter beneath it. He drifted out to sea and then on the flood tide came into what is now known as LOCH ARD Gorge. He swam to shore, bruised and dazed, and found a cave in which to shelter. Some of the crew stayed below deck to shelter from the falling rigging but drowned when the ship slipped off the reef into deeper water. Eva Carmichael had raced onto deck to find out what was happening only to be confronted by towering cliffs looming above the stricken ship. In all the chaos, Captain Gibbs grabbed Eva and said, "If you are saved Eva, let my dear wife know that I died like a sailor". That was the last Eva Carmichael saw of the captain. She was swept off the ship by a huge wave. Eva saw Tom Pearce on a small rocky beach and yelled to attract his attention. He dived in and swam to the exhausted woman and dragged her to shore. He took her to the cave and broke open case of brandy which had washed up on the beach. He opened a bottle to revive the unconscious woman. A few hours later Tom scaled a cliff in search of help. He followed hoof prints and came by chance upon two men from nearby Glenample Station three and a half miles away. In a state of exhaustion, he told the men of the tragedy. Tom returned to the gorge while the two men rode back to the station to get help. By the time they reached LOCH ARD Gorge, it was cold and dark. The two shipwreck survivors were taken to Glenample Station to recover. Eva stayed at the station for six weeks before returning to Ireland, this time by steamship. In Melbourne, Tom Pearce received a hero's welcome. He was presented with the first gold medal of the Royal Humane Society of Victoria and a £1000 cheque from the Victorian Government. Concerts were performed to honour the young man's bravery and to raise money for those who lost family in the LOCH ARD disaster. Of the 54 crew members and passengers on board, only two survived: the apprentice, Tom Pearce and the young woman passenger, Eva Carmichael, who lost all of her family in the tragedy. Ten days after the LOCH ARD tragedy, salvage rights to the wreck were sold at auction for £2,120. Cargo valued at £3,000 was salvaged and placed on the beach, but most washed back into the sea when another storm developed. The wreck of LOCH ARD still lies at the base of Mutton Bird Island. Much of the cargo has now been salvaged and some was washed up into what is now known as LOCH ARD Gorge. Cargo and artefacts have also been illegally salvaged over many years before protective legislation was introduced. One of the most unlikely pieces of cargo to have survived the shipwreck was a Minton porcelain peacock - one of only nine in the world. The peacock was destined for the Melbourne International Exhibition in 1880. It had been well packed, which gave it adequate protection during the violent storm. Today, the Minton peacock can be seen at the Flagstaff Hill Maritime Museum in Warrnambool. From Australia's most dramatic shipwreck it has now become Australia's most valuable shipwreck artefact and is one of very few 'objects' on the Victorian State Heritage Register. The "Loch Ard" is registered on the National Shipwreck database and is protected as an Historic "Shipwreck. It is one of Australia's and Victoria's most tragic and most famous shipwrecks. The quantity of luxury and commercial items carried as cargo show the type and quality of goods passengers migrating to Australia at that time were bringing with them Flagstaff Hill’s collection of artefacts from LOCH ARD is significant for being one of the largest collections of artefacts from this shipwreck in Victoria. It is significant for its association with the shipwreck, which is on the Victorian Heritage Register (VHR S417). The collection is significant because of the relationship between the objects, as together they have a high potential to interpret the story of the LOCH ARD. The LOCH ARD collection is archaeologically significant as the remains of a large international passenger and cargo ship. The LOCH ARD collection is historically significant for representing aspects of Victoria’s shipping history and its potential to interpret sub-theme 1.5 of Victoria’s Framework of Historical Themes (living with natural processes). The collection is also historically significant for its association with the LOCH ARD, which was one of the worst and best known shipwrecks in Victoria’s history. Small pocket knife salvaged from the wreck of the Loch Ard. It has a dark brown cover on one side. Reverse side is only partly there. Both blades are missingflagstaff hill, warrnambool, shipwrecked coast, flagstaff hill maritime museum, maritime museum, shipwreck coast, flagstaff hill maritime village, great ocean road, loch line, loch ard, captain gibbs, eva carmichael, tom pearce, glenample station, mutton bird island, loch ard gorge, pocket knife, knife, tool -
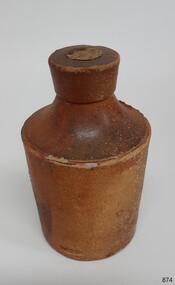 Flagstaff Hill Maritime Museum and Village
Container - Ink Bottle, Royal Doulton, 1853-1878
The ink bottle was made by the Royal Doulton company which began as a partnership between John Doulton, Martha Jones, and John Wattis an English ceramic and home accessories manufacturer founded in 1815. Operating initially in Vauxhall, London, it later moved to Lambeth, In1882 it opened a factory in Burslem, Stoke on Trent, in the centre of English pottery. The business specialised in making salt-glazed stoneware articles, including utilitarian or decorative bottles, jugs and jars, much of it intended for inns and pubs. The backbone of the business was a wide range of utilitarian wares, mostly stoneware's, including storage jars, tankards and the like, and later extending to pipes for drains, lavatories and other bathroom ceramics. From 1853 to 1902 its wares were marked Doulton & Co., then from 1902, when a royal warrant was given, wares were marked Royal Doulton. The company always made some more decorative items, initially still mostly stoneware, and from the 1860s the firm made considerable efforts to get a reputation for design, in which it was largely successful, as one of the first British makers of art pottery. Initially, this was done through artistic stoneware made in Lambeth, but in 1882 the firm bought a Burslem factory, which was mainly intended for making bone china table wares and decorative items. History of the Loch Ard: The Loch Ard got its name from ”Loch Ard” a loch that lies to the west of Aberfoyle, and the east of Loch Lomond. It means "high lake" in Scottish Gaelic. The vessel belonged to the famous Loch Line which sailed many vessels from England to Australia. The Loch Ard was built in Glasgow by Barclay, Curdle and Co. in 1873, the vessel was a three-masted square-rigged iron sailing ship that measured 79.87 meters in length, 11.58 m in width, and 7 m in depth with a gross tonnage of 1693 tons with a mainmast that measured a massive 45.7 m in height. Loch Ard made three trips to Australia and one trip to Calcutta before its fateful voyage. Loch Ard left England on March 2, 1878, under the command of 29-year-old Captain Gibbs, who was newly married. The ship was bound for Melbourne with a crew of 37, plus 17 passengers. The general cargo reflected the affluence of Melbourne at the time. Onboard were straw hats, umbrellas, perfumes, clay pipes, pianos, clocks, confectionery, linen and candles, as well as a heavier load of railway irons, cement, lead and copper. There were other items included that were intended for display in the Melbourne International Exhibition of 1880. The voyage to Port Phillip was long but uneventful. Then at 3 am on June 1, 1878, Captain Gibbs was expecting to see land. But the Loch Ard was running into a fog which greatly reduced visibility. Captain Gibbs was becoming anxious as there was no sign of land or the Cape Otway lighthouse. At 4 am the fog lifted and a lookout aloft announced that he could see breakers. The sheer cliffs of Victoria's west coast came into view, and Captain Gibbs realised that the ship was much closer to them than expected. He ordered as much sail to be set as time would permit and then attempted to steer the vessel out to sea. On coming head-on into the wind, the ship lost momentum, the sails fell limp and Loch Ard's bow swung back towards land. Gibbs then ordered the anchors to be released in an attempt to hold their position. The anchors sank some 50 fathoms - but did not hold. By this time the ship was among the breakers and the tall cliffs of Mutton Bird Island rose behind. Just half a mile from the coast, the ship's bow was suddenly pulled around by the anchor. The captain tried to tack out to sea, but the ship struck a reef at the base of Mutton Bird Island, near Port Campbell. Waves subsequently broke over the ship and the top deck became loosened from the hull. The masts and rigging came crashing down knocking passengers and crew overboard. When a lifeboat was finally launched, it crashed into the side of Loch Ard and capsized. Tom Pearce, who had launched the boat, managed to cling to its overturned hull and shelter beneath it. He drifted out to sea and then on the flood tide came into what is now known as Lochard Gorge. He swam to shore, bruised and dazed, and found a cave in which to shelter. Some of the crew stayed below deck to shelter from the falling rigging but drowned when the ship slipped off the reef into deeper water. Eva Carmichael a passenger had raced onto the deck to find out what was happening only to be confronted by towering cliffs looming above the stricken ship. In all the chaos, Captain Gibbs grabbed Eva and said, "If you are saved Eva, let my dear wife know that I died like a sailor". That was the last Eva Carmichael saw of the captain. She was swept off the ship by a huge wave. Eva saw Tom Pearce on a small rocky beach and yelled to attract his attention. He dived in and swam to the exhausted woman and dragged her to shore. He took her to the cave and broke the open case of brandy which had washed up on the beach. He opened a bottle to revive the unconscious woman. A few hours later Tom scaled a cliff in search of help. He followed hoof prints and came by chance upon two men from nearby Glenample Station three and a half miles away. In a complete state of exhaustion, he told the men of the tragedy. Tom then returned to the gorge while the two men rode back to the station to get help. By the time they reached Loch Ard Gorge, it was cold and dark. The two shipwreck survivors were taken to Glenample Station to recover. Eva stayed at the station for six weeks before returning to Ireland by steamship. In Melbourne, Tom Pearce received a hero's welcome. He was presented with the first gold medal of the Royal Humane Society of Victoria and a £1000 cheque from the Victorian Government. Concerts were performed to honour the young man's bravery and to raise money for those who lost family in the disaster. Of the 54 crew members and passengers on board, only two survived: the apprentice, Tom Pearce and the young woman passenger, Eva Carmichael, who lost her family in the tragedy. Ten days after the Lochard tragedy, salvage rights to the wreck were sold at auction for £2,120. Cargo valued at £3,000 was salvaged and placed on the beach, but most washed back into the sea when another storm developed. The wreck of Lochard still lies at the base of Mutton Bird Island. Much of the cargo has now been salvaged and some items were washed up into Lochard Gorge. Cargo and artefacts have also been illegally salvaged over many years before protective legislation was introduced in March 1982. One of the most unlikely pieces of cargo to have survived the shipwreck was a Minton majolica peacock- one of only nine in the world. The peacock was destined for the Melbourne 1880 International Exhibition. It had been well packed, which gave it adequate protection during the violent storm. Today the Minton peacock can be seen at the Flagstaff Hill Maritime Museum in Warrnambool. From Australia's most dramatic shipwreck, it has now become Australia's most valuable shipwreck artifact and is one of very few 'objects' on the Victorian State Heritage Register.An early utilitarian stoneware item made by a well-known company that specialised in making salt-glazed items that later earned a reputation for making stoneware art objects. Of additional significance is that it was recovered from the wreck of the Loch Ard. A shipwreck that is of additional significance as it is registered on the Victorian Heritage Register ( S 417). Flagstaff Hill has a varied collection of artefacts from Loch Ard and its collection is significant for being one of the largest accumulations of artefacts from this notable Victorian shipwreck of which the subject items are a small part. The collections objects give us a snapshot of how we can interpret the story of this tragic event. The collection is also archaeologically significant as it represents aspects of Victoria's shipping history that allows us to interpret Victoria's social and historical themes of the time. Through is associated with the worst and best-known shipwreck in Victoria's history. Salt glazed stoneware ink bottle, large capacity, tapered lip and body, two-tone brown with some encrustation on surface, still sealed with cork. Inscription in clay. Recovered from the wreck of the LOCH ARD.Stamped into clay "DOULTON LAMBETH"flagstaff hill, warrnambool, flagstaff hill maritime museum, shipwreck coast, flagstaff hill maritime village, great ocean road, loch line, loch ard, captain gibbs, eva carmichael, tom pearce, glenample station, mutton bird island, loch ard gorge, ink bottle, bulk ink bottle, writing accessory, stationery, stoneware, doulton lambeth, royal doulton, writing equipment -
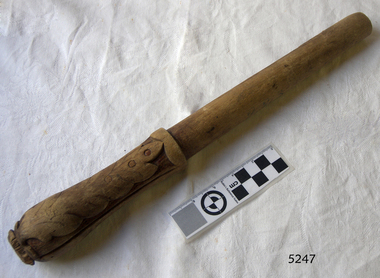 Flagstaff Hill Maritime Museum and Village
Functional object - Belaying Pin, Before 1878
Belaying Pin: A belaying pin is a solid metal or wooden object used on traditionally rigged sailing vessels to secure lines of running sale rigging. Largely replaced on most modern vessels by cleats, but are still used, particularly on square-rigged ships. A belaying pin is composed of a round handle and cylindrical shaft. The shaft is inserted into a hole in various strategically located wooden pin rails that line the extension of a ship's side above the level of the deck and the surrounding the base of masts, or free-standing, called (fife rails) up to the base of the pins handle. A line is then led under and behind the base of the pin then round the top in a figure-8 pattern for at least four turns. The excess line is coiled and stored neatly by taking a bight from the upper part of the final strand, looping it over and round beneath the coil, then twisting it once or more before slipping the twisted end over the top of the belaying pin to secure the coil in place. The subject item seems to have been hand made possibly by a crew member to while away his time at sea given the item is hand carved and rather personalised in appearance. History of the Loch Ard: The Loch Ard got its name from ”Loch Ard” a loch which lies to the west of Aberfoyle, and the east of Loch Lomond. It means "high lake" in Scottish Gaelic. The vessel belonged to the famous Loch Line which sailed many vessels from England to Australia. The Loch Ard was built in Glasgow by Barclay, Curdle and Co. in 1873, the vessel was a three-masted square-rigged iron sailing ship that measured 79.87 meters in length, 11.58 m in width, and 7 m in depth with a gross tonnage of 1693 tons with a mainmast that measured a massive 45.7 m in height. Loch Ard made three trips to Australia and one trip to Calcutta before its fateful voyage. Loch Ard left England on March 2, 1878, under the command of 29-year-old Captain Gibbs, who was newly married. The ship was bound for Melbourne with a crew of 37, plus 17 passengers. The general cargo reflected the affluence of Melbourne at the time. Onboard were straw hats, umbrella, perfumes, clay pipes, pianos, clocks, confectionery, linen and candles, as well as a heavier load of railway irons, cement, lead and copper. There were other items included that were intended for display in the Melbourne International Exhibition of 1880. The voyage to Port Phillip was long but uneventful. Then at 3 am on June 1, 1878, Captain Gibbs was expecting to see land. But the Loch Ard was running into a fog which greatly reduced visibility. Captain Gibbs was becoming anxious as there was no sign of land or the Cape Otway lighthouse. At 4 am the fog lifted and a lookout aloft announced that he could see breakers. The sheer cliffs of Victoria's west coast came into view, and Captain Gibbs realised that the ship was much closer to them than expected. He ordered as much sail to be set as time would permit and then attempted to steer the vessel out to sea. On coming head-on into the wind, the ship lost momentum, the sails fell limp and Loch Ard's bow swung back towards land. Gibbs then ordered the anchors to be released in an attempt to hold its position. The anchors sank some 50 fathoms - but did not hold. By this time the ship was among the breakers and the tall cliffs of Mutton Bird Island rose behind. Just half a mile from the coast, the ship's bow was suddenly pulled around by the anchor. The captain tried to tack out to sea, but the ship struck a reef at the base of Mutton Bird Island, near Port Campbell. Waves subsequently broke over the ship and the top deck became loosened from the hull. The masts and rigging came crashing down knocking passengers and crew overboard. When a lifeboat was finally launched, it crashed into the side of Loch Ard and capsized. Tom Pearce, who had launched the boat, managed to cling to its overturned hull and shelter beneath it. He drifted out to sea and then on the flood tide came into what is now known as Loch Ard Gorge. He swam to shore, bruised and dazed, and found a cave in which to shelter. Some of the crew stayed below deck to shelter from the falling rigging but drowned when the ship slipped off the reef into deeper water. Eva Carmichael a passenger had raced onto the deck to find out what was happening only to be confronted by towering cliffs looming above the stricken ship. In all the chaos, Captain Gibbs grabbed Eva and said, "If you are saved Eva, let my dear wife know that I died like a sailor". That was the last Eva Carmichael saw of the captain. She was swept off the ship by a huge wave. Eva saw Tom Pearce on a small rocky beach and yelled to attract his attention. He dived in and swam to the exhausted woman and dragged her to shore. He took her to the cave and broke the open case of brandy which had washed up on the beach. He opened a bottle to revive the unconscious woman. A few hours later Tom scaled a cliff in search of help. He followed hoof prints and came by chance upon two men from nearby Glenample Station three and a half miles away. In a complete state of exhaustion, he told the men of the tragedy. Tom then returned to the gorge while the two men rode back to the station to get help. By the time they reached Loch Ard Gorge, it was cold and dark. The two shipwreck survivors were taken to Glenample Station to recover. Eva stayed at the station for six weeks before returning to Ireland by steamship. In Melbourne, Tom Pearce received a hero's welcome. He was presented with the first gold medal of the Royal Humane Society of Victoria and a £1000 cheque from the Victorian Government. Concerts were performed to honour the young man's bravery and to raise money for those who lost family in the disaster. Of the 54 crew members and passengers on board, only two survived: the apprentice, Tom Pearce and the young woman passenger, Eva Carmichael, who lost her family in the tragedy. Ten days after the Loch Ard tragedy, salvage rights to the wreck were sold at auction for £2,120. Cargo valued at £3,000 was salvaged and placed on the beach, but most washed back into the sea when another storm developed. The wreck of Loch Ard still lies at the base of Mutton Bird Island. Much of the cargo has now been salvaged and some items were washed up into Loch Ard Gorge. Cargo and artefacts have also been illegally salvaged over many years before protective legislation was introduced in March 1982. One of the most unlikely pieces of cargo to have survived the shipwreck was a Minton majolica peacock- one of only nine in the world. The peacock was destined for the Melbourne 1880 International Exhibition in. It had been well packed, which gave it adequate protection during the violent storm. Today the Minton peacock can be seen at the Flagstaff Hill Maritime Museum in Warrnambool. From Australia's most dramatic shipwreck it has now become Australia's most valuable shipwreck artifact and is one of very few 'objects' on the Victorian State Heritage Register. The shipwreck of the Loch Ard is of significance for Victoria and is registered on the Victorian Heritage Register ( S 417). Flagstaff Hill has a varied collection of artefacts from Loch Ard and its collection is significant for being one of the largest accumulation of artefacts from this notable Victorian shipwreck. The collections object is to also give us a snapshot into history so we are able to interpret the story of this tragic event. The collection is also archaeologically significant as it represents aspects of Victoria's shipping history that allows us to interpret Victoria's social and historical themes of the time. The collections historically significance is that it is associated unfortunately with the worst and best-known shipwreck in Victoria's history. Wooden belaying pin with leaf design on the handle (hand made).Has the words Loch Ard faintly inscribed on handle (Artifact Rego No LA/32)flagstaff hill, warrnambool, shipwrecked coast, flagstaff hill maritime museum, maritime museum, shipwreck coast, flagstaff hill maritime village, great ocean road, loch line, loch ard, captain gibbs, eva carmichael, tom pearce, glenample station, mutton bird island, loch ard gorge, wooden belaying pin -
 National Wool Museum
Clothing - 1984 Los Angeles Olympics Men's Opening Ceremony Shirt, c. 1984
On the 1984 Los Angeles Olympic Uniforms donator Doug wrote- During the 1980s the Australian wool industry was at its most prosperous times with record numbers of sheep producing wool receiving ever increasing values due to the success of the Reserve Price Scheme, and the overall guidance of the Australian Wool Corporation (AWC). As a humble technician, my role was a low profile newly created position of “Controller, Technical Marketing” where wool was to be marketed on its technical properties, as distinct from the “Product Marketing Group” which exploited trhe traditional high profile approach of marketing wool;s superior fashion attributes. The Woolmark was the tool central to this approach. When the forthcoming Los Angeles Olympic Games was announced, the Product Marketing Group seized upon the chance to show the world that we could make top fashion garments and display them on our elite athletes on the world stage. A concept was launched using a contemporary top designer, Adel Weiss, with the most exclusive fabrics and knits available, and all with a lot of hype. This launch failed dismally for the following reasons- - The designer did a wonderful job presenting an excellent fashion range on perfect skinny models. The AOC however wanted a uniform which had an obvious Australian appearance when fitted to elite, and frequently muscular, athletes. - The fabrics chosen did not reflect the performance required by travelling athletes, there was no recognition of the need for ‘easy care.’ - There was no recognition given to the problem of measuring, manufacturing and distribution of a range of articles when the selected athlete could be domiciled anywhere in Australia. - There was no appreciation of such historical facts as Fletcher Jones, who had been unofficial suppliers dating back to the 1954 Olympics in Melbourne, and the Fletcher Jones board member, who was also an AWC board member, and was not in favour of the change. The project passed from Product Marketing to Public Relations, a big spending off-shoot of the AWC Chairman David Asimus, and due to the day to day operations of the project was passed to me and PR took care of the financial matters. The first task was to meet with the AOC and find out exactly their requirements. This lead to the production of a design and manufacturing brief, cointaining exact time lines for each event required to ensure an appropriate uniform on every athlete chosen to represent his/her country on the date given for the Opening Ceremony in Los Angeles. Working backwards the timeline becomes- 1. Noted the exact date of the Opening Ceremony. 2. Estimated the date for distributing completed garments to each athlete. 3. Estimated the time span available for measuring each athlete and commence making each component of the ensemble to the individual measurements of each athlete. 4. Decided the date for making the final choice of uniform design concept. 5. Decided the date for distribution of the design brief to selected designers. These five steps were spread out over a two year period. The Commonwealth Games occur midway between each Olympic Games, work on the Olympic uniform commences the week after the Commonwealth Games closing ceremony and MUST be ready by the prescribed day two years hence. The project also had to remain cognisant of trade politics existing within the span of the task, as well as the temperament of designers in general. It is no overstatement to say that in the past every designer in Australia believed they could, and should, be chosen to design the Australian Uniform. The final choice of designer almost always faced criticism from the fashion press and any designer who had been overlooked. However, with the contenders receiving an exacting brief the numbers of serious contenders greatly reduced. The Los Angeles Olympic Uniforms. A further reason for the AWC bid failure to design the LA uniform was that the AOC had already chosen Prue Acton to design it. This was based on her proven performance during previous games as she had a talent for creating good taste Australiana. Her design concepts also considered the effect when they were viewed on a single athlete as well as the impact when viewed on a 400 strong team coming on to the arena. A blazer trouser/skirt uniform in bright gold was chosen for the formal uniform. It was my task to select a pure wool faille fabric from Foster Valley weaving mill and have sufficient woven and ready within the prescribed timeline. The trouser/skirt fabric selected was a 60/40 wool polyester plain weave fabric from Macquarie Worsted. This fabric had a small effect thread of linen that was most attractive when dyed to match some eucalyptus bark Prue had brought back from central Australia. For the Opening Ceremony uniform, Prue designed a series of native fauna, a kookaburra for the men’s shirt and a pleated skirt with a rural scene of kangaroos, hills and plants. This presented an insurmountable printing challenge to the local printing industry as it had an unacceptably large repeat size and the number required (50) was also commercially unacceptable. The solution was a DIY mock up at RMIT and the employment of four student designers. The fabric selected for this garment was a light weight 19 micron, pure wool with a very high twist yarn in alternating S and Z twist, warp and weft. This fabric proved to be the solution to a very difficult problem, finding a wool product which is universally acceptable when worn next to the sin by young athletes competing in the heat of a Los Angeles summer. Modifications to this fabric were developed to exploit its success when facing the same problem in future games. Garment Making- The most exacting garment in the ensemble is the tailored blazer, plus the related trouser/skirt. Unfortunately tailoring athletes that come in various shapes and sizes such as; - Weight lifters develop an enormous chest, arms and neck size. A shirt made to a neck size of 52 would produce a shirt with cuffs extending well beyond the wearer’s hands. - Basketball players are up to 7 feet tall and garments relying ona chest measurement grading would produce a shirt with cuffs extending only to elbow length. - Swimmers develop enormous shoulders and slim hips, cyclists by contrast develop thighs I liken to tree trunks and a uniform featuring tight trousers must be avoided at all cost. Suffice to say many ensembles require specialist ‘one off’ treatment for many athletes. Meanwhile there is a comfortable in between group who can accept regular sizes so you can cater for these by having back up stock with plenty of built in contingencies. Athletes may be domiciled anywhere in Australia, this creates a fundamental problem of taking their measurements. The Fletcher Jones organisation was key to answering this problem due to their presence in every capital city, as well as many provincial towns around Australia. Each athlete on being selected for the Olympic Team was simultaneously requested to visit their nearest Fletcher Jones shop. The standardised measurement data collected was shared with the other manufacturers, e.g. Pelaco Shirts, Holeproof Socks and Knitwear, Maddison Belts, and even Hush Puppy Shoes. As the time for the Games approached the AOC made arrangements for combining meeting of all. Selected available athletes at the Australian Institute of Sport, Canberra, where, among other things, they were fitted and supplied with their uniform. The method evolved as follows.Men’s cream coloured button up, collared shirt. Images of a kookaburra have been printed onto the shirt, a single kookaburra on the left breast and a pair of kookaburras on the reverse of the shirt. The kookaburras are printed in a brown tone to complement the cream colour of the fabric.On tag - FMaustralian wool corporation, 1984 los angeles olympics, olympic uniforms, men's uniforms, sport, athletes -
 Wodonga & District Historical Society Inc
Photograph - Civic Leaders Wodonga 1876 - 1994
Wodonga Shire was created in 1876 when the colonial government agreed to ratepayers' petitions to have their part of the local government district severed from the Yackandandah Shire to form a new municipality. In March 1973 Wodonga was declared as the first Rural City in Australia. This was officially proclaimed by the Governor of Victoria, Sir Rohan Delacombe at an open-air ceremony in Hovell Street following a procession along High Street led by the Victorian Police Band. The first meeting of the held in the open air immediately after the proclamation. In 1994, the Jeff Kennett government restructured local government in Victoria. His reforms dissolved 210 councils and sacked 1600 elected councillors. Commissioners were appointed in their place. Wodonga’s Commissioners were Mel Reid, Des Kelly and Michael Hanson. Reforms introduced created 78 new councils through amalgamations. Democratically elected councillors returned to Wodonga in 1997, with Graham Crapp as Mayor.This item documents the leaders of local government in Wodonga since its inception in 1876 until Local Government reform in 1994.A photo collage representing Shire Presidents and Mayors of Wodonga, including a typed list of names and dates. All Shire Presidents and Mayors of Wodonga from 1876 – 1994 J. Woodland 1876-7, J. Bambrick 1877-78, G. Street 1878-79, W. L. Ferrier 1879-80, T. Reidy 1880-81, J. Bambrick 1881-82, A. Schlink 1882-83, T. Reidy 1883-84, N. P. Newnan 1884-86, J. Bambrick 1886-87, H. Harkin 1887-88, T. Johnston 1888-89, W.C. McFarlane 1889-91, P. Adams 1891-92, J. G. Shields 1892-93, H. Harkin 1893-94, W.C. McFarlane 1894-95, N. P. Newnan 1895-96, J. Bassett 1896-97, R. Morrison 1897-98, G. S. Manns 1898-99, H. Smith 1899-1900, H. Beardmore 1900-1901, G. Leighton 1901-02, J. H. McGeoch 1902-03, H. Beardmore 1903-1904, J. Whan 1904-05, A.E. Müller 1905-06, A. L. Wright 1906-07, J. H. McGeoch 1907-08, H. Beardmore 1908-1910, G. Leighton 1910-11, H. Beardmore 1911-1912, J. H. McGeoch 1912-13, G. Leighton 1913-14, H. Beardmore 1914-1917, S. T. Parker 1917-19, W. Twomey 1919-21, T. Ryan 1921-23, W. Twomey 1923-25, T. Ryan 1925-26, C. F. Pollard 1926-27, W. Twomey 1927-28, C. S. Street 1928-29, K. D. Watson 1929-30, M. Martin 1930-31, R, Richardson 1933-36, T. Ryan 1936-38, M. Martin 1938-39, R, Richardson 1939-41, J. S. Hore 1941-43, K. D. Watson 1943-45, C. F. Pollard 1945-47, C.C. Sheather 1947-48, T. E. Snowdon 1948-49, J. S. Hore 1949-50, G.A.W. Boyes 1950-52, D. J. Schubert 1952-54, V. R. Peard 1954-55, M. E. Morrison 1955-56, M. E. Morrison 1956-57, J. S. Hore 1957-60, D.J. Schubert 1960-61, A.B.S. Collins 1961-62, A. G. Richardson 1962-63, J. S. Hore 1963-65, J. A. Terrill 1965-67, H. W Draper 1967-68, J.A. Terrill 1968-71, *L.E. Stone 1971-74, K.T. Riley 1974-76, H. Draper 1976-77, Rex. Chamberlain 1977-80, H. W. Draper 1980-82, R. J. Macaulay 1982-84, L.O. Boyes 1984-85, **Pamela Stone 1985-86, M. McEachern 1986-87, R.J Macaulay 1987-88, I. Deegan 1988-89, Valentina Gillard 1989-90, R. J. Macaulay 1990-91, L. C. Boyes 1991-92, T. Corcoran 1992-94 *Last Shire President & first Mayor of the City ** First woman Mayor, Widow of L.B. Stonewodonga council, wodonga shire council, civic leaders -
 Bendigo Military Museum
Photograph - Army Survey Regiment - Regimental Training Military Skills Revision, 1985
This is a set of 35 photographs of the Army Survey Regiment personnel undertaking military skills revision, at the Army Survey Regiment, Fortuna, Bendigo, 1985. They participated in lessons on the handling of the M30 Grenade and SLR Rifle. These lessons were part of the six objectives of regimental training outlined in the administrative instruction – Exercise “City Soldier” accompanying these photos. The other objectives were first aid at Fortuna, RATEL and navigation at Wellsford Forest; and rifle shooting at Wellsford Rifle Range. Personnel from Air Survey, Cartographic, Lithographic and Headquarters Squadrons were reallocated to four training platoons for one week from 7th to 11th October 1985.This is a set of 35 photographs of the Army Survey Regiment undertaking military skills revision, part of Regimental Training at Fortuna Villa 1985. Black & white photos .1P to .17P are printed on photographic paper and scanned at 300 dpi. Photos .18P to .35P are on 35mm negative film and scanned at 96 dpi. They are part of the Army Survey Regiment’s Collection. .1) - Photo, black & white, 1985, L to R: CPL Brian Fauth, unidentified (x2), SGT Dennis Learmonth - instructor, unidentified (x2). .2) - Photo, black & white, 1985, unidentified personnel, SGT Dennis Learmonth – instructor. .3) - Photo, black & white, 1985, unidentified personnel, SGT Dennis Learmonth – instructor. .4) - Photo, black & white, 1985, unidentified personnel, SGT Dennis Learmonth - instructor. .5) - Photo, black & white, 1985, unidentified personnel. .6) - Photo, black & white, 1985, unidentified personnel. .7) - Photo, black & white, 1985, L to R: SGT Dennis Learmonth – instructor, CPL Brian Fauth, SPR Viv (Hawkins) Doherty, CPL Ken Peters, CPL Megan (McBurney) Reynolds, CPL Mick ‘Buddha’ Ellis, unidentified, SPR Wally Twidale, unidentified personnel. .8) - Photo, black & white, 1985, L to R: unidentified personnel, LT Ossie Slade. .9) - Photo, black & white, 1985, L to R: unidentified personnel, CPL Greg Honan, SGT Don Williams, LCPL Bob Sheppard, unidentified personnel. .10) - Photo, black & white, 1985, L to R: unidentified personnel, SPR Bloxham, SPR Jason Wells, unidentified personnel, CPL Gillham, CPL Peter Imeson, unidentified. .11) - Photo, black & white, 1985, L to R: SPR Terry Winzar, unidentified, WO1 Noel ‘Nesty’ Coulthard, unidentified personnel. .12) - Photo, black & white, 1985, unidentified personnel. .13) - Photo, black & white, 1985, L to R: SSGT Tony Harder – UK Exchange Instructor, unidentified personnel, CPL Bob Thrower, unidentified, SPR Jim Humphrey, LCPL Bob Sheppard. .14) - Photo, black & white, 1985, L to R: unidentified personnel, CPL Mark Casey, SSGT Tony Harder – UK Exchange Instructor. .15) - Photo, black & white, 1985, L to R: unidentified, CPL Paul Richards, SPR John Keely, CPL Peter Johnson, unidentified, SSGT Tony Harder – UK Exchange Instructor, SPR Dave Wright, unidentified personnel. .16) - Photo, black & white, 1985, L to R: unidentified, WO2 Brian Partridge – Instructor, unidentified personnel. .17) - Photo, black & white, 1985, WO2 Brian Partridge – Instructor, unidentified personnel. Unidentified. .18) - Photo, black & white, 1985, CPL Lea-anne (Smallshaw) Shirley, CPL Megan (McBurney) Reynolds, SGT Dennis Learmonth – instructor. .19) - Photo, black & white, 1985, SSGT Steve Hansen – Instructor, from background tree L to R: SPR Dave Lawler, CPL Ken Peters, CPL Steve Burke, SPR Wally Twidale, CPL Dave Murphy, SPR Jim Walker. .20) - Photo, black & white, 1985, L to R: unidentified (x3), CPL Ian Nelson, CPL Eddy Jacobs, SPR Tracy (Parker) Ash, remainder unidentified. .21) - Photo, black & white, 1985, CPL Eddy Jacobs piggybacking SPR Jason Wells, remainder unidentified. .22) - Photo, black & white, 1985, CAPT Dave McLachlan piggybacking unidentified soldier. .23) - Photo, black & white, 1985, unidentified soldiers competing in leapfrog race. .24) - Photo, black & white, 1985, SPR Leah (Hoffman) Peppler throwing dummy hand grenade, SSGT Ian ‘Rock’ Thistleton – Instructor. .25) - Photo, black & white, 1985, unidentified soldiers’ basic pouches cleared by instructor at end of hand grenade lesson. .26) - Photo, black & white, 1985, unidentified soldier throwing dummy hand grenade. .27) - Photo, black & white, 1985, unidentified personnel with dummy hand grenades, SGT Dennis Learmonth – instructor. .28) - Photo, black & white, 1985, unidentified soldier throwing dummy hand grenade. .29) - Photo, black & white, 1985, unidentified personnel with dummy hand grenades, unidentified instructor. .30) - Photo, black & white, 1985, adjusting SLR rifle gas plugs L to R: unidentified, SPR John Keely, CPL Paul Richards, unidentified, CPL Peter Johnson, remaining personnel unidentified, unidentified instructor. .31) - Photo, black & white, 1985, L to R: unidentified (x6), SPR Dave Wright, unidentified, SPR Barry Hogan, CPL Lyall Camp, SSGT Tony Harder – UK Exchange Instructor, SPR Steve Coulson, CPL Mark Lander. .32) - Photo, black & white, 1985, SLR rifle lesson L to R: unidentified, CPL Gary Drummond, SSGT Steve Hansen – Instructor in background, CPL Peter Breukel, SPR Steve Burke, CPL Brian Fauth, remaining personnel unidentified. .33) to .35) - Photo, black & white, 1985, unidentified personnel during SLR rifle lesson..1P to .35P No personnel are identifiedroyal australian survey corps, rasvy, army survey regiment, army svy regt, fortuna, asr -
 Federation University Historical Collection
Document, Establishment of the Ballarat School of Mines, 1870, 1870
The Ballarat School of Mines was the first site of technical edducation in Australasia. It is now a predecessor institution of Federation University Australia. It's first president was Redmond Barry.Correspondence and planning documents relating to the setting up of the Ballarat School of Mines. it includes tenders for contractors for the refurbishment of the former Ballarat Circuit Court. .1) Rules for the pupils of the Mining School at Zurickau, 18/11/1870 (not translated by Emanuel Steinfeld, perhaps by W. Henderson) .2) Regulations of the Mining Academy at Frieberg, 18/11/1870 .3) Einrichtungen, Freiberg, 1870 (written in German) .4) Letter from Somerville Learmonth of Ercildoun to Harrie Wood, Clerk of the Board of Mines Ballarat, accepting a position as one of three trustees of the Ballarat School of Mines, along with Redmond Barry and R.H. Bland, 08/01/1870 .5) Printing order with Robert Wreford, 26/01/1870 .6) H. Waymouth to Mr Bickett re the Ballarat School of Mines, 1780 .7) Letter from R.H. Bland of Clunes to Harrie Wood of the Ballarat Mining Board, 27/01/1870 .8) Letter from Somerville Livingstone Learmonth of Ercildoun to Harrie Woods of the Ballarat Mining Board refusing the offer to be a Trustee of the Ballarat School of Mines, 28/01/1870 .9) Minutes of the meeting of the Ballarat School of Mines Executive Council, 05/02/1870 and Correspondence from Harrie Wood to J. Warrington Rogers re the lease of the building for the Ballarat School of Mines, 21/01/1870 .10) Chief Secretary's Office to Ballarat Mining Board re Life Membership of the Ballarat School of Mines, 02/02/1870 .10b) Letter from Redmond Barry, Carlton Gardens, Melbourne re the visit of the Governor of Victoria to the Ballarat School of Mines, 04/02/1870 .12) Letter from Charles Pucke on behalf of Mr McCulloch to H, Ainswood, Secretary of the Ballarat Mining Board, 11/07/1870 .13) Correspondence from Henry Rosales of Walhalla (Chairman of the Gippsland Mining Board) to James Baker of the Ballarat School of Mines, 28/12/1870 .11) Meeting of the Executive Council, Bickett, Eddy Downes, 08/02/1870 .14) Letter from John Phillips, contract surveyor of St Arnaud to Mr Newman, Vice-President of the Ballarat School of Mines, 15/12/1870 .15) Articles ordered and obtained for the Ballarat School of Mines, 03/01/1870 .16) Telegram from John Lewis of Clunes to the Ballarat School of Mines. .16b) Quote from painter Thomas Robson for painting the Ballarat School of Mines, 05/06/1870 .17) Note from Duncan Gillies to Harrie Wood re grant for the Ballarat School of Mines, 05/06/1870 .18) Correspondence re Grant to the Ballarat School of Mines, Duncan Gillies, 04/07/1870 .19) Correspondence concerning the Ballarat School of Mines from F. Valient to Harrie Wood, 14/05/1870 .19b) Correspondence from Somerville Livingstone Learmonth to Harrie Woods - an apology for a meeting with Judge Rogers, 23/05/1870 .20) Letter from R.H. Bland to Harrie Wood, 15/07/1870 .22) Telegraph from J. Warrington Rogers to Harrie Wood of the Ballarat Mining Board concerning tenders for the Ballarat School of Mines, which was established in 1870. .23) Letter from Ballarat Mining Board to Judge Warrington Rogers, 31/05/1870 .24) Telegraph to Harrie Wood of the Ballarat Mining Board from J. Warrington Rogers concerning Sir Redmond Barry. A note at the bottom of the telegraph notes ‘This telegram has been delayed through repairs on line. .25) Letter on Melbourne Public Library Letterhead from librarian Augustus Fulk, 05/08/1870 .26) Letter from R.H. Bland to Harrie Wood, 30/05/1870 .27) Letter from Robert Park re alteration of the former Ballarat Court House for use as the Ballarat School of Mines, 05/05/1870. .28) Letter from G. Whitty re painting of the former Ballarat Court House for use as the Ballarat School of Mines, 04/05/1870 .29) Letter from William Newman re plastering of the former Ballarat Court House for use as the Ballarat School of Mines, 05/05/1870 .30) Letter from Charles A. Abbott re teaching Mechanical Drawing at the Ballarat School of Mines, 04/04/1870 .32) Letter from Redmond Barry to the Ballarat School of Mines, 07/1870 .31) National Insurance Company of Australia insurance for the Ballarat School of Mines (former Ballarat Circuit Court), 01/05/1870 .33) Letter from R.H. Bland to Harrie Wood, 09/1870 .34) Letter from Somerville Livingstone Learmonth to Harrie Wood, 06/09/1870 .35) Letter to the Chief Secretary to the Ballarat School of Mines Library & Museum, 30/11/1870 .36) Parliament house (Kitto) to the Ballarat Mining Board, 15/11/1870 .37) H. de la Poer Wall of Grenville College to R.W. Newman of the Ballarat School of Mines, 27/04/1971 .38) W.H. Odgers to the Ballarat East Town Clerk, 20/05/1870 .39) Correspondence to the Borough of Clunes for the Ballarat Mining Board requesting a grant to set of a school of mines at Ballarat. 25/03/1870 .40) Surveyor to Harrie Wood, Mining Registrar, 27/04/1870 .40) Letter to Judge Warrington Rogers re the contractor's account for satisfactory completion of work on the Ballarat School of Mines, 11/07/1870 .43) Desks for the Ballarat School of Mines by Henry Gough, 1870 .44) Ballarat Star Office to James Baker of the Ballarat School of Mines, 1870ballarat school of mines, frieberg mining academy, learmonth, somerville learmonth, wreford, weymouth, bland, rivet henry bland, barry, redmond barry, mcculloch, phillips, john phillips, robson, gillies, duncan gillies, warrington rogers, melbourne public library, whitty, robert park, newman, william newman, charles abbott, janes baler, de la poer wall, odgers, louis le gould, wood, harrie wood, steinfeld, emanuel steinfeld, ainswood, pucke, thomas robson, telegraph, telegram, state library of victoria, fulks, architecture, reed, j. reed, rosales, abbott, charles a. abbott, mechanical drawing, drawing, ballarat circuit courthouse, ballarat courthouse, national insurance company of australia, grenville college, chief secretary's office, robert sandon, school of mines, schools of mines, establishment, ballarat school of mines establishment, germany, london, ercildoun -
 Federation University Historical Collection
Document - Documents, Ballarat School of Mines Correspondence Relating to the Ballarat Technical Art School, 1907-1914, 24/12/1907 - 28/08/1914
The dates 1907-1914 cover the first eight years of the Ballarat Technical Art School No. 15, a division of the Ballarat School of Mines. This covers that time before the custom built Ballarat Technical Art School opened in 1915.48 pieces of hand and type written correspondence relating to the Ballarat Technical Art School, covering its first eight years. .1) Transferal of money from the Ballarat Fine Art Public Gallery Association to the Ballarat School of Mines for credit to the Ballarat Technical Art School No 15. .3) Letter from Herbert H. Smith reporting on the appointment of Thomas Trengove to the position of Art Director at the Stawell School of Mines, and the appointment of Arthur Lilburne and Pridgeon as student assistants. .5) Application from Arthur M. Lilburne for a position at the Ballarat Technical Art School. .7) Resignation of Thomas Trengrove from the Ballarat Technical Art School so he could take up a position at the Stawell School of Mines, 1908. .9) Correspondence from H.H. Smith concerning expectations. 1908 .10) Report from Herbert H. Smith on the number of Art enrolments at the Ballarat West Art School, the Ballarat East Art School and the Drawing Centre. .8) Correspondence from Henry H. Hall regarding his teaching appointment, 1908 .11) A Report on architectural studies at the Ballarat Technical Art School on Clegg and Miller letterhead. .12) Report from M.C. Young. .13) Report from Arthur Lilburne .14) Reorrt from J.A. Wright, 1908 .15) Report on student numbers from Edith M. Cornell, 1908 .16) Report on classes in Freehand Geometry and Perspective by Fred Foster, 1908 .16b) Report by Decorating and Signwriting teacher John Barber, 1908 .17) Report from Esther and Lily Green from the East Public Library, 1908 .18) Report from Percy Isaac of the Ballarat East Public Library re manual training and Sloyd classes. .19) Report on the progress of the Ballarat Technical Art School by Principal Herbert H. Smith, 1908 .20) Report from Arthur M. Lilburn on the Elementary Evening Classes and the State School Teachers Saturday class, 1908 .21) Report by M.C. Young on drawing classes at the Ballarat Technical Art School, 1908 ,22) Report by Fred Foster on Freehand Geometry of Perspective classes at the Ballarat Technical Art School, 1908 .24) Report by E. and L. Green on classes at the Ballarat Technical Art School, 1908 .25) Report by Miss Wright on Dresscutting classes at the Ballarat Technical Art School, 1908 .26) Report by John Barber on Signs and Decorating classes at the Ballarat Technical Art School, 1908 .27) Report by Edith Cornell on Millinery classes at the Ballarat Technical Art School, 1908 .28) Report by Percy R. Green on Manual Training ad Carpentry classes at the Ballarat Technical Art School, 1908 .29) Correspondence from Posenby Carew-Smyth and Melbourne Education Department letterhead, 1908, .30) Report on the need for instruction in Decorative Needlework at the Ballarat Technical Art School by Principal Herbert H. Smith. Ida Johnston undertook classes from Miss Macgeorge in Melbourne at the suggestion of Posonby Carew-Smyth, and H.H. Smith suggested she be appointed to teach the class, 1910 .31) Report on the Junior Technical School, 1915 .32) Quarterly Report on the Ballarat Technical Art School by Principal Herbert H. Smith, 1911 .34) Report on the progress of the Ballarat Technical Art School by Principal Herbert H. Smith, 1914 .34b) Invoice from James Ingram and Son, Booksellers and School Stationers, 1908 .35) Report on the progress of the Ballarat Technical Art School by Principal Herbert H. Smith, 1914 .36) Correspondence from F.N. King seeking employment at the Ballarat Junior Technical Scool due to the resignation of A.W. Steane, 1914 .37) Correspondence regarding the qualifications of F.N. King, including Sloyd at NAAS, Sweden, 1914 Reference from F.V. Burridge of the London County Council Central School of Arts and Crafts (incorporating The Royal Female School of Art), Southamoton Row, London, regarding Francis N. King, 1913 .40) Correspondence on Ballarat Junior Technical School letterhead when it was located at 104 Doveton Street, Ballarat (Dana Street Primary School) from Albert W. Steane. The report mentioned to appointment of R.W. Richards commencing duties as a science ad mathematics master and Francis N. King as Woodwork and Modeling instructor, 1914 .41) Report on the progress of the Ballarat Technical Art School by Principal Herbert H. Smith, 1914 .42) Correspondence on Stanley Mullen Company letterhead requesting a junior (lady) to help in designing and drawing from Needlework, 1914 .43) Report on the progress of the Ballarat Technical Art School by Principal Herbert H. Smith, 1914 .44) Report on the progress of the Ballarat Technical Art School by Principal Herbert H. Smith, 1914. The report includes the resignation of Donadl Johnston to take up the position of assistant to Posonby Carew-Smyth. Harold Herbert to travel to England, and Edwin Cannon to to apply his art knowledge commercially. H.H. Smith suggested they be replaced with Ken Moss and Harold Brown .45) Report on the progress of the Ballarat Technical Art School by Principal Herbert H. Smith .46) Hours and duties of the caretaker and attendant at the Ballarat Technical Art School .47) Letter from the J.A. Powell, secretary of the Ballarat West Art School to the Ballarat School of Mines. ballarat technical school, henry j. hall, arthur m lilburn, thomas h. trengrove, herbert h. smith, g.w. clegg, m.c. young, j.w. wright, fred foster, j. barber, etsher green, lily green, p. isaac, e.m. cornell, albert steane, f.n. king, letterhead, ballarat fine art public gallery association, richard maddern, j. powell, j.a. powell, frederick martell, ponsonby carew-smyth, stawell school of mines, lilburne, pridgeon, arthur lilburne, henry hall, edith m. cornell, john barber, east ballarat library, esther green, percy isaac, sloyd, millinery, r.w. richards, frank king, a.w. steane, naas, majorie walker, art needlework, stanley mullen company, donald johnston, ted cannon, edwin cannon, harold brown, harold herbert, art gallery of ballarat -
 Victorian Aboriginal Corporation for Languages
Book, Aldo Massola, Journey to Aboriginal Victoria, 1969
Looks at the Aboriginal community from the time of white contact, across many parts of Victoria. Chap.1; Melbourne - early missions, camp of Native Police, corroboree trees, canoe trees, grave &? headstone of Derrimut; quarries at Keilor, excavation sites at Green Gully &? Keilor; quarry at Mt. William, notes on inheritance of quarries Coranderrk settlement - Barraks grave, notes on his life; Chap.2; Geelong - Yawangi group of the Wothowurong tribe, camping grounds in area quarries; Notes on William Buckley, Gellibrand (a notable Aboriginal), graves in the Western Cemetery; Chap.3; Colac - war between Colac &? Geelong tribes; Mission at Birregurra, reason for failure of Buntingdale Mission; brass plate to Coc-coc-coine; reserve at Elliminyt, native ovens, camp sites, initiation site &? ritual; quarry sites, axegrinding factory, rock pecking &? engraving; dried hand &? 3 Aboriginal skulls found; Chap.4; The south-west coast - middens, camp sites notes on Framlingham Stn., fish traps at Tyrendarra; Chap.5; The far west - massacres of Aborigines near Casterton; camp sites, oven mounds; the first cricket team formed; Aboriginal cemetery; Chap.6; Hamilton - camps; Mount Rouse Station, axegrinding grooves at Nareeb Nareeb, shelters described, fish traps, massacre at Lake Condah; mission; canoes; Chap.7; Camperdown - legend about Lake Bullen Merri; obelisk erected in memory of Aborigines of district especially chief Wombeetch Puyuun; Jarcoort tribe; fish weirs, camps, intertribal fights between Booluc-burrers, Jarcoorts &? Ellengermote groups; bartering place at Mount Noorat; articles traded, legend of Flat-Top Hill; Chap.8; Ballarat - camp at Lake Wendouree; White Stone Lagoon; legends concerning Mt. Buninyong &? waterfalls at Lal-lal; camp sites; pygmy-type implements near Meredith, quarry at Glue Pot Rocks near Durdidwarrah; brass plate of King Billy; Chap.9; Ararat - Tjapwurong territory; camp sites, quarries, shield &? canoe trees; Bunyip belief at Lake Buninjon of Muk-jarawaint &? Pirtkopen-noot tribes, gives legend; stone implements; mill stones; fish weirs; stone arrangement near Lake Wongan; ground drawing of a bunyip, paintings in rock shelter near Mt. Langi Ghiran; Chap.10; Maryborough - camps, oven mounds, rock wells, stone arrangement at Carisbrook; camp sites at Mt. Franklin; Chap.11; Charlton - belief in Mindye (snake); canoe trees, ovens, camp sites, water holes, rock wells, stone implements; method of rainmaking; Chap.12; Horsham-Stawell, The Wimmera - Wotjobaluk land; camps, fish traps at Toolondo; Black Range cave paintings, Flat Rock shelters (detailed account of these paintings); Bunjils Cave; Chap.13; Horsham-Stawell, The Mallee - camp sites, implements; Ebenezer Mission, Willie Wimmera taken to England by Rev. Chase to become a missionary, died in England; Chap.14; The Murray River, Mildura Swan Hill - Battle of the Rufus; ceremonial ground, Lake Gol Gol, canoe &? shield trees; stone implements; camp sites, fire place arrangements; fish traps; oven mounds; Chap.15; The Murray River, Swan Hill-Echuca - legend about Lake Boga; camps, oven mounds, the Cohuna skull, Kow Swamp, method of burial; Chap.16; Shepparton ovens; brass plates of King Paddy of Kotupna &? King Tattambo of Mulka Stn., native well, camps; Chap.17; Wangaratta -camps, quarry, rock holes, the Faithful massacre; grinding rocks at Earlston; Chap.18; The High Plains - Ya-itma-thang; camps, Bogong moth feasts, native paths for trade &? intertribal fights, articles traded; painted shelters; Koetong Ck. Valley, near Mt. Pilot &? near Barwidgee Ck.; Chap.19; Dandenong - water holes, list of 8 holes in Beaumaris - Black Rock area; camps, middens, stone implements (microliths), legend of Angels Cave, stone axes, Native Police Force, Narre Narre Warren Station, legend about rocks on Bald Hill, kangaroo totemic site; Chap.20; Wonthaggi- Yarram - natives visit Phillip Is., murder of William Cook and Yankee by five Tasmanians (listed as Bon Small Boy, Jack Napoleon Timninaparewa, Fanny Waterpoordeyer, Matilda Nattopolenimma and Truganini) near Cape Patterson, men; camp sites, middens, legend of White Rock; Chap.21; Sale - Bairnsdale, The Lakes Country middens, camps; legend at Wulrunjeri; story of a white woman supposedly living with with the Tutangolung tribe, efforts made to prove story; canoe trees; Chap.22; Sale-Bairnsdale, The Inland Braiakolung tribe, camps, implements, canoe &? shield trees; Ramahyuck Mission, grinding rocks, fights with Omeo tribe; native tracks, death through enemy magic - procedure, belief in ghosts; Chap.23; Lakes Entrance and the Country to the east - Kroatungolung people, legend of Kalimna Valley; camps, stones of Nargun, bunyip, devils at Lake Tyers, excavation at Buchan, carbon dates; middens, ochre at Cape Conrad, stone fish-hook file at Thurra River; note on Bidwel tribe; Each chapter gives historical details, early contacts, relationships with settlers; Aboriginal place names and detailed description of sites and geographical features.b&w photographs, b&w illustrations, colour illustrationsgeelong, colac, hamilton, camperdown, ballarat, ararat, maryborough, charlton, horsham, stawell, murray river, shepparton, wangaratta, dandenong, wonthaggi, yarram, sale, bairnsdale, lakes entrance -
 University of Melbourne, Burnley Campus Archives
Album - Black and white and colour slides, Burnley Views, 1947-1955
Contributor: T.H. KneenCardboard box of 108 35mm glass slides in metal frames made by "Gnome." Box labelled "Burnley Gardens Slides." Also 16 unused slides (1) Swan Street entrance c. (2) Orchid? b/w. (3) Nursery b/w. (4) Pasture area with man working b/w. (5) Draught horse working in the Orchard b/w. (6) Crop of corn in the Orchard c. (7) Magnolia c. (Magnolia x soulangeana). (8) Display of orange flowers c. (9) Lemon tree in the Orchard c. (10) Sign advertising 'Fruit Tree Pruning Demonstarion Sat. 2nd July (1949) c. (11) Jersey cow c. (12) Rock Point c. (13) Dahlias in the Orchard c. (14) Foundation Stone '28th August, 1946' c. (15) Felled Cypress tree 1951 b/w. (16) School truck in front of glasshouses and cacti b/w. (17)Administration Building completed but surrounded by rubble C.1949 c. (18) Plant Research Institute c. (19) Inside a glasshouse. c. (20) Administration Building c. (21) Group of female students dressed up for a function c. (22) Solenostemon (Syn. Coleus) in a glasshouse. (23, 24)Stock Matthiola incana. (25) Blossom in the Orchard c. (26) Orchard c. (27) Picking fruit in the Orchard c. (28) 2 female students holdong large bunches of poppies c. (29) Flowers growing in the Orchard c. (30) House - not Burnley c. (31) Students on an excursion c. (32) Staff member with Gladioli c. (33) Garden view - not Burnley? c. (34) Administration Building c. (35) Roses c. (36) Flowers in the Orchard c. (37) Draught horse working in the Orchard c. (38) Staff member amongst flowers in the Orchard c. (39) Garden view c. ((40) Blossom in the Orchard c. (41) Orchard c. (42) Flowers inside glasshouse c. (43) Mesembryanthemums in pots possibly in the nursery c. (44) Tree b/w. (45) Garden bed c. (46) Sign, 'Agrostology Branch, pasture Plant Research Field,' c. (47) Path to Principal's Residence c. (48) Irrigation in the Orchard b/w. (49) Cactus flowers b/w. (50) Garden view with T.H. Kneen children playing c. (51) (52) Cinerarias (now Pericallis x hybrida) in pots c. (53) Temporary building where the Grey Garden is now b/w. (54) Garden view b/w. (55) Unknown building b/w. (56) Person pruning in the Orchard c. (57) Students working in the Orchard c. (58) Swan Street with recently completed rock wall constructed by the Public Works Department b/w. (59) Lagoon paddock b/w. (60,62) Pavilion and new Administration Building before the Pavilion was removed b/w. (61) As (60) but viewed from a different direction c. (63) Plant c. (64) View through a window on the stairs in the Administration Building c. (65) Plant c. (66) Garden view of trees c. (67) Garden View b/w. (68) Blossom tree c. (69 )Garden view along path to Principal's Residence c. (70) Lagoon Paddock c. (71) Lagoon Paddock with cows b/w. (72) Inside a glasshouse b/w. (73) Entrance sign- Department of Agriculture Burnley Gardens, School of Horticulture & Primary Agriculture, Plant Research laboratory, Agrostology Branch, Fruit Preserving Branch c. (74) Plant Research Laboratory b/w. (75) Students on an excursion c. (76) Glasshouses b/w. (77) Garden view b/w. (78) Kniphophia c. (79) Hibiscus c. (80) Garden view c. (81) Dairy, Silo and dog b/w. (82) Irrigation in then Orchard b/w. (83) Garden view with magnolia c. (84) Flower plots in the Orchard c. (85) Pruning demonstration b/w. (86) Administration Building under construction c. (87) Rock Point c. (88) Mrs Kneen and Magnolia c. (89) Glasshouses c. (90) Sequoia sempervirens b/w. (91) Inside Administration Building c. (92) Luffmann Ponds b/w. (93) Sequoia sempervirend, Mrs Kneen and child c. (94) Garden bed in front of Sequoian sempervirens c. (95) Principals Residence b/w. (96) Poultry pens b/w. 1947 (97) Principals Residence b/w. (98) Student picking fruit from netted tree b/w. (99) Rock Point and Long Border c. (100) Administration Building under construction c. (101) Greenhouse b/w. (102) Rock Point c. (103) Flowers in the Orchard c. (104) Waterlilies in the Pond c. (105) Blossom tree c. (106) Hilda Kirkhope Rockery c. (107) Long Border c. (108) Plant Research Institute with flower border along drive c.burnley gardens, flower, nursery, pasture, draught horse, orchard, crops, magnolia, chicken coops, egg laying competition -
 Bendigo Military Museum
Photograph - Lithographic Squadron Group Photos, Army Survey Regiment, Fortuna Villa, Bendigo, 1990
This is a set of 15 photographs of personnel posted to Lithographic Squadron at the Army Survey Regiment, Fortuna Villa, Bendigo Victoria, on the 1st of October 1990. These informal and formal group photos were taken on the day of a CO’s Parade. It is not known why sunglasses were worn at the Squadron parade outside the Litho huts. Photos of the other three Squadrons, the Officers, and Warrant Officers/Sergeants from this set of negatives are catalogued in item 6440.11P. This is a set of 15 photographs of personnel posted to Lithographic Squadron at the Army Survey Regiment, Fortuna Villa, Bendigo Victoria, on the 1st of October 1990. The photographs are on 35mm negative film and were scanned at 96 dpi. They are part of the Army Survey Regiment’s Collection. .1) &.2) - Photo, black & white, 1990. OC MAJ Bob Coote. .3) - Photo, black & white, 1990. Front rank L to R: SPR Ken Labouchardiere, SPR Doug Whiteside, SPR Mark McCullogh. Centre rank L to R: SPR Andrew Woodman. Rear rank L to R: CPL Geoff Webb, CPL Daryl South. .4) - Photo, black & white, 1990. Front rank L to R: SSGT Russ Mollenhauer, SGT Kim Reynolds, SGT Brian Paul, unidentified, SPR Ken Labouchardiere, SPR Doug Whiteside, Centre rank L to R: SPR Graeme Spong, SPR Andrew Woodman. Rear rank L to R: SGT Steve Burke, CPL Geoff Webb. .5) - Photo, black & white, 1990. WO1 Trevor Osborne. .6) - Photo, black & white, 1990. LCPL Damien Cole. .7) - Photo, black & white, 1990. L to R: WO2 Rhys De Laine, WO2 Steve Egan, WO2 Keith Fenton RE UK Exchange, WO2 Rob Bogumil, WO1 Bill Jones. .8) - Photo, black & white, 1990. L to R: SPR Shane ‘Smily’ Campbell, SPR Andrew Woodman, CPL Daryl South. .9) - Photo, black & white, 1990. LT Greg Tolcher. .10) - Photo, black & white, 1990. SGT Steve Burke. .11) - Photo, black & white, 1990. Lithographic Squadron: Back row L to R: SPR Ross Anza, SGT Brian Fauth, unidentified, SPR Andrew Arman, SGT Gary Kerr, SPR Doug Whiteside, SSGT Russ Mollenhauer, CPL Peter Swandale, CPL Roy Hicks, SPR Shane ‘Smily’ Campbell, SPR Graeme Spong. Jones. 3rd row L to R: SSGT Garry Drummond, SGT Kim Reynolds, unidentified, SGT Brian Paul, CPL Gavin Mclean, SPR Mark McCullogh, CPL Le-Anne (Smallshaw) Shirley, CPL Geoff Webb, SPR Gary Lord, SSGT Di Chalmers, CPL Peter Dillon, LCPL Damien Cole, SGT Steve Burke. 2nd row L to R: SSGT Peter Imeson, SPR Gary Sievers, unidentified, CPL Daryl South, SPR Greg Howell, SPR Janet Murray, SPR Michelle Withers, SPR Ken Labouchardiere, SPR John Bragg, SPR Andrew Morrison-Evans, CPL John ‘Flash’ Anderson, CPL Trevor King. Front row L to R: WO2 Steve Egan, WO1 Trevor Osborne, LT Greg Tolcher, WO2 Rob Bogumil (standing), OC MAJ Bob Coote, LT Marty Lyons, WO2 Rhys De Laine, WO2 Keith Fenton RE UK Exchange, WO2 Jeff Willey. .12) & .13) - Photo, black & white, 1990. Lithographic Squadron: Back row L to R: SPR Ross Anza, SGT Brian Fauth, unidentified, SPR Andrew Arman, SGT Gary Kerr, SPR Doug Whiteside, SSGT Russ Mollenhauer, CPL Peter Swandale, CPL Roy Hicks, SPR Shane ‘Smily’ Campbell, SPR Graeme Spong. Jones. 3rd row L to R: SSGT Garry Drummond, SGT Kim Reynolds, unidentified, SGT Brian Paul, CPL Gavin Mclean, SPR Mark McCullogh, CPL Le-Anne (Smallshaw) Shirley, CPL Geoff Webb, SPR Gary Lord, SSGT Di Chalmers, CPL Peter Dillon, LCPL Damien Cole, SGT Steve Burke. 2nd row L to R: SSGT Peter Imeson, SPR Gary Sievers, unidentified, CPL Daryl South, SPR Greg Howell, SPR Janet Murray, SPR Michelle Withers, SPR Ken Labouchardiere, SPR John Bragg, SPR Andrew Morrison-Evans, CPL John ‘Flash’ Anderson, CPL Trevor King. Front row L to R: WO2 Steve Egan, WO1 Trevor Osborne, LT Greg Tolcher, WO2 Rob Bogumil, OC MAJ Bob Coote, LT Marty Lyons, WO1 Bill Jones, WO2 Rhys De Laine, WO2 Keith Fenton RE UK Exchange, WO2 Jeff Willey. .14) - Photo, black & white, 1990. L to R: WO2 Rob Bogumil, unidentified, OC MAJ Bob Coote, CPL Daryl South, unidentified (x3), CPL Roy Hicks, SSGT Di Chalmers, WO2 Jeff Willey, WO2 Keith Fenton RE UK Exchange, SPR Ken Labouchardiere, WO2 Rhys De Laine. .15) - Photo, black & white, 1990. L to R: SPR Greg Howell, SPR Gary Sievers, unidentified, SPR Ross Anza, unidentified (x4), SSGT Russ Mollenhauer, SPR Doug Whiteside, SGT Brian Paul, unidentified (x7), WO2 Jeff Willey, unidentified, WO2 Keith Fenton RE UK Exchange, WO2 Rhys De Laine, SPR Shane ‘Smily’ Campbell..1P to .15P – no annotationsroyal australian survey corps, rasvy, army survey regiment, army svy regt, fortuna, asr, litho sqn -
 Bendigo Military Museum
Photograph - Officer Commissioning and CO’s Handover Parade, Army Survey Regiment, Fortuna Villa, Bendigo, 1992
This is a set of 28 photographs taken at a CO’s Parade at the Army Survey Regiment, Fortuna, Bendigo in 1992. On this parade WO1 Bill Jones received his commission and by promotion to Captain from CO LTCOL Rene van den Tol. Command of the unit was handed over to LTCOL Rob McHenry. It is probable the commissioning and handover ceremonies occurred on the CO’s Parade. LTCOL Rene van den Tol was CO from 1989 to 1992 and LTCOL Rob McHenry was CO from 1992 to 1993.This is a set of 28 photographs taken at a CO’s Parade at the Army Survey Regiment, Fortuna, Bendigo in 1992. The colour photographs are on 35mm negative film and scanned at 96 dpi. They are part of the Army Survey Regiment’s Collection. .1) - Photo, colour, 1992. Headquarters Squadron marches past RSM WO1 Graham Ragless. .2) - Photo, colour, 1992. Cartographic Squadron marches past RSM WO1 Graham Ragless. L to R: unidentified personnel, WO2 Steve Hansen, CPL Roger Pearson, WO1 Gary Warnest, SSGT Dennis Learmonth, SSGT Greg Else, CPL Ian Bowes, SGT Stuart Symonds. .3) - Photo, colour, 1992. Lithographic Squadron marches past RSM WO1 Graham Ragless. L to R: unidentified personnel, WO1 Steve Egan, LCPL John Bragg, unidentified personnel, WO2 Rob Bogumil, unidentified personnel, SPR Corey Hill. .4) - Photo, colour, 1992. Air Survey Squadron marches past RSM WO1 Graham Ragless. L to R: unidentified personnel, WO1 Allan Hancox, SSGT Wolfgang Thun, unidentified personnel, WO2 Neil ‘Ned’ Kelly, unidentified personnel, SGT Dave Longbottom, SGT Brian Johnson. .5) - Photo, colour, 1992. Cartographic Squadron. L to R: unidentified personnel, SGT Stuart Symonds, CPL Col McInnes, CAPT Mary Anne Martinek in foreground, SPR Jodi Seith, unidentified personnel, SPR Avril (Bray) Lloyd. .6) - Photo, colour, 1992. Air Survey Squadron. L to R: unidentified officer, SSGT Bruce Hammond, SPR Tracy Tillman, SPR Rachel (Stanford) Scott, SPR Paula (Golding) Brinsmead, SGT Graeme Reany, unidentified officer in foreground, unidentified personnel, CPL Steve Coulson. .7) - Photo, colour, 1992. Cartographic Squadron inspection. L to R: RSM WO1 Graham Ragless, unidentified, OC MAJ Graeme Wastell, CO LTCOL Rene van den Tol, unidentified personnel, CPL Col McInnes, SPR Jodi Seith, SPR Avril (Bray) Lloyd. CPL Steve Ellis, SPR Ian Brown, SPR Andrew Lazdovskis. .8) - Photo, colour, 1992. Cartographic Squadron inspection. L to R: OC MAJ Graeme Wastell, CO LTCOL Rene van den Tol, SPR Avril (Bray) Lloyd, CPL Steve Ellis, SPR Ian Brown, SPR Andrew Lazdovskis, SPR Adrian Taylor, unidentified, SPR Mick Knight, SPR Dawn Hoadley, CPL Craig Kellet. .8) to .12) - Photo, colour, 1992. Officer Commissioning Ceremony. L to R: CO LTCOL Rene van den Tol, WO1 Bill Jones promoted to Captain. .13) - Photo, colour, 1992. Officer Commissioning Ceremony. L to R: ADJT CAPT Geoff Ford, RSM WO1 Graham Ragless, CO LTCOL Rene van den Tol, WO1 Bill Jones promoted to Captain. .14) - Photo, colour, 1992. Officer Commissioning Ceremony. WO1 Bill Jones promoted to Captain. .15) - Photo, colour, 1992. Commanding Officer Handover. CO LTCOL Rene van den Tol delivers speech. .16) to .17) - Photo, colour, 1992. Commanding Officer Handover. R to L: CO LTCOL Rene van den Tol hands over to incoming CO LTCOL Rob McHenry. .18) - Photo, colour, 1992. Commanding Officer Handover. L to R: RSM WO1 Graham Ragless, ADJT CAPT Geoff Ford, CO LTCOL Rob McHenry. .19) - Photo, colour, 1992. Commanding Officer Handover. L to R: ADJT CAPT Geoff Ford, RSM WO1 Graham Ragless, CO LTCOL Rob McHenry. .20) - Photo, colour, 1992. Cartographic Squadron marches off parade ground. L to R: OC MAJ Graeme Wastell, unidentified officer, CAPT Greg Oaten, LT Matt Jackson, CAPT Mary Anne Martinek, SPR Mick Knight. .21) & .22) - Photo, colour, 1992. Cartographic Squadron marches off parade ground. .23) - Photo, colour, 1992. Lithographic Squadron marches off parade ground. L to R: OC Bob Coote, unidentified officer, SPR Scott Cameron, unidentified officer, SSGT Russ Mollenhauer, SGT Brian Fauth. .24) - Photo, colour, 1992. Lithographic Squadron marches off parade ground. L to R: LCPL Janet Murray, unidentified, SPR Mick Muzeen, Allison (Ottaway) Wooldrage, SGT Keith Quinton, SGT Frank Lenane, SGT Laurie Justin, SGT Dale Hudson, LCPL John Bragg, unidentified, SGT Kim Reynolds, SPR Corey Hill, SPR Andrew Arman, SPR Ross Anza, WO1 Peter Coombes. .25) - Photo, colour, 1992. Parade guests. L to R: unidentified guests, MAJ Peter Jensen. .26) - Photo, colour, 1992. Parade guests. L to R: unidentified guests, CAPT Doug Arman, unidentified guests. .27) - Photo, colour, 1992. Parade personnel march off. L to R: unidentified, WO2 Ted Burgess, WO1 Ken Slater. .28) - Photo, colour, 1992. Parade personnel. L to R: unidentified, SPR Allan Blake..1P to .28P – There are no annotations.royal australian survey corps, rasvy, army survey regiment, army svy regt, fortuna, asr -
 Bendigo Military Museum
Photograph - Army Survey Regiment Freedom of Entry Parade Rehearsal, Bendigo CBD, 1985
This set of 30 black and white photographs were taken at the Army Survey Regiment’s parade rehearsal held at the Queen Elizabeth Oval, Bendigo on the 27th of June 1985. The rehearsal was for the Freedom of Entry parade held 1-2 weeks later in 1985. The exact date for the Freedom of Entry parade is not known. The Freedom of Entry to the City of Bendigo was an honour first conferred by the Bendigo City Council to the Army Survey Regiment in 1970. The Freedom of Entry parade in 1985 was the fourth time the unit exercised its right of freedom of entry. The Regiment also exercised its Freedom of Entry with anniversary parades in 1977, 1980 and 1995. Refer to items 6020.8P, 6021.25P, 6248P, 6266, 6409.2 and 6430.39P for more Army Survey Regiment Freedom of Entry photographs, documents and certificates. See item 6471.2P for photos of Lithographic Squadron taken on the same day of this parade rehearsal.This set of 30 black and white photographs of the Army Survey Regiment (Army Svy Regt) were taken on the 27th of June 1985 at a rehearsal for the Freedom of Entry parade to the City of Bendigo, held 1-2 weeks later in 1985. The photographs are on 35mm negative film and were scanned at 96 dpi. They are part of the Army Survey Regiment’s Collection. .1) - Photo, black & white, 1985. Army Svy Regt .2) - Photo, black & white, 1985. Army Svy Regt right dress drill. .3) - Photo, black & white, 1985. Officers ready to take posts. .4) - Photo, black & white, 1985. Army Svy Regt present arms. SPR Mick Arnott in foreground. .5) - Photo, black & white, 1985. Army Svy Regt presents arms. .6) - Photo, black & white, 1985. Army Svy Regt presents arms. CAPT Neil Taylor in right foreground. .7) - Photo, black & white, 1985. In readiness for arrival of guests of honour. CO LTCOL Jorge Gruszka and CPL Nick Van Dalen in left foreground. .8) - Photo, black & white, 1985. Arrival of guests of honour. CO LTCOL Jorge Gruszka leads the salute. CPL Nick Van Dalen opening the car door. .9) - Photo, black & white, 1985. CO LTCOL Jorge Gruszka formally welcomes the guests of honour, the “Lord Mayor”, acted by SGT John Zuringer. .10) - Photo, black & white, 1985. CO LTCOL Jorge Gruszka escorts “Lord Mayor” (SGT John Zuringer) from the dais to inspect the Army Svy Regt’s squadrons. .11) - Photo, black & white, 1985. Inspection of the Army Svy Regt’s squadrons. .12) - Photo, black & white, 1985. Inspection of the Army Svy Regt’s squadrons. WO1 Dave Thomson on the far right with sword. .13) - Photo, black & white, 1985. Inspection of squadrons. L to R: CAPT Neil Taylor in foreground. 2LT Kathy Ryan, CO LTCOL Jorge Gruszka, WO1 Brian Mead, Lord Mayor” (SGT John Zuringer). Front rank: 2nd right CPL TJ Wicker, SSGT Doug Gay, Centre rank: 2nd right SPR Tracy (Parker) Ash, CPL Mark Lander. .14) - Photo, black & white, 1985. Inspection of squadrons Centre rank: L to R: SPR Robin Marshall, CPL Mark Lander, remainder unidentified. CO LTCOL Jorge Gruszka, WO1 Brian Mead, Lord Mayor” (SGT John Zuringer). Rear rank: 4th right SSGT Greg Buckingham, 3rd right SSGT Ian ‘Rock’ Thistleton, 2nd right SPR Annette Godden, 1st right SSGT Graham Ragless. .15) - Photo, black & white, 1985. L to R: “Lord Mayor” (SGT John Zuringer) and WO1 Brian Mead march past the Army Band. .16) - Photo, black & white, 1985. Army Svy Regt marches past the dias. ‘Eyes right’ salute given by CO LTCOL Jorge Gruszka. .17) - Photo, black & white, 1985. Unidentified squadron marches past the dias. ‘Eyes right’ salute given by MAJ Daryl Hockings CSM. .18) - Photo, black & white, 1985. Unidentified squadron marches past the dias. ‘Eyes right’ salute given by MAJ Rob John. .19) - Photo, black & white, 1985. Lithographic squadron marches past the dias. ‘Eyes right’ salute given by MAJ Peter Raue. .20) - Photo, black & white, 1985. Unidentified squadron marches past the dias. ‘Eyes right’ salute given by by MAJ Terry Edwards. .21) - Photo, black & white, 1985. Army Svy Regt right dress drill. .22) - Photo, black & white, 1985. At attention. Front rank: L to R: SSGT Doug Gay, CPL TJ Wicker, remainder unidentified. Centre rank: L to R: SPR Robin Marshall, remainder unidentified. Rear rank: 4th right SSGT Greg Buckingham, 3rd right SSGT Ian ‘Rock’ Thistleton, 2nd right SPR Annette Godden, 1st right SSGT Graham Ragless, far right super-numery WO1 Doug Arman. .23) - Photo, black & white, 1985. At attention. Centre rank: L to R: SPR Robin Marshall, remainder unidentified. Rear rank: SSGT Graham Ragless. Super-numery rank 2nd right - WO1 Doug Arman, far right - WO2 Pat Lumsden. .24) - Photo, black & white, 1985. Army Svy Regt Advance and Review Order. .25) - Photo, black & white, 1985. Army Svy Regt presents arms. .26) - Photo, black & white, 1985. CO LTCOL Jorge Gruszka leads the Army Svy Regt’s march past the dias. .27) - Photo, black & white, 1985. Army Svy Regt marches past the dias. ‘Eyes right’ salute given by CO LTCOL Jorge Gruszka. .28) - Photo, black & white, 1985. Unidentified squadron marches past the dias. ‘Eyes right’ salute given by MAJ Rob John. .29) - Photo, black & white, 1985. Lithographic squadron marches past the dias. ‘Eyes right’ salute given by MAJ Peter Raue. .30) - Photo, black & white, 1985. Army Svy Regt completes its march past the dias. No personnel are identified. Date and occasion annotated on film negative sleeve.royal australian survey corps, rasvy, army survey regiment, army svy regt, fortuna, asr -
 Bendigo Military Museum
Photograph - 4th Field Survey Squadron ANZAC Day Parade. Adelaide, SA, 1994
This is a set of 32 photographs of 4th Field Survey Squadron personnel parading through the streets of the Adelaide CBD on ANZAC Day, on the 25th of April 1994. The march concluded at the Cross of Sacrifice in Pennington Gardens East followed by the ANZAC Day Service of Remembrance. See items 6566.14P and 6567.11P for more photos taken during ANZAC Day, 1994.This is a set of 32 photographs of 4th Field Survey Squadron personnel parading through the streets of the Adelaide CBD on ANZAC Day, on the 25th of April 1994. The colour photographs are on 35mm negative film and are part of the Army Survey Regiment’s Collection. The photographs were scanned at 96 dpi. .1) - Photo, colour, 1994. Preparation. Bayonets fixed on SLR rifles. .2) - Photo, colour, 1994. Eyes right as unit passes dignitaries on the dais. .3) - Photo, colour, 1994. Eyes right as unit passes dignitaries on the dais. CAPT Rob Gray, centre of photo, OC MAJ Peter Demaine on right. .4) to .7) - Photo, colour, 1994. Eyes right as unit passes dignitaries on the dais. .8) - Photo, colour, 1994. Unit marches along the parade route. .9) to .13) - Photo, colour, 1994. Eyes right as unit passes dignitaries. .14) - Photo, colour, 1994. Unit marches along the parade route. Right file L to R: WO2 Peter Hammer, unidentified, SGT Dave Longbottom, SGT Paul Baker, unidentified. .15) - Photo, colour, 1994. Unit marches along the parade route. Right file L to R: SGT Paul Baker, unidentified (x2), SPR Fran Calvert, SPR Greg Richards, SGT H. Evertz. Centre file: SGT Mark Donnelly, SPR Mark McInerney, unidentified (x2), SPR Matt Arnold. .16) - Photo, colour, 1994. Unit marking time. Right file L to R: SGT Paul Baker, unidentified (x2), SPR Fran Calvert, SPR Greg Richards, SGT H. Evertz, CPL Brett Parkin. Centre file L to R: SPR Matt Arnold, SPR Mark Linwood. Right file L to R: unidentified, SPR Mark Sinderberry. Officers L to R: unidentified (x2), CAPT Rob Gray, CAPT Tony Stephens. .17) - Photo, colour, 1994. Unit marking time. L to R: SGT Paul Baker, unidentified, SSGT John ‘Shep’ Shephard, SGT Dave Longbottom, SPR Daryl Miller, CPL Steve Wegener, unidentified (x2), CPL Jeremy Archer, WO2 Peter Hammer, unidentified Warrant Officers (x2). .18) - Photo, colour, 1994. Unit marking time. L to R: SPR Mark Linwood, SPR Greg Richards, SPR Matt Arnold, SPR Mark Sinderberry, unidentified (x5), SPR Chris Pearse, unidentified, CPL Dick Crawford, unidentified, SSGT John ‘Shep’ Shephard, CPL Steve Wegener, unidentified, CPL Jeremy Archer, unidentified Warrant Officer. .19) - Photo, colour, 1994. Unit marking time. Officers L to R: unidentified (x2), CAPT Tony Stephens. L to R: SPR Mark Linwood, SPR Greg Richards, SPR Matt Arnold, SPR Mark Sinderberry, remainder unidentified. .20) - Photo, colour, 1994. Unit marched along the parade route. L to R: CAPT Rob Gray, unidentified officer. .21) - Photo, colour, 1994. Unit marches along the parade route. OC MAJ Peter Demaine. .22) - Photo, colour, 1994. Unit marches along the parade route. L to R: CAPT Tony Stephens, SPR Mark Linwood, SPR Matt Arnold, SPR Mark Sinderberry, unidentified (x3), SPR Chris Pearse, unidentified, CPL Dick Crawford, unidentified, SGT Dave Longbottom, SSGT John ‘Shep’ Shephard, CPL Steve Wegener, CPL Jeremy Archer, unidentified Warrant Officers (x2). .23) - Photo, colour, 1994. Unit marches along the parade route. L to R: SSGT John ‘Shep’ Shephard, SPR Daryl Miller, CPL Steve Wegener, unidentified, CPL Jeremy Archer, unidentified Warrant Officers (x2). .24) - Photo, colour, 1994. Unit marches along the parade route. L to R: unidentified, CPL Dick Crawford, SGT Dave Longbottom, SSGT John ‘Shep’ Shephard, unidentified, CPL Steve Wegener, WO2 Peter Hammer, CPL Jeremy Archer, unidentified Warrant Officers (x2). .25) - Photo, colour, 1994. Unit marches along the parade route. L to R: unidentified (x3), SPR Fran Calvert, unidentified (x2), SPR Chris Pearse, unidentified, CPL Dick Crawford, SPR Daryl Miller, SSGT John ‘Shep’ Shephard. .26) - Photo, colour, 1994. Unit marches along the parade route. L to R: CAPT Tony Stephens, CPL Brett Parkin, SPR Mark Linwood, SGT H. Evertz, SPR Mark Sinderberry, unidentified (x2). .27) - Photo, colour, 1994. Unit marches along the parade route. L to R: CPL Brett Parkin, CAPT Tony Stephens, SPR Mark Linwood, SPR Greg Richards, SPR Matt Arnold, unidentified, SPR Mark Sinderberry, unidentified (x3), SPR Chris Pearse, unidentified, CPL Dick Crawford, unidentified, SGT SSGT John ‘Shep’ Shephard, CPL Steve Wegener, CPL Jeremy Archer, unidentified Warrant Officer. .28) - Photo, colour, 1994. Unit marches along the parade route. L to R: Officers - OC MAJ Peter Demaine, unidentified (x2), CAPT Rob Gray, CAPT Tony Stephens. L to R: CPL Brett Parkin, SGT H. Evertz, SPR Mark Linwood, SSGT Pat ‘Fuji’ Drover, SPR Mark Sinderberry, unidentified. .29) - Photo, colour, 1994. Unit preparing to halt. .30) to .32) - Photo, colour, 1994. Unit ‘stand easy’..1P to .32P – There are no personnel identified. ‘1994 ANZAC DAY’ annotated on negatives sleeve.royal australian survey corps, rasvy, 4 fd svy sqn -
 Bendigo Military Museum
Photograph - Army Survey Regiment Freedom of Entry March, Bendigo CBD, 1980
The Freedom of Entry to the City was an honour conferred by the Bendigo City Council to the Army Survey Regiment in 1970. 1980 was the third time the unit exercised its freedom of marching into the city with swords drawn, bayonets fixed and drums beating. The honour is usually bestowed upon local regiments, in recognition of their dedicated service, and it is common for military units to periodically exercise their freedom by arranging a parade through the city. Led by the Regiment’s CO – LTCOL Bob Skitch, the unit marched down View St in the CBD, along Pall Mall and up Gaol Rd to the Queen Elizabeth II Oval. The ceremonial parade followed with a march past the guests of honour, Mayor of Bendigo Councillor Paul Tomkinson and military dignitaries. The parade concluded after formal inspections of the troops. The Regiment also exercised its Freedom of Entry with anniversary parades in 1977, 1980, 1985, 1990 and 1995. Some photos in this set were also printed on photo paper and catalogued under item 6021.25P. Photos of the parade are catalogued under item 6490.53P. Photos of the Freedom of Entry parade rehearsal are catalogued under item 6479.38P.This set of 21 black and white photographs of the Army Survey Regiment were taken on the occasion of the Freedom of Entry to the City of Bendigo March in 1980. The majority of photographs are on 35mm negative film and scanned at 96 dpi. Photos 6491.3P and 6491.18P were printed on photographic paper and scanned at 300 dpi. They are part of the Army Survey Regiment’s Collection. .1) - Photo, black & white, 1980. L to R: MAJ Don Swiney MBE, LTCOL Bob Skitch, WO1 Aub Harvey, ADJT CAPT John Harrison, photographer in foreground – SGT Garran Hill .2) to .5) - Photo, black & white, 1980. L to R: MAJ Don Swiney MBE, LTCOL Bob Skitch, WO1 Aub Harvey, ADJT CAPT John Harrison. .6) - Photo, black & white, 1980. Headquarters Squadron marches left wheels into Pall Mall followed by 3rd MD Band. L to R: WO2 Ted Burgess, WO1 Dave Thomson, WO2 George Graham, CPL Andy Wilson, unidentified (x2), SPR Jeff Ruiz, unidentified, SGT Rick Warren, remainder unidentified. .7) - Photo, black & white, 1980. Headquarters Squadron marches down Pall Mall followed by 3rd MD Band. Right file L to R: WO1 Alex Cairney, WO2 Ted Burgess, CPL Andy Wilson, unidentified, SGT Rick Warren, remainder unidentified. Centre file L to R: unidentified (x2), SGT Bruce Hammond, CPL Phil McGuire. .8) - Photo, black & white, 1980. 3rd MD Band marches down Pall Mall. .9) - Photo, black & white, 1980. Dignitaries on dais next to Soldiers Institute Memorial Hall. L to R: Colonel Commandant COL J.L. Stedman (Retd), Commander 3MD BRIG Geoffrey Cohen AM, unidentified aide de camp, Brigadier Lawrence Fitzgerald OBE (Retd), Mayor – Councillor Paul Tomkinson, CAPT Don Maskew. .10) - Photo, black & white, 1980. Lithographic Squadron marches down Pall Mall towards the dais. L to R: CPL Josh Degroot, CPL Rhys De Laine, unidentified, SPR Per Andersen – right marker, MAJ Sam Schwartz US Exchange, CAPT Stan Vote, OC MAJ Robin Blackburn. .11) - Photo, black & white, 1980. Headquarters Squadron salutes on the march past the dais. L to R: CPL Cliff Webb, unidentified officer, SGT Bob Croxton, unidentified, SGT Syd Davis, CAPT Bob Cooper. .12) - Photo, black & white, 1980. 3rd MD Band marches down Pall Mall towards the dais. .13) - Photo, black & white, 1980. 3rd MD Band marches past the dais. L to R: Colonel Commandant COL J.L. Stedman (Retd), Commander 3MD BRIG Geoffrey Cohen AM, unidentified aide de camp, Brigadier Lawrence Fitzgerald OBE (Retd), Mayor – Councillor Paul Tomkinson, CAPT Don Maskew, unidentified officer. .14) - Photo, black & white, 1980. 3rd MD Band salutes on the march past the dais. L to R: unidentified aide de camp, Colonel Commandant COL J.L. Stedman (Retd), Commander 3MD BRIG Geoffrey Cohen AM, CAPT Don Maskew, Brigadier Lawrence Fitzgerald OBE (Retd), Mayor – Councillor Paul Tomkinson, unidentified officer. .15) - Photo, black & white, 1980. 3rd MD Band salutes on the march past the dais. L to R: Colonel Commandant COL J.L. Stedman (Retd), Commander 3MD BRIG Geoffrey Cohen AM, Mayor – Councillor Paul Tomkinson, CAPT Don Maskew. .16) - Photo, black & white, 1980. Squadrons march past the dais. .17) - Photo, black & white, 1980. Female Contingent salutes on the march past the dais. L to R: Colonel Commandant COL J.L. Stedman (Retd), Commander 3MD BRIG Geoffrey Cohen AM, CAPT Don Maskew, Brigadier Lawrence Fitzgerald OBE (Retd), Mayor – Councillor Paul Tomkinson. .18) - Photo, black & white, 1980. Female Contingent salutes on the march past the dais. L to R: SPR Scheryl Delforce, SPR Ilen Isaac, SPR Ginny (Turner) Rowe, SPR Cathy Regan, CPL Marrianne (Van De Zee) De Groot, SPR Gae (Robinson) Amato, SPR Megan (McBurney) Reynolds, SPR Sue (Fryer) Bottomley, SPR Le-anne (Smallshaw) Shirley, SPR Janet (Chopping) Justin, SPR Zoe (Lisiewich) Ames, unidentified saluting officer, L to R: Colonel Commandant COL J.L. Stedman (Retd), Commander 3MD BRIG Geoffrey Cohen AM. .19) - Photo, black & white, 1980. Cartographic Squadron led by CAPT Bob Roche salutes on the march past the dais. L to R: Colonel Commandant COL J.L. Stedman (Retd), Commander 3MD BRIG Geoffrey Cohen AM, CAPT Don Maskew, Brigadier Lawrence Fitzgerald OBE (Retd), Mayor – Councillor Paul Tomkinson. .20) & .21) - Photo, black & white, 1980. Air Survey Squadron salutes on the march past the dais. L to R: Colonel Commandant COL J.L. Stedman (Retd), Commander 3MD BRIG Geoffrey Cohen AM, CAPT Don Maskew, Brigadier Lawrence Fitzgerald OBE (Retd), Mayor – Councillor Paul Tomkinson.There are no personnel identified. royal australian survey corps, rasvy, army survey regiment, army svy regt, fortuna, asr -
Surrey Hills Historical Society Collection
Archive - Vertical file, Awards
A vertical file containing the following items regarding awards of various nature; all individuals having some local connection: 1. ‘Proudly humble retiree’, re Antonio Trivisonno paper and date unknown (1 page); and ‘OAM for seniors work’ Whitehorse Leader, 2.2.2011 (1 page). 2. ‘Antonio Trivisonno - enthusiasm for life’, SHNN, No. 170, Feb./March 2011 (1 page). 3. ‘Boroondara‘s Queen’s Birthday Honours list’, (re David Bottomley and William Swinson) Progress Leader, 14.6.2016 (1 page). 4. ‘Order of Australia awards’, (re David Kissane and John Payne) SHNN c. Feb. 2018 (1 page). 5. ‘Conservator honoured’, (re John Payne) Age ?, 26.1.2018 (1 page). 6. ‘Making world a better place’, (re David Kissane and others) Whitehorse Leader, 29.1.2018 (1 page). 7. ‘Honours for local people’, re Dr Hari Harayan Sinha and Stanley Bruce McKenzie, SHNN 44, Feb./March 1990 (1 page). 8. ‘Congratulations’, re Martin Culkin, Andrew Wall and Jean Jackson, SHNN No. 185 Aug./Sept. 2013 (1 page). 9. ‘A bloomin’ good life’, re Mr. Vivian Bennett, 1989 (source unknown), (1 page). 10. “Know your plants” medallist advises re Mr. Vivian Bennett, 1979 (source unknown), (1 page). 11. ‘Community contributions recognised’ re Caroline Carroll and Jack Ma, SHNN No. 188, Feb./March 2014 (2 pages). 12. Christopher Thorn, SHNN No. 206, Feb./March 2017 (1 page). 13. ‘Calculation is worth a medal’ re Prof. Kate Smith-Miles, Progress Leader, 23.11.2010 (1 page). 14. ‘Reward for dedicated work a dream once thought impossible for Caroline’, re Caroline Carroll, Progress Leader, 28.1.2014 (1 page). 15. ‘Community service – with a smile’, re Nina Buscombe, SHNN No. 92, Feb./March 1998 (1 page). 16. ‘Local resident awarded OAM’, re Charlie Wei Quan Xu, SHNN 225 April/May 2020 (1 page). 17. ‘David Winter, Whitehorse Citizen of the Year’, SHNN 230, Feb./March 2021 (1 page). 18. Gwen Smith Victorian Senior of the Year 2016, The Senior, November, 2016 (1 page). 19. ‘Local Traders win Oz awards!’ SHNN 142, June/July 2006 (1 page). 20. Centenary Medal Presentation 24.3.2003 at Ashwood Secondary College, 12 page booklet provided by Anna Burke, MP, Federal member for Chisholm. Note Elizabeth Meredith. 21. ‘Father of the Year!’ SHNN 138, October/November 2005 re Robert Moodie (1 page). 22. Burwood Bulletin Inc., Issue 159, Autumn 2021, re David Winter (3 sheets). 23. ‘Mont Albert Resident receives Order of Australia’, SHNN 158 re Dr. Rodney Arambewela (1 page). 24. ‘Citizen of the year 2000’, SHNN 106, June/July 2000 re Gert Rainey (1 page). 25. “’Best Friend’ award for Philip Crohn, SHNN 181, Dec. 2012/Jan./2013 (1 page). 26. ‘Surrey Hills Citizen of the Year 2002’, SHNN 118, June/July 2002 re Suzanna Henman (1 page). 27. ‘Bill Chandler awarded OAM’, SHNN 191, August/September, 2014 (1 page). 28. Kevin Donnelly AM, SHNN 206, February/March, 2017 (1 page). 29. ‘Just her cup of tea’, Progress Press, 1.5.2000. (1 page). 30. ‘Congratulations Greg Buchanan!’, SHNN No. 236, February, 2022 (1 page), and Citizenship Ceremony 26.1.2022. (A4 folded sheet). 31. ‘Meet our 2022 Citizens of the Year’, Boroondara Bulletin, March, 2022: Greg Buchanan, Rhea Werner and Belinda Battey (2 sheets). 32. ‘Order of Australia awards’: John Grace AO; Lesley (Pat) Farrant AM; Helen Buckingham OAM; Margaret Zacharin OAM; SHHN No. 215, August-September 2018 (1 page). 33. ‘It’s an Honour!’ Graeme Davison AM; Graham Bartle OAM; Stephen Dinham OAM; SHHN No. 173 August-September 2011 (1 page). 34. Mrs. Anne Patricia Murphy, awarded OAM, (no date), (1 page). 35. Citizen of the year 2023 Maxine Gross, Boroondara Bulletin, March, 2023 (1 page). 36. ‘Citizen of the year 2000’, Gert Rainey, SHNN No. 106, June/July 2000 (1 page). 37. ‘Arthur Tonkin Surrey Hills Citizen of the year 2001’, SHNN No. 112, June/July 2001 (1 page). 38. ‘Surrey Hills Citizen of the year 2001’, Suzanna Henman, SHNN No. 118, June/July 2002 (1 page). 39. ‘Surrey Hills Citizens of the year 2004’, Sue Barnett and Andrew White, SHNN No. 130, June/July 2004 (1 page). 40. ‘A creative and rich life’, Peter Hardham OAM, SHNN ? , June 2019 (1 page). 41. ‘Australia Day Honours’, Craig Kenny and Jillian Wright both OAM and of Mont Albert, SHNN No. 219, April/May 2019, (1 page). 42. Professor Marilyn Liddell, AM, Progress Press, Feb. 2010 (1 page). antonio trivisonno, david bottomley, william swinson, david kissane, dr hari harayan sinha, stanley bruce mckenzie, andrew wall, martin culkin, jean jackson, vivian bennett, caroline carroll, jack ma, christopher thorn, prof. kate smith-miles, nina buscombe, charlie wei quan xu, gwen smith, david winter, robert moodie, elizabeth meredith, rodney arambewela, philip crohn, suzanna henman, gert rainey, bill chandler, kevin donnelly, greg buchanan, rhea werner, belinda battey, john grace, lesley (pat) farrant, helen buckingham, margaret zacharin, graeme davison, graham bartle, stephen dinham, anne patricia murphy, maxine gross, arthur tonkin, peter hardham, andrew white, craig kenny, sue barnett, jillian wright, marilyn liddell, john payne -
 Melbourne Tram Museum
Album - Charles Craig - part 1 of 2, 1950s to 1970s
Photo - see pdf file for further information. Number Brief Description CC1 S178 at Elsternwick level crossing track works CC2 Building East Preston Depot 1955 CC3 Camberwell depot – post WW2 – lots of trams and a black cat CC4 W2 584 and SW6 958 northbound – Chapel St and Brighton Road CC5 W2 357 – southbound, Chapel St Brighton Road CC6 Pascoe Vale Road, Raceday working – note the signal CC7 The Preston Workshops - The Argus, post WW2, 223, 647 et al CC8 923 or is it 922 being built at Preston – The Argus photo - CC8A 832 being positioned onto trucks at Preston after an overhaul – Argus Photo – see also CC306 CC9 Footscray depot` CC10 W5 797 in St Kilda Road during track works – 1950s CC11 W2 457 at Kew Post Office CC12 Wellington Parade – W2 432, 492 and 337 – special event CC13 Swan St line up of trams – football? Or other special event – Sinclair’s bus on the right side. CC14 W2 630 being washed at a depot – The Argus photo CC15 Royal Park line at Flemington Road – W2 355 and W5 786 CC16 Nicholson St track construction from a tram cab CC17 T181 on tour at Gordon St CC18 T181 on Maribyrnong Bridge CC19 Ditto at River St just off bridge CC20 As for CC18 CC21 At Raleigh Rd CC22 T181 at Footscray depot CC23 Track construction, Nicholson, just north of Gertrude CC24 Commissioning overhead Bourke St tram 988 CC25 Queens Parade – 997 and 994 CC26 Swapping trolley wheel to skid – commissioning CC27 Track construction in Gertrude St CC28 985 in Queens Parade running special CC29 997 in Queens Parade CC30 1033 at North Fitzroy – AETA Special CC31 Bourke St at Elizabeth St – has passengers on board CC32 W6 985, 996 Queens Parade, Mk 3 bus 333 CC33 As above CC34 Showing construction at Nicholson & Gertrude – Bourke St CC35 W2 223 on Burnley temporary bridge – VR track expansion CC36 W5 823 – ditto CC37 Tram on old bridge prior to removal CC38 W2 433 on temporary bridge with new bridge beams and old track CC39 Looking down showing temporary single track – Swan St CC40 Tait train passing under tram bridge CC41 SW6 on single line – off loading CC42 W2 547 at City Road Junction CC43 City Road Jtn – 1969 – 596 and 771 CC44 City Road Jtn – 1969 – 596 and 771 (same as CC45 438 in Flinders St CC46 355 somewhere CC47 552 somewhere CC47A 364 at Preston Workshops? CC48 W2 334 on Traverser – Preston Workshops CC49 Wellington pade – large line up of trams, c1950 925, and 611 CC50 W2 493 Franklin st – advertising for Savings Certificates CC51 Possibly 551 with advertising for fund raising for Blind institute CC52 249 at Hawthorn – Riversdale Junction – with a Tally Ho and Village Fair Aux. board CC53 MMTB Postcard of 511 CC54 Wattle Park terminus with Single line warning sign CC55 Wattle Park Duplication CC56 36 at Domain Junction – 833 CC57 36 at Domain Junction CC58 36 at Domain Junction with 810 and 833 CC59 36 in Swanston by Flinders St Station CC60 36 in Spencer St at A’Beckett CC61 36 crossing Collins St CC62 36 crossing Collins St CC63 36 northbound in St Kilda Road with Shrine in background CC64 36 northbound in Swanston St at Flinders St CC65 Postcard – Ballarat 36 in Domain Road CC66 Postcard - Stampshow – Hawthorn Horse tram CC67 Postcard - Stampshow – Peace cable tram CC68 Postcard - 1041 and cable car set 1 at Preston CC69 Postcard - Colins & Elizabeth – greetings from old Melbourne CC70 Postcard - Cable car set at Preston CC71 Postcard - Twentyman’s cable cars CC72 Postcard - Nu-color-vue – horse tram 256 CC73 Cable car set – Market & Flinders CC74 Cable trams at Twentymans’ in their shed CC75 Cable tram track at Bourke & Spencer prior to removal CC76 Cable tram bogie at Preston Workshops – used as a dolly CC77 Cable trams at Twentymans’ CC78 Postcard - Valentines – Bourke looking west from Swanston CC79 Postcard - Rose 3938 – Bourke at Swanston – the Leviathan building CC80 Postcard - Valentines – Elizabeth St looking south from Collins – No. 19 CC81 Postcard - Rose P4765 – Bourke St Melbourne CC82 Postcard - Rose 4090 – cable tram passing Parliament house CC83 Postcard - Valentines – GPO Elizabeth St CC84 Interior of cable trailer with clothing on a set CC85 Elizabeth St looking north CC86 Cigarette card - Collins St No. 41- WD HO Wills CC87 Postcard - Rialto building with cable set CC88 Postcard - Valentines - Swanston at Flinders looking north CC89 CC90 Q 150 Hanna St – dated on rear CC91 176 turning – photo ex Alan Jungworth CC92 161 on Princes Bridge – minimum fare 4d sign and Inspector CC93 459 at Point Ormond CC94 158 at Gordon St – side on view CC95 X 217 in Swanston St CC96 X 217 in Swanston St with an East Brighton destination CC97 T177 CC98 T177 Peel St – no destination roll – being transferred? CC99 X1 462 in Glenhuntly Road to Point Ormond CC100 X1 462 in Glenhuntly Road to Elsternwick Rly Station CC101 X1 462 in Glenhuntly Road to Point Ormond CC102 Q 150 Hanna St CC103 190 at Camberwell Depot CC104 T182 at Footscray CC105 X1 466 and W2 at Footscray CC106 190 at Camberwell Depot CC107 X1 467 Barkly St Footscray CC108 X2 679 turning into William St from La Trobe St CC109 X2 677 Glenhuntly Road with Point Ormond Destination CC110 Postcard T180 CC111 Postcard format – X1 467 on a truck – see also CC178 CC112 Postcard format – X1 467 at Wantirna South CC113 Q200 and SW6 896 at Thornbury – has labels on rear CC114 T177, Ballarat Road – has labels on rear CC115 T178 at Point Ormond CC116 Postcard X1 465 and 466 CC117 Postcard – X2 676 CC118 Postcard – TMSV X2 217 CC119 810 on temporary bridging – 24-12-67 CC120 W2 575 – Queens Parade junction in, still temporary bridging, substation under construction CC121 Forming Queens Parade Junction base slab CC122 W2 596 prior to tramway works – all tracks still in position CC123 It’s a mass of reinforcing – bridging being formed CC124 Looking north with substation being built CC125 Looking east with some rather tight curves, Wellington St still in use CC126 SW6 958 ex Wellington St with all tracks and signal box and buildings. CC127 Victoria Pde at Gisborne looking east – at least 4 cars CC128 SW6 893? With dash canopy lights and SW6 862 and a man with a newspaper CC129 SW6 894 on the S curves, with tram in Wellington St CC130 Similar photo CC131 W2 564 turning into Wellington St – the concrete tracks are not that old CC132 W2 552 running out of Wellington St CC133 W5 732 from Fitzroy St into St Kilda Road with next iteration in position – very wonky CC134 W5 764 turning into Fitzroy St CC135 SW6 947 turning from Wellington St CC136 W2 586 running out of High St CC137 W2 500 turning into Wellington St CC138 W2 543 in Wellington St inbound CC139 L103 with St Kilda Junction destination, and a tower truck on right CC140 Workmen – new track in Queensway in use CC141 Ditto CC142 L103 in Queensway, and another car in bound CC143 Looking east along Wellington St which has been taken out of use. Also a MMTB Roller CC144 W5 824 and a W2 and all types of wobbly temporary track CC145 W2 354 to High St CC146 Sw6 947 on the S bends CC147 W2 500 looking north – tram on the S bends CC148 SW6 896 leaving the S bend CC149 W2 357 and a MMTB City bus with trees/gardens on the side CC150 W5 817 Elliot Ave – see also CC302 CC151 W2 552 – note the large trolley bridge CC152 W2 550 at depot or workshops CC153 1B truck CC154 SW2 432 CC155 W2 155 at Glenhuntly CC156 SW6 937 on AETA tour? CC157 X2 677 on Footscray service – Ballarat Rd? CC158 W2 641 – High St Kew? CC159 SW6 847 – Power St Hawthorn CC160 Simpson St – big line up CC161 W2 546 truck No. 1? CC162 W2s at Glenhuntly depot CC163 No. 15 truck under 899 CC164 206 and other junk at Preston Workshops CC165 W in Swanston St Melbourne – Rose series card CC166 Y1 613 Batman Ave?? or William St at Collins CC167 Tram plans CC168 X 217 Swanston St – see also 95 and 96 CC169 217 in Swanston St – same as 95 CC169A 192 in St Kilda Road at Princes bridge CC170 192 in St Kilda Road at Princes bridge CC171 Bendigo 3 arriving Malvern depot – being unloaded CC172 Ditto CC173 T180 at a depot CC174 X1 463 wheel set CC175 C30 – dog car side view – close up CC176 C30 dog car CC177 206 and 30 at Preston Workshops CC178 X1 467 on a truck – see CC111 also CC179 42 CC180 42 at a depot, no destination box CC181 W2 556 1A type truck CC182 Flinders St Station – Rose Series CC183 W7 1035 Spring – Nicholson St CC184 W7 1022 MMTB Post Card CC185 Adelaide 178 – has on rear – R. Lilburn 4/82 CC186 Adelaide 175 – has on rear – R. Lilburn 4/82 CC187 Y1 610 on AETA tour CC188 Y1 610 on AETA tour with large group – Point Ormond CC189 AETA display – has GH55-32 in pencil on rear CC190 AETA display – has GH55-29 in pencil on rear CC191 Y1 610 on AETA tour with large group – Point Ormond CC192 VR 53 at Footscray CC193 VR cars 40 and 34 at Elwood wash dock CC194 W7 1024 as the 1970 Christmas tram CC195 Geelong – loading a set of 22E trucks CC196 Geelong 10 and 23 running an AETA special CC197 Geelong – AETA special CC198 Geelong 7 at Junction CC199 Geelong 10, in the city CC200 Geelong 33 with Belmont destination CC201 Geelong 15 Eastern Park destination 29-3-1948 CC202 Geelong 23 at Railway Station – 29-3-1948 CC203 Geelong 23 at Railway Station – 29-3-1948 CC204 Geelong – loading a bogie tram CC205 Geelong – loading a bogie tram CC206 Geelong 40 – loaded on truck CC207 Geelong 40 – on jacks CC208 Geelong 40 on jacks – 19 behind CC209 Geelong 38 with two workers on either side CC210 – 214 Australian Historic Tramways stamp folder and set CC215 Bendigo 17 at depot – has dup JBS on rear CC216 Bendigo 20, 29 bogie and straight sill car at Charing Cross CC217 Bendigo one man bogie Pall Mall CC218 Bendigo – Bogie 23, other cars and welding truck at depot CC219 Bendigo 7 with Quarry Hill destination CC220 Bendigo 21 with Lake Weerona destination CC221 ESCo 18 Ballarat CC222 Ballarat bogie 22 on AETA special CC223 Ditto CC224 Ballarat 34 at Stones Corner – R Lilburn CC225 Ballarat 15 in Bridge St – R Lilburn CC226 Ballarat 40 at Gardens – R Lilburn CC227 Ballarat 37 running out of depot – R Lilburn CC228 Postcard – Valentines – Sturt St with loaded horse tram trailer CC229 AETA Geelong tram tour ticket – 29-3-1948 CC230 Postcard – Geelong – Valentine 2114 – T&G building CC231 Postcard – PMTT ! – High St Malvern CC232 Postcard – Empire – Glenferrie Road, Malvern at Wattletree Rd CC233 Postcard Y469, MMTB CC234 Postcard Z2 Spring St CC235 Postcard – Z1 MMTB CC236 Postcard – Stamp Show W1 431 CC237 Postcard – Stamp show B2005 CC238 Postcard – Stamp show W6 982 CC239 Postcard – Valentines 1264 – Johnstone Park with tram in distance CC240 Postcard – Rose 10711 – Swanston and Lonsdale – Hospital and W232 CC241 Postcard – Rose 4827 – Fitzroy St St Kilda W2 362 and 548 CC242 Postcard – Valentines – 939 – St Kilda War Memorial, W and a R? CC243 Postcard – Valentines – 572 – St Kilda War Memorial, W 413 and 140? CC244 Postcard – Valentines – 938 – Uper and Lower Esplanade – L 104 CC245 Postcard – St Kilda Rd at Princes Bridge Y1 and W CC246 Postcard – Biscay BG82 – W5 814 - CC247 Postcard – Biscay 796112 – Bourke St looking west CC248 Postcard – Biscay 796109 – Bourke St looking east CC249 Postcard – Biscay 2AUS58 – Z5 Bourke St CC250 Postcard – Biscay BG 249 – Swanston St CC251 Postcard – National View – St Kilda Rd – shrine and Prince Henrys W2 405 CC252 Postcard – Nu color vue – 11 ML 156 – St Kilda Rd CC253 Postcard – Nu color vue – 11 ML 153 – Swanston St CC254 Postcard – Nu Color vue – Collins St 442 CC255 Postcard – Pitt card – Adelaide – H 364 at Victoria St CC256 Postcard – SPER L/P 154 CC257 Postcard – BTMS – 550 CC258 Postcard – SPER – Brisbane 295 CC259 Adelaide 131 at Burnside – has R Lilburn on card, c1911 CC260 Adelaide 194 CC261 Adelaide 235, with two crew, The News photo CC262 Rockhampton, outside post office – has source of photo details CC263 Sydney – 2086 and 2062 arriving Circular Quay CC264 Sydney – P class – Pitt St? CC265 Sydney – 1610 at Circular Quay CC266 Brisbane 99 and 468 CC267 Sydney with bridge behind CC268 Steam tram Paramatta Park – 103 CC269 Sydney – Museum Station =- Elizabeth St CC270 Sydney – weed burner 137S at a loop Demonstrates the work of Charles Craig in photography and collection of prints.Assembled album in a black presentation folder of 270 photographs from the Charles Craig Collection - 86 sleeves - part 1 of 2. All photographs have been scanned and placed on the Museum's G drive. A list of all photographs with details where possible has been compiled. Victorian Provincial, Launceston, Hobart and Sydney tram photos have been transferred to other Museums, image files retained.melbourne, tramways, tramcars, trams, charles craig, st kilda junction, trackworks