Showing 2010 items
matching tram routes
-
 Melbourne Tram Museum
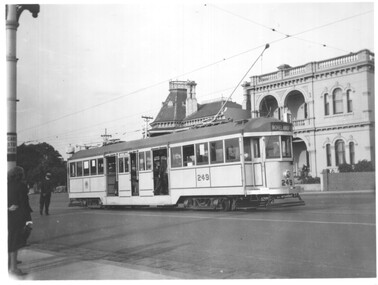
Photograph - Black and white - tram 249 Luna Park Jubilee and negative, 1938
Photograph of W2 249 painted in silver and blue for the silver Jubilee of Luna Park 1938. Tram has the destination of Moreland, route 15. The photo is taken at the intersection Fitzroy St and The Esplanade. There is a compulsory tram stop sign on the left side of the photo. Photo also in item 4601, TAP73. This view has not been cropped. Photo by either Peter Duckett or Ray Pearson. The tram is now owned by the Sydney Tramway Museum and was painted a burgundy colour to promote a heritage tram line in Canberra in 2001. See item 5602. Demonstrates a specially painted tram for a Luna Park event.Black and white photograph on Kodak Velox paper.trams, tramways, w2 class, tram 249, luna park, the esplandade -
 Melbourne Tram Museum
Photograph - Albert Road and Clarendon St South Melbourne, Bill Kingsley, 13/10/1971
Set of four black and white photos by Bill Kingsley of trams in South Melbourne: 1 - SW6 895 (Sth Melbourne & St Kilda Beach, Route 12) outbound in Albert Road. Tram has advertisements for Robo 2 min auto car wash, and Norton makes Bear Tape. 2 - W2 639 (Sth Melbourne & St Kilda Beach, Route 12) outbound in Albert Road. Tram has advertisements for Tolleys Brandy. In the background is the former South Melbourne Football ground. 3 - W5 773 (City-Brunswick St, route 12), turning from Albert Road into Clarendon St. Tram has advertisements for Sprint soft drink and HMV sound systems. 4 - Photo of Bill KIngsley's well-known VR Combi van.Yields information about the Albert Road tram servicesSet of four black and white photographs and associated 35mm negatives.Location on the rear of each print.trams, tramways, bill kingsley., albert road, clarendon st, route 12, sw6 class, w5 class, w2 class, tram 895, tram 639, tram 773, vr combi, south melbourne, south melbourne football ground -
 Melbourne Tram Museum
Negative - Copy - L 101 Balaclava Junction Hawthorn Road Caufield, early 1940s
Copy negative of a photograph of L 101 Balaclava Junction Hawthorn Road Caufield, with a destination of Glenhuntly Depot. The tram was fitted with a route number boxes in June 1939, which provides a date era for the tram, but is yet to have its drop centre floor raised. Behind the tram is the shelter at this location along with a sign stating the trams could be taken to Balaclava, St Kilda Beach and Caulfield, along with a tram stop sign and an End Section sign.Yields information about the use of L class trams.Copy negative of a black and white photographtramways, caulfield, l class, tram 101, hawthorn road, shelters, signs, trams -
 Melbourne Tram Museum
Negative - Copy - CW5 685 Hawthorn Road, Balaclava Junction, early to mid 1940s
... Junction Route 67. tram 685 Copy negative of a black and white ...Black and white photograph of CW5 685 in Hawthorn Road with Caulfield Park in the background, just before Balaclava Junction. Tram has white strips on the bumper and under the cab windows. Photo during the early to mid 1940's. Tram has an Auxiliary board "Via Dandenong Rd" and showing, Route 67. At the time, Route 67 ran from St Kilda ran from Balaclava Junction to St Kilda, Acland St via Dandenong Road. Ceased in 1955. See 3599 for a poor print.Yields information about the use of L class trams.Copy negative of a black and white photographtramcars, tramways, caulfield, hawthorn road, cw5 class, balaclava junction, route 67., tram 685 -
 Melbourne Tram Museum
Negative - Copy - W2 533 Balaclava Junction, late 1940s
... Copy negative of a photograph of W2 class tram 533 about... Junction W2 class tram 533 Route 69 Copy negative of a black ...Copy negative of a photograph of W2 class tram 533 about to do a right hand turn from Hawthorn Road into Balaclava Road, with a destination of St Kilda Beach via Balaclava Road, Route 69. Behind the tram is a sign stating the trams could be taken to Balaclava, St Kilda Beach and Caulfield, along with a tram stop sign and an End Section sign.Yields information about the use of W2 class tramsCopy negative of a black and white photographtramcars, tramways, caulfield, hawthorn road, signs, balaclava junction, w2 class, tram 533, route 69 -
 Ballarat Tramway Museum
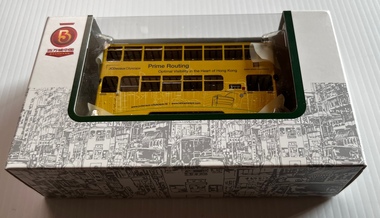
Model - Model Hong Kong double decker 45, Bachmann Models, c1990
Model of a Hong Kong double deck tram, No. 45 made by Bachmann models, China. Painted in an overall advertising scheme for Prime Routing for JCDecaux advertising.Demonstrates of a model of Hong Kong double decker tram.Model of Hong Kong double decker tram in cardboard box, clear plastic packaging, instruction sheets made fitted with a motorised bogie, trolley pole. Model shows seats and stairways on upper deck. HO Scale. Model is operable.models, tramcars, hong kong, bachmann models -
 Ballarat Tramway Museum
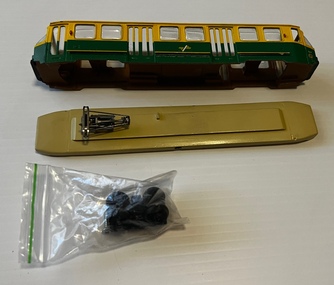
Model - Model Melbourne A class tram 276 - partly assembled, Weico Models
Model of a Melbourne A class tram, partly assembled with some parts in a plastic bag. Fitted with an operable pantograph. Painted Melbourne colours of green and cream with PTC logo and number 276 in black on the trolley pole retriever position showing the destination of Mont Albert, Route 42. Model built by Weico. Has drop centre seats and driver's seats, the two saloons are left empty for motors.Demonstrates a model that represented a successful Melbourne bogie tram.Model of Melbourne A class 276 - partly assembled with some parts in packing.models, tramcars, weico models, melbourne, a class, tram 276 -
 Melbourne Tram Museum
Photograph - Colour prints - last day of Hawthorn tram depot operations - set of 2, 14/2/1965
Set of two colour prints taken on the last day of operation, of the Hawthorn Tram depot as a running depot in the evening. The photographer is not known. Possibly a copy print. 1 - looking at operations in Wallen Road with W2 353 (Hawthorn route 27) returning to the depot and two W2s (possibly 330 and 332) shunting in Wallen Road. 2 - SW6 855 and SW6 848 are on roads 5 and 6 in the "new" shed at Hawthorn. The depot ceased as a running shed on 14/2/1965. Yields information about the last day of Hawthorn tram depot as a running depot.Set of two colour prints - printed on Kodak Royal paper.trams, tramways, sw6 class, w2 class, last day, hawthorn tram depot, wallen road, tram 353, tram 855, tram 848 -
 Melbourne Tram Museum
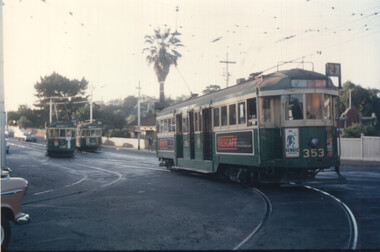
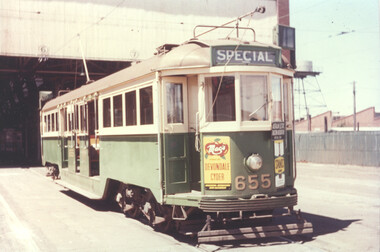
Photograph - Set of five colour prints - last day of Footscary - AETA tour, 10/2/1962
Colour prints show the trams used by the AETA (Australian Electric Traction Association) on 10/2/1962 to mark the closure of the local routes at Footscray. 1 - W3 655 at South Melbourne depot 2 - W3 655 shunting at Moonee Ponds Junction 3 - W4 670 followed by W3 655 crossing the Maribyrnong Road Bridge. 4 - The two trams at Footscray Station 5 - At Footscray tram depot with local cars. See item 3992 for other photographs. Yields information about the AETA tour to mark the closure of the Footscray local system. Set of five Colour print on Kodak Royal paper.trams, tramways, w3 class, w4 class, tram 655, tram 670, footscray, maribyrnong road, moonee ponds junction, south melbourne depot -
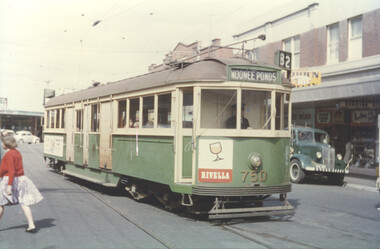 Melbourne Tram Museum
Photograph - Set of two photos - route 82 cars on the day of the closure of the Footscray local routes, 10/2/1962
... routes. trams tramways Ballarat Road Leeds St Footscray W5 class ...Colour prints showing two of the service cars running route 82 on the day of the closure of the Footscray local routes 10-2-1962: 1 - W5 750 (Moonee Ponds, route 82) at the Footscray terminus in Leeds St. 2 - VR 52 (Moonee Ponds, route 82) turning from Ballarat Road into Gordon St.Yields information about route 82 service cars on the day of the closure of the Footscray local routes. Set of two Colour print on Kodak Royal paper.trams, tramways, ballarat road, leeds st, footscray, w5 class, vr class, tram 52, tram 750 -
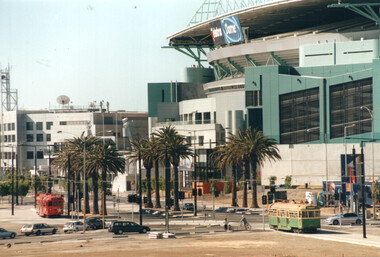
 Melbourne Tram Museum
Photograph - Colour print - City Circle tram - Docklands, Jan. 2003
... about the Melbourne City Circle tram route. trams tramways City ...Colour print showing a City Circle car fitted with trolley poles on the City Circle route in Harbour Esplanade with the Collins St bridge and Queens Warehouse in the background. This building now houses the Fox Classic car museum. Given the flagging on either side of the road, photo is probably soon after the opening of the section of the City Circle route in Jan. 2003.Yields information about the Melbourne City Circle tram route.Colour print on paper - Kodak Professional Papertrams, tramways, city circle, harbour esplanade, docklands melbourne -
 Melbourne Tram Museum
Photograph - Colour print - Harbour Esplanade - Docklands, Jan. 2003
Colour print showing two W class trams in Harbour Esplanade with the "Telstra Dome" in the background. Photo is probably soon after the opening of the section of the City Circle route in Jan. 2003.Yields information about the Melbourne Docklands.Colour print on paper - Kodak Professional papertrams, tramways, harbour esplanade, docklands melbourne, telstra dome, w class trams -
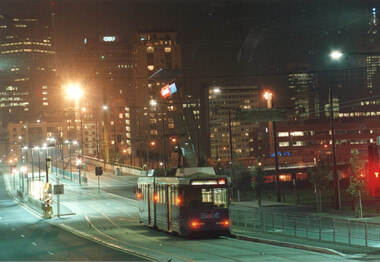 Melbourne Tram Museum
Photograph - Colour print - B class tram - La Trobe St bridge, c2000
Colour print showing a B class tram (Bundoora RMIT) reversing at the western end of the then new LaTrobe St bridge. This section of track was opened during March 2000 - see Reference.Yields information about the LaTrobe St bridge.Colour print on paper - Kodak Professional Papertrams, tramways, bundoora rmit, latrobe street, docklands melbourne, route 86, b class -
 Melbourne Tram Museum
Photograph - Colour print - Freight Car 17 at Hawthorn Depot, early 1965
Colour print showing Freight Car 17 on No. 1 Road at Hawthorn Depot prior to its closure as a running shed. The tram is advertising Sunkist Peas. Alongside the tram is W2 324 (Hawthorn Depot, Route 80) No. 17 was converted from NMETL No. 13 and this tram is now on display at the Museum. See Reference. Photo most likely taken shortly before the depot closed as a running shed. The depot ceased as a running shed on 14/2/1965. Yields information about the last days of Hawthorn tram depot as a running depot and the use of the Freight car.Colour print - printed on Kodak Royal paper.trams, tramways, w2 class, tram 17, tram 324, freight car, sunkist peas, mmtb, v class, hawthorn depot -
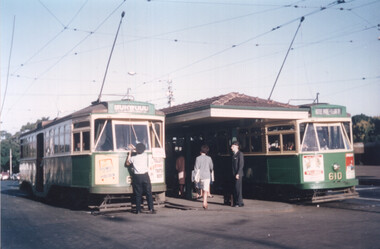 Melbourne Tram Museum
Photograph - Colour print - Y1 class trams - Batman Ave
... . trams tramways Batman Ave Y1 class tram 610 MMTB Route 70 Wattle ...Colour print showing two Y1 class trams at the Batman Ave terminus at Princes Bridge. The tram on the left has the destination of Burwood, with the driver attending to the pole. The tram on the right, Y1 610 has the destination of Wattle Park Elgar Road. Both these trams were based at Camberwell Depot during the 1960s and 1970s. Photo likely mid-1960s. Yields information about the use of the Y1 class trams during the 1960s.Colour print - printed on Kodak Royal paper.trams, tramways, batman ave, y1 class, tram 610, mmtb, route 70, wattle park -
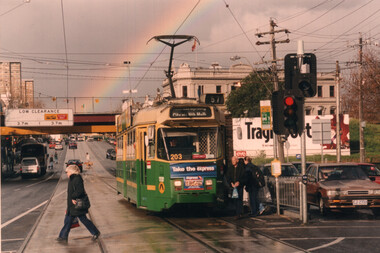 Melbourne Tram Museum
Photograph - Colour Print - Racecourse Road - Z3 203 with a rainbow
... . Yields information about the use of the use of Z3 trams on route ...Colour print of Z3 203 (Route 57) at the Newmarket Plaza shopping centre, stop in Racecourse Road. The tram is in The Met/PTC colour scheme. In the background are the Douta Galla Hotel, the Newmarket Station railway overbridge and a rainbow. Photo c2000.Yields information about the use of the use of Z3 trams on route 57.Colour print - printed on Kodak Professional paper.trams, tramways, z3 class, tram 203, racecourse road, newmarket, route 57 -
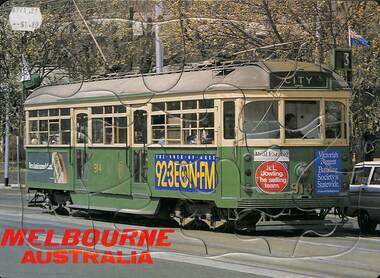 Melbourne Tram Museum
Souvenir - Jigsaw puzzle - tram SW6 914, 1970s
Sold as a souvenir of a Melbourne tram - 17 piece within a outer fixed part. Features SW6 914 (Route 3, City), MMTB colour scheme with adverts for VB Beer, 92.3 EON.FM, K L Dowling real estate and Statewide Building Society.Demonstrates souvenirs of Melbourne trams.Jigsaw puzzle - stamped featuring a photo of SW6 914, wrapped in a cellophane sheet. Has a label on rear "Made in Hong Kong" and a price label on the front "$1.80". Has "Melbourne Australia" printed in the bottom left hand corner.trams, tramways, jigsaw puzzle, souvenirs, melbourne, sw6 class, tram 914 -
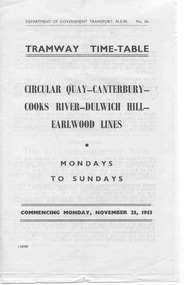 Ballarat Tramway Museum
Ephemera - Timetable, Dept of Government Transport - NSW, Sydney Tramway Timetable - 1953 Sydney, 1953 and 1954
Paper - black and white. Alterations on separate pieces of paper in the book - 5 pages. 120.1 - Tramway timetable for Circular Quay - Canterbury - Cooks Rivers - Dulwich Hill - Earlwood lines, 1953. 120.2 - Altered journey for route, Circular Quay - Cooks River line - 1954 120.3 - Altered journey - Dulwich Hill, Glebe Point, Balmain, Lilyfield and Darling St. wharf - Canterbury lines - 1954. 120.4 - Altered journey (on trail) Circular Quay and Darling St. wharf and Canterbury lines - 1954. 120.5 - Additional and altered journeys - Circular Quay and Darling St. wharf lines - 1954 120.6 - Tram time table for Circular Quay - North Bondi line (via Bellevue Hill) including running times, sections and fares - July 26 1954.sydney, timetables -
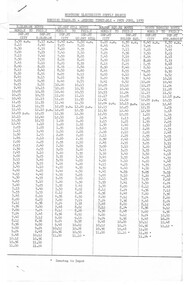 Ballarat Tramway Museum
Ephemera - Timetable/s, State Electricity Commission of Victoria (SECV), "Bendigo Tramways - amended Timetable", Jun. 1970
Set of Bendigo Tramway timetables. Each Two page Gestetner duplicated documents, stapled in the top left hand corner, providing weekday and weekend services for each route departing the city and the nominated route terminus. .1 - Issued 29/6/1970 - see images 1 and 2 .2 - issued 27/9/1971 - see image 3 and 4 .3 - issued 26/6/1970 - same as .1 - three copies held - three copies of SECV copies given to the BTPS at the time of closure. .4 - issued 29/6/1970 - different layout at heading and changes to the bottom of the second page - images 5 and 6. Yields information about Bendigo trams and their timetables for the various lines.Set of four SECV North Electricity Supply Branch timetables. 285.3 - each of three copies marked in ink - "BTPS No 502" in top right hand corner, with copy 1 having "408" crossed out.bendigo, secv, timetables, tram services -
 Ballarat Tramway Museum
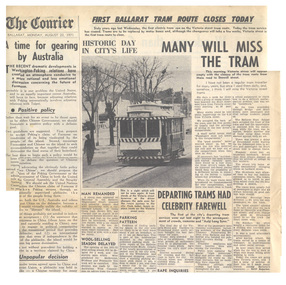
Newspaper, The Courier Ballarat, "Many will miss the Tram", "Departing Trams had Celebrity Farewell", 1971
Yields information about the closure of the SEC Ballarat system in particular the Victoria St line. Has a strong association with the article author.Set of two Newspaper clippings pasted onto a single sheet of paper with two Punch holes on the left hand side with one hole through the photograph within the cutting. Clipping from The Courier, Ballarat, Monday, 23/8/1971 (corrected date), of two items in the paper about the closure of the trams in Victoria St. The main item written by a staff reporter recalls the days of travelling regularly on the tram when a student going to and from school, Saturday travelling and as a means of transport. Second item in the same cutting reports on the closure of the Victoria St. route the previous day. Mentions the interest in the trams, the BTPS, and police protection that was not needed. Photograph accompanying the article is of a driver turning the pole at the Victoria St. terminus of tram No. 31. Second clipping, from The Courier, dated 8/9/1971, reports on a collection of historic tram photos in the Commonwealth Bank for the next two weeks, presented by the Tramway Museum Society of Victoria. 1068.2 - full page of The Courier, 23/8/1971, added 10/9/2013 and image added.In red ink in upper right hand corner, "21/8/71" of the first cutting and "8/9/71" in red ink in the top right hand corner of the second cuttingtrams, tramways, closure, victoria st., tmsv, displays -
 Ballarat Tramway Museum
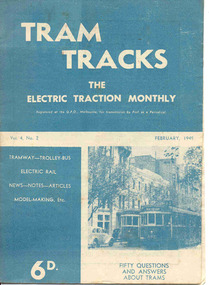
Magazine, Jack Richardson, "Tram Tracks - The Electric Traction Monthly", Feb. 1949 to August 1949
2467.1 - Vol. 4 No. 2, February 1949 of "Tram Tracks - The Electric Traction Monthly" of the Australian Electric Traction Association. Magazine consists of 16 printed pages with a 12 page supplement titled "Fifty Questions and Answers about trams in Australia". Has a single staple on the saddle. Incorporated within the magazine are articles or editorials on Tramways and Tramway Experts (Sydney and bus replacement), Interurban to St Kilda (conversion of VR St. Kilda line). General news items on Brisbane, Geelong, Launceston closure, Hobart, Bourke St routes, Perth, Adelaide, NSW, Christchurch, Overseas tramways and railways. Also has letters to the Editor, plans of a Birney tram for model makers and AETA Notes. Issue has advertisements for the Model Dockyard, ARLHS, The Hobby Shop, Barnes Tennis Centre, Fleet, Christie Model Railway Equipment of Sydney, Meadmore Model Engineering, Austral Bronze, Wattle Park, Traction Publications and Robilt "O" gauge locomotives. 2467.2 - Vol 4, No. 5 - May 1949 - 20 pages - red cover, 4th year, article by Peter Duckett with photos of Board members, "PCC Trucks here", MMTB advert for staff, news from Sydney, Newcastle, Melbourne (applications for new Chairman to replace Mr. Bell), Bendigo, Perth, Christchurch, Wellington, Wanganui, Bourke St construction work (photo of poles), Brisbane tramway history, map of CBD Melbourne, Melbourne and Sydney suburban railways, AETA News. 2467.3 - Vol 4, No. 6 - June 1949 - 16 pages - green pages, tramways and private cats, news from Sydney, Newcastle, Melbourne, Launceston, Hobart, article "Scrap Sydney Tams by 1960 - Newcastle this years say London experts", buses tackle football crowds (Sydney), Fremantle (Wal Jack letter), and Melbourne and Sydney suburban railways, AETA News. 2467.4 - Vol 4, No. 7 - July 1949 - 16 pages - tramways and the public, news from Sydney, Newcastle, Melbourne, appointment of R. Risson as new chairman, Perth, Adelaide, Launceston, tramcar solenoid brakes, National City Lines USA, and Melbourne and Sydney suburban railways, AETA News. 2467.5 - Vol 4, No. 8 - August 1949 - 8 pages - tramways and politics, photo of new points for Latrobe and William Sts, East Hills Line by C. C. Singleton, general tramway news, and advertisement for Robilt model railways. .2 to .4 added 15-2-2016 from the collection of Ian Stanley. .5 added 24-3-18 - from consolidation of Melbourne Tram Museum and BTM collections)trams, tramways, electric traction, aeta, australian tramways, mmtb, pcc, closure, sydney, newcastle, brisbane -
 Ballarat Tramway Museum
Ephemera - Timetable/s, State Electricity Commission of Victoria (SECV), "Official Time Table Bendigo June 1940", Jun. 1940
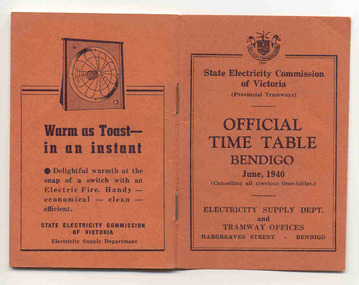
Centre pages show a map of the system and the sections. The extension to North Bendigo is yet to be constructed. Gives times for trams leaving the city or the terminals for the routes and for the Eaglehawk route, leaving Long Gully Bridge. Has four SECV Advertisements within the book for hot water, ovens - cookers, toasters and electric fan heaters. Three copies held. See item 5356 for a digital image of the same document with a photograph of Len Smith of Geelong loading a pram into a Birney tram.Provides details of 1940 tram services in Bendigo.Forty-page booklet, with orange lightweight covers, saddle-stapled, SECV Provincial Tramways with the title "Official Time Table Bendigo June 1940". Has address if Hargreaves St Bendigo on bottom of the cover. Two copies held.bendigo, timetables, secv -
 Ballarat Tramway Museum
Document - Manuscript, "Ballarat Tramways", 1950's
... History", five pages titled "Part 1 - Horse Trams - Ballarat 1887..., opening of the electric routes, (conversion of horse trams ...Each copy consists of a chapter, one page titled "Early History", five pages titled "Part 1 - Horse Trams - Ballarat 1887 - 1905, Sebastopol 1893 - 1912, Ballarat East Nil" Notes on the construction of the tramway, opening, personalities, Julien Battery tram, and half a page titled "Bits of Interest". The 3rd chapter, 3 pages, titled "Part 2 - Electric Trams - Ballarat 1905, Ballarat East, Sebastopol 1912". Notes the early power supply history in Ballarat, opening of the electric routes, (conversion of horse trams to electric), and the purchase of new trams ex Melbourne 1930. Chapter ends with 3 short paragraphs notes on the SEC taking over, Conductresses during the war and reconstruction. Author - unknown - possibly the SEC, Les Denmead and others - notes the scrubber car still in service in 1969? See also item 106 and 6419 for similar documents.Yields detailed information about the history of Ballarat's tramways.Three copies of a typed manuscript titled "Ballarat Tramways" - 18 foolscap pages. Each document has been typed, 1.5 line spacing on foolscap paper, 2nd and 3rd copies are carbon copies.On front cover of copy 1 hand written in black ink "BTPS No. 419". Copy 3 has "Incomplete" on the top right hand corner.trams, tramways, manuscript, ballarat tramways, ballarat, horse trams, esco, statistics -
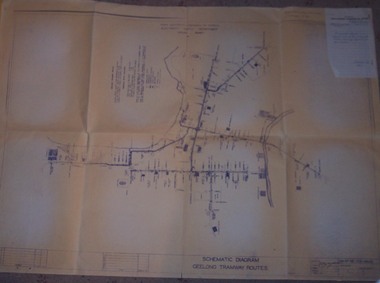 Ballarat Tramway Museum
Drawing, State Electricity Commission of Victoria (SECV), "Schematic Diagram Geelong Tramway Routes", 1953
The drawing is very detailed showing streets, cross streets, route, loops, schools, woollen mills, ovals, sections, track phones, stops, route and track miles, pedestrian crossings, railway stations and notes on through route mileages.Print of a drawing showing in very good detail, the schematic layout of the Geelong Tram system. Produced in 1953 and sent to Tramway Supt. in 1970 for his records. Gives very detailed information on another SEC tramway system.Dyeline print of SEC Drawing No. GE-T13-8829, titled "Schematic Diagram Geelong Tramway Routes". Drawing prepared 27/8/1953. Stapled to the top right hand corner of the sheet is a SEC memo form from finance section, distribution services to the Dept. Tramway Superintendent, Ballarat, dated 6-2-1970 forwarding Les Denmead the plan. Was unstapled during the 1/2008 copying of the drawing. On top right hand corner of drawing, "Ballarat Tramway Preservation Society Catalogue No. 605" in ink and on rear in two places "Geelong Tramways" and one "BTPS 605"geelong, map, track layout, tram stops -
 Ballarat Tramway Museum
Document - Manuscript, State Electricity Commission of Victoria (SECV), "Geelong Tramways Early History", 1960s
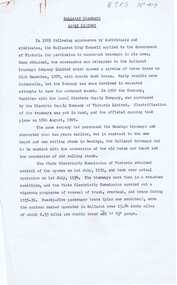
Consists of formation history, track and route dates, operator, SEC takeover and route lengths. Three pages of statistics - Income, Expenditure and loss 1935 to 1936, - includes car miles., operational statistics, expenditure breakdown of the SEC era. The last three years of operational statistics have been filled in by hand. Probably prepared late 1960's by Les Denmead (assumption here - See Reg item 3289 and 3483 for Bendigo version)Yields historical notes and statistics on the Geelong Tramway system - the statistical information being the most important. Shows the financial situation of the Geelong system was never satisfactory.Four sets - original and three copies - foolscap typed documents, five pages each, titled "Geelong Tramways Early History". 'BTPS 402" in top right hand corner.trams, tramways, geelong, sec, mesco, history, statistics -
 Ballarat Tramway Museum
Photograph - Digital image, Peter Bruce, "No. 11 Mt Pleasant", 1970s
... the Mt Pleasant route and Barkly St. Trams tramways Barkly St Mt ...Yields information about the Mt Pleasant route and Barkly St.Digital image, black and white, of No. 11 in Barkly St, out bound to Mt Pleasant. Tram has a Twin Lakes sign. Photo taken by Peter Bruce 1970's and 1971, prior to the closure of the Ballarat tramway system. Peter's Title of image: "No. 11 Mt Pleasant" trams, tramways, barkly st, mt pleasant, tram 11 -
 Ballarat Tramway Museum
Photograph - Digital image, Peter Bruce, "No. 11 Setting down.", 1970s
... the Mt Pleasant route and Barkly St. Trams tramways Barkly St Mt ...Yields information about the Mt Pleasant route and Barkly St.Digital image, black and white, of No. 11 in Barkly St, out bound to Mt Pleasant setting down passengers. Tram has a Twin Lakes sign. Mini Minor motor car in the front of the tramcar. Photo taken by Peter Bruce 1970's and 1971, prior to the closure of the Ballarat tramway system. Peter's Title of image: "No. 11 Setting down."trams, tramways, barkly st, mt pleasant, tram 11 -
 Ballarat Tramway Museum
Photograph - Digital image, Peter Bruce, "No. 14 Sturt", 1970s
... of the Victoria St route.. Trams tramways Sturt St Victoria St tram 14 ...Yields information about Sturt St between Lydiard St and Grenville St, part of the Victoria St route..Digital image, black and white, of No 14 descending the Sturt St hill to Grenville St, enroute to Victoria St. Photo taken by Peter Bruce 1970's and 1971, prior to the closure of the Ballarat tramway system. Peter's Title of image: "No. 14 Sturt"trams, tramways, sturt st, victoria st, tram 14 -
 Ballarat Tramway Museum
Photograph - Digital image, Peter Bruce, "No. 26 Sturt and Grenville", 1970s
... the bottom end of Sturt St and the Victoria St route. Trams tramways ...Yields information about the bottom end of Sturt St and the Victoria St route.Digital image, black and white, of No. 26, at the bottom of the Sturt St hill prior to crossing Grenville St, enroute to Victoria St. Note the conductor talking to the driver. Owen Williams, ANZ and Crockers in the view. Photo taken by Peter Bruce 1970's and 1971, prior to the closure of the Ballarat tramway system. Peter's Title of image: "No. 26 Sturt and Grenville"trams, tramways, sturt st, grenville st, victoria st, tram 26 -
 Ballarat Tramway Museum
Photograph - Digital image Set of 3, Peter Bruce, "No. 32 Lydiard St North", 1970s
... the Lydiard St North Route, and the landscape. Trams tramways Lydiard ...Yields information about the Lydiard St North Route, and the landscape.Digital image, black and white, set of three images of No. 32 in Lydiard St North, taken with a telephoto lens at various locations. Photo taken by Peter Bruce 1970's and 1971, prior to the closure of the Ballarat tramway system. Peter's Title of image: "No. 32 Lydiard St North"trams, tramways, lydiard st north, tram 32