Showing 2063 items
matching loops
-
 Glenelg Shire Council Cultural Collection
Functional object - Life Buoy, n.d
Purchased by Glenelg Shire from Kurtze's Museum. The Casino commenced West Coast Trade in 1882 after being purchased by the Belfast and Koroit Steam Navigation Co. The Casino came to an end in 10.7.1932 when it rolled over and sank at Apollo Bay. Casino built at Dundee Scotland 425 reg. tons.Life buoy, circular ring, canvas covered cork, rope loop fixed to 4 points on the outside edge. Painted white "SS CASINO" and "PORT FAIRY" lettered in black. 2 images of flags painted opposite sides of the 'front' of buoy. Ex SS CASINO wrecked 10.7.1932.Front: 'SS Casino' 'Port Fairy' Back: - -
Glenelg Shire Council Cultural Collection
Costume - Sash - Ancient Order of Foresters, n.d
Plain green sash, maroon fringe either end. Small maroon ribbon sewn to edge of sash, 2 pieces, each one about 1/4 of the way along and tied together to form a loop in the sash, enabling it to be slipped over head and shoulder. * JB embroidered in yellow -
Port Melbourne Historical & Preservation Society
Accessory - Wedding accessories, Good luck charm, Family and friends of Barbara Gardiner, 1958
Bridal good luck charms made by family and friends to be worn by Barbara GARDINER nee HEGARTY at her wedding. See 4007 for full detail.Seven bridal good luck charms with ribbon loops, to be worn on bride's wrist. Shoe shaped charm, white satin over card with white wax flowers, white bow and white braided trim. Handwritten on back in pen" All our love, Auintie Maya and Uncle Ernie"celebrations fetes and exhibitions, domestic life, costume, handcrafts, weddings, barbara gardiner nee hegarty, alice hegarty nee mott, robert (bob) gardiner -
 National Vietnam Veterans Museum (NVVM)
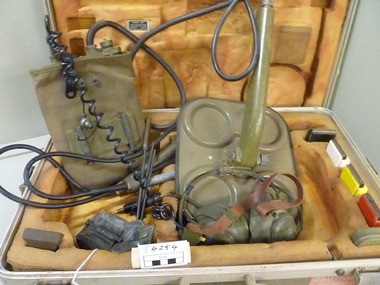
Equipment - Mine detecting set
Green detecting set - Comprising of : Metal Case.Square detecting plate / Coil / loop; Detector wand battery pack and insert, detector unit earphones,spare amplifiers. Tin w/spare ear pins.Battery pack no Batteries Detector unit cover, probe assembly.Lithium button cells - removed.Detecting Set mine, model P 158. Serial Number 9686, Purchase order CB / 94236,MFR Name Polan Industries inc.FSN 6665 - 966-9071. Insert top /FSN 6665-991-0012 /Detecting set mine /Group 1 /size 15 /MFG Part NO COO- 0309 US property 6665-00-966-9871 Red caution sign on bottom.detecting set. -
 Bendigo Historical Society Inc.
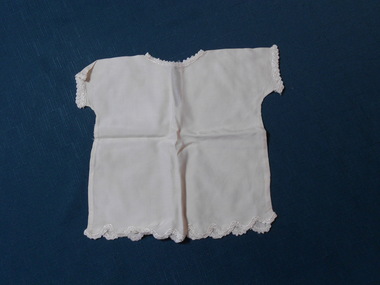
Clothing - COTTON BABY'S DRESS
Cream coloured cotton baby's dress. Cut in one piece. No shoulder seams. Two side seams. Back opening with 6cm split. Fastened with one button and loop. Cap sleeves. Scoop neckline. Hand crocheted trim on neckline, arm openings and around hemline. Hand made.costume accessories, children's, baby's dress -
 Dandenong/Cranbourne RSL Sub Branch
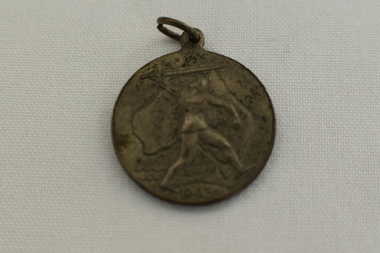
Medal - Victory Medal 1945
Circular Medal with suspension loop. The front of the medal shows a Knight with sword in front of an outline of Australia &1945, The back shows a map of the southern hemisphere showing Australia, Antarctica, New Zealand, South America & South Africa. At the top has words Victory Medal and the bottom manufacturers marking,Victory Medal 1945 -
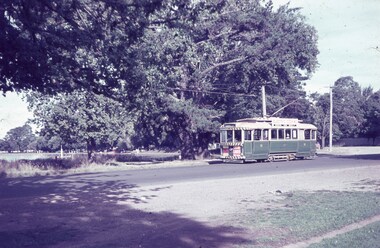
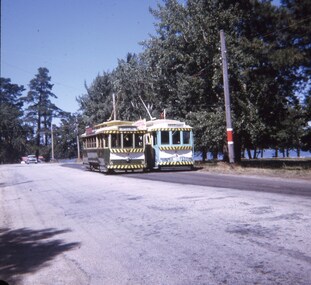
 Ballarat Tramway Museum
Negative - Set of 3, Campbell Duncan, 2/07/1971 12:00:00 AM
Yields information about tram operations and the street views in Wendouree Parade near Barrett Ave and Carlton St.Set of 3 photographs taken on 28/2/1971 by Campbell Duncan of trams in Wendouree Parade. .1 - No. 26 in bound to Victoria St in Wendouree Parade, near Barrett Ave. .2 - ditto .3 - No. 27 (Mt Pleasant) and No. 32 (Victoria St) crossing at the Carlton St Loop.trams, tramways, wendouree parade, carlton st loop, barrett ave, tram 26 tram 32 tram 27 -
 Ballarat Tramway Museum
Slide - 35mm slide/s, Keith Caldwell, 16/03/1963 12:00:00 AM
Yields information about the appearance of Wendouree Parade near Carlton St and tram operations.Agfa colour slide, white cardboard mount, photo by Keith Caldwell on 16/3/1963 of: Tram 17 heading to the Gardens in Wendouree Parade nearing the Carlton St Loop. Tram has a Twin Lake and a Dancing advertisement on the front dash panel and an Electric Cooking roof advertisement.In ink "16.3.63"tramways, trams, wendouree parade, carlton st loop, tram 17 -
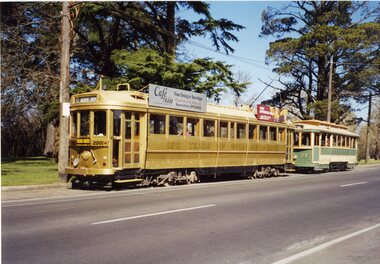 Ballarat Tramway Museum
Photograph - Colour Photograph/s - set of 3, Austin Brehaut, 22/09/2003 12:00:00 AM
Set of three colour prints photographs taken by Austin Brehaut on 22/9/2003 on Kodak paper during the first run or test run of No. 27 in Wendouree Parade following a truck overhaul. 2258.1 - No. 45 and 27 at Carlton St. 2258.2 - ditto at Gardens Loop 2258.3 - dittoOn rear of each photo in blue ink are details of the photograph, location, tramcar numbers and photographer.testing, wendouree parade, btm, tram 27, tram 45 -
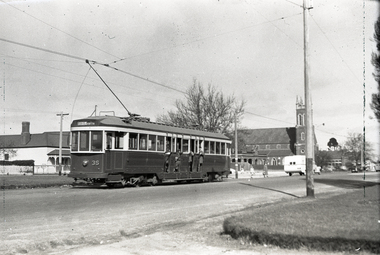
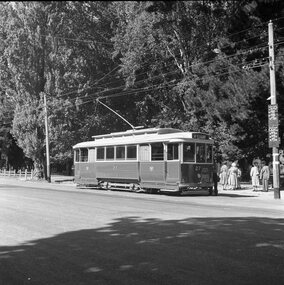 Ballarat Tramway Museum
Photograph - Black & White Photograph/s, 1950s
Yields information about the appearance of one of Ballarat tramcars. No. 27 during the mid 1950's and Gardens Loop.Black and white photograph of Ballarat No. 27 South bound in Wendouree Parade, Gardens Loop, 1950's. No details of photographer. Tram has the destination of Mt Pleasant and a Briquettes advertisement on the front dash panel. Original negative scanned at hi res and image updated 1/6/2020.tramways, trams, wendouree parade, gardens loop, tram 27 -
 Ballarat Tramway Museum
Photograph - Black & White Photograph/s, Ballarat 19 Sturt St, late 1950's or early 1960
Black and White photograph, of Ballarat No. 19, late 1950's or early 1960 in the City Loop in Sturt St. Has the median strip in the background. Tram has a roof advertisement for Castrol motor oil. Printed on Fuji-colour paper. 2nd copy added 6/1/15."TMSV Sales" stamp on rear. On rear of 2nd copy - P&M & MM J76 = BALL 19 = Bend 7.tramways, trams, sturt st, city loop, tram 19 -
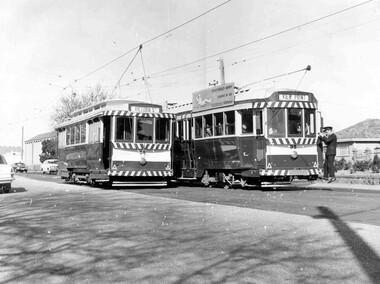 Ballarat Tramway Museum
Photograph - Black & White Photograph/s, John Phillips, late 1960's
Black and white print of bogie tram No.35 and 28 crossing at the King St. Loop, late 1960's. No. 28 has destination of Victoria St and No. 35, View Point and a SEC roof advertisement. "Everything's under control in my all-electric kitchen". Photo by John Phillips. tramways, trams, king st, victoria st, tram 28, tram 35 -
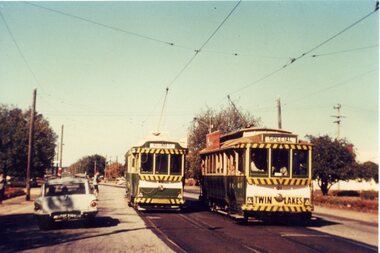 Ballarat Tramway Museum
Postcard, Ron Scholten, SEC Ballarat No. 40, Victoria St
Colour photograph, printed on a postcard back format of SEC Ballarat No. 40 crossing No. 21 at the King St. loop. No. 40 outward bound, with destination of Victoria St, and No. 21, showing Special - tram tour. No. 21 has a yellow background Twin Lakes sign on front dash panel.trams, tramways, king st, victoria st, tram 41, tram 42 -
 Ballarat Tramway Museum
Negative, Travis Jeffrey, 17/06/1962 12:00:00 AM
Colour Negative No. N398, of Bendigo Birney No. 28 at a loop on the Eaglehawk line. Tram has the destination of Eaglehawk. Photo possibly 17/6/1962. Colour laser printed copy of image stored in box 73. Image scanned at hi res 27/5/2020 and image updated.In red pen on folder that contained negative, "NR74B" and "17 Jun 62". trams, tramways, bendigo, eaglehawk, tram 28 -
 Ballarat Tramway Museum
Negative, Travis Jeffrey, 17/06/1962 12:00:00 AM
Colour Negative No. N399, of Bendigo Birney No. 28 at a loop on the Eaglehawk line. Tram has the destination of Eaglehawk. Photo possibly 17/6/1962. Colour laser printed copy of image stored in box 73. Image scanned at hi res 27/5/2020 and image updated.In red pen on folder that contained negative, "NR73B" and "17 Jun 62". trams, tramways, bendigo, eaglehawk, tram 28 -
 Ballarat Tramway Museum
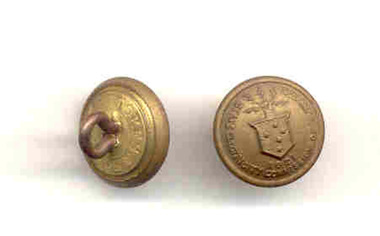
Uniform - Cap Button/s, Stokes & Sons Melbourne, 1960's
Demonstrates the manufacture of uniform items and their use in uniforms for tramway crews in Ballarat.Four No. brass SEC buttons, small, used in caps to retain the cap band (plastic - See Reg Item 4451). Made with three parts, front pressing, base and loop. Front is the SEC logo, back has the manufacturers name stamped in, "Stokes Sons" (Stokes and Sons Melbourne).tramways, trams, sec, cap, uniforms, buttons -
 Otway Districts Historical Society
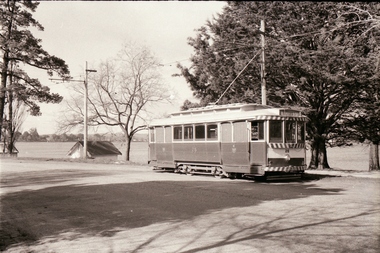
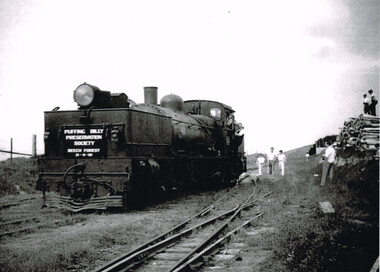
Photograph, Ray Jude, Beech Forest: engine leaving balloon loop, 1959, 21 November 1959
B/W. Engine G41, showing the sign "Puffing Billy Preservation Society, Beech Forest, 21-11-59", leaves the balloon loop at Beech Forest Railway Station, with guard and child hanging from the engine. A number of people are in the area, particularly two on top of a stack of timber. beech forest; railways; -
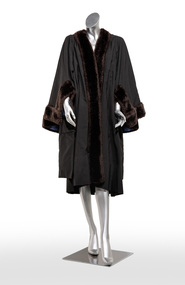 Bayside Gallery - Bayside City Council Art & Heritage Collection
Ceremonial object - Robe, R.W. Bredin & Son, City of Brighton Mayoral Robe
Knee length black mayoral ceremonial robe with centre front opening. Black wool with dark brown faux fur edging on centre front opening and cuffs. Blue silk lining in sleeves. Gathered/puckered at back and fur collar connected to back with black plastic button and loop.city of brighton, mayoral robe, robe, ceremonial wear, r.w. bredin & son, raymond w. bredin, brighton, mayor, bayside, mayoral regalia -
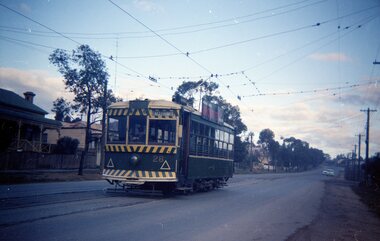
 Ballarat Tramway Museum
Slide - 27 mm sq slide/s, Andrew Howlett, Trams crossing at Barrett Ave or Depot Loop, Feb 1969?
Yields information about Wendouree Parade at the depot loop and the Begonia Festival tram of 1969 and a special tram service.Colour slide, Kodak white cardboard mount, developed Mar 1969 of No. 26 eastbound crossing Begonia Festival Showboat tram No. 21 at the Barrett Ave or Depot Loop. No. 26 is running a Special. One of a series of tour photos - see Reg item 7667, 7668, 7683 and 7701.ballarat, tramways, trams, wendouree parade, decorated trams, begonia festival, depot loop, barrett ave, tram 26, tram 21 -
 Ballarat Tramway Museum
Negative, Wal Jack, mid 1950's
Yields information about tram services on the Victoria St line and passengers.Negative and Digital images of the Wal Jack Ballarat Negative file of No. 35 inbound in Victoria St, at the King St loop picking up passengers at the tram stop. Tram has the destination of Gardens via Sturt St West. In the background is St Alipius church. mid 1950'strams, tramways, victoria st, king st, passengers, tram stop -
Ballarat Tramway Museum
Banner - BTPS open for inspection, c1972
Painted on white linen, banner used during early days of BTPS at new depot site. Has words "Ballarat Tramway Preservation Society" in red paint, "OPEN" in red paint & "For inspection" in black paint. Also has yellow paint areas, has cloth loops in corners.tramways, trams, btps, banner, depot -
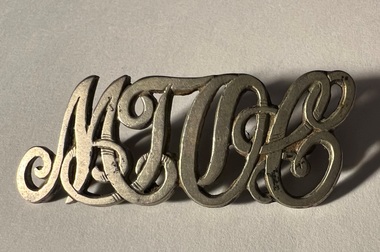 Ballarat Tramway Museum
Badge - MTOCo lapel, 1900s
Lapel Badge for the Melbourne Tramway and Omnibus Co. staff. Has an abbreviation of "MTOCo" to indicate the tramway operator and worn as part of their uniform. Made by Stokes & Sons Melboune.Demonstrates a item worn on a MTOCo Uniform.Made from a cast brass item, nickel plated, cast in the form of handwritten or script letters. On the rear, silver soldered on are two brass loops at either end of the badge to enable the badge to be sewn or fitted with clips onto the cap or the uniform. Has the name of Stokes & Sons stamped into the rear.trams, tramways, uniforms, cable trams, mtoco -
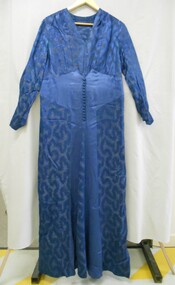 Bendigo Historical Society Inc.
Clothing - HELEN MUSK COLLECTION: BLUE SILK DRESS. PART OF A TWO PIECE ENSEMBLE
Floor length dress of royal blue silk fabric with a metallic thread forming a tinsel like pattern. There is a V neck at front with a high round neck at the back. The bodice front is made from two pieces with a centre seam. The bodice is attached to midriff panel of royal blue satin. At the front the bodice is gathered slightly onto the panel with a V shape at t centre front of the panel. At the hip line centre front the midriff panel narrows and then widens and the panel extends to the hem. The centre panel is divided and has a godet insert in the centre. Fifteen decorative fabric covered buttons with roulette loops are attached at centre of midriff panel. The back of the bodice is one piece is gathered slightly into a high waisted skirt made up of four gored pieces. The side opening (21 cm) at the waist on the LHS has three metal hooks with cotton loops and two press studs. The long sleeves are set in with lily point finish at the wrist. The underside of the sleeve at the wrist has ten decorative fabric covered buttons with roulette loops. Machine and hand stitched.costume, female daywear, blue silk dress -
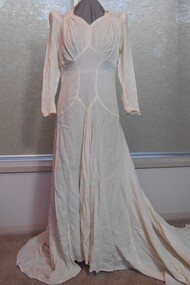 Bendigo Historical Society Inc.
Clothing - CREAM WEDDING DRESS WITH EXTENDED TRAIN, 1930's
Long lily-pointed sleeves, fastened at the wrist with six X 0ne cm covered buttons and loops. A firm padded roll 19cm long, and eleven cm circumference sits at the shoulder at top of sleeve. A gathered panel on either side of the neckline forms a sweetheart neckline. Gathering under the bust, and a A shaped centre front panel - with V shape at lower edge-panel 33cm long. Two semi-circular panels 28 X 19cm from side seam to the centre front, and defining the shape of the peaked centre panel. A small inverted pleat comes from th ebottom peak of the centre panel. Skirt is circular and extends into a sweeping train.29 covered buttons with loops extend from the back neckline to the curved join at the hipline of bodice and skirt. A one cm band of fabric has been machine stitched around the hemline, and hand rolled and hand stitched to give weight and finish at the hemline. Two X 2.5cm loops, hand stitched are at the left and right sides, to slip over the fingers to hold the train above the ground.costume, female, cream wedding dress with extended train -
 Ballarat Tramway Museum
Slide - 27 mm sq slide/s - set of 11, Lilian Butler, Wendouree Parade and Sturt St West, Sep. 1971
Yields information about the streetscapes of Ballarat depot to Pleasant St route and in particular buildings and people that crewed the trams.Set of eleven Colour 27 x 27 mm slide in a Kodachrome cardboard mount. .1 - Wendouree Parade looking west towards St Aidans Drive - the gate pillars can be seen. .2 - ditto looking west - Fairyland .3 - ditto looking towards Gardens Loop .4 - No. 41 at Gardens Loop, with destination of Gardens via Drummond North .5 - ditto showing Mt Pleasant .6 - ditto, just past the now BTM Depot Junction. .7 - Carlton St - showing the gates .8 - Looking towards Hamilton Ave from within Carlton St loop with the signal showing red. .9 - Turning from Hamilton Ave into Sturt St West. .10 - Sturt St west looking east with the Loreto convent walls on the left hand side. .11 - Sturt St - Pleasant St intersection - showing road surface, a tram coming towards the intersection and buildings on either side. Slide mount date September 1971. Photo from the collection of Lilian Butler.ballarat, tramways, trams, wendouree parade, st aidans drive, gardens loop, depot junction, carlton st, carlton st loop, signals, sturt st west, pleasant st, tram 41 -
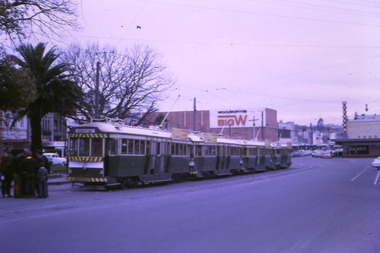 Ballarat Tramway Museum
Photograph - Digital image Set of 7, Tony Smith, 19/09/1971 12:00:00 AM
Yields information about Ballarat Tramways and trams prior to the closure of the tramway system.Set of 7 digital images of Ballarat trams prior to closure, scanned from original slides by Tony Smith, 1971 prior to closure of the system. This set of slides appears to be the last day of operations - 19/9/1971 .1 - Four bogie trams parked in city loop with Woolworth's Big W and Dickins in the background. Not well focused. first tram 37 - see Reg Item 6158.6. .2 - 42 at Sturt and Lydiard St, north side, night photo with crew standing by the tram stop sign. Has the post office in the background. .3 - bogie tram at the south side, night photo, has the Commonwealth Bank in the background. .4 - 39 (at the rear of the four bogie trams parked in the City loop), night photo, looking west. .5 - 42 at Sebastopol terminus with the Royal Mail Hotel in the background - night photo. .6 - bogie tram and 39 parked in the city loop - two have now departed. Has Dickins, Gear Chemist and Edments Hartleys stores in the background. .7 - 34 at Sturt and Lydiard St north side.trams, tramways, closure, night photo, city loop, post office, tram 37, tram 42, tram 39, tram 34 -
 Ballarat Tramway Museum
Photograph - Digital image Set of 25, Warren Doubleday, 26/12/2004 12:00:00 AM
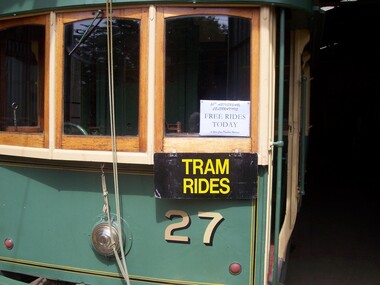
Set of 21 Digital Images of the recommencement or reopening of tram services following the reconstruction of the power supply and substation on 26/12/2004. .1 - Sign announcing free rides today in the front of No. 27 .2 - Peter Winspur and Garry Wood showing Peter the process for turning the power on .3 - ditto .4 - closing the Circuit Breaker .5 - 27 runs across Wendouree Parade .6 - 27 leaves the depot .7 - Peter Winspur removes the sign on the pole saying we were not running .8 - 27 in Wendouree Parade .9 - Carolyn Cleak removing a sign .10 - Placing signs and turning the pole at Carlton St .11 - Carlton St and waiting passengers .12 - Pole sign and bicycle warning sign re tram tracks .13 - Sam Boon and band at Gardens Loop .14 - ditto .15 - ditto .16 - Happy passengers .17 - Richard Gilbert - reopening speech. .18 - No. 26 and happy passengers .19 - 27 and 26 at the loop .20 - No. 26 at the loop, with passengers and the band. .21 - as for 19trams, tramways, btm, substation, wendouree parade, reopening, carlton st, gardens loop, tram 27, tram 26 -
 Flagstaff Hill Maritime Museum and Village
Container - Surgical Instrument Case, mid 20th century
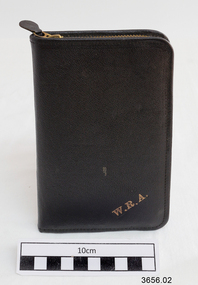
This surgical instrument case belonged to Dr. W.R. Angus, who had many portable medical and surgical sets in his possession. The case was donated to Flagstaff Hill Maritime Village by the family of Doctor William Roy Angus, Surgeon and Oculist. It is part of the “W.R. Angus Collection” that includes historical medical equipment, surgical instruments and material once belonging to Dr Edward Ryan and Dr Thomas Francis Ryan, (both of Nhill, Victoria) as well as Dr Angus’ own belongings. The Collection’s history spans the medical practices of the two Doctors Ryan, from 1885-1926 plus that of Dr Angus, up until 1969. ABOUT THE “W.R.ANGUS COLLECTION” Doctor William Roy Angus M.B., B.S., Adel., 1923, F.R.C.S. Edin.,1928 (also known as Dr Roy Angus) was born in Murrumbeena, Victoria in 1901 and lived until 1970. He qualified as a doctor in 1923 at University of Adelaide, was Resident Medical Officer at the Royal Adelaide Hospital in 1924 and for a period was house surgeon to Sir (then Mr.) Henry Simpson Newland. Dr Angus was briefly an Assistant to Dr Riddell of Kapunda, then commenced private practice at Curramulka, Yorke Peninsula, SA, where he was physician, surgeon and chemist. In 1926, he was appointed as new Medical Assistant to Dr Thomas Francis Ryan (T.F. Ryan, or Tom), in Nhill, Victoria, where his experiences included radiology and pharmacy. In 1927 he was Acting House Surgeon in Dr Tom Ryan’s absence. Dr Angus had become engaged to Gladys Forsyth and they decided he would take time to further his studies overseas in the UK in 1927. He studied at London University College Hospital and at Edinburgh Royal Infirmary and in 1928, was awarded FRCS (Fellow from the Royal College of Surgeons), Edinburgh. He worked his passage back to Australia as a Ship’s Surgeon on the on the Australian Commonwealth Line’s T.S.S. Largs Bay. Dr Angus married Gladys in 1929, in Ballarat. (They went on to have one son (Graham 1932, born in SA) and two daughters (Helen (died 12/07/1996) and Berenice (Berry), both born at Mira, Nhill ) Dr Angus was a ‘flying doctor’ for the A.I.M. (Australian Inland Ministry) Aerial Medical Service in 1928 . The organisation began in South Australia through the Presbyterian Church in that year, with its first station being in the remote town of Oodnadatta, where Dr Angus was stationed. He was locum tenens there on North-South Railway at 21 Mile Camp. He took up this ‘flying doctor’ position in response to a call from Dr John Flynn; the organisation was later known as the Flying Doctor Service, then the Royal Flying Doctor Service. A lot of his work during this time involved dental surgery also. Between 1928-1932 he was surgeon at the Curramulka Hospital, Yorke Peninsula, South Australia. In 1933 Dr Angus returned to Nhill where he’d previously worked as Medical Assistant and purchased a share of the Nelson Street practice and Mira hospital from Dr Les Middleton one of the Middleton Brothers, the current owners of what was once Dr Tom Ryan’s practice. Dr L Middleton was House Surgeon to the Nhill Hospital 1926-1933, when he resigned. [Dr Tom Ryan’s practice had originally belonged to his older brother Dr Edward Ryan, who came to Nhill in 1885. Dr Edward saw patients at his rooms, firstly in Victoria Street and in 1886 in Nelson Street, until 1901. The Nelson Street practice also had a 2 bed ward, called Mira Private Hospital ). Dr Edward Ryan was House Surgeon at the Nhill Hospital 1884-1902 . He also had occasions where he successfully performed veterinary surgery for the local farmers too. Dr Tom Ryan then purchased the practice from his brother in 1901. Both Dr Edward and Dr Tom Ryan work as surgeons included eye surgery. Dr Tom Ryan performed many of his operations in the Mira private hospital on his premises. He too was House Surgeon at the Nhill Hospital 1902-1926. Dr Tom Ryan had one of the only two pieces of radiology equipment in Victoria during his practicing years – The Royal Melbourne Hospital had the other one. Over the years Dr Tom Ryan gradually set up what was effectively a training school for country general-practitioner-surgeons. Each patient was carefully examined, including using the X-ray machine, and any surgery was discussed and planned with Dr Ryan’s assistants several days in advance. Dr Angus gained experience in using the X-ray machine there during his time as assistant to Dr Ryan. Dr Tom Ryan moved from Nhill in 1926. He became a Fellow of the Royal Australasian College of Surgeons in 1927, soon after its formation, a rare accolade for a doctor outside any of the major cities. He remained a bachelor and died suddenly on 7th Dec 1955, aged 91, at his home in Ararat. Scholarships and prizes are still awarded to medical students in the honour of Dr T.F. Ryan and his father, Dr Michael Ryan, and brother, John Patrick Ryan. ] When Dr Angus bought into the Nelson Street premises in Nhill he was also appointed as the Nhill Hospital’s Honorary House Surgeon 1933-1938. His practitioner’s plate from his Nhill surgery states “HOURS Daily, except Tuesdays, Fridays and Saturday afternoons, 9-10am, 2-4pm, 7-8pm. Sundays by appointment”. This plate is now mounted on the doorway to the Port Medical Office at Flagstaff Hill Maritime Village, Warrnambool. Dr Edward Ryan and Dr Tom Ryan had an extensive collection of historical medical equipment and materials spanning 1884-1926 and when Dr Angus took up practice in their old premises he obtained this collection, a large part of which is now on display at the Port Medical Office at Flagstaff Hill Maritime Village in Warrnambool. During his time in Nhill Dr Angus was involved in the merging of the Mira Hospital and Nhill Public Hospital into one public hospital and the property titles passed on to Nhill Hospital in 1939. In 1939 Dr Angus and his family moved to Warrnambool where he purchased “Birchwood,” the 1852 home and medical practice of Dr John Hunter Henderson, at 214 Koroit Street. (This property was sold in1965 to the State Government and is now the site of the Warrnambool Police Station. ). The Angus family was able to afford gardeners, cooks and maids; their home was a popular place for visiting dignitaries to stay whilst visiting Warrnambool. Dr Angus had his own silk worm farm at home in a Mulberry tree. His young daughter used his centrifuge for spinning the silk. Dr Angus was appointed on a part-time basis as Port Medical Officer (Health Officer) in Warrnambool and held this position until the 1940’s when the government no longer required the service of a Port Medical Officer in Warrnambool; he was thus Warrnambool’s last serving Port Medical Officer. (The duties of a Port Medical Officer were outlined by the Colonial Secretary on 21st June, 1839 under the terms of the Quarantine Act. Masters of immigrant ships arriving in port reported incidents of diseases, illness and death and the Port Medical Officer made a decision on whether the ship required Quarantine and for how long, in this way preventing contagious illness from spreading from new immigrants to the residents already in the colony.) Dr Angus was a member of the Australian Medical Association, for 35 years and surgeon at the Warrnambool Base Hospital 1939-1942, He served as a Surgeon Captain during WWII 1941-45, in Ballarat, Victoria, and in Bonegilla, N.S.W., completing his service just before the end of the war due to suffering from a heart attack. During his convalescence he carved an intricate and ‘most artistic’ chess set from the material that dentures were made from. He then studied ophthalmology at the Royal Melbourne Eye and Ear Hospital and created cosmetically superior artificial eyes by pioneering using the intrascleral cartilage. Angus received accolades from the Ophthalmological Society of Australasia for this work. He returned to Warrnambool to commence practice as an ophthalmologist, pioneering in artificial eye improvements. He was Honorary Consultant Ophthalmologist to Warrnambool Base Hospital for 31 years. He made monthly visits to Portland as a visiting surgeon, to perform eye surgery. He represented the Victorian South-West subdivision of the Australian Medical Association as its secretary between 1949 and 1956 and as chairman from 1956 to 1958. In 1968 Dr Angus was elected member of Spain’s Barraquer Institute of Barcelona after his research work in Intrasclearal cartilage grafting, becoming one of the few Australian ophthalmologists to receive this honour, and in the following year presented his final paper on Living Intrasclearal Cartilage Implants at the Inaugural Meeting of the Australian College of Ophthalmologists in Melbourne In his personal life Dr Angus was a Presbyterian and treated Sunday as a Sabbath, a day of rest. He would visit 3 or 4 country patients on a Sunday, taking his children along ‘for the ride’ and to visit with him. Sunday evenings he would play the pianola and sing Scottish songs to his family. One of Dr Angus’ patients was Margaret MacKenzie, author of a book on local shipwrecks that she’d seen as an eye witness from the late 1880’s in Peterborough, Victoria. In the early 1950’s Dr Angus, painted a picture of a shipwreck for the cover jacket of Margaret’s book, Shipwrecks and More Shipwrecks. She was blind in later life and her daughter wrote the actual book for her. Dr Angus and his wife Gladys were very involved in Warrnambool’s society with a strong interest in civic affairs. Their interests included organisations such as Red Cross, Rostrum, Warrnambool and District Historical Society (founding members), Wine and Food Society, Steering Committee for Tertiary Education in Warrnambool, Local National Trust, Good Neighbour Council, Housing Commission Advisory Board, United Services Institute, Legion of Ex-Servicemen, Olympic Pool Committee, Food for Britain Organisation, Warrnambool Hospital, Anti-Cancer Council, Boys’ Club, Charitable Council, National Fitness Council and Air Raid Precautions Group. He was also a member of the Steam Preservation Society and derived much pleasure from a steam traction engine on his farm. He had an interest in people and the community He and his wife Gladys were both involved in the creation of Flagstaff Hill, including the layout of the gardens. After his death (28th March 1970) his family requested his practitioner’s plate, medical instruments and some personal belongings be displayed in the Port Medical Office surgery at Flagstaff Hill Maritime Village, and be called the “W. R. Angus Collection”. The W.R. Angus Collection is significant for still being located at the site it is connected with, Doctor Angus being the last Port Medical Officer in Warrnambool. The collection of medical instruments and other equipment is culturally significant, being an historical example of medicine from late 19th to mid-20th century. Dr Angus assisted Dr Tom Ryan, a pioneer in the use of X-rays and in ocular surgery. Surgical instrument case, black leather pouch with metal zipper closure, part of the W.R. Angus Collection. Inside is a removable white fabric insert with loops for storing surgical instruments, attached with press studs. Initials are embossed on the case in gold “W.R.A.”. The cloth insert has a maker’s stamp on it (illegible).Gold print initials across corner on outside of case "W.R.A.". Maker's stamp on internal clot (Illegible).flagstaff hill, warrnambool, shipwrecked coast, flagstaff hill maritime museum, maritime museum, shipwreck coast, flagstaff hill maritime village, great ocean road, dr w r angus, dr ryan, surgical instrument, t.s.s. largs bay, warrnambool base hospital, nhill base hospital, mira hospital, flying doctor, medical treatment, surgical instrument case, surgical kit, portable surgical instruments, medical carry case, medical instruments and accessories -
 Kiewa Valley Historical Society
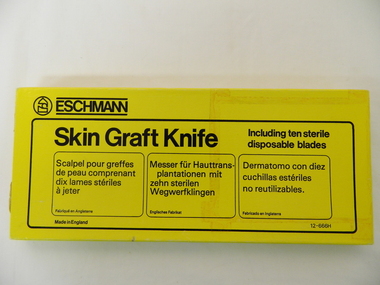
Skin Graft Knife
This medical / hospital equipment was used in the Tawonga District General Hospital which was built in the 1950s specifically for the increase in population due to the Kiewa Hydro Scheme.Historical: Shows the development of scientific hospital equipment. Provenance: Used in the Tawonga District General Hospital which was remote and therefore required good equipment.In yellow cardboard box with black writing. Hollow (loop) handle. Pivot is a screw so that the blade can be taken out. Blade has a hole for the screw. Has a shorter straight side and a longer side with teeth like a saw. It fits in a cavity shaped for the knife. Another cavity is next to it but is empty.Box: Eschmann Skin Graft Knife / Including ten sterile disposable blades. Followed by 3 other languages. Made in England hospital equipment. medical instrument. tawonga. mt beauty. knife. skin graft -
 Royal Australian and New Zealand College of Obstetricians & Gynaecologists (RANZCOG)
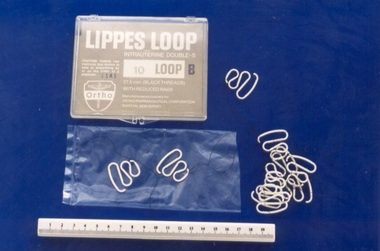
Ten Lippes Loop intrauterine devices, with container, associated with Professor Geoff Bishop, Ortho Pharmaceutical Corporation
This item came from Geoff Bishop's rooms at Mollison House, 386 Albert Street, East Melbourne. Distributed by Ethnor P/L Sydney, these bulk purchase packs pre-dated the individually sterile packaged products with disposable applicators.Ten Lippes Loop IUDs [29.1-29.10], Size B. Made of white plastic with black threads attached at one end of each. Double S shape intrauterine device. With clear plastic bag [.11], clear plastic hinged container [.12] and paper product information sheet [.13].intrauterine device, contraception