Showing 1746 items
matching tramways bendigo
-
 Ballarat Tramway Museum
Negative, Bruce Herbert, "Bendigo and Ballarat Trams (AETA Convention) 30 Mar 1975", 30/03/1975 12:00:00 AM
... tramways BTPS Ballarat AETA Bendigo Bendigo Trust Wendouree Parade ...Negative folder - made by ROW1 International of West Germany containing 40 No. 35 mm negatives of the AETA 1975 Convention visit to Ballarat and Bendigo on 30-3-1975. 17 photos of Ballarat and 23 of Bendigo. Ballarat photos: 1 - 40 at the Wendouree Parade crossing loop showing trams stop signage and AETA members standing at the front of the tram. 2 - distant view of 27 in the loop and the "wide roadway" 3 - view of 40 northbound about to nearing loop with various cars in the view. 4 - 40 about to enter loop with 27 in background. 5 - 40 and 27 at loop 6 - 40 at St Aidans Drive 7 - 14 and 27 at loop with 40 in the background 8 - 27 leaving loop 9 - 14 leaving loop 10 - General view showing cars and 40 in the loop, looking north. 11 - as for 1 12 - ditto 13 - 40 northbound, 27 southbound at loop 14 - 27 at loop 15 - 26, 14 and 28 at depot including 1 road. 16 - ditto with people viewing the trams - shows the overhead on 1 road. 17 - X41 and B80 on train at Spencer St, probably the train the group travelled on. trams, tramways, btps, ballarat, aeta, bendigo, bendigo trust, wendouree parade, depot, gardens loop, motor vehicles, tram 40 tram 27 tram 26 tram 14 tram 28 -
 Ballarat Tramway Museum
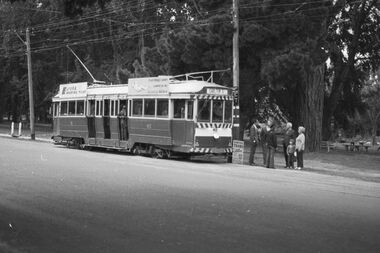
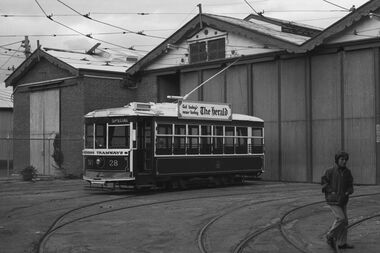
Negative, Bruce Herbert, "Bendigo and Ballarat Trams (AETA Convention) 30 Mar 1975", 30/03/1975 12:00:00 AM
... at Spencer St. Trams tramways BTPS Ballarat AETA Bendigo Bendigo ...Negative folder - made by ROW1 International of West Germany containing 40 No. 35 mm negatives of the AETA 1975 Convention visit to Ballarat and Bendigo on 30-3-1975. 17 photos of Ballarat and 23 of Bendigo. Bendigo photos: 1 - No. 28 at the depot 2 - ditto 3 - 24 and another bogie tram in side the depot 4 - No. 3? inside the depot 5 - 12, scrubber - 17 and two bogie trams 6 - scrubber and other bogie trams. 7 - general view with 24 and other bogie trams 8 - ditto 9 - Four trams at the Gold Mine, lead by 28. 10 - 19 at the Gold Mine 11 - single trucker with "tram tours" sign on the front 12 - 28 and two other cars at the Joss House, North Bendigo 13 - 19 and two other cars at the Joss House 14 - 30 at depot junction and loop 15 - 28 and 18 16 - 18 in the loop 17 - 28 and 18 McCrae St 18 - 28, 18 and 30 ditto 19 - 19 20 - No. 18 and 28 in Pall Mall with The Beehive in the background. Outside the building is an American Doughnut Kitchen van. The junction trackwork for the Eaglehawk lines remain in position. 21 - No. 30 northbound, with the City Family Hotel and other shops in the background. 22 - ditto and the cenotaph, 23 - B74 on a train at Spencer St. trams, tramways, btps, ballarat, aeta, bendigo, bendigo trust, depot, mccrae st, tram 28 tram 19 tram 30 tram 18 tram 24 tram 3 tram 12 tram 17 tram scrubber -
 Ballarat Tramway Museum
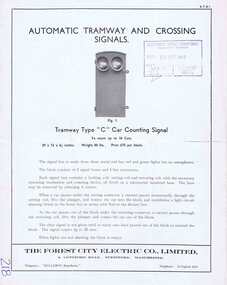
Pamphlet, The Forest City Electric Co. Limited England, "Automatic Tramway and Crossing Signals", c1948
... in Ballarat and Bendigo. Trams tramways Forest City Signals Level ...Yields information about the types of tramway signals available for use on tramways systems. The type BY was used by the SEC in Ballarat and Bendigo.Four page Pamphlet or Brochure Forest City ATS1, printed brochure with illustrations "Automatic Tramway and Crossing Signals" – four types noted. Four types: 1. Tramway type "C: Car counting signal, up to 10 cars 2. Tramway type "BY" - non car counting signals 3. Level crossing signal operated by approaching cars 4. Turning Warning signals with notes on rear page of the set up for automatic control signals for rail crossings on roads, docks etc. Date stamped by SEC 20/9/1949 on front cover.Has “218” in biro in bottom left hand corner.trams, tramways, forest city signals, level crossings, signals -
 Ballarat Tramway Museum
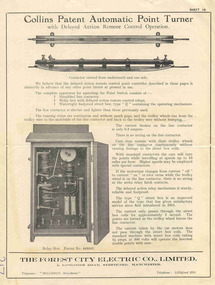
Pamphlet, The Forest City Electric Co. Limited England, "Collins Patent Automatic Point Turner", c1940's?
... or Bendigo. Trams tramways Forest City Signals Level Crossings ...Yields information about the types of automatic point Turing mechanisms used on tramway systems, not actually used in Ballarat or Bendigo.Four page Pamphlet or Brochure Forest City No. 19, "Collins Patent Automatic Point Turner". Four page printed brochure with illustrations 1940’s? describing the Point turning mechanism with illustrations, of the equipment, method of operation advantages, wiring, the street box and curb (kerb) control box. c1940's? Has “217” in biro in bottom left hand corner.trams, tramways, forest city signals, level crossings, signals -
 Ballarat Tramway Museum
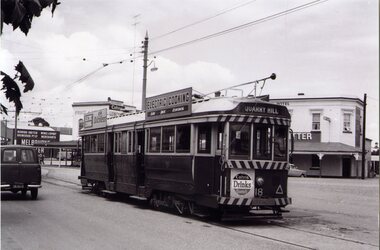
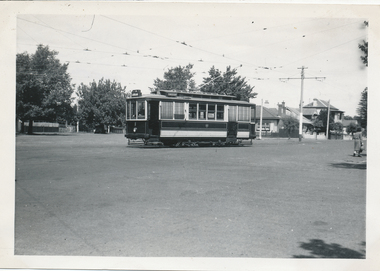
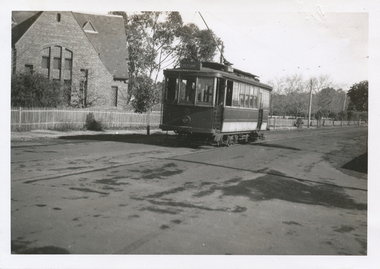
Photograph - Black & White Photograph/s, Ron Hann, Jan. 1963
Yields information about the interior of Bendigo tram depot, is storage area and two Birney trams.Black and white print on laser print paper - of Bendigo 18 at the Eaglehawk terminus 1/1963. Photo by Ron Hann. Tram has a Cohn's Drink advertisement on the front dash panel, two SEC roof advertisements and the destination of Quarry Hill. In the background are a hotel and a liquor store, both advertising Melbourne Bitter. Printed on Fujifilm, Fujicolor Crystal Archive for Frontier"Has label "Reference 6/214/26 Photo by Ron Hann" and another label "Eaglehawk Bendigo 01.63"trams, tramways, eaglehawk, hotels, tram 18 -
 Ballarat Tramway Museum
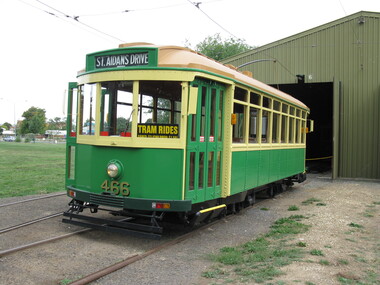
Photograph - Digital image set of 6, "466 last day in service", 27/03/2010 12:00:00 AM
Four digital images and two movie images on the last day of operation of tram 466 prior to return to Bendigo. Taken by Austin Brehaut. .1 - 466 at the depot prior to running out. .2 - 466 at Carlton St .3 - 466 at St Aidans Drive with Len Millar at the controls .4 - Looking through the rear view mirror at the inside of the tram. .5 - Movie image of 466 turning at Depot Junction onto the access track. .6 - Movie image of 466 running in onto 6 road at the depot. For movie images see directory c:/dbtext/AV images/Reg Item 4641-5 and 4641-6 trams, tramways, last day, btm, wendouree parade, depot, depot junction, tram 466 -
 Ballarat Tramway Museum
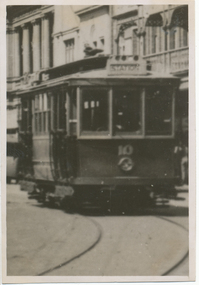
Photograph - Black & White Photograph/s, 1920s
Black and White copy print contained within the Wal Jack Bendigo and Geelong Album, see Reg Item 5003 for more details. Close up from Reg Item 4335i, showing Geelong No. 10 in Malop St Geelong. See that item for more details. Photo dates c1920's. Not known who made print. trams, tramways, geelong, mesco, malop st, tram 10 -
 Ballarat Tramway Museum
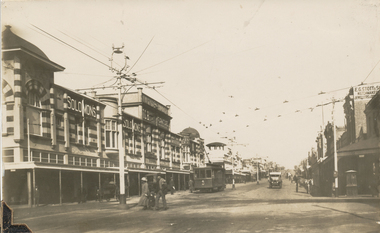
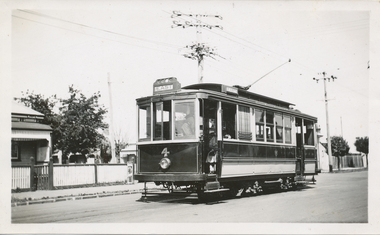
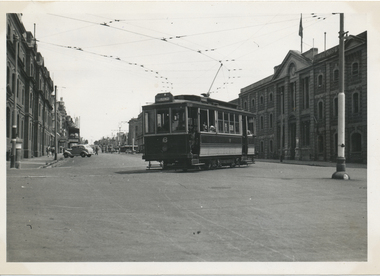
Photograph - Black & White Photograph/s, c1928
Black and White copy print contained within the Wal Jack Bendigo and Geelong Album, see Reg Item 5003 for more details. View of the intersection of Moorabool St and Malop St, photo from the North East corner. No. 4 MESCo, about 1928, heading south. Tram has the destination of Newtown. Solomons and E.G. Stott Jewellers and watchmakers buildings in the photo. Note the fire alarm, and letter box on the corner (right hand side of photo) Not known who made print. on rear in pencil "Newtown destination"trams, tramways, geelong, mesco, malop st, moorabool st, tram 4 -
 Ballarat Tramway Museum
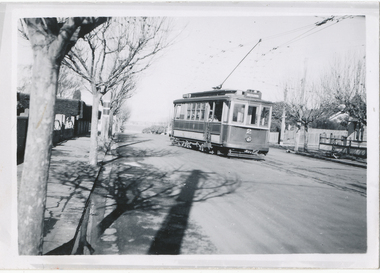
Photograph - Black & White Photograph/s, Wal Jack, 3/01/1945 12:00:00 AM
Black and White print contained within the Wal Jack Bendigo and Geelong Album, see Reg Item 5003 for more details. Photo of Geelong No. 1 turning out of Ryrie St into Garden St 3rd January 1945, with destination of East. Photo by Wal Jack. See also Reg Item 4395 for another copy of this photograph used by W. F. Scott. Printed on Ilford Paper. i1 - scan of print in the album i2 - rear of image i3 - scan of negative at 3200dpi added 27/6/2020. On the rear in blue ink "SEC Geelong No. 1 to East, turning out of Ryrie St into Garden St 3rd January 1945" with Wal Jack copyright stamp in the top right hand corner and the number "T318" written in.trams, tramways, geelong, ryrie st, tram 1 -
 Ballarat Tramway Museum
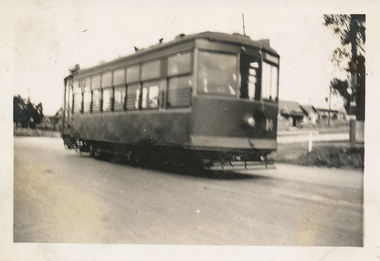
Photograph - Black & White Photograph/s, 1940
Black and White print contained within the Wal Jack Bendigo and Geelong Album, see Reg Item 5003 for more details. Photo of Geelong No. 3 in Moorabool St. 1940. No details of photographer on rear. Tram has the destination of East. In the background is a sign for Berger Paints and F&M Ritchie? Wal's album notes provides the date of 1940. Printed on Kodak Velox Paper. On rear in ink "84 Geelong Tramways, State Electricity Commission, No. 3 One of their original trams I believe. They ride very steady and smooth. Duncan and Fraser body. The Brush Electrical Engineering Co. Ltd, Loughborough England, long wheel base truck."trams, tramways, geelong, moorabool st, tram 3 -
 Ballarat Tramway Museum
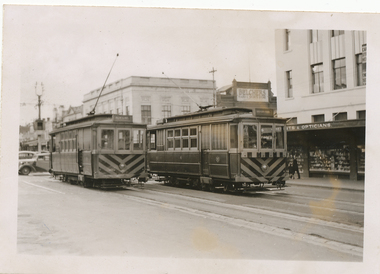
Photograph - Black & White Photograph/s, Wal Jack, 1/01/1956 12:00:00 AM
Black and White print contained within the Wal Jack Bendigo and Geelong Album, see Reg Item 5003 for more details. Photo of Geelong No. 5 and No. 4 in Ryrie St near Moorabool St. 1-1-1956, Photo by Wal Jack. In the background is Belchers Radio and Sport Store and a set of bar traffic lights. No. 5 has the destination of Newtown, and No. 4 the destination of Eastern Park. i1 - scan of print in the album i2 - rear of image i3 - scan of negative at 3200dpi added 27/6/2020.On the rear in blue ink "Geelong No. 5 to Newtown, No. 4 to Eastern Park, Ryrie St near Moorabool St, 1-1-56" with Wal Jack copyright stamp in the top right hand corner and the number "T1303" written in.trams, tramways, geelong, ryrie st, tram 5, tram 4 -
 Ballarat Tramway Museum
Photograph - Black & White Photograph/s, 1940
Black and White print contained within the Wal Jack Bendigo and Geelong Album, see Reg Item 5003 for more details. Photo of Geelong No. 4 at the Chilwell terminus, 1940, no details of photographer. Tram has the destination of East. A lady is seated in the front talking to the driver. Wal's album notes provides the date of 1940. Printed on "Selo" paper. On the rear in blue ink "Geelong No. 4" in ink.trams, tramways, geelong, chilwell, tram 4 -
 Ballarat Tramway Museum
Photograph - Black & White Photograph/s, late 1940s?
Black and White print contained within the Wal Jack Bendigo and Geelong Album, see Reg Item 5003 for more details. Photo of Geelong No. 5 in Moorabool St, late 1940's. No details of photographer. Has the T&G building, Savoia Cafe, The Commercial Bank of Australia in the background. Photo has been glued onto the album sheet.trams, tramways, geelong, moorabool st, tram 5 -
 Ballarat Tramway Museum
Photograph - Black & White Photograph/s, Wal Jack, Mar. 1939
Black and White print contained within the Wal Jack Bendigo and Geelong Album, see Reg Item 5003 for more details. Photo of Geelong No. 5 at the Wharf terminus, March 1939. Wal's album notes provides the date. Printed on Kodak Velox Paper. See Reg Item 7813 for the negative. On rear in ink " Geelong Tramways, No. 5 near wharf. One of the original trams built in 1912 by Duncan and Fraser."trams, tramways, geelong, moorabool st, tram 5 -
 Ballarat Tramway Museum
Photograph - Black & White Photograph/s, Wal Jack, 1940
Black and White print contained within the Wal Jack Bendigo and Geelong Album, see Reg Item 5003 for more details. Photo of Geelong No. 6 at the North terminus. The tram has the destination of Belmont. In the background are the Federal Wool stores. Wal's album notes provides the date of 1940. i1 - scan of print in the album i2 - rear of image i3 - scan of negative at 3200dpi added 6/6/2020. trams, tramways, geelong, north, tram 6 -
 Ballarat Tramway Museum
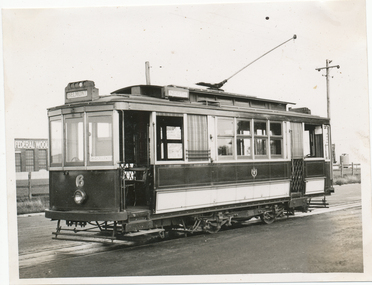
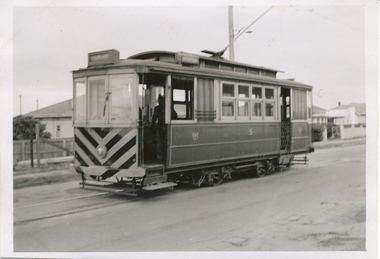
Photograph - Black & White Photograph/s, Wal Jack, 3/03/1940 12:00:00 AM
Black and White print contained within the Wal Jack Bendigo and Geelong Album, see Reg Item 5003 for more details. Photo of Geelong No. 7 at the East terminus. The tram has the destination of Chilwell. In the background are paddocks. Photo by Wal Jack 3/3/1940. Printed on Kodak paper. i1 - scan of print in the album i2 - rear of image i3 - scan of negative at 3200dpi added 6/6/2020. On rear in ink "T140 Geelong Tramways No. 7 Brush Saloon, East terminus 3-3-40. W Jack photo"trams, tramways, geelong, east, tram 7 -
 Ballarat Tramway Museum
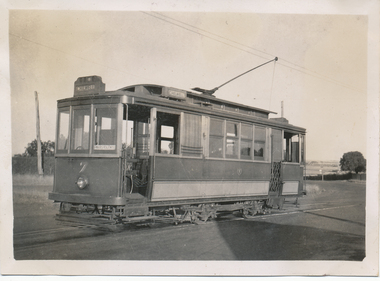
Photograph - Black & White Photograph/s, Ken Magor?, c1940
Black and White print contained within the Wal Jack Bendigo and Geelong Album, see Reg Item 5003 for more details. Photo of Geelong No. 8 at the West terminus. The tram has the destination of West and has a driver standing by the rear of the tram. Photographer Ken Magor? - same hand writing as Reg Item 5837. c1940? On rear in pencil " SEC Geelong No. 8 at West terminus"trams, tramways, geelong, west, tram 8 -
 Ballarat Tramway Museum
Photograph - Black & White Photograph/s, Keith Kings, 31/07/1955 12:00:00 AM
Black and White print contained within the Wal Jack Bendigo and Geelong Album, see Reg Item 5003 for more details. Photo of Geelong No. 5 painted with zebra stripes at Belmont 31/7/1955. Photo by Keith Kings. On rear in ink - in top right hand corner, the Keith Kings copyright stamp with number P(b)(3) written in. "Geelong No. 5 "Zebra" painted ends, but without canopy. On car thus. 31/7/55".trams, tramways, geelong, belmont, tram 5 -
 Ballarat Tramway Museum
Photograph - Black & White Photograph/s, Keith Kings, 31/07/1955 12:00:00 AM
Black and White print contained within the Wal Jack Bendigo and Geelong Album, see Reg Item 5003 for more details. Photo of Geelong No. 4 painted with zebra stripes north bound in Moorabool St. Keith notes it has been fitted with dash canopy lights. 31/7/1955. Photo by Keith Kings. On rear in ink - in top right hand corner, the Keith Kings copyright stamp with number P(b)(2) written in. "Geelong No. 4 "Zebra" painted ends, with canopy. On single truck car thus. 31/7/55".trams, tramways, geelong, moorabool st, tram 4 -
 Ballarat Tramway Museum
Photograph - Black & White Photograph/s, 8/01/1956 12:00:00 AM
Black and White print contained within the Wal Jack Bendigo and Geelong Album, see Reg Item 5003 for more details. Photo of Geelong No. 5 in Ryrie St at intersection with Moorabool St. Tram has the destination of City. In the background are Bank of New South Wales building, a set of bar lights and three other trams. Photographer not known. Dated 8/1/1956. On rear in ink "Car No. 5 on shuttle run Ryrie St to Beach on last day of running this service 8/1/56"trams, tramways, geelong, ryrie st, moorabool st, tram 5 -
 Ballarat Tramway Museum
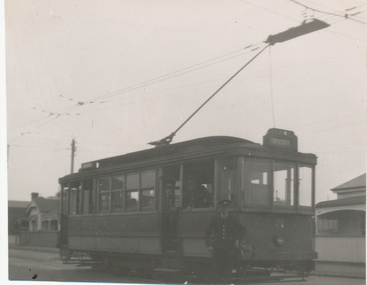
Photograph - Black & White Photograph/s, Wal Jack, 27/06/1955 12:00:00 AM
Black and White print contained within the Wal Jack Bendigo and Geelong Album, see Reg Item 5003 for more details. Photo of Geelong No. 8 at the Railway Station with the Gordon Institute buildings in the background. The tram has the destination of Chilwell. Photo by Wal Jack 27/6/1955. Printed on Ilford paper. i1 - scan of print in the album i2 - rear of image i3 - scan of negative at 3200dpi added 27/6/2020. On rear in ink "SEC Geelong No. 8 to Chilwell at Geelong Station". Has the Wal Jack copyright stamp in the top right hand corner with the number "T331" written in and the date "27 Jun 1955" stamped with a purple ink hand date stamp.trams, tramways, geelong, railway station, tram 8 -
 Ballarat Tramway Museum
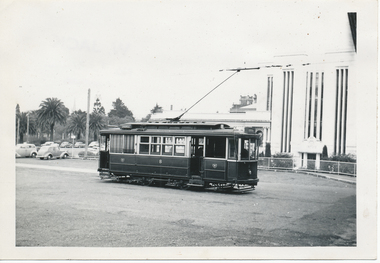
Photograph - Black & White Photograph/s, Wal Jack, 1/01/1956 12:00:00 AM
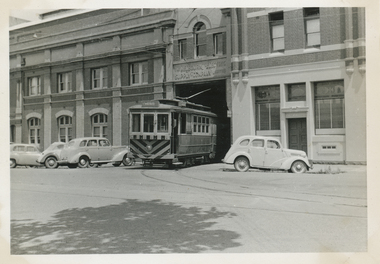
Black and White print contained within the Wal Jack Bendigo and Geelong Album, see Reg Item 5003 for more details. Photo of Geelong No. 4 standing outside the depot building with a number of cars parked outside. Photo by Wal Jack 1-1-1956. Printed on Ilford paper. i1 - scan of print in the album i2 - rear of image i3 - scan of negative at 3200dpi added 29/6/2020. On rear in ink "SEC Geelong No. 4 coming out of the depot, Corio Terrace Geelong 1-1-56". Has the Wal Jack copyright stamp in the top right hand corner with the number "T333" written in..trams, tramways, geelong, geelong depot, sec depot, corio terrace, mesco, tram 4 -
 Ballarat Tramway Museum
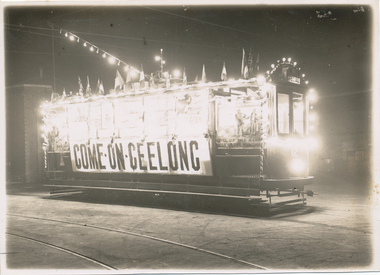
Photograph - Black & White Photograph/s, Jul. 1915
Black and White print contained within the Wal Jack Bendigo and Geelong Album, see Reg Item 5003 for more details. Photo of Geelong No. 12 at the Geelong depot July 1915, decorated and used by the National Defence Association as a recruiting tram. Has many lights and flags on the tram and the words "Come on Geelong" on the sides. See Inscriptions for further details. No details as to photographer or source. On rear in pencil "National Defence Association Recruiting car. This contained a brass band which played along the various routes. A speaker travelled with the car. The tram would stop at predetermined positions to allow of appeal for recruits." "July 1915".trams, tramways, geelong, decorated trams, world war 1, tram 12 -
 Ballarat Tramway Museum
Photograph - Black & White Photograph/s, Wal Jack, 23/06/1949 12:00:00 AM
Black and White print contained within the Wal Jack Bendigo and Geelong Album, see Reg Item 5003 for more details. Photo of Geelong No. 5 from Chilwell climbing up Pakington St Hill, from Mercer St. Chilwell. Has the destination of East. Photo by Wal Jack 23-6-1949. Printed on Ilford paper. See also Reg Item 7824 for another similar photograph. i1 - scan of print in the album i2 - rear of image i3 - scan of negative at 3200dpi added 17/6/2020. On rear in ink "SEC Geelong No."5 from Chilwell climbing up Pakington St Hill, from Mercer St. Chilwell. 23-6-49" Has the Wal Jack copyright stamp in the top right hand corner with the number "T281" written in..trams, tramways, geelong, chilwell, pakington st, tram 5 -
 Ballarat Tramway Museum
Photograph - Black & White Photograph/s, Wal Jack, 23/06/1949 12:00:00 AM
Black and White print contained within the Wal Jack Bendigo and Geelong Album, see Reg Item 5003 for more details. Photo of Geelong No. 8 to Newtown, in Aphrasia St at Talbot St. Newtown. Photo by Wal Jack 23-6-1949. Tram has the destination of Newtown. Has a church in the background - possibly now part of the Geelong College - (Google Earth) i1 - scan of print in the album i2 - rear of image i3 - scan of negative at 3200dpi added 18/6/2020. On rear in ink "SEC Geelong No. 8 to Newtown in Aphrasia St from Talbot St. 11.31am Newtown 23-6-49" Has the Wal Jack copyright stamp in the top right hand corner with the number "T284" written in.., Negs contained within a shoe box received from Keith Kings.trams, tramways, geelong, newtown, aphrasia st, tram 8 -
 Ballarat Tramway Museum
Photograph - Black & White Photograph/s, Wal Jack, 23/06/1949 12:00:00 AM
Black and White print contained within the Wal Jack Bendigo and Geelong Album, see Reg Item 5003 for more details. Photo of Geelong No. 2 at the junction of the Newtown line. Has the destination of Chilwell. Photo by Wal Jack 23-6-1949. i1 - scan of print in the album i2 - rear of image i3 - scan of negative at 3200dpi added 6/6/2020. On rear in ink "SEC Geelong No. 2 leaving Newtown Junc for Chilwell 23-6-49" Has the Wal Jack copyright stamp in the top right hand corner with the number "T282" written in..trams, tramways, geelong, newtown, chilwell, tram 2 -
 Ballarat Tramway Museum
Photograph - Black & White Photograph/s, Wal Jack, 3/01/1945 12:00:00 AM
Black and White print contained within the Wal Jack Bendigo and Geelong Album, see Reg Item 5003 for more details. Photo of Geelong No. 6 turning from Moorabool St in Corio St enroute to Beach. Has many wool store buildings in the background. Printed on Ilford paper. i1 - scan of print in the album i2 - rear of image i3 - scan of negative at 3200dpi added 25/6/2020. On rear in ink "SEC Geelong No. 6 to Beach. Turning out of Moorabool St. into Corio Terrace 1.50pm 3rd January 1945" Has the Wal Jack copyright stamp in the top right hand corner with the number "T323" written in. trams, tramways, geelong, moorabool st, corio st, beach, tram 6 -
 Ballarat Tramway Museum
Photograph - Black & White Photograph/s, Wal Jack, Easter 1936
Black and White print contained within the Wal Jack Bendigo and Geelong Album, see Reg Item 5003 for more details. Photo of Geelong Birney 14 with two trolley poles at Eastern Park, Easter 1936. Wal's album notes that trams 14 and 15 were bought new in 1924 and the both had two trolley poles, and that one was removed in 1936. i1 - scan of print in the album i2 - rear of image i3 - scan of negative at 3200dpi added 18/6/2020. trams, tramways, geelong, eastern park, tram 14 -
 Ballarat Tramway Museum
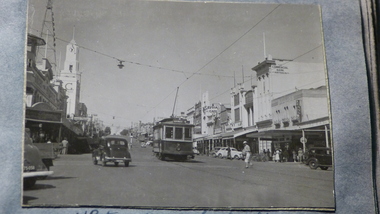
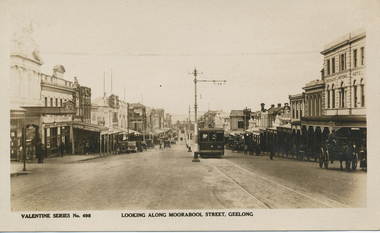
Postcard, Moorabool St, Geelong with Birney No. 14
Postcard contained within the Wal Jack Bendigo and Geelong Album, see Reg Item 5003 for more details. Valentine Series Postcard, No. 498 looking north along Moorabool St, Geelong with Birney No. 14 approaching the camera on the single line section. The tram has the destination of South (prior to extension from the Barwon River to Belmont in 1927) and is fitted with two trolley poles. There are two other trams in the photograph along with many motor vehicles and horse drawn vehicles - mid 1920's. Moorabool St has centre poles. In the photo are Sully's National Hotel, White Hart Hotel, Leitch Cycles and sports goods and a T&G building (prior to the new one being built?). Published by Valentines Publishing Co of Queen St Melbourne. See related documents for a email from Richard Gilbert providing further documents.trams, tramways, south, belmont, geelong, moorabool, tram 37, tram 36 -
 Ballarat Tramway Museum
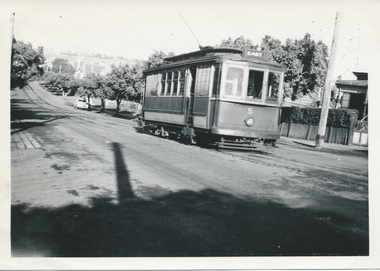
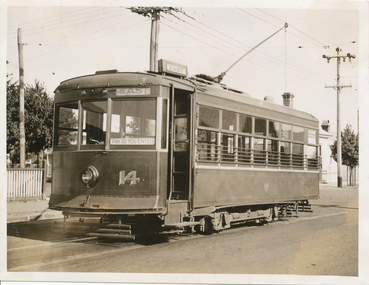
Photograph - Black & White Photograph/s, Wal Jack, 1940
Black and White print contained within the Wal Jack Bendigo and Geelong Album, see Reg Item 5003 for more details. Photo of Geelong Birney 14 at the Chilwell terminus, 1940. Wal notes it is No. 11 on the Bendigo system. The tram has the destination of East and has a "Pay as you Enter" sign on the door. i1 - scan of print in the album i2 - rear of image i3 - scan of negative at 3200dpi added 18/6/2020.On the rear in ink "Geelong Tramways No. 14 Birney Car, bought new 1924"trams, tramways, geelong, chilwell, birney, tram 14