Showing 1425 items
matching museum closure
-
 Ballarat Tramway Museum
Photograph - Digital image, 1970s
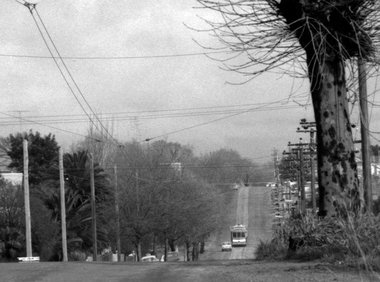
Yields information about the Mt Pleasant route and Barkly St.Digital image, black and white, of No. 31 in Barkly St, Mt Pleasant. Photo taken by Peter Bruce 1970's and 1971, prior to the closure of the Ballarat tramway system. Peter's Title of image: "No. 31 over the hill"trams, tramways, mt pleasant, barkly st, tram 31 -
 Ballarat Tramway Museum
Photograph - Digital image, 1970s
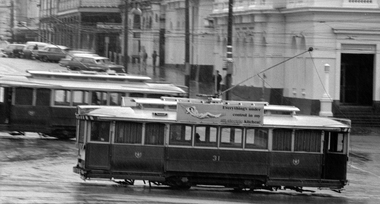
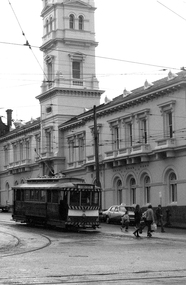
Yields information about the Lydiard St and Sturt St intersection.Digital image, black and white, of No. 31 west bound in Sturt St crossing Lydiard St, while along single trucker goes the other way. No 31 has a "Everything's under control in my all electric kitchen!" roof advertisement. Has the Post Office building in the background. Photo taken by Peter Bruce 1970's and 1971, prior to the closure of the Ballarat tramway system. Peter's Title of image: "No. 31 crossing Lydiard St"trams, tramways, lydiard st, sturt st, tram 31 -
 Ballarat Tramway Museum
Photograph - Digital image, 1970s
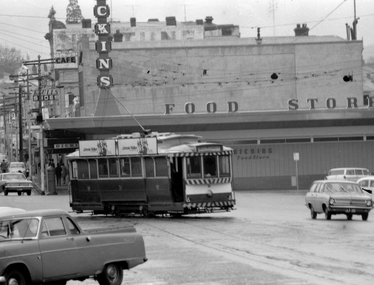
Yields information about the Sturt St and Grenville St intersection.Digital image, black and white, of No. 31 entering Sturt St from Bridge St, with S E Dickins Food store in the background. Tram has two Johnnie Walker Whiskey roof advertisements. Photo taken by Peter Bruce 1970's and 1971, prior to the closure of the Ballarat tramway system. Peter's Title of image: "No. 31 Dickins"trams, tramways, sturt st, bridge st, tram 31 -
 Ballarat Tramway Museum
Photograph - Digital image Set of 3, Peter Bruce, Grant St Loop - Mt Pleasant, 1970s
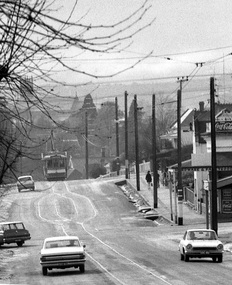
Yields information about the Grant St Loop on the Mt Pleasant line.Digital image, black and white, series of three images of No. 31 entering, travelling through and leaving the Grant St Loop on the Mt Pleasant line. Taken with a telephoto lens at varying lengths. Has a Hardware and Fancy Goods shop on the right hand side. Photo taken by Peter Bruce 1970's and 1971, prior to the closure of the Ballarat tramway system. Peter's Title of image: "No. 31 Approach", "No. 31 into the loop" and "No. 31 leaves the loop"trams, tramways, mt pleasant, grant st, barkly st, tram 31 -
 Ballarat Tramway Museum
Photograph - Digital image Set of 2, Peter Bruce, Lydiard St North, 1970s
Yields information about the Sturt St and Lydiard St intersection.Digital image, black and white, two images of No. 32 in Lydiard St North. .1 - adjacent to the post office, about to turn into Sturt St, enroute for Sebastopol. .2 - further up Lydiard St North, taken from outside Craigs Royal Hotel (see also Reg Item 4594 for a similar photo) Photo taken by Peter Bruce 1970's and 1971, prior to the closure of the Ballarat tramway system. Peter's Title of image: "No. 32 Lydiard St Nth".trams, tramways, lydiard st, craig s hotel, post office, tram 32 -
 Ballarat Tramway Museum
Photograph - Digital image Set of 3, Peter Bruce, "No. 32 Lydiard St North", 1970s
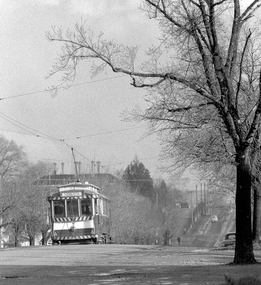
Yields information about the Lydiard St North Route, and the landscape.Digital image, black and white, set of three images of No. 32 in Lydiard St North, taken with a telephoto lens at various locations. Photo taken by Peter Bruce 1970's and 1971, prior to the closure of the Ballarat tramway system. Peter's Title of image: "No. 32 Lydiard St North"trams, tramways, lydiard st north, tram 32 -
 Ballarat Tramway Museum
Photograph - Digital image Set of 2, Peter Bruce, "No. 34 and schoolgirls", 1970s
Yields information about the Hospital Corner, Drummond and Sturt St intersection area.Digital image, black and white, of No. 34 at Drummond and Sturt intersection, in bound with two school girls walking across the street. The first image is a cropped version of the same photograph. Photo taken by Peter Bruce 1970's and 1971, prior to the closure of the Ballarat tramway system. Peter's Title of image: "No. 34 and schoolgirls"trams, tramways, sturt st, hospital corner, tram 34 -
 Ballarat Tramway Museum
Photograph - Digital image, 1970s
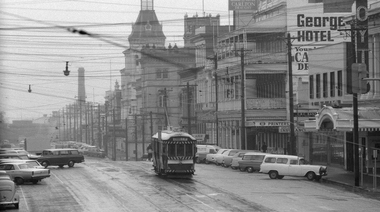
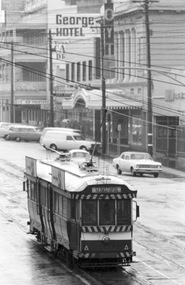
Yields information about Lydiard St between Mair and Sturt Streets.Digital image, black and white, of No. 38 travelling north in Lydiard St North between Sturt and Mair Sts, with many parked cars. Has the George Hotel, the CBC Bank, Hoyts Regent, and other buildings in the view. See also Reg Item 4580 for a later photograph, probably 38 too. Photo taken by Peter Bruce 1970's and 1971, prior to the closure of the Ballarat tramway system. Peter's Title of image: "No. 38 Lydiard St near Mair St."trams, tramways, lydiard st, tram 38 -
 Ballarat Tramway Museum
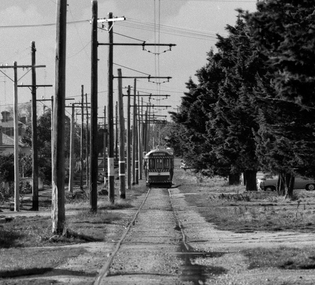
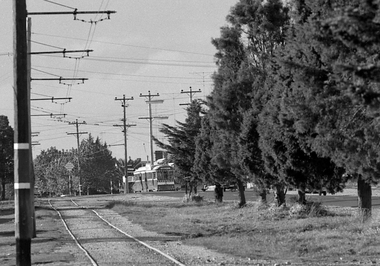
Photograph - Digital image, Peter Bruce, "No. 39 approaching Sebas", 1970s
Yields information about the Sebastopol route and area near the terminus.Digital image, black and white, of No. 39 in Albert St Sebastopol, north of the Sebastopol terminus. Shows the condition of the track and the number of poles in the section. Taken with a telephoto lens. Photo taken by Peter Bruce 1970's and 1971, prior to the closure of the Ballarat tramway system. Peter's Title of image: "No. 39 approaching Sebas"trams, tramways, sebastopol, tram 38 -
 Ballarat Tramway Museum
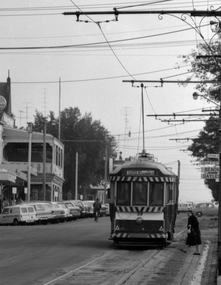
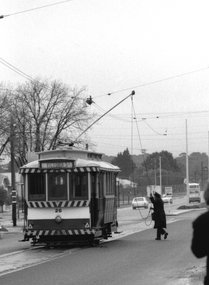
Photograph - Digital image, Peter Bruce, "No. 39 at Doveton St", 1970s
Yields information about the Sturt St track, near Doveton St.Digital image, black and white, of No. 39 at the corner of Doveton and Sturt St, with the tram going to Gardens via Drummond Nth. A lady is walking behind the tram. Photo taken by Peter Bruce 1970's and 1971, prior to the closure of the Ballarat tramway system. Peter's Title of image: "No. 39 at Doveton St"trams, tramways, doveton st, sturt st, tram 39 -
 Ballarat Tramway Museum
Photograph - Digital image Set of 3, Peter Bruce, 1970s
Yields information about the highway crossing Albert St Sebastopol from both sides.Digital image, black and white, set of three images of No. 41 crossing Albert St Sebastopol. .1 - No. 41 southbound, before crossing Albert St. .2 - ditto, after crossing Albert St .3 - No. 41 on return, north bound. Note the pole with directions for Mt Clean, Sebastopol Gun Club. Photo taken by Peter Bruce 1970's and 1971, prior to the closure of the Ballarat tramway system. Peter's Title of image: "No. 41 at the Highway"trams, tramways, albert st, sebastopol, tram 41 -
 Ballarat Tramway Museum
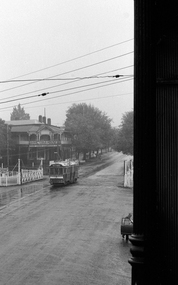
Photograph - Digital image, 1970s
Yields information about the railway level crossing.Digital image, black and white, of No. 41 north bound in Lydiard St North, crossing the railway lines with Victoria House in the background, at the level crossing. A wet day. Photo taken by Peter Bruce 1970's and 1971, prior to the closure of the Ballarat tramway system. Peter's Title of image: "No. 41 at the Railway"trams, tramways, level crossings, railway station, lydiard st nth, tram 41 -
 Ballarat Tramway Museum
Photograph - Digital image, Peter Bruce, "No. 41 Mair St", 1970s
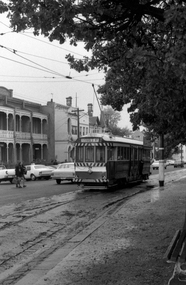
Yields information about Lydiard St between Mair and Sturt St.Digital image, black and white, of No. 41 southbound in Lydiard St after crossing Mair St with the George Hotel and Hoyts theatre in the background. The tram has the destination of Sebastopol. Photo taken by Peter Bruce 1970's and 1971, prior to the closure of the Ballarat tramway system. Peter's Title of image: "No. 41 Mair St"trams, tramways, mair st, lydiard st nth, tram 41 -
 Ballarat Tramway Museum
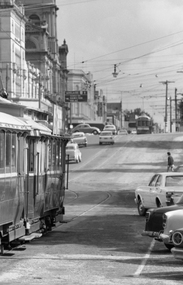
Photograph - Digital image, Peter Bruce, "No. 43 Sturt St", 1970s
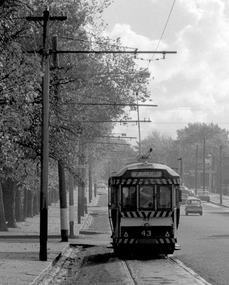
Yields information about the Sturt St. track at Talbot St.Digital image, black and white, of No. 43 inbound along Sturt St at Talbot St. Tram has the destination of Mt Pleasant. Photo taken by Peter Bruce 1970's and 1971, prior to the closure of the Ballarat tramway system. Peter's Title of image: "No. 43 Sturt St"trams, tramways, sturt st, talbot st, tram 43 -
 Ballarat Tramway Museum
Photograph - Digital image, 1970s
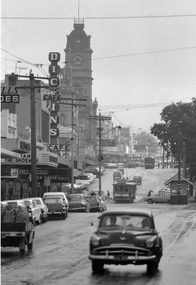
Yields information about the Sturt St. and Bridge St and some of the cars that used the street - a Plymouth.Digital image, black and white, of a scene in Bridge St looking back towards the Town Hall and Sturt St, showing a Plymouth motor vehicle, a single trucker and a bogie car in Sturt St. Shows the Dickins store, Williams the Shoeman, Roger David Store. Photo taken by Peter Bruce 1970's and 1971, prior to the closure of the Ballarat tramway system. Peter's Title of image: "Plymouth Bridge St"trams, tramways, bridge st, sturt st, town hall -
 Ballarat Tramway Museum
Photograph - Digital image, 1970s
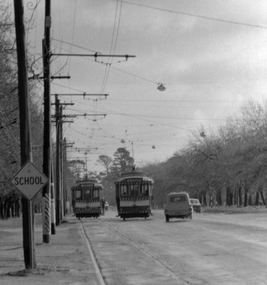
Yields information about a D loop on the Sturt St West track..Digital image, black and white, of two single truckers crossing at one of the D loops, probably Parker St, in Sturt St West with cars passing the trams. A school sign indicates a possible location. Photo taken by Peter Bruce 1970's and 1971, prior to the closure of the Ballarat tramway system. Peter's Title of image: "Sturt St West D Loop"trams, tramways, parker st loop, sturt st west -
 Ballarat Tramway Museum
Photograph - Digital image, 1970s
Yields information about swinging the pole at the Victoria St terminus.Digital image, black and white, of the pole being swung by the conductor on No. 26 at the Victoria St terminus. shows the terminus arrangements and the location. Tram has the destination of Victoria St. Photo taken by Peter Bruce 1970's and 1971, prior to the closure of the Ballarat tramway system. Peter's Title of image: "Swinging the Poles"trams, tramways, victoria st, crews, trolley poles, tram 26 -
 Ballarat Tramway Museum
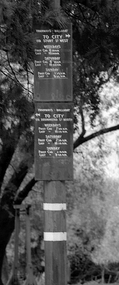
Photograph - Digital image, Peter Bruce, "Tram Times", 1970s
Yields information about timetable board at the Gardens Loop.Digital image, black and white, of the two timetable signs at the Gardens Loop in Wendouree Parade. Photo taken by Peter Bruce 1970's and 1971, prior to the closure of the Ballarat tramway system. Peter's Title of image: "Tram Times"trams, tramways, timetables, gardens loop -
 Ballarat Tramway Museum
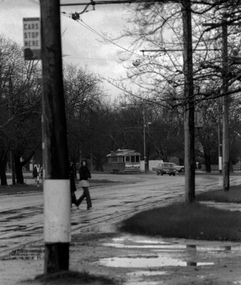
Photograph - Digital image, 1970s
Yields information about Sturt St west track near Hamilton Ave with pedestrians.Digital image, black and white, of a single truck tram, with a Twin Lakes sign, outbound in Sturt St West, near the Hamilton Ave stop, with two girls walking across the road after it has rained. Photo taken by Peter Bruce 1970's and 1971, prior to the closure of the Ballarat tramway system. Peter's Title of image: "Two girls and tram"trams, tramways, sturt st west, hamilton ave -
 Ballarat Tramway Museum
Photograph - Digital image Set of 2, Peter Bruce, "Up the Street", 1970s
Yields information about Sturt St and the City loop.Digital image, black and white, two images, of two single truck trams parked in the City Loop Sturt St, looking up the hill towards the Town Hall. Photo taken by Peter Bruce 1970's and 1971, prior to the closure of the Ballarat tramway system. Peter's Title of image: "Up the Street"trams, tramways, city loop, sturt st -
 Ballarat Tramway Museum
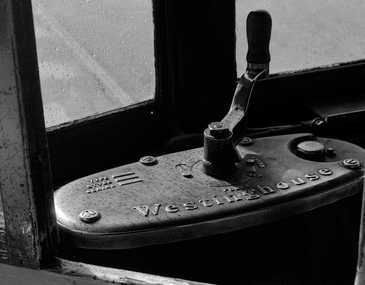
Photograph - Digital image, Peter Bruce, top of a Westinghouse T1F Controller, 1970s
Yields information about the top of a Westinghouse T1F controller.Digital image, black and white, of the top of a Westinghouse T1F Controller from outside the door of the tram with the sunlight reflecting off the controller. Photo taken by Peter Bruce 1970's and 1971, prior to the closure of the Ballarat tramway system. Peter's Title of image: "Westinghouse Controller"trams, tramways, tram controllers, tramcars -
 Ballarat Tramway Museum
Photograph - Black & White Photograph/s, John Phillips, May. 1985
Yields information about the central Ballarat streets, buildings late 1960's prior to the closure of the tramway and commencement of the construction of Sovereign Hill.Black and White photograph of Ballarat No. 27, photographed by John Phillips, after its repainting to the 1930's colour scheme, but before the white tyres were painted, May 1985. Large image held. Small print of this image added 10/10/2019 and print referenced. trams, tramways, btps, tramcars, restoration, repainting, tram 27 -
 Ballarat Tramway Museum
Photograph - Black & White Photograph/s - set of 6, Keith Kings, 8/01/1956 12:00:00 AM
Black and White print contained within the Wal Jack Bendigo and Geelong Album, see Reg Item 5003 for more details. Set of six black and white photographs from Keith Kings of the staged closures of the Geelong tramways. Note some of these photographs are very similar to those of Geoff Grant - See Reg Item 485 and 476i7. .1 - No. 18 last tram to East, leaving city - 8/1/1956 - KSK Photo Q(x)(6) .2 - No. 7, last tram at West at terminus - 8/1/1956 - KSK Photo Q(x)(7) - has a group of people standing in front of the tramcar. .3 - No. 6 - last tram at North terminus, with a very large group of people in front of tram. Tram has the destination of North. 4/3/1956 - KSK Photo T(b)(6). .4 - No. 18 - last tram at Newtown terminus, with a very large group of people in front of tram. Tram has the destination of Newtown. 22/1/1956 - KSK Photo R(y)(3). .5 - No. 19, last tram to Eastern Park, at terminus on second last trip, with conductor on front step. 22/1/56, KSK Photo R(y)(2). Tram has the destination of Eastern Park. .6 - No. 1 - last regular tram from Beach to Chilwell, leaving Beach terminus - KSK Photo Q(x)(5).On the rear in ink and with the Keith Kings Copyright stamp: .1 - Geelong - 18 last tam to East leaving city, Sun 8/1/56 - Q(x)(6) .2 - Geelong - 7 - last tram at West at terminus, Sun 8/1/56 - Q(x)(7) .3 - Geelong - 6 - last tram at North terminus, Sun 4/3/56 - T(b)(6) .4 - Geelong - 18 - last tram at Newtown terminus, Sun 22/1/56 - R(y)(3) .5 - Geelong - 19 - last tram to Eastern Park, at terminus on second last trip - Sun 22/1/56 - R(y)(2) .6 - 1 - last regular tram from Beach to Chilwell, leaving Beach terminus, Sun 8/1/56 - Q(x)(5)trams, tramways, geelong, closure, east, north, chilwell, beach, newtown, eastern park, last tram, tram 18, tram 7, tram 6, tram 19, tram 1 -
 Ballarat Tramway Museum
Photograph - Black & White Photograph/s - set of 4, Keith Kings, 8/01/1956 12:00:00 AM
Black and White print contained within the Wal Jack Bendigo and Geelong Album, see Reg Item 5003 for more details. Set of four black and white photographs from Keith Kings of the staged closures of the Geelong tramways. Note some of these photographs are very similar to those of Geoff Grant - See Reg Item 476i8. Also see Reg item 4398 and 4399 for same images of Keith Kings collected by Bill Scott. .1 - No. 1 - last tram ex Chilwell back at Depot - Sun 8/1/56 - KSK Photo Q(x)(8). .2 - Scene for the last tram in Ryrie St, Sun 26/3/56, many people in photograph, with tram in background, has destination of Belmont. KSK Photo T(g)(7) .3 - ditto, for 31 and 38 as the third and second "last" trams, back at Ryrie St, Sun 26/3/56 - KSK Photo T(g)(6) .4 - Nos. 31 and 38 as the last trams at Belmont terminus, Sun 26/3/1956 - KSK Photo T(g)(4)On the rear in ink and with the Keith Kings Copyright stamp: .1 - "Geelong - 1 - last tram ex Chilwell back at Depot - Sun 8/1/56" - Q(x)(8) .2 - "Geelong - 4 - last tram back at Ryrie St, Sun 26/3/56" - T(g)(7) .3 - "Geelong - 31 & 38 - as third and second "last" trams, back at Ryrie St, Sun 26/3/56" - T(g)(6) .4 - "Geelong - 31 and 38 as last trams at Belmont terminus, Sun 26/3/1956" - T(g)(4)trams, tramways, geelong, closure, chilwell, ryrie st, belmont, last tram, tram 1, tram 4, tram 31, tram 38 -
 Ballarat Tramway Museum
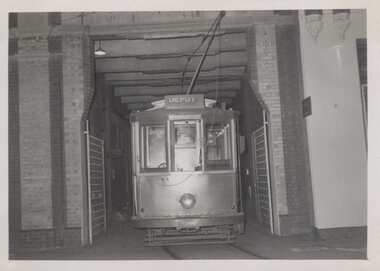
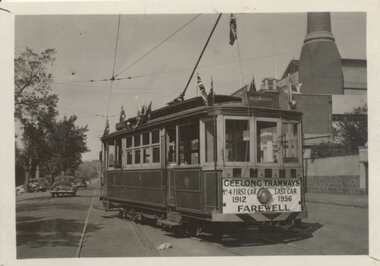
Photograph - Black & White Photograph/s - set of 3', Keith Kings, 26/03/1956 12:00:00 AM
Black and White print contained within the Wal Jack Bendigo and Geelong Album, see Reg Item 5003 for more details. Set of three black and white photographs from Keith Kings of the staged closures of the Geelong tramways. .1 - Geelong No. 4 - decorated as the Last tram, has a dash sign "Geelong Tramways No. 4 first car 1912, Last car 1956 Farewell", with the destination of Belmont. Photographed with power station in the background in Corio Terrace. 26/3/1956, KSK Photo (T)(e)(8). Printed on Ilford Paper. See also Reg Item 2667 and 4388 for a colour slide version of the same photograph. .2 - ditto - about to leave the depot - KSK Photo - T(g)(3) .3 - ditto - back at the depot - KSK Photo - T(g)(8)On the rear in ink and with the Keith Kings Copyright stamp: .1 - "Geelong - 4 - decorated as Official "Last" tram -26/3/56" - (T)(e)(8). .2 - "Geelong - 4 - illuminated as last tram Sun 26/3/56" - (T)(g)(3). .3 - "Geelong - 4 - last tram, back at Depot, Sun 26/3/56" - (T)(g)(8). trams, tramways, geelong, closure, depot, last tram, tram 4 -
 Ballarat Tramway Museum
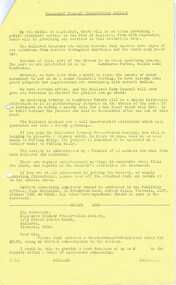
Newsletter, Ballarat Tramway Preservation Society (BTPS), "Information for Members and Interested Parties", 1971
... . Museums BTPS Closure TMSV Publicity Set of 12 documents printed ...Yields information about the formation of the BTPS in 1971 and has a strong association with those involved., Yields information about the formation of the BTPS in 1971 and has a strong association with those involved.Set of 12 documents printed for distribution to BTPS members, either before or after the formal formation of the organisation to preserve the Ballarat Tramways. All printed by the Gestetner duplication process except for 5920.9 printed by Jeffrey Zilles Ballarat. Consolidated from other items or holdings from donations into a single year set of newsletters. All produced during 1971. .1 - Invitation to Join the Ballaarat Tramway Preservation Society - for a full copy see Reg Item 4252. .2 - Information sheet No. 1 .3 - Progress report from the Publicity Officer (19th August 1971). .4 - Progress report from the Publicity Officer (September 1971) - image only from Reg Item 4251 .5 - Information to Members and Interested Parties - October 1971 - image only from Reg Item 4252 .6 - Information to Members and Interested Parties - November 1971 .7 - Information to Members and Interested Parties - December 1971 .8 - Ballarat Tramway Preservation Society - invitation to join and information. .9 - Information sheet with tram sketch in top left hand corner - printed by Jeffrey Zilles Ballarat. (2nd copy added 6/12/2019 from Donation of David Wright) 10 - Sales List .11 - Joint Statement by the Tramway Museum Society of Victoria Limited and the Ballarat Tramway Preservation Society .12 - Lake Wendouree Tramway Museum Committee - minutes of formation 18th April 1971. museums btps, closure, tmsv, publicity -
 Ballarat Tramway Museum
Newsletter, Ballarat Tramway Preservation Society (BTPS), "Information for Members and Interested parties", 1972
... Parade Ballarat Ballarat goldfields Museums BTPS Closure TMSV ...Set of 9 documents printed for distribution to BTPS members as news. All printed by the Gestetner duplication process. Consolidated from other items or holdings from donations into a single year set of newsletters. All produced during 1972. .1 - Information Newssheet January 1972 .2 - Information for Members and Interested parties - February 1972 .3 - ditto March 1972 .4 - Disposal List for Ballarat Tramcars - April 1972 .5 - Information for Members and Interested parties - April - May 1972 .6 - ditto June - July 1972 .7 - ditto September 1972 .8 - ditto November 1972 .9 - ditto November 1972 All documents scanned as pdf images.museums btps, closure, tmsv, publicity -
 Ballarat Tramway Museum
Document - Notice - Belmont Tramway route closure, State Electricity Commission of Victoria (SECV), 3/1956
Notice - advising the closure of the Belmont Geelong tram route on Sunday 25/3/1956 and its replacement by buses.Demonstrates a SEC notice about the closure of the Belmont tram route.Notice - dyeline print on paper.tramways, geelong, closure, belmont, notices and information -
 Ballarat Tramway Museum
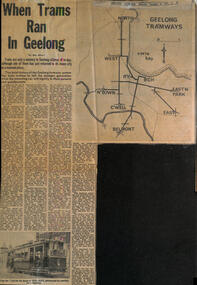
Newspaper, Geelong Advertiser, "When trams ran in Geelong", 9/10/1971
Newspaper cutting titled "When trams ran in Geelong" written by Max White. Looks at the development of the tramway system in Geelong, MESCo, operation, take over by the SEC and finally closure. Notes the use of coloured route lights, conductresses, and how the system was shut down in stages. Has a photo of Geelong 7 supplied by Bob Prentice.Yields information about the history of the Geelong tramway system.Newspaper clipping newsprint - Geelong Advertiser 9/10/1971tramways, geelong, closure, belmont, mesco, local history -
 Ballarat Tramway Museum
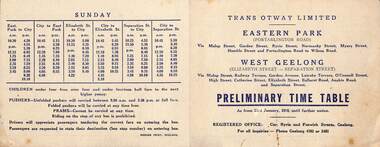
Ephemera - Set of 4 - Timetables - Geelong bus, Trans Otway, 1956
Set of 4 - Timetables - Geelong buses that were introduced following the closure of the Geelong tram system. 1 - Trans Otway - Eastern Park and West Geelong dated 23/1/1956 - gives route and times. Printed - 111x142mm 2 - Benders Busways - Chillwell - gives times, fares, bus stop locations and route details - tri fold foolscap - 210 x 111 3 - ditto - for Newtown 4 - Corio bus lines - Belmon - City from 26/3/1956 - gives sections, fares, routes, times and route details - folded quarto - 205 x 164 All note that folded pushers carried at any times, unfolded between 9.30 and 3.30, no prams. See item 6812 for the Transport Regulation Board poster of 1956 and two other bus operators.Yields information about the bus timetables following the closure of the Geelong tram system.Set of four printed or duplicated documentstramways, geelong, closure, bus, buses, bus replacement, timeables, trans otway, corio bus lines, benders busways