Showing 2441 items
matching goldfields north
-
 Ballarat Tramway Museum
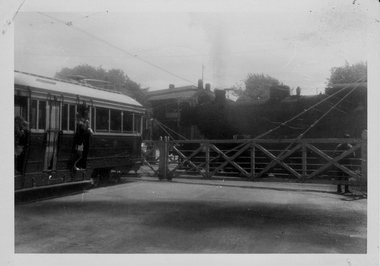
Photograph - Digital image, Chris Phillips, c1970
Yields information about the tram and railway operations in Lydiard St North at the railway level crossings.Digital image, black and white, of a bogie tram waiting at the Ballarat station level crossing for a locomotive (K class) to cross.trams, tramways, level crossings, lydiard st north, ballarat railway station, railways -
 Ballarat Tramway Museum
Photograph - Digital image Set of 2, Doug Colquhoun, c1955
Set of two colour digital images of Geelong trams photographed by Doug Colquhoun? .1 - Geelong No 8 at the Chilwell terminus, c1955. Note the tram stop furniture on the pole behind. Tram has the destination of Beach. .2 - Trams 31 and 34 photographed in Moorabool St at a Safety Zone stop. Safety Zone stop sign in photograph. Trams have the destination of Belmont and North. Kays pastries and Austral Art Furnishers stores building in the background.trams, tramways, geelong, north, belmont, moorabool st, safety zone, tram 8, tram 31, tram 34 -
 Ballarat Tramway Museum
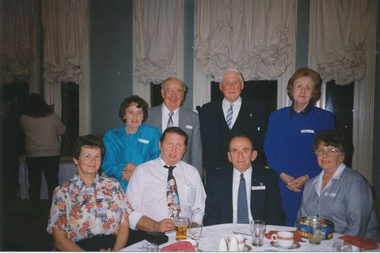
Photograph - Digital image
Has a strong association with Dave Kellett, Norm Lorensini, Jim Maher and Neil Robe and their partners at a 1996 Tramway Reunion event.Digital image of a colour photograph of a group of eight people at the 20/91996 Ballarat ex Tramways Reunion, at the Alexandra Lydiard St North, Ballarat. Has details of the people on the rear of the photograph. trams, tramways, secv, reunions, crews -
 Ballarat Tramway Museum
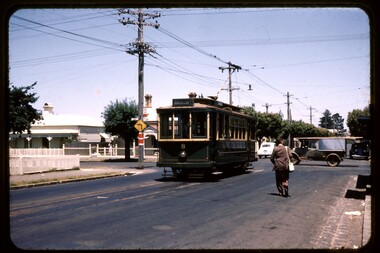
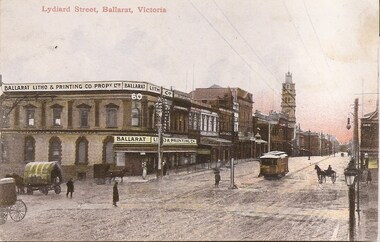
Postcard, Ballarat Litho & Printing Co, Lydiard St North, 1905
... Parade Ballarat Ballarat goldfields Postcard Lydiard St North ...Yields information about the corner of Mair and Lydiard St soon after the Ballarat Electric Tramway opened.Digital Image of and ESCo tram north bound in Lydiard St North, at the intersection with Mair St. Shows the Ballarat Litho and Printing Co Propy Ltd building on the corner. Note the centre poles and the pole in the middle of the intersection. Has a number of horse drawn vehicles. Photo taken soon after opening as the destination sign is on the dash panel. From the Facebook group of old time photographs of yesterday. Titled "Lydiard St Ballarat Victoria"trams, tramways, mair st, lydiard st north, esco, postcards -
 Ballarat Tramway Museum
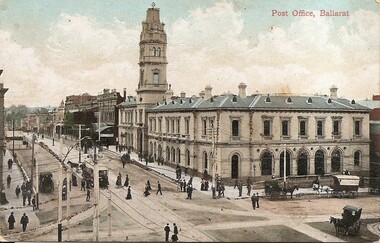
Postcard, ESCo tram north bound in Lydiard St North
... Parade Ballarat Ballarat goldfields Postcard ESCo tram north ...Yields information about the corner of Sturt St and Lydiard St soon after the Ballarat Electric Tramway opened.Digital Image of and ESCo tram north bound in Lydiard St North, at the intersection with Sturt St. Shows the Ballarat Post Office and other buildings in Lydiard St. Note the centre poles the new tram tracks. Photo taken soon after opening as the destination sign is on the dash panel. There are a number of lines of dark brown piles of earth? Work still being undertaken. Titled "Post Office Ballarat". From the Facebook group of old time photographs of yesterday.trams, tramways, sturt st, lydiard st north, esco, postcards -
 Ballarat Tramway Museum
Photograph - Black & White Photograph/s, Negative, Ellis Collection, c1950
Yields information about the appearance of Sturt St c1950 and the Lydiard St intersection.Black and white photograph of a single trucker west bound in Sturt St at Lydiard St North. Note the bus alongside the tram. Has the National Mutual building and Commonwealth Bank buildings. Sign on the National Mutual building advertising Commercial Union Insurance and Doepel and Lilley Real Estate. Bracket arms are of the type that required the pole to be cut into. c1950. Item donated comprised negative 1095, A4 print and laminated A4 print. Negative scanned at 2400dpi. On the top edge of one of the prints "same as 1094"trams, tramways, ballarat, sturt st, secv, lydiard st, tram 30 -
 Ballarat Tramway Museum
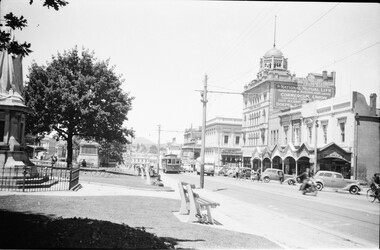
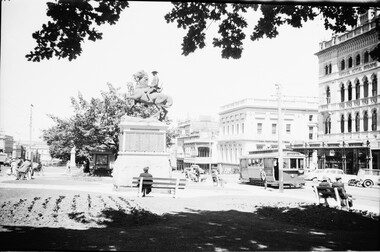
Photograph - Black & White Photograph/s, Negative, Ellis Collection, c1950
Yields information about the appearance of Sturt St and Lydiard St intersection c1950 and the use of the trams.Black and white photograph of No. 12, Sturt St West in Sturt St at Lydiard St North. Has the National Mutual building and Commonwealth Bank buildings. Bracket arms are of the type that required the pole to be cut into. c1950. Has the Boer War Memorial in the view. Item donated comprised negative 1141, A4 print and laminated A4 print. Negative scanned at 2400dpi. On the top edge of one of the prints "Sturt St Ballarat 1950 no print required"trams, tramways, ballarat, sturt st, secv, lydiard st, statues, tram 12 -
 Ballarat Tramway Museum
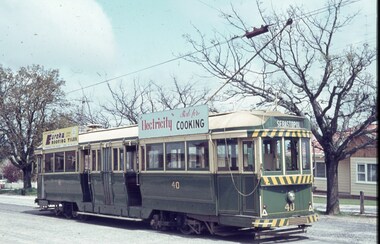
Slide - 35mm slide/s - set of 2, David Verrier, 6/10/1964 12:00:00 AM
Yields information about the appearance of tram 40 at the Sebastopol terminus and the overhead pan helped to locate the trolley pole.Set of two Agfa colour slide, white blue plastic mount. Photograph by David Verrier of tram No. 40 at the Sebastopol terminus. .1 - end on photograph showing the destination sign ready for the return trip to Lydiard St North and the terminus overhead pan used to assist the location of the trolley pole. .2 - similar. Tram has roof advertisements for Eureka Roof Tiles and an SEC Electric Cooking advert. On the dash panel is an advertisement for Dancing at the Civic Hall. In the background is the Royal Hotel and the a Milk bar with a telephone box outside. Photo taken 6/10/1964.On back of slide in pencil "Tues 6/10/64 Ballarat, No. 40 Sebastopol Terminus" on both slides.tramways, trams, sebastopol, albert st, tram 40 -
 Ballarat Tramway Museum
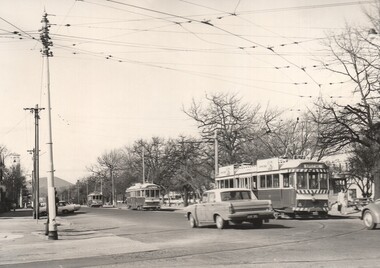
Slide - 35mm slide/s, David Verrier, 6/10/1964 12:00:00 AM
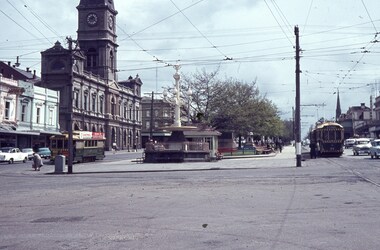
Yields information about the appearance of the City Centre tramway area, and the tram services that ran from there.Agfa colour slide, white blue plastic mount. Photograph by David Verrier of looking west at the intersection of Sturt and Lydiard St with trams 28 (south side)( Gardens), and on the north side tram 34 (Mt Pleasant) and behind it No. 40 (Lydiard St North). Has the Town Hall, tram stop shelter and the fountain in the view. Note the traction power electrical box on the corner with an elderly lady about to cross the road. Photo taken 6/10/1964.On back of slide in pencil "Tues 6/10/64 Ballarat, Sturt and Lydiard St, RT 34 Mt Pleasant, 40 Lydiard Nth LT 28 Gardens"tramways, trams, sturt st, tramway centre, lydiard st, town hall, tram 34, tram 40, tram 28 -
 Ballarat Tramway Museum
Slide - 35mm slide/s, David Verrier, 6/10/1964 12:00:00 AM
Yields information about the appearance of tram 40 at the Lydiard St terminus and the overhead pan at this location.Agfa colour slide, white blue plastic mount. Photograph by David Verrier of No. 40 at the Lydiard St North terminus. Tram has roof advertisements for Eureka Roofing Tiles and Electricity for Cooking Tram destination set for Sebastopol. Note the pan in the overhead to assist placement of the trolley pole.On back of slide in pencil "Tues 6/10/64 Ballarat, Tram No. 40 at Lydiard St terminus"tramways, trams, lydiard st north, overhead, tram 40 -
 Ballarat Tramway Museum
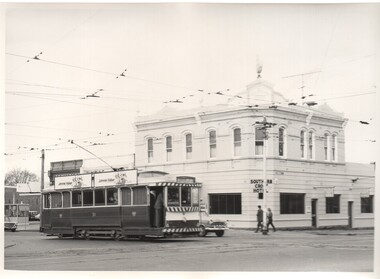
Photograph - Black & White Photograph/s - set of 5, Charles Craig, 1971
Yields information about the intersection of Sturt St and Drummond St and its use by trams in the period before the closure of the SEC system. Shows the Southern Cross Hotel.Set of five Black and White photographs of trams near the intersection of Sturt St and Drummond St South, Hospital Corner. All have the Southern Cross Hotel in the background .1 - No. 31 crosses Drummond St, Gardens via Sturt St West, with two Johnnie Walker Roof adverts. .2 - No. 40 turns from Drummond St South en route to Lydiard St North, while another bogie car waits. Both trams have an electric cooking roof advert. .3 - No. 17 crosses Sturt St with two bogie trams in the view - appears to have been taken before .2. Note the passengers getting off the tram on the south side. .4 - No. 21 turning into Drummond St south, with destination of Sebastopol. Tram has an electric cooking roof advert. .5 - No. 33 crosses Sturt St from Sebastopol while another tram waits at the Sturt St stop. Photo by Charles Craig - during 1971. trams, tramways, sturt st, hospital corner, drummond st sth, tram 31, tram 40, tram 17, tram 21, tram 33 -
 Ballarat Tramway Museum
Photograph - Black & White Photograph/s set of 2, Charles Craig, 1971
Yields information about the intersection of Sturt St and Drummond St and its use by trams in the period before the closure of the SEC system.Set of two Black and White photographs of trams near the intersection of Sturt St and Drummond St North, Hospital Corner. .1 - No. 41, another bogie and a single trucker travel along Sturt St south, the last tram has a destination of Special. .2 - Photo looking at the median strip with a tram on either side. Single trucker with a Twin Lakes sign inbound and another single truck outbound. Shows the position of the shelter and the ESCo switch box. Has a Marshal battery advert on a building in the background. Photo by Charles Craig - during 1971. trams, tramways, sturt st, hospital corner, drummond st, tram 41 -
 Ballarat Tramway Museum
Photograph - Black & White Photograph/s - set of 6, Charles Craig, 1950s
Yields information about the appearance and use of the Ballarat Railway Station level crossing by trams prior to closure.Set of six black and white photographs of trams at the railway level crossing, Ballarat, Lydiard St North featuring the railway station, gates and signals, Reeds Coffee Palace and the Provincial Hotel. .1 - 28 heading south, with an R class and a K class locomotive in the view. .2 - 11, heading north - taken during the 1950's. .3 - 17 parked right up to the gates while K184 shunts at the station. .4 - single trucker (number obscured) - most likely 17 giving the passengers in the previous photo. .5 - Photo with two single truckers in the view and the gates being closed after the tram has passed. .6 - 11, at the gates with a bogie tram behind. No. 11 has a Briquettes roof advert and a Twin Lakes sign. Photo by Charles Craig - during 1971, except for .2, taken during the 1950's. trams, tramways, lydiard st north, railway station, signals, level crossings, tram 28, tram 11, tram 17 -
 Ballarat Tramway Museum
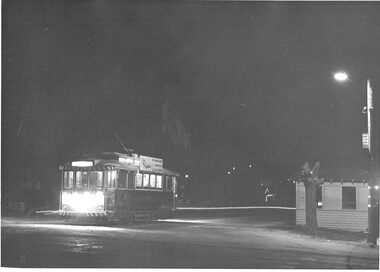
Photograph - Black & White Photograph/s - set of 3, Charles Craig, 1971
Yields information about the appearance and use of the Lydiard St terminus at night.Set of three black and white photographs of No.30 at the Lydiard St North terminus at night. Has the tram stop shelter in the view and the tram stop signs. Tram fitted with a SEC All electric cooking roof advert. Tram has the destination of Sebastopol. .1 - photo with shelter in the view - three copies .2 - photo with the terminus and street lights .3 - as for .1, but on the side of the street, has the lights of Ballarat in the view. Photo by Charles Craig - during 1971. trams, tramways, lydiard st north, night photo, tram 30 -
 Ballarat Tramway Museum
Photograph - Black & White Photograph/s, Charles Craig, 1971
Yields information about the Victoria St terminus just before the closure of the SEC operated system,Black and white photographs of No. 12 at the Victoria St terminus, with the destination Gardens via Drummond St North. Photo most likely 21/8/1971 at the time of closure and possibly during the ARHS / TMSV tour. Has many photographers in the view. Tram has a Twin Lakes sign. Meagher's Hotel in the background with a Victoria Bitter sign. Photo by Charles Craig, probably August 1971.trams, tramways, victoria st, closure, special trams, tram 12 -
 Ballarat Tramway Museum
Photograph - Black & White Photograph/s set of 2, Charles Craig, 21/08/1971 12:00:00 AM
Yields information about tram operations in Wendouree Parade prior to closure following a big rain storm.Set of two black and white photographs of trams in Wendouree Parade after the big rain / hail storm on Friday 21/8/1971 .1 - No. 41 at the intersection with St Aidans Drive and Wendouree Parade, Tram has two Johnnie Walker roof advertisements .2 - No. 12 in Wendouree Parade, near Haddon St with destination of Gardens via Drummond North with a tram stop shelter in the background. Tram has a Twin Lakes sign. Photo by Charles Craig, at the time of the first closure of the Ballarat system, 23/8/1971 when the Victoria St line closed.trams, tramways, wendouree parade, haddon st, shelters, st aidans drive, closure, tram 41, tram 12 -
 Ballarat Tramway Museum
Photograph - Black & White Photograph/s, Charles Craig, Aug. 1971
Yields information about tram operations in Drummond St North and the Mill St crossing loop.Black and white photograph of trams 41 and 38? crossing at the Mill St loop, Drummond St North. No. 41 is running a special and No. 38? running a Gardens via Drummond St North. Photo by Charles Camera, at the time of the first closure of the Ballarat system, 23/8/1971 when the Victoria St line closed.trams, tramways, drummond st nth, mill st loop -
 Ballarat Tramway Museum
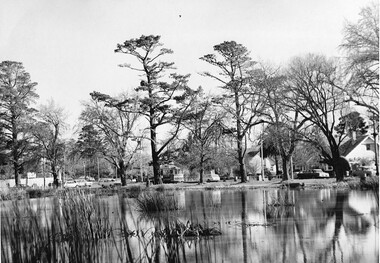
Photograph - Black & White Photograph/s set of 2, Charles Craig, Aug. 1971
Yields information about tram operations in Wendouree Parade and Lake Wendouree.Set of two Black and white photographs of view of trams and Lake Wendouree. .1 - single trucker in Wendouree Parade near Convent Corner, Hamilton Ave, north bound, taken from the finish of the rowing course. .2 - No. 17 westbound in Wendouree Parade, near Barrett Ave, with destination of Gardens via Drummond St North. Photo by Charles Camera, at the time of the first closure of the Ballarat system, 23/8/1971 when the Victoria St line closed.trams, tramways, lake wendouree, wendouree parade, tram 17 -
 Ballarat Tramway Museum
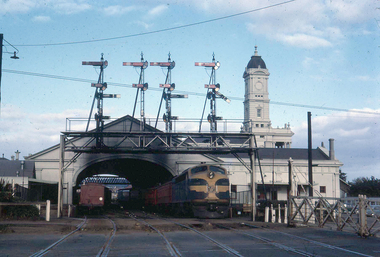
Photograph - Digital image, W. J. Llewelyn, late 1960s
Set of three colour digital images taken by W. J. Llewelyn of the Ballarat Railway Station at Lydiard St North. .1 - Possibly a S class loco on the Horsham / Dimboola/Serviceton St, about to leave Ballarat station during the late 1960's or early 1970's. A freight train is on platform 2. Note the Parcels Office and that the clock had not been fitted to the station building. .2 - S305? shunting at Ballarat station, during the late 1960's or early 1970's. Photos taken from the signal box. .3 - R766 on a special train at the station - late 1980's. Has the failed Melbourne - Canberra - Sydney tourism venture carriages at the rear.trams, tramways, railway station, level crossings, lydiard st north, steam locomotive -
 Ballarat Tramway Museum
Photograph - Digital image, W. J. Llewelyn, c1960
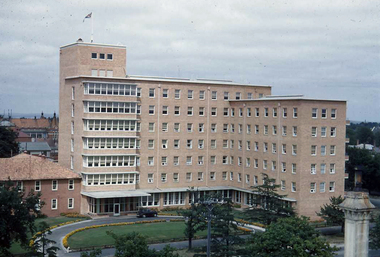
Colour digital images taken by W. J. Llewelyn of the Ballarat Base Hospital c1960, possibly from the Fire Station tower. Shows the driveway in to the hospital from Drummond St North.trams, tramways, drummond st nth, hospital -
 Ballarat Tramway Museum
Photograph - Digital image, W. J. Llewelyn, late 1971
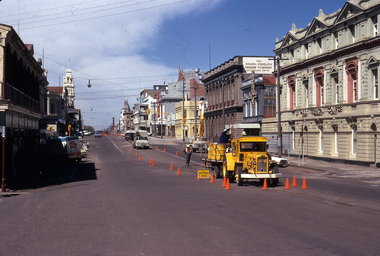
Yields information about the removal of the overhead in Lydiard St North, following the closure of the SEC operated tram system in Sept. 1971Set of two colour digital images taken by W. J. Llewelyn of the removal and cutting up of the overhead and cutting the copper trolley wire in Lydiard St North - Oct. 1971? Shows the method and equipment used. Has a van marked "Arch Smallgoods" in Lydiard St North. Shows the Mair St traffic light, and Railway Hotel on the corner. In the background is the George Hotel, St Paul's Technical College, and Union Fidelity Trustee Company buildings in the background. Warren Doubleday remembers being there at the time, but can't find a photograph of it and date.trams, tramways, lydiard st, closure, secv, overhead, demolition -
 Ballarat Tramway Museum
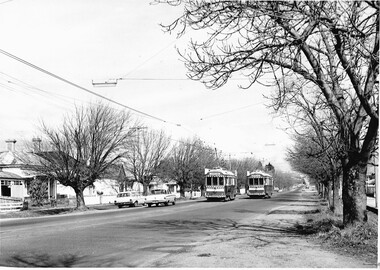
Photograph - Digital image, Chris Phillips, c1970
Yields information about the use of trams, destinations and shunting in Lydiard St North prior to closure.Digital image of two trams in Lydiard St north near Sturt St. Both trams have the destination of City Oval (may have been taken just prior to that of Reg Item 7023). and No. 26 may be about to shunt on the crossover. Has the Post Office, the Mining Exchange and other buildings in the background.trams, tramways, lydiard st north, city oval, tram 26, tram 27 -
 Ballarat Tramway Museum
Photograph - Digital image Set of 2, Chris Phillips, c1970
Yields information about the use of trams in the vicinity of Hospital Corner.Set of two digital images of trams at Hospital corner, c1970 by Chris Phillips.. .1 - No 39 inbound in Sturt St, about to cross Drummond St. Has the Hospital in the background and the tram stop. Tram has the destination of Mt Pleasant. .2 - No. 17 crossing Sturt St from Drummond St South. Has the destination of Lydiard St North. Has the buildings on the corner and the various directional signs in the view. Tram has a SEC roof advert - everything's under control in my all electric kitchen. Ritchie's food and liquor store in the background.trams, tramways, hospital corner, sturt st, drummond st, tram 39, tram 17 -
 Ballarat Tramway Museum
Photograph - Digital image Set of 2, Chris Phillips, c1971
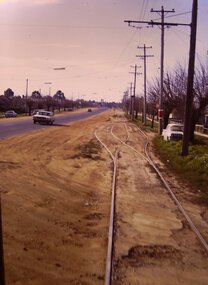
Yields information about the tram track in Albert St Sebastopol and its appearance.Set of two digital images of the tram track in Albert St Sebastopol c1971 by Chris Phillips. .1 - looking north in Albert St at the Grey St loop - shows the road conditions and poles along with the tram stop. .2 - possibly looking north on the western side of Albert St with two men about to board the tram with cameras in hand. Has a "Waller" name on building in background.trams, tramways, sebastopol, albert st, grey st loop -
 Ballarat Tramway Museum
Photograph - Digital image Set of 3, Chris Phillips, 30/05/1971 12:00:00 AM
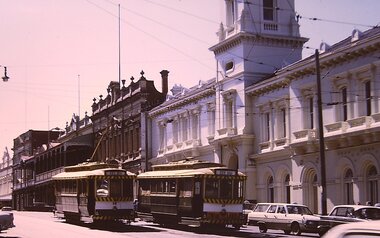
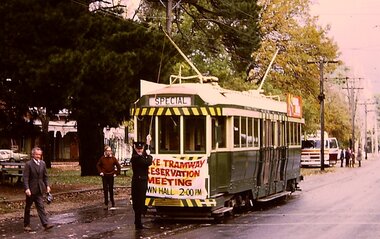
Yields information about the special tram and the people involved at the time of the formation of the BTPS prior to closure of the SEC operated system.Set of three digital images of tram 36 advertising the Lake Tramway Preservation Meeting at the Town Hall 31/5/1971 by Chris Phillips. .1 - tram at Gardens loop with the motorman L Bird pulling the pole down - similar photo to that of The Age Newspaper, see Reg Item 2487. .2 - tram turning from Sturt St into Lydiard St North with the Post Office and the Mining Exchange buildings in the background. .3 - tram at the City stop, south side of Sturt St with the Town Hall and Myers in the background. Also has the tram stop signs in the photograph. See also Reg Item 1064 for the newspaper clipping, 2487 for a print of The Age photograph. See 7033i4 for notes on the tram and who made the banner - thought to be Tom Clark. Imagebtm7033i2bw - black and white version of the slide use in the Long Gallery imagebtm7033i2co - colour hi res scan.trams, tramways, lake wendouree, charters, museum establishment, btps, sturt st, gardens, lydiard st north -
 Ballarat Tramway Museum
Photograph - Digital image, Chris Phillips, c1970
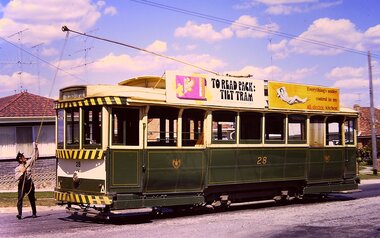
Yields information about the tram operations at the Lydiard St terminus.Digital image of No. 28 at the Lydiard St North terminus with the trolley pole being swung by the driver. The tram has the destination of Sebastopol, a SEC Everything under control in my all electric kitchen and a Bliss Bombs ( "To Read pack: Tilt Tram") roof advert.trams, tramways, lydiard st north, drivers, trolley poles, tram 28 -
 Ballarat Tramway Museum
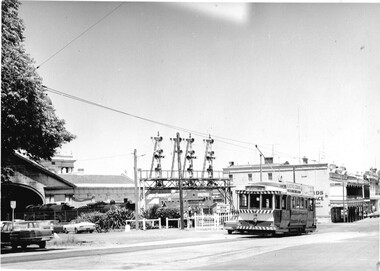
Photograph - Digital image, Chris Phillips, c1970
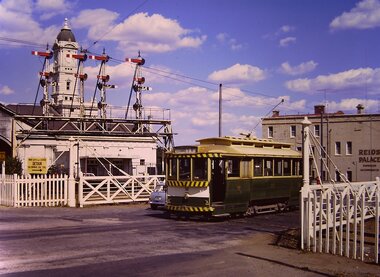
Yields information about the tram operations at the Lydiard St level crossing and the Ballarat Railway Station.Digital image of No. 32 crossing the Lydiard St North level crossing at Ballarat Railway Station . Tram has the destination Lydiard St North. In the background is the station building, clock tower and the signal gantry. On the right hand side is Reids Coffee Palace.trams, tramways, lydiard st north, level crossings, ballarat railway station, tram 32 -
 Ballarat Tramway Museum
Photograph - Digital image, Chris Phillips, c1970
Yields information about the tram operations in Wendouree Parade and photographers near the close of the tramway system operated by the SEC.Digital image of No. 27 travelling north in Wendouree Parade near Carlton St. Windmill Drive south is in the background. Tram has the destination of City and a Twin Lake dash canopy advert. Has another person taking a photograph or photographer in the view.trams, tramways, wendouree parade, carlton st, tram 27 -
 Ballarat Tramway Museum
Photograph - Digital image, Chris Phillips, c1970
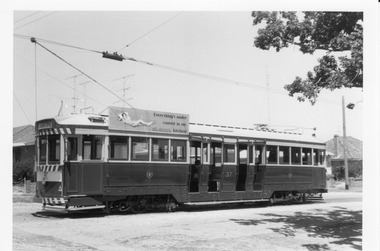
Yields information about the tram operations in Lydiard St North and the type of trams used.Digital image, black and white, of No. 37 at the Lydiard St North, waiting to return to Sebastopol. Has an SEC roof advert - all under control in my all electric kitchen.trams, tramways, lydiard st north, tram 37 -
 Ballarat Tramway Museum
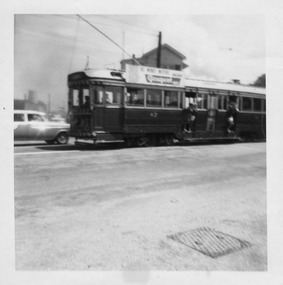
Photograph - Digital image, Chris Phillips, c1970
Yields information about the tram operations in Lydiard St North and the type of trams used.Digital image, black and white, of No. 42 in Lydiard St, north bound, waiting at the railway gates with the signal box in the background. Out of focus.trams, tramways, level crossings, lydiard st north, railway station, tram 42