Showing 1774 items matching " wally "
-
 Ballarat Tramway Museum
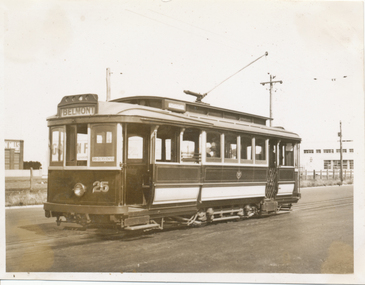
Photograph - Black & White Photograph/s - 25 at the North terminu, Wal Jack, Mar. 1940
Black and White print contained within the Wal Jack Bendigo and Geelong Album, see Reg Item 5003 for more details. Photo of 25 at the North terminus, March 1940. Note the "Pay as you enter" sign. Tram has the destination of Belmont. i1 - scan of print in the album i2 - rear of image i3 - scan of negative at 3200dpi added 18/6/2020.trams, tramways, geelong, north, tram 25 -
 Ballarat Tramway Museum
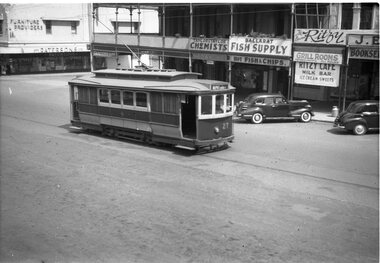
Negative, Wal Jack, late 1940's or early 1950's
Yields information about the tram services and the lower section of Sturt St.Negative and Digital image of the Wal Jack Ballarat Negative file of No. 27 with the destination Depot via Ripon St. Note the white painted windows. Photo late 1940's or early 1950's. In the background are Paterson's Furniture Providers, Taylor and Taylor Chemists, Ballarat Fish Supply and The Ballarat Ritzy Cafe and Grill Rooms. The chemist shop has a sign for Kodak Film.trams, tramways, sturt st, tram 27 -
 Ballarat Tramway Museum
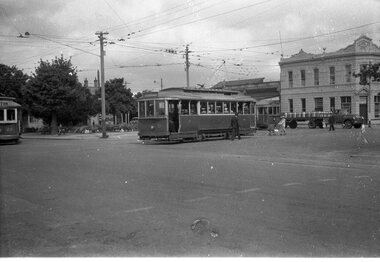
Negative, Wal Jack, late 1940's or early 1950's
Yields information about the tram services and the way they could co-ordinate at Hospital Corner and other traffic.Negative and Digital image of the Wal Jack Ballarat Negative file of three trams at Hospital corner. No. 20 has turned from Drummond North in Sturt - City No. 21 from Sturt in Drummond North - Gardens via Drummond North No. 15 in Sturt St for Gardens via Sturt St west. In the background is the Southern Cross Hotel. There is a lady with a pram and beer delivery truck.trams, tramways, hospital corner, sturt st, drummond st, tram 20 tram 21 tram 15 -
 Ballarat Tramway Museum
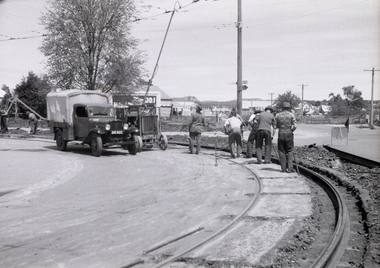
Negative, Wal Jack, Oct. 1951
Yields information about the relay of the track at the corner of Main Road and Barkly St.Negative and Digital images of the Wal Jack Ballarat Negative file of trackwork to relay the outer rail at the corner of Barkly St and Main Road. Shows the methodology of the work. Has the compressor connected to the overhead in the view. Done at the same time as Bridge St and Main Road - see Reg Item 7731? See Reg Item 5294 for the first tram over the curve - 21/10/1951trams, tramways, main road, barkly st, trackwork, track repairs, welding truck, rails -
 Melbourne Tram Museum
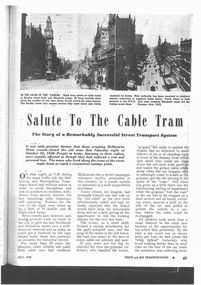
Document - Photocopy, Truck and Bus Transportation, "Salute to the Cable Tram", Original July 1948
Photocopy of an article from the July 1948 issue of Truck and Bus Transportation titled "Salute to the Cable Tram", about the author's view on the closure of the cable tram, a child's view point, first services, photos by Wal Larsen, route details, winding down, take over, conversion and finally closure. Based on Reg Item 3908, would have been written by Frank Sheenen.trams, tramways, cable trams, tramcars, lights, depots, closure, melbourne -
 Melbourne Tram Museum
Negative, Wal Jack, 22/3/1940?
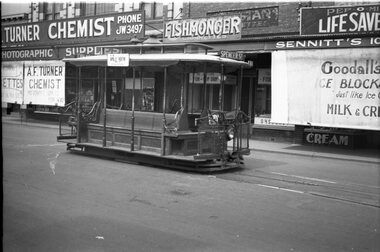
Negative of cable grip car shunting at the Northcote terminus High Street, possibly 22/3/1940, by Wal Jack. Shows the grip car on the terminal track returning for the trailer - . In the background is a F. Turner Chemist, a fishmonger and a milk bar advertising Goodall's ice blocks, Pep-o-mints life savers and Sennett's Icecream. Could be photograph at the same time as Reg Item 5051.trams, tramways, cable trams, northcote, high st, shunting, grip tram -
 Melbourne Tram Museum
Negative, Wal Jack, 1953
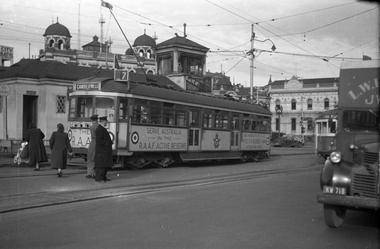
Black and white negative, by Wal Jack, of SW6 923 (Camberwell Route 7) decorated as the RAAF tram during late 1953 at the Victoria St shunt, in Swanston St alongside the signal box and waiting room. Has W2 361 coming into the view. In the background is the City Baths and the works of Greer & Ashburner wire works See also Reg Item 4655 for a coloured photo of the tram.trams, tramways, sw6 class, victoria st, swanston st, decorated trams, raaf, route 7, tram 923 -
 Melbourne Tram Museum
Negative, Wal Jack, c1946
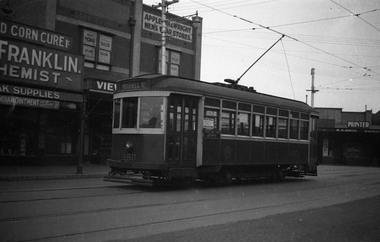
Black and white negative, by Wal Jack, of S class 166 (Destination, Depot) and an a X2 class in Leeds Street before Irving Street at the Footscray railway station. Photo may be taken on the same day as the other photos of S 166 - 21-4-1945 In the background are View Bakery, Appleton and Wright - Men's Wear, Rainbow Knit Wear, Marx's Laundry and at least one solider.trams, tramways, footscray, s class, leeds st, tram 166, x2 class., mmtb -
 Melbourne Tram Museum
Negative, Wal Jack, late 1930's?
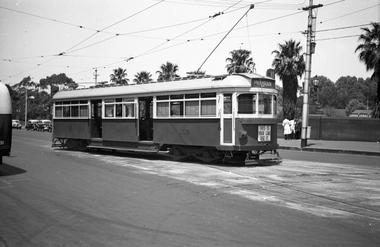
Black and white negative, by Wal Jack, of X1 460, at the Footscray Railway Station terminus in Leeds St. Has the destination of Russell St. Tram has a Pay as You leave sign. In the background is the Franklin Chemist, Appleton and Wright Menswear, Roy Thomas Tailor, and R. S. Smith Printer. Either late 1930's, 1940 or post 1945 no white stripe on tram.trams, tramways, footscray, leeds st, x1 class, tram 460 -
 Melbourne Tram Museum
Negative, Wal Jack, 1939
Black and white negative by Wal Jack of SW6 850 (Prahran, route 77), leaving the Batman Ave terminus at Princes Bridge. Has tail lights and dash canopy lighting with the sign "This is you car use it" underneath. The front number can just be seen. Note the parked taxis and drivers on the south side of the roadway. See also Reg Item 5244 for a photo of the tram at the terminus.trams, tramways, princes bridge, sw6 class, dash canopy lights, new tramcars, batman ave, tram 850 -
 Melbourne Tram Museum
Negative, Wal Jack, 11/03/1962 12:00:00 AM
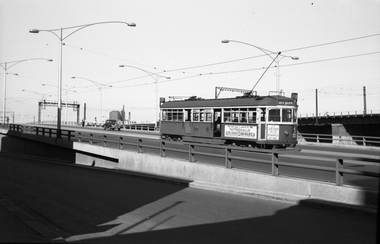
Black and white negative, by Wal Jack, of SW6 906 (North Balwyn, Route 48) eastbound on the Flinders St overpass c1960. Tram has two advertisement for Tattersall's Bonanza prize, and white crow tomato sauce. In the background is the Railway bridge with an advertisement for Western Star butter and a Morris motor car. In the far background is the Mobil oil building, which was completed during 1960.trams, tramways, sw6 class, north balwyn, flinders st, route 48, tram 906 -
 Melbourne Tram Museum
Negative, Wal Jack, 25/06/1955 12:00:00 AM
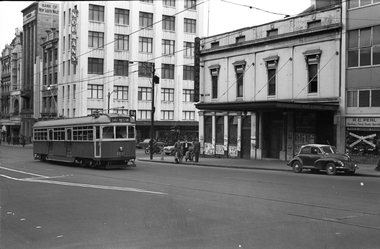
Black and white negative, by Wal Jack, of W7 1011 (East Preston, route 88) in Bourke St crossing Russell St, 25-6-1955 In the background is A C Pearl Handbag and Travel goods specialist, Richardson Wine and Spirit store which appears to be closed, Normans, E Watkins? and Bank of NSW. Note the soft top Morris and the men on the street corner squatting.trams, tramways, bourke st, route 88, russell st, w7 class, east preston, tram 1011 -
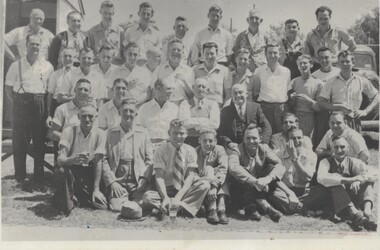 Wodonga & District Historical Society Inc
Photograph - Fred Rochow Railways Collection - Driver George Padgett's Retirement 1955
The Fred Rochow Railways Collection incorporates photos related to the operation of the Wodonga Railway Station including different types of trains and railways staff C. 1930 – 1990. It was donated to the Wodonga Historical Society by Fred Rochow, a railwayman who spent many years based in Wodonga. He joined the Victorian Railways on 17th June l947 and retired in 1988. For some time, he was a member of the Australian Federated Union of Locomotive Enginemen and served a term as a member of the Trades Hall Council. He had an extensive knowledge of the struggles that took place to achieve better conditions for railway workers. Fred worked for many years as a fireman and then worked his way up the ranks to driver, experiencing many changes from the days of steam locomotives through to diesel trains, locomotives and even the modern XPT train. He worked throughout Victoria at different stages of his career, with his final working years focused on the northeast of Victoria and the Albury to Melbourne line. After his retirement, Fred continued to share his love of steam miniature trains with the community. George Padgett was born into a railway family in Numurkah, Victoria on 3 February 1890. He began working for the Victorian Railways as a junior clerk in Maryborough and gained his Driver’s ticket in 1913 at North Melbourne. In November 1937 when the “Spirit of Progress” made its first run from Melbourne to Albury, he was moved to Wodonga. From the train's first return trip he took over the driving. During his career, he made an average of 92 round trips a year. George made his last trip on 4 February 1955 prior to his retirement. George died in Wodonga on 19 February 1967. This collection has local and statewide significance as it captures images of trains, locomotives and personnel who operated the railway services in Wodonga and throughout Northeast Victoria. The railways played a critical role in opening up Victoria and connecting Australia for trade, business, social communication and transport.A group of men gathered at a retirement function for George Padgett in 1955. George was a driver on the "Spirit of Progress". Back Row: Cyril Hughes, Steve Cuper, Ted Hamilton, Lloyd Holmes, George Lloyd, Frank Fulford, Tom Guinane (?), Mick Kowalzuk (?) Centre Row: Bill Welsh, Eric Molloy, Tom Fitzgerald, Reg Feitz (?), Unknown, George Taylor, Bill Baldock, Reg Matthews, Ted Jenkins, Buddy Straghan(?), Unknown. Seated Front Row: Vic Jones, Vin Snow, Jack Dawe. George Padgett, Alex Reid, ? Lawson, Unknown, Austin Fulford, Doug West, Wally Riley, Norm Davey, Unknown, Wally McGeachin (Clerk), Morrie Flanigan.railways wodonga, fred rochow, k class locomotives -
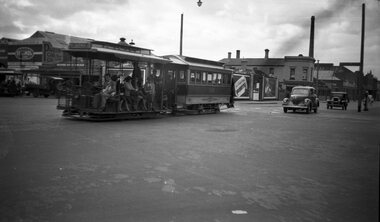 Melbourne Tram Museum
Negative - cable tram Johnston St, Wal Larsen, 15/04/1939
Negative of a cable set at the intersection of Johnston and Nicholson St 15/4/1939, last day of service. Tram inbound to Lonsdale St. Trailer 520. Another car set in Nicholson St on the left side of the photo. In the background is the depot of the "Parlor Car Company", advertising Stenol oilsYields information about the Johnston St cable trams on the last day of the Collingwood line.Negative and black and white print with notes on the rear.Written on rear of album print - "Cable tram with trailer 520 note fancy work on side at the intersection of Johnston & Nicholson Streets, Fitzroy. Photo taken on last day of service on Collingwood route 15th April 1939. Photo Wal H Larsen." Written on rear of print - "Trailer 520 with nice designs on her side coming up Johnston St Fitzroy on last day service. Note Nicholson St tram on left. 15 April 1939, Photo Wal Larsen." Has "No. 12 dT" in ink and "171" in pencil in top right hand corner.trams, tramways, cable trams, nicholson st, johnston st, closure, last day, tram 520 -
 Stawell Historical Society Inc
Photograph - Stawell Fire Brigade, Stawell Fire Brigade with Captain Ray Maddocks
Black and White Photo. Men in Uniform with Helments. Officers in capsStan Illig, A, Oliver, Jack Maddocks, Lindy Hughes, Ray Maddocks, Eric Freeland, Harrold Freeland, Harold D???, Henry Dunn. Front Harry Widge, Wally Steard, Phil Jamison, Frank Floyd, Jack Jamison, Toby Rowlands, Fred Crouch. -
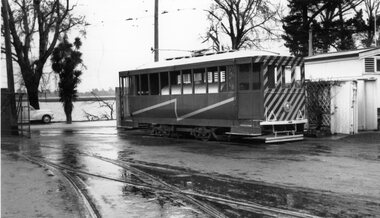 Ballarat Tramway Museum
Photograph - Black & White Photograph/s, Wal Jack, 12/04/1959 12:00:00 AM
Yields information about Ballarat's trams, and the City centre area and the Commonwealth Bank.Black and white print of the Ballarat Scrubber just inside the Depot gates with Lake Wendouree and the toilet block in the background. Photographed on a wet day. Photo print courtesy of Port Dock Railway Museum, now the National Railway Museum. See worksheet 4311 for letter and details of prints sent to Bill Scott, 19/10/2001. Any photo credit to mention NRM Collection.On rear of copy "SEC Ballarat / Scrubber / Wendouree Depot / 7/9/60 / Wal Jack photo / National Railway Museum / 2124 (NRM)" Has a "William Scott" address label in the bottom right hand corner and "37)" in the top left hand corner.trams, tramways, depot, scrubber tram, tram scrubber -
 Melbourne Tram Museum
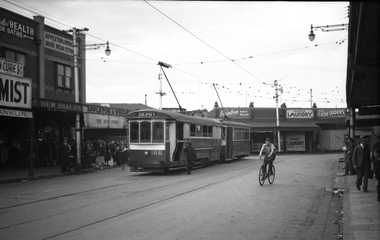
Negative, Wal Larsen, Cable trams Gertrude St, 6/5/1940
Photograph of a cable tram set in Gertrude St Fitzroy, alongside the winding house. Has a two uniformed men on the Grip car. In the background is the Royal Exhibition Buildings.Yields information about Gertrude St Fitzroy and cable trams.Negative of a photograph. Print also held.Notes on rear of print "Northcote tram outside Nicholson Street power house, trailer 574, 6 May 1940, Photo Wal Larsen" . Has number 180 in pencil in top right hand corner and No. 142 in ink in bottom left hand corner.trams, tramways, cable trams, nicholson st, gertrude st, winding houses -
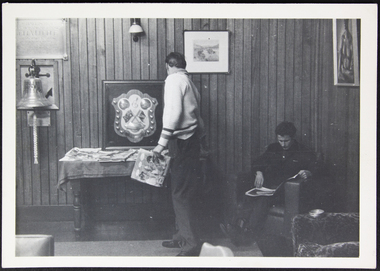 Mission to Seafarers Victoria
Photograph - Photograph, Black and white, 1950s
The image portrays how the Celia Little room (Celia Little plaque on the wall) was used mid 20th C. and date of similar image (see record 0221) The inclusion of the bell from the 'Moreton Bay' vessel dates the image to post 1957 when the bell was presented to the Mission. Used as a sitting room or lounge area at the Mission to Seafarers Melbourne. The image also shows the style of dress and style of magazine covers of the time. On the table stands the shield for the annual competition by crew of merchant ships presented by Wally Nancarrow, Sydney. (see item 0608)The photograph is significant in that it captures the essence of the Mission to Seafarers mid-20th century. It identifies the main use of the Celia Little room as a reading area. It also helps date and track locations of other objects in the heritage collection. A black and white photograph of two men in the Celia Little room at the Mission to Seafarers Melbourne. The top left of the photograph is a bell fixed to the wall that has a bell pull with a long piece of decorative knot-work attached to the clapper. The room is set up as a lounge area with at table left of the centre against the wall. The table is laden with magazines and papers on top of a tablecloth. A picture frame is sitting on the table and leaning against the wall that has a 'shield' or 'coat of arms' displayed. (see also VC records 221 and 0608) One of the men is standing central in the photograph, in a white jumper holding a magazine and half turned towards the wall.The second man is sitting in a chair in the bottom right side of the photograph and appears to be reading. A few tops of chairs are seen at the very bottom of the photo and on the wall are a plaque to the left, a framed picture to the right of the first man's head and another in the far right top corner. The room appears to be lit from the left.melbourne, bell, men, magazine, chairs, wains coting, papers, mission-to-seafarers, celia-little-room, bell-pull, picture-frame, 1940s, celia little, plaque, shield, soccer, football -
 Ambulance Victoria Museum
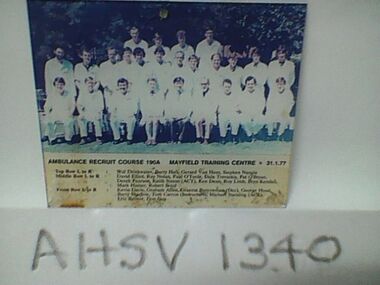
Photograph, Ambulance Recruit Course 190A, Mayfield Training Centre, 31 January 1977, 1977
Front Row L to R: Kevin Davis, Graham Allen, Graeme Barrowman (Dec), George Hood, Barry Shadlow, Tom Carron (Instructors), Michael Standing (ACT), Eric Rennie, Don Guy. Middle Row L to R: David Elliot, Ray Nolan, Paul O'Toole, Dale Trevaskis, Pat O'Bryan, Derek Pearson, Keith Simon (ACT), Ken Dean, Roy Limb, Bryn Kendall, Mark Hamer, Robert Boyd. Top Row L to R: Wal Drinkwater, Barry Hall, Gerard Van Hees, Stephen Nangle.Colour photograph of Ambulance Recruit Course, Mayfield Training Centre trainees,ambulance recruit course, mayfield training centre, instructors, act -
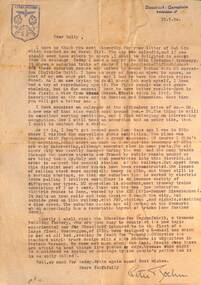 Ballarat Tramway Museum
Letter - from Peter Boehm Dusseldorf to Wal Jack, Peter Boehm, 1950
Wal Jack had an extensive range of correspondents throughout Australia and the world who often provided him with detailed drawings and notes on various tramway systems. The letter from a resident of Dusseldorf West Germany, details the author's travels, issues post World War 2, photos, enlargers, a visit to Koln or Cologne, war damage, photos of Russian tramcars, tramcars in use, the interurban line to Bonn and his forthcoming visit to "Dusseldor fer Waggonfabrik" which became the Duewag factory. A web search shows that the author published at least one book on trams.Demonstrates some of the correspondence that Wal Jack received from around the world.Letter typed on A4 paper with sender's stamp and address with a pencil sketch on the rear. letters, wal jack, railways, tramways, dusseldorf, duewag, koln, colongne -
 Bendigo Historical Society Inc.
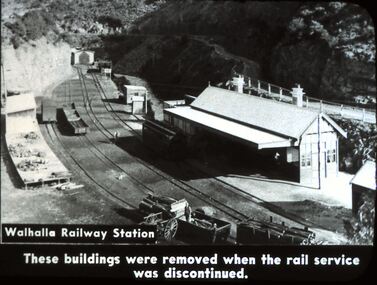
Slide - DIGGERS & MINING. DIGGERS AND MINERS, c1850s
Diggers & Mining. Diggers and miners. Walhalla - Gold Town. Walhalla Railway station. These buildings were removed when the rail service was discontinued. Picture shows 2 lines coming in and 2 lines off to the side, a building on one side with platform which is on the same level as the rails. Passengers would have needed to climb up into the carriages. Markings: 23 995 WAL. Used as a teaching aid.hanimounteducation, tertiary, goldfields -
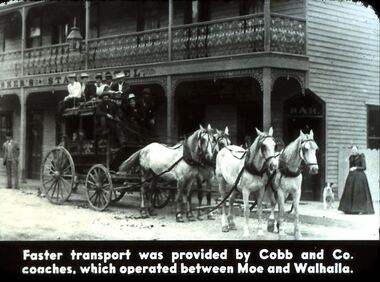 Bendigo Historical Society Inc.
Slide - DIGGERS & MINING. DIGGERS AND MINERS, c1850s
Diggers & Mining. Diggers and miners. Walhalla - Gold Town. Faster transport was provided by Cobb and Co. coaches, which operated between Moe and Walhalla. Picture shows a Cobb and Co. coach with 4 white horses outside a 2 story hotel. --kers Star Hotel. There are at least 9 people riding on the outside of the coach and more inside. Markings: 23 995 WAL. Used as a teaching aid.hanimounteducation, tertiary, goldfields -
Tatura Irrigation & Wartime Camps Museum
Photograph, Racing Club Dinner c1955
Racing Club Dinner c1955.|L-R Nearest Table: Postmaster, J. Carroll, Palmer Young, ...., ...., Merv & Dais Fletcher, Father O'Sullivan, Wal Reddie, Frank McWhimsey, Frank Stevenson, Tom Cornish.|Centre Row: Neil Colliver, Jack O'Meara, Bill Pritchard, Tom Hunter, Jack O'Toole, ...., ...., ...., Mick O'Reilly, ...., Jim Young.|Back Row: Jim Harford, Jerry Carlyon.tatura, recreations, sports, costume, female, male -
 Ballarat Tramway Museum
Negative, Wal Jack, early 1950's
Yields information about the method of delivery of bogie trams from Melbourne and the Western Highway near Ballarat early 1950'sNegative and Digital images of the Wal Jack Ballarat Negative file of the delivery of a bogie tramcar on a very wet day using a Yellow Express truck. Would appear that the railway line is on there right hand side, possibly just before the Caledonia bridge under the railway line at the foot of the Warrenheip bank on the Western Highway. Timing related to Reg Item 5327i, btm5207i, delivery of ex MMTB 42 or 35.trams, tramways, delivery of tramcars, railways, bogie trams, ballarat -
 Ballarat Tramway Museum
Photograph - Black & White Photograph/s, Charles Craig, 14/03/1949 12:00:00 AM
Yields information about the use of the first bogie tram to be used in Ballarat and its use on an AETA tour.Black and white photograph of Ballarat bogie tram No. 22 (later 37) on an AETA tour. Photo location - possibly Mt Pleasant. See Wal Jack notes btm5533 on this tram. Photo by Charles Craig, dated by G.Cleak - 14.3.1949 - Labour Day. See also Reg item 7591 for a photo of this tram on the same tour at the Sebastopol terminus a md 8513 for a similar photograph. 2 copies held. trams, tramways, bogie trams, aeta, tours, tram 22 -
 Ballarat Tramway Museum
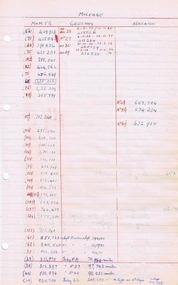
Document - List, Wal Jack, "Mileages", 1950's
Yields information about the mileages of the Ballarat tram fleet in other cities, prior to coming to Ballarat.Handwritten list of SEC Ballarat Tramcars and their mileages in the other cities prior to coming to Ballarat. Aligns with the list on the previous page. Gives their Melbourne or Adelaide numbers and their mileage in Melbourne, Adelaide or Geelong. For some the bogie trams, also gives the date they left Preston Workshops. Prepared by Wal Jack Contained within Reg Item 5507 - Foolscap binder with green covers, black binding edge and metal clips. tramcars, livery, sec, esco -
 Ballarat Tramway Museum
Document - Letter/s, State Electricity Commission of Victoria (SECV), 13/12/1961 12:00:00 AM
Yields information about Ballarat tramways financials during the 1950's.Letter, typed on one quarto sheet, from SEC Ballarat Office to Wal Jack on SEC Letterhead, dated 13/12/1961, providing a print of old Bendigo trams - toast rack and combination trams and providing information on annual losses for Ballarat for the years 1950 to 1961 and the passengers carried. Has the initials HWL:LRT, signed H. W. Linaker as Manager. The paper has a Burnie Bond watermark. trams, tramways, tramcars, ballarat, financial statements -
Ballarat Tramway Museum
Document - Tramcar Record - SEC No. 22 (3rd), Wal Jack, 1950's
Tramcar record for SEC Ballarat No. 22, the 3rd tram to carry this number, builder, system location, short history and work in Ballarat.Yields information about the history of individual tramcars in Ballarat.Handwritten note on foolscap lined sheet outlining the history of Ballarat Tramcar No. 22 - 3rd use of this number, who built for, date to Ballarat, painting and other changes to the tramcar as compiled by Wal Jack. Part of a series on each SEC Ballarat operated tramcar, except for the ESCo trams. Contained within Reg Item 5507 - Foolscap binder with green covers, black binding edge and metal clips.trams, tramways, ballarat, tramcars, tramcars of ballarat, tram 22 -
Ballarat Tramway Museum
Document - Tramcar Record - SEC No. 23, Wal Jack, 1950's
Tramcar record for SEC Ballarat No. 23, the 2nd tram to carry this number, builder, system location, short history and work in Ballarat.Yields information about the history of individual tramcars in Ballarat.Handwritten note on foolscap lined sheet outlining the history of Ballarat Tramcar No. 23 - 2nd use of this number, who built for, date to Ballarat, painting and other changes to the tramcar as compiled by Wal Jack. Part of a series on each SEC Ballarat operated tramcar, except for the ESCo trams. Contained within Reg Item 5507 - Foolscap binder with green covers, black binding edge and metal clips. trams, tramways, ballarat, tramcars, tramcars of ballarat, tram 23 -
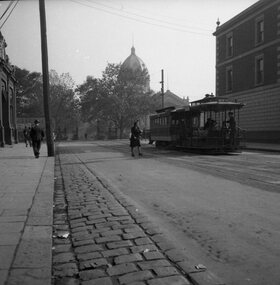
 Ballarat Tramway Museum
Photograph - Digital image, Wal Jack, late 1930's
Yields information SEC 3rd 22, one of the ex Adelaide tramcars and the streetscape late 1930's. at the City tram terminus.Digital image from the Wal Jack Ballarat Album of No. 22 at the City terminus, south side, with the Post Office in background. Tram has the destination of Gardens via Sturt St West. Not dated, late 1930s. Note very similar image to Reg item 1373. See image i2 for rear of photograph. See Reg Item 1373 for a poor print and Reg Item 7540 for the original negative.on rear of photo in ink, "Ballarat Tramways 3rd No. 22 ex Adelaide 92 / smashed up July 1944 tram" and in bottom right corner "W. Jack"trams, tramways, sturt st