Showing 1569 items matching " johnsons"
-
 Lakes Entrance Historical Society
Photograph - Johnson/Sweeney, Lakes Post Newspaper, 1992
Black and white photograph of Mark Johnson and Allison Sweeny on their wedding day Kalimna West Victoriacelebrations, genealogy -
 Mission to Seafarers Victoria
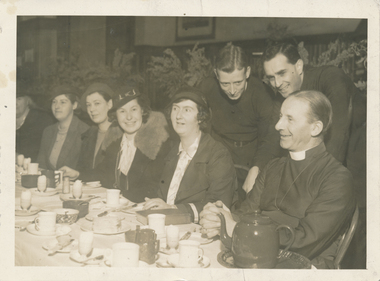
Photograph, Herald, 29 June 1934
The photograph was published in the Herald with caption: "A snapshot at the breakfast given to Archbishop Head by the Harbor Light Guild at the Seamen's Mission today. From right, Archbishop Head, the Chaplain Superintendent of the Mission (Rev. F. L. Oliver), the assistant chaplnin (Rev. R. L. Kerdel), Misses L. Rae, A. Phillips, and J. Johnson. (Story in page 8).Photograph depicting a group of one man sitting next to 3 women at a table dressed with cups, teapot. Behind him are two men standing and smilingWritten on verso with blue ink by Beverley Kent nee Oliver: 1935/36 / Abp Head, Dad, Padre Kernel, Miss Norman, Alma Philips, Jean Johnsonpadre oliver, reverend frank leslie oliver, archbishop head, harbour lights guild, hlg, r.l. kerdel, l. rae, a. phillips, j. johnson, breakfast, table, meal, alma phillips, jean johnson -
 Bendigo Historical Society Inc.
Newspaper - JENNY FOLEY COLLECTION: GRINNERS
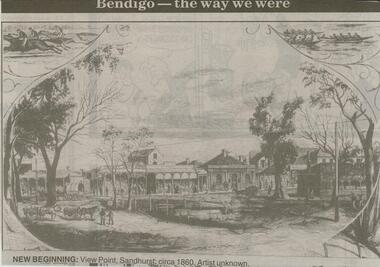
Bendigo Advertiser ''The way we were'' from 2000. Grinners: 1927 Premiers, Raywood, in the Tandara-Mitiamo Lines Association. Back row - Ned Kinsman (trainer), Lewis Ross, Ray Morshed, Sid Morshed, Fred Crapper, Frank Crapper, Bert Donaldson, Simon O'Halloran, Arthus Johnson (trainer). Middle - Jack Miller (committee), Britt Richards, Jack Crapper, Sid Aldridge, Ern Hayes, Edgar Johnson, Alan Johnson, Ginge Gunn (committee). Front - Jack Gallagher, Jack Peat, Rupert Ellis, Charlie Pascoe, Percy Johnson. The clip is in a folder.newspaper, bendigo advertiser, the way we were -
 Bendigo Historical Society Inc.
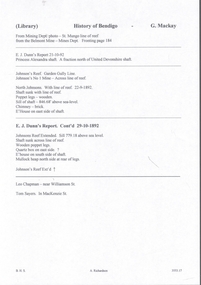
Document - NEW CHUM & VICTORIA LINES OF REEF - NOTES ON JOHNSON'S REEF
Handwritten notes mention 'History of Bendigo by G Mackay, St Mungo Line of Reef from the Belmont Mine, Princess Alexander Shaft, Johnson's no 1 Mine, North Johnson's with notes on buildings, etc. and date 22/9/1892, and the Johnson's Reef Extended dated 29/10/1892, with note on building, mullock heap, and sill 779.18 above sea level. Also mentioned are Leo Chapman and Tom Sayers.document, gold, new chum & victoria lines of reef, notes on johnson's reef, history of bendigo, g mackay, mines' dept, st mungo line of reef, e j dunn report 21/10/92, princess alexander shaft, united devonshire shaft, johnson's reef, garden gully line, johnson's no 1 mine, north johnson's, e j dunn's report 29/10/1892, johnson's reef extended, leo chapman, tom sayers -
 Phillip Island and District Historical Society Inc.
Photograph, 1950's
Photograph donated by Rod Carmichael.Black & White laminated photograph. San Remo Pier with "Evening Star". Newhaven Pier in the background. L Talbot and B Johnson 1950 ?ferry evening star, ferries, san remo pier, newhaven pier, rod carmichael -
 Flagstaff Hill Maritime Museum and Village
Domestic object - Plate, Johnson Bros
The Process of Making Pottery Decorating, Firing, Glazing, Making, Technical There is a rhythm and flow to clay. It can’t be done all at once! Even the making process! It can take weeks to get everything done, especially if you can only work on your pottery once a week! Even though we have three hour classes, it’s often just not enough time! Here is an overview of some of the processes so you have a bit more grasp on some of the technical stuff! Step One – Design There are SO many ideas out there for making stuff in clay! From delicate porcelain jewellery, through to heavy sculptural work and everything in between. Deciding your direction is sometimes not that easy – when you first start, try everything, you will naturally gravitate to the style that you enjoy! The options and variations are endless and can get a wee bit overwhelming too! Check in with me before you start to ensure your ideas will work, what order you might do things, how you could achieve the look you are seeking and any other technical data required! Step Two – Making Clay is thixotropic. This means that as you work with it, the clay first gets sloppier and wetter, before is begins to dry in the atmosphere. For most things, you simply can’t do all parts of the project at once. An example of work order might look like: Get last weeks work out from the shelves Prepare clay for today’s work – roll your clay, prepare balls for throwing, make the first stage of a pinch pot) Clean up last week’s work and put it on the shelf for bisque firing Check that you have any glazing to do – and do enough of it that you will have time to finish your main project Do the next step of your next project – there might be a further step that can’t be complete immediately, in that case, wrap your work well and put onto the shelves. Letting your work rest for a while can really help keep your work clean and professional looking. Many things require bagging under plastic to keep it ready for work the next week – put your name on the outside of the bag so you can find your work easily. We have stickers and markers. Consider how you want to decorate your work – coloured slip can be applied at a fairly wet stage (remembering that it will make your work even wetter!). Trying to apply slip to dry clay won’t work! If you want to do sgraffito – you will need to keep the work leather hard (a state of dryness where you can still work the clay with a little effort and a little water and care). Step Three – Drying Most of the time your work can go into the rack uncovered to let it dry out for the following week. If you want to continue forming or shaping you will need to double bag your work – put your work on a suitable sized bat and put the bat in a bag so the base of the bag is under the bat, then put another bag over the top of the work and tuck the top of the bag under the bat. If you want to trim (or turn) your thrown work the following week, it should also be double bagged. If your work is large, delicate, or of uneven thicknesses, you should lightly cover your work for drying. When considering the drying process, bare in mind the weather, humidity and wind! The hotter and dryer, the faster things dry and work can dry unevenly in the shelves – this can lead to cracking – another time to lightly cover your work for drying. Step Four – Trimming and Cleaning Up Your work is dry! It is called greenware now and it is at it’s most fragile! Handle everything with two hands. I often refer to soft hands – keep everything gentle and with your fingers spread as much as possible. Try to not pick up things like plates too much, and always with both hands! Before your work can be bisque fired it should be “cleaned up”. You work won’t go into the kiln if it has sharp edges – when glazed, sharp edges turn into razor blades! Use a piece of fly wire to rub the work all over – this will scratch a little so be light handed. Use a knife or metal kidney to scrape any areas that require a bit more dynamic treatment than the fly wire offers! Finally, a very light wipe over with a slightly damp sponge can help soften and soothe all of your edges and dags! Trimming thrown work: If you are planning to trim (or turn) your thrown work (and you should be), make sure you bag it well – your work should be leather hard to almost dry for easiest trimming. Use this step to finish the work completely – use a metal kidney to polish the surface, or a slightly damp sponge to give a freshly thrown look. Wipe the sponge around the rim after trimming, and check the inside of the pot for dags! Trimming slip cast work: Usually I will trim the rims of your work on the wheel the following day to make that stage easier, however you will still need to check your work for lumps and bumps. Last but not least – check that your name is still clearly on the bottom of your work. Step Five – Bisque Firing When the work is completely dry it can go into the bisque kiln. The bisque kiln is fired to 1000°C. This process burns off the water in the clay as well as some of the chemically bound water. The structure of the clay is not altered that much at this temperature. Inside the bisque kiln, the work is stacked a little, small bowl inside a larger bowl and onto a heavy plate. Smaller items like decorations or drink coasters might get stacked several high. Consideration is paid to the weight of the stack and shape of the work. A bisque kiln can fire about one and a half times the amount of work that the glaze kiln can fire. The firing takes about 10 hours to complete the cycle and about two days to cool down. Once it has been emptied the work is placed in the glaze room ready for you to decorate! Step Six – Glazing Decorating your work with colour can be a lot of fun – and time consuming! There are three main options for surface treatment at this stage: Oxide Washes Underglazes Glazes Washes and underglazes do not “glaze” the work – It will still need a layer of glaze to fully seal the clay (washes don’t need glaze on surfaces not designed for food or liquid as they can gloss up a little on their own). Underglazes are stable colourants that turn out pretty much how they look in the jar. They can be mixed with each other to form other colours and can be used like water colours to paint onto your work. Mostly they should have a clear glaze on top to seal them. Oxides are a different species – the pink oxide (cobalt) wash turns out bright blue for instance. They don’t always need a glaze on top, and some glazes can change the colour of the wash! The glazes need no other “glaze” on top! Be careful of unknown glaze interactions – you can put any combination of glaze in a bowl or on a plate, but only a single glaze on the outside of any vertical surface! Glazes are a chemical reaction under heat. We don’t know the exact chemicals in the Mayco glazes we use. I can guess by the way they interact with each other, however, on the whole, you need to test every idea you have, and not run the test on a vertical surface! Simply put, glaze is a layer of glass like substance that bonds with the clay underneath. Clay is made of silica, alumina and water. Glaze is made of mostly silica. Silica has a melting point of 1700°C and we fire to 1240°C. The silica requires a “flux” to help it melt at the lower temperature. Fluxes can be all sorts of chemicals – a common one is calcium – calcium has a melting point of 2500°C, however, together they both melt at a much lower temperature! Colourants are metal oxides like cobalt (blue), chrome (green through black), copper (green, blue, even red!), manganese (black, purple and pink) iron (red brown), etc. Different chemicals in the glaze can have dramatic effects. for example, barium carbonate (which we don’t use) turns manganese bright pink! Other elements can turn manganese dioxide brown, blue, purple and reddish brown. Manganese dioxide is a flux in and of itself as well. So, glazes that get their black and purple colours, often interact with other glazes and RUN! Our mirror black is a good example – it mixes really well with many glazes because it fluxes them – causes them to melt faster. It will also bring out many beautiful colours in the glazes because it’s black colouring most definitely comes from manganese dioxide! Glaze chemistry is a whole subject on it’s own! We use commercial Mayco glazes on purpose – for their huge range of colour possibilities, stability, cool interactions, artistic freedom with the ability to easily brush the glazes on and ease of use. We currently have almost 50 glazes on hand! A major project is to test the interactions of all glazes with each other. That is 2,500 test tiles!!!! I’m going to make the wall behind the wheels the feature wall of pretty colours! Step Seven – Glaze (Gloss or sometimes called “Glost”) Firing Most of the time this is the final stage of making your creation (but not always!) The glaze kiln goes to 1240°C. This is called cone 6, or midrange. It is the low end of stoneware temperatures. Stoneware clays and glazes are typically fired at cone 8 – 10, that is 1260 – 1290°C. The energy requirement to go from 1240°C to 1280°C is almost a 30% more! Our clay is formulated to vitrify (mature, turn “glass-like”) at 1240°, as are our glazes. A glaze kiln take around 12 hours to reach temperature and two to three days to cool down. Sometimes a third firing process is required – this is for decoration that is added to work after the glaze firing. For example – adding precious metals and lustres. this firing temperature is usually around 600 – 800°C depending upon the techniques being used. There are many students interested in gold and silver trims – we will be doing this third type of firing soon! After firing your work will be in the student finished work shelves. Remember to pay for it before you head out the door! There is a small extra charge for using porcelain clay (it’s more than twice the price of regular clay), and for any third firing process! Once your work has been fired it can not turn back into clay for millennia – so don’t fire it if you don’t like it! Put it in the bucket for recycling. https://firebirdstudios.com.au/the-process-of-making-pottery/Ceramics have evolved over thousands of years.A white earthenware side plate with a gadroon edge. Has water marks and chips on front.‘Johnson Bros England Reg No 15587’flagstaff hill, warrnambool, shipwrecked-coast, flagstaff-hill, flagstaff-hill-maritime-museum, maritime-museum, shipwreck-coast, flagstaff-hill-maritime-village, johnson bros, ceramics, tableware -
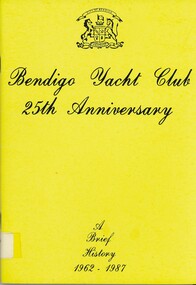 Bendigo Historical Society Inc.
Book - BENDIGO YACHT CLUB 25TH ANNIVERSARY 1962 - 1987, 1987
Bendigo Yacht Club 25th. Anniversary. A Brief History 44 pages. Compiled by Brian Guest and Hugh WardA. Johnson, B. Guest, H. Wardbendigo, sporting clubs, bendigo yacht club, bendigo, bendigo yacht club, sport -
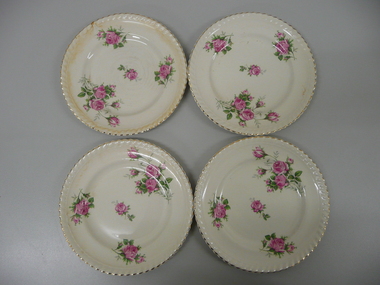 Bendigo Historical Society Inc.
Domestic Object - 4 SIDE PLATES
Four white china side plates decorated with sprays of pink roses and green leaves, crimped edges with gilding around rim.Sovereign Pottery Johnson Made in Australiadomestic equipment, food consumption, plates -
 Tatura Irrigation & Wartime Camps Museum
Book, Waranga, 1965
Presentation of day-to-day happenings in Warange district by a member of Soldier-Settlement family. Research period 1865-1965Gold dust jacket. 1860 goldfields depicted thereon. Printing in white and red. 147 pagesRon Johnson Hunter. Xmas 1965waranga, forster hw, tatura, books, history, local -
Tatura Irrigation & Wartime Camps Museum
Book, Waranga 1865 1965 A Shire History, 1965
Presentation of day-to-day happenings in Warange district by a member of Soldier-Settlement family. Research period 1865-1965Gold dust jacket. 1860 goldfields depicted thereon. Printing in white and red. 147 pagesRon Johnson Hunter. Xmas 1965waranga, forster hw, tatura, books, history, local -
 Clunes Museum
Photograph, RICHARDS AND CO
OVAL PHOTOGRAPH OF FRANCES FORD. PINTUCKED FRONT AND LACE ON DRESS.S FISHER JOHNSON STURT ST.local history, photography, photographs, early citizens -
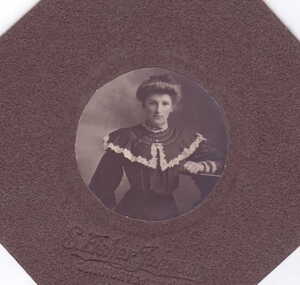
Glenelg Shire Council Cultural Collection
Photograph - Unknown portrait
Black and white portrait photograph of a man. He is wearing a jacket and bow tie with a white shirt. He has a moustache which is curled and waxed to the ends. He has bushy eyebrows. Mounted in salmon board and dark brown wooden frameJohnson & Co Hamilton (bottom right) -
 Bendigo Historical Society Inc.
Document - ROBERT DENIS KELLY COLLECTION: MAP OF ELECTRIC RAILWAYS OF LONDON
Document: map of the electric railways of London. Buff coloured document, printed in black, white and red on front cover. Folds into 9 x 14 map. Details include tourist destinations, descriptions of costs etc.Johnson, Riddle & Co. Ltd. London.person, robert denis kelly, world war 1, france, london, underground, electric railway -
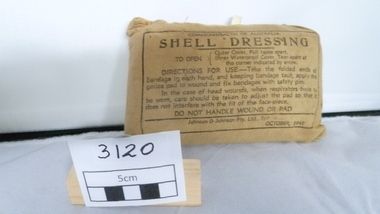 National Vietnam Veterans Museum (NVVM)
Equipment - Equipment, Army, Field Dressing, 1941
Tan coloured cotton package containing dressing. Instructions for use written on outside.Commonwealth of Australia Shell Dressing. Extensive directions for use. Johnson & Johnson P/L Syd October 1941field dressing, shell dressing, sas -
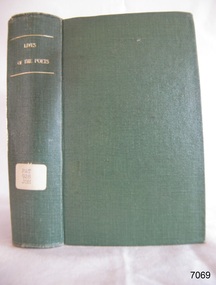 Flagstaff Hill Maritime Museum and Village
Book, The Lives of the Most Eminent English Poets
Pattison Collection This item is from the ‘Pattison Collection’, a collection of books and records that was originally owned by the Warrnambool Mechanics’ Institute, which was founded in Warrnambool in 1853. By 1886 the Warrnambool Mechanics’ Institute (WMI) had grown to have a Library, Museum and Fine Arts Gallery, with a collection of “… choice productions of art and valuable specimens in almost every branch and many wonderful national curiosities are now to be seen there, including historic relics of the town and district.” It later included a School of Design. Although it was very well patronised, the lack of financial support led the WMI in 1911 to ask the City Council to take it over. In 1935 Ralph Pattison was appointed as City Librarian to establish and organise the Warrnambool Library as it was then called. When the WMI building was pulled down in 1963 a new civic building was erected on the site and the new Warrnambool Library, on behalf of the City Council, took over all the holdings of the WMI. At this time some of the items were separated and identified as the ‘Pattison Collection’, named after Ralph Pattison. Eventually, the components of the WMI were distributed from the Warrnambool Library to various places, including the Art Gallery, Historical Society and Flagstaff Hill. Later some were even distributed to other regional branches of Corangamite Regional Library and passed to and fro. It is difficult now to trace just where all of the items have ended up. The books at Flagstaff Hill Maritime Village generally display stamps and markings from Pattison as well as a variety of other institutions including the Mechanics’ Institute itself. RALPH ERIC PATTISON Ralph Eric Pattison was born in Rockhampton, Queensland, in 1891. He married Maude Swan from Warrnambool in 1920 and they set up home in Warrnambool. In 1935 Pattison accepted a position as City Librarian for the Warrnambool City Council. His huge challenge was to make a functional library within two rooms of the Mechanics’ Institute. He tirelessly cleaned, cleared and sorted a disarrayed collection of old books, jars of preserved specimens and other items reserved for exhibition in the city’s museum. He developed and updated the library with a wide variety of books for all tastes, including reference books for students; a difficult task to fulfil during the years following the Depression. He converted all of the lower areas of the building into a library, reference room and reading room for members and the public. The books were sorted and stored using a cataloguing and card index system that he had developed himself. He also prepared the upper floor of the building and established the Art Gallery and later the Museum, a place to exhibit the many old relics that had been stored for years for this purpose. One of the treasures he found was a beautiful ancient clock, which he repaired, restored and enjoyed using in his office during the years of his service there. Ralph Pattison was described as “a meticulous gentleman whose punctuality, floorless courtesy and distinctive neat dress were hallmarks of his character, and ‘his’ clock controlled his daily routine and his opening and closing of the library’s large heavy doors to the minute.” Pattison took leave from 1942 to 1942 to serve in the Royal Australian Navy, Volunteer Reserve as Lieutenant. A few years later he converted one of the Museum’s rooms into a Children’s Library, stocking it with suitable books for the younger generation. This was an instant success. In the 1950’s he had the honour of being appointed to the Victorian Library Board and received more inspiration from the monthly conferences in Melbourne. He was sadly retired in 1959 after over 23 years of service, due to the fact that he had gone over the working age of council officers. However, he continued to take a very keen interest in the continual development of the Library until his death in 1969. WARRNAMBOOL PUBLIC LIBRARY The Warrnambool Mechanics’ Institute (WMI) was formed by a voluntary community group in 1863, within six years of Warrnambool’s beginnings, and its Reading Room opened in 1854. The WMI operated until 1963, at which time it was one of the oldest Mechanics’ Institutes in Victoria. Mechanics’ Institutes offered important services to the public including libraries, reading rooms and places to display and store collections of all sorts such as curiosities and local historical relics. In 1886 a Museum and Fine Arts Gallery were added to the WMI and by the beginning of the 20th century, there was also a billiards room and a School of Art. By this time all Mechanics’ Institutes in country Victoria had museums attached. Over the years the Warrnambool Mechanics’ Institute Library was also known as the Warrnambool Public Library the Warrnambool Library and the Free Library. Early funding from the government was for the “Free Library”. The inscription in a book “Science of Man” was for the “Warrnambool Public Library”, donated by Joseph Archibald in 1899. Another inscription in the book “Catalogue of Plants Under Cultivation in the Melbourne Botanic Gardens 1 & 2, 1883” was presented to the “Warrnambool Library” and signed by the author W.R. Guilfoyle. In 1903 the Warrnambool Public Library decided to add a Juvenile Department to library and stock it with hundreds of books suitable for youth. In 1905 the Public Library committee decided to update the collection of books and added 100 new novels plus arrangements for the latest novels to be included as soon as they were available in Victoria. In July 1911 the Warrnambool Council took over the management of the Public Library, Art Gallery, Museum and Mechanics’ Institute and planned to double the size of the then-current building. In 1953, when Mr R. Pattison was Public Librarian, the Warrnambool Public Library’s senior section 10,000 of the 13,000 books were fiction. The children’s section offered an additional 3,400 books. The library had the equivalent of one book per head of population and served around 33 per cent of the reading population. The collection of books was made up of around 60 per cent reference and 40 per cent fiction. The library was lending 400 books per day. In 1963 the Warrnambool City Council allocated the site of the Mechanics’ Institute building, which included the Public Library, Museum and Art Gallery, for the new Municipal Offices and the Collections were dispersed until 1971. The Warrnambool Library took over the Mechanics’ Institute Library’s holdings on behalf of the Warrnambool City Council. Since the closure of the Warrnambool Mechanics’ Institute the exact location and composition of the original WMI books and items have become unclear. Other materials have been added to the collection, including items from Terang MI, Warrnambool Court House and Customs House. Many of the books have been identified as the Pattison Collection, named after the Librarian who catalogued and numbered the books during his time as Warrnambool Public Librarian in the time before the Mechanics’ Institute closed. It seems that when Warrnambool became part of the Corangamite Regional Library some of the books and materials went to its head office in Colac and then back to Warrnambool where they were stored at the Art Gallery for quite some time. Some then went to the Warrnambool Historical Society, some stayed at the Art Gallery and some were moved to Flagstaff Hill Maritime Village. The various stamps and labels on the books held at Flagstaff Hill show the variety of the collection’s distribution and origin. The books in the collection at Flagstaff Hill Maritime Village date from the 1850s to the late 1950s and include rare and valuable volumes. Many of the books are part of the “Pattison Collection” after the Warrnambool’s Public Librarian, Mr R. Pattison. The Pattison Collection, along with other items at Flagstaff Hill Maritime Village, was originally part of the Warrnambool Mechanics' Institute’s collection. The Warrnambool Mechanics’ Institute Collection is primarily significant in its totality, rather than for the individual objects it contains. Its contents are highly representative of the development of Mechanics' Institute libraries across Australia, particularly Victoria. A diversity of publications and themes has been amassed, and these provide clues to our understanding of the nature of and changes in the reading habits of Victorians from the 1850s to the middle of the 20th century. The collection also highlights the Warrnambool community’s commitment to the Mechanics’ Institute, reading, literacy and learning in the regions, and proves that access to knowledge was not impeded by distance. These items help to provide a more complete picture of our community’s ideals and aspirations. The Warrnambool Mechanics Institute book collection has historical and social significance for its strong association with the Mechanics Institute movement and the important role it played in the intellectual, cultural and social development of people throughout the latter part of the nineteenth century and the early twentieth century. The collection of books is a rare example of an early lending library and its significance is enhanced by the survival of an original collection of many volumes. The Warrnambool Mechanics' Institute’s publication collection is of both local and state significance. The Lives of the Most Eminent English Poets Author: Samuel Johnson Publisher: George Clark Date: 1847 A label on spine with typed text PAT 928 JOH Front loose endpaper has a sticker from Corangamite Regional Library Service Front loose endpaper has a stamp from Corangamite Regional Library Service Pastedown front endpaper has a sticker from Warrnambool Public Library shipwrecked-coast, flagstaff-hill, flagstaff-hill-maritime-museum, warrnambool, maritime-museum, shipwreck-coast, flagstaff-hill-maritime-village, shipwrecked-artefact, book, pattison collection, warrnambool library, warrnambool mechanics’ institute, ralph eric pattison, corangamite regional library service, warrnambool city librarian, mechanics’ institute library, victorian library board, warrnambool books and records, warrnambool children’s library, the lives of the most eminent english poets, samuel johnson -
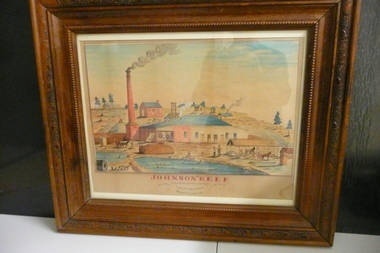 Bendigo Historical Society Inc.
Painting - JOHNSON'S REEF GOLD MINING COMP
Water colour painting of Johnson's Reef Gold Mining Camp California Gully Bendigo Victoria Australlia.organization, mining, johnsons reef -
Tatura Irrigation & Wartime Camps Museum
Photograph, Johnson's Newsagency Streetscape Looking West
Johnson's Newsagent & Stationer, streetscape of Hogan Street looking west. Solicitor's Chambers, CBC Bank. c1935.tatura, buildings, historic, street, furniture, signs, cbc -
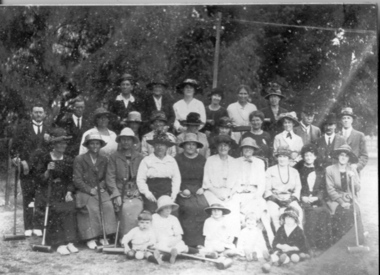 Tatura Irrigation & Wartime Camps Museum
Photograph, croquet club members
Croquet Club Members include Mesdames Francis, JS Hill, Johnson, Wedlock, Robbins, Pigdon and Hunter -
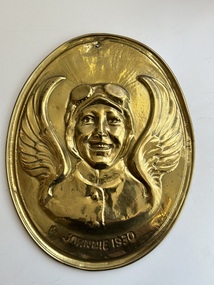 Moorabbin Air Museum
Plaque (Item) - Amy Johnson Brass Wall plaque 1930
Johnnie 1930 -
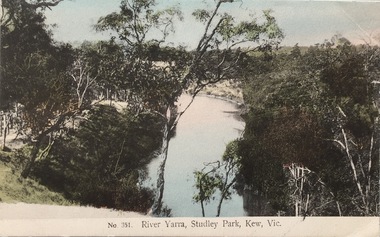 Kew Historical Society Inc
Postcard, The VSM.Series, No.351. River Yarra, Studley Park, Kew, Vic, c.1905
This is a colour postcard of the River Yarra at Studley Park, circa 1905. The postcard, which has handwritten notes on the reverse. It was printed in Prussia as part of the Victoria Stamp Market (VSM) Series. Coloured postcard of the Yarra River looking north from Galatea Point, near the Johnson Street Bridge.Donated by Miss B. Challen. ?Taken from bend above Galatea Point, looking north. Identified by Darcy Dugan, Yarra Bend Parks.river yarra, victoria stamp market (vsm) series, postcards -
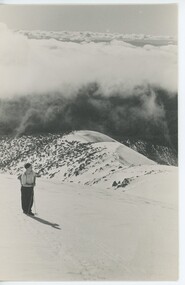 Falls Creek Historical Society
Photograph - Bogong Trip 1951- Eskdale Spur
MEYER COLLECTION - FALLS CREEK PHOTOS In 1947 a determined group of like-minded State Electricity Commission (SEC) staff including Ray Meyer, the chief surveyor of the Kiewa Hydro-Electric Scheme, had a common interest that revolved around the skiing potential of the snow-covered high plains which included what is now the resort of Falls Creek. The six SEC employees, Toni St Elmo, Ray Meyer, Jack Minogue, Lloyd Dunn, Adrian Ruffenacht and Dave Gibson (together with their families) banded together to secretly build a 'hut' that was the first ski lodge at Falls Creek. Using a road built in 1930s to gain access to Falls Creek, their hut project was carried out in secret as efforts by other skiers were blocked by H.H.C. Williams – the engineer in charge of the Hydro Scheme. In 1946 Ray Meyer made a trip to the Lands Office in Melbourne. He came away with a 99-year lease on three acres that was ideally suited for a hut designed by Lloyd Dunn. Adrian Ruffenacht (Design Engineer for the KHS) had suggested where the group should build because of easy access to a spring for water. Much of the building material required was scavenged from derelict huts on the high plains. Due to the need for secrecy, the determined group worked on the hut in the evenings and weekends to avoid detection. During the building period the group had met at Echidna Rock (now known as Eagle Rock) where Skippy St Elmo announced, "This is my favourite ‘Skyline’.” And so the first lodge in the area at Falls Creek Ski Resort came into existence. With the development of the International Poma in the 1970s, the Skyline Lodge, which was sited between the ski-lift’s pole one and pole two, was demolished. However, the legacy of Ray Meyer, Toni St Elmo, Jack Minogue, Lloyd Dunn, Adrian Ruffenacht and Dave Gibson and Skyline lives on in the vibrant atmosphere of Falls Creek Resort. The MEYER COLLECTION documents developments on the Kiewa Hydro Scheme and their life at Falls Creek from the mid 1930s to 1960s.This image is significant because it depicts aspects of the life of a pioneering family of Falls Creek and the founders of "Skyline", the first lodge at Falls Creek.Two black and white images of Wal Johnson taken at Eskdale Spur on a trip to Mt. Bogong in 1951.falls creek, bogong high plains, staircase spur memorial, ray meyer, wal johnson -
Port Melbourne Historical & Preservation Society
Audio - Claire Johnson, John Kirby, The Effect of Spanish Flu on Australia and Port Melbourne, 24 Mar 2014
Claire Johnson talks about Spanish Flu outbreak of 1919 and its effects on Australia and Port MelbourneDuration 01:35:10 (including meeting preliminaries)health - general health, families, spanish flu -
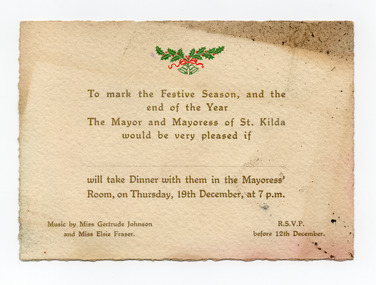 St Kilda Historical Society
Ephemera - Invitation - mayoral dinner, To mark the Festive Season and the end of the Year, 1918 or 1929
Although the name of the Mayor and Mayoress, and the year of the invitation are not stated, the fact that music was provided by 'Miss Gertrude Emily Johnson' provides a possible clue as to the date. Gertrude Emily Johnson (1894-1973), coloratura soprano and theatre administrator, was born on 13 September 1894 at Prahran, Melbourne. She was a student of (Dame) Nellie Melba at the women's singing school that Melba founded at the Albert Street Conservatorium, East Melbourne (later the Melba Memorial Conservatorium). The date specified in the invitation, Thursday 19th December, indicates that the event was either in 1918 or 1929. As Gertrude Johnson moved to London in February 1921 and returned to Australia in 1935, when she retired from her singing career, it appears likely that the invitation to the mayoral dinner was for 19 December 1918. Elsie Fraser would have accompanied her on the piano.Cream coloured card printed in gold and with Christmas bells and holly in green and red, being an invitation for dinner with the Mayor and Mayoress of St KildaTo mark the Festive Season, and the end of the Year, the Mayor and Mayoress of St Kilda would be very pleased if ... will take Dinner with them in the Mayoress' Room, on Thursday, 19th December, at 7pm. Music by Miss Gertrude Johnson and Miss Elsie Fraser. RSVP before 12th December.gertrude johnson, elsie fraser, st kilda council, st kilda mayoral function -
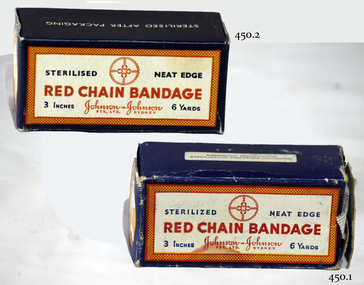 Flagstaff Hill Maritime Museum and Village
Equipment - Ribbon Gauze & Box, Johnson & Johnson Pty Ltd
Most surgical wounds are closed primarily, but some are allowed to heal by secondary intention. This usually involves repeated packing and dressing of the raw wound surfaces. Although the long-term care of such wounds has devolved to the care of nurses in the community or out-patient setting, the initial wound dressing or cavity packing is done by the surgeon in the operating theatre. Many surgeons are unaware of the growth of the discipline of wound care, and still use traditional soaked gauze for dressing and packing open surgical wounds and cavities. https://www.ncbi.nlm.nih.gov/pmc/articles/PMC1963638/The control of bleeding and wound management is vitally important for the survival of the patient.Gauze bandage and cardboard box.Two boxes. One box in better condition. Red Chain Bandage. Johnson and Johnson Pty Ltd Sydney. 3 inches, 6 yards. Sterilized neat edge.flagstaff hill, warrnambool, shipwrecked-coast, flagstaff-hill, flagstaff-hill-maritime-museum, maritime-museum, shipwreck-coast, flagstaff-hill-maritime-village, "red chain bandage", gauze, bandage, johnson & johnson -
 South West Healthcare
Corn Plaster Set, 20th century
1 box 12 corn plasters;1 metal stand with glass lamp with 1 wick.Box labelled "Johnson & Johnson" , "MADE IN ENGLAND" "THICK" "CORN P". Distributers label - "SAMBELL'S Cnr. Pharmacy/ WARRNAMBOOL"medicine, corn plaster -
Bendigo Historical Society Inc.
Photograph - KEN BICE COLLECTION: CENTRAL DEBORAH MINE, BENDIGO
Copy of photo: 6 miners sitting down, underground. On back miners at No. 16 L (1270 ft.) plat Central Deborah Mines, Bendigo, 1952. From left Jackie Lewis, Bob Johnson, Bill Landy, Roger Yates, and Les Johnson. This is a digital only photograph.bendigo, mining, central deborah mine, bendigo, mining, central deborah, lewis, johnson, landy, yates, johnson. -
University of Melbourne, Burnley Campus Archives
Newspaper - Newspaper Cutting, The Australian, Phillip Johnson, 2014
(1) Article in "The Weekend Australian Magazine" Oct/Nov 2014. "10 Questions Phillip Johnson (1998), Landscape Designer, 40." (2) Article in "The Weekend Australian Aplus" Nov 15-16, 2014. "Flora" by Helen Young. Article about Phillip Johnson's book, "Connected."the weekend australian magazine, phillip johnson, helen young, landscape designer, connected, book -
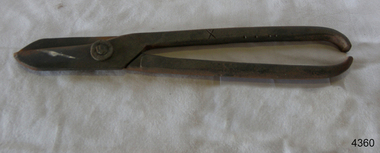 Flagstaff Hill Maritime Museum and Village
Snips
Tin Snips metal 298mm x 45mm Has an "X" stamped on handle. Maker Johnson & Co Sheffieldflagstaff hill, warrnambool, shipwrecked-coast, flagstaff-hill, flagstaff-hill-maritime-museum, maritime-museum, shipwreck-coast, flagstaff-hill-maritime-village -
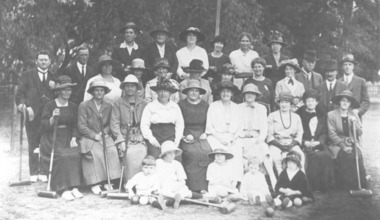 Tatura Irrigation & Wartime Camps Museum
Photograph, Croquet Club
Tatura Croquet Club.|Members include Mesdames Francis, J.S. Hill, Johnson, Wedlock, Robbins, Pigdon and Hunter.tatura, recreations, games, sports, costume, female, male, children