Showing 422 items
matching wallen rd
-
 Melbourne Tram Museum
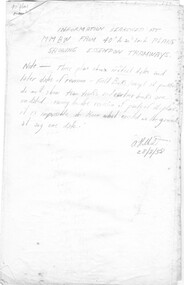
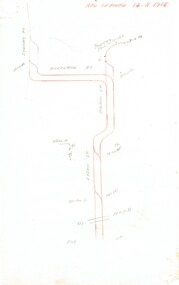
Document - Research Notes, H. S. McComb, The Age, "Information searched at MMBW from 40' to 1 inch plans showing Essendon Tramways" & "A Women Drove the First Tram", c1958
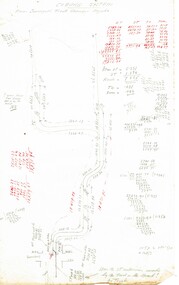
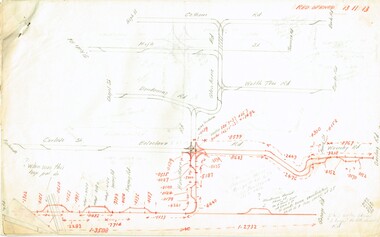
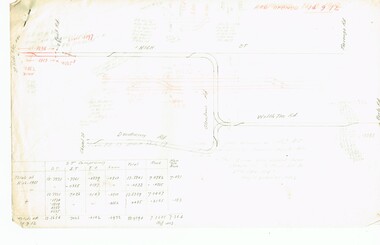
Set of papers, handwritten concerning the history of Essendon electric system, track layouts, dimensions, field book notes, plans, sketches of Trackwork prepared by A H McC? - dated 28/8/1958. "Information searched at MMBW from 40' to 1 inch plans showing Essendon Tramways" Includes a copy of a newspaper cutting from The Age 11/10/1956, titled "A Women Drove the First Tram". Items 2027 to 2030 and 1309 copy 2 contained within box 72.3 in a brown folder marked "Historical Data regarding Essendon Tramways and their services to the City"trams, tramways, essendon, saltwater river, keilor rd, reports, essendon depot, nmetl, moonee ponds, mmbw, opening -
 Melbourne Tram Museum
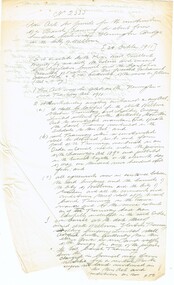
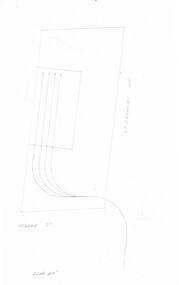
Document - Research Notes, H. S. McComb, electric tramways in Essendon, c1956
Set of papers, handwritten concerning the history of the electric tramways in Essendon, some in response to a query from a Mr. H. W, Bryne of Buckley St Essendon, dated 21/5/1956. Prepared largely by H. S. McComb, with notes on the extract of Act 2333, notes to the Chief Engineer, letter from H. Bryne, track layout sketches, meeting notes etc. Dated 1956 - draft of letter to go from the Secretary. Items 2027 to 2030 and 1309 copy 2 contained within box 72.3 in a brown folder marked "Historical Data regarding Essendon Tramways and their services to the City"trams, tramways, essendon, saltwater river, keilor rd, reports, essendon depot, nmetl, moonee ponds, mmbw, opening -
 Melbourne Tram Museum
Document - Research Notes, H. S. McComb, "Preston System", 1956
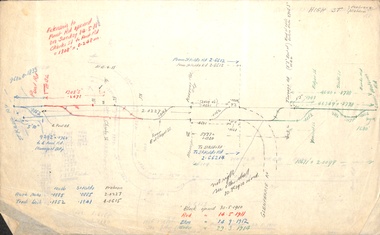
Set of papers, handwritten concerning the development and timing of the "Preston Tramway system" - 14 sheets by the Fitzroy, Northcote and Preston Tramways Trust Prepared largely by H. S. McComb, with notes dates, depot, track layout, lengths, the Act, dates and calculations, curves, Barkly St terminus, St Georges Road and interface with the cable trams. Item contained within box 72.3 in a brown folder marked "FN&PTT" in red pencil.trams, tramways, preston, fitzroy, northcote, fnptt, opening, st georges rd, cable trams -
 Melbourne Tram Museum
Document - Research Notes, H. S. McComb, "Coburg System" - part 1 of 2, c1956
Set of papers, handwritten concerning the development and timing of the "Coburg Tramway system" - about 34 sheets by the Melbourne Brunswick Coburg Tramways Trust. Prepared largely by H. S. McComb, with notes dates, depot, track layout, lengths, the Act, dates and calculations, curves, details of depot, track layouts, intersections and the interface with the cable tram at Queensberry and Swanston Streets. See Reg Item 2035 for part 2, further maps and details of the cable tram interface at Queensberry St. Items 2034 and 2034 within box 72.3 in a brown folder marked "MB&CTT" in red pencil.trams, tramways, mbctt, coburg, brunswick, opening, cable trams, queensberry, madeline st, moreland rd, sydney rd -
 Melbourne Tram Museum
Document - Research Notes, H. S. McComb, "Coburg System" - part 2 of 2, c1956
Set of papers, handwritten concerning the development and timing of the "Coburg Tramway system" - 9 sheets by the Melbourne Brunswick Coburg Tramways Trust. Prepared largely by H. S. McComb, with notes dates, depot, track layout, lengths, the Act, dates and calculations, curves, details of depot, track layouts, intersections and extensive details of the interface with the cable tram at Queensberry and Swanston Streets. Items 2034 and 2034 within box 72.3 in a brown folder marked "MB&CTT" in red pencil.trams, tramways, mbctt, coburg, brunswick, opening, cable trams, queensberry, madeline st, moreland rd, sydney rd -
 Melbourne Tram Museum
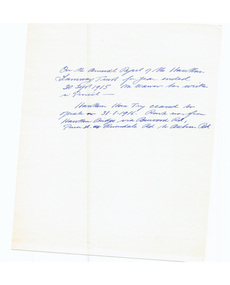
Document - Research Notes, H. S. McComb, extracts from the HTT Annual reports, 1950's
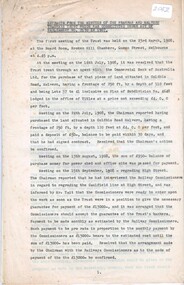
Set of papers - 28 sheets giving extracts from the HTT Annual reports - hand written in ink on plain quarto paper. - Notes the closing date of the horse tramway as 31/1/16 - whether to delegate operation to PMTT - Wattle Park - Metropolitan Tramway Park - Riversdale Road extension - Construction of the tramway, contracts and issues - Opening of the Line - extension of the depot - New tramcars - Burwood Accident - Report of Engineer and Manager - Permanent Way issues - Overhead Items 2037 to 2041 within box 72.3 in a brown folder marked "Hawthorn Tramway Trust" in red pencil. See Reg Items 2364 to 2367 for copies of the original reports.trams, tramways, htt, hawthorn, reports, annual reports, pmtt, wattle park, riversdale rd, construction, hawthorn depot, track, overhead -
 Melbourne Tram Museum
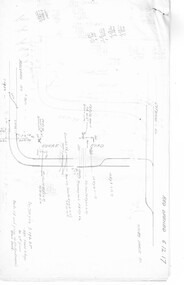
Document - Research Notes, H. S. McComb, development and timing of the "PMTT" - part 2, 1950's
Set of papers, handwritten concerning the development and timing of the "PMTT", Prahran and Malvern - about 40 sheets. Prepared by H. S. McComb - gives layout of the PMTT system, primarily of Burke Road, sketches of track layout, opening dates, sketches of various junctions, bridges, track miles, junctions, reconciliation of track lengths from various sources includes Whitehorse Road, Victoria St cable tram terminus, Kew Depot, Candy Corner, St Kilda terminus, Malvern Depot, High St, Items 2041 to 2052 within box 72.3 in a brown folder marked "PMTT" in red pencil.trams, tramways, pmtt, malvern, routes, track, kew depot, burke rd, surveys, victoria st, whitehorse rd, malvern depot, st kilda, candy corner -
 Melbourne Tram Museum
Document - Research Notes, H. S. McComb, development and timing of the "PMTT" part 3, 1950's
Set of papers, handwritten concerning the development and timing of the "PMTT", Prahran and Malvern - about 30 sheets. Prepared by H. S. McComb - gives layout of the PMTT system, of track layout, opening dates, sketches of various junctions, bridges, track miles, junctions: Kew Junction, Glen Huntly Road, Glenhuntly Road, Victoria St cable tram terminus, Barkers Road, Commercial Road, Malvern Road, Hawthorn Road, Balaclava Junction, Caulfield station loop, Glenferrie Road. Items 2041 to 2052 within box 72.3 in a brown folder marked "PMTT" in red pencil.trams, tramways, pmtt, malvern, routes, track, kew junction, victoria st, barkers rd, glenhuntly rd, malvern rd, caulfield, hawthorn rd, balaclava rd, balaclava junction, glenferrie rd -
 Melbourne Tram Museum
Document - Research Notes, H. S. McComb, development and timing of the "PMTT" - part 4, 1950's
Set of papers, handwritten concerning the development and timing of the "PMTT", Prahran and Malvern - about 40 sheets. Prepared by H. S. McComb - gives layout of the PMTT system, primarily of Burke Road, sketches of track layout, opening dates, sketches of various junctions, bridges, track miles, junctions, reconciliation of track lengths from various sources includes Glenferrie and Cotham Road, Balaclava Road, Hawthorn Road, Glenhuntly Road, Waverley Road and St Kilda Esplanade, Candy Corner. Items 2041 to 2052 within box 72.3 in a brown folder marked "PMTT" in red pencil.trams, tramways, pmtt, malvern, routes, track, surveys, glenferrie rd, cotham rd, balaclava rd, hawthorn rd, waverley rd, st kilda, candy corner -
 Melbourne Tram Museum
Document - Research Notes, H. S. McComb, development and timing of the "PMTT" - part 5, 1950's
Set of papers, handwritten concerning the development and timing of the "PMTT", Prahran and Malvern - about 20 sheets. Prepared by H. S. McComb - gives layout of the PMTT system, primarily of Burke Road, sketches of track layout, opening dates, sketches of various junctions, bridges, track miles, junctions, reconciliation of track lengths from various sources includes High St Malvern, extension to Punt Road, Dandenong Road, Wattle Tree Road, including its duplication Items 2041 to 2052 within box 72.3 in a brown folder marked "PMTT" in red pencil.trams, tramways, pmtt, malvern, routes, track, surveys, wattle tree rd, punt rd, dandenong rd, high st, duplications -
 Melbourne Tram Museum
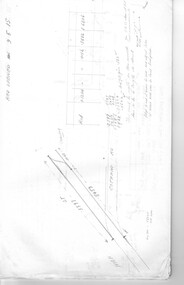
Document - Research Notes, Mr. Mainwaring, PMTT surface slopes, 1910
Three ruled foolscap sheets, tied in the top left hand corner with string, headed Prahran Malvern Tramways - tape measurement of surface slopes from High Street, Glenferrie Road Wattle tree Road to Burke Road. Prepared by Mr Mainwaring in black and red ink. Dated 30.6.1910. Items 2041 to 2052 within box 72.3 in a brown folder marked "PMTT" in red pencil.trams, tramways, pmtt, malvern, surveys, high st, wattle tree rd, burke rd -
 Melbourne Tram Museum
Document - Research Notes, H. S. McComb, Extracts of PMTT Minutes - track layouts, 1950's
Set of papers, handwritten concerning the development and timing of the "PMTT", Prahran and Malvern - 6 sheets. Prepared by H. S. McComb - gives layout of the PMTT system, primarily of Burke Road, sketches of track layout, opening dates, sketches of various junctions, bridges, track miles, junctions, reconciliation of track lengths from various sources of High St Malvern, extension to Punt Road and St Kilda Roads includes duplications and a Wattle Tree Road. Items 2041 to 2052 within box 72.3 in a brown folder marked "PMTT" in red pencil.trams, tramways, pmtt, malvern, routes, track, surveys, punt rd, high st, wattle tree rd, duplications -
 Melbourne Tram Museum
Document - Research Notes, H. S. McComb, "Extracts from the Minutes of the Prahran and Malvern Tramways Trust which was constituted under Act of Parliament No. 21030 in 1907", 1940's
Original and carbon copy of "Extracts from the Minutes of the Prahran and Malvern Tramways Trust which was constituted under Act of Parliament No. 21030 in 1907", 10 foolscap sheets. Includes depot purchase, regrading of High St, extension to Burke Road, relocation of water mains, surveys, starting of construction, tenders for track and buildings, opening, extension, F. A. McCarty & Co., Dandenong Road lines, railway bridges, extension of High St to St Kilda Road, MMBW, finances. Items 2041 to 2052 within box 72.3 in a brown folder marked "PMTT" in red pencil.trams, tramways, pmtt, malvern, routes, track, surveys, malvern rd, tenders, construction, opening, dandenong rd, mmbw, finances -
 Melbourne Tram Museum
Newspaper, The Age, “Fatal collision – then fire”, 10/11/1967 12:00:00 AM
“Fatal collision – then fire” The Age, Friday November 10 1967 Photo and text Car tram collision, Camberwell Rd, Camberwell Car overtaking petrol tanker on Camberwell Rd, Camberwell, collides with Burwood bursts into flames and was completely destroyed. Tram driver (Van Leeuwin) leapt from cabin, conductress thrown forward but no injured. Tram had no passengers. Tram pushed burning car for about 100 yardstrams, tramways, accidents, collision, camberwell rd, camberwell -
 Melbourne Tram Museum
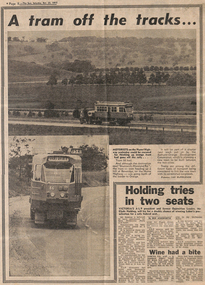
Newspaper, The Sun, “A tram off the tracks”, 22/10/1977 12:00:00 AM
“A tram off the tracks” The Sun, Saturday, Oct 22, 1977 Photos and text Tram # 86 Photos of tram # 86 being transported on semi-trailer on Hume Highway at Beveridge on its way to Orange, NSW. Part of display by Bathurst-Orange Development Corporation, planning to build a new town between the two cities. Trams among the different types of transport being considered to link the proposed town to its neighbours. Tram displays “Brunswick-Moreland Rd” and route number 954.trams, tramways, displays, trucks, z class, transporting trams, tram 86 -
 Melbourne Tram Museum
Photograph - Black & White Photograph/s, Lee A Ratten, c1940?
Black and white photograph of VR tram 34 in Brighton VR tramcar 34 built at VR Newport Workshops as one of 5 bogie drop centre trams (33-37) and entered service in 1918. Operated by VR on the St Kilda to Brighton broad-gauge line until it was withdrawn in 1959 when the line closed. Tram has the destination of St Kilda Rd. Advertising signs "Robur". On the rear is the photograph stamp of Lee A Ratten of 51 Cotham Road Kew.trams, tramways, vr class tramcars, brighton, st kilda brighton, tram 34 -
 Melbourne Tram Museum
Negative, Travis Jeffrey, c1963
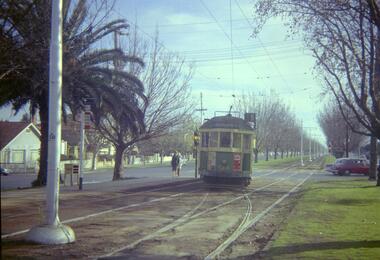
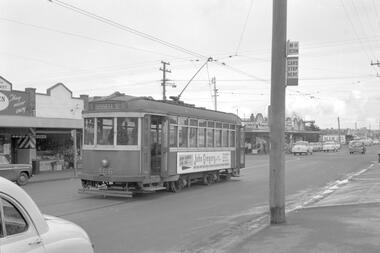
Negative of tram 219 at a tram stop. Tram has destination City and Route No 7. Photo looks staged as a school child in uniform leaning at door, driver and passenger in front window are all staring at the photographer. Note the tram has a trolley wheel fitted, the stop is a compulsory stop and that there is a light fitting above the tram with a tinted glass shield that indicated the type of stops at night. Possibly in Burke Road, between Leura Grove and Toorak Road.Paper folder that contained the negative had "NR99A" in red ink, "M5" in pencil, 58A in green ink, date stamp "1 Jan 1963" on front, and date stamp on rear "26 Sep 1962".trams, tramways, w2 class, route 7, tram stops, burke rd, tram 219 -
 Melbourne Tram Museum
Negative, Travis Jeffrey, c1963
Negative of tram 372 in Toorak Rd at Burwood terminus. Tram has destination City and Route No 74. Photo shows a person wearing what appears to be a Brisbane tramway cap tying down trolley pole for return trip to City. Comment from Tony Smith of the MTPA, that it could be Travis Jeffery. Email from Len Millar - 7-2-2019 - "As best as I can decipher by enlarging the image, it does look like a young Travis. The long-ish face was my guide. Brisbane hat – and tying a pole down on a service car in busy Toorak Road? That would be Travis!"Paper folder that contained the negative had "NR100A" in red ink, "12A" in blue ink, date stamp "1 Jan 1963" on front, and date stamp "26 Sep 1962" on rear.trams, tramways, w2 class, route 74, burwood, toorak rd, tram 372 -
 Melbourne Tram Museum
Negative - Set of 2, Travis Jeffrey, 10/06/1962 12:00:00 AM
Colour negative of tram 514 in Dandenong Road. Tram has destination Malvern - Burke Rd and Route No 5. Photo shows tram shunting. Note the newspaper box on the left hand side of the photograph. , Colour negative of tram 514 in Wattletree Road at Burke Rd terminus. Tram has destination City and Route No 5. Note thePaper folder that contained the negative had "NR77B" and date written as 10 Jun 62 in red ink., Paper folder that contained the negative had "NR76B" and date written as 10 Jun 62 in red ink.trams, tramways, w2 class, route 5, dandenong rd, wattle tree rd, malvern burke rd, tram 514 -
 Melbourne Tram Museum
Negative, Travis Jeffrey, 10/06/1962 12:00:00 AM
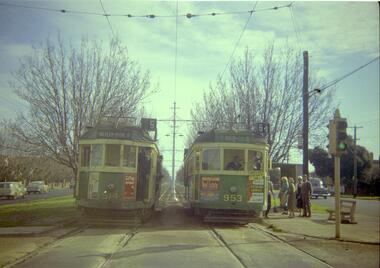
Colour negative of trams 514 and 953 in Dandenong Road. Tram 514 has destination Malvern - Burke Rd and Route No 5. Photo shows tram on the left track (city-bound), although facing towards its destination (Malvern). Driver standing in door of cab and conductor standing in doorway to tram. Tram 953 has destination East Brighton via Caulfield and Route No 64. Sign on front states: "Connect with Malvern-Burke Rd tram".Paper folder that contained the negative had "NR75B" and date written as 10 Jun 62 in red ink.trams, tramways, w2 class, route 5, route 64, dandenong rd, wattle tree rd, malvern burke rd, tram 514, tram 953 -
 Melbourne Tram Museum
Negative, Travis Jeffrey, 1/06/1962 12:00:00 AM
Colour negative of tram 547 in Bridge Road Richmond. Tram 547 has destination Camberwell Depot - Burke Rd and Route No 76. Set of two negatives.Paper folder that contained the negative had "NR75B" and date written as 10 Jun 62 in red ink.trams, tramways, w2 class, route 76, bridge rd, richmond, camberwell depot, tram 547 -
 Melbourne Tram Museum
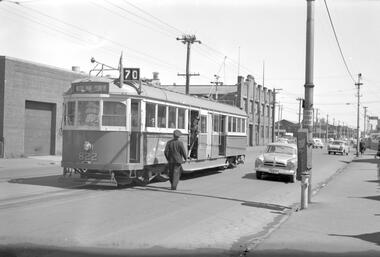
Negative, Travis Jeffrey, 30/09/1961 12:00:00 AM
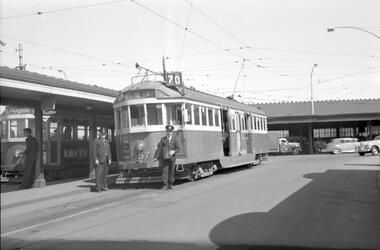
Negative of trams 557 and 849 at Batman Avenue tram terminus. Tram 557 in foreground has destination Wattle Park - Elgar Rd and Route No 70. Photo shows tram on the right track (outwards from city), with driver and conductor standing in front of tram, posing for the camera. Tram 849 in background has destination Prahran (route not visible).Paper folder that contained the negative had "NR58A" written in red ink, "M3" written in pencil, "48A" written in blue ink, and date stamped/written as 30 Sep 1961.trams, tramways, w2 class, sw5 class, route 70, batman ave, wattle park, prahran, crews, conductors, tram 557, tram 849 -
 Melbourne Tram Museum
Negative - Set of 6, Travis Jeffrey, 10/06/1962 12:00:00 AM
Colour negative of tram 613 in Bridge Road, Richmond. Tram has destination Wattle Park - Elgar Rd. , Colour negative of tram 613 in Toorak Rd at Burwood terminus. Tram has destination City , Colour negative of tram 613 in Toorak Rd. Tram has destination Burwood , B&W negative of tram 613 in Camberwell Depot. Tram has destination City , Colour negative of tram 613 at Camberwell Rd at Bowen St. Tram has destination Bowen St , Colour negative of tram 613 at Camberwell Rd. Tram has destination Hartwell Tram has advertisement for Rivella wine, Champion Spark plugs and Stillwell's Holdens.Paper folder that contained the negative had "NR67B" and date written as 1 Jun 62 in red ink., Paper folder that contained the negative had "NR85B" and date written as 22 Jul 62 in red ink., Paper folder that contained the negative had "NR87B" and date written as 22 Jul 62 in red ink., Paper folder that contained the negative had "NR63A" written in red ink,, "M9" written in pencil and date stamped 23 Feb 62., Paper folder that contained the negative had "NR84B" and date written as 22 Jul 62 in red ink., Paper folder that contained the negative had "NR86B" and date written as 22 Jul 62 in red ink.trams, tramways, y1 class, wattle park, burwood, bridge rd, toorak rd, camberwell depot, camberwell rd, hartwell, bowen crescent, tram 613 -
 Melbourne Tram Museum
Negative, Travis Jeffrey, 1/12/1959 12:00:00 AM
Negative of tram 822 in Swan St Richmond, at Bendigo St. Tram has destination Wattle Park - Elgar Rd and Route No 70. Photo shows driver on road talking to conductor who is leaning out of doorway. Tram stop has a bundy clock. On the side of the bundy clock could be a point bar clipped to the clock case.Paper folder that contained the negative had "NR14A" written in red ink, "M14" written in pencil, "14A" written in blue ink, "P Ormond" written in purple ink and date stamped as 1 Dec 1959.trams, tramways, w5 class, swan st, crews, bundy clock, tram 822 -
 Melbourne Tram Museum
Negative - Set of 2, Travis Jeffrey, 10/06/1962 12:00:00 AM
B&W negative of tram 459 in Footscray. Tram has destination Williamstown Rd. Driver walking past front of tram. , B&W negative of tram 459 in Barkley St, Footscray at Leeds St. Tram has destination Ballarat Rd. Driver about to board tram, which is ready for shunting.????Paper folder that contained the negative had "NR67B" and date written as 1 Jun 62 in red ink., ?????Paper folder that contained the negative had "NR85B" and date written as 22 Jul 62 in red ink.trams, tramways, x1 class, footscray, barkly st, tram 459 -
 Melbourne Tram Museum
Negative - Set of 2, Travis Jeffrey, 23/07/1961 12:00:00 AM
B&W negative of tram 460 in Somerville Rd Footscray. Tram has destination Ballarat Rd. , B&W negative of trams 460 and 465 in Leeds St, Footscray at Irving St. Tram on left (460) has destination Ballarat Rd and tram on right (465) has destination Russell St. Female conductor talking to driver. Third unidentified tram behind 460.Paper folder that contained the negative had "NR45A" written in red ink, "F4" written in pencil, "35A" written in blue ink, and date stamped 23 Jul 1961. On rear, dates stamped 26 Sep 1962 and 6 Oct 1962., Paper folder that contained the negative had "NR49A" written in red ink, "F3" in pencil, "39A" in blue ink, and date stamped 28 Sep 1961. On rear, dates stamped 26 Sep 1962 and 6 Oct 1962.trams, tramways, x1 class, footscray, leeds st, somerville rd, tram 459, tram 460 -
 Melbourne Tram Museum
Negative, Travis Jeffrey, 5/09/1960 12:00:00 AM
B&W negative of tram 466 in Somerville Rd, Footscray.Paper folder that contained the negative had "NR10A" written in red ink, "F6" written in pencil, "10A" written in blue ink, and date stamped 29 Nov 1959. On rear, dates stamped 26 Sep 1962 and 2 Sep 1962.trams, tramways, x1 class, footscray, somerville rd, tram 464 -
 Melbourne Tram Museum
Negative - Set of 8, Travis Jeffrey, Jun. 1960
1. B&W negative of tram 468 in Ballarat Rd Footscray. Tram has destination Explosives Factory. Driver stepping down from cab and passenger walking from tram to kerb. 2. B&W negative of tram 468 in Ballarat Rd at Gordon St Footscray. Tram has destination Railway Station. Tram shelter shown in front of Powell Hotel. 3. B&W negative of tram 468 in Gordon St Footscray. Tram has destination Railway Station. Tram is shown at corner of River St on wrong side of road, so appears to be ready for shunting. 4. B&W negative of tram 468 at Ordnance Factory West Maribyrnong. Tram has destination Ordnance Factory. W2 454 is in background. 5. B&W negative of tram 468 in River St Footscray. Tram has destination Explosives Factory. 6. B&W negative of tram 468 in Raleighs Rd West Maribyrnong. Tram has destination Explosives Factory. Tram is shunting. 7. B&W negative of tram 468 in Somerville Rd Footscray. Tram has destination Russell St. Tram is shown with driver and female conductor posing for photographer. 8. B&W negative of tram 468 at Ordnance Factory West Maribyrnong. Tram has destination Explosives Factory. 2nd unidentified Tram is shown in background. Female conductor walking the trolley pole around. NOTE: - dates are not as marked on some photo envelopes recorded below as the Footscray closed March 1961.1. Paper folder that contained the negative had "NR30A" written in red ink, "F9" written in pencil, "20A" written in blue ink, and date stamped 11 Jun 1960. On rear, dates stamped 26 Sep 1962 (twice). 2. Paper folder that contained the negative had "NR36A" written in red ink, "F8" in pencil, "26A" in blue ink, and date stamped 11 Jun 1960. On rear, dates stamped 26 Sep 1962 and 6 Oct 1962. 3. Paper folder that contained the negative had "NR47A" written in red ink, "F10" in pencil, "37A" in blue ink, and date stamped 23 Sep 1961. 4. Paper folder that contained the negative had "NR32A" written in red ink, "F14" in pencil, "22A" in blue ink, and date stamped 11 Jun 1960. On rear, dates stamped 26 Sep 1962 and 6 Oct 1962. 5. Paper folder that contained the negative had "NR54A" written in red ink, "F15" written in pencil, "44A" written in blue ink, and date stamped 28 Sep 1961. On rear, dates stamped 26 Sep 1962 and 6 Oct 1962. 6. Paper folder that contained the negative had "NR56A" written in red ink, "F13" in pencil, "46A" in blue ink, and date stamped 28 Sep 1961.2. 7. Paper folder that contained the negative had "NR64A" and "NR105A" written in red ink, "F11" in pencil, "64A" in green ink, and date stamped 1 Jan 1963. On rear, date stamped 26 Sep 1962. 8. Paper folder that contained the negative had "NR62A" written in red ink, "F12" in pencil, "52A" in blue ink, "damaged" in purple ink, and date stamped 11 Jun 1960.trams, tramways, x1 class, footscray, ballarat rd, gordon st, ordnance factory, somerville rd, trolley poles, crews, drivers, conductors, tram 468, tram 454 -
 Melbourne Tram Museum
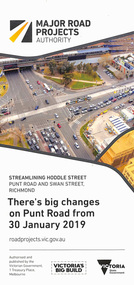
Pamphlet, Major Road Projects Authority, "There's big changes on Punt Road from 30 January 2019", Jan. 2019
Pamphlet describing roadworks at Punt Road and Swan St intersection during January and February 2019. Photo of intersection has a B class at the Punt Road tram stop travelling west towards the city.trams, tramways, road works, punt rd, swan st -
Melbourne Tram Museum
Newspaper, The Age, "Late trams to go before flow”, 26 Feb 2019
Newspaper clippings titled: "Late trams to go before flow” - the Age, Tues 26 Feb, 2019. Trial of new GPS technology on trams on route 75 which will trigger an early switch of traffic lights from red to green. This will enable late-running trams to proceed through the intersection. Information from the GPS systems will be sent to a central traffic control centre to change light sequence and prioritise late-running trams. Trial will run between March and May 2019.trams, tramways, route 75, toorak rd, burwood highway, traffic control, traffic lights, testing, trials