Showing 177 items
matching stone bridges
-
 Ballarat Tramway Museum
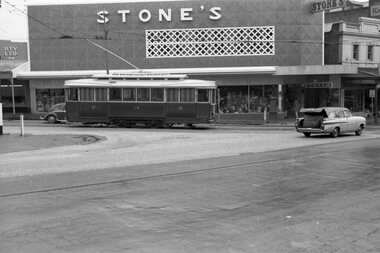
Negative - Set of 3, Campbell Duncan, 10/08/1971 12:00:00 AM
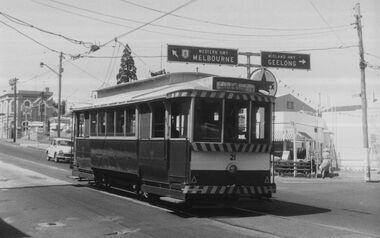
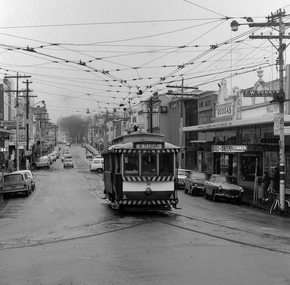
Yields information about tram operations and the street views at Stones Corner.Set of 3 photographs taken on 10/8/1971 by Campbell Duncan of trams in the Main of No. 31 approaching the junction with Bridge St and Victoria St. The tram has the destination of Gardens via Drummond North and a Twin Lakes sign. In the background are the Avery Scales store, Wearwell and Stones Corner. Shows the overhead arrangements at this location.trams, tramways, main road, stones corner, tram 31 -
 Ballarat Tramway Museum
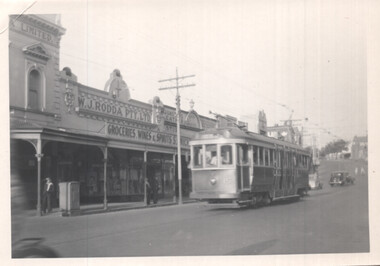
Photograph - Black & White Photograph/s set of 2, Charles Craig, 1950s
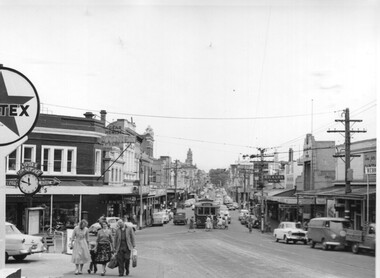
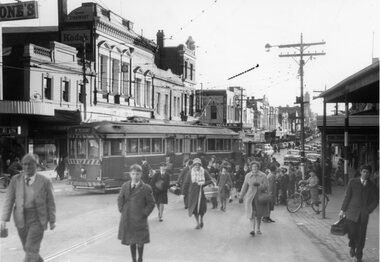
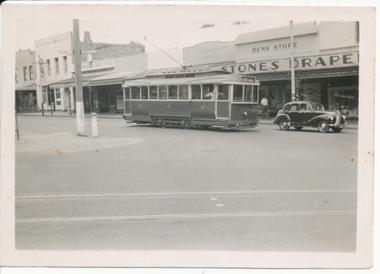
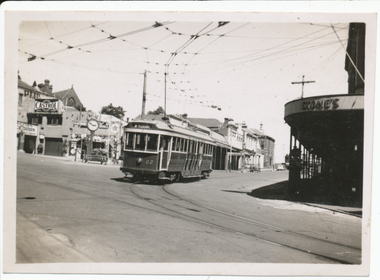
Yields information about the traffic and appearance of Bridge St during the 1950's.Set of two black and white photographs of trams in Bridge St at the intersection with Main Road and Victoria St .1 - tram at the intersection with Stones Corner and other shops in the background. Includes the Caltex services station, the Listers for Service clock and direction sign, with many people leaving the tram and walking along Victoria St. Has the Gear Chemist, Ricksha Paint and other shops in the view. .2 - No. 28 - for Gardens via Sturt St West and the intersection. Photo possibly early 1950's. Both photos by Charles Craig trams, tramways, bridge st, main road, victoria st, tram 28 -
 Ballarat Tramway Museum
Photograph - Digital image, W. J. Llewelyn, c1971
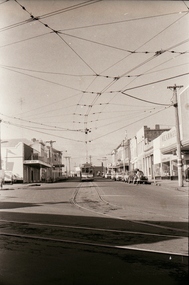
... tramways Bridge St Victoria St Stones Corner Royal Visit Grenville ...Yields information about the Royal Visit to Ballarat and the appearance of Bridge St during 1956 and just prior to the closure of the tramway.Set of three colour digital images taken of the Bridge St Ballarat by W. J. Llewelyn. .1 - Looking west along Bridge St from the Service Station, shows the various buildings, tram track, tram shelter and overhead. Appears to be c1971. .2 - Look east from Grenville St, 1954 with the Royal Visit decorations in the placed. Has the Dickins Self Service Grocery shop, Bucks Head Hotel and a sign for Morsheads store. Tram tracks and overhead apparent along with two trams in the far distance. .3 - Looking west along Sturt St from Bridge and Grenville St - shows the buildings in the background, tramway overhead, general congestion, letter box, tram stop shelter. A tram is parked in the loop. Has a Davies Bread advert on the Mechanics Institute building, also Thomas Jewellers, T& G and the Odeon Theatre sign.trams, tramways, bridge st, victoria st, stones corner, royal visit, grenville st, shelters, sturt st -
 Ballarat Tramway Museum
Negative, Wal Jack, late 1930's
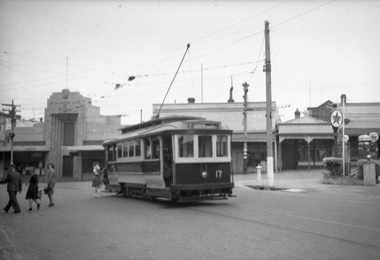
... Victoria St Bridge St Main St Stones Corner tram 17 Negative ...Yields information about Ballarat 's tram operations and Stones Corner.Negative and Digital image of the Wal Jack Ballarat Negative file of No. 17 loading passengers at Stones Corner, the intersection of Victoria St and Main St. A Caltex service station is on the right hand side and the State Savings Bank of Victoria. trams, tramways, victoria st, bridge st, main st, stones corner, tram 17 -
 Ballarat Tramway Museum
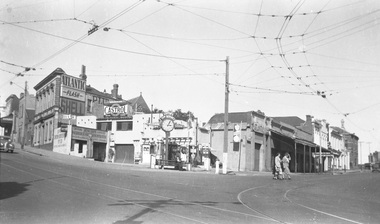
Photograph - B&W print of donated negative, Ron E. Fluck, 23/04/1950 12:00:00 AM
... Parade Ballarat Ballarat goldfields tramways trams Bridge St ...Black and white print of a donated negative. Print made 8/1998. Photo of the Lister's Junction Service Station, overhead and tram track at the intersection of Bridge St, Main St and Victoria St. (Stones Corner). Shows the style of overhead construction, signal contactors, the service station, its clock and associated advertising. Three ladies are crossing the road. Photo taken on 23.4.1950 at 3.05pm. Advertising on service station has Atlantic, Shell, and Castrol. Has multiple petrol dispensing bowsers. Clocks has directional arrows for Melbourne and Geelong. Tram tracks visible. Copy made Oct. 2001 for the "gold, Gold GOLD" temporary exhibition - colour laser print onto card, with Velcro dots on rear. Stored in box D1 (Display Box) 02/2003. high res scan of the negatives added 18/1/2019.tramways, trams, bridge st, stones corner, ballarat, main st -
 Ballarat Tramway Museum
Photograph - Black & White Photograph/s, The Courier Ballarat, 1/07/1964 12:00:00 AM
... , clothing, and buildings. tramways trams Stones Corner Bridge St ...Yields information about the seemingly frequent derailment of bogie trams at this intersection and the people who travelled on the tram and alternative means of transport - walking. Also details information about the streetscape, clothing, and buildings.Black and White copy photograph of a newspaper photograph taken by The Courier - No. 40 derailed, Bridge & Main Sts corner, 1964. Photo taken 1/07/1964, published 2/07/1964 No. 40 bound for Mt Pleasant. Location Stones Corner. Has buildings in Bridge St in the background and part of Stones sign. Photo shows many people, passengers, from the single truck tram behind No. 40, walking up Bakery Hill towards Victoria St West. Ladies, Gents, shoppers, passengers, school children etc. Collected by Alan Bradley from the Ballarat Courier early 1980's. See Excel file "Record of Ballarat Courier Photos SEC era" (Archive Documents) for source of details.On rear stamped "Copyright, The Ballarat Courier Proprietary Limited."tramways, trams, stones corner, bridge st, derailments, accidents, passengers, tram 40 -
 Ballarat Tramway Museum
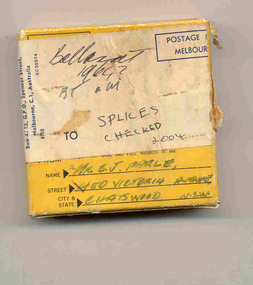
Film - Movie Film & Box, Kodak, 1960s
Yields information in movie film format of Ballarat trams in 1962, a enthusiast tour, how the system operated and was used by people., Yields information in movie film format of Ballarat trams in 1962, a enthusiast tour, how the system operated and was used by people.Movie film - 8mm, approx. 4.15mins, with green leader strip on a plastic reel, within a Kodachrome II colour movie cardboard box and addressed to B.J. Parle, Chatswood. Titled "Ballarat 1962" Has been transferred to DVD - see Reg item 4100 as Segment No. 3. Filmed and made by Ben Parle. Also transferred to DVD by Rod Cook Oct. 2015, via Roger Greenwood for use in his DVD, "The City of Ballarat Trams, Gardens & Gold" of 2016. See Reg Item 6883. Synopsis: based on time - Colour film Title "Ballarat 1962" 0:00 21 in Sturt St arriving City Centre tram stop from the west. 0:12 41 and another bogie car at City Centre tram stop, North side of Sturt St loading passengers 0:21 39 crosses Sturt St from Lydiard St Nth and pulls up at the tram stop in Sturt St. 0:55 39 leaves City centre and travels west along Sturt St – two sequences. 1:11 View from front of a single trucker, leaving Carlton St loop after crossing a bogie car and travelling along Wendouree Parade towards Gardens Loop 2:09 No. 20 in Gardens Loop and pan across to the Gardens Statuary pavilion with lots of flowers. 2:41 No. 20 leaving Gardens loop and heading north in Wendouree Parade. 2:54 Bogie tram in Wendouree Parade between depot and Gardens loop, southbound. 3:12 No. 32 leaving Victoria St terminus, with orphanage in the background, in bound, has a Trotting tonight sign on front of tram, and crossing the Eureka line rail bridge. 3:23 No. 20 in Bridge St, out bound, near Stones Corner 3:42 38 in bound from Mt Pleasant at Stones Corner, stops, lets of passengers and then proceeds along Bridge St into the City 4:15 endWritten labels giving title information on outside of box.trams, tramways, ballarat, wendouree parade, sturt st, victoria st, bridge st, tram 21, tram 41, tram 39, tram 20, tram 32, tram 38 -
 Ballarat Tramway Museum
Slide - 35mm slide/s, Ben Parle, Jan. 1954
... Parade Ballarat Ballarat goldfields Tramways trams Bridge St Main ...Kodachrome Transparency - 35mm slide - cardboard mount, with one side with red border and words "Kodachrome Transparency" top and bottom. On the other side is "Made in England" and "View from this side". Photo taken by Ben Parle 1/1954. Photo of Ballarat No. 21 at the intersection of Bridge, Victoria St and Main St, turning into Main Rd from Bridge St. Tram has the destination of Mt. Pleasant. Buildings in the background are Stones stores, Rickson's Paint (?). Advertising for ANZ bank, Kodak film. For high resolution scan see btm2817h.tif "Sturt St Ballarat" "1/54"tramways, trams, bridge st, main st, stones corner, victoria st, tram 21 -
 Ballarat Tramway Museum
Photograph - Digital image, c1971
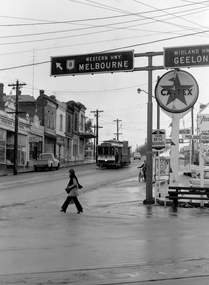
Yields information about Ballarat streetscape and its trams in the closing days of the SEC tramway system.Digital image from a black and white print of tram 21 at the intersection of Bridge, Victoria Streets and Main Road, inbound to the Gardens via Sturt St West. Has the Caltex service station, the Munster Arms Hotel in the background. CRB Road signage for Melbourne and Geelong over the tram. At Stones Corner. Photo by Marc Dahlstrom c1971. On rear is the Marc Dahlstrom stamp.trams, tramways, bridge st, victoria st, main st, stones corner, tram 21 -
 Ballarat Tramway Museum
Photograph - Digital image, c1971
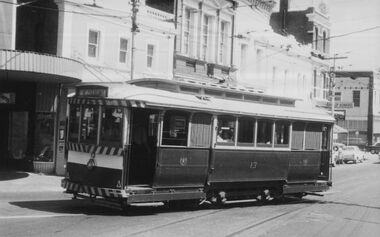
... tramway system. Trams tramways Bridge St Stones Corner tram 13 ...Yields information about Ballarat streetscape and its trams in the closing days of the SEC tramway system.Digital image from a black and white print of tram 13, turning from Bridge St into Main Road outbound for Mt Pleasant with the various buildings on the southside in the background. Photo by Marc Dahlstrom c1971. On rear is the Marc Dahlstrom stamp.trams, tramways, bridge st, stones corner, tram 13 -
 Ballarat Tramway Museum
Document, Gold Museum, Royal visit tram 38, 1990's
Yields information about the photographic holdings of the Gold Museum, an din particular the preparation of No. 38 decorated for the Royal visit of 1954 and Bridge St Ballarat.Photocopy of two photographs from the Gold Museum Tramways Map Cabinet: 80-020b - No. 38 in Wendouree Parade, at depot junction receiving finishing touches in March 1954, prior to the Royal visit - See Reg Item 412 for a photo in Lydiard St Nth and other items. 80-020c - Bridge St looking West from Stones Comer, shows tram track, parked cars.Along top edge "Gold Museum Tramways Map Cabinet"trams, tramways, ballarat, royal visit, decorated trams, bridge st -
 Ballarat Tramway Museum
Photograph - Digital image, looking west along Bridge St Ballarat with the lighting provided for the Royal Visit, 1954
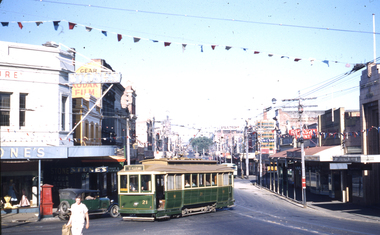
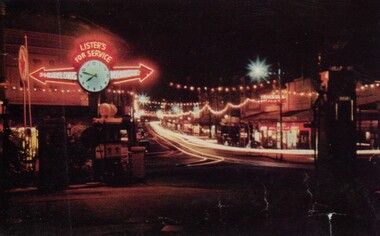
... the appearance of Bridge St festoon lighting for the 1954 Royal Visit ...Yields information about the appearance of Bridge St festoon lighting for the 1954 Royal Visit and Begonia Festival. Has a strong association with the Garage on the corner of Bridge St and Main Road.Digital Copy of a photograph sourced by Roger Greenwood as part of his work on the production of a Video Tape on Ballarat's trams. Photographer and source details not provided by Roger. See btm6304doc.pdf Image looking west along Bridge St Ballarat with the lighting provided for the Royal Visit and Begonia Festival 1954. Has the Lister's Garage sign providing directions to Melbourne and Geelong with a clock centrally mounted. Also has a Caltex sign. Photo from a postcard. trams, tramways, bridge st, stones corner, main road, royal visit, begonia festival -
 Ballarat Tramway Museum
Photograph - Digital Image, Bridge Street
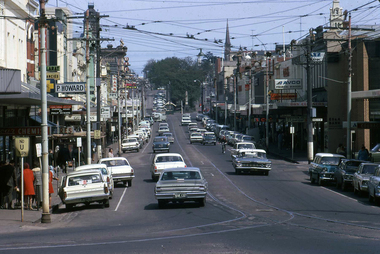
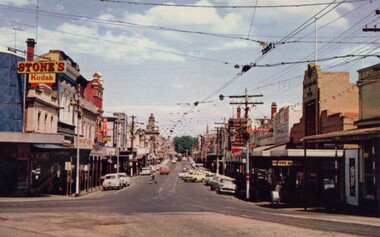
... . Shows the festoon lighting. Trams tramways Bridge St Stones ...Yields information about the appearance of Bridge St early 1960's and the buildings on either side. Shows the festoon lighting.Digital Copy of a photograph sourced by Roger Greenwood as part of his work on the production of a Video Tape on Ballarat's trams. Photographer and source details not provided by Roger. See btm6304doc.pdf Image looking west along Bridge St Ballarat with the festoon lighting in position. See Reg Item 6303i. This image appears to be early 1960's, possibly a bogie tram with yellow stripping at the Grenville St end, but not the large white stripe. Has the Stones Corner and The State Bank buildings in the view. Photo from a postcard, published c1967 as advised in the e-mail of 20/7/15. Print in box 13 trams, tramways, bridge st, stones corner, main road -
 Ballarat Tramway Museum
Photograph - Digital image, Wal Jack, 1/02/1951 12:00:00 AM
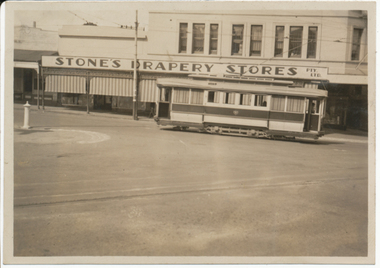
... No. 18 inbound to the City in Main St, at Bridge St with Stones... at the time. Trams tramways Main St Bridge St Stones Corner tram 18 ...Yields information about the appearance of Stones Corner in 1951 and the appearance of the trams at the time.Digital image from the Wal Jack Ballarat Album of Ballarat No. 18 inbound to the City in Main St, at Bridge St with Stones Drapery corner in the background. Photo by Wal Jack 1-2-1951. Also Greens Pies and Pastries and Fargher and Roff Plumbers stores. See image i2 for rear of photograph. See image i3 for hi res scan of print. See image i4 for hi res scan of negativeIn ink on rear "SEC Ballarat No. 18 in Main Rd from Victoria St, Ballarat East 1 Feb 1951" and Wal Jack stamp in bottom right hand corner with number "T689" written in .trams, tramways, main st, bridge st, stones corner, tram 18 -
 Ballarat Tramway Museum
Photograph - Digital image Set of 10, Tony Smith, 1971
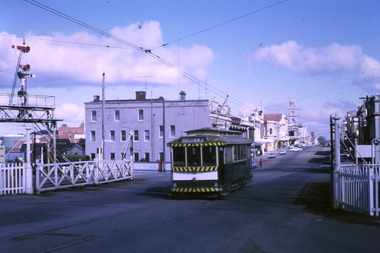
... St North. .3 - 13 in Bridge St, at Stones Corner. Tram has... St Nth Drummond St Sth Bridge St Stones Corner Bell St Parker ...Yields information about Ballarat Tramways and trams prior to the closure of the tramway system.Set of 10 digital images of Ballarat trams prior to closure, scanned from original slides by Tony Smith, 1971 prior to closure of the system. .1 - 27 crossing Lydiard St North level crossing, with Reids Coffee Palace in the background. .2 - 11 and 26? crossing at the Bell St loop - 11 has destination of Lydiard St North, Twin Lakes sign and a SEC Briquette advert. 26 - enroute to Lydiard St North. .3 - 13 in Bridge St, at Stones Corner. Tram has a Twin Lakes advertisement. Has the Bank of NSW, ? Hotel, with a JP Howard sign on the building. .4 - 26 and 27 crossing at Bell St loop. 26 has a Briquettes roof advert. .5 - 13 and 12? crossing at the Parker St loop. 13 has a Twin Lakes advert. .6 - 13 at Carlton St loop, Wendouree Parade. Has the Olympic rings in the background. .7 - 17 in Wendouree Parade, with destination of Gardens via Drummond St North, near the depot. Tram has a Twin Lakes advert. .8 - 31 turning from Wendouree Parade into Macarthur St at View point, with a shelter in the background. Tram is showing Special. .9 - 31 in Macarthur St at View Point - has destination of Victoria St. .10 - 21 enroute to Victoria St, about to cross Grenville St. Tram has the destination of Victoria St. Has the signal control box on the adjacent pole.trams, tramways, level crossings, lydiard st gates, lydiard st nth, drummond st sth, bridge st, stones corner, bell st, parker st loop, wendouree parade, carlton st, view point, macarthur st, grenville st, sturt st, tram 27, tram 11, tram 26, tram 13, tram 21, tram 31, tram 12, tram 17 -
 Ballarat Tramway Museum
Photograph - Digital image, c1922
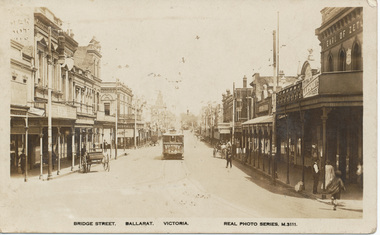
... the buildings, buildings and scene in Bridge St looking east from Stones ...Yields information the buildings, buildings and scene in Bridge St looking east from Stones Corner.Digital image from the Wal Jack Ballarat Album of a postcard - titled "Bridge St Ballarat Victoria, with an ESCo tram in Bridge St. Tram has a Viceroy Tea advertisement on the front panel. The junction between Main and Victoria St lines at Stones Corner is in the foreground. Real Photo Series M 3111. Has a number of horse carts in the photograph. Note the single trolley wire on the Victoria St line and double on the Mt Pleasant line. Card produced by Valentines & Sons Publishing Co. Ltd. See rear of card for company location details. In the photo are advertisements or buildings for: Earl of Zetland, Lothier, Redhalls, Viceroy Tea. Wal has dated the photo about 1922 on the rear of the postcard.. For rear of postcard - see image i2.On the rear in pencil, "Old type in 1922"trams, tramways, esco, bridge st, stones corner -
 Ballarat Tramway Museum
Photograph - Digital image, Wal Jack, 3/01/1944 12:00:00 AM
... No. 11 outbound to Mt Pleasant in Main St, at Bridge St... tramways Main St Bridge St Stones Corner tram 11 In ink on rear ...Yields information about the Stones Corner and Ballarat trams during the mid 1940's.Digital image from the Wal Jack Ballarat Album of Ballarat No. 11 outbound to Mt Pleasant in Main St, at Bridge St with Stones Drapery corner in the background. Photo by Wal Jack 3-1-1944. See image i2 for rear of photograph.In ink on rear "Ballarat Tramway No. 11 in Main St near Bridge St Junction 3-1-1944" and "W. Jack" in bottom right hand corner.trams, tramways, main st, bridge st, stones corner, tram 11 -
 Ballarat Tramway Museum
Photograph - Digital image, Wal Jack, 29/12/1945 12:00:00 AM
... -numbered and Stones Corner. Trams tramways Bridge St Stones Corner ...Yields information about the early use of Ballarat's first bogie tram after it had been re-numbered and Stones Corner.Digital image from the Wal Jack Ballarat Album of No. 22 turning from Bridge St into Main St 29-12-1945. Has the Castrol / Caltex service station with clock in the background and Stones Corner building. Tram proceeding to Mt Pleasant. See image i2 for rear of photograph. See image i3 for hi res scan of print. See image i4 for hi res scan of negativeIn ink on rear " SEC Ballarat Tramways bogie. 22, turning out of Bridge St into Main St, Ballarat East Post Office in background in Main St. 29-12-45" with number "T547" within Wal Jack photo stamp.trams, tramways, bridge st, stones corner, main st, bogie trams, tram 22 -
 Ballarat Tramway Museum
Photograph - Digital image, Peter Bruce, "Bridge St", 1970s
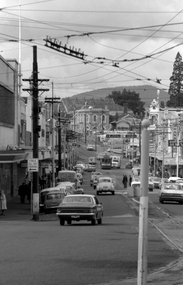
Yields information about the Bridge St landscape looking east.Digital image of a view looking east along Barkly St from Grenville St showing a tram a the intersection of the Mt Pleasant and Victoria St lines (Stones Corner). Has the shops on both side of the street in view. In the far distance is the Caltex service station. Photo taken by Peter Bruce 1970's and 1971, prior to the closure of the Ballarat tramway system. Peter's Title of image: "Bridge St"trams, tramways, ballarat, bridge st -
 Ballarat Tramway Museum
Photograph - Digital image, 1970s
Yields information about the Bakery Hill Victoria St and the Caltex Service Station.Digital image, black and white, of No. 26 descending Bakery Hill to Stone's Corner, Victoria and Main St with the Caltex service station in the foreground. Has a lady with slacks walking across the road and a boy wheeling a bike down the footpath. Note the Highway direction signs and service station signage. O'Brien Motors and a book and record shop on the north side Bakery Hill Victoria St. shops. See Reg 4603 for the subsequent photo at this location. Photo taken by Peter Bruce 1970's and 1971, prior to the closure of the Ballarat tramway system. Peter's Title of image: "No. 26 Bridge and Vic1"trams, tramways, victoria st, main st, stones corner, bakery hill, tram 26 -
 Ballarat Tramway Museum
Photograph - Digital image Set of 2, Peter Bruce, "No.30 Bridge and Main", 1970s
... in Bridge St. 4605.1 - at Stones Corner, enroute to Mt Pleasant... and white, two images, of No. 30 in Bridge St. 4605.1 - at Stones ...Yields information about Bridge St Ballarat and its associated shopping strip.Digital image, black and white, two images, of No. 30 in Bridge St. 4605.1 - at Stones Corner, enroute to Mt Pleasant with Rodda's, Gill & O'Keffe, C.W. Pennan, ANZ Bank and other shops in the background. Note the signal lamps on the right hand side of the photo above the tram stop sign and how the overhead was arranged at this junction. 4605.2 - at Grenville St end, with Faulls Shoes, Suttons HMV and other shops in the background. Photo taken by Peter Bruce 1970's and 1971, prior to the closure of the Ballarat tramway system. Peter's Title of image: "No.30 Bridge and Main" and "No. 30 Bridge St up end".trams, tramways, bridge st, mt pleasant, tram 30 -
 Bendigo Historical Society Inc.
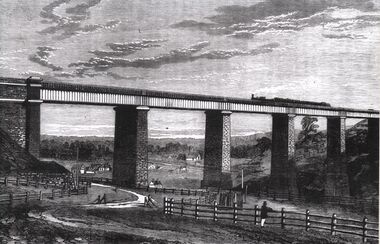
Photograph - TARADALE RAILWAY VIADUCT - ENGRAVING
Photocopy of photo: engraving shows Taradale Railway Viaduct completed. Steam train on viaduct. Stone piers supporting railway line on bridge. Underneath viaduct, post and rail fence, cottages in background.railways, bendigo to melbourne, taradale viaduct -
 Ballarat Tramway Museum
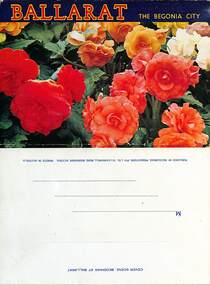
Postcard - Folder Set, Nu-color-vue or Nucolorvue Productions, "Ballarat the Begonia City", early 1960s
... Wendouree, Bridge St from Stones Corner that shows the tramway..., Civic Hall, Lake Wendouree, Bridge St from Stones Corner ...Published by Nucolorvue Productions of Moorabbin Vic. Features photos the Imperial Crown at the Shell House, Ballarat Post Office, looking west up Sturt St with a number of trams in the City Loop. It would appear that the trams have been fitted with dash canopy lightings which dates the photo to early 1960s to mid 1960s. As well Eureka Stockade, Civic Hall, Lake Wendouree, Bridge St from Stones Corner that shows the tramway overhead and signals, Arch of Victory, Sturt St Statuary and Gardens, Begonia House, The Gardens and the Floral Clock with the Town or City Hall. Demonstrates a postcard folder produced by Nucolorvue.Printed colour postcard folder titled "Ballarat The Begonia City", featuring a photo of begonias on the cover and an address box on the rear of the folder.sturt st, city loop, postcards, gardens, lake wendouree, begonias, eureka stockade, shell house -
 Ballarat Tramway Museum
Negative, Wal Jack, 1950's
... Stones Corner Bridge St tram 30 Negative and Digital images ...Yields information about Ballarat tram No. 18 at Stones Corner.Negative and Digital images of the Wal Jack Ballarat Negative file of No 18 at Stones Corner, in bound from Mt Pleasant. Side on view. Has the Stones clothing store in the background. Note the motor car travelling westbound, with large object in the boot. Has the boot lid open. Photo 1950's. trams, tramways, main road, stones corner, bridge st, tram 30 -
 Ballarat Tramway Museum
Postcard - Bridge Sreet Ballarat Vic, VSM Melbourne
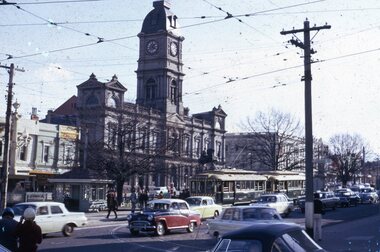
... Parade Ballarat Ballarat goldfields Postcard - Bridge Sreet ...Postcard - Bridge Sreet, Ballarat Vic showing tram tracks, a number of horse drawn carts and cabs. On the far right, a tram stop sign can be seen, along with men talking. In the view are shops, businesses or advertisements for: Junction Boot Store, Havelock Tobacco, Halls Corner, A Bregeut Ales & Butter shop, W A Stark Wines and Spirits, Velvet Soap, Thomas Dunstan? Leather Merchant.Yields infomation about the corner of Bridge Street, Main Road and Victoria Streets.Black and white postcard titled Bridge Sreet Ballarat Vic, looking west from the corner of Bridge Street, Main Road and Victoria Streets 1910c. Divided back type, published by VSM Melboune and printed in Prussia.bridge street, ballarat, stones corner, victoria street, main road, tramways, tram track, horse drawn vehicles -
 Ballarat Tramway Museum
Photograph - Ballarat 15 in Victoria Street, Bob Lilburn, early 1950s
... Photo shows Ballarat bogie tram 15 in Bridge Street... tram 15 in Bridge Street Ballarat, near Stones Corner. The tram ...Photo shows Ballarat bogie tram 15 in Bridge Street Ballarat, near Stones Corner. The tram arrived in Ballarat in Oct. 1945 and was renumbered to No. 36 in Sept 1953. Photo early 1950s. In the background is W J Rodda Pty Ltd Grocery, wines and spirits store and Dunstan's leather store. Note the metal box on the footpath - could be an Electric Supply Co. cable power terminal box.Yields information about bogie tram 15, early 1950s.Black and White photograph of Ballarat 15 in Bridge StreetHas in ink on rear " R Lilburn"ballarat, tramways, trams, stones corner, bridge st, tram 15, esco, w j rodda -
 Ballarat Tramway Museum
Slide - Set of six slides Ballarat City area, September 1971
... Lydiard St North tram13 Stones Corner Sturt St Bridge St Set ...Set of six colour slides, possibly taken on Saturday 4 September 1972, prior to the closure of the Mt Pleasant line the following day. 1 - Two single truckers at Sturt and Lydiard Streets with many motor cars. Town Hall in the background. 2 - Tram 12 (Sebastopol) picking up passengers at the stop just before the tram turned the corner into Sturt St. Driver running a one-man tram. In the background are the ANZ and other bank buildings. 3 - Tram 13 at Stones Corner - with the destination of Gardens via Sturt St. West. The tram is crowded. 4 - Grenville and Sturt St with four trams and many motor cars - taken from near Lydiard St. 5 - Single trucker descends the hill to Grenville St, with the Titanic Bandstand in the background, 6 - Bogie tram westbound in a very busy Bridge St, near Grenville St. Demonstrates tram operations in the Ballarat city area prior to closure of the SEC operated system.Set of six Kodachrome cardboard slides.tramways, ballarat, trams, tram 12, city, lydiard st north, tram13, stones corner, sturt st, bridge st -
 Kew Historical Society Inc
Photograph - Zig-zag Bridge, Kew, Henry Beater Christian, 1920s
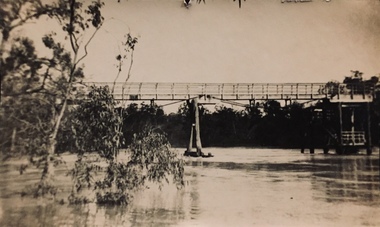
An item from an outstanding and diverse photographic collection, assembled by members of the Christian family of Pakington Street, Kew, comprising professional and amateur photography, depicting individuals, natural and settled environments and the interactions between these worlds. Many of the photographs vividly capture the worlds of three generations of men - Henry Christian, his son Orlando Henry Beater Christian, and his grandson of Henry Beater Christian. The most important photographer was the youngest, Henry Christian, who was a keen explorer, not just of his immediate environment but also of the Victorian wilderness. His major opus is contained in two albums in which he records, sometimes in majestic detail and on other occasions the intimate features of the natural world. His photographic travels during the 1920s, often in solitary ramblings but on other occasions with companions, recall the heroic landscape photography of an earlier era, pioneered by Nicholas Caire. In addition to their aesthetic value, the albums are historically significant records within the State of Victoria, of what is now a distant point in time, and of places that have become radically altered through human intervention.Sepia photograph of the wooden trestle Zig-Zag Bridge across the River Yarra. The bridge was built in the 1870s to transport stone from the west side of the Yarra to the east side. The stone was used in the construction of the Kew Asylum. The bridge continued to link the two asylums on each side of the river. yarra river -- kew (vic), zig-zag bridge -- kew (vic.), henry beater christian, christian-washfold collection -
 Port Fairy Historical Society Museum and Archives
Postcard, Moyne River Port Fairy
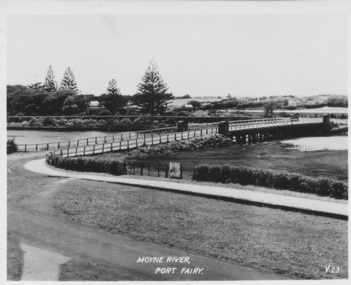
This bridge was built in 1902, replacing a previous structure that crossed the Moyne River from 1857 and linked Belfast with Belfast East, as the two areas of Port Fairy were then known. Prior to that, passage over the river was via a ford (an underwater stone track that allowed wagons to cross when the river was low) located just north of where the current car bridge stands. The present bridge survived the great flood of 1946, but has been the subject of innumerable patch-up jobs over its 114 years. In 2012, the bridge underwent a detailed structural assessment and was given the OK for the next eight to 10 years, notwithstanding the need for regular maintenance works. At the time, it was estimated a new bridge would cost between $2-3 million. It was extensively refurbished in 2016Sole means for traffic to cross to the east side of Port FairyBlack and white photographMoyne River Port Fairyriver, moyne, bridge, road -
 Federation University Art Collection
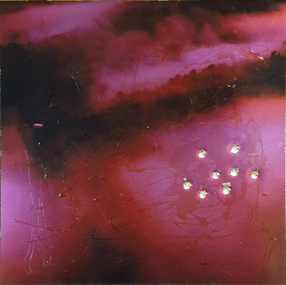
Artwork, other - Artwork, 'Ghosts in the Himalayas (Shot Up)' by Lisa Anderson, 2016
Dr Lisa ANDERSON (1958- ) Dr Anderson’s research questions environmental issues that impact on the social structures of communities and their mapped or metaphysical borders. She develops projects around ways of understanding the effects of climate change. These include work with folklore, legends and religions that tell stories of coping with weather, forced migration of animals and people and coping with difference. She has undertaken international residency programs and exhibitions in the Arctic, Iceland, Paris, Norway, London and China, and she was the first Artist in Residence at the Australian Museum. These unique opportunities continue an extensive art practice of installation work, video, photography and sculpture. Anderson has an extensive record of exhibitions in Australia and overseas with work included in both private and corporate collections. Her exhibitions include Journeys: Due North, a large installation work that includes work created over a 10-year period of engagement in expedition and science work North of the Arctic Circle. Beneath the Beauty of Architecture, an exhibition at her London Gallery, Bicha, used images created in China, Nunuvut Territory in Canada and the Antarctic while working with the migration stories of survival. Dr Anderson has created many large scale artworks that challenge notions of occupation of the City, including Writing the City, a three-year program of installation works to shift the use of Sydney to being a city of public space in its pre-Olympic development. Singing up Stones celebrated the people who created and use the Opera House and the Quay for performance and ideas. This included the first image projection onto the Sydney Opera House, a projection onto the Sydney Harbour Bridge and a ballet of cruise liners with the sound simulcast on the local radio station. Two digital prints with acrylic on metal and bullet holes. This work is the result of research on the hidden voice of landscape undertaken by Dr Lisa Anderson while an Honorary Professor at Federation University Australia. lisa anderson, available