Showing 2010 items
matching tram routes
-
 Melbourne Tram Museum
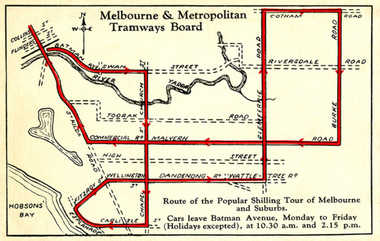
Drawing - Digital Image, Shilling Tour Map, 1927
Map shows the route of the Shilling Tour Map, using Y469 - shows the direction of travel and departure times from Batman Ave. Destination City 5th Edition notes that the services with the tram commenced in June 1927.Yields information about the MMTB's 1927 Shilling tour of Melbourne.Digital Image of an MMTB Map.trams, tramways, y class, tours, tourist trams, tourist trips, tram 191 -
 Melbourne Tram Museum
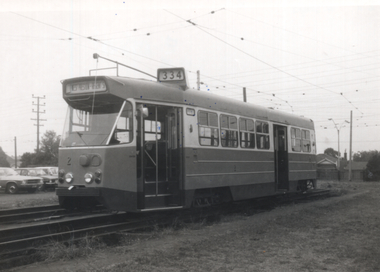
Photograph - Black & White, David Menzies, Tram Z 2 at Preston Workshops, June 1975
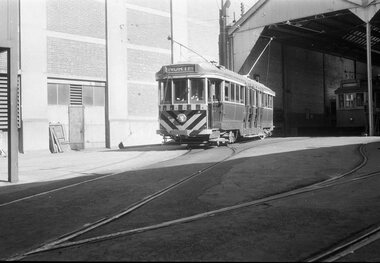
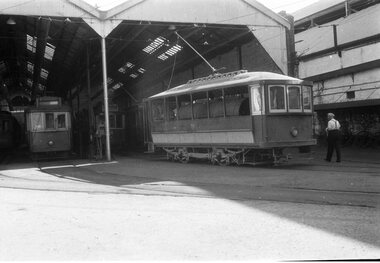
Black and white print of Z class tram No. 2 at Preston Workshops. Has the destination of West Preston Regent St with a route number "334". Photo possibly at the time around the trams entry to service on 28/6/1975. See reference.Yields information about Z class 2 around the time of its commissioning.Black and White photograph - printed on plain paper with photographers stamp on rear.Has stamp of David Menzies on rear. and in ink "Z 2 W'shops"tramways, trams, mmtb, z class, tram 2 -
 Melbourne Tram Museum
Photograph - Black & White, AEC Mark III Bus 512 Flinders St, c1970
Black and white print of AEC Mk III No 512 in Flinders Street. with the station building behind. Has route number 246, Fishermens Bend via Ingles St. Photo taken Circa 1970 as the bus has the three number route number but is not fitted with electric turn light indicators. Comeng Body, entered service 1952/53, "Bob-Tailed" to one-man configuration in the 1962/63 conversion batch. Yields information about Flinders St buses serving Fishermens Bend.Black and White photograph - printed on plain papertramways, trams, mmtb, buses, bus 512 -
 Melbourne Tram Museum
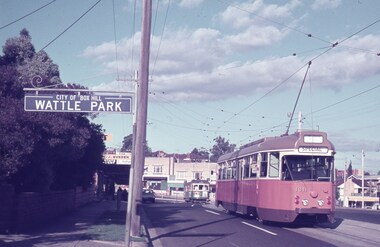
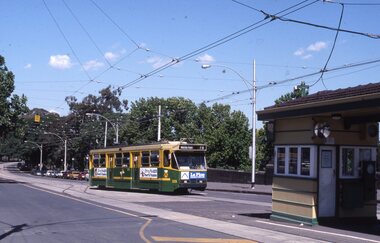
Slide - W2 559 Riversdale Road, Wattle Park, Tramway Museum Society of Victoria (TMSV), c1960
... Melbourne Tram Museum 8 Wallen Road Hawthorn melbourne ...Colour slide of W2 559 (City Route 70) climbing Riversdale Road to Warragul Road with the MMTB owned Wattle Park in the background. At the time the track was a single line between the Wattle Park terminus at Elgar Road and Warragul Road. The tram has two "White Crow" adverts on front of the tram.Yields information about the Wattle Park line and W2 559;Kodachrome colour slides, cardboard mount, duplicate.Has "MP36" in pencil and stamped "Tramways Museum Society Victoria" on rear.tramways, wattle park, w2 class, route 70, tram 559 -
 Melbourne Tram Museum
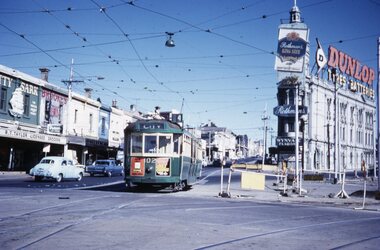
Slide - L 102 St Kilda Junction, Tramway Museum Society of Victoria (TMSV), mid 1960s
... Kilda at St Kilda Junction, running a route 4 service. The tram... at St Kilda Junction, running a route 4 service. The tram has ...Colour slide of L 102, northbound, leaving High Street St Kilda at St Kilda Junction, running a route 4 service. The tram has adverts for Dutor valves and Booses engine oil additive. In the background are R T Taylor licensed grocer, Brookes Bros, the Junction Hotel advertising Rothmans, Dunlop tyres, and Wynvale Flagons. Some roadworks are taking place on the right-hand side.Yields information about St Kilda Junction and tram 102Kodachrome colour slides, cardboard mount, duplicate.Has "MP102" in pencil and stamped "Tramways Museum Society Victoria" on rear.tramways, camberwell depot, l class, tram 102, st kilda junction -
 Melbourne Tram Museum
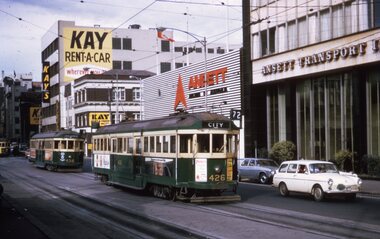
Slide - SW2 426 & W2 438 - Franklin St, Tramway Museum Society of Victoria (TMSV), mid 1960s
Colour slide of SW2 426 (route 72) and W2 438 (route 8) arriving at the Franklin St City terminus. Tram 426 has AMCO jeans and Princes clothing adverts. In the background are the Kay Rent-a-Car buildings and the Ansett Airlines / Ansett Transport Industry offices. Possibly late 1960s.Yields information about the Franklin St terminus late 1960sKodachrome colour slides, cardboard mount, duplicate.Has "MP103" in pencil and stamped "Tramways Museum Society Victoria" on rear.tramways, franklin st, w2 class, sw2 class, tram 426, tram 438 -
 Melbourne Tram Museum
Photograph - W6 979 ready to leave North Fitzroy Depot, David Menzies, 1975
Black and white print of W6 979 ready to leave North Fitzroy Depot. Shows the depot offices and the depot behind and depot allocation board to the right of the tram. Tram about to run a route 96.Yields information about North Fitzroy Depot.Black and White photographs - printed on plain paper with photographers stamp and notes on rear.Has stamp of David Menzies on rear. and in ink details of photo.tramways, trams, mmtb, north fitzroy depot, w6 class, tram 979 -
 Ballarat Tramway Museum
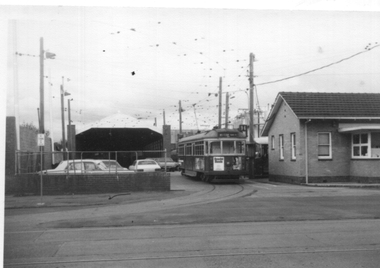
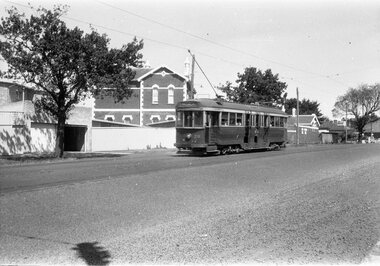
Negative - Geelong Belmont terminus tram 38, early 1956
Photo shows Geelong No. 38 at the Belmont terminus, High Street with the return destination of North. Note the compulsory tram stop on the left-hand pole. One of a set of photos was taken between 15/2/1956 and 3/3/1956 when services operated only between Belmont and North before the final closure of the Belmont route on 25/31956 and that bogie tram 31 is not shown on the board, having gone to Ballarat on 15/2/1956 - see item 5554. See item 8213 for an article on the Geelong system by Keith Kings. Yields information about the Belmont tram terminus prior to closure.Black and white Negative - 120 sizetram stops, tramways, high st, geelong, tram 38, belmont -
 Ballarat Tramway Museum
Negative - Geelong tram inbound Mercer Street, early 1956
Photo shows a Geelong tram inbound in Mercer Street, near The Esplanade. Tram has the destination of Belmont. Based on the running board at item 8267, most likely No. 33. One of a set of photos was taken between 15/2/1956 and 3/3/1956 when services operated only between Belmont and North before the final closure of the Belmont route on 25/31956 and that bogie tram 31 is not shown on the board, having gone to Ballarat on 15/2/1956 - see item 5554. See item 8213 for an article on the Geelong system by Keith Kings. Yields information about tramway operations prior to closure of the Geelong system.Black and white Negative - 120 sizetram stops, tramways, geelong, mercer st, tram 33 -
 Ballarat Tramway Museum
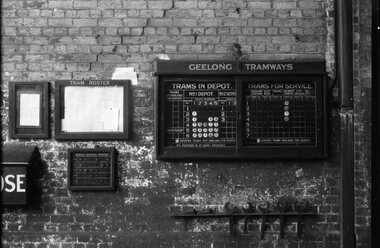
Negative - Tramcar allocation board - Geelong, early 1956
Photo shows the Tramcar allocation board - in the Geelong depot. Shows the four bogie cars in operation or available on the day the photograph was taken. Shows that some of the Meadowbank-built trams and bogie trams had already left the depot. One of a set of photos was taken between 15/2/1956 and 3/3/1956 when services operated only between Belmont and North before the final closure of the Belmont route on 25/31956 and that bogie tram 31 is not shown on the board, having gone to Ballarat on 15/2/1956 - see item 5554. See item 8213 for an article on the Geelong system by Keith Kings. Yields information about the Geelong depot allocation board that showed the location and use of the tramcars on the day.Black and white Negative - 120 sizetramways, geelong, depot, depot allocation, tramcar allocation -
 Ballarat Tramway Museum
Negative - Geelong 38 and welding truck - Moorabool St, early 1956
Photo shows Geelong 38 south bound to Belmont and welding truck - Moorabool St between Myers and McKillop Streets. The welding with the power supply from the overhead would most likely be repairing a broken joint. One of a set of photos was taken between 15/2/1956 and 3/3/1956 when services operated only between Belmont and North before the final closure of the Belmont route on 25/31956 and that bogie tram 31 is not shown on the board, having gone to Ballarat on 15/2/1956 - see item 5554. See item 8213 for an article on the Geelong system by Keith Kings. Yields information about the Geelong operations toward the closure of the tram system.Black and white Negative - 120 sizetramways, geelong, tram 38, moorabool st, welding truck, track repairs -
 Ballarat Tramway Museum
Negative - Tram 40 - Moorabool & Malop Streets, early 1956
Photo shows Geelong 40 on its way to North Geelong, turning from Moorabool St into Malop St. In the background are now the National Mutual and Market Square buildings. One of a set of photos was taken between 15/2/1956 and 3/3/1956 when services operated only between Belmont and North before the final closure of the Belmont route on 25/31956 and that bogie tram 31 is not shown on the board, having gone to Ballarat on 15/2/1956 - see item 5554. See item 8213 for an article on the Geelong system by Keith Kings. Yields information about the Geelong operations toward the closure of the tram system.Black and white Negative - 120 sizetramways, geelong, moorabool st, malop st, tram 40 -
 Ballarat Tramway Museum
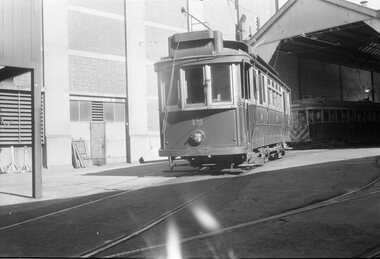
Negative - Tram 33 Geelong depot, early 1956
Photo shows Geelong 33 on No. 5 road at Geelong depot being driven out with the destination set to North. One of a set of photos was taken between 15/2/1956 and 3/3/1956 when services operated only between Belmont and North before the final closure of the Belmont route on 25/31956 and that bogie tram 31 is not shown on the board, having gone to Ballarat on 15/2/1956 - see item 5554. See item 8213 for an article on the Geelong system by Keith Kings. Yields information about the Geelong operations toward the closure of the tram system.Black and white Negative - 120 sizetramways, geelong, geelong depot, tram 33 -
 Ballarat Tramway Museum
Negative - Geelong scrubber at depot, early 1956
The photo shows the Geelong scrubber on the front of No. 2 road with No. 16 behind and No. 19 alongside. One of a set of photos was taken between 15/2/1956 and 3/3/1956 when services operated only between Belmont and North before the final closure of the Belmont route on 25/31956 and that bogie tram 31 is not shown on the board, having gone to Ballarat on 15/2/1956 - see item 5554. See item 8213 for an article on the Geelong system by Keith Kings. Yields information about the Geelong operations toward the closure of the tram system and in particular the Geelong scrubber or track cleaning tram.Black and white Negative - 120 sizetramways, geelong, geelong depot, scrubber, geelong 16, geelong 19 -
 Ballarat Tramway Museum
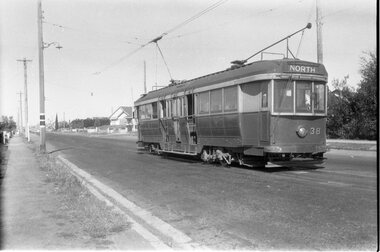
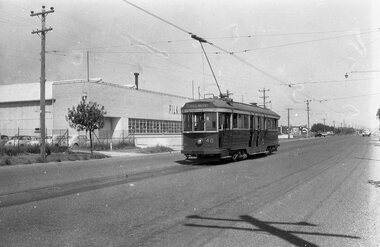
Negative - Tram 40 at the North terminus, early 1956
Photo shows Geelong tram 40 at the North Terminus, with the Pilkington glass factory behind. The tram has the destination of Belmont. One of a set of photos was taken between 15/2/1956 and 3/3/1956 when services operated only between Belmont and North before the final closure of the Belmont route on 25/31956 and that bogie tram 31 is not shown on the board, having gone to Ballarat on 15/2/1956 - see item 5554. See item 8213 for an article on the Geelong system by Keith Kings. Yields information about the Geelong operations toward the closure of the tram system and the North terminus.Black and white Negative - 120 sizetramways, geelong, geelong depot, tram 40, north -
 Ballarat Tramway Museum
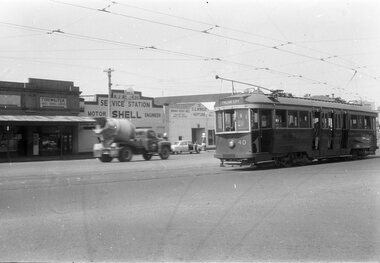
Negative - Tram 40 - Mercer St, city end, early 1956
Photo shows Geelong tram 40 Mercer St, city end. The tram has the destination of North. In the background is a typewriter shop, R J Reynolds? Shell service station and S G Winkler Service station with a Neptune sign. The driver has his hand on the air brake and the controller with the front driver's window open. One of a set of photos was taken between 15/2/1956 and 3/3/1956 when services operated only between Belmont and North before the final closure of the Belmont route on 25/31956 and that bogie tram 31 is not shown on the board, having gone to Ballarat on 15/2/1956 - see item 5554. See item 8213 for an article on the Geelong system by Keith Kings. Yields information about the Geelong operations toward the closure of the tram system.Black and white Negative - 120 sizetramways, geelong, tram 40, north, mercer st -
 Ballarat Tramway Museum
Negative - Tram 19 at Geelong Depot, early 1956
Photo shows Tram 19 at Geelong Depot One of a set of photos was taken between 15/2/1956 and 3/3/1956 when services operated only between Belmont and North before the final closure of the Belmont route on 25/31956 and that bogie tram 31 is not shown on the board, having gone to Ballarat on 15/2/1956 - see item 5554. See item 8213 for an article on the Geelong system by Keith Kings. Yields information about the Geelong operations toward the closure of the tram system.Black and white Negative - 120 sizetramways, geelong, geelong depot, tram 19 -
 Ballarat Tramway Museum
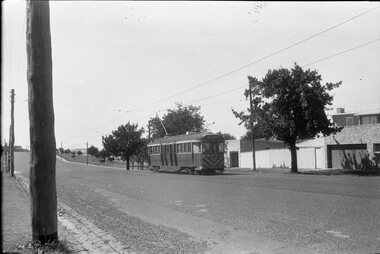
Negative - Tram 38 Mercer Street, early 1956
Photo shows Tram 38 Mercer Street, near The Esplanade with the destination of Belmont. One of a set of photos was taken between 15/2/1956 and 3/3/1956 when services operated only between Belmont and North before the final closure of the Belmont route on 25/31956 and that bogie tram 31 is not shown on the board, having gone to Ballarat on 15/2/1956 - see item 5554. See item 8213 for an article on the Geelong system by Keith Kings. Yields information about the Geelong operations toward the closure of the tram system.Black and white Negative - 120 sizetramways, geelong, tram 38, mercer st -
 Ballarat Tramway Museum
Negative - Moorabool St, looking south at the Kardinia Park loop, early 1956
Photo shows Moorabool St, looking south at the Kardinia Park loop. One of a set of photos was taken between 15/2/1956 and 3/3/1956 when services operated only between Belmont and North before the final closure of the Belmont route on 25/31956 and that bogie tram 31 is not shown on the board, having gone to Ballarat on 15/2/1956 - see item 5554. See item 8213 for an article on the Geelong system by Keith Kings. Yields information about the Geelong tram system.Black and white Negative - 120 sizetramways, geelong, moorabool st, kardinia park loop -
 Ballarat Tramway Museum
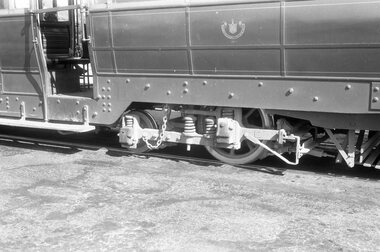
Negative - Brill 22E bogie or truck - Geelong tramcar, early 1956
Photo shows Brill 22E Maximum Traction bogie or truck - Geelong tramcar, has the SEC logo on the side of the tramcar in the view. One of a set of photos was taken between 15/2/1956 and 3/3/1956 when services operated only between Belmont and North before the final closure of the Belmont route on 25/31956 and that bogie tram 31 is not shown on the board, having gone to Ballarat on 15/2/1956 - see item 5554. See item 8213 for an article on the Geelong system by Keith Kings. Yields information about the Geelong bogie trams.Black and white Negative - 120 sizetramways, geelong, brill 22e, maximum traction, bogie trams -
 Ballarat Tramway Museum
Negative - Geelong trams 33 & 40 Barwon Bridge, early 1956
Photo shows Geelong trams 33 & 40 in Moorabool St just south of the Barwon Bridge on the long crossing loop. Based on the running board at item 8267, most likely tram No. 33. One of a set of photos was taken between 15/2/1956 and 3/3/1956 when services operated only between Belmont and North before the final closure of the Belmont route on 25/31956 and that bogie tram 31 is not shown on the board, having gone to Ballarat on 15/2/1956 - see item 5554. See item 8213 for an article on the Geelong system by Keith Kings. Yields information about the Geelong operations toward the closure of the tram system.Black and white Negative - 120 sizetramways, geelong, moorabool st, tram 33, tram 40, barwon river -
 Ballarat Tramway Museum
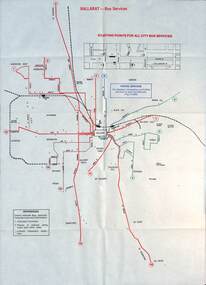
Map - Public Transport Map - Bus, Ministry of Transport, Ballarat, Bendigo & Geelong, 1977
Set of three maps, c1977 show the bus routes for each of Ballarat, Bendigo and Geelong along with railways. Provides information on each route, summary timetables, who operated the route and places of interest. Published by the Ministry of Transport in conjunction with the Transport Regulation Board, Bus Proprietors Association and VicRail. By comparison with the posters issued at the time of tram closure, can see the changes made to the routes in each city. See item 6813 for Ballarat, 6812 for Geelong, and 6814 for Bendigo.Demonstrates a public transport map published by the Ministry of Transport.Set of three 10 fold maps printed in colour to pocket size.On each map "7/77" in ink.buses, maps, ballarat, bendigo, geelong, timetables, railways -
 Melbourne Tram Museum
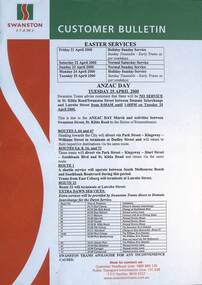
Ephemera - Customer Bulletin, Easter & Anzac Day services, 2000
Provides details of services for Easter and ANZAC day 2000 advising the route diversions for ANZAC Day march and events. Note it was one five day long holiday period - a late Easter. Includes extra services for the Dawn Services at the Shrine. Has contact details.Demonstrates a Swanston Tram Customer Bulletin.A3 sheet - printed with Swanston Trams logo and colours - 120gsm paperswanston trams, timetables, anzac day, easter, tram services -
 Melbourne Tram Museum
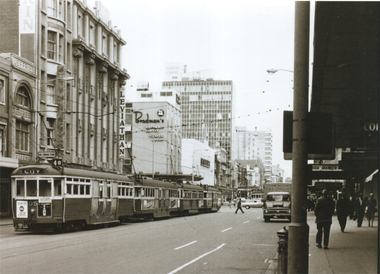
Photograph - L 105 Swanston St, Tramway Museum Society of Victoria (TMSV), 1960s
... and the use of L class trams. trams L class tram 105 route 4B Bourke ...Photograph shows a line of trams at the corner of Bourke and Swanston Sts during the 1960s. L 105 is the rear car, showing a route number 4B. In the background are Jeffries, Swanston building, Leviathan, and Bradman's. Note the "No Centre Turn" sign above the route number box of 105. A Hawthorn Taxi trucks vehicle is on the right side of the photo.Yields information about Swanston St and the use of L class trams.Photograph - Black and whiteHas TMSV Sales stamp on rear.trams, l class, tram 105, route 4b, bourke st, swanston st -
 Ballarat Tramway Museum
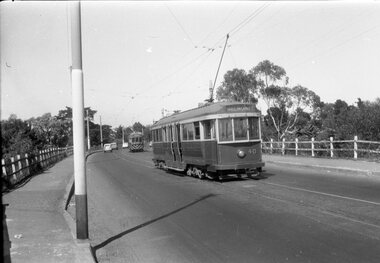
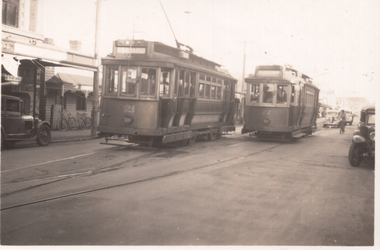
Photograph - Geelong 21 and 22 crossing at the Albert St loop in Pakington St, Wal Jack, 23-6-1949
Geelong 21 and 22 crossing at the Albert St loop, the second loop in Pakington St. Tram 21 has the destination of Station, and 22 the destination of West. See item 7815 for negative. Date - 23-6-1949. Refer to "Twenty five years ago, the Closure of the Geelong Tramways", by Ken McCarthy, April 1981 issue of Trolley Wire page 10 for routing information.Yields information about tram operations in Pakington St.Black and white photograph, with hand written details on rear.See rear image. tramways, trams, geelong, tram 21, tram 22, pakington st -
 Melbourne Tram Museum
Album - Robert Thomson Slide Collection - box 15, 1989
Photo - see pdf file for further information. Number Date Brief Description RT341 14-4-1974 PCC1041 at Wattle Park RT342 17-4-1974 St Kilda Road Extension – was High St and Brighton Road RT343 31-3-1975 PCC 1041 at Moonee Ponds Junction RT344 1989 SW6 914 Truganini Road, single line RT345 Jan 90 Z59 westbound in La Trobe St route 89 RT346 Apr 89 W 380 Albert Road with A283 on St Kilda line over bridge (Tours database provides a date of 25-6-1989 for an ARHS tour) RT347 1989 Truganini Rd duplication work RT348 1989 Truganini Rd duplication work RT349 1989 Truganini Rd duplication work’ RT350 Jan 90 SW5 763 Balaclava Junction RT351 Apr 1989 W2 533 Overhead test car Victoria Parade and B class RT352 Apr 1989 W2 533 overhead test car Port Melbourne line RT353 Apr 1989 ditto at Port Melbourne station RT354 Jan 1990 11W scrubber in William St RT355 1986 Transport Art tram SW5 731 - Painted by Lesley Dumbrell RT356 Apr 89 SW6 869 leaving Malvern depot RT357 Apr 89 W1 431 on tour – Truganini Road RT358 Apr 89 W1 431 at East Brighton terminus RT359 Apr 89 W380 and W1 431 on tour Albert Road South Melbourne RT360 Apr 89 W1 431 East Malvern Darling Road RT361 c1989 L 104 William St and Z95 at La Trobe St RT362 c1989 L 104 Peel St RT363 Jan 1990 SW6 921 Balaclava Junction RT364 Apr 1989 B2 2007 Victoria Parade RT365 Apr 1989 B2 2007 Mont Albert terminus RT366 Apr 1989 B2 2007 Bundoora line Plenty Road RT367 Apr 1989? Z3 209 and B2 200) at Bundoora terminus RT368 Apr 1989? B2 2009 and Z2 111 at Bundoora terminus RT369 Apr 1989 W5 839 and W1 431 Truganini Road RT370 Apr 1989 W1 380 Albert Road and B2 on over bridge RT371 Apr 1989 SW6 923 Dandenong Road Demonstrates the work of Robert Thomson in photography, collection and/or production of slidesAssembled album in a black presentation folder of 30 colour slides, collected or produced by Robert Thomson. A list of all photographs with details has been compiled. melbourne, tramways, trams, tram 1041, wattle park, st kilda road, tram 914, tram 59, truganini road, tram 380, st kilda light rail, tram 283, tram 763, balaclava junction, tram 533, port melbourne, tram 11w, william st, transporting art, tram 869, tram 431, tram 104, east malvern, east brighton, peel st, victoria parade, mont albert, bundoora, tram 2007, tram 209, tram 2009, tram 111, tram 839, albert road, tram 923, dandenong road -
 Melbourne Tram Museum
Album - Robert Thomson Slide Collection - box 17, 1999 to 2001
... extension route 48 in Yarra Trams livery RT426 Nov 2001 11W Bourke... “Tram stop ahead” RT405 Nov 99 W6 977 Swanston St – route 8 ...Photo - see pdf file for further information. Number Date Brief Description Box 17 RT396 Nov. 99 A 239 arriving Batman Ave Route 70 RT397 Nov 99 W7 1012 running Special, Clarendon St RT398 Nov 99 A 300, Port Melbourne, Mont Albert route 109 RT399 Nov 99 A 286 Port Melbourne line, route 109 RT400 Nov 99 Z3 223 Carlisle St St Kilda, route 69 – with destination set for return Kew Cotham Road RT401 Nov 99 W7 1005 Swanston St route 8 with Christmas decorations – route 8 RT402 Nov 99 Z3 140 Swanston St route 8 with Christmas decorations – route 11 RT403 Nov 99 Z3 144 Swanston and Bourke with “Give way to passengers ”sign – route 1 RT404 Nov 99 Z3s 144 and 196 Swanston St – with sign “Tram stop ahead” RT405 Nov 99 W6 977 Swanston St – route 8 and Z1 72 RT406 Nov 99 11W and City Circle SW5 723 – Spencer and Collins Sts RT407 Nov 99 SW6 960 University terminus, route 16 RT408 Nov 99 SW6 960 University terminus with Z2 108 and other trams RT409 Nov. 99 A 234 Wattle Park terminus, route 70 RT410 Nov 99 New track docklands with old shipping shed in the view. RT411 Nov 99 Flinders St extension Docklands new track RT412 Nov 99 A 255 route 109 Port Melbourne terminus with former station building RT413 Nov 99 SW6 954 Route 16, Ackland St terminus with a Z3 behind. RT414 Nov 99 Restraurant tram 442, Esplanade. RT 415 Nov 2000 Z27 and Z1 Balaclava Junction RT416 Nov 2000 A 278 route 109 Port Melbourne terminus with former station building RT417 Nov 2001 B2 2010 in Yarra livery, Bourke St at Spencer St RT418 Nov 2001 B2 2108 turning from Bourke into Spencer St (route 96) followed by another B2 2048? RT 419 Nov 2001 Z 80 and another two Zs in Swanston St RT420 Nov 2001 Z137 and other Z’s in Swanston St RT421 Nov 2001 Z82 Swanston st RT422 Nov 2001 Z3 169 Wests Road, West Maribyrnong terminus with another Z arriving. Route 57 RT423 Nov 2001 West Maribyrnong terminus board with Swanston Trams signage RT424 Nov 2001 Z3 172 route 82, Wests Road RT425 Nov 2001 A class Flinders St extension route 48 in Yarra Trams livery RT426 Nov 2001 11W Bourke St with MTOCco building in the background. Demonstrates the work of Robert Thomson in photography, collection and/or production of slidesAssembled album in a black presentation folder of 31 colour slides, collected or produced by Robert Thomson. A list of all photographs with details has been compiled. All rights reserved for all photos., melbourne, tramways, trams, tram 239, route 70, batman ave, tram 1012, clarendon st, tram 300, port melbourne, route 109, tram 223, tram 69, tram 1005, route 8, swanston st, tram 140, tram 144, tram 196, tram 977, tram 72, tram 11w, tram 723, city circle, tram 960, tram 108, tram 234, wattle park, docklands, trackwork, flinders st, tram 255, tram 954, tram 442, tram 27, tram 1, tram 278, tram 2010, tram 2108, tram 80, tram 137, tram 82, tram 169, wests road, west maribyrnong, swanston trams, tram 172, route 82, route 48, bourke st, mtoco -
 Melbourne Tram Museum
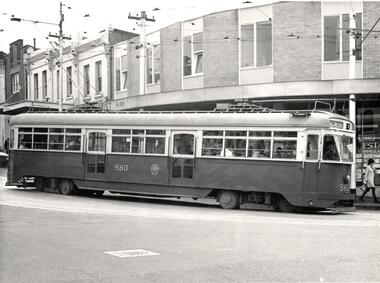
Photograph - Black & White Photograph/s, 1960's?
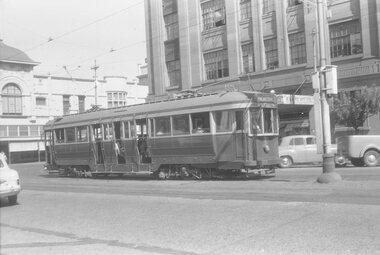
Black and White photograph of PCC car 980 turning at the corner of Gertrude and Smith Streets, possibly during the 1960's. Tram has the destination of East Preston. Could be a MMTB Photograph. Printed on a stippled paper.trams, tramways, gertrude st, smith st, east preston, tram 980, pcc class, fitzroy, route 88, mmtb -
 Melbourne Tram Museum
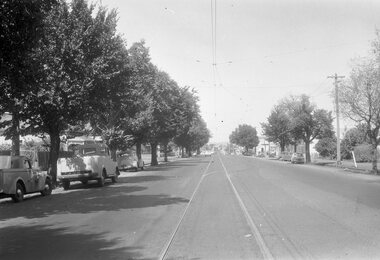
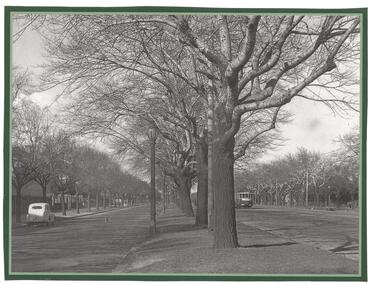
Photograph - Black and White photograph, early 1940
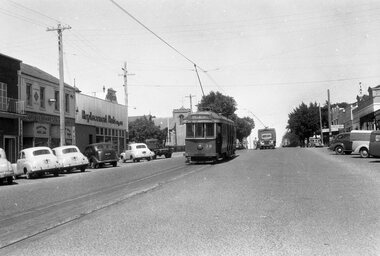
... Trams tramways St Kilda Rd Route 64 East Brighton tram 219 ...Black and white photograph white a grey and green border of possibly tram W2 class 219, southbound in St Kilda Road with one parked car on the left hand side. Shows the nature of St Kilda Road during the winter. Photo during the early 1940's with the tram having white stripes for war time. The tram has the destination of East Brighton, Route 64.trams, tramways, st kilda rd, route 64, east brighton, tram 219 ?, w2 class, world war 2 -
 Melbourne Tram Museum
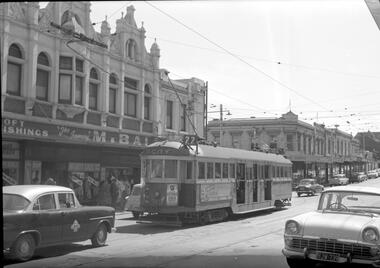
Negative, Travis Jeffrey, c1959
... Trams tramways W2 class Route 77 Church St Richmond tram ...Negative of tram 319 at a tram stop in Church St at Swan St Richmond. Tram has destination City and Route No 77.Paper folder that contained the negative had "NR12A" in red ink, "M5" in pencil, 12A in blue ink, date stamp "29 Nov 1959" on front.trams, tramways, w2 class, route 77, church st, richmond, tram 319, overhead