Showing 12823 items
matching brown
-
 Warrnambool and District Historical Society Inc.
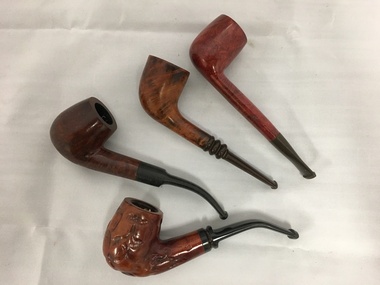
Artefact, Pipes x 4, Mid 20th century
These pipes came from the Warrnambool firm of Peter Hand Tobacco Company Pty Ltd and were typical of the pipes sold by that firm. The Peter Hand Tobacco Company commenced in 1958 and was a wholesale distributor of tobacco and cigarettes throughout the Western District until early in the 21st century when tobacco smoking was no longer a widespread habit in any community in Australia. The retail shop was at 97 Liebig Street Warrnambool. These pipes are of interest as they came from the Peter Hand Tobacco Company, a prominent business in Warrnambool for 50 years. They are also a memento of the times when pipe-smoking amongst men was prevalent. These are briar pipes with black Bakelite mouth pieces. All appear to be unused. .1 A brown briar pipe with an indented pattern .2 A brown briar pipe with a polished wood .3 A light brown briar pipe with a mottled pattern finish .4 A brown briar pipe with a smooth polished finish1 ‘Seville Special’ .2 ‘Real Briar’ .3 ‘Nording Danmark N 118’ .4 ‘Vavrs VZ’ (?) peter hand tobacco company (warrnambool), history of warrnambool -
 Kiewa Valley Historical Society
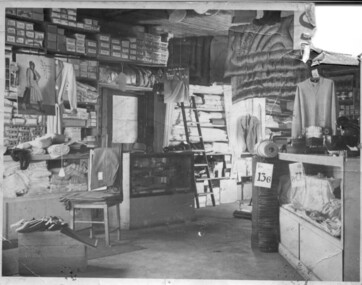
Black and white photograph of shop interior, c1940/50
Interior of shop in the Kiewa area. Possibly Bogong Village. Bogong was constructed in the 1940's and this would be typical of the type of merchandise sold in that era.Photograph shows a typical interior of a small store in the 1940's and 50's. The merchandise on sale includes a wide range of goods from eiderdowns to shoes, fabric and clothing.Black and white photo of interior of a shop showing various merchandise. Has section of photo torn from upper right upper corner approx. 35mm x 40 mm.In pencil on back of photo is ? store at Bogong Village There are large brown stains in each corner. (Back of photograph)bogong, merchandise, shop interior -
 Benalla Art Gallery
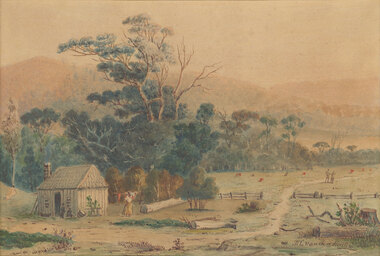
Watercolour, H. L. VAN DEN HOUTEN, Settler's hut, Not dated
Born: The Hague, Netherlands 1801; Arrived: Melbourne, Victoria, Australia 1853; Died: Melbourne, Victoria, Australia 1879ColonialGift of Mrs E.E. Ledger, 1987Watercolour depicting a rural landscape with a settler's hut and figures standing in a cleared paddock. Gold and grey brushed timber frame with off white window mountRecto: Signed "H L Van den Houten" in brown watercolour in l.r.c of composition; Not dated; Not titledwatercolour, landscape, house, figures, path, fence, building, hills -
 Stawell Historical Society Inc
Equipment - Realia - Glassware, Aunde / Norwellan
North Western Woolen Mills became Norwellan Textiles then AUNDEGlass graduated Pipette1/001 Silberbrand eternal I m I 0 to 0.9 markings in brown yellow band -
 Dandenong/Cranbourne RSL Sub Branch
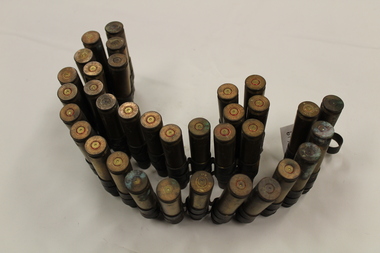
Linked cartridge cases, Circa June 1962
Linked cartridge cases. 50 calibre brass cases with metal links joining them together. Each cartridge is stamped L11 A2 K 69. DS B2. 50 calibre ammunition Browning. -
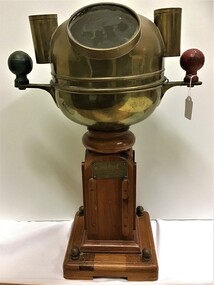 Queenscliffe Maritime Museum
Instrument - Ship's Binnacle
Ship's binnacle mounted on wooden stand possibly ornamentalTrade Mark 'Sistral', Henry Brown & Son Ltd, Station Works, Barking, Essex, Type SJbinnacle, compass -
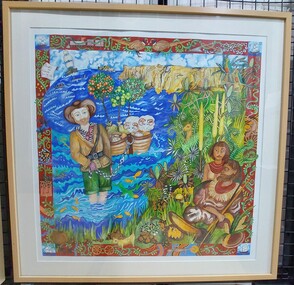 Glenelg Shire Council Cultural Collection
Painting, Jennifer McCarthy, Edward Henty Arrival, 2009
Winner of the 175th Anniversary of Edward Henty landing at Portland, Acquisitive Art Prize.Gouache on paper depiction of Edward Henty's arrival at Portland Bay. Cream coloured mat board. Light coloured wooden frame. Wire hanging cord. A colourful border depicting native animals as well as other items such as a steam train, shovel, cartwheels surrounds an image of the coastline. Each corner of the border shows a sailing ship. In the foreground are two Indigenous Australians seated on the floor surrounded by bushland. To the left stands a man in European clothing - green trousers and a striped top. He is ankle deep in the water. Behind him are two baskets which he holds with a chain. Behind that are two sheep. Top left is a parchment which says, Thistle the Pioneer, Nov 19th 1834.Front: Back - 'Jennifer McCarthy Edward Henty - Arrival 2009' - Brown texta Also framers sticker1834, the thistle, henty, colonial, portland bay -
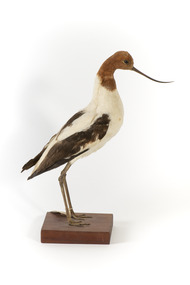 The Beechworth Burke Museum
Animal specimen - Red Necked Avocat, Trustees of the Australian Museum, 1860-1880
This particular species is native to Australia and can be located throughout the mainland, preferably in the south-western interior. It is known for its distinctively upturned bill, the males of this species have a slightly more upturn to their bill than the female. This style of bill is unusual among birds and is used to assist them forage in the water of shallow wetlands. These birds feed on aquatic insects, crustaceans and seeds. The name of this species is derived from the distinctive chestnut brown/red colouring of the head and neck. Interestingly, the call of this bird has been described as a "yapping" sound which is similar to the sound of dogs barking when performed by a flock in flight. This specimen is part of a collection of almost 200 animal specimens that were originally acquired as skins from various institutions across Australia, including the Australian Museum in Sydney and the National Museum of Victoria (known as Museums Victoria since 1983), as well as individuals such as amateur anthropologist Reynell Eveleigh Johns between 1860-1880. These skins were then mounted by members of the Burke Museum Committee and put-on display in the formal space of the Museum’s original exhibition hall where they continue to be on display. This display of taxidermy mounts initially served to instruct visitors to the Burke Museum of the natural world around them, today it serves as an insight into the collecting habits of the 19th century.This specimen is part of a significant and rare taxidermy mount collection in the Burke Museum. This collection is scientifically and culturally important for reminding us of how science continues to shape our understanding of the modern world. They demonstrate a capacity to hold evidence of how Australia’s fauna history existed in the past and are potentially important for future environmental research. This collection continues to be on display in the Museum and has become a key part to interpreting the collecting habits of the 19th century.This Red Necked Avocat specimen is stylized in a standing position upon a wooden platform. There is a pale brown identification tag tied around its left leg. The bird has long pale grey coloured legs and a characteristic long, thin and black upturned bill. The plumage of this species is largely white. It has a chestnut brown/red coloured head which is where this species gets its name. The wings are white with black tips.25c. / Avocet / Catalogue, page, 36. / taxidermy mount, taxidermy, animalia, burke museum, beechworth, australian museum, skin, reynell eveleigh johns, bird, australian birds, large bird, red necked avocat, avocat -
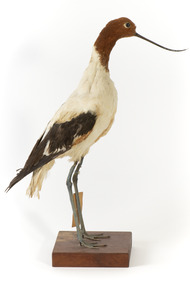 The Beechworth Burke Museum
Animal specimen - Red-Necked Avocat, Trustees of the Australian Museum, 1860-1880
This particular species is native to Australia and can be located throughout the mainland, preferably in the south-western interior. It is known for its distinctively upturned bill, the males of this species have a slightly more upturn to their bill than the female. This style of bill is unusual among birds and is used to assist them forage in the water of shallow wetlands. These birds feed on aquatic insects, crustaceans and seeds. The name of this species is derived from the distinctive chestnut brown/red colouring of the head and neck. Interestingly, the call of this bird has been described as a "yapping" sound which is similar to the sound of dogs barking when performed by a flock in flight. This specimen is part of a collection of almost 200 animal specimens that were originally acquired as skins from various institutions across Australia, including the Australian Museum in Sydney and the National Museum of Victoria (known as Museums Victoria since 1983), as well as individuals such as amateur anthropologist Reynell Eveleigh Johns between 1860-1880. These skins were then mounted by members of the Burke Museum Committee and put-on display in the formal space of the Museum’s original exhibition hall where they continue to be on display. This display of taxidermy mounts initially served to instruct visitors to the Burke Museum of the natural world around them, today it serves as an insight into the collecting habits of the 19th century.This specimen is part of a significant and rare taxidermy mount collection in the Burke Museum. This collection is scientifically and culturally important for reminding us of how science continues to shape our understanding of the modern world. They demonstrate a capacity to hold evidence of how Australia’s fauna history existed in the past and are potentially important for future environmental research. This collection continues to be on display in the Museum and has become a key part to interpreting the collecting habits of the 19th century.This Red Necked Avocat specimen is stylized in a standing position upon a wooden platform. There is a pale brown identification tag tied around its left leg. The bird has long pale grey coloured legs and a characteristic long, thin and black upturned bill. The plumage of this species is largely white. It has a chestnut brown/red coloured head which is where this species gets its name. The wings are white with black tips.24c. / Avocat / Catalogue, page, 36. /taxidermy mount, taxidermy, animalia, burke museum, beechworth, australian museum, skin, reynell eveleigh johns, bird, australian birds, large bird, red necked avocat, avocat -
 Glenelg Shire Council Cultural Collection
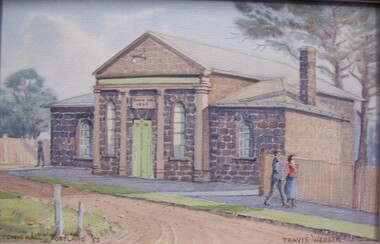
Painting, Travis Webber, Town Hall, Portland, 1955
Portland Town CouncilPainting of a bluestone building. There are four columns to the front of the building. One either side of a green front door and the other two either side of each side window. Above the front door is a sign which reads ' Town Hall 1869' A footpath is in front of the building, with a man and woman walking together. The man wears a suit and hat and the woman wears a red shirt and blue skirt. At the other side of the building there is another figure - shadowy. A dirt road curves from foreground centre towards and past the building to the left. Two tall pines are behind the building on right.Front: Town Hall Portland '55 (brown paint, lower let). Travis Webber (brown paint, lower right). Back: Geelong Picture Framers, 211 Moorabool Street, GEELONG. Ph. 97805 (blue ink stamp, lower centre).portland town hall, bluestone building, bluestone, 1800s -
Tatura Irrigation & Wartime Camps Museum
Photograph
Photos from Superintendent Hannan's album. Presbyterian Training Boys Farm.|Dhurringile Mansion.|Photo 2- Charles Brown top left and right.|Photo 3- Charles Brown top left and right.|Photo 4-Tom Been right.|Douglas McHugh left.|5 Photos.photograph, people -
Creswick Campus Historical Collection - University of Melbourne
Still Image, 1964
Subject: Lower Glenelg Plantation . 7 brown envelopes marked Run 1. No. 12 - 17of 9 prints each. Stored in a brown cardboard file box marked Lower Glenelg Plantation Run No.1. 11 - 17(x9). Photos commissioned by Forests Commission Victoria 1964.Aerial Photographs -
Stawell Historical Society Inc
Photograph, Stawell High School Form 5 breakup 1959 -- Named
Rodney Eime, Barry Leslie, Robert Sargent, Frank Allen Noel Reeves, Ron Brown, Kay Neil, Jan Punchard, Ellen McKay, Adele Brown, Sandra Fawkner, Kay Stewart, IsabelEvery, Carol Polock, Jan Morrow, Lola Paulett, Alison Murdock, Kevin Harris. Stawell High School Students 1959Names of Studentseducation -
Ringwood and District Historical Society
Plans - Freeway, Country Roads Board, Victoria, Eastern Freeway Ringwood Section - Planning Report on Suggested Concepts Investigation (Country Roads Board) 1974, 1974
Report on suggested concepts investigation for freeway.Report on suggested concepts investigation for freeway. Buff coloured covers with brown printing. Bound with brown Spirex. pp. 39. -
 Flagstaff Hill Maritime Museum and Village
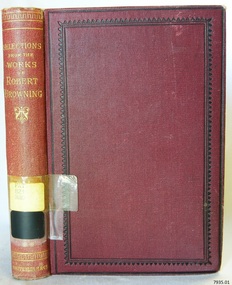
Book, Selections from The Poetical Works of Robert Browning
This item is from the ‘Pattison Collection’, a collection of books and records that was originally owned by the Warrnambool Mechanics’ Institute, which was founded in Warrnambool in 1853. By 1886 the Warrnambool Mechanics’ Institute (WMI) had grown to have a Library, Museum and Fine Arts Gallery, with a collection of “… choice productions of art, and valuable specimens in almost every branch and many wonderful national curiosities are now to be seen there, including historic relics of the town and district.” It later included a School of Design. Although it was very well patronised, the lack of financial support led the WMI in 1911 to ask the City Council to take it over. In 1935 Ralph Pattison was appointed as City Librarian to establish and organise the Warrnambool Library as it was then called. When the WMI building was pulled down in 1963 a new civic building was erected on the site and the new Warrnambool Library, on behalf of the City Council, took over all the holdings of the WMI. At this time some of the items were separated and identified as the ‘Pattison Collection’, named after Ralph Pattison. Eventually the components of the WMI were distributed from the Warrnambool Library to various places, including the Art Gallery, Historical Society and Flagstaff Hill. Later some were even distributed to other regional branches of Corangamite Regional Library and passed to and fro. It is difficult now to trace just where all of the items have ended up. The books at Flagstaff Hill Maritime Village generally display stamps and markings from Pattison as well as a variety of other institutions including the Mechanics’ Institute itself. RALPH ERIC PATTISON Ralph Eric Pattison was born in Rockhampton, Queensland, in 1891. He married Maude Swan from Warrnambool in 1920 and they set up home in Warrnambool. In 1935 Pattison accepted a position as City Librarian for the Warrnambool City Council. His huge challenge was to make a functional library within two rooms of the Mechanics’ Institute. He tirelessly cleaned, cleared and sorted a disarrayed collection of old books, jars of preserved specimens and other items reserved for exhibition in the city’s museum. He developed and updated the library with a wide variety of books for all tastes, including reference books for students; a difficult task to fulfil during the years following the Depression. He converted all of the lower area of the building into a library, reference room and reading room for members and the public. The books were sorted and stored using a cataloguing and card index system that he had developed himself. He also prepared the upper floor of the building and established the Art Gallery and later the Museum, a place to exhibit the many old relics that had been stored for years for this purpose. One of the treasures he found was a beautiful ancient clock, which he repaired, restored and enjoyed using in his office during the years of his service there. Ralph Pattison was described as “a meticulous gentleman whose punctuality, floorless courtesy and distinctive neat dress were hallmarks of his character, and ‘his’ clock controlled his daily routine, and his opening and closing of the library’s large heavy doors to the minute.” Pattison took leave during 1942 to 1945 to serve in the Royal Australian Navy, Volunteer Reserve as Lieutenant. A few years later he converted one of the Museum’s rooms into a Children’s Library, stocking it with suitable books for the younger generation. This was an instant success. In the 1950’s he had the honour of being appointed to the Victorian Library Board and received more inspiration from the monthly conferences in Melbourne. He was sadly retired in 1959 after over 23 years of service, due to the fact that he had gone over the working age of council officers. However he continued to take a very keen interest in the continual development of the Library until his death in 1969. The Pattison Collection, along with other items at Flagstaff Hill Maritime Village, was originally part of the Warrnambool Mechanics' Institute’s collection. The Warrnambool Mechanics’ Institute Collection is primarily significant in its totality, rather than for the individual objects it contains. Its contents are highly representative of the development of Mechanics' Institute libraries across Australia, particularly Victoria. A diversity of publications and themes has been amassed, and these provide clues to our understanding of the nature of and changes in the reading habits of Victorians from the 1850s to the middle of the 20th century. The collection also highlights the Warrnambool community’s commitment to the Mechanics’ Institute, reading, literacy and learning in the regions, and proves that access to knowledge was not impeded by distance. These items help to provide a more complete picture of our community’s ideals and aspirations. The Warrnambool Mechanics Institute book collection has historical and social significance for its strong association with the Mechanics Institute movement and the important role it played in the intellectual, cultural and social development of people throughout the latter part of the nineteenth century and the early twentieth century. The collection of books is a rare example of an early lending library and its significance is enhanced by the survival of an original collection of many volumes. The Warrnambool Mechanics' Institute’s publication collection is of both local and state significance. Selections from The Poetical Works of Robert Browning Author: Robert Browning Publisher: Smith, Elder & Co Date: 1891Label on spine cover with typed text PAT 821 BRO Pastedown front endpaper has sticker from Warrnambool Mechanics Institute and Free Library Front loose endpaper has a sticker from Corangamite Regional Library Servicewarrnambool, shipwrecked-coast, flagstaff-hill, flagstaff-hill-maritime-museum, maritime-museum, shipwreck-coast, flagstaff-hill-maritime-village, shipwrecked-artefact, book, pattison collection, warrnambool library, warrnambool mechanics’ institute, ralph eric pattison, corangamite regional library service, warrnambool city librarian, mechanics’ institute library, victorian library board, warrnambool books and records, warrnambool children’s library, great ocean road, selections from the poetical works of robert browning, robert browning -
 Flagstaff Hill Maritime Museum and Village
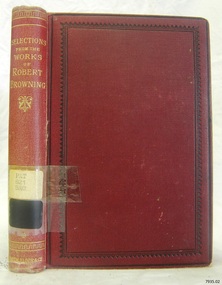
Book, Selections from The Poetical Works of Robert Browning
This item is from the ‘Pattison Collection’, a collection of books and records that was originally owned by the Warrnambool Mechanics’ Institute, which was founded in Warrnambool in 1853. By 1886 the Warrnambool Mechanics’ Institute (WMI) had grown to have a Library, Museum and Fine Arts Gallery, with a collection of “… choice productions of art, and valuable specimens in almost every branch and many wonderful national curiosities are now to be seen there, including historic relics of the town and district.” It later included a School of Design. Although it was very well patronised, the lack of financial support led the WMI in 1911 to ask the City Council to take it over. In 1935 Ralph Pattison was appointed as City Librarian to establish and organise the Warrnambool Library as it was then called. When the WMI building was pulled down in 1963 a new civic building was erected on the site and the new Warrnambool Library, on behalf of the City Council, took over all the holdings of the WMI. At this time some of the items were separated and identified as the ‘Pattison Collection’, named after Ralph Pattison. Eventually the components of the WMI were distributed from the Warrnambool Library to various places, including the Art Gallery, Historical Society and Flagstaff Hill. Later some were even distributed to other regional branches of Corangamite Regional Library and passed to and fro. It is difficult now to trace just where all of the items have ended up. The books at Flagstaff Hill Maritime Village generally display stamps and markings from Pattison as well as a variety of other institutions including the Mechanics’ Institute itself. RALPH ERIC PATTISON Ralph Eric Pattison was born in Rockhampton, Queensland, in 1891. He married Maude Swan from Warrnambool in 1920 and they set up home in Warrnambool. In 1935 Pattison accepted a position as City Librarian for the Warrnambool City Council. His huge challenge was to make a functional library within two rooms of the Mechanics’ Institute. He tirelessly cleaned, cleared and sorted a disarrayed collection of old books, jars of preserved specimens and other items reserved for exhibition in the city’s museum. He developed and updated the library with a wide variety of books for all tastes, including reference books for students; a difficult task to fulfil during the years following the Depression. He converted all of the lower area of the building into a library, reference room and reading room for members and the public. The books were sorted and stored using a cataloguing and card index system that he had developed himself. He also prepared the upper floor of the building and established the Art Gallery and later the Museum, a place to exhibit the many old relics that had been stored for years for this purpose. One of the treasures he found was a beautiful ancient clock, which he repaired, restored and enjoyed using in his office during the years of his service there. Ralph Pattison was described as “a meticulous gentleman whose punctuality, floorless courtesy and distinctive neat dress were hallmarks of his character, and ‘his’ clock controlled his daily routine, and his opening and closing of the library’s large heavy doors to the minute.” Pattison took leave during 1942 to 1945 to serve in the Royal Australian Navy, Volunteer Reserve as Lieutenant. A few years later he converted one of the Museum’s rooms into a Children’s Library, stocking it with suitable books for the younger generation. This was an instant success. In the 1950’s he had the honour of being appointed to the Victorian Library Board and received more inspiration from the monthly conferences in Melbourne. He was sadly retired in 1959 after over 23 years of service, due to the fact that he had gone over the working age of council officers. However he continued to take a very keen interest in the continual development of the Library until his death in 1969. The Pattison Collection, along with other items at Flagstaff Hill Maritime Village, was originally part of the Warrnambool Mechanics' Institute’s collection. The Warrnambool Mechanics’ Institute Collection is primarily significant in its totality, rather than for the individual objects it contains. Its contents are highly representative of the development of Mechanics' Institute libraries across Australia, particularly Victoria. A diversity of publications and themes has been amassed, and these provide clues to our understanding of the nature of and changes in the reading habits of Victorians from the 1850s to the middle of the 20th century. The collection also highlights the Warrnambool community’s commitment to the Mechanics’ Institute, reading, literacy and learning in the regions, and proves that access to knowledge was not impeded by distance. These items help to provide a more complete picture of our community’s ideals and aspirations. The Warrnambool Mechanics Institute book collection has historical and social significance for its strong association with the Mechanics Institute movement and the important role it played in the intellectual, cultural and social development of people throughout the latter part of the nineteenth century and the early twentieth century. The collection of books is a rare example of an early lending library and its significance is enhanced by the survival of an original collection of many volumes. The Warrnambool Mechanics' Institute’s publication collection is of both local and state significance. Selections from The Poetical Works of Robert Browning Author: Robert Browning Publisher: Smith, Elder & Co Date: 1891Label on spine cover with typed text PAT 821 BRO Pastedown front endpaper has sticker from Warrnambool Mechanics Institute and Free Library Front loose endpaper has a sticker from Corangamite Regional Library Servicewarrnambool, shipwrecked-coast, flagstaff-hill, flagstaff-hill-maritime-museum, maritime-museum, shipwreck-coast, flagstaff-hill-maritime-village, shipwrecked-artefact, book, pattison collection, warrnambool library, warrnambool mechanics’ institute, ralph eric pattison, corangamite regional library service, warrnambool city librarian, mechanics’ institute library, victorian library board, warrnambool books and records, warrnambool children’s library, great ocean road, selections from the poetical works of robert browning, robert browning -
 Federation University Historical Collection
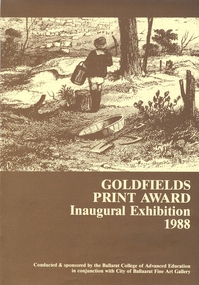
Document, Goldfields Print Award Application Form, 1988 (exact)
The Ballarat College of Advanced Education Print Award offered $1,200 as an encouragment to Australian printmakers. The exhibition was held at the Ballarat Fine Art Gallery. Four page application form for the inaugural Goldfields Print Award Exhibition printed in brown ink on light brown paper. allan mann, margaret rich, neil leveson, john crump, printmaking, ballarat college of advanced education, ballarat fine art gallery, art gallery of ballarat -
 St Kilda Historical Society
Ephemera - Special event program, Osboldstone & Co. Pty. Ltd, Captain Cook Statue St Kilda Beach Unveiling Ceremony Monday, 17th December, 1914, 1914
The booklet was produced for the unveiling of the Captain Cook Statue on 7 December 1914 at the St. Kilda Foreshore. It contains details of Cook's life, the statue and the donor, Andrew Stenhouse, as well as of its unveiling. The statue was unveiled by the Governor of Victoria, Sir Arthur Stanley, watched on by Commonwealth and State dignitaries and hundreds of St Kilda residents. Sixteen page booklet of white paper printed in brown with cardboard cover of similar colours. Secured by brown cotton cord..st kilda, catani gardens, john tweed, andrew stenhouse, captain cook statue, statue, captain cook -
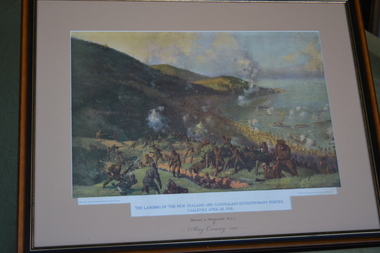 Wangaratta RSL Sub Branch
Framed Print, Premier Framing Service
Landing of ANZAC's at Gallipoli April 25 1915Brown timber frame with light brown mount containing print depicting soldiers landing on shore from ships at sea.The landing of the New Zealand and Australian Expeditionary Forces,Gallipoli,April 25,1915anzac, gallipoli, 25/4/1915 -
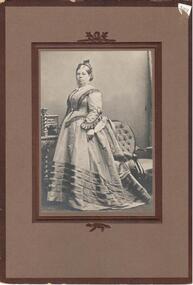 Hume City Civic Collection
Photograph, c1880
Ann Holden married George Evans at the age of 16 in 1843. She lived at Emu Bottom and died in 1893 at the age of 67. Possibly taken between 1880 and 1890, perhaps when she was operating the Royal Oak Hotel, Latrobe Street, Melbourne.Sepia photograph of a lady standing in front of a chair and dresser. This photo is mounted on brown cardboard edged in a darker brown outline.On back: stamp: S.A.MAYOR / Morrah Street / PARKVILLE Written in ink: Mrs George Evans / nee Ann Holden / Married 1843 / died 1893 aged / 67 years.evans, george, emu bottom, oldest house, holden, anne, mayor, s. a., photographers, royal oak hotel, hotels, george evans collection -
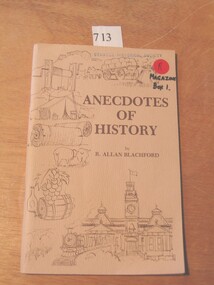 Stawell Historical Society Inc
Book, R Allan Blachford, Anecdotes of History 1985 by Alan Blachford, 1985
Reference book. Fawn card cover Sketches of various scenes in brown. the title also in brown. Sketches by John Glover (Local Artist).R A Blachfordstawell -
 Whitehorse Historical Society Inc.
Leisure object - Toy Horse
Beige cloth covered horse on wheels. Brown wool mane and tail. Brown leather saddle. Black button eye.toys, general -
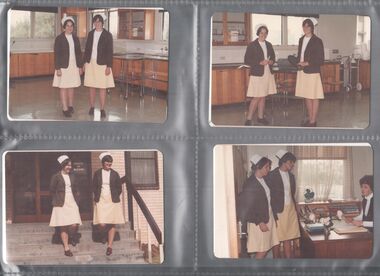 Northern District School of Nursing. Managed by Bendigo Historical Society Inc.
Photograph - Models wearing new uniform
The Northern District School of Nursing opened in 1950 in to address the issues around nurse recruitment, training and education that had previously been hospital based. The residential school was to provide theoretical and in-house education and practical training over three years. The students would also receive practical hands-on training in the wards of associated hospitals. The Northern District School of Nursing operated from Lister House, Rowan Street, Bendigo. It was the first independent school of nursing in Victoria and continued until it closed in 1989.Eight colour photographs with two nurses modelling the yellow uniform with alternate brown jacket and brown shoes at Lister House.nurses uniforms, ndsn -
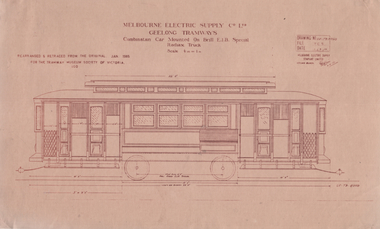 Ballarat Tramway Museum
Drawing, TMSV, "Combination Car Mounted Brill E1B Special Radiax Truck", 1/1985
Drawing of Melbourne Electric Supply Co. Ltd (MESCo) Geelong tramways - "Combination Car Mounted Brill E1B Special Radiax Truck" - trams 16 to 23, built by Pengelley & Co in Adelaide 1924-25. Details the tramcar elevation with dimensions, and shows the towbars. Drawing dated Jan 1985, prepared for the TMSV. Scale 1/4"=1' Second drawing is titled "Elevations of body Pengelley tram Nos. 20-23" - based on MESCo drawing GE-T9-8358. Drawing dated Jan 1985, prepared for the TMSV. Scale 1/4"=1' Yields information about the Pengelley built tramcars for Geelong.Set of Drawings printed on light brown paper with brown ink - Drawing GE-T9-8350 and GE-T9-8358trams, tramways, geelong, drawings, pengelley -
 Mont De Lancey
Baby shoes
Worn by Dorothy WilmsA pair of brown leather baby shoes with ribbon tie. Plus one additional brown shoe - not matching, with button tie.baby shoes, shoes -
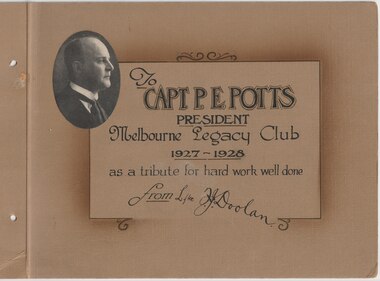 Melbourne Legacy
Album - Photo album, One Week's Legacy Club Publicity. Tribute to Capt P E Potts, 1928
An album of newspaper clippings and photos compiled to thank Legatee Philip E Potts when he was leaving Melbourne in 1928. L/ Potts was president of Legacy in 1927-28. The album was compiled by Legatee Frank Doolan. The articles included the first annual demonstration being held on 28 March 1928 with 300 junior legatees performing. Legatee Aaron Beattie was in charge with help from Mrs Gillies and Jim Tierney. Also articles about the proposed building of the Shrine of Remembrance and the appeal for funds. One page shows pictures of a social event held on the Burns Philp ship 'Marella'. Another photo of Marella is in the collection. Legatee Potts was manager of the old-established shipping firm Burns, Philip and Co Ltd. He also was president of the Melbourne 'Highland Pipe Band, a councillor of the Melbourne Scots and English Speaking Union, and a member of the Rotary Club. A record of a tribute to a past president and outlines significant events in 1928.Brown cardboard album x 13 pages of newspaper clippings and photos from 1928 held together by brown string.shrine of remembrance, philip e potts, past presidents -
 Bendigo Military Museum
Book - POCKET BOOK, The Australian Soldiers' Pocket Book, July 1941
Made for the Australian Comforts Fund and published by Brown, Prior Anderson Pty LtdPocket book with red cloth cover, title in black ink on front. Contains information of use to Australian soldiers including signalling, first aid, military terminology etc Revised 5th Edition.Page 3 personal details of owner .pocket books, soldiers, military, -
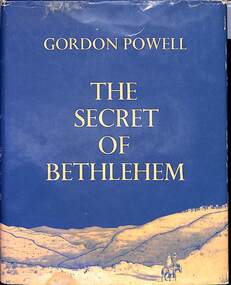 Ringwood and District Historical Society
Book, "The Secret of Bethlehem" by Gordon Powell. Illustrated by local Ringwood resident, George Browning. Published South Australia 1963
The Illustrator of the book George Browning was a resident of Ringwood. He was a war photographer in WW2.Book illustrated by local Ringwood resident. Dust cover and book have blue covers with gold printing. 30 pages with illustrations. -
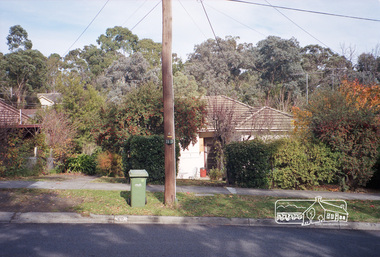 Eltham District Historical Society Inc
Photograph, Margaret Ball, 28 Dudley Street, Eltham, June 1999, 1999
Built 1960s by J. Brown as a spec. house; Owner 1960s: Lyndsay ArdleyThe Margaret Ball (Pre 1960s Houses) Collection was a personal project initiated to mark the year 2000 and arose as a result of the disappearance of many pre-1960s parts of Eltham due to development. Approximately 200 pre-1960s style houses that were left in Eltham between Main Road and east to Bible Street, between Cecil Street to the north and south to Dalton Street were photographed in late 1999. Not all of the houses could be photographed; some because the garden or trees blocked the view of the house, others because of rubbish or cars were in the way, some because people were working on the house or in the gardens at the time.Roll of 35mm colour negative film, 5 of 6 stripsFuji 200eltham, houses, streets, margaret ball (pre 1960s houses) collection, dudley street -
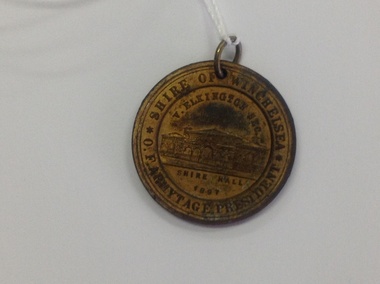 Winchelsea and District Historical Society
Medal, 1897
Handed in by Trevor Brown who found it under a house at Horsham, Victoria, Australia. Shire of Winchelsea medal. Photo of Shire Hall.Round Commemorative Medal. Shire Hall Photo 1897. Queen Victoria's 60th year of reign. 1837 - 1897. Shire of Winchelsea. O.F.Armytage President.winchelsea. medal. queen victoria.