Showing 1483 items matching "terminus"
-
 Whitehorse Historical Society Inc.
Photograph, Thomas Richards Burrowes Morton Family Group
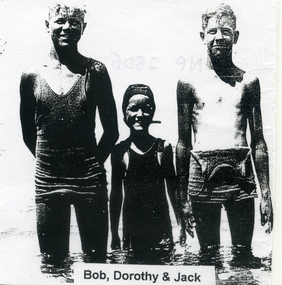
On 18th June 1853 the 839 ton ship 'Earl of Charlemont' was wrecked near Barwon Heads. Her 450 passengers and crew struggled ashore without loss of life. Among them were John and Anne Morton, their 3 sons and 5 daughters. Before leaving Ireland, their eldest son George Pickering Morton, had married Anne Eliza Burrowes. Their son, Thomas Richard Burrowes Morton, born in Melbourne on 12 March 1854, was usually known as ' T.R.B.' Aged 26 he married Louisa Mary Esther Morgan. In 1909 Louisa Morton had a cottage built at Points Lonsdale and named it 'Dorrington', surname of her Welsh Grandmother. During previous holidays the family stayed at the 'Terminus'. They travelled by train from Blackburn to Port Melbourne, paddle-steamer to Queenscliff and horse-bus to Point Lonsdale.Black and white copy, No. 25 of set of 27 - Bob, Dorothy and Jack in swimming costumes at beach. No surnames recordedmorton thomas richards burrowes -
 Whitehorse Historical Society Inc.
Photograph, Thomas Richard Burrowes Morton Family Group
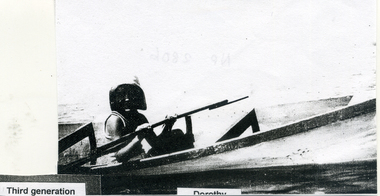
On 18th June 1853 the 839 ton ship 'Earl of Charlemont' was wrecked near Barwon Heads. Her 450 passengers and crew struggled ashore without loss of life. Among them were John and Anne Morton, their 3 sons and 5 daughters. Before leaving Ireland, their eldest son George Pickering Morton, had married Anne Eliza Burrowes. Their son, Thomas Richard Burrowes Morton, born in Melbourne on 12 March 1854, was usually known as ' T.R.B.' Aged 26 he married Louisa Mary Esther Morgan. In 1909 Louisa Morton had a cottage built at Points Lonsdale and named it 'Dorrington', surname of her Welsh Grandmother. During previous holidays the family stayed at the 'Terminus'. They travelled by train from Blackburn to Port Melbourne, paddle-steamer to Queenscliff and horse-bus to Point Lonsdale.Black and white copy, No. 26 of set of 27 - Dorothy in canoe at seaside. No surname recordedmorton thomas richards burrowes -
 Whitehorse Historical Society Inc.
Photograph, Thomas Richards Burrowes Morton Family Group
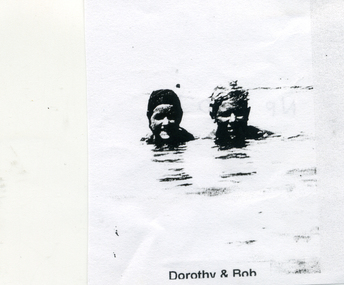
On 18th June 1853 the 839 ton ship 'Earl of Charlemont' was wrecked near Barwon Heads. Her 450 passengers and crew struggled ashore without loss of life. Among them were John and Anne Morton, their 3 sons and 5 daughters. Before leaving Ireland, their eldest son George Pickering Morton, had married Anne Eliza Burrowes. Their son, Thomas Richard Burrowes Morton, born in Melbourne on 12 March 1854, was usually known as ' T.R.B.' Aged 26 he married Louisa Mary Esther Morgan. In 1909 Louisa Morton had a cottage built at Points Lonsdale and named it 'Dorrington', surname of her Welsh Grandmother. During previous holidays the family stayed at the 'Terminus'. They travelled by train from Blackburn to Port Melbourne, paddle-steamer to Queenscliff and horse-bus to Point Lonsdale.Black and white copy, No. 27 of set of 27 - Dorothy and Bob in the water at beach. No surnames recordedmorton thomas richards burrowes -
 Otway Districts Historical Society
Photograph, Railway Survey Camp, Beech Forest, 4 Apr 1897, 4 April 1897
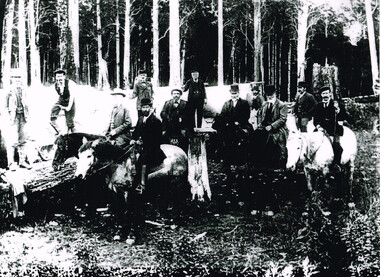
On the 18th August, 1896, the question of selecting localities for the permanent survey of a narrow-gauge line to Beech Forest from Colac was mooted. Two potential lines were examined. In a memorandum to the Minister for Railways, dated 23rd March, 1897, the Engineer-in-Chief recommended that the eastern and longer route via Lardner's Track be adopted. The second route, while identical from Colac to Gellibrand River, differed. By a more direct route the Beech Forest terminus is reached 5 miles sooner and cost approximately L24,500 less. The direct line would also serve a larger lot of settlers and would obtain a larger lot of traffic than the alternate proposal. The Parlimentary Standing Committee on Railways examined the proposal in situ and recommended that the direct route from Gellibrand to Beech Forest should be adopted and the Lardner's Track route should be abandoned at once.Photograph, Railway Survey Camp, 4 April 1897. Inspection of alternative routes by Parliamentary Committee on Railways.People named in the photograph.beech forest; railway; survey; victorian parliament; calcutt; fraser; e.h. cameron; d. mciville; a. harris; n. mcinnes; j.s. white; j. wood; t. baker; j. gardner; t.g. watson; standing committee; -
 Melbourne Tram Museum
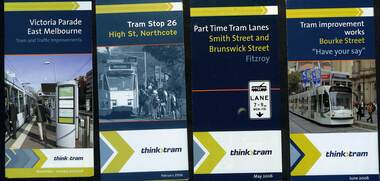
Pamphlet - Set of 8 Think Tram projects, VicRoads, 2005 to 2009
Set of 8 pamphlets detailing the proposed works and dates undertaken by VicRoads, Yarra Trams and the State Government. All include a small map of the works. 1 - Victoria Parade East Melbourne - 5 fold - 2005/2006 2 - Tram stope 26, High St Northcote - 3 fold - Feb. 2006 3 - Part time tram lanes Smith St and Brunswick St Fitzroy - 3 fold - May 2006 4 - Bourke St - have your say - 4 fold - June 2006 5 - Toorak Road tram terminus - 3 fold - Nov. 2006 6 - Bourke St tram stop construction - 4 fold - Sept 2007 7 - Elizabeth St at Queen Victoria Market platform stop - 2 fold - Nov. 2007 8 - Nicholson St - have your say - 4 fold - June 2009Demonstrates an information documents produced by Vicroads as part of the Think Tram projects.Set of 8 pamphlets - folded to DL printed on gloss paper.trams, tramways, vicroads, think tram, projects, roadworks, tram stops, toorak road, bourke st, high st, elizabeth st, nicholson st, victoria parade -
 Ballarat Tramway Museum
Photograph - Digital image set of 6, 27/06/1971 12:00:00 AM
Yields information about the SEC Ballarat trams in the months before the closure of the SEC Tramway system. Yields information about the streetscape.Set of six Digital images, scanned from slides by Graeme Cleak, scanning by Peter Winspur 9/2011. .1 - Slide FQ16 - No. 41, outbound at the south end of Drummond St south about to turn into Skipton St, with the destination of Bell St. .2 - slide FQ18 - No. 41, outbound to Sebastopol terminus, Albert St, just before the terminus itself. .3 - slide FQ21 - No. 41, inbound Albert St Sebastopol with the Sebastopol Town Hall in the background. Tram has a "Bliss Bombs" roof advertisement on the side, "Make Bliss, Not Love". .4 - slide FQ22 - Trams 26 and 41, crossing at Grey St Sebastopol Loop. No. 41 has destination of Grey St. .5 - slide FQ27 - Trams 27 and 37, crossing at the Hamilton Ave loop, No. 41 inbound - with destination of Victoria St at the Hamilton Ave loop with the "Stonehenge" fence house in the background. Sturt St West. .6 - slide FS29 - No. 37 at Grenville St, Sturt St intersection with Bridge St in the background. Tram has the destination of View Point and is entering the loop itself. The destination was no longer in use at the time of the photograph and would indicate that the destination has been arranged. In the background is the Woolworths Big W store and the Dickins Food Store. All photos taken on 27/6/1971. trams, tramways, drummond st sth, sebastopol, grey st, albert st, sturt st west, grenville st, tram 41, tram 26, tram 27, tram 37 -
 Ballarat Tramway Museum
Photograph - Digital image Set of 10, Tony Smith, 5/09/1971 12:00:00 AM
Yields information about Ballarat Tramways and trams prior to the closure of the tramway system.Set of 10 digital images of Ballarat trams prior to closure, scanned from original slides by Tony Smith, 1971 prior to closure of the system. This set of slides, possibly on the last weekend of Mt Pleasant services - closure took place on 5/9/1971. .1 - 13 outbound in Barkly St, Mt Pleasant - with another single trucker and the Ballarat Fire Station in the background. .2 - Bogie tram and single trucker at Grant St Loop. Has the Mobile service station on the right hand side. Note the family sitting on the steps of a house on the left side watching proceedings. .3 - 14 (Mt Pleasant) and 39 ditto. .4 - 27? and 39 crossing at the Morrison St loop. .5 - 14 and another single trucker at Mt Pleasant terminus. Has the corner store in the background with adverts for Robur Tea, Womens Weekly and Coca Cola. .6 - 39 and two single truckers at the Mt Pleasant terminus. .7 - View looking south along Ripon St from Mair St, with power station buildings on the right hand side. Shows the power distribution poles on the street. .8 - Scrubber tram on 0 road with tennis court alongside. .9 - 40 running special in Wendouree Parade, near the Haddon St intersection. .10 - 40 turning from Macarthur St into Drummond St Nth.trams, tramways, mt pleasant, barkly st, grant st, victoria park, sturt st west, ripon st, view st, depot, wendouree parade, drummond st nth, macarthur st, closure, tram 14, tram 39, tram 13, tram 26, tram scrubber, 40 -
 Melbourne Tram Museum
Photograph - Set of 4 Black & White Photograph/s, Don Schulz, mid 1920's
Series of four Black and White Photographs cable trams in Melbourne at the Bridge Road terminus or city during the mid 1920's/ .1 - Bridge road terminus with the car house or depot on the left hand side with the destination of Spencer St. .2 - Gripman possibly checking his watch with a depot worker? stepping off the tram. .3 - family stepping off the tram with cable trailer 368 in the view - Elizabeth St, near Flinders St? See Brian Weedon's notes re the photo and the trailer. .4 - As for .1 - with an X marked above the lady and a very large motor car passing. Printed on Kodak Paper. Adam Chandler advised by email 5/8/2020: " note there's a destination box fitted to the grip - from memory, these started to be used from the mid-1920s with the dummy and trailer repaints into the brown colour? That also looks to be either a 1925 or 26 Buick - the "moustache" shape at the top of the front radiator grille and the distinctly angled lower sash of the windscreen are further hints. Given the Richmond line closed in 1927 for conversion I'd say some time between 1924 and 29 June 1927." Also see image i5.pdf for further notes regarding the photographs and the Bridge Road tram depot building - use the original pdf file to read. Image i6, has had the "X" removed - done by Darren Hutchesson.On rear in ink in each print, "Cable car Melbourne" and "286 Anzac Hy/Marion Rd Adelaide SA, collection of late Don Schultz"trams, tramways, cable trams, bridge road, flinders st, richmond depot, hawthorn bridge, tram 368 -
 Ballarat Tramway Museum
Photograph - Colour Photograph/s - set of 25, Austin Brehaut, 7/04/2000 12:00:00 AM
Yields information about various locations in Ballarat in March 2000 for comparison with previous photographs.Set of 25 colour photographs taken by Austin Brehaut on 7 April 2000 showing various locations that Ballarat trams once ran in, for use in a BTM presentation, named "Ballarat Past and Present" at the COTMA 2000 Ballarat Conference. All on Fujicolour Crystal Archive Paper. On rear in blue ink is the date, location and where relevant a reference number to photo locations that the author of the presentation had requested. Letter from Austin, filed with the worksheet for Reg. Item 1772. 1773.1 - Base Hospital, Cnr Drummond St. North and Mair St. .2 - Hospital Corner - Base Hospital Along Drummond St. North .3 - St John of God Hospital, cnr Mair and Drummond St. Nth. .4 - Hospital Corner, looking South East from Base Hospital .5 - Gardens at Loop (Wendouree Parade) .6 - Gardens Loop and Shelter .7 - Shelter at Gardens Loop .8 - Bridge Mall looking west .9 - Lower Victoria St. along Bridge St .10 - Railway crossing, Ballarat Station, with gates open .11 - Victoria St. hill facing west .12 - Railway crossing, Lydiard St. North .13 - Railway crossing, Ballarat Station, with gates closed .14 - Lydiard St. North terminus from cemetery .15 - Lydiard St. North at Macarthur St. .16 - Lydiard St. North at Sturt St facing South East - Post Office on left .17 - Looking north along Lydiard St at Sturt St .18 - Sturt and Lydiard Sts corner from Post Office .19 - Centre plantation Sturt St. looking east .20 - Sturt St. West near Ballarat and Clarendon College .21 - Sturt St. West facing west at Russell St. .22 - Victoria St. terminus .23 - Victoria St. terminus .24 - St Alipius Church, Victoria St. .25 - Junction of tramline and Phoenix foundry railway in Sturt St. at Armstrong St. (transferred from roadway) See Reg item 4645 and 4646 for the 2010 comparisons.See Aboveballarat, hospital corner, gardens loop, railway crossing, lydiard st. north, sturt st, phoenix foundry, armstrong st., victoria st., sturt st. west -
 Ballarat Tramway Museum
Photograph - Digital image, Mal Rowe, 29/06/1968 12:00:00 AM
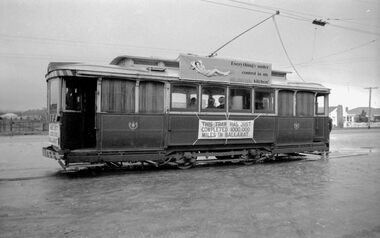
Yields information about the purported achievement of tram 27 reaching 1,000,000 miles and the TMSV Tour and the Sebastopol terminus.Digital image of a Black and white photograph of Tram 27 at Sebastopol terminus during the celebrations of the tram completing its "millionth" mile in Ballarat on Saturday 29 June 1968. Note the undeveloped land on the opposite side of Albert St and the overhead pan used to help centre the pole at night. Tram showing "Special", has banner "This tram has just completed 1,000,000 (million) miles in Ballarat" on the front of the tram during the TMSV Celebratory tour. See also Reg Items 1878 and 7990 to 7995 for other photos of the day by Mal Rowe. Note: A review of the tram car mileages by Dave Macartney, showed that it was actually 900,000, due to a carryover error.trams, tramways, tmsv, million miles, albert st, sebastopol, tram 27 -
 Ballarat Tramway Museum
Photograph - Digital image Set of 6, George Coop, 1968 - 1970
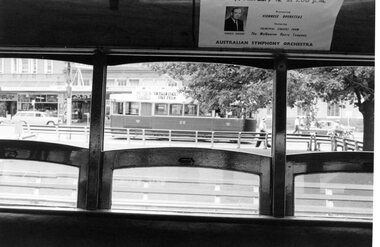
Yields information about the interior views of the Ballarat tramcars and the driver's compartment.Six (6) Digital images taken by George Coop during the period 1968 - 1970, of the interior of trams. .1 - looking out of the open windows of a the saloon of a single trucker to the tram 28, at the City terminus. There is an Australian Symphony Orchestra interior advert. .2 - Looking through the open passenger door, with No. 17 behind. .3 - Looking from the saloon towards to the open end, no car number apparent. .4 - Looking at the driver's bulkhead with the used ticket box and a hand on the controller. .5 - View of the driver's compartment - T1F Controller, PV brake valve and "Pay as you enter" reversed. .6 - Close up of the Westinghouse T1F controller. trams, tramways, interiors, controllers, brake valves, signs, westinghouse, tram 17, tram 28 -
 Ballarat Tramway Museum
Photograph - Illustration/s, Grenville St. and Sturt St. Ballarat
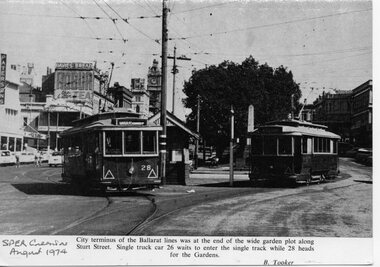
Black and white illustration from the South Pacific Electric Railway Co-op (Sydney Tramway Museum) - Aug. 1974 calendar of Ballarat trams 26 and 28 at the intersection of Grenville St. and Sturt St. Tram 28 proceeding to the Gardens via Drummond St., while 26 waits for 28 to clear and proceed to what appears on the destination to be Mt. Pleasant. Photo undated, but prior to the fitting of marker lights on the drivers canopy window sills - during the 1950's. Photo caption mentions that this was the City terminus of the system - incorrect during the SEC operational days. Photo by B. Tooker. Has buildings on either side of Sturt St. in background.On bottom right hand corner "SPER Calendar Aug. 1974"trams, tramways, ballarat, sturt st., grenville st. -
 Ballarat Tramway Museum
Photograph - Black & White Photograph/s, early 1960's
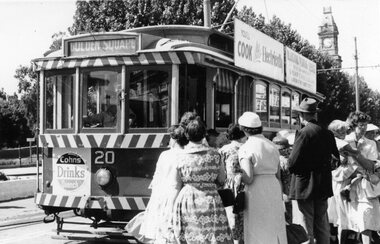
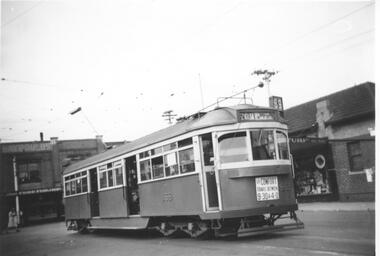
Black and White print of an SECV Bendigo tram 20 at Charing Cross terminus for the Golden Square route loading passengers. Trams has dash canopy lights, but no large white strip under the drivers windows. Photo not dated but appears to be at during early 1960's. Tram showing destination of "Golden Square", has "Cohn's Drinks Quench" ad on front dash panel, SEC Roof ad "You'll Cook better electrically" and "B.J. Osborn Plumbing Service" roof ad. Has Bendigo Post Office clock tower in background. Tram off loading passengers while others are waiting to get on. Good photo for people.trams, tramways, charing cross, bendigo, golden square, tram 20 -
 Ballarat Tramway Museum
Slide - 35mm slide/s, Travis Jeffrey, c1961
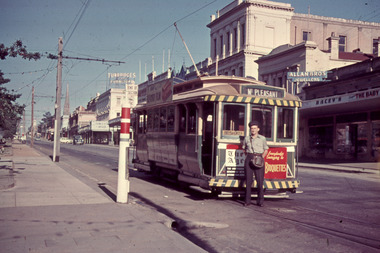
Agfa plastic mount (blue base, white cover) with a photo of No. 14 (see slide BAS 7 (Reg No. 2317) for same ad arrangement) at City terminus. Dave Kellett standing by front of tram. Posed photograph. Tram is in the process of being fitted with dash canopy lights and tiger strips. Has Allan Bros. Jewellers, SEC office, Tunbridge's Furnishings and Macey's buildings in the background. Roof Advertisement for Ilford film, and dash panel advertisements for The AGE and SEC Briquettes. Slide rescanned at 3200 dpi 24-10-2020, jpg replaced, tiff file retained. This file was scanned in 2003 and may show colour changes."BAS 10" in penciltramways, trams, sturt st, city terminus, tram 14 -
 Ballarat Tramway Museum
Negative - Black and white print from negative, Travis Jeffrey, 30/09/1961 12:00:00 AM
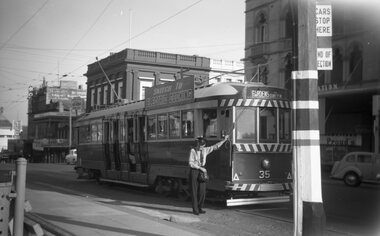
Negative No. N383 and black and white print made by a laser printer (stored in folder) of Ballarat No. 35 at the City Terminus in Sturt St, south side with the conductor (appears to be No. 17) standing by the front of the tram. Part of tram obscured by pole with SEC painted tram stop sign, enamel stop sign and end of section sign. Tram has an SEC roof advertisement, "Switch to Electric Cooking" and destination of Gardens via Sturt St. West. In the background is the Commonwealth Bank building, Prouds jewellers and the Odeon Theatre. Date of photo on folder - 30/9/1961. Original negative rescanned 24/5/2020 and image file updated. Paper folder that contained the negative had "NR57A" in red ink, "BA11" in pencil, date stamp of "20 Sep 1961" on front, and on rear date stamps "26 Sep 1962" and "6 Oct 1962".trams, tramways, sturt st, city terminus, odeon theatre, tram 35 -
 Ballarat Tramway Museum
Photograph - Colour Photograph/s, Travis Jeffrey, 6/11/1962 12:00:00 AM
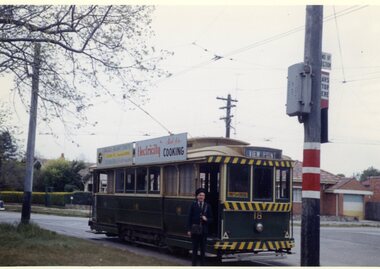
Colour photograph of Ballarat No. 18 at the View Point terminus in Wendouree Parade. Photograph has the conductor (and driver?) standing by the front of the tram, after the pole has been turned. Destination sign yet to be changed from View Point. Photo shows the tram stop arrangements with painted pole, "End of Section", "Cars Stop Here" sign, timetable sign and on the back of the pole a Section insulator connection box. Tram has two roof advertisements, SEC "Electric Cooking" and the Whites Florist Sturt St. shop advertisement and a "Pay as you Enter" sign. In the background is the Macarthur St. tram line. Photo dated 6/11/1962. On Kodacolor paper."60Ed" in blue ink, date stamp 6 Nov 1962" in red ink.view point, wendouree parade, tram stops, tram 18 -
 Ballarat Tramway Museum
Document - Photocopy, "Something Old"
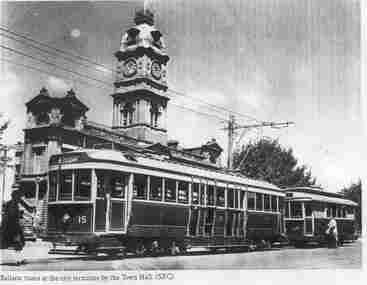
Photocopy of two photos in an unknown magazine, with the page heading of "Something Old", page 79 of: 1. - Ballarat trams No. 15 and 24 at the City terminus in Sturt St with the Town Hall in the background. No. 15 has the destination of Mt. Pleasant. (See Reg Item 3804 for a large print) 2. - Geelong trams No. 32 and two other single truck trams, at the corner of Ryie and Moorabool Streets with the T&G building in the background. No. 32 has the destination of Belmont. Photos c1950. Three copies on A4 size pager held. "The Ballarat Tramways" notes that No. 15 arrived in Ballarat October 1945 and was renumbered to No. 36 in 1953. Both photos credited to the SECtrams, tramways, ballarat, town hall -
 Ballarat Tramway Museum
Photograph - Black and White photograph/s - mounted, c1914
Yields information about trams used, services and buildings in Sturt St near Grenville St in the ESCo era c1914.Black and White photograph mounted on heavy cardboard backing. Photo of Ballarat ESCo trams near the Grenville City terminus - two trams, left hand one has a advertisement for Viceroy tea on the front dash panel. Companies in image are: Mechanics Institute Library, C. Marks, A. E. White, Indian Depot, Peakes and Gas Co. Has the Mechanics Institute building, Town Hall building on both sides of Sturt St. Some early motor vehicles - c1914? From a Railway Photograph? Has marks from old support tape on rear. Note image scanned in two runs through a scanner, resulting in the shading in the image file.trams, tramways, sturt st, town hall, grenville st, esco -
 Melbourne Tram Museum
Photograph - Black & White Photograph/s, Lee A Ratten, mid 1940's
Black and white photograph of tramcar 869 in Glenferrie Road with Dash Canopy lighting. 1941 eleven SW6 class trams built by MMTB at Preston Workshops, numbers 866 to 876. Entered service 19 June 1941. Based at Malvern Depot c1948 to c1991. Advertisements in shop for Turf and Ardath. Sign on front of tram: "For comfort travel between 9:30 & 4:0" Tram has the destination of St Kilda Beach via Balaclava. Route number 69. Extensively damaged by fire in Church St at North Richmond terminus Tuesday, 14th November 2006. August 2014 transferred from Preston Workshops to Newport Workshops.trams, tramways, sw6 class, glenferrie rd, dash canopy lights, tram 869, route 69, kew -
 Melbourne Tram Museum
Negative - Set of 3, Wal Jack, 23/02/1942 12:00:00 AM
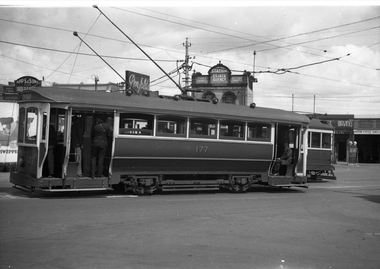
Set of 3 Black and white negatives by Wal Jack, of T 177: .1 - at Elsternwick, Glenhuntly Road. Note the tram does not have a white bumper and apron or a head light shade. There is a W2 class tram behind. In the background are buildings for Apps & Sons Undertakers, James Smith Station Estate Agency, Penfolds, a hair salon, a Shell service station which has motor cycle sales. .2 - The tram at {Point Ormond terminus, with the crew chatting. Note the bandstand in the rear. .3 - ditto Photo not dated in album, but was with three negs of T177 at Elsternwick on 23-2-42. Date confirmed from the same photograph held by the Ballarat Tramway Museumtrams, tramways, point ormond, glenhuntly rd, t class, tram 177, mmtb, tram crews -
 Melbourne Tram Museum
Ephemera - Christmas Card, Peter Duckett, "Single Track Days on the East Brighton Line", 1996
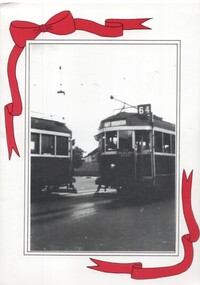
Christmas Card prepared by Peter and Patti Duckett and sent to Keith Kings Printed photo on exterior with red printed ribbons, photo corners on inside with another photo and gold block print and the Duckett's address. Photographs by Peter Duckett. Item made for 1996 Christmas Card titled "Single Track Days on the East Brighton Line", featuring the story of the single track extension in 1937 for the East Brighton, route 64 line. Notes the staff system in use for Safeworking. Cover photo includes the driver of W2 class 452 bound for East Brighton, picking up the staff from another car and the inside print of tram 550 at the terminus."To Keith" in ink.trams, tramways, east brighton, route 64, safeworking, staff, crossing loop, w2 class, tram 452, tram 550 -
 Melbourne Tram Museum
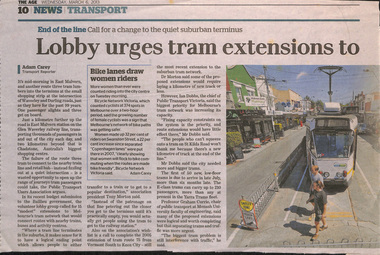
Newspaper, The Age, "Lobby urges tram extensions to avoid dead end trips", 6/03/2013 12:00:00 AM
Newspaper clipping from The Age, 6/3/2013, titled "Lobby urges tram extensions to avoid dead end trips" about extending existing tram lines to stations to make better transport connections and interchanges. Has a map showing possible extension. Written by Adam Carey with comments from Tony Morton, Ian Dobbs (comments about capacity issues), Graham Currie. Map shows 15 extensions. Adjacent to the item is an article about the Rowville train line extension. Has a photo of Z1 at the East Malvern terminus and box about women making use of bicycle lanes. Item spread over two sheets.trams, tramways, melbourne, tramways, new tramway, east malvern -
 Melbourne Tram Museum
Photograph - Illustration/s, Marilyn Phillips, 2015
Illustration of Driver John (Jack) O'Callaghan and a conductor at a terminus or short working with tram W 342. Has the dates regarding the tramcar's working life on the top of the illustration. Advised by Donor that Jack was a "tram employee" between 1919 and 1922, a Gripman - 1924 - 1925 and a Motorman 1928 - 1931. After that he was a signalman. The photo was possibly taken at an opening of new track event. Scanned from an original photograph by the donor and sent to the depot when visiting about organising a tour. Tram crew in full uniform of the era, driver holding the controller and brake handles. Conductor with ticket bag etc. In 1927 the tram was based at Essendon Depot - see Reg item 800.trams, tramways, motormen, conductors, w class, tram 342, uniforms -
 Melbourne Tram Museum
Photograph - Set of two Black & White Photograph/s, 1950's? to 1960's
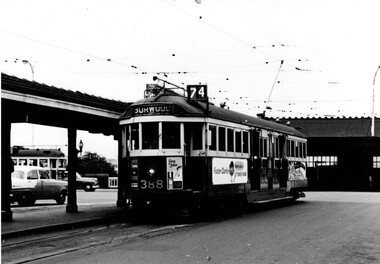
Black and white photograph of W2 's at the Batman Ave terminus late 1950's to early 1960's. .1 - W2 388 with destination of Burwood, route 74 with Flinders St station Swanston St awning in the background. Has adverts for Long John whiskey, Apex Ford, and Foster Clarks family food. .2 - W2 337 just after arrival with the conductor about to raise the pole front pole. Has passengers leave and boarding the tram from across the roadway. Showing route 76. Has advert on the drivers panel for Remy Martin Brandy. Printed on Fujichrome paper. Not known who took the photograph or when it was printed.Stamped in black ink on back "TMSV Sales"trams, tramways, batman ave, conductors, burwood, tram 388, tram 337 -
 Orbost & District Historical Society
pencils, 1960's
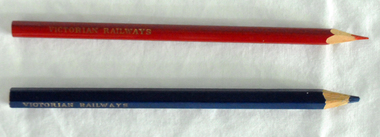
These pencils were supplied to the Orbost railway Station office to be used for clerical work. They were used by Victor Smithers who was the Assistant Station Master at Orbost from 1957 - late 1960's. He was also a reliever until the 1970's after which he returned to Ormond Station on the Frankston line where he worked until his death in 1979. The Bairnsdale-Orbost railway was opened in 1916 to serve the agricultural and timber industry. Because of the decline in traffic and heavy operating costs, the line was finally closed in August, 1987. Orbost Railway Station was opened on Monday 10 April 1916 as the terminus of the Orbost railway line, and closed in 1987. The station was located on the west side of the Snowy River despite the town of Orbost being on the east side of the river, in order to save on the costs of a bridge over the river, which at the time had highly variable levels. This item is associated with the history of the Orbost-Bairnsdale railway line and therefore reflects the role that the rail line played in the social and economic history of Orbost.Two coloured pencils. 2580.1 is a hexagonal blue pencil and has "Wolff's Emperor MADE IN AUSTRALIA". 2580.2 is a round red pencil with "Wolff's Fintorex MADE IN AUSTRALIA coloured copying". Both have "VICTORIAN RAILWAYS" marked in gold lettering on the sides. orbost-railway-station smithers-victor -
 Melbourne Tram Museum
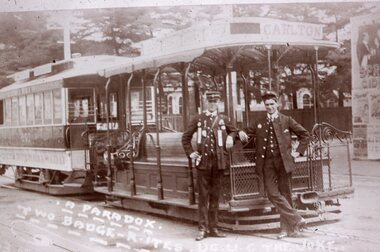
Slide - Black and white - reproduction - Carlton cable tram and crews, 1912
Reproduction slide of a photograph of a cable tram, trailer number 201, with the destination or Carlton with the grip man and conductor standing in front of the tram. Both are young men. The conductor is adorned with his safety pins and trip slips, that he would punch a hole in when he sold or collected a fare. The bell punch in the conductor's right hand would sound a bell to indicate the fare had been collected. There is a church vicarage in the background - at Prahran terminus in Chapel Street outside Trinity church. Underneath the photo is written "A Paradox: two Badger ?" which is a reference to the General Strike in Brisbane of Jan 1912 by Brisbane Tramway Company workers over the wearing of Union badges which was strongly opposed by the Company Manager Joesph 'Boss' Badger. See also item 7485 for a similar-themed photograph about the Badger. At the time there was a major industrial or arbitration case before Mr Justice Higgins regarding Australian tramways employees and their working conditions.Demonstrate cable tram uniforms and cable tram trip slips that were used to account for fare collection and has a close association with an event in Brisbane that led to a General Strike.Kodachrome cardboard duplicate slide - Black and white - reproduction - Carlton cable tram and crews - 1910s? "CB7" in penciltrams, tramways, cable trams, carlton, bell punch, unifoms, crews, grip men, conductors, prahran, tram 201, unions, brisbane, joesph badger -
 Melbourne Tram Museum
Photograph - W class 307 and crew, 1924-1928
Photograph shows W class 307 standing on slightly curved track displaying destination "Victoria Bridge" and no route number box attached. The uniformed motorman and conductor stand on the roadway next to the front driver's cab where the trolley pole has been tied down. The conductor wears his coin bag and the driver is holding the tram's key and air brake handle. An elderly male passenger with coat stands at the drop-centre doorway and other passengers are inside. The car body of W 307 was built by Holden Motor Body Builders in South Australia in 1924 as part of a large contract to build W class trams. Victoria Bridge was the termini of both the Collins Street and Victoria Parade cable tram that closed in 1929 and the Mont Albert electric tram from Union Road, via Whitehorse Road and Kew Junction. Perhaps this photograph is of the Mont Albert terminus although the curved track suggests otherwise.Yields information about early W class tramcars . Black and white photograph with penciled dates on rearPencil writing reads "Between 2/9/24 & 19/3/28" trolley pole, drop-centre, w class, tram 307, victoria bridge, route number box, key, air brake handle, car body, holden motor body builders, mont albert, termini -
 Melbourne Tram Museum
Album - David Frost Slide Collection, David Frost
Photo - see pdf file for further information. Number Brief Description date DFC1 A general view from the former railway platform at Port Melb Station looking towards Station Pier on opening day 20-12-1987 DFC2 A2 285 in the Tramway Platform at Port Melbourne Station on opening Day 20-12-1987 DFC3 A2 285 in the Tramway Platform at Port Melbourne Station on opening Day 20-12-1987 DFC4 A2 285 in the Tramway Platform at Port Melbourne Station on opening Day 20-12-1987 DFC5 A2 273 at St Kilda Tramway Station on opening day 22-11-1987 DFC6 A2 273 turning from Fitzroy St into St Kilda Tramway Station on opening day 22-11-1987 DFC7 B1 2001 at St Kilda Tramway Station turning into Fitzroy St on opening day 22-11-1987 DFC8 B1 2002 enters St Kilda Tramway Station on opening day 22-11-1987 DFC9 An A2 approaches St Kilda Tramway Station on opening day 22-11-1987 DFC10 Concreting the connecting curve from Fitroy St into St Kilda Station c July 1987 DFC11 An MTA AEC MKVI bus in Grey St St Kilda at Dalgety St with Tramway works in the background c July 1987 DFC12 Grey St St Kilda at Dalgety St with Tramway works in the background in Fitzroy St c July 1987 DFC13 Concreting the connecting curve from Fitroy St into St Kilda Station c July 1987 DFC14 Restaurant Tram 442 in Fitzroy St at Grey St Passing MTA bus 59 outside St Kilda Station c1986 DFC15 Former VR tram stop sign painted on a pole at Glenhuntly Rd & Broadway DFC16 Former VR Elwood Tram Depot under demolition 1996 DFC17 Former VR Elwood Tram Depot under demolition 1996 DFC18 Former VR Elwood Tram Depot under demolition 1996 DFC19 Former VR Elwood Tram Depot under demolition 1996 DFC20 Former VR Elwood Tram Depot under demolition 1996 DFC21 Former VR Elwood Tram Depot under demolition 1996 DFC22 Former VR Elwood Tram Depot under demolition 1996 DFC23 Former VR Elwood Tram Depot under demolition 1996 DFC24 MTS Tower waggon in use at the former VR Elwood Tram Depot under demolition 1996 DFC25 A Sign advertising the sale of the Former VR Elwood Tram Depot – 10/8/1996 1996 DFC26 Former VR Elwood Tram Depot under demolition 1996 DFC27 Interior of a shed at the former VR Elwood Tram Depot under demolition 1996 DFC28 Former VR Elwood Tram Depot under demolition 1996 DFC29 Former VR Elwood Tram Depot under demolition 1996 DFC30 Former VR Elwood Tram Depot under demolition 1996 DFC31 VR 20, former breakdown car in Bob Prentice’s Back Yard Jan 1974 DFC32 VR 20 on a low loader en route to Bob Prentice’s for preservation 1959 DFC33 VR 20 as the breakdown car on the St Kilda Electric Street Railway c1955 DFC34 VR 39 waits in St Kilda St as breakdown car 20 enters Elwood Depot c1955 DFC35 VR 54 and 50 in the rear yard of Elwood Depot c1958 DFC36 VR 50 in the rear yard of Elwood Depot c1958 DFC37 VR 50 in the rear yard of Elwood Depot c1958 DFC38 VR 28 in St Kilda St outside Elwood depot after the line had been cut back to this point c1958 DFC39 VR 29 in St Kilda St outside Elwood depot after the line had been cut back to this point c1958 DFC40 VR 35 passes 28 on the St Kilda Electric Street Railway c1955 DFC41 VR 39 on the St Kilda Electric Street Railway c1955 DFC42 Y1 613 on a tour c1970 DFC43 VR 54 in St Kilda St outside Elwood Depot c1955 DFC44 VR 28 at Brighton Beach Terminus c1955 DFC45 VR 33 being washed in the wash bay at the rear of Elwood Depot c1955 DFC46 VR 20 breakdown car running into Elwood Depot c1955 DFC47 VR 3 in the rear yard at Elwood Depot c1955 DFC48 VR 51 on an AETA Tour running out of Elwood Depot c1958 DFC49 VR 28 on the St Kilda Electric Street Railway c1955 DFC50 VR 28 with crew in St Kilda St outside Elwood depot after the line had been cut back to this point 1959 DFC51 VR 52 in Grey St near Fitzroy St c1958 DFC52 VR 51 on a AETA Tour passes 33 in Grey St near Fitzroy St c1958 DFC53 VR 29 in Grey St near Fitzroy St c1958 DFC54 VR51 on an AETA Tour shunts as 52 waits on the St Kilda Electric Street Railway c1958 DFC55 VR 51 on the Black Rock Electric Street Railway c1955 DFC56 VR 28 in St Kilda St outside Elwood depot after the line had been cut back to this point c1958 DFC57 Combined Rail-Tram Tickets of the Black Rock Electric Street Railway Feb 1975 DFC58 Combined Rail-Tram Tickets of the St Kilda Electric Street Railway Feb 1975 DFC59 Electric Street Railway & Motor Coach Paper Tear off Tickets Feb 1975 DFC60 VR 52 & 53 on Rt 82 pass in Cordite Ave near Wests Rd Sept 1975 DFC61 Z 68 & 52 in East Preston Depot in M&MTB Livery c1977 DFC62 Copy photo of VR 18 in Elwood Depot c1910 DFC63 VR 51 as a one man car at Black Rock Terminus c1955 DFC64 VR 53 on Rt 82 in Droop St Footscray Jan 1974 DFC65 B2 2027 on Rt 96 in South Melb Station c1988 DFC66 VR 20 as preserved in Bob Prentice’s backyard High St Prahran Jan 1974 DFC67 VR 700 on Rt 82 in Droop St Footsray c1978 DFC68 VR 28 as the last car from ST Kilda Station 28-2-1959 DFC69 VR 700 at the Rt 82 Moonee Ponds Terminus c1978 DFC70 VR 52 waiting time at the Rt 82 Footscray Terminus, the driver intently stares at the bundy clock as the Braid and the Connie gossip Jul 1972 DFC71 VR 54 shunting outside Elwood Depot to return to St Kilda Station 1959 DFC72 SW6 969 in MTA Livery blocking the entrance to South Melb Depot presumably during the scratch ticket dispute Jan 1990 DFC73 VR 52 & 53 on Rt 82 pass in Droop St Footscray Sept 1975 DFC74 VR 700 after withdrawl in the Newport Railway museum in the process of a repaint c1985 DFC75 VR 700 after withdrawl in the Newport Railway museum in the process of a repaint c1985 DFC76 VR 700 on Rt 82 in Droop St Footsray at The Cresent c1978 DFC77 VR 700 on Rt 82 in Droop St Footsray c1978 DFC78 Former VR tram depot in use as an MTA Bus depot c1990 DFC79 VR 52 waiting time at the Rt 82 Footscray Terminus Jul 1972 DFC80 VR 52 waiting time at the Rt 82 Footscray Terminus with Connie changing the pole Jul 1972 DFC81 VR 52 at the Rt 82 Moonee Ponds Terminus with the crew chatting 7-12-1974 DFC82 VR 52 on Rt 82 on the reserved track in Raleigh Rd Ascot Vale Jan 1974 DFC83 VR 53 on Rt 82 in Leeds St Footscray about to turn into Hopkins St April 1976 DFC84 VR 53 on Rt 82 in Droop St Footsray Jan 1974 DFC85 VR 700 on Rt 82 in Droop St Footsray at Hopkins St c1978 DFC86 Z 52 in MTA livery on Rt 19 in Elizabeth St near Bourke St c1985 DFC87 VR 52 at the Rt 82 Moonee Ponds Terminus Jul 1972 DFC88 VR 53 at the Rt 82 Footscray Terminus Jan 1974 DFC89 VR 52 freshly outshopped from the workshops and W7 1011 at the Bourke St Terminus with 52 on display for the 1968 railway exhibition 1968 DFC90 Painting of W class 369 in Chocolate & Cream c1930 DFC91 Charing Cross, Bendigo at night c1965 DFC92 Ballarat ? c1965 DFC93 Bendigo 18 on an AETA tour in McCrae St near Tramway Ave c1965 DFC94 View from the roof of a tram in the body shop at Preston Workshops 1977 DFC95 View from the roof of a tram in the body shop at Preston Workshops 1977 DFC96 View from the roof of a tram in the body shop at Preston Workshops showing the panto on 546 1977 DFC97 Interior view of Carlton Control Centre showing desk and wall panel c1968 DFC98 W2 493 on Rt 55 in Kingsway outside South Melb Depot Aug 1973 DFC99 W2 496 in Sturt St at Kingsway on Rt 1 Jul 1973 DFC100 Z class truck c1975 DFC101 Z3 116 in Bourke St at King St as new c1979 DFC102 Bob Prentice on tour c1968 DFC103 SW6 900 as an advertising tram for Newsday at night 1969 DFC104 597 Jul 1973 DFC105 W2 480 on Rt 3 passing under the railway bridge at Caulfield Oct 1972 DFC106 Interior view of Carlton Control Centre showing desk c1968 DFC107 SW6 856 on Rt 77 at night Jul 1973 DFC108 W2 496 in Sturt St at Kingsway on Rt 1 Jul 1973 DFC109 PCC 980 on a tour at South Melb Depot c1968 DFC110 SW6 856 on Rt 77 at night Jul 1973 DFC111 View from the roof of a tram in the body shop at Preston Workshops showing the panto on 546 1977 DFC112 Dandenong Rd from Chapel St Nov 1968 DFC113 A Z class car turns from Gertrude into Nicholson St c1990 DFC114 SW6 900 as an advertising tram for Newsday at night 1969 DFC115 Port Melbourne Station showing Centennial bridge and station building prior to closure. 10-1987 DFC116 Port Melbourne station with train prior to closure, looking south 10-1987 Demonstrates the work of David Frost in photography and or collecting slides.Assembled album in a black presentation folder of 116 colour slides, 6 slide sleeves, collected or photographed by David Frost. Many are TMSV or Windsor Publications slides. All photographs have been scanned and placed on the Museum's G drive. A list of all photographs with details has been compiled. melbourne, tramways, trams, vr trams, elwood, st kilda light rail, port melbourne, opening, elwood depot, buses -
 Ballarat Tramway Museum
Film - Movie Film & Box, Kodak, 1960 to 1971
Yields information in movie film format of Ballarat trams in 1960 through to 1971, how the system operated and was used by people, including special trams., Yields information in movie film format of Ballarat trams in 1960 through to 1971, how the system operated and was used by people, including special trams.Movie film - 8mm, approx. 15 mins, without leader strip on a plastic reel, within a clear plastic case - Standard 8, titled "Ballarat Trams". See Reg Item 4957 for DVD and Mini DVD. Has been transferred to DVD - see Reg item 4957 Made by Arthur Hill. Also transferred to DVD by Rod Cook Oct. 2015, via Roger Greenwood for use in his DVD, "The City of Ballarat Trams, Gardens & Gold" of 2016. See Reg Item 6883. In Arthur's letter - on file - Made between 1960 and August 1971. Synopsis: based on time. Between 1960 and 1968 0:00 Trams Ahead sign before the Victoria St terminus with 20 at terminus 0.14 - No. 20 leaving Victoria St terminus and being followed along Victoria St by car and then passengers jointing the tram at a tram stop. 00.40 - No. 12 (c1960) in bound along Lydiard St North and arriving in the Gregory St loop. 00.56 - No. 12 and 14 crossing at Gregory St. 01.20 - No. 33 and a bogie car crossing at depot loop. 01.31 - No. 18 travelling along Wendouree Parade with the Lake in the background. 01.42 - No 41 at depot junction and running into the depot No. 2 road with a short sequence of a tramway signal. 02.17 - SEC Sign at the depot gate, shot of 41 in No. 2 road, with the lights other way around, Caution beware of trams sign and a red signal. 02.31- Timetable sign at Gardens Loop 02.36 - No. 30 arriving at Loop and view of a signal with no lights showing. 02.48 - Destination roll being changed through a number of destinations. 03.26 - No. 20 arriving at Carlton St loop with the Olympic monument in the background and the red signal light going out. 03.31 - a lady standing at the front of No. 20, with an ice cream in hand, and No. 17 arriving at the Carlton St loop with a short sped up sequence and No. 20 departing from the loop, followed by No. 17 leaving the loop, heading into the city. 03.41 - No. 13 inbound from Sebastopol crossing Albert St and heading into the city. 04.12 - view of signal and contactor, the light going green and the tram passing underneath. 04.24 - No. 12 at the Sebastopol terminus and departing. 04.51 - No. 12 crossing Albert St Sebastopol. 05.16 - Following No. 12 along Albert St, with Borough Offices in background initially. 05.28 - No. 12 arriving at the Grey St loop with No. 14 arriving at the loop from the city and both trams departing. March 1971 05.58 - No. 30 being followed along Barkly St, Mt Pleasant and the pole being turned at the terminus 06.32 - No. 30 picking up a lady passenger. 06.38 - view from the front of a tram, with the drivers hand and a cigarette, view from the back of the tram, along the Mt Pleasant route and running through the loop and then turning into Main St - has the Ballarat (East) fire station in one sequence, and finally running along Main St. 07.35 - view from tram, with car turning into Bridge St. and then running into Sturt St passed the Parking Loop, and along Sturt St. 08.32 - Points at Drummond St North being changed, doors changed over and the tram running along Drummond St. North, through the Mill St loop and into Macarthur St and in Wendouree Parade, with the Lake Wendouree in view and crossing No. 12 at the Depot Loop, with crews chatting, past the depot, a lady passenger getting off the tram near Forest St., and arriving at Gardens Loop with the same lady passenger who got on in Barkly St, getting off the tram. 11.09 - view of No. 30 at Gardens Loop, departing the loop. August 1971 11.30 - R761 crossing Melton (Exford Wier) on the special train to Ballarat and then the bridge between Ballan and Gordon Stations. 12.16 - View from the front of a tram, following No. 26 along Lydiard St North, crossing at Gregory St and returning to the City. 12.39 - No. 14 and one other tram running along Albert St to Sebastopol, crossing No. 21 at Grey St and then to Sebastopol terminus, crossing Albert St and return and running along Albert St. 13.36 - No. 26, 39 crossing 13 at Gardens Loop. 14.00 - view looking across Lake Wendouree. 14.07 - 26 arriving at Victoria St, running part of Destination roll, passengers getting off with hotel in the background, trolley pole being turned and then with 39 following tram along Victoria St, crossing at the King St Loop. 15.07 - view of a trolley pole tracking through the overhead at curve 15.10 - end. Written labels giving title information on reel.trams, tramways, ballarat, sebastopol, lydiard st north, victoria st, mt pleasant, lake wendouree, depot, tram 12, tram 13, tram 14, tram 17, tram 18, tram 21, tram 26, tram 33, tram 39, tram 41 -
 Ballarat Tramway Museum
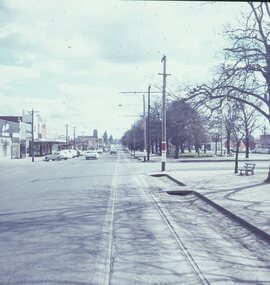
Slide - 27 mm sq slide/s - set of 5, Lilian Butler, Sturt Street, 1971
Yields information about Sturt St between Lydiard St and Ripon St.Set of 5 AGFA slides - blue and white plastic mounts: 1 - Sturt St looking west, south side from Windermere St. .2 - ditto from Dawson St, shows tram stop sign and end of section sign. .3 - ditto from Armstrong St - with Myer's and Coles stores in the background. .4 - ditto at Ripon St, showing junction of View Point line, has the shelter on the right. .5 - City terminus - Sturt St and Lydiard St, with a bogie tram arriving from Grenville St. Has the ESCo switch box in the view - (to the right of the ladies). Has the Commonwealth Bank on the right hand side of the photo. Photo from the collection of Lilian Butler. ballarat, tramways, trams, sturt st, dawson st, tram stops, view point, shelters, lydiard st